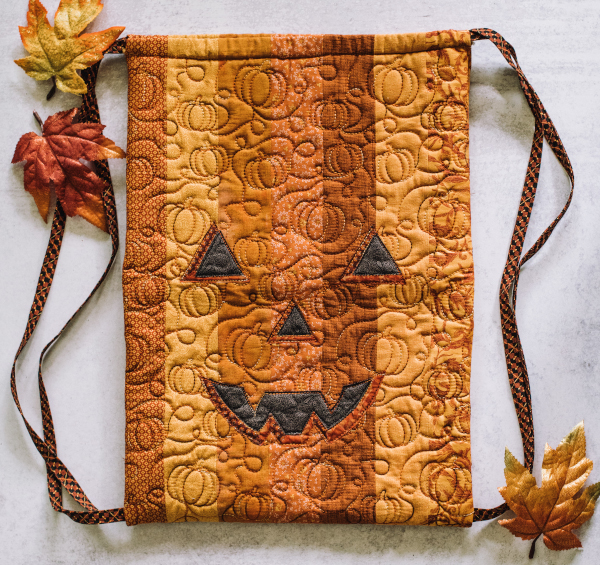
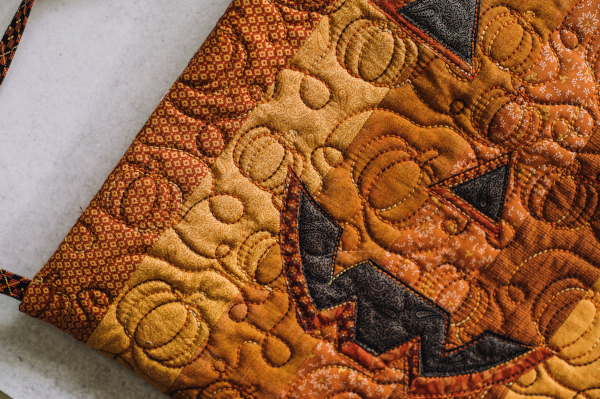
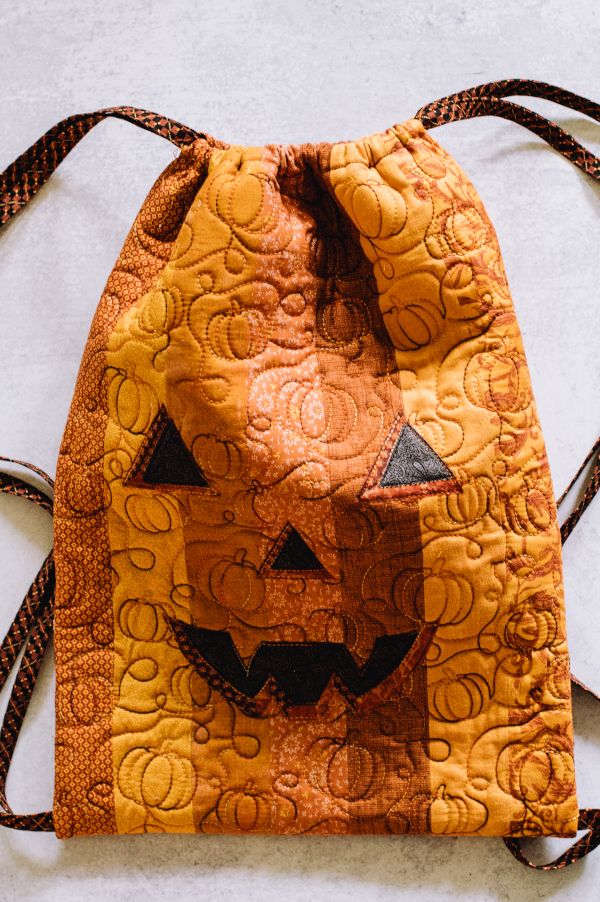
Get your little ones in the Halloween spirit with this spooky and super cute sewing project! Made using precut jelly roll strips, this DIY treat bag is easy enough for beginners and is an excellent project to practice working with small and skinny pieces of fabric. Add an adorable applique face to your jack-o’-lantern with the provided templates and finish your treat bag with some delicate machine quilting. Your kids will love adding their Halloween goodies to their personalized trick-or-treat bags.
Finished Size: 14”W X 16”H
Skill Level: Intermediate
Materials:
- Fabric requirements
- Pumpkin outside (designer used jelly roll strips) – [7] 2 1/2” x WOF strips
- Lining – 1/2 yard
- Straps – 1/3 – 3/8 yard
- Face applique (black, dark grey, or yellow) – [1] 10” square
- Soft and Stable by Annie’s – 1/2 yard (Do not substitute! Other similar products have skipped stitches when quilting through them).
- Fusible webbing – 10” square

Abbreviations and Terms:
- WOF = width of fabric, usually about 40 inches
- Jelly Roll Strip – a 2 1/2” X WOF strip. You can cut your own but you need at least 2 different fabrics totaling 1/2 yard.
Designer Notes:
- You can reinforce the straps by lining them with Pellon SF101 (woven fusible interfacing). If you chose to reinforce the straps, you will need 1 yard of interfacing.
Instructions:
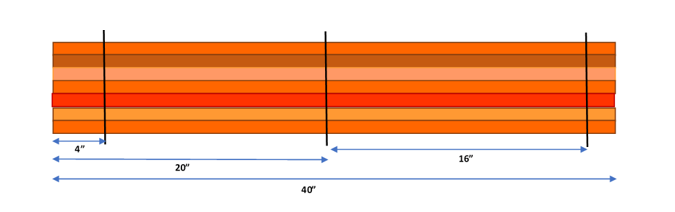
- Piece together the 2 1/2” WOF strips to form a strip set. Sew into 3 pairs. Press the seams. Sew one pair to remaining single strip. Press the seam. Sew the other two pairs together to form a 4 strip set. Press the seam. Sew the three strip and four strip set together. Press the seam. You should have a strip set that measures 14 1/2” W X approximately 40” L. Trim the ends to remove the selvage and to square the end. Trim to exactly 40” L.

- Using a water or heat soluble pen, mark the strip set in the middle at 20”. Then mark on each end 4” from the end.
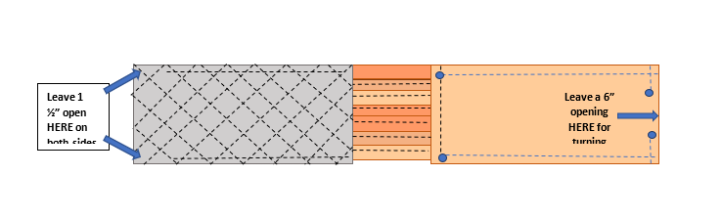
- Layer the strip set with the markings on top of the Soft and Stable, right side of both facing up. Quilt the strip set to the Soft and Stable. You can do whatever you like but do not go past the 4 inch mark on either end. The middle mark will be the bottom of the cinch sack, so if you are using a directional quilting motif, make sure to change the orientation 180 degrees so it will be right side up on both the front and the back.
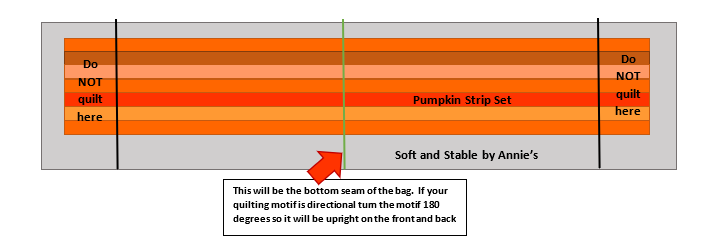
- Once the quilting is complete, trim away the excess Soft and Stable. Trim even with the long sides of the strip set. Trim only the Soft and Stable away under the strip set at the 4” marks on either end. (This will become the casing and is why you do not want to quilt in this area.)
- Chose which jack-o’-lantern face you would like on your bag. Trace the face template onto the paper side of the fusible webbing. Iron the fusible webbing to the wrong side of your 10” square of black/gray/yellow face fabric. Cut out the face on the drawn lines. Arrange the face on the cinch sack as shown in the diagram. Iron the face in place. Stitch down the face using an applique, blanket, satin, or straight stitch. The side with the face will be the front of your bag.
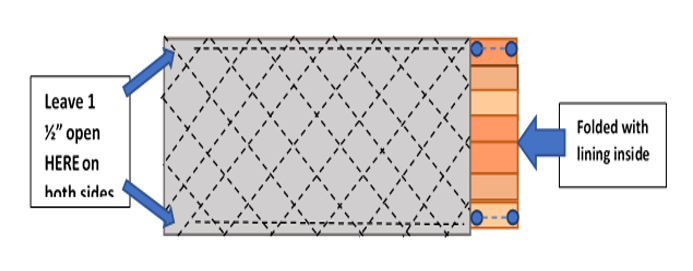
- Cut 2 pieces of the lining fabric. Each should measure 16 1/2” X 14 1/2”. Using a 1/4” seam allowance, sew one of these lining pieces to either end of the strip set. Sew with right sides together. Press the seams.
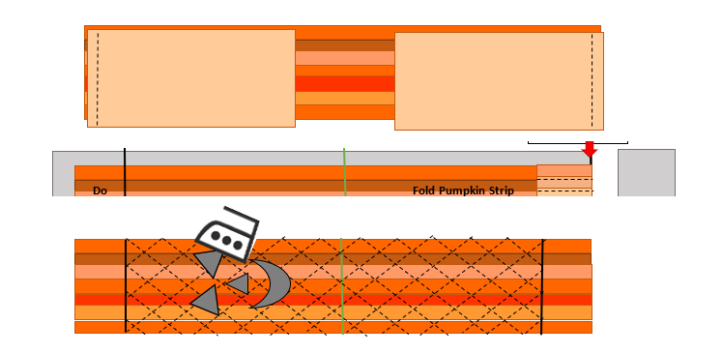
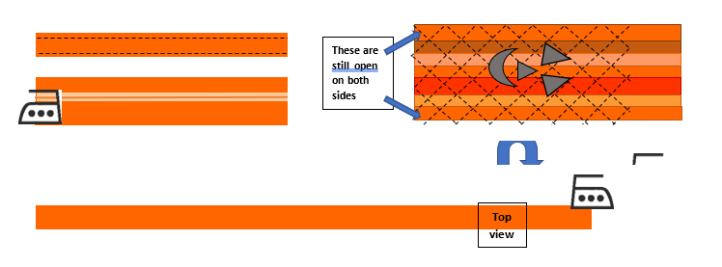
- Now fold the bag in half on the line drawn in the middle of the strip set. Start sewing 1 1/2” from the fold all the way down both sides. Sew to where the quilting on the outside of the bag ends and stop. Lock your threads in place.
- Sew along where the 2 lining pieces meet, leaving a 6″ hole in the middle of the bottom seam to turn the bag through.
- Now tuck the lining into the quilted outer fabric with wrong sides facing out. Stitch along the strip set between the quilted outer bag and the lining.
- Make the straps. Sew the four 2 1/2” WOF fabric strips into two long strips. Sewing the seam on a diagonal will give the strip greater strength. NOTE: Lining these strips with SF101 interfacing at this step will make them more durable. If the bag is going to be carried on a regular basis, then adding the SF101 interfacing will help the bag straps last longer.

- Once you have the two strap pieces [each 2 1/2” X approx. 80”], fold them in half with right sides facing out and iron.

- Now open the strap on the fold and turn the two raw edges into the center and press.
- Now refold it on the center fold and press. You will have four layers of fabric with no raw edges showing and each of the 2 straps will measure 5/8” wide by approximately 80” long.
- Top stitch down both sides of the two straps. Sew about 1/8” from the edge. Your straps are finished; set them aside while you create the casing at the top of the bag to feed them through.
- Turn the bag right sides out through the 6″ hole in the bottom of the lining seam. Then tuck the lining down inside the cinch sack. The outer strip set will fold into the top of the bag, since the lining is shorter than the outside fabric strip set. Use a tool to poke out the corners of the upper casing. Press the upper fold on the casing on both sides of the bag.

- Fold the upper casing in half about 1″ from the top edge and down into the inside of the bag. Top stitch it in place along the top front and top back. This will create the casing to thread your straps through. There should be one casing along the front and one casing along the back.
- Now it is time to feed the straps through the casing. Each strap will go through both casings. Read carefully so your bag will cinch when it is complete. Use a safety pin to thread the straps through the casing.
- Starting from the left side, thread the left strap through the front facing, moving from left to right. Both ends should be on the left side of the bag. Even up the ends so they are exactly the same length.
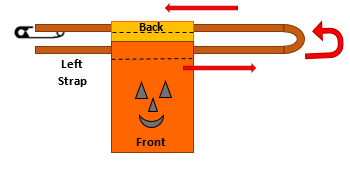
- Starting from the right side, thread the right strap through the front facing, moving from right to left. Then feed the same right strap through the back casing from left to right. Both ends should be on the right side of the bag. Even up the ends so they are exactly the same length. This second strap will be slightly harder to feed, since you already have one strap in place.
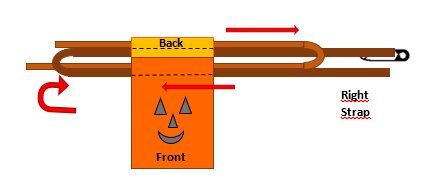
- Starting from the left side, thread the left strap through the front facing, moving from left to right. Both ends should be on the left side of the bag. Even up the ends so they are exactly the same length.
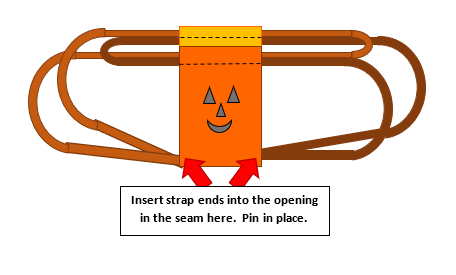
- Once the straps are laced through the upper casings and the ends are evened up, you will insert them into the bottom of the side seam you left open on the bottom of the quilted outer bag. Both of the ends of the right strap go into the hole on the right side of the bag. Both of the ends of the left strap go into the hole on the left side of the bag. Pin the straps in place and turn the entire bag inside out.
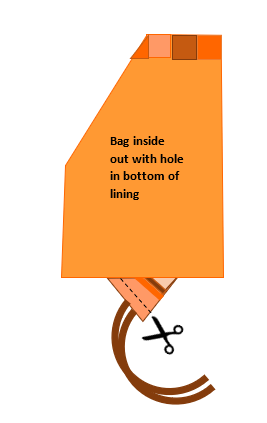
- With the bag inside out, pull the unsewn side seam corner through the opening in the bottom of the lining. Pull about 12” of both ends of the strap through the hole. Sew the side seam shut. Go over the seam 3 or 4 times to make sure there is a firm hold on the strap ends. Trim the excess strap you pulled through the hole off using scissors. Do this on both side seams and with both straps.
- Whip stitch the opening in the lining shut. Turn bag right side out. It is now ready for all of your Halloween treats!
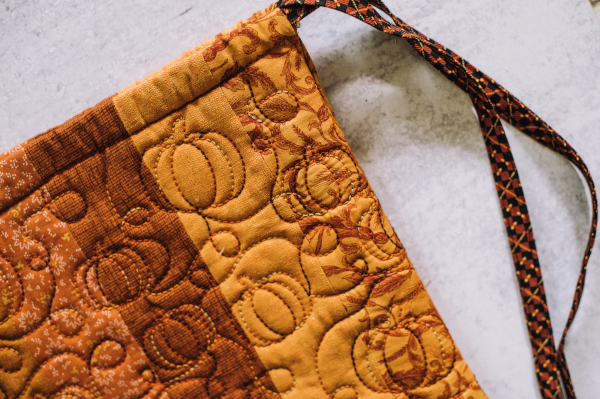
Is the pumpkin vine quilting done with an embroidery machine? What is the design pattern for the quilting?
Hi Denise! We reached out to the designer of this project about the pumpkin vine design. The bag was quilted in the hoop using an embroidery machine. The file for the pumpkin design is by Designs by Juju; the design label is “Pumpkin End-to-end Quilting Embroidery Design” and the product number/SKU is DBJJE2E087. You can find the design at designsbyjuju.com. Hope this helps! – Ashley, WeLikeSewing
I love this tote. I also love the all over pumpkin quilting pattern. Is there a pattern or template for that? Lynette
Hi Lynette! We’re so glad you like this project, including the free motion pumpkins details. The designer did not provide a pattern or template for these. I will reach out to them to see if they can provide more details. Thank you for your patience! – Ashley, WeLikeSewing
I click on the template but it wont download
Hi Jen! Thanks so much for letting us know about this issue. This issue should now be resolved. Please let us know if you are unable to open the PDF. Have a great day! – Ashley, WeLikeSewing
Thank you
You’re welcome, Jen! Have a great day! – Ashley, WeLikeSewing