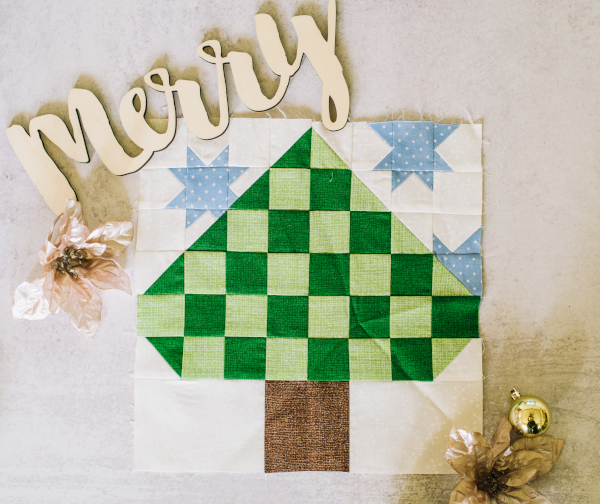
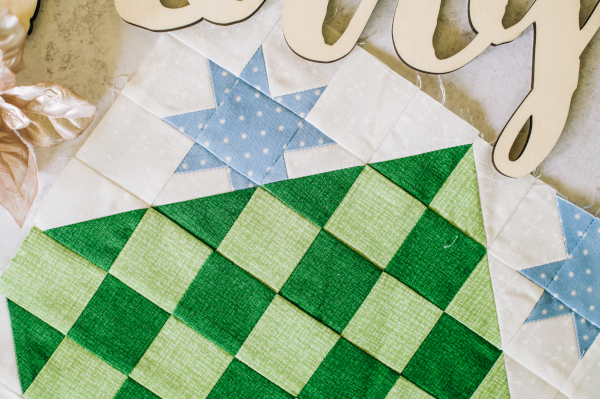
Channel the serenity of a winter forest covered in freshly fallen snow with this quilt block pattern. Using tiny 8-point stars as snowflakes, this block design utilizes solid colors to create a Christmas tree made in alternating shades of green. You can create a charming winter throw pillow using this design or join it with other blocks for a stunning snowy quilt. This quilting project is ideal for advanced beginner quilters, as it merges working with easy HSTs and smaller pieces of fabric. Quilt a beautiful block that’s perfect for Christmas or the entire winter season with this fun pattern.
Finished Size (unfinished edges): 12 1/2” x 12 1/2”
Seam Allowances: 1/4”
Materials:
- Blue cotton fabric:
- Cut 16 1 1/4” x 1 1/4” (Piece A)
- Cut 3 2 x 2” (Piece B)
- Dark green cotton fabric:
- Cut 18 2 x 2” (Piece C)
- Light green cotton fabric:
- Cut 18 2 x 2” (Piece D)
- Brown cotton fabric:
- Cut 1 3 1/2” x 3 1/2” (Piece E)
- White cotton fabric:
- Cut 19 2 x 2” (Piece F)
- Cut 2 3 1/2” x 5” (Piece G)
Designer Notes:
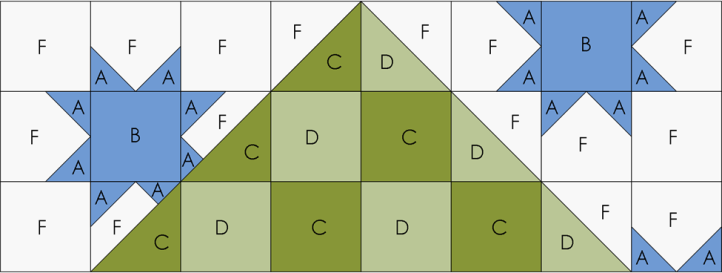
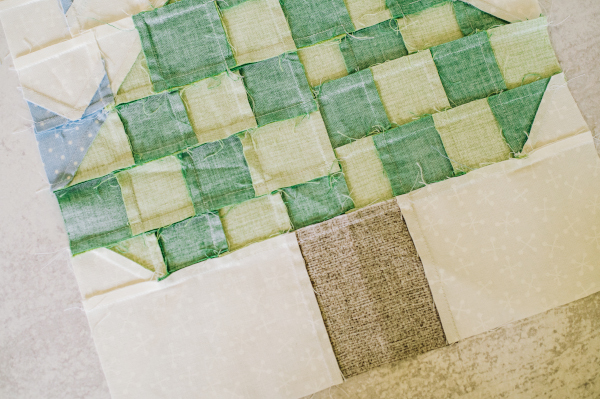
- This quilt block is made using solid pieces, half square triangles, and connector corners. Those are sewn into six sections, which are then assembled to make the block.
- For easier assembly, solids or tone-on-tone prints are recommended, and directional prints should be avoided.

Instructions:
- To begin, draw a diagonal line, corner to corner, on the wrong side of each of the 16 pieces A, 5 pieces C, and 5 pieces D.
- Begin section 1 by making the first connector corner. Pin one piece A to the corner of one F, with the drawn line running as shown.
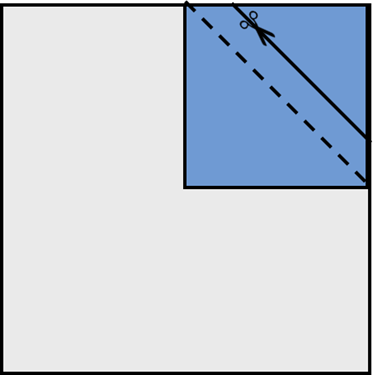
- Stitch along the drawn line. Trim off the excess 1/4” from the stitching line, toward the corner. Press the corner away from the square, with the seam toward the blue.
- Pin a second piece A to the adjacent corner. Stitch, trim, and press in the same manner.
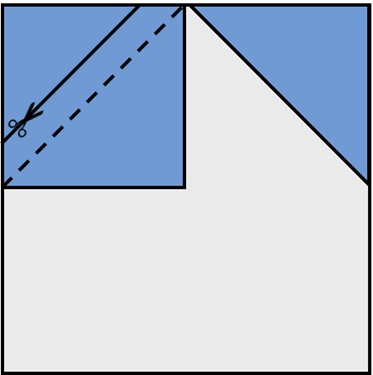
- Repeat the process to make three more of the same units, using six pieces A and three F. Set three of the units aside.
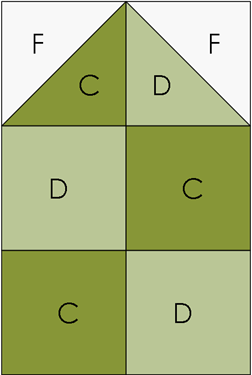
- Pin one C to one A/F unit, with the pieces F in the two corners to the left and the line on C running from the upper right corner to the lower left. Stitch along the line on C. Trim 1/4” from the stitching line toward the lower right corner. Press open.

- Repeat with a second A/F unit and C, but with the two pieces A in the upper corners.

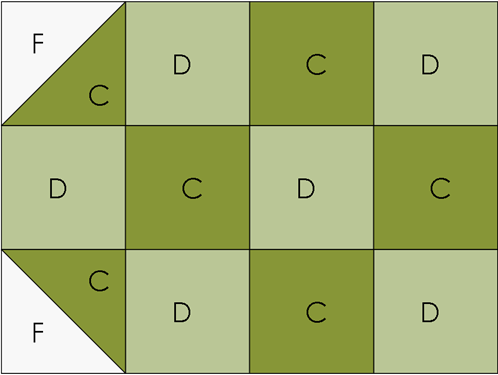
- Lay out the two units created in the last steps, the A/F units previously set aside, and the remaining pieces shown in section 1.

- Sew together in horizontal rows, then stitch the rows together to finish the section.
- To begin section 2, pin one piece C to one F and one piece D to one F. Stitch along the drawn lines. Trim 1/4” from the stitching and press open to create half square triangles.
- Lay out those two units and the remaining pieces in section 2.
- Stitch into horizontal rows, then stitch the rows together.
- For section 3, stitch four A/F units as in section 1, using remaining 8 pieces A and 4 pieces F.

- Pin two pieces D to two pieces F. Stitch along the lines, trim 1/4” away, and press open.
- Lay out all units and pieces to match the diagram. Pay particular attention to the direction of all pieces A. Stitch into horizontal rows, then sew together to finish the section.

- For section 4, sew 2 pieces C to two F along the lines. Trim and press.
- Lay out with the remaining pieces. Stitch horizontal rows, then sew those rows together.
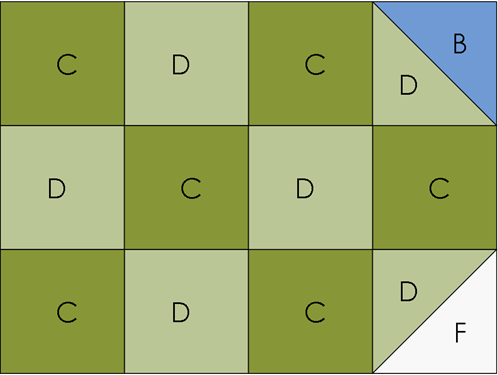
- Section 5 is similar, but begin by sewing one piece D to one B, and one D to one F. Trim and press. Stitch the horizontal rows first, then sew those together to finish the section.
- For section 6, simply sew the three pieces together as shown.

- To assemble the block, begin by sewing section 1 to section 2. Add section 3.
- Sew section 4 to section 5.
- Sew the three rows together to finish the block.

Lindo!! ????