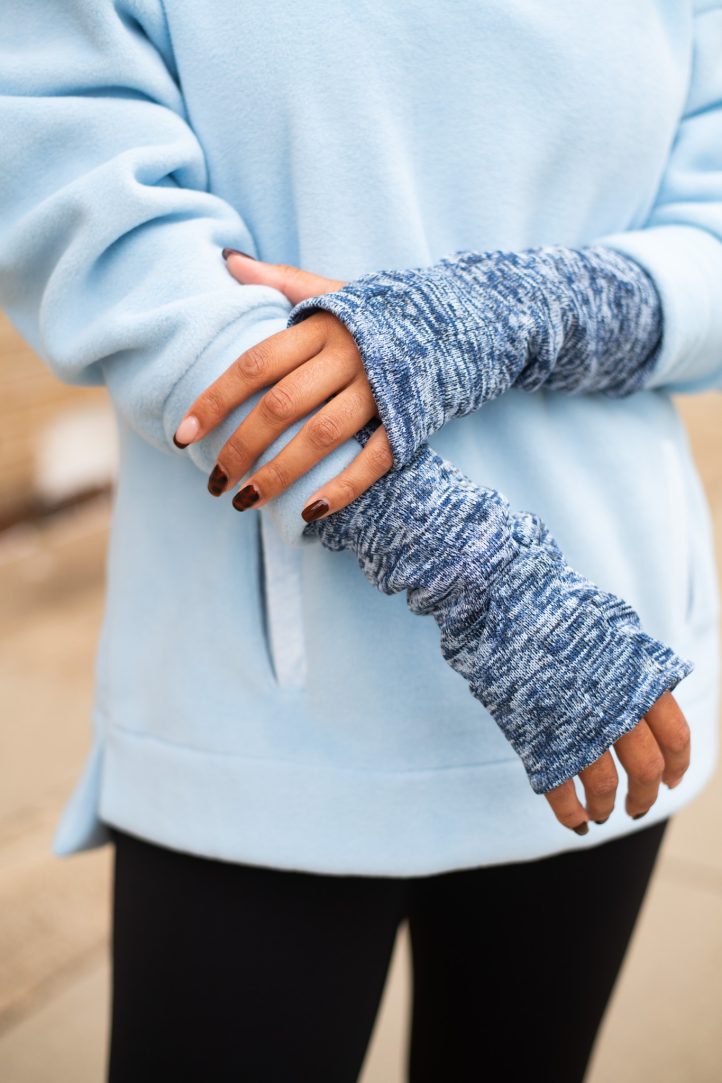
Is there truly anything more irritating than completing your daily errands while sporting bulky, clumsy winter gloves? Don Morin’s simple and streamlined winter arm warmers are an ultra-handy alternative to thick winter mittens and gloves, allowing you easy of movement while keeping your hands toasty. Designed with sporty knitted fleece fabric, these sewn arm warmers are a must-make for winter and are completed with a printable PDF pattern.
Hand-warmers are a perfect fashion accessory for cold and cooler weather months! Useful on outdoor adventures in the snow, or perfect for a little extra hand warmth at the indoor ice rink, they still allow your hands to stay warm without losing manual dexterity. Collecting change at a market stall, tying your child’s skates, texting on your mobile phone, eating and drinking perhaps at the local winter festival – all of this can be done without having to take off your gloves. Wear them high on the forearms, or push them down to the wrist for a touch of warmth.
Materials:
- Approximately 1/3 yard of knitted fleece fabric, 60” (152 cm) wide
- Color-matched all-purpose thread
- Ballpoint or stretch machine needles, 75/11
- Transparent elastic, 1/4” (6mm) wide, optional
- PDF Pattern – This is located at the bottom of this page. Please see printing instructions below.
PRINTING INSTRUCTIONS:
Note: To download the pattern, click on the pattern download button at the bottom of the page. We recommend opening your pattern download using Adobe Acrobat.
FABRICATION: KNITTED FLEECE:
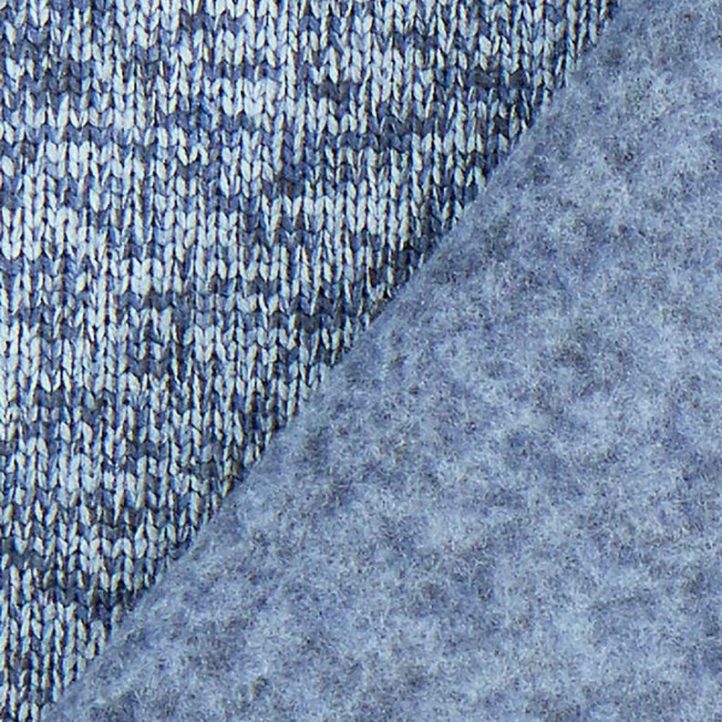
Knitted Fleece is a durable, warm and stretchy fabric that is often used to make outerwear, sportswear, and all kinds of cold-weather accessories. It has a smooth jersey knit face side with a soft, fuzzy, wooly fleece on the back side, that is capable of trapping heat in the winter months. This type of jersey knit is very breathable and wonderfully soft against the skin.
Knitted fleece can be composed of different fibers. The most common are 100% polyester and polyester blends, both of which are extremely soft and durable. For better stretch recovery, look for blends that include elastane within the fiber content, so that the fabric does not lose its shape.
These fibers create a lightweight, yet strong fabric. Its extra warmth during colder months prevents the wearer from feeling uncomfortable, making it a favorite outdoor clothing material. The nap on the inside of this fabric helps to make it resistant to wear-and-tear, while the fabric itself dries quickly. It offers a combination of softness, warmth, stretchiness, and resilience.
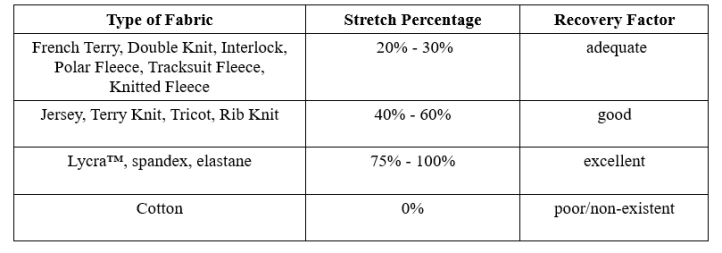
The knitted fleece used for the sample model is a good mix of all the above traits. Melange tones are trendy, as there is a mixture of several colors in the material and therefore easy to combine in different colorways. The special way of weaving/knitting the fabric makes it stretchable without losing its shape, and has 20% stretchability with an “adequate” recovery. This fluffy knit fleece is great for cozy hand-warmers and mittens. You should finish all edges and use a stretch or jersey needle when sewing this type of fabric.
WORKING WITH KNITTED FLEECE:
- Take the nap into consideration. When working with knitted fleece, it’s important to look at the surface of the fabric when laying out our pattern pieces. Fabrics like these have a nap, or a brushed look to the pile which means all the fibers are running in the same direction. Mark the fleece side of the knitted fleece with a piece of tape noting the direction of the nap before you start cutting. The nap should run the same way for all pieces, or it will be immediately obvious when you assemble your finished project.
- Determine the stretch and recovery of the fabric. Stretch percentage is the amount of elasticity a knit fabric possesses. Knowing the stretch percentage of knit fabrics is essential for sewing with knit patterns. You can find the skill of measuring the stretch percentage very useful when drafting your own patterns, adjusting a pattern to fit with the fabric you want to use, or even when you’re shopping for fabric to follow the recommendations in commercial sewing patterns.
- Use a longer stitch length. Since the fabric is a knit fabric beneath the fuzzy pile, a short stitch length can cause it to stretch and distort. Adjust your stitch length to be slightly longer than usual, about eight to ten stitches per inch, whether you’re using a straight stitch or zig-zag. If your machine has settings specifically for stretch fabrics, opt for those.
- Choose a stretch needle. Designed specifically for working with knit fabrics, a stretch needle has a rounded ballpoint tip which slides between the tiny loops that make up the fabric rather than potentially piercing them as a pointed needle would. The damage from pointed needles can cause holes to develop along the seams if fibers are damaged to the point of breaking, so using a ballpoint needle can actually extend the life of your project. Pointed needles are also prone to developing hooks or barbs at their tips over time, which can snag and tear at the loops of a knit fabric. Spare yourself the hassle and switch to a stretch needle!
- Ease up on the pressure of the presser foot. With its fluffy pile and stretchy core, it only takes a light touch to get knitted fleece through your sewing machine. Lower the pressure of your presser foot to avoid distortion and make it easier to zip through your project.
- Avoid high heat. Knitted fleece is commonly made of polyester, sometimes with a small percentage of other fibers blended in. This makes it durable, soft, and safe for the washer and dryer. It’s not, however, safe for ironing except at low temperatures. High heat will cause the fabric to scorch or melt. Finger pressing will do fine for most parts of your project. If you’re using fusible interfacing, make sure your iron is set to the appropriate heat, and use a press cloth to avoid applying heat directly to the fleece.
- Finish your seam allowances. Since seam allowances can roll up and be uncomfortable and unsightly inside a finished garment, it’s best to opt for seam styles that produce a finished look on both the inside and outside of the garment. These include mock flat-felled seams (fleece is too bulky for true flat-felling), lapped seams, and lock-stitched seams. Opt for hand-sewn overcasted seam finishes for raw edges or if you prefer machine-serge the edges of your cut pieces before assembling.
STRETCH PERCENTAGE:
Most knit fabrics stretch, no matter if there is plenty of elastane in them or no elastane at all. This is in result of the special way the manufacturing process is conducted. Knit fabrics with no elastane added, stretch just a little bit, usually across the grain. When there is elastane added to the structure of the fabric, knits can stretch up to 100% in all directions.
Knit fabrics can be two-way and four-way stretch. Two-way means that fabric stretches across the grain, from selvage to selvage. Four-way stretch means that the fabric stretches in both directions – with grain and across the grain.
Usually, knits have the greatest stretch across the grain. This is the direction which pattern pieces are laid out so that the fabric stretches around the body. That’s why we usually measure stretch percentage across the grain. If the knit fabric has a nap, the fabric must follow a “with nap” layout when cutting.
HOW TO FIND THE STRETCH PERCENT OF FABRIC:
To determine the stretchability of your knit fabric, grab a 5” section of your fabric and lay it next to a ruler. (If working in metric, grab 12cm.)
Hold the left side at the zero mark of your ruler and the right end at the 5” (12cm) mark. Stretch the fabric across the ruler until it resists being stretched anymore. Write down the amount it stretched beyond the original length.

For example, if your fabric stretches to 7 1/2″, it stretched 2 1/2″ past the original length. This is 50% stretch. Here’s the calculation:
2.5 (amount the fabric stretched) / 5 (original length) = 0.5 multiplied by 100 is 50%
Another thing that you need to pay attention to is the recovery of the fabric after it has been stretched. When you stretch the fabric as much as it would go to determine the stretch factor, it bounces back to take its original shape. The fabrics that bounce back close to their original shape have good recovery.
Knits and woven fabrics with elastane in their fiber content tend to have better recovery than the ones with less or no elastane in their composition.
You can use them for sewing really fitted garments like leggings or bathing suits, because the garment is going to keep its shape after the intensive stretching when you wear it.
There are all types of garments that don’t need very good fabric recovery as well as garments for which good recovery is essential. Therefore, you need to consider fabric recovery together with the stretch factor when picking the fabric for a sewing project.
Most knits will work for this pattern. You just really want something with at least good recovery, so it doesn’t stretch out while in use, or if it is only adequate, you can supplement with transparent elastic in the construction. No one wants a saggy glove!
MACHINE SET-UP:
As no two sewing machines perform in the same manner, you should always test the thread tension and stitch quality on a scrap piece of fabric that matches the one you will use for your project. This way, you can avoid wasting time and materials on seams that are not satisfactory. Testing the thread tension and stitch quality will also help you prevent damage to your fabric, needle, or sewing machine.
Pressure Foot – Loosen the pressure on your machine’s foot as the knitted fleece is thicker than an average knitted fabric; 1 notch below Normal setting.
Needle – Use a ball-point or stretch machine needle; Stretch HA x 1 SP.
Machine Foot – Zig-Zag Foot “A” or standard all-purpose presser foot.
Straight Stitch – Average or longer stitch length; 2.5 long out of a possible 5; 0 width; and a tension – 4 out of a possible 9.
Zig-zag Stitch – Longer than average stitch length; 2 long out of a possible 5; 4 width out of a possible 7; and a tension – 3 out of a possible 9.
Thread – 100% polyester or all-purpose thread; color-matched to fabric.
Pressing – Finger-pressing recommended; or low-temperature iron (1-dot setting) if necessary.
SIZING:
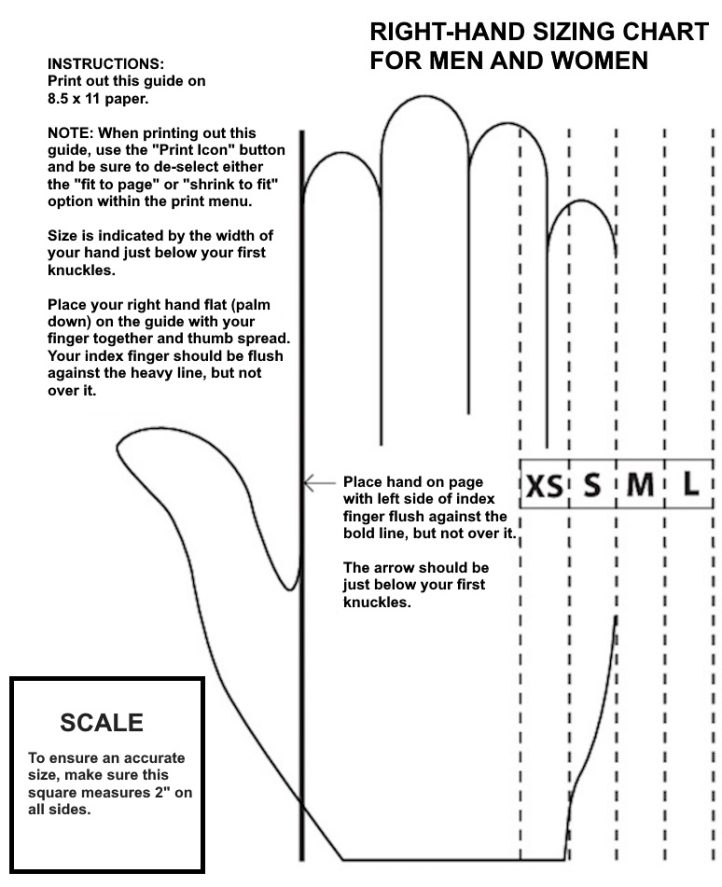
When determining pattern size, use this handy guide. Print out this guide on 8 1/2” x 11” paper.
De-select either the “fit to page” or “shrink to fit” option in the Print Menu. Print at 100% scale.
MARKING AND CUTTING:
It’s important to identify the face side/wrong side of the fabric, as well as the grain and in this case, the nap direction. Most knitted fleece fabrics are similar to jersey knits and therefore have no real selvage, but you should still follow what would be the grainline, i.e. the same direction as the selvage. It’s important to get the stretch in the correct direction, horizontally.
Knitted fleece is napped on the underside of the cloth, and it is strongly recommend that you cut all pattern pieces in the same nap direction. Stroke the fabric with your hands to see in which direction the nap goes, generally it is cut in the downward (flatten) direction.
The face side can be identified as the knit component but if it isn’t obvious by eye, grab the fabric with both hands and stretch it out. The edge of the fabric will roll to the face side.
As there is no selvage on knits, do not assume that the fabric has been cut straight. You should not measure the grainline from the fabric edge when cutting knits. Instead, look for the vertical formation (rib) on the fabric and align the grainline with that line instead. If you are folding the fabric, fold it along a vertical rib. Don’t align the grainline with the fabric’s edges since they are not likely to be 100% straight. Also, some knits tend to curl along the edges, which is another reason you shouldn’t rely on the cut edges to be straight.
Marking and cutting the pieces one at a time, using a single layer of fabric, will usually be much more accurate. Cutting these types of materials on the fold is often tricky and can lead to disappointing results and a lot of unnecessary stress. Select a vertical row of loops on the face side of the knit and baste along it with a contrasting thread marking. Use this as your “straight grain” and place the pattern pieces equidistant from the thread marking to ensure the greatest amount of stretch is across the width of the fabric. Also pay attention to the direction of the nap on the underside of the fabric. All cut pieces should have the nap lying in the same direction.
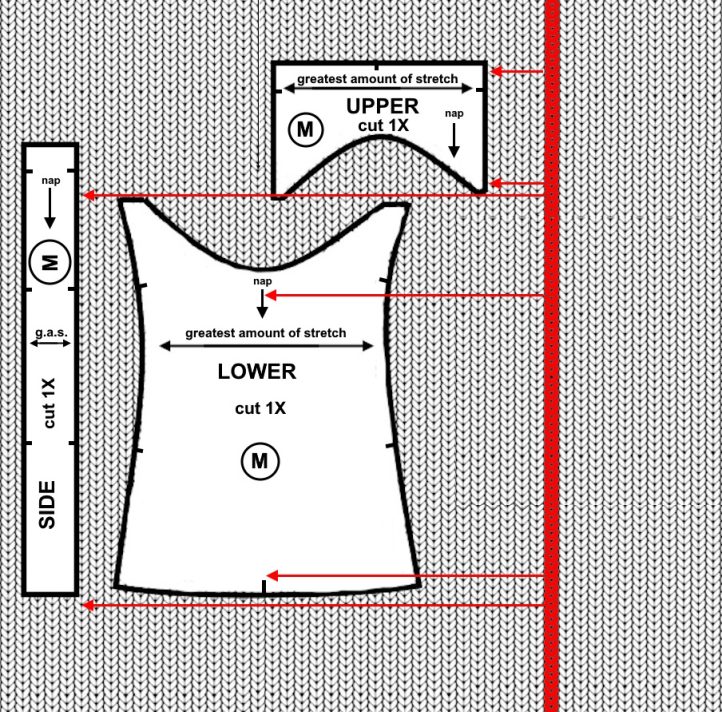
Using dressmaker’s pins can damage knits. Plus, pins will also distort the fabric somewhat since they pull the fabric together, meaning the cutting won’t be as exact. Instead, Don recommends using pattern weights to keep the pattern pieces in place during cutting. If you are using pins, use ballpoint pins sparingly and close to the edges. Then, place heavy objects to keep the pattern flat on the areas that will be the most visible on the garment.
Use a rotary cutter and a cutting mat to cut knits. This will make cutting knits much easier and faster. And the edges will look cleaner too.
Tailor’s chalk and similar marking tools don’t always stick well on knit fabrics. The designer recommends making tailor tacks to mark notches in the seam allowances instead. Make the tailor tacks no more than 1/4”- 3/8” in length, especially if the seam allowance is narrow.
If the knit fabric you are using is prone to unravelling or may have curved seams, be sure to stabilize the cross-grain cuts as soon as you cut them. Stay stitching is a line of straight stitching done inside the seam allowance that prevents fabrics from stretching out of shape, especially on curves, which will have at least sections cut on the bias or cross-grain. Fleece, with its stretchy knit structure, is very prone to stretching without this reinforcement. Remember to use a longer stitch length when stay stitching to avoid introducing distortion to your pattern pieces.
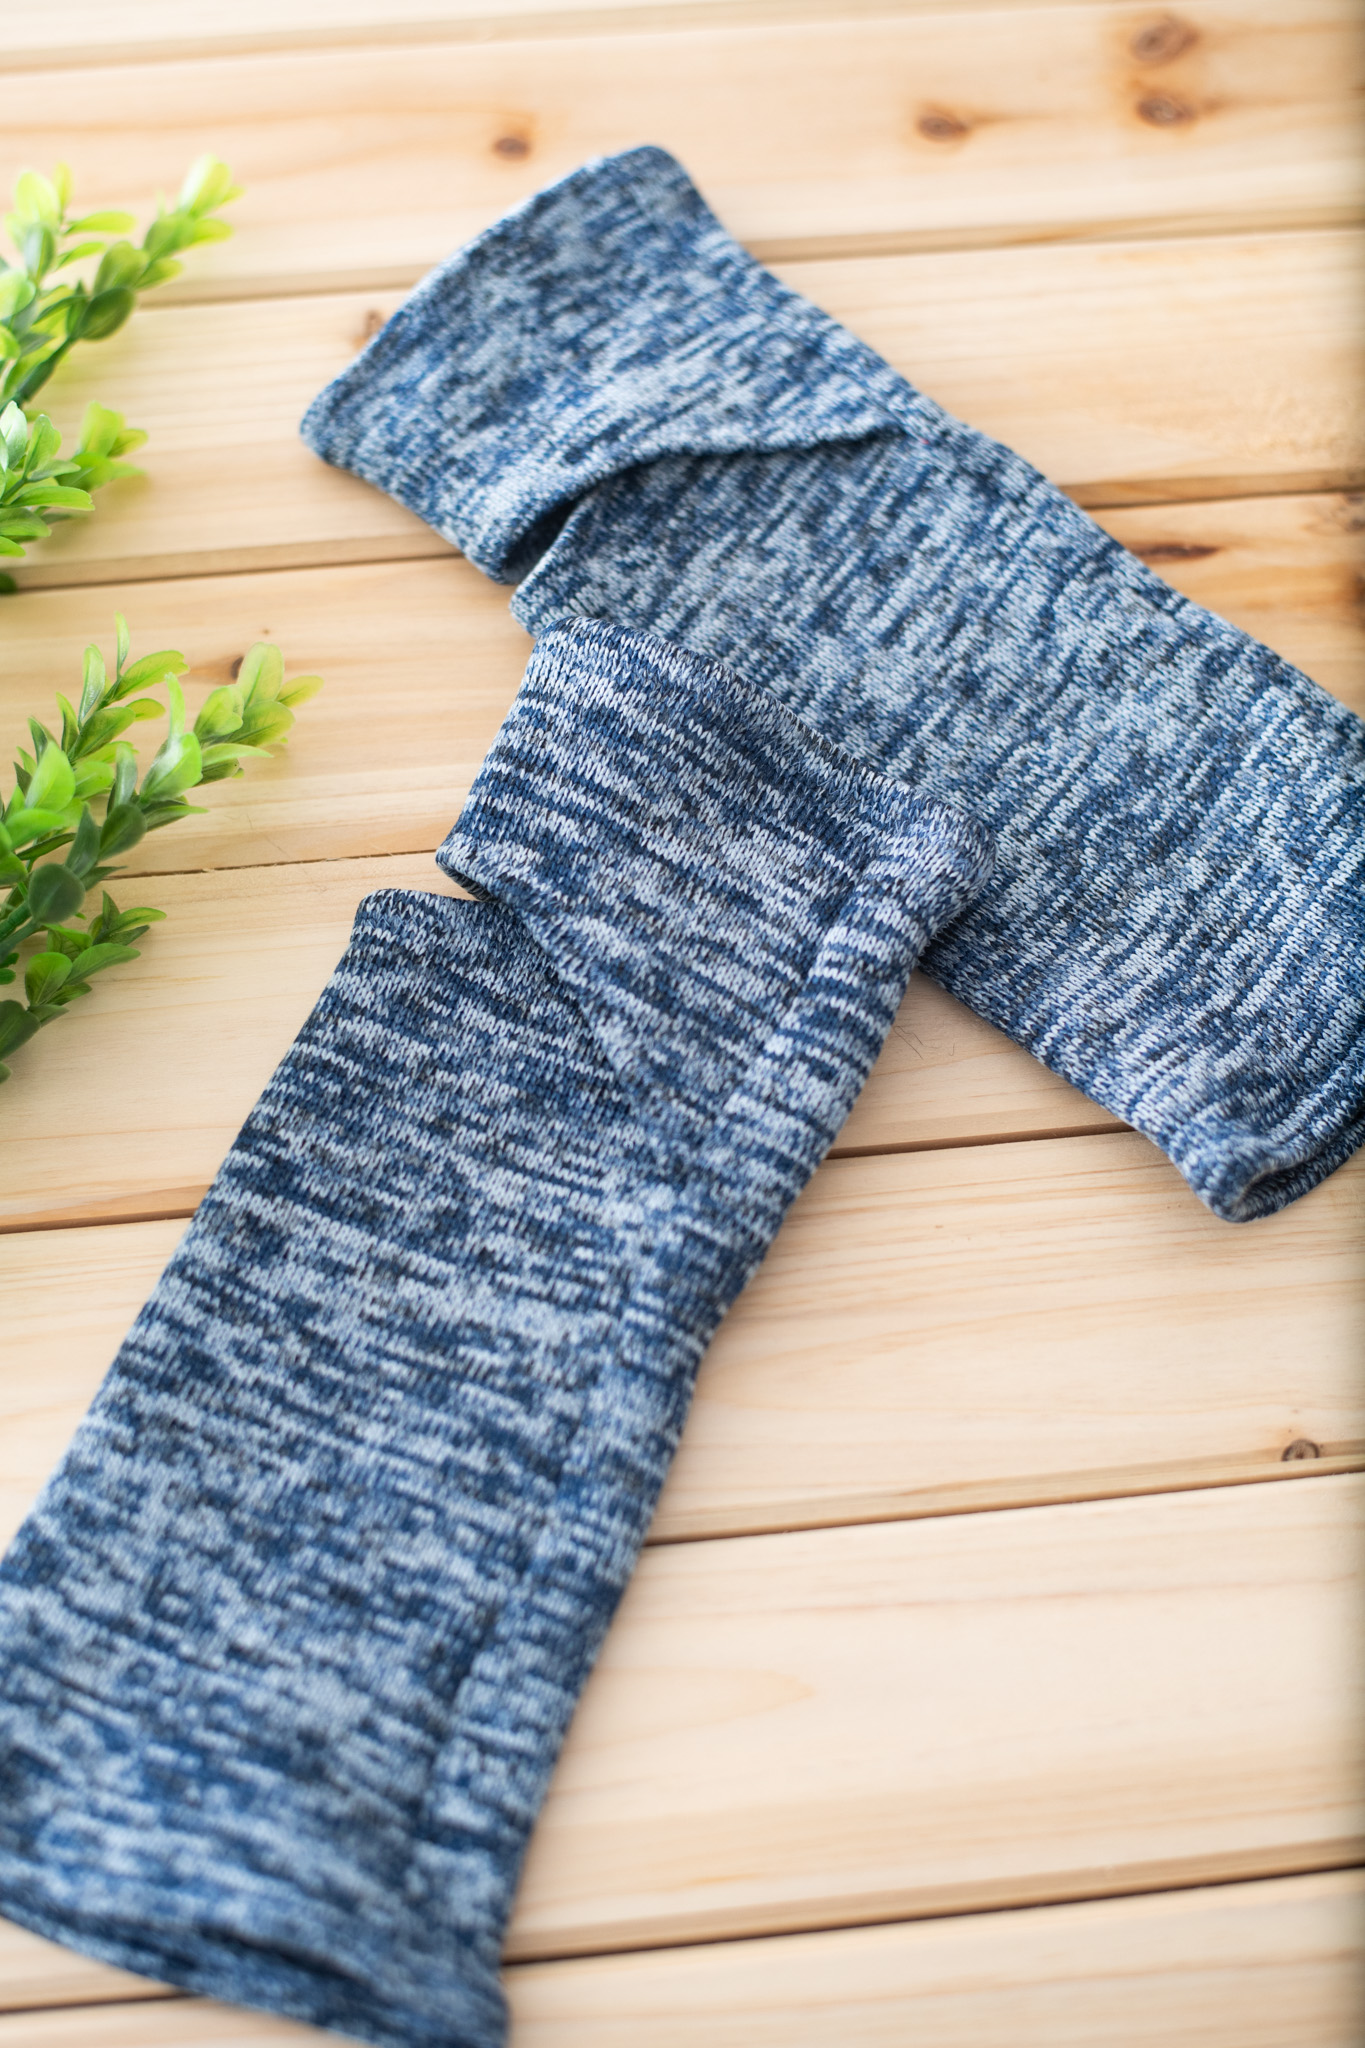
The only thing you need to keep in mind when marking on a single ply is that you have to mirror duplicate pieces, such as the sleeves for example. Otherwise, you’ll have two left sleeves if the fabric has a wrong and a right side! For this project, the make-up of the hand-warmers is identical front and back so it is not required that the pattern pieces be mirrored. The hand-warmer can be worn on either hand. Each hand-warmer has three parts: an upper piece, a lower piece, and a side piece. Cut one of each piece to make up one complete unit.
Sewing Instructions:
Note: If you have not done so already, loosen the downward pressure on your sewing machine’s foot as the knitted fleece is thicker than an average knitted fabric; Don recommends one-notch below the normal setting.
Remember to sew in the direction of the nap.
Abbreviations: RSU = right side up (knit side) WSU = wrong side up (fleece side)
Collect 3 knit pieces for each hand-warmer: upper, lower, and side, and transparent elastic to stabilize the cross-grain of the fabric.
- Align a length of transparent elastic to the lower curved edge of the upper piece (WSU) and secure the elastic with a zig-zag stitch over it to attach it to the fabric. Let the elastic lie flat while slightly stretching it, keeping the elastic taut. Leave a small tail of elastic at each end to be trimmed away later in the construction.
- Pro Tip: If you have issues when starting a seam, especially a bulky one, try using a stitch starter. It’s a folded piece of fabric that you can use to start your stitching. Start by sewing in the middle of the stitch starter. Place your real fabric right next to it and continue sewing for a smooth transition. Don’t forget to back-tack on your real fabric to lock your seam in.
- Starting from the center of the curved edge and working outward, turn the edge of the fabric, 3/8” towards the wrong side, to hem the upper piece and enclose the elastic. Top-stitch the raw edge of the turn using a zig-zag stitch. Set aside.
- Align another length of transparent elastic to the upper curved edge of the lower piece (WSU) and repeat Step 1.
- Starting from the center of the curved edge and working outward, turn the edge of the fabric, 3/8” towards the wrong side, to hem the lower piece and enclose the elastic. Repeat in the same manner as Step 2.
- With face sides together (RSU), match one side of the upper piece to the side piece. Begin by pinning the raw edges of the upper portion together and then the end of the curved edge to the notches on the side piece. Fill in smoothly between the two set of notches.
- Repeat Step 5 and match the side of the lower piece to the side piece, beginning with the notches and filling in between the pins. This piece will lap over the upper piece and form the thumb opening.
- Sew from top to bottom, using a scant 1/4-inch seam allowance, with a straight stitch if the knit has a 2-way stretch or a narrow stretch-stitch if the knit has a four-way stretch. Trim away any excess elastic from the seam and remove tailor-tacks.
- With face sides together (RSU), fold the fabric in half and pin the upper- and lower pieces to the remaining raw edge of the side piece in the same manner as in Step 5 – 6.
- With face sides together (RSU), sew from top to bottom, using a scant 1/4-inch seam allowance, with a straight- or stretch-stitch to form a tubular sleeve. Trim away any excess bulk from the seam and remove tailor-tacks.
- Finger press the seams open. The fleece will not fray. Neaten the seam allowances if using a different type of knit with an overcast stitch or serge it with an over-lock machine.
- On the open ends of the hand-warmer, align a length of transparent elastic to the raw edge of the finger opening (WSU) and secure the elastic with a zig-zag stitch to encase it and stretch the elastic slightly as you do so.
- Repeat Step 11 on the other end of the hand-warmer and attach the elastic to the wrong side of the sleeve cuff (WSU).
- Hem the open-ends of the hand-warmer by turning the edge of the fabric, 3/8” towards the wrong side to hem and enclose the elastic. Top-stitch the raw edge of the turn using a zig-zag stitch.
- Make a second hand-warmer by repeating the construction steps. The hand-warmers are the same front and back so flip one over for the opposite arm.


I’m getting this pattern ready to cut. On one of the pages, there are two (2) pieces that LOOK alike. But one of these pieces doesn’t fit any where Before 1 start cutting I need to know which I need use
Thank you
L R
Hi L R! Thank you for your comment. Can you please let us know which pages of the pattern you are talking about? Then we can reach out to the designer to discuss any pattern updates that may be needed. Thanks so much! – Ashley, We Like Sewing