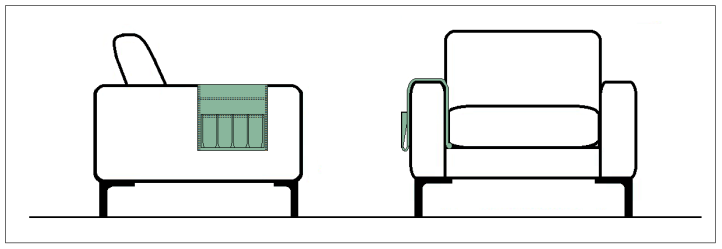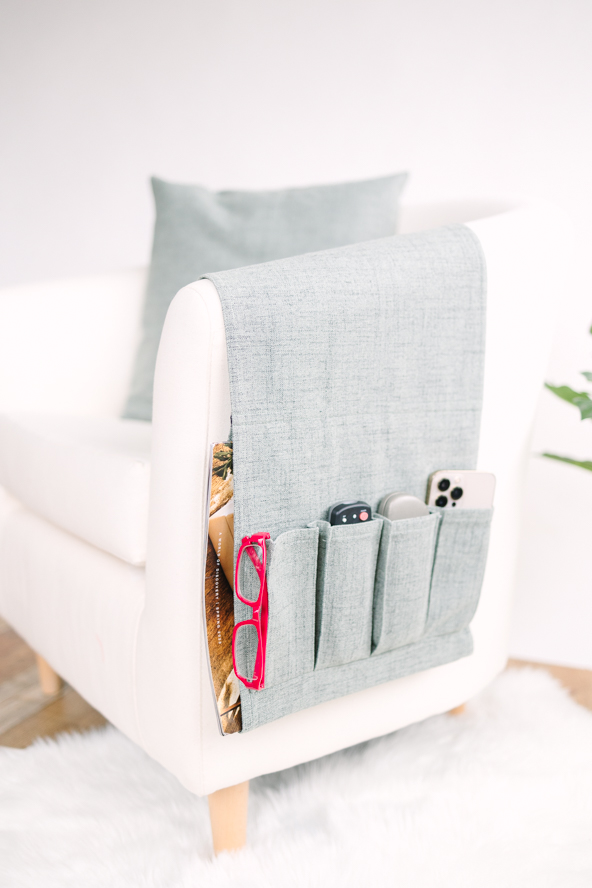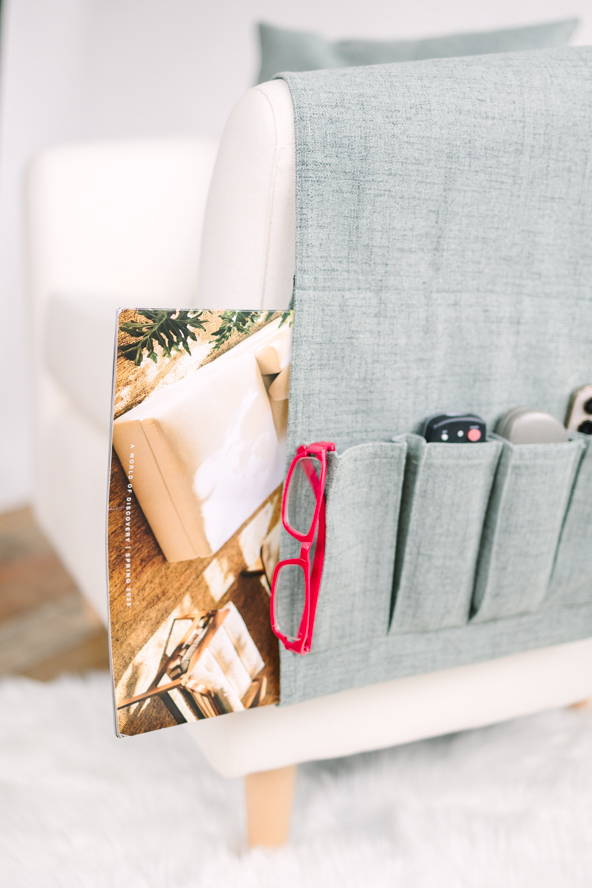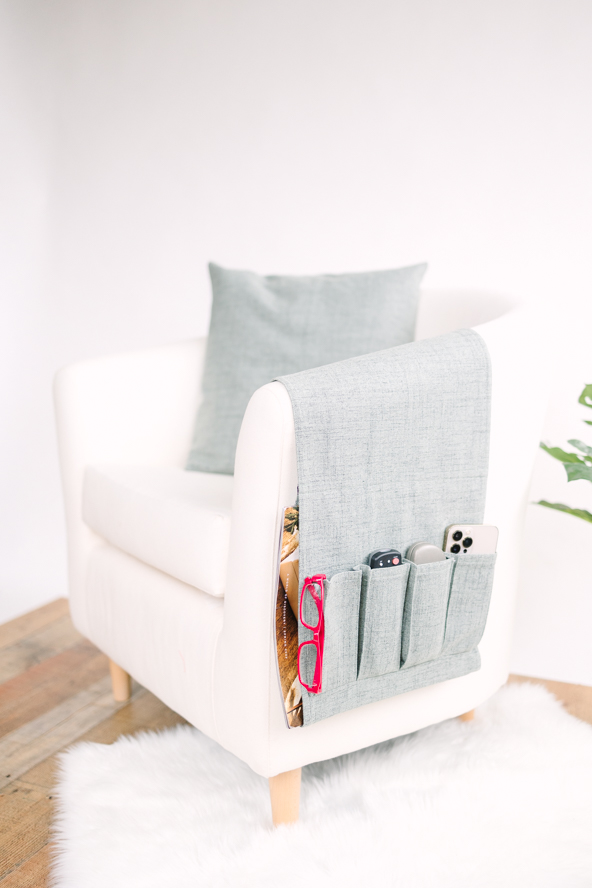
Forget about boring, plain organizers from big box stores and create a chic and sleek custom caddy with this organizational sewing pattern. Keep all of your remote controls in one handy spot with this armrest remote caddy. This DIY organizer is made to fit your furniture, so it’s easy to customize to fit your personal décor style. Featuring a compartment to hold newspapers and magazines as well as your remotes, this caddy sewing pattern is an excellent way to declutter your living space.
Seam Allowance: Single seam allowance = 3/8” wide; double turned hem = 3/4” wide
Skill Level: Easy/novice
Materials:
- 2/3 yards of upholstery fabric, 60” wide
- 1 1/3 yards of twill tape, 1/2” wide
- All-purpose thread
- 3 yards of weighted drapery tape
- Round wooden dowel, 12″ long (C measurement minus 1 depending on your caddy’s measurements; see C measurement below) & 3/8″ in diameter
Machine Set Up:
- Stitching – Single-needle straight stitch
- Needle Type – Universal, size 14 – 16
- Stitch Length – Medium (3 of possible 5 setting)
- Tension – Medium (4 of possible 8 setting)
- Topstitching – 3/8” from edge and 1/8” from edge, parallel to one another
- Bartack – Zig-zag satin stitch (length – 1, width – 3, tension 3 of possible 9 setting)
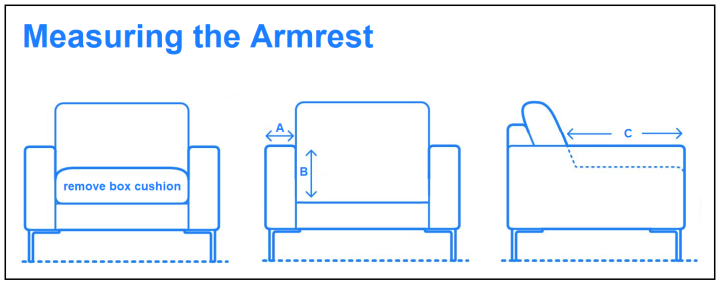
MEASUREMENTS NEEDED:
This handy organizer installs easily over the armrest of your favorite armchair or sofa, and is made-to-measure to your furniture. You will need a few measurements.
For the length and width of the caddy, measure the armrest of your armchair or sofa.
- For the length of the caddy, measure the width across the top of the armrest (A). Next, remove the seat’s box cushion and measure the vertical distance from the top of the armrest to the seat platform (B).
- For the width of the rectangle, the number of remote controllers and the length of the armrest from front edge to the backrest of the seat (C) will determine the width of the caddy.
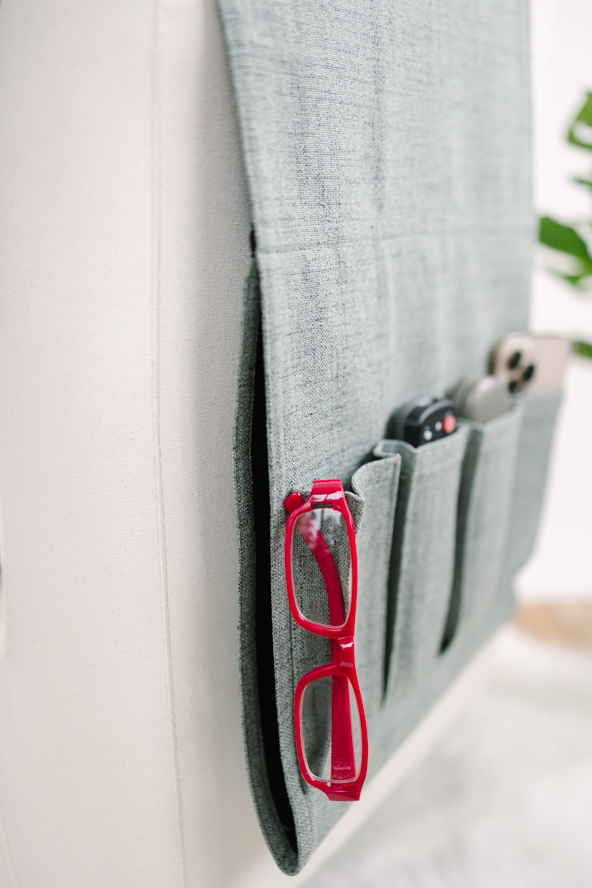
- For the pocket compartments, collect all your remote controllers and measure their lengths and widths. The widest one will determine the width of each pocket compartment and the shortest one will determine the height of the pocket compartments.
CUSTOMIZING THE PATTERN:
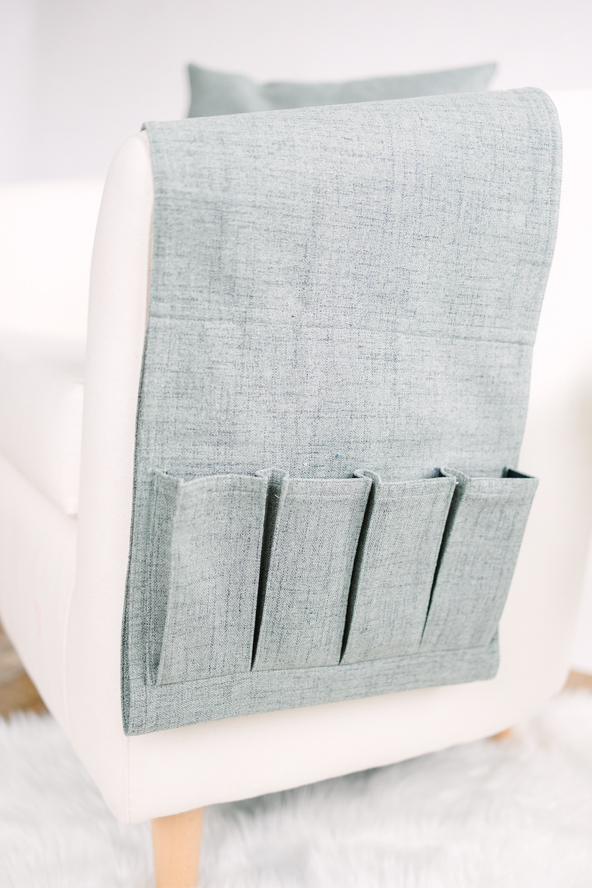
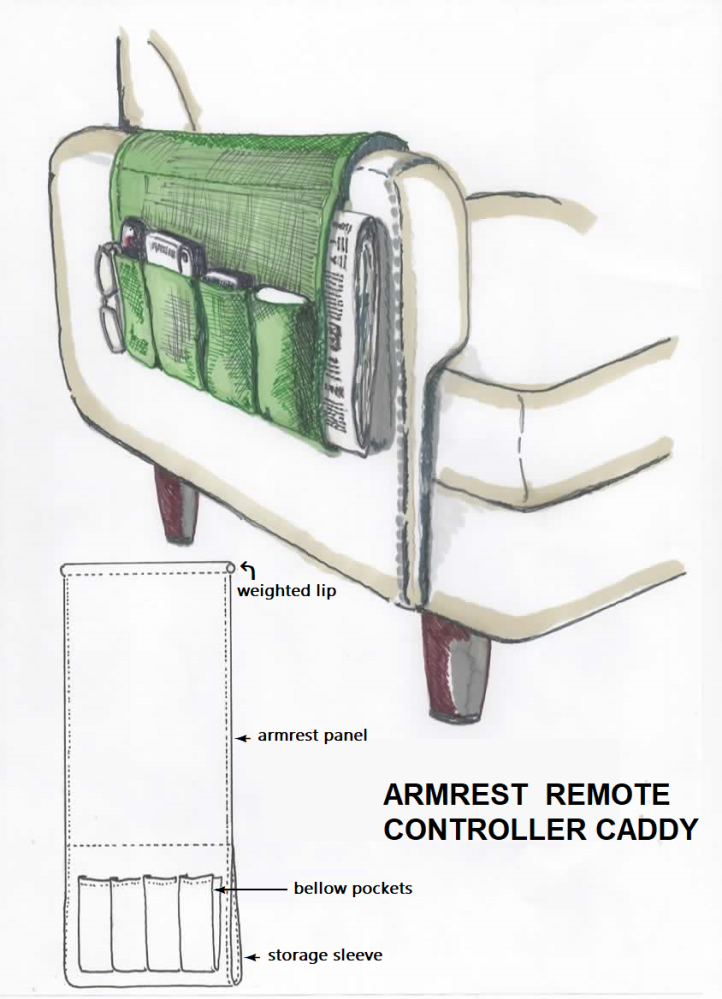
The armrest remote control caddy is made up of two rectangles – one for the main panel and a smaller one for the pocket compartments. The rectangles can be drawn onto paper or marked directly onto the cloth once it has been squared. If you plan to make more than one, making a paper template is recommended. Draw out the pattern to accommodate your furniture.
Begin by drawing the smaller rectangle for the number of remote controllers you want to store. Each remote control device is held in a bellow pocket. Measure the length and width of each device at its longest and widest points. The widest device will determine the width of the pocket while the shortest device will determine the length of the pocket.
Some remote controllers are sleek and slender, while others are chunky and ergonomically-shaped. The thickest one will determine the depth of the bellow.
For example in the prototype sample: (l x w x d)
- Controller #1 is the shortest – 6” x 1 1/2” x 3/8”
- Controller #2 is in-between – 7” x 1 1/2” x 3/8”
- Controller #3 is chunkiest – 8” x 2” x 1”
- Controller #4 is widest – 10” x 2 3/4” x 3/4”
Therefore, the size of each pocket is 6” high x 2 3/4” wide x 1” deep and 4 pockets are needed. Compare the collective width of the 4 pockets to the length of the armrest (C) to the backrest. The final amount must be less than the length of the chair’s armrest. If the width is greater, try a combination of three compartments instead of four.
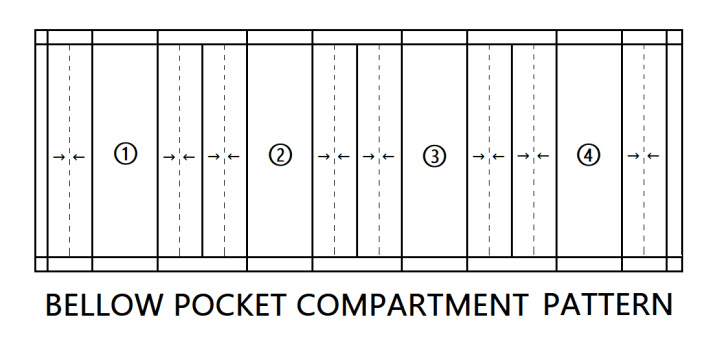
The Bellow Pocket Compartments Rectangle Pattern:
The pockets are set up side by side 4 times and measure 1” + 2 3/4” + 1” (4 3/4” in total) for each unit. Each bellow is a box pleat to create the depth of the pocket. The pleat depth and its return is 1/2” (1” in total).
Cutting width equals (4 x pocket width + 2”) + 2 seam allowances.
Cutting length equals height of pocket + 2 seam allowances.
For example for the sample model, the rectangle for the compartment piece is cut, 20” x 7”.
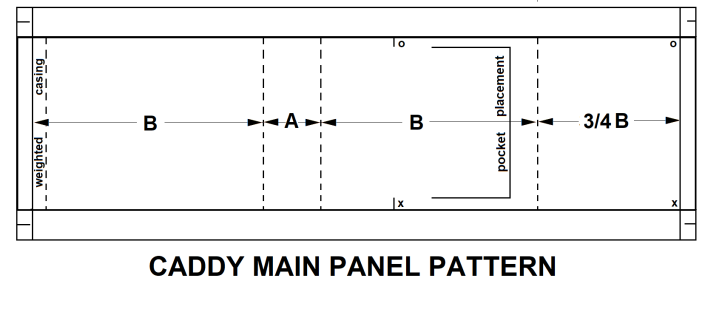
The Caddy Rectangle Pattern:
The cutting length for the caddy equals (2 3/4 x B) + A + 2” for turns.
The width for the main panel is determined by the finished pocket compartments.
The cutting width of the caddy equals (4 x pocket widths + 1”) + 2 seam allowances.
For example for the sample model, the rectangle for the caddy is cut, 43 1/2” x 13 1/2”.
Follow the cutting formulas to customize the rectangles shapes to fit your style of furniture.
FABRIC SUGGESTIONS:
In the home décor department of your favorite fabric retailer, look for bonded upholstery fabrics that have a felt or flannel backing. This stabilizing backing makes the fabric more stable and firm so that it retains its shape better. These soft backings are non-slip and non-scratching, which will not wear against home furnishings and electronic devices.
Many home decor fabrics are also treated for stain and dirt resistance such as Scotchgard® or by Martindale®, which indicates the wear resistance of the fabric. The higher the Martindale, the more durable the fabric. The designer recommends that you choose a material that has at least 20,000 Martindale. The advantage is better care and protection of your home furnishings.
Bonded upholstery fabrics come in many choices such as hopsacking, microfiber suedes, numbly bouclés, imitation leathers, textured vinyls, and quilted laminates to name a few and are available in wide-width goods and a variety of complimentary colors and textures to suit traditional and contemporary room décor styles.
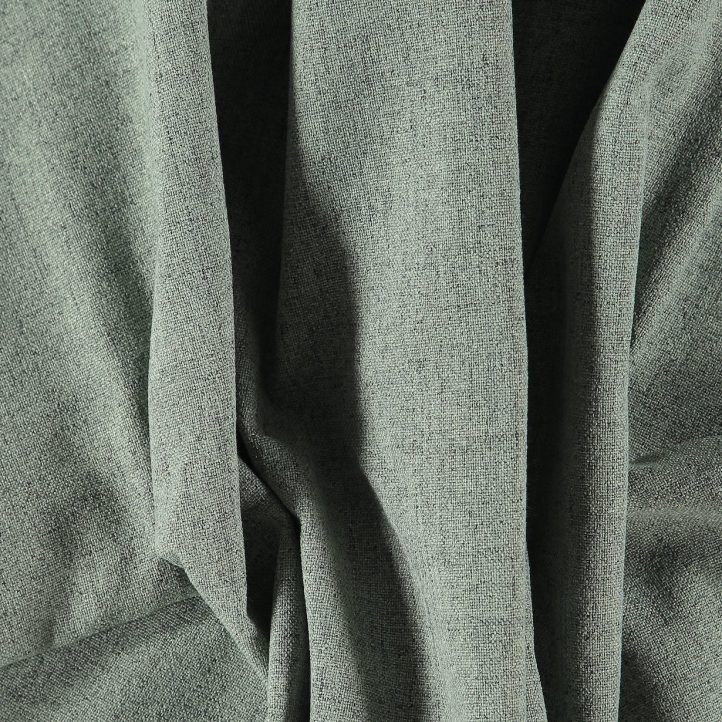
Note: For the sample model, we chose a Oeko-Tex 100 certified textured polyester hopsack bonded fabric with a felt backing, 54” wide, 280g/m², Martindale 20000, in sage green.
MARKING AND CUTTING:
The laminating process of bonded fabrics make the material more stable and keeps the cloth on grain. To square the cloth, use a set-square ruler with one of its arms resting on the selvedge, as you cannot draw/pull a cross-grain thread. Square up the corners at right angles (90º).
To remove any wrinkles or folds, use a low heat temperature setting on your iron and gently press on the backside of the cloth only. Use a lint-free press-cloth.
Once the fabric is prepped, mark directly onto the cloth with tailor’s chalk or place the paper pattern along the width of the fabric and secure in place with pattern weight. Trace out each rectangle and cut out each rectangle one time.
Thread-mark the foldlines of the bellow pockets on the small rectangle and tailor-tack the placement of the pockets on the large rectangle. This basting will be removed later.

Instructions:
STAY THE TOP EDGE OF POCKET COMPARTMENTS:
- Super-impose the twill tape as a stay along top edge of the compartment piece, with face side up. Edge-stitch along the edges of tape. Press flat.
- Fold the taped edge to the wrong side of the cloth and press flat. Double topstitch the top edge; 1/2” along the outer edge of the stay tape and 1/8” along the face side of the piece. Press flat.
MAKE THE BELLOW POCKETS:
- With wrong sides together, fold and press along the thread-marking on each pocket section. Keep the top edge square.
- Edge-stitch (1/8”) along each fold.
- Butt folded edges together to form a box pleat. Press pleats flat. There are 3 box pleats in total and a half-pleat on each end for form the depth of the pockets. Baste the pleats closed along the bottom edge of the compartment piece. Set aside.
STAY THE SHORT ENDS OF THE ORGANIZER PANEL:
- Super-impose the twill tape as a stay along the ends of the main piece, with face side up. Edge-stitch along the edges of tape. Press flat.
HEM THE SIDES OF THE ORGANIZER PANEL:
- Turn and fold (3/8”) the long edges of the panel to the wrong side of the panel and fold again (3/8”) to make a double-turned hem. Press flat.
- Double-topstitch the long edges of the panel in 2 passes; 3/8” from the edge and 1/8” from the edge.
ATTACH POCKET COMPARTMENTS:
- With right sides together, lay the pleated compartment piece upside-down onto the placement line (thread-marking) indicated on the main piece of the organizer. Center the compartment piece between the caddy sides and align the stitching line with the placement line. Pin/baste to the main piece. Sew across the pleated ends but do not include the side seam allowances. Trim away excess material in folds of pleats.
- Fold up the compartment piece so that it is face up with the main piece. Fold in the side seam allowances and edge-stitch along the fold to attach.
- Bartack the inside corners to reinforce the piece, before sewing down the bellows.
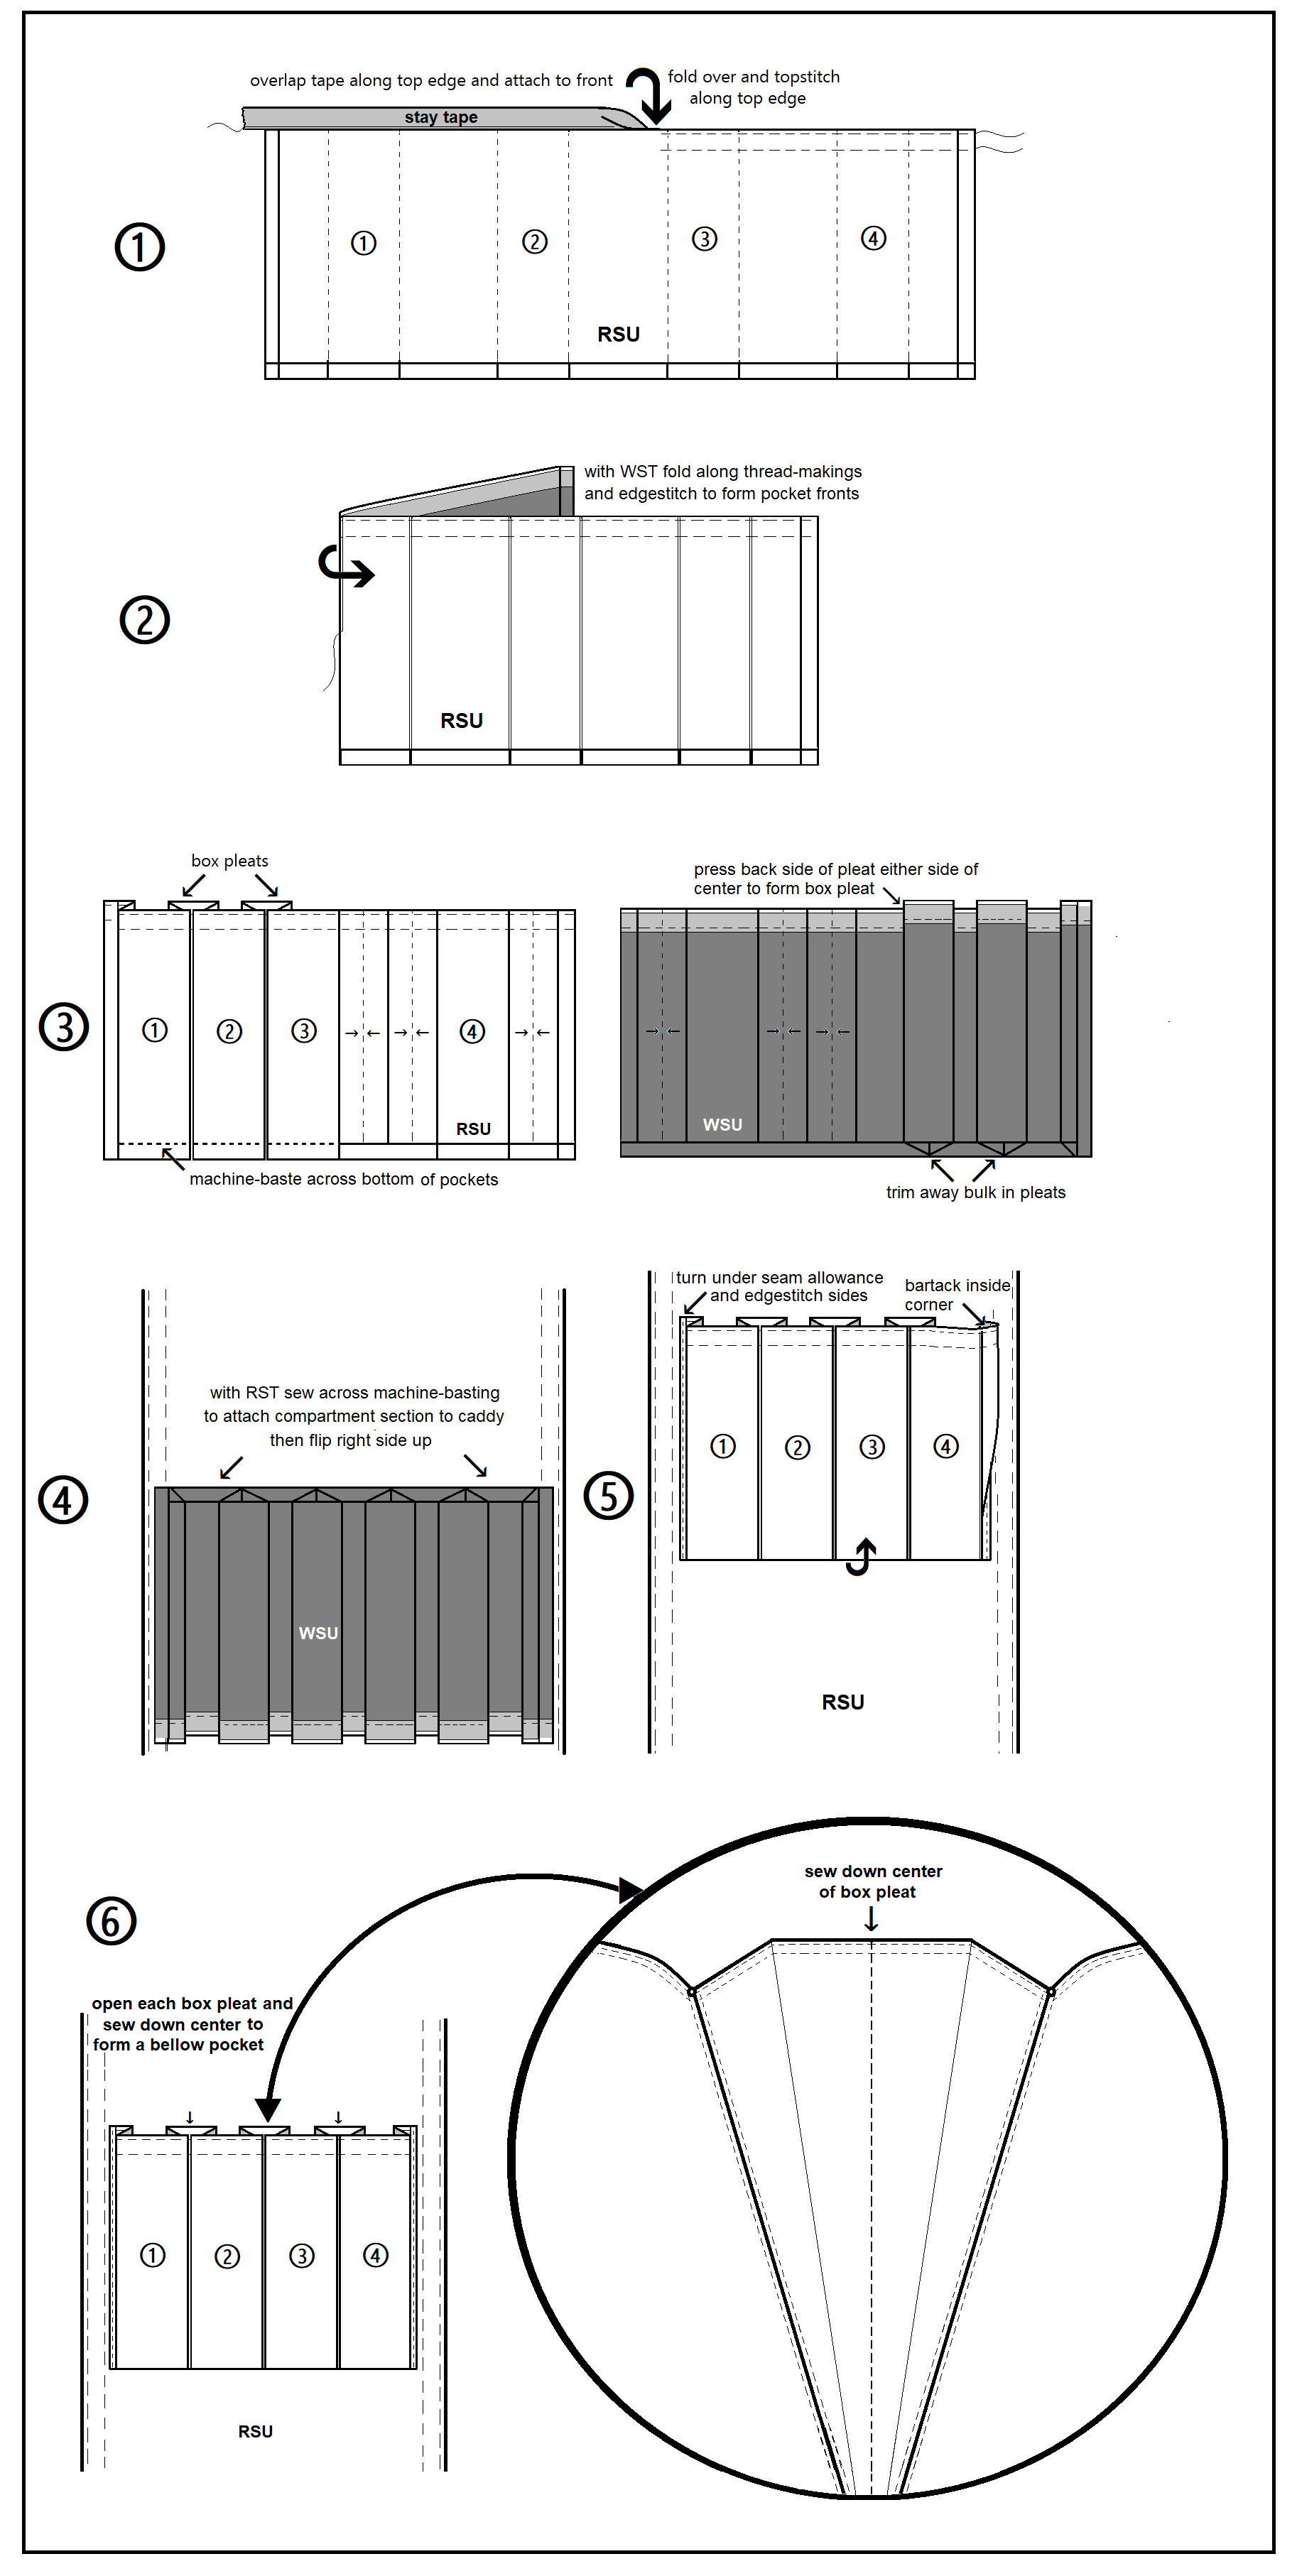
MAKE THE BELLOW POCKETS:
- The bellow of each pocket compartment is made by sewing down the middle of the box pleat. Start with the middle pleat and find its center. Pin/baste it to the main panel. Repeat same for the other two box pleats. Each pocket should be the same; adjust if necessary.
- Center the needle between the two folds of the pleat and topstitch down the center of each pleat. This step creates the bellows and finishes the pockets.
MAKE THE STORAGE SLEEVE:
- With wrong sides together, fold up the taped edge below the pocket compartments about 10 – 11 inches to make an open loop of fabric (X meets X and O meets O).
- Edge-stitch (1/8”) along the edges of the stay tape to join together and form the storage sleeve.
MAKE THE WEIGHTED LIP EDGE:
- Turn the remaining taped end of the caddy panel to the wrong side of the cloth and make a 1” hem. Machine-stitch parallel rows of stitching on the stay tape, tucking in the cut ends, to form a casing for the weighted lip edge.
- Slip-stitch one end of the casing closed.
- Wrap weighted drapery tape (zinc pellets) around the length of a narrow wooden dowel that is cut to length. Slide the wrapped dowel into the casing and slip-stitch the end closed. (Alternatively, use plastic pellets to fill the casing to capacity and sew shut).
Installation:
Installation is simple. Drape the caddy (compartment-side out) over the armrest of the furniture. Lift up the seat cushion, put the weighted lip side of the caddy on the seat platform. Replace the seat cushion to sandwich the installation in place. If the seat cushion cannot be lifted up, roll up part of the weighted end of the caddy to the desired length and push it into the gap between the armrest and the seat. The weighted lip edge and the felted backing will prevent the caddy from slipping when the devices are stored in the pockets. The caddy itself also protects the armrest from daily wear and tear.