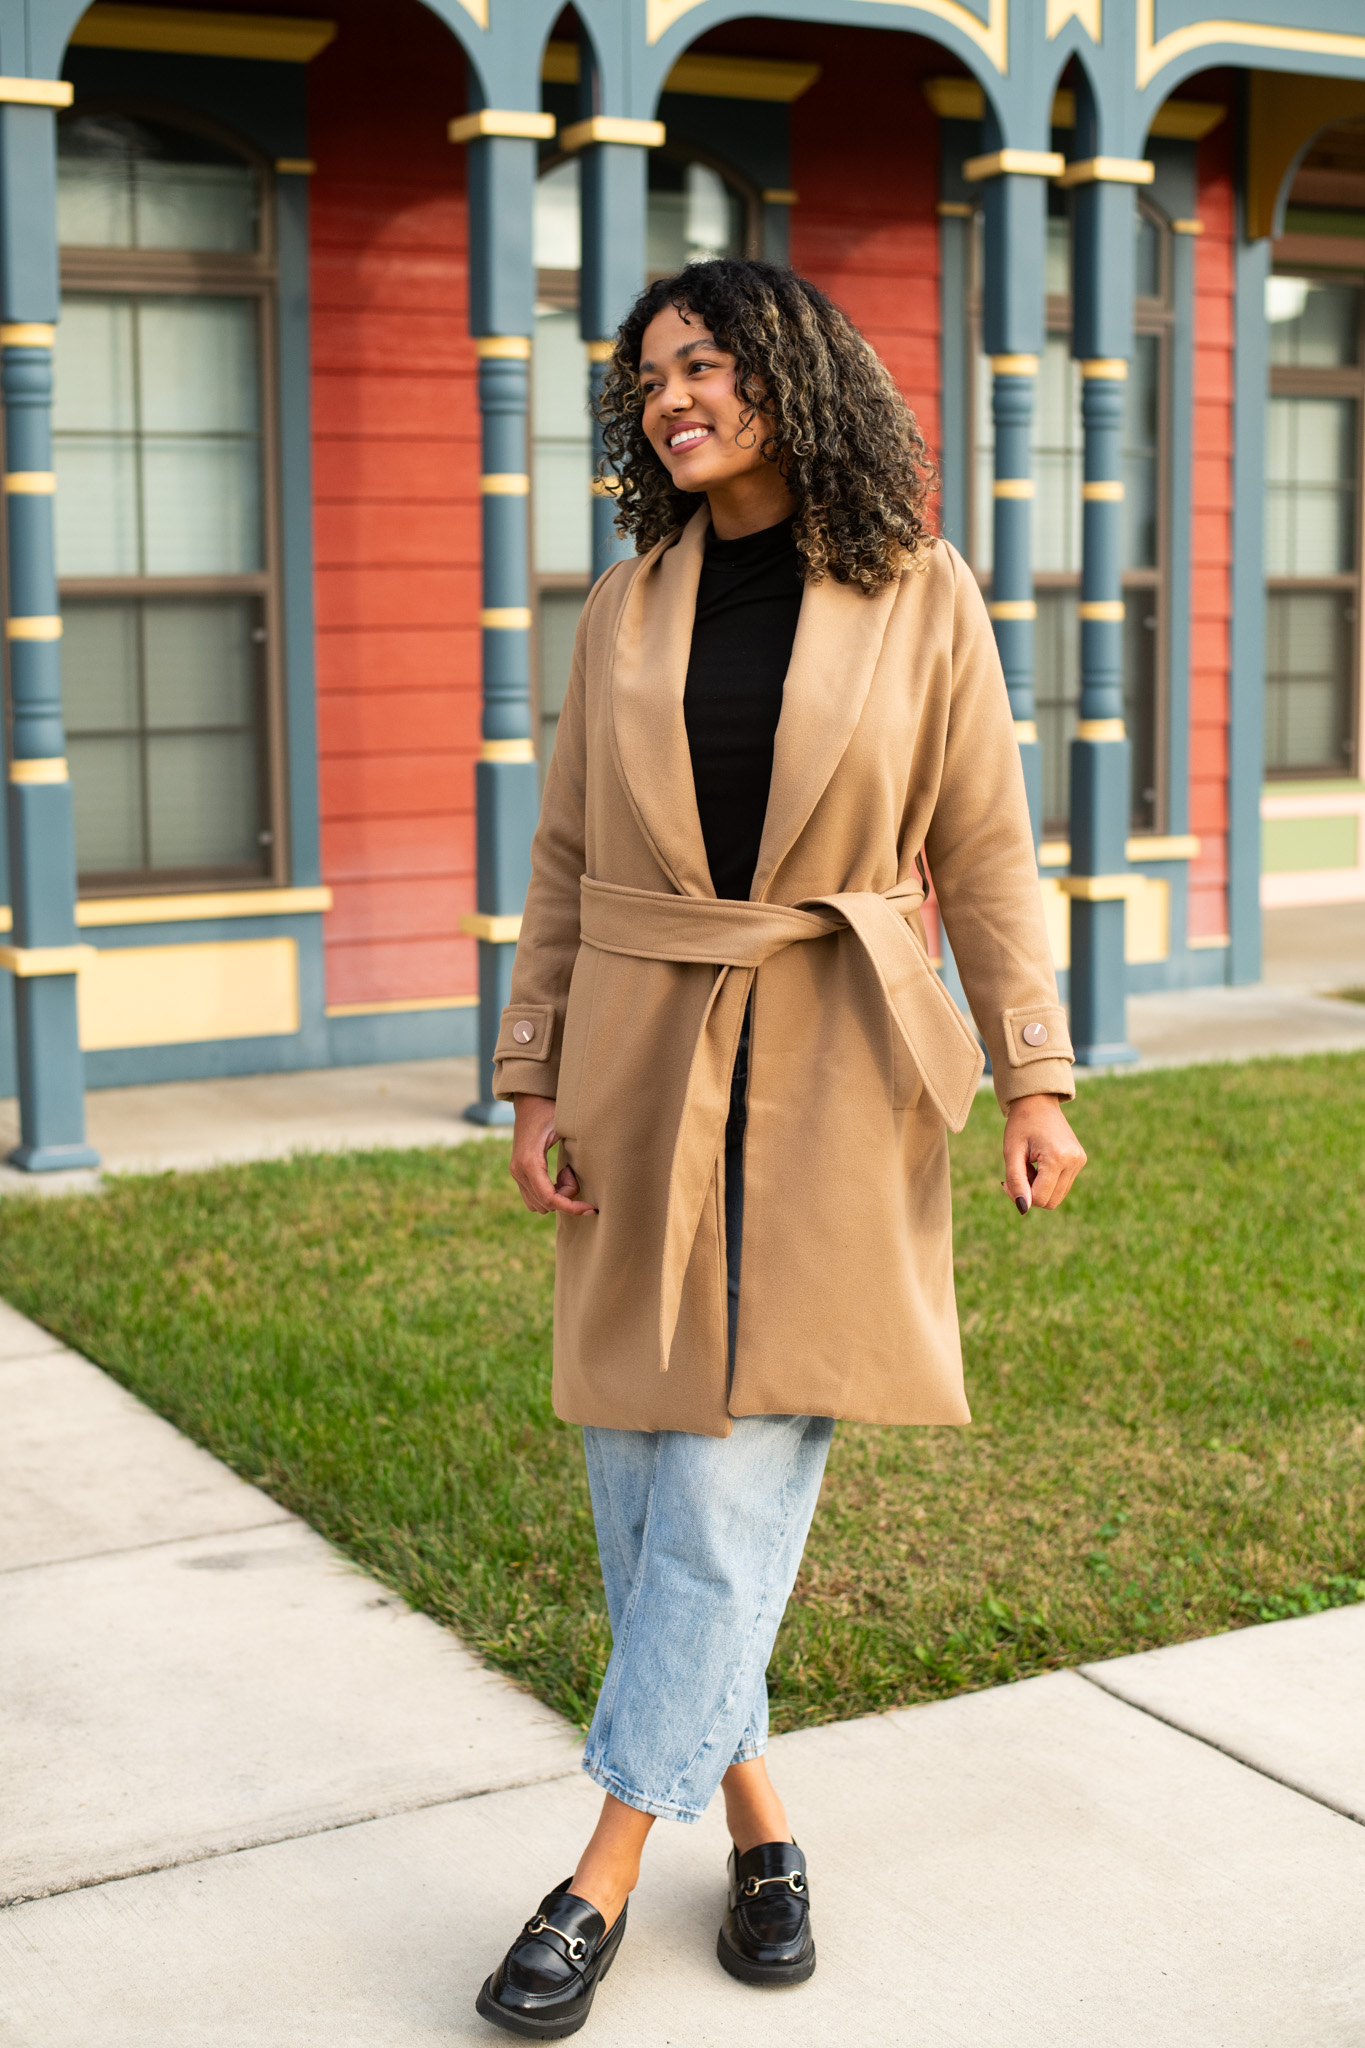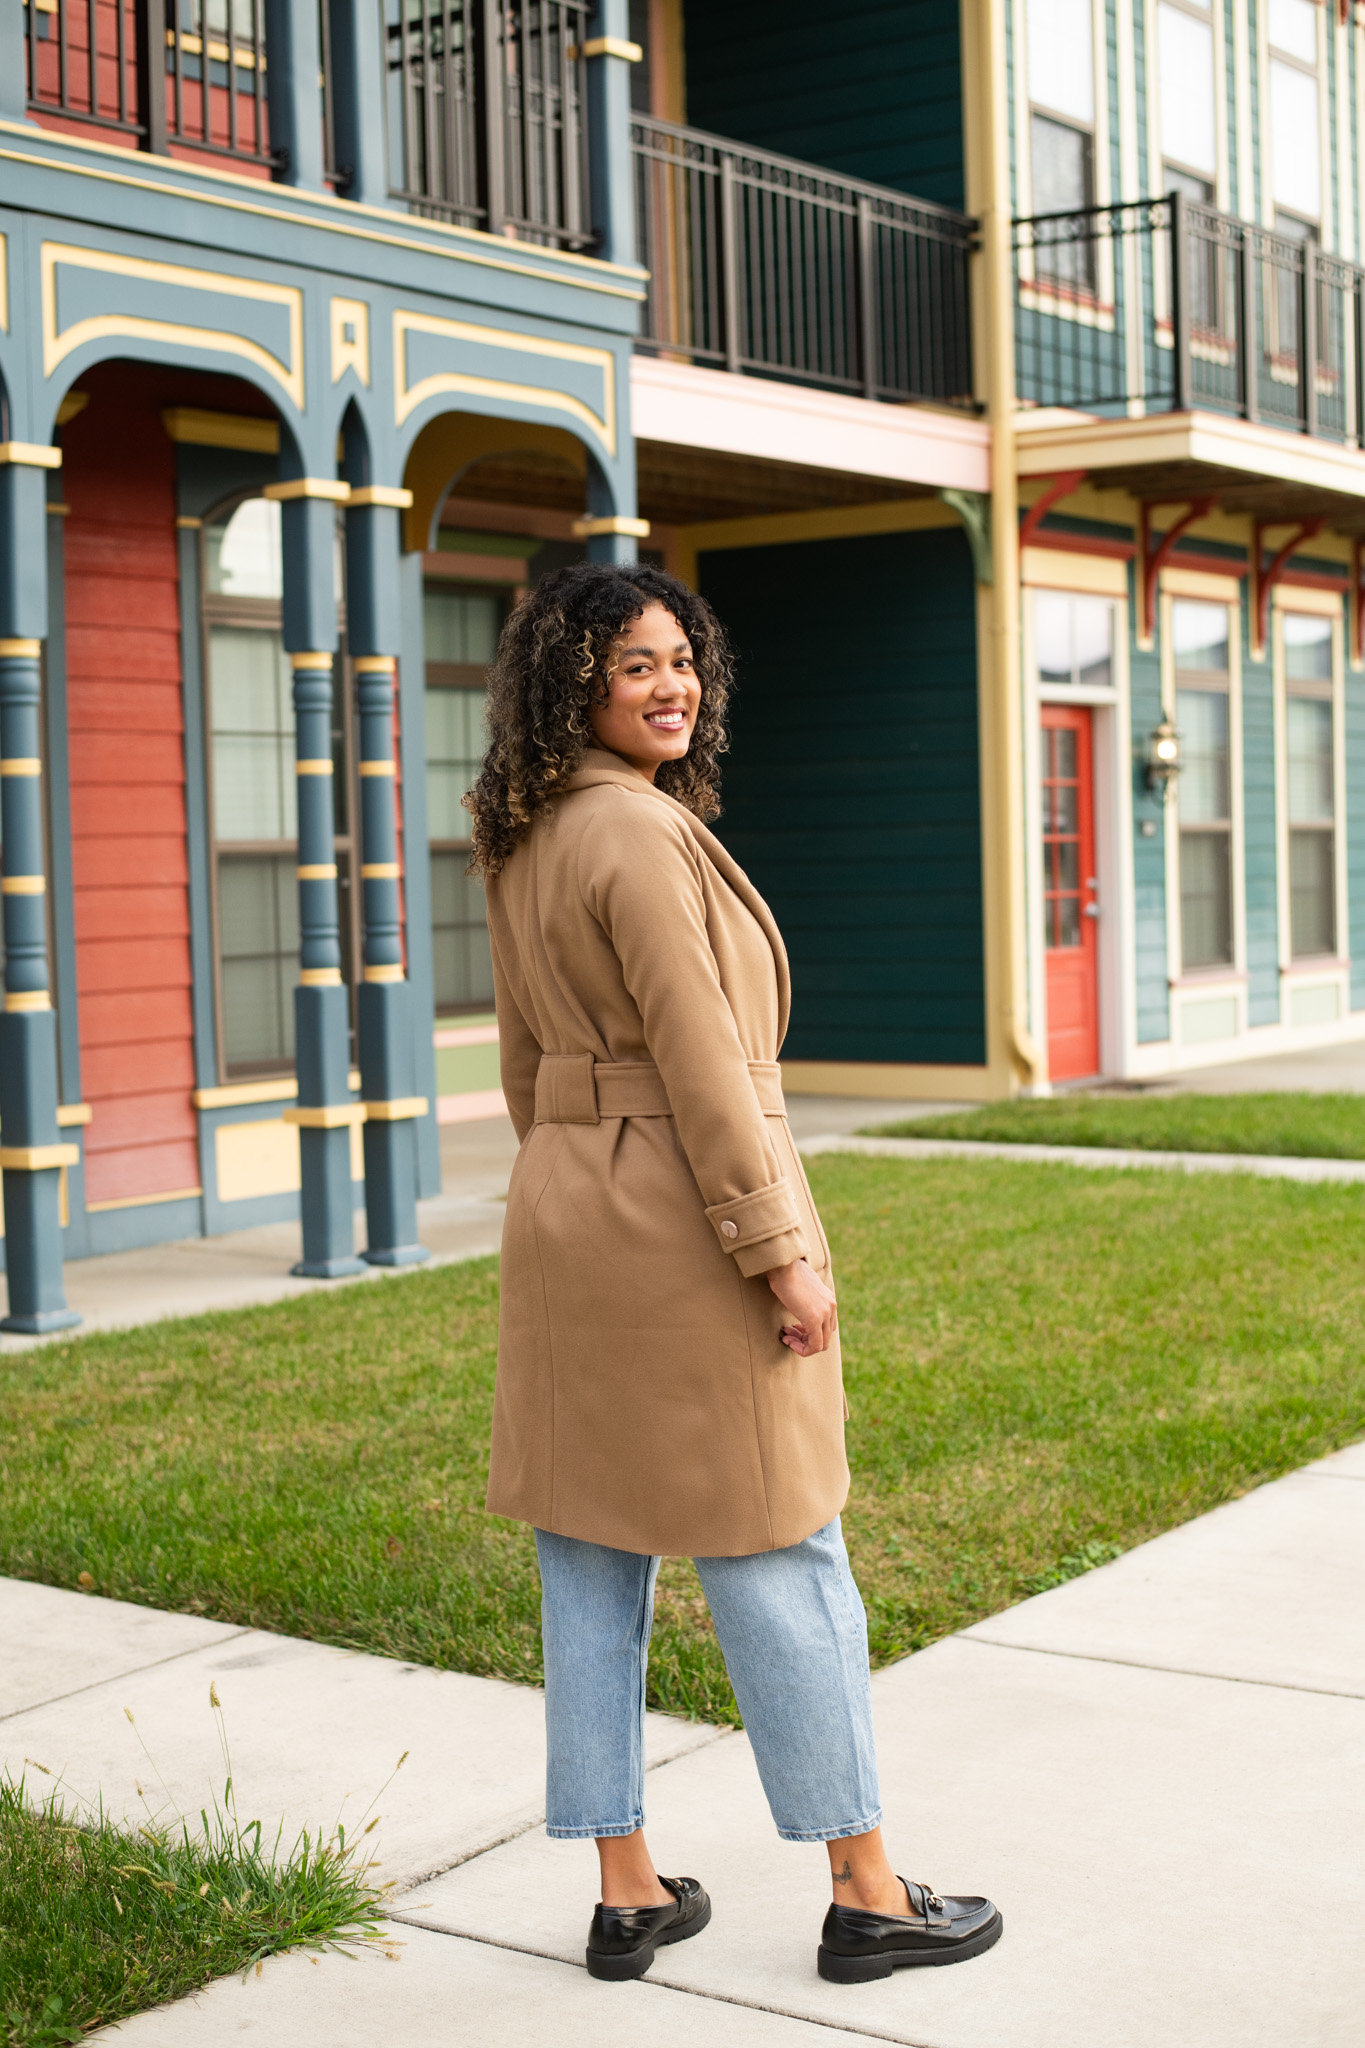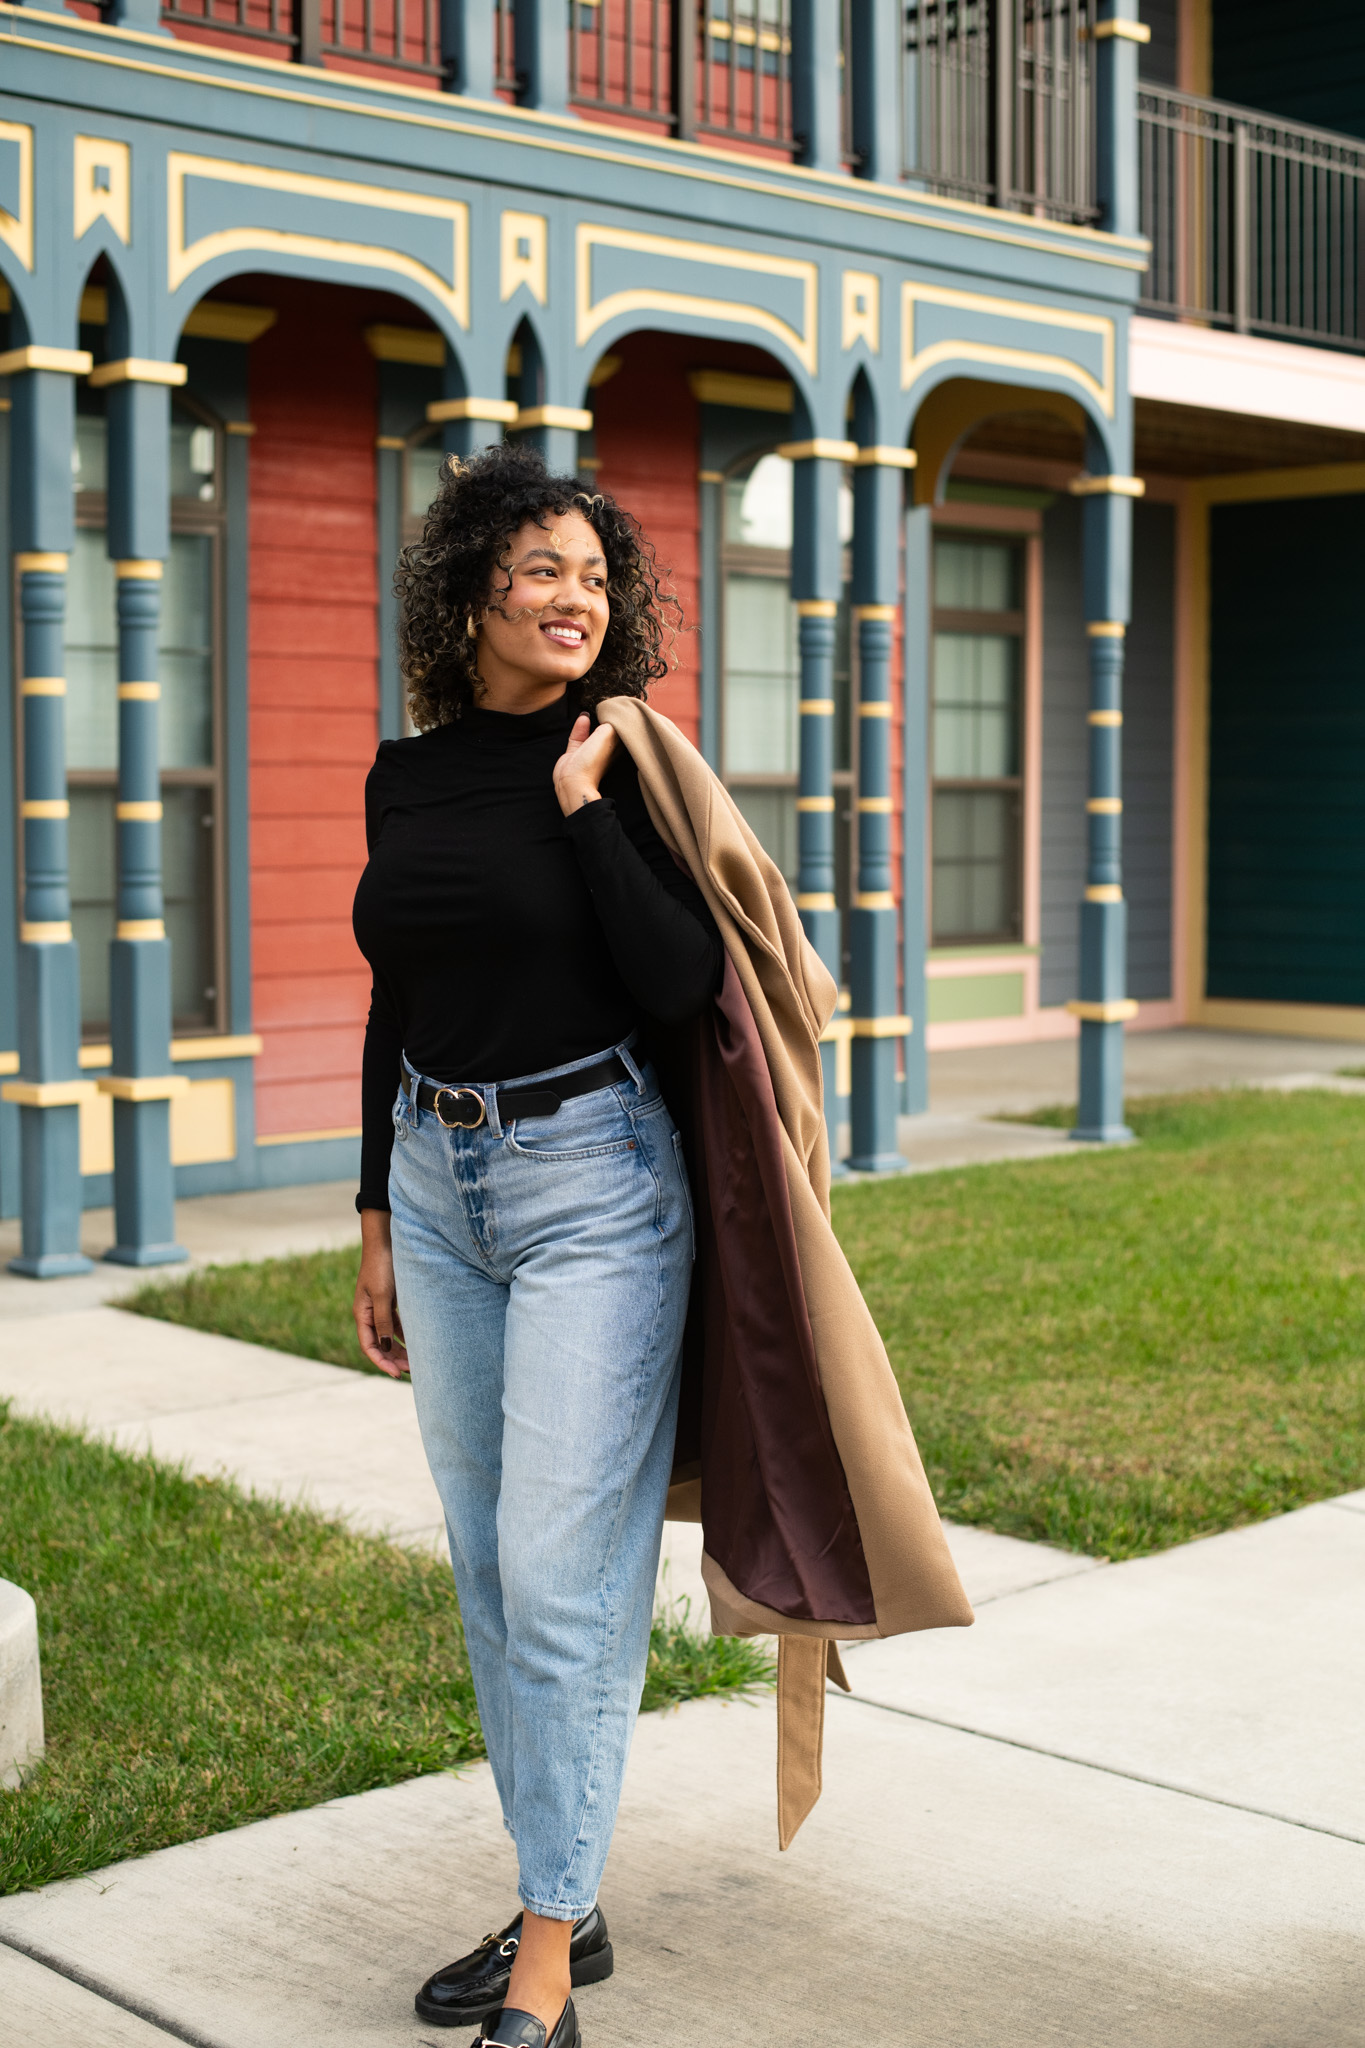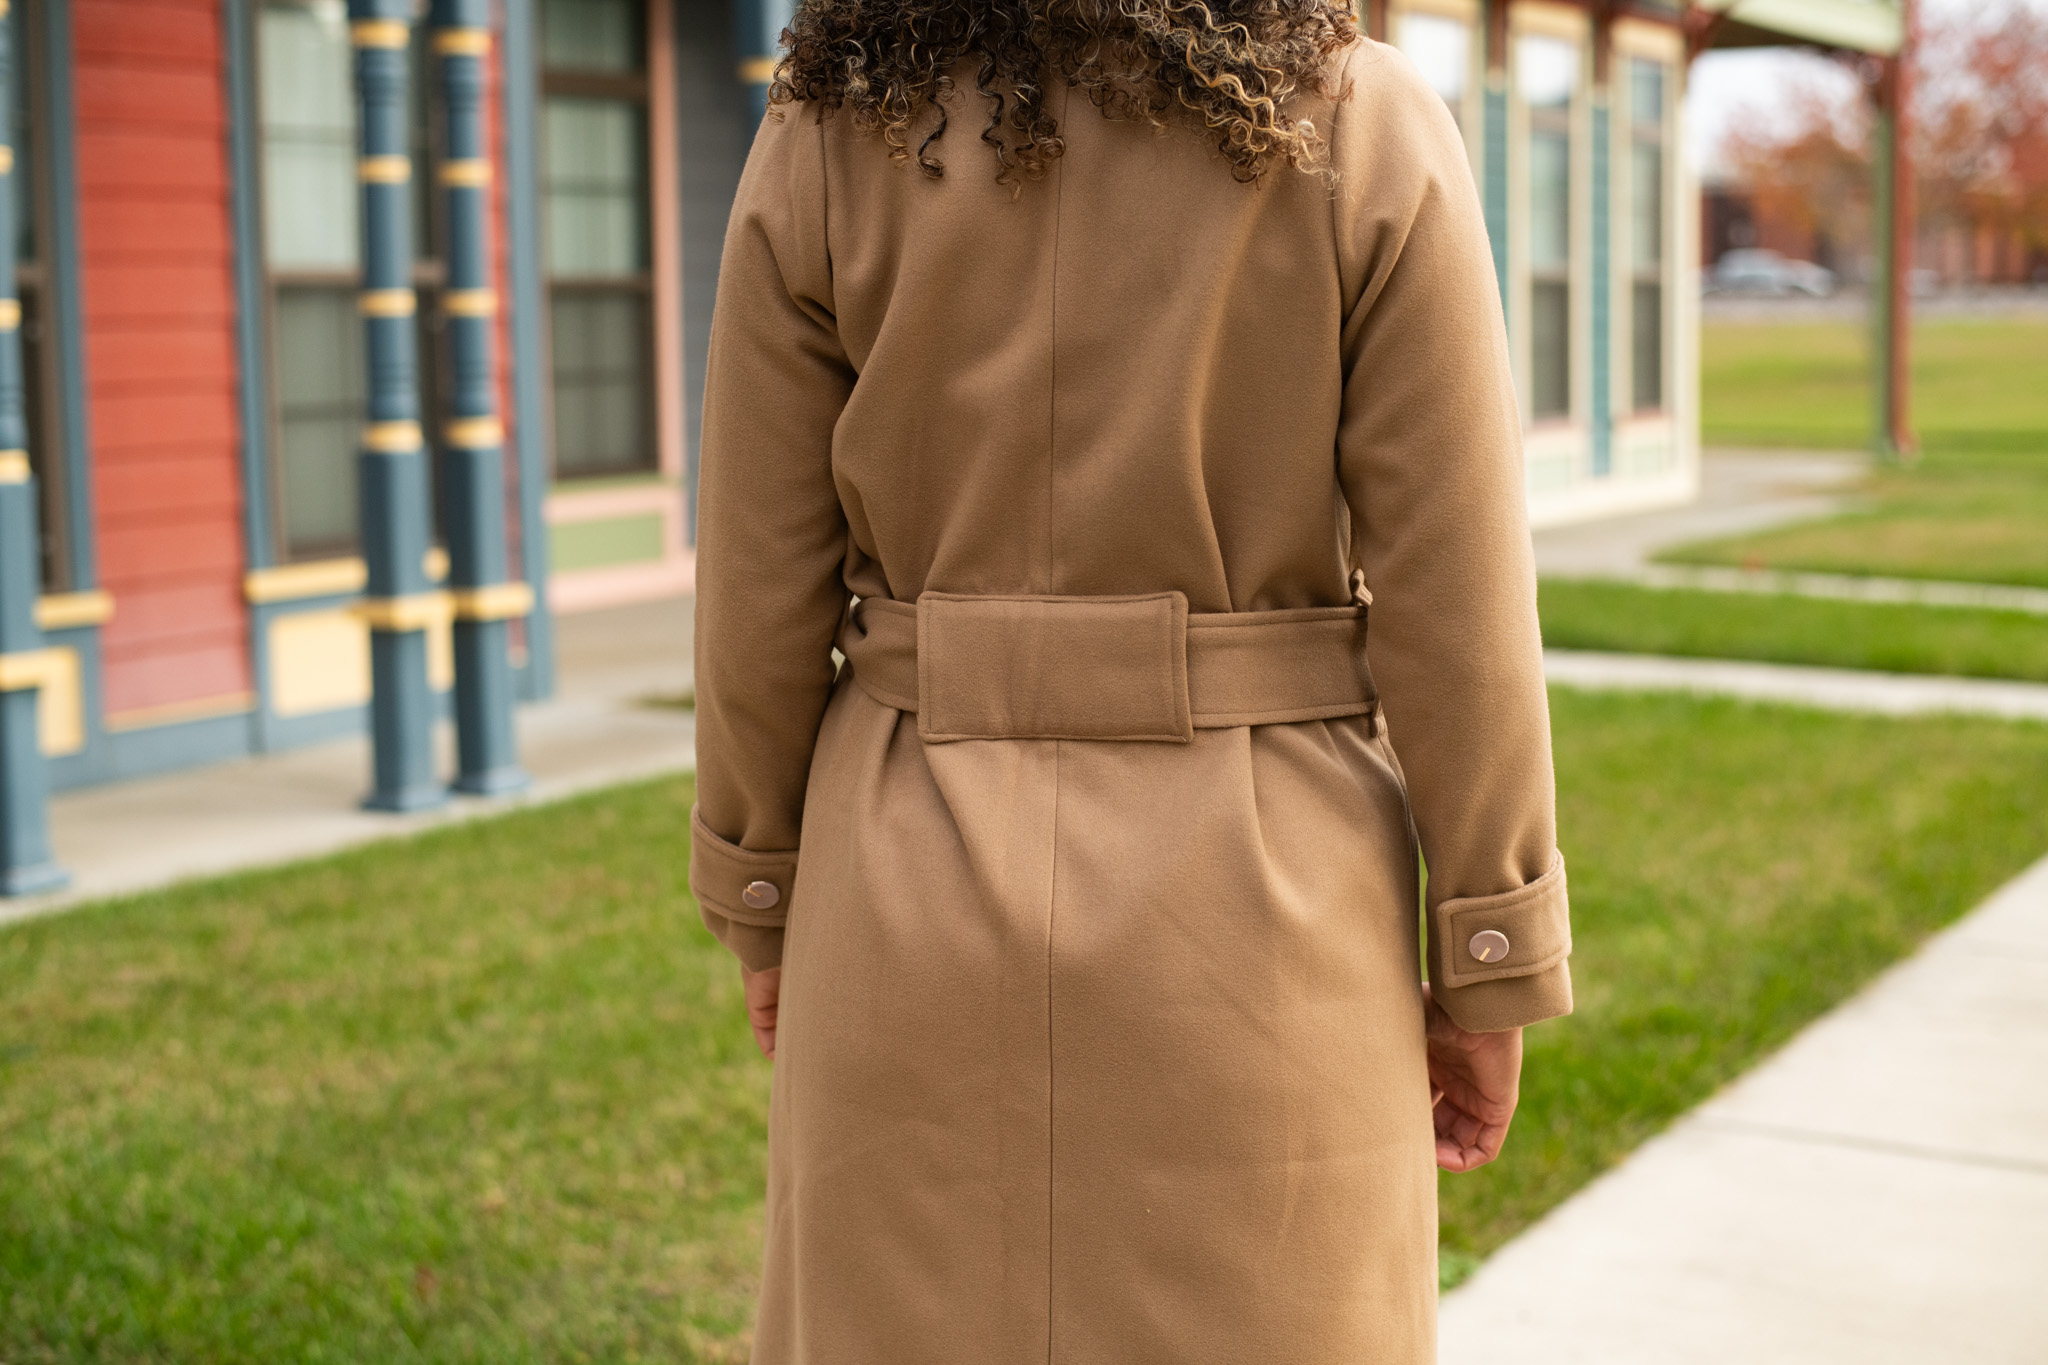
Wrap yourself in luxury this winter by designing this gorgeous coat pattern from Lauren Merciris. Made in warm fabrics like wool, this wrap coat pattern is lined in soft silky fabric and features a wrap belt at the waist and button detail at the wrists. This beautiful winter coat pattern looks equally stunning when paired with jeans and a simple top or a flirty dress on New Year’s Eve and is sure to become your go-to winter outerwear.
Designer Note: All the seam allowances are included: 1 cm/ 0.4 in.
Materials:
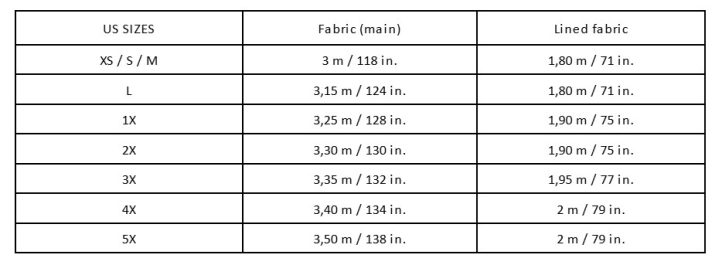
- Fabric and material requirements (fabric width 150 cm / 59 in.)
- Wool, tweed, weed, bouclé, jacquard, wool: (No stretch) for the main fabric
- Lining fabric (polyester, viscose, silk, satin: No stretch) for the lined fabric
- 4 buttons of diameter from 18 mm / 0.7 in. to 30 mm / 1.18 in.
- Grosgrain ribbon 1 cm / 0.4 in. wide x 25 cm / 10 in. length.
- PDF Pattern – This is located at the bottom of this page. Please see printing instructions below.
PRINTING INSTRUCTIONS:
Note: To download the pattern, click on the pattern download button at the bottom of the page. We recommend opening your pattern download using Adobe Acrobat.
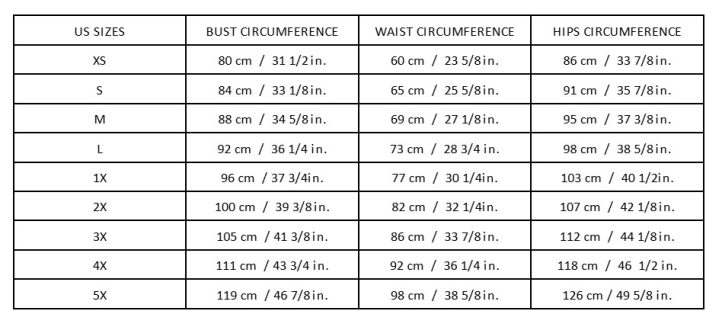
SIZE CHART (CMS/INCHES):
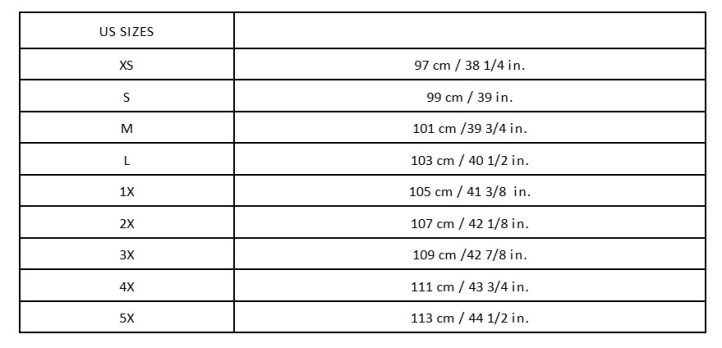
FINISHED GARMENT LENGTH (FROM SHOULDERS TO HEMLINE IN CM/INCHES):
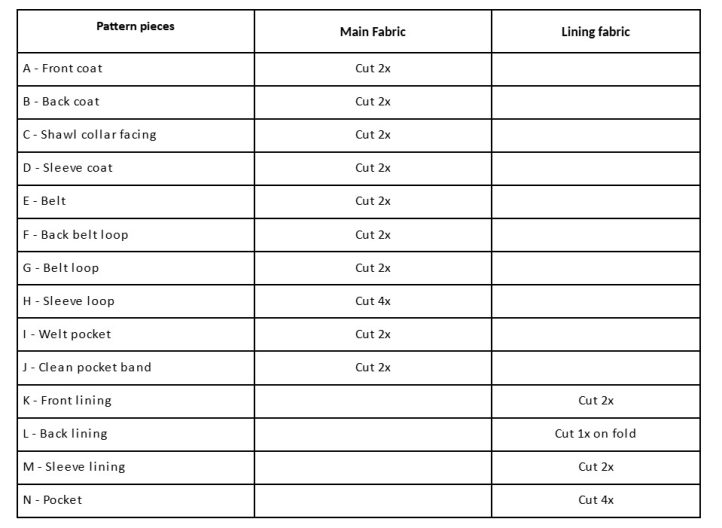
PATTERN PIECES:
Sewing Instructions:
CUTTING:
- Lay out the main fabric.
- For all sizes, fold the fabric along the selvage edges (rights sides together).
- Lay out the lining fabric.
- For all sizes, fold the fabric along the selvage edges (rights sides together).
- Lay out the pattern pieces on the fabric, respecting the grainline, and cut out each piece as many times as the pattern indicates.
- Mark all the markers on the reverse side of the parts.
ASSEMBLING THE OUTSIDE COAT:
The Back:
- Place the two « Backs » together (Pieces B), right sides together, and pin.
- Sew at 1 cm/0.4 in. along the center back. Press, spreading seam allowances.
- Place the two « Back belt loops » together (Pieces F), right sides together, and pin.
- Sew all around at 1 cm/0.4 in, leaving a 5 cm/2 in. opening.
- Trim seam allowances and corners and turn piece right side out.
- Press carefully, tucking in the sewn-in part.
- Close the opening with a hand seam.
- Optional: Topstitch 1 cm/0.4 in. from the edge all around.
- Position the back belt loop on the mark in the middle of the back and pin.
- Sew 1 cm/0.4 in. from edges at top and bottom (leave sides open). If you have topstitched, be sure to sew into the first seam you have sewn.
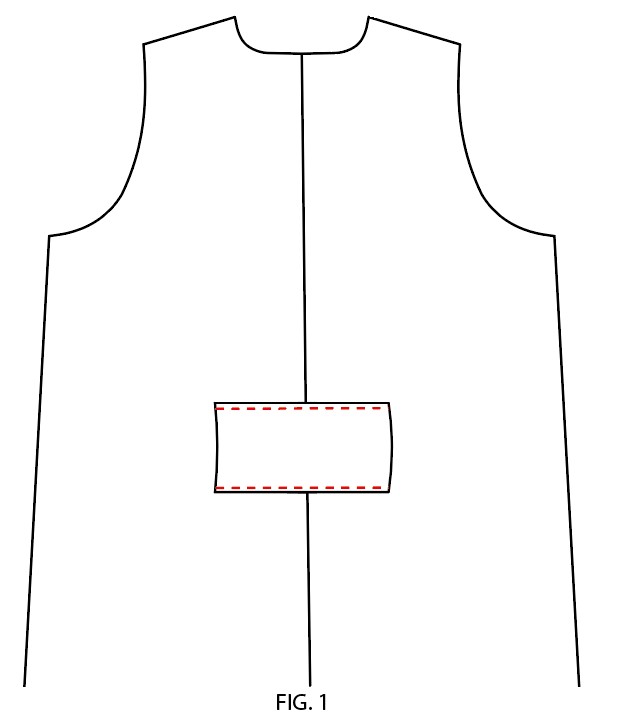
The Belt:
- Place the two parts of the « belt » together, right sides together, and pin along the small side (Pieces E).
- Sew at 1 cm/0.4 in. from the edge.
- Press, spreading the seam allowances.
- Fold the entire length of the belt right sides together and pin.
- Sew the entire length and the corners 1 cm/0.4 in. from the edges, leaving a 10 cm/4 in. opening.
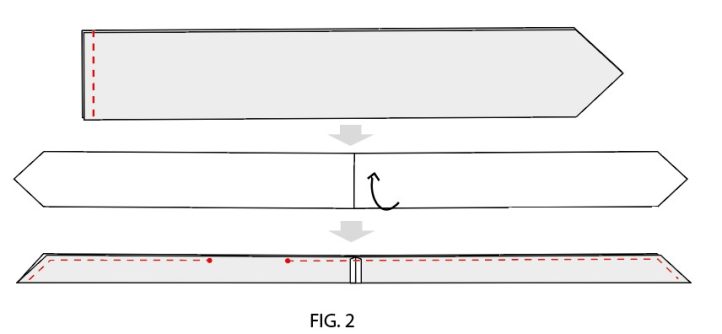
- Trim the corners and turn the waistband right side out, making the corners point out.
- Press carefully, tucking in the unstitched areas.
- Close the opening with a hand stitch.
- Topstitch 0.5 cm/0.2 in. from the edge all around the belt.
The Pockets:
- Place the right side of one of the « Pocket » (Pieces N) on the right side of the « Clean pocket band » (Pieces J).
- Sew at 1 cm/0.4 in. along the pocket opening.
- Press spreading the seam allowances. The belt band prevents the bottom of the pocket from showing when the pocket is opened, giving it a nice finish.
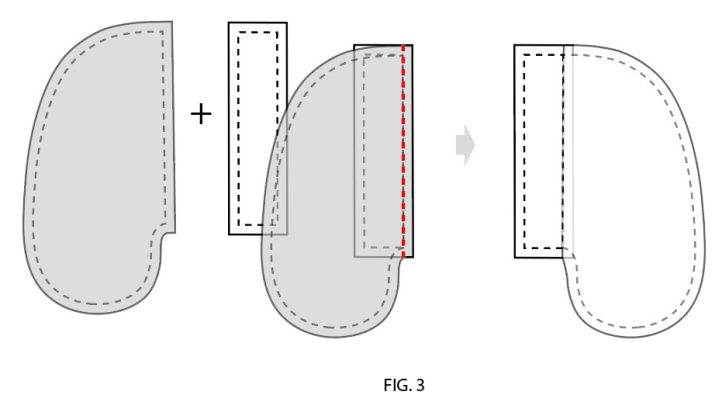
- Fold the « Welt pocket » (Pieces I) according to the fold mark, right side out. Iron. The welt pocket will be the visible strip on the outside of the pocket.
- Position the folded welt pocket on the right side of the second pocket section (Pieces N). Sew at 1 cm/0.4 in.
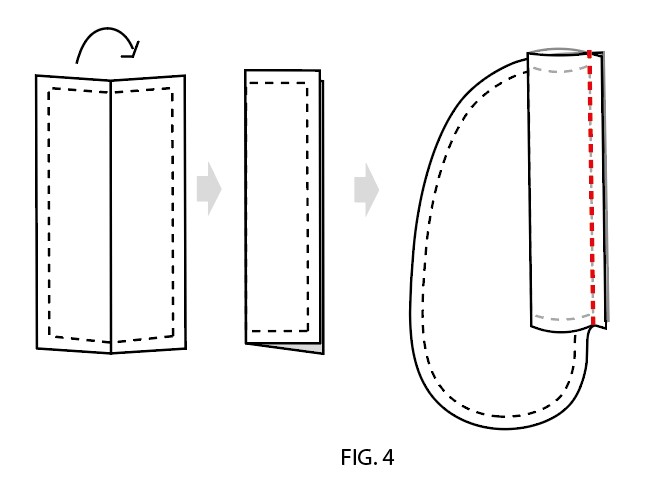
- Now position the two prepared pocket parts right sides together, along the pocket markings on the « Front » (Pieces A). Be sure to match the seam lines with the reference lines. Sew as shown, leaving 1 cm/0.4 in. on each side.
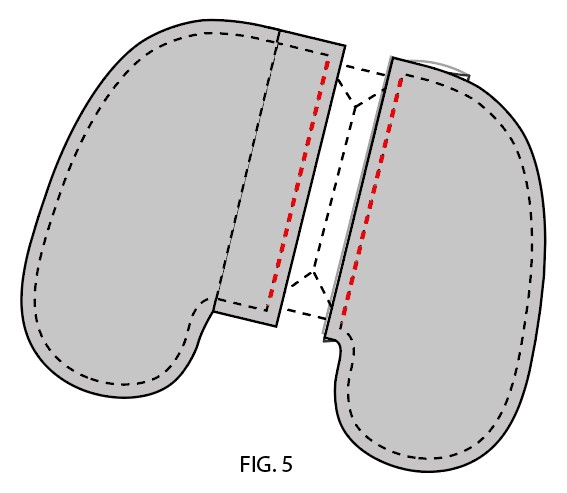
- Now cut into the front fabric following the mark in the middle of the rectangle on the front.
- Turn over the two pocket parts sewn to the wrong side of the front.
- Tuck in the welt pocket and position carefully.
- On the wrong side of the front, turn up the triangles and sew at 1 cm/0.4 in. intervals to hold everything together (the sides of the clean pocket band + the welt pockets + the triangle). Do the same on the other side of the pocket. Press.
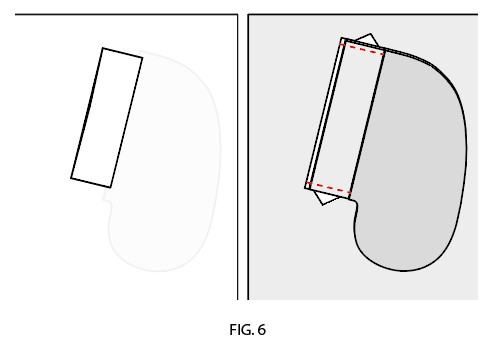
- Sew the two pockets together (Pieces N) at 1 cm/0.4 in. from the edges. Iron.
- Do the same for the other pocket, respecting the symmetry.
The Front:
- Place the « Front » (Pieces A), right side together. Pin the top of the collar on the front and sew 1 cm/0.4 in. from edges.
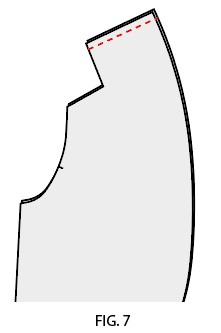
- Iron, spreading seam allowances.
- Place the front assembled right sides together on the back and match the shoulder lines to the collar line. Between the collar line and shoulder line, spread the fabric to create a nice straight seam with rounded corners.
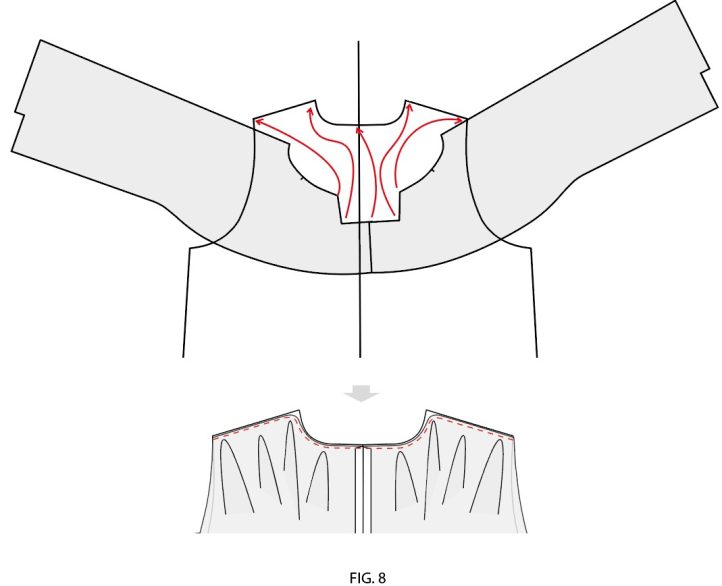
- Pin carefully and sew at 1 cm/0.4 in. Notching and trimming at shoulder/neckline corner.
- Assemble the two “Shawl collar facing » (Pieces C) in the same way (the top of the collar). Pin and sew 1 cm/0.4 in. from edges. Iron, spreading seam allowances.
- Place the shawl collar facing assembled on the front, right sides together, matching the center seam.
- Pin the entire length along the curved edges from the bottom to the opposite side sewing 1 cm/0.4 in. from the edges.
- Turn right side out and press carefully.
- Optional: Topstitch all around the collar, 0.5 cm/0.2 in. from the edge.
Side Seams:
- Join, pin, and sew the right sides of the coat at 1 cm/0.4 in.
- Iron, spreading the seam allowances.
Belt Loops:
- Fold the two sides of the « Belt loop » (Pieces G) lengthwise, wrong sides together, evenly with edges meeting in the middle. Pin in place.
- Apply a Grosgrain ribbon, pin, and sew 0.1 mm/0.04 in. from edge of Grosgrain on both sides to hold the two folds together.
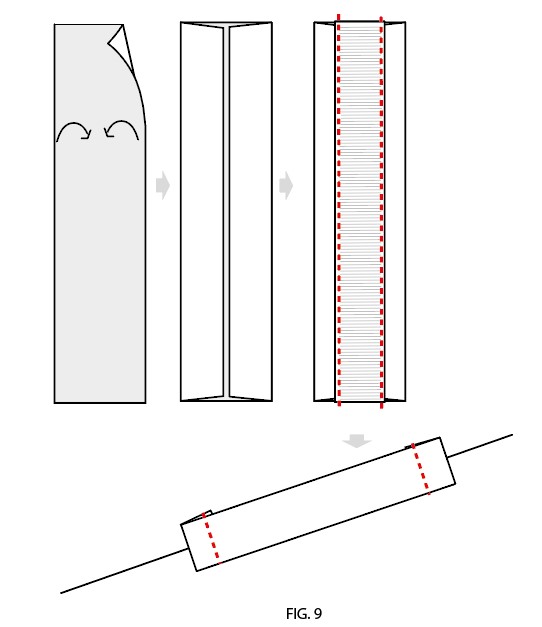
- Trim excess and use a lighter to prevent Grosgrain ends from fraying.
- Fold back the two ends by 1 cm/0.4 in. and iron.
- Pin and sew along markings slightly under 1 cm/0.4 in. to hold.
- Do the same for the second belt loop.
The Sleeves:
- Place two « sleeve loop » (Pieces H) together, right sides together.
- Pin and sew at 1 cm/0.4 in. all around, leaving a 5 cm/2 in. opening.
- Trim corners.
- Turn right side out, making the corners stand out.
- Press carefully, tucking in the unstitched areas.
- Close the opening with a hand stitch.
- Topstitch at 0.5 cm/0.2 in. all around.
- Place the sleeve loop on the « sleeve coat » markings (Pieces D) on the outside and pin.
- Sew two buttons corresponding to the markings.
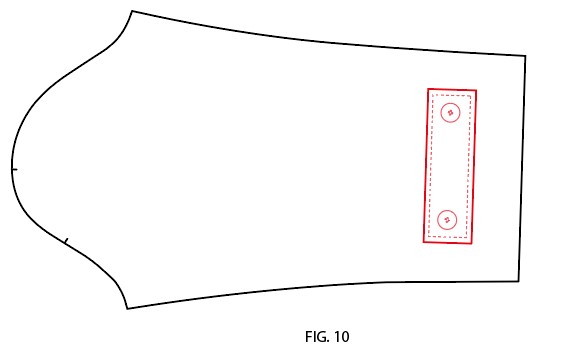
- Do the same for the other sleeve.
- Close each sleeve side seam, right sides together, 1 cm/0.4 in. from the edges.
- Turn right side out and iron to flatten.
- Turn the coat inside out and insert the sleeve, right sides together, matching the notch markings.
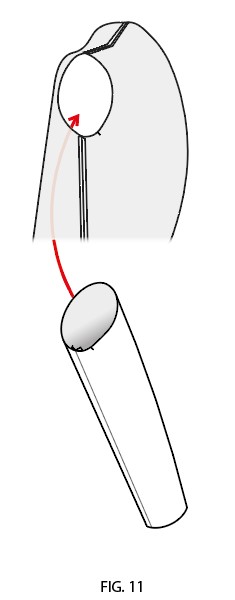
- Pin the entire armhole and sew 1 cm/0.4 in. from edges.
- Do the same for the other sleeve.
ASSEMBLING THE LINING:
Back Lining Ease Fold:
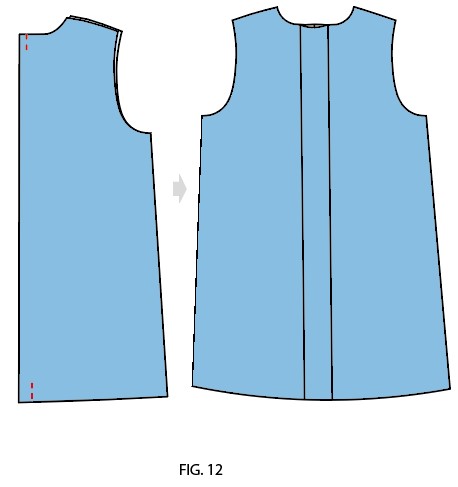
- Fold the « Lining back” (Piece L) wrong sides together.
- Form an ease fold by sewing the lining together along the lines at the top and bottom of the Back Lining (about 3 cm/1.18 in.), according to the marks.
- Open the lining back and press the fold to the right side of the lining.
Assemble the Front and Back Lining:
- Place the right side of the back lining coat in front of you.
- Place the wrong sides of the two « fronts lining coat » (Pieces K) also in front of you.
- Join, pin, and sew the sides together at 1 cm/0.4 in.
- Iron, spreading the seam allowances.
Lining Sleeves:
- Close the “Lining sleeves » (Pieces M) by sewing each sleeve right sides together leaving an opening of 20 cm/8 in.
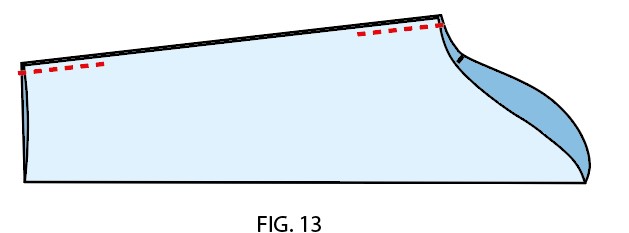
- Iron, spreading the seam allowances (flatten the margins of openings as well).
- Turn the lining sleeves right side out and the lining coat inside out.
- Insert the lining sleeve, right sides together, matching the notch markings.
- Pin the entire armhole and sew 1 cm/0.4 in. all around from the edges.
- Press carefully.
- Do the same for the other sleeve.
ASSEMBLING THE LINING AND THE COAT:
Assembling the Bottom and Along the Facing:
- Tuck in 3 cm/1.18 in. on the front and back of the outer coat bottom hem.
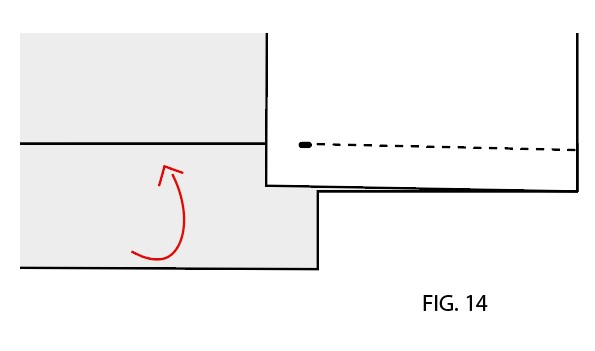
- Iron to mark.
- Join the bottom hem of the front and front facing, then make a scissor cut along the mark (from the corner to the bottom start of the facing).
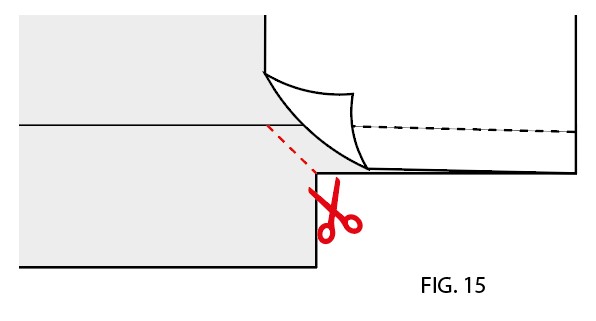
- Turn the front facing inside out and place the bottom of the lining right sides together over the entire bottom of the coat (at the edge of the hem).
- Pin in place, making sure to match the side seams. Sew at 1 cm/0.4 in. (in the marked fold), leaving 1 cm/0.4 in. unstitched towards the inside of the coat.
- Make a 1 cm/0.4 in. fill with the lining on the same margin on each side of the coat and stitch to hold at 5 mm /0.2 in. from the edge. (This operation prevents the lining from pulling on the bottom of the coat).
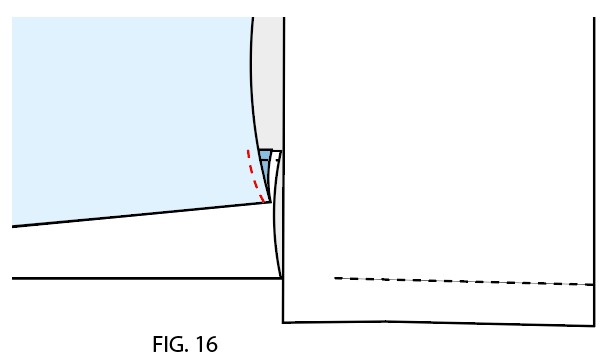
- Now turn the bottom fabrics to align the Collar shawl facing and the front lining vertically and sew the two together (stop at the shoulder seams).
- Do the same seam with the front and the shawl collar facing on the other side.
- Put your hand inside the coat through the opening in one of the sleeves.
- Through the sleeve opening, grasp and pull the top of the lining and the top of the shawl collar facing so that they are right sides together.
- Pin well to obtain nice rounded corners and sew at 1 cm/0.4 in. Trim bottom corners and/or seam allowances if needed.
- Turn the coat right side out. Now the entire lining is sewn to the bottom of the coat, the sides and the neckline.
- Iron carefully.
Assembling the Sleeves Together:
- Insert each sleeve lining correctly (without twisting) into each coat sleeve.
- Pass your hand through one of the sleeves and through the hole left in the lining, pick up the bottom of the lining and the bottom of the jacket sleeve.
- Gently slide them (while holding them pinched together) out of the opening to gain access. Position the sleeves bottom together, right sides together, respecting the seams, and pin all around the sleeve.
- Sew 1 cm/0.4 in. from the edge.
- Repeat for the second sleeve.
- Trim seams if necessary.
- Make the sleeves stand out on the outside.
- Position sleeves and press to hold inner hem in place.
- From inside the jacket, gently pull each sleeve lining to close the opening left in each sleeve.
- Pin the openings edge to edge and sew 2 mm/0.08 in. from the edge.
Finishing:
- Optional: Sew a small invisible holding seam in the side seams at the bottom to ensure that the hem stays together. This operation can also be performed on the sleeve hem seam.

