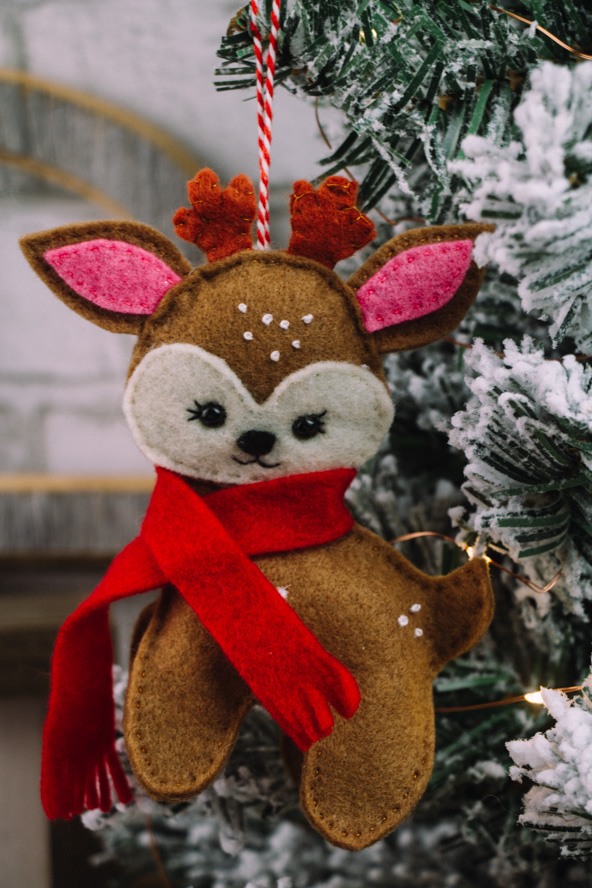
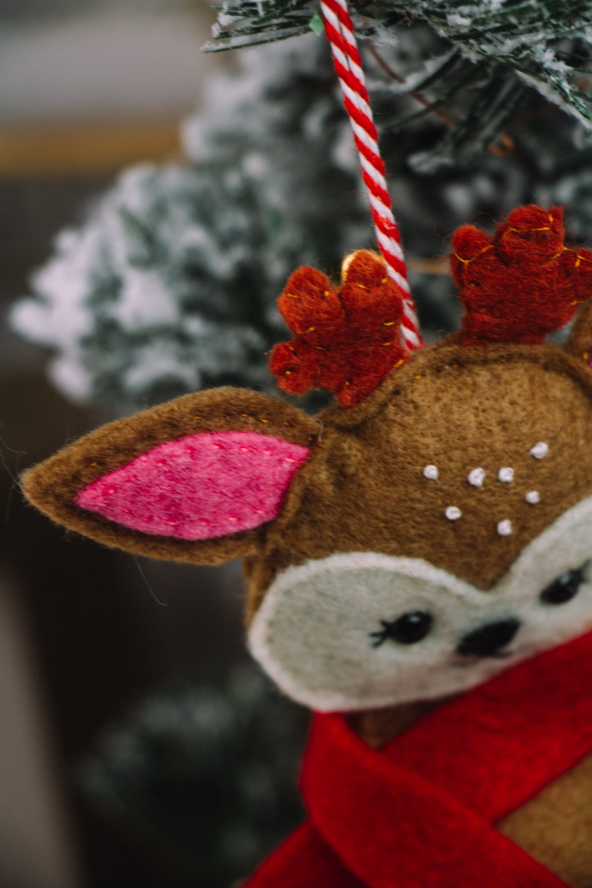
There’s something so special about creating handmade Christmas decorations that can be passed down from generation to generation, which is we’re so excited to share this tutorial for designing your own adorable deer ornament. Featuring a darling felt winter scarf, this Christmas ornament pattern pairs perfectly with the Forest Fox Woodland Ornament also featured in this issue. This sweet ornament is sure to be a hit with adults and children alike, and we love the idea of creating a batch of these deer with a differently colored scarf for every family member. Brush up on your hand stitching skills with this easy Christmas ornament.
Skill Level: Easy
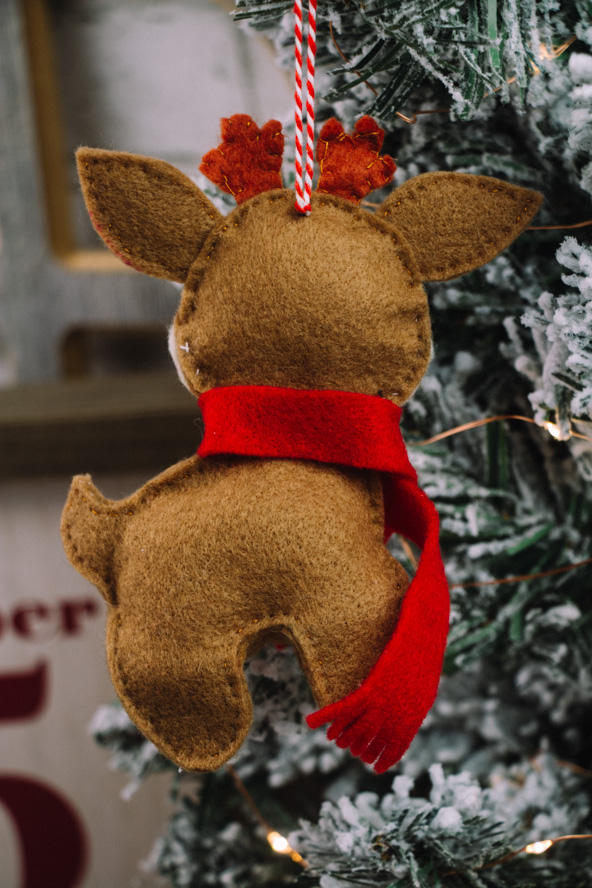
Finished Measurements: 4″ wide x 5 1/2″ tall
Seam Allowances: 5mm (3/16″)
Materials:
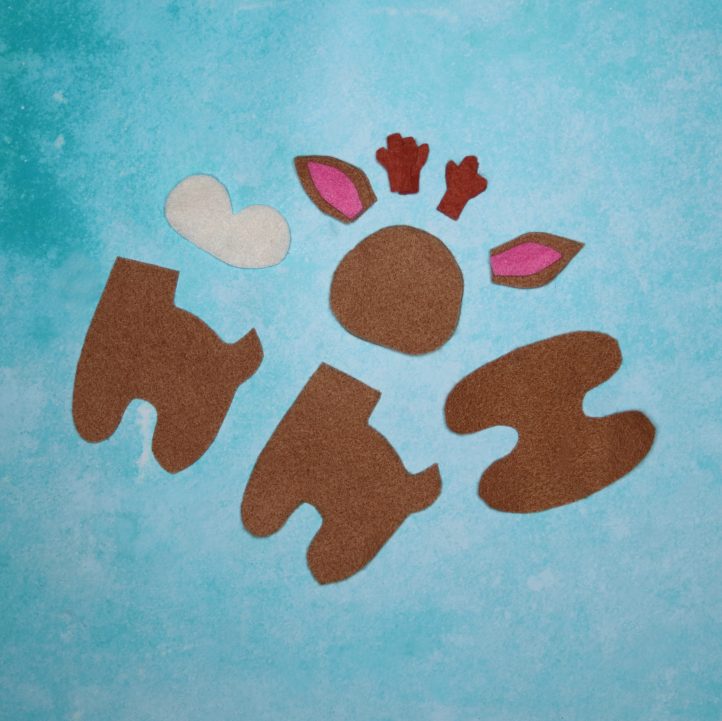
- Fabric: Felt in rust brown, cream, white, red, and dark brown, one 12” square of each; plus small scraps of black and pink
- Sewing thread: cream, dark brown, red, black, and pink
- Safety toy eyes
- Safety toy stuffing
- Red and white Christmas twine for hanging loop – approx. 14″
- PDF Template – This is located at the bottom of the page. Please see printing instructions below.
Tools:
- Pencil
- Dressmaker’s shears
- Pins
- Sewing needle
PRINTING INSTRUCTIONS:
To download the PDF template, click on the download button at the bottom of the page. We recommend opening your download using Adobe Acrobat.
Designer Notes:
- Make your woodland decorations even more festive by placing scented pouches inside them before stitching up – you could add cinnamon, lavender, or a mixture of Christmas spices!
- If you don’t have any toy eyes in your stash, you can make the eyes for our woodland decorations by working two French knots on the face in black yarn or embroidery floss, instead.
Instructions:
- Begin by cutting out your felt pieces. Print out the deer template below, and use it to draw and then cut each of the shapes from sheets of colored felt as indicated, using sharp scissors or dressmaker’s shears.
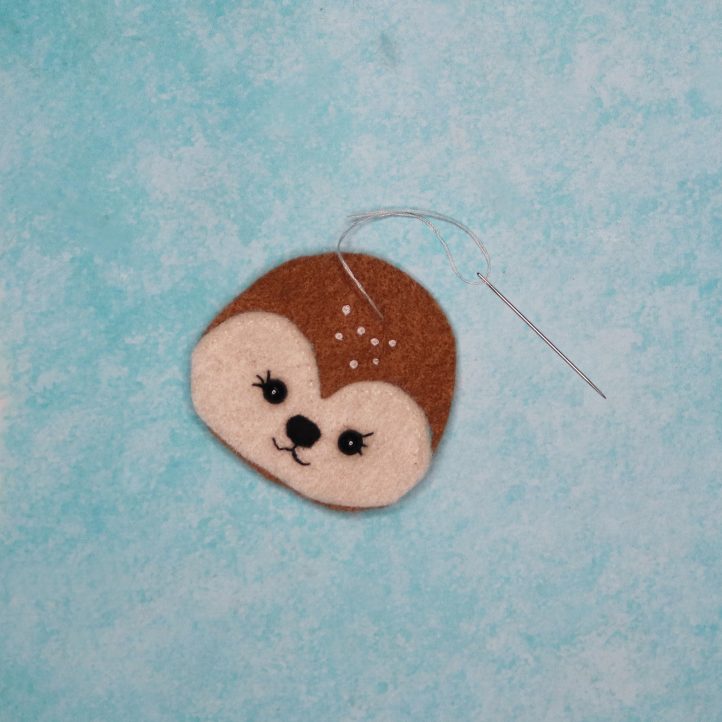
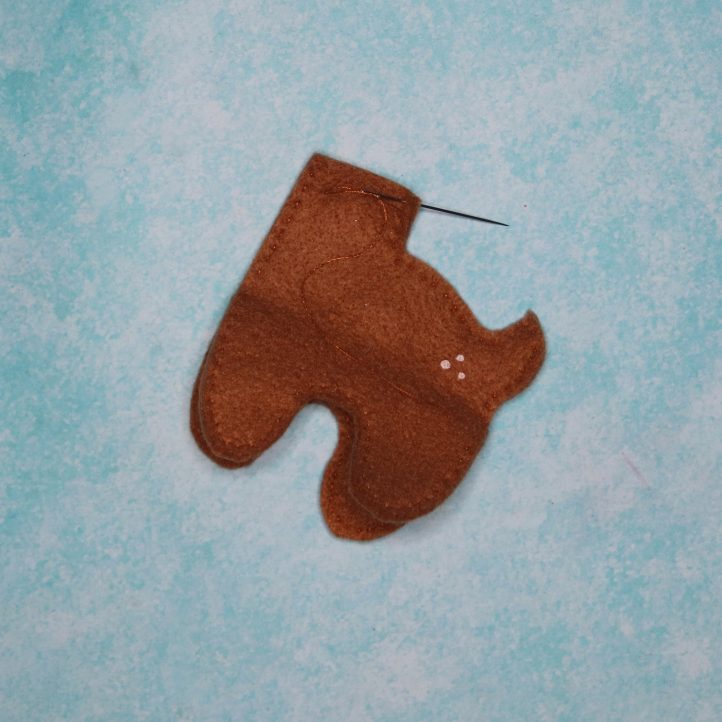
- Layer the cream-colored face piece onto one of the brown head pieces, aligning at the bottom edge (you can also use our photo as a placement guide). Thread a sewing needle with a length of cream thread and work a straight stitch across the top of the cream-colored piece, to hold the two together. Embroider a scattering of French knots on the deer’s forehead, then attach two safety toy eyes to the face. Add a small black felt nose, then embroider a mouth and eyelashes onto the face in black thread.
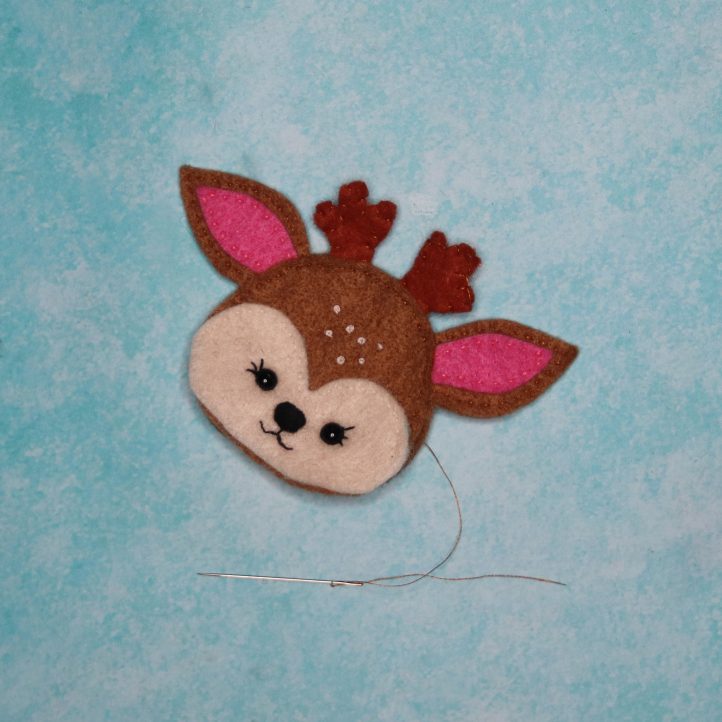
- Make the antlers and ears. Layer the antler pieces in pairs, and work a blanket stitch all around the edge of each pair to hold them together. Stitch each of the pink inner ear pieces onto one of the brown ear pieces, then layer and sew the brown ears up in pairs, with the pink inner ear facing out. Place the two head pieces together and sandwich the antlers and ears into position between them, then work a line of straight stitching across the top of the head, to catch all the layers together and hold the antlers and ears in position.
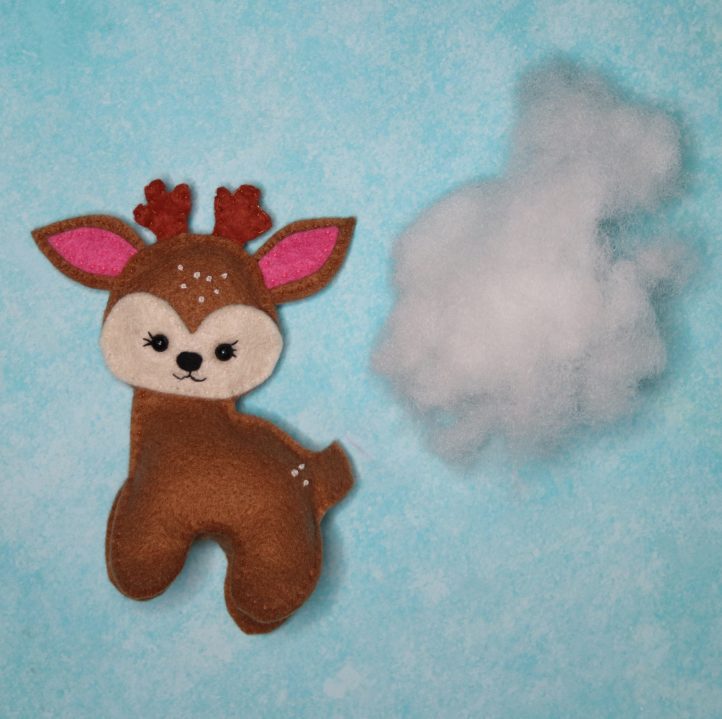
- Add three cream French knots to each side of the deer’s rump. Lay the two side body pieces together, aligning the edges. Fold the belly piece in half at the line indicated, then sandwich this in-between the legs, aligning the feet – the fold of the belly should sit around half way up the side of the body. Carefully work a straight hand stitch in brown thread from the neck, along the back, and the rump of the deer. Once you get to the fold of the belly, split off and stitch each side separately. Continue, until you reach the opposite side of the neck. Leave the neck edge open for now.
- Stuff the body through the neck opening, making sure to push the filling down into the deer’s legs using a pencil or a chop stick. Begin to work a line of straight stitch along the bottom edge of the head, adding a little stuffing as you go. When you get to the bottom of the head, sandwich the neck of the body piece within it, then continue to stitch across, to hold the two together.
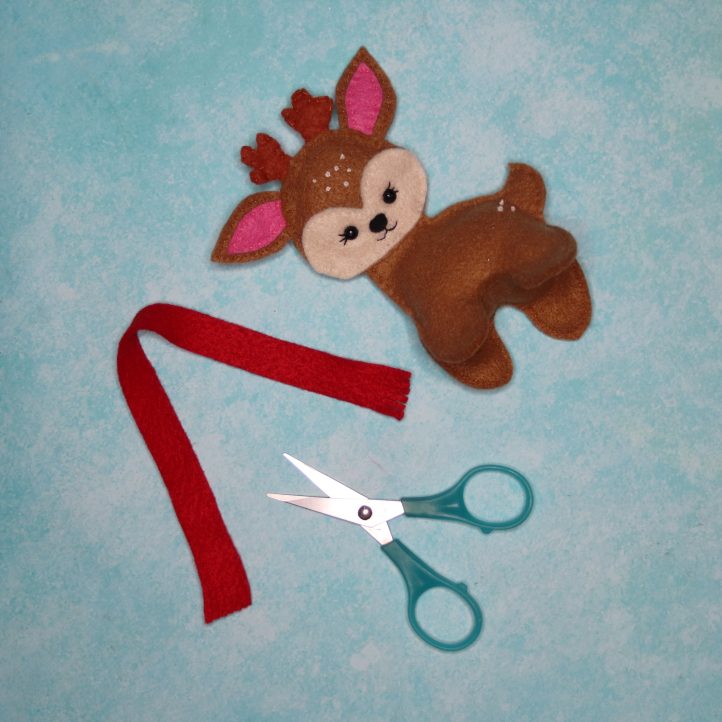
- Cut a long strip of red felt, then snip into each of the short edges to make fringing. This is the deer’s scarf. Wrap the scarf around his neck and tie loosely to secure. Finally, add a loop of ribbon or twine to the back of his head to allow for hanging.
I am vision impaired and can not do much sewing anymore. However, I might could do this pattern so I want to give it a try. Kitty Hadnum
Hi Kitty! We hope you enjoy this project. Have a great day! – Ashley, WeLikeSewing
so cute when finished
No download link anywhere, how sad.
Hi Nancy! The download is available at the bottom of the page to our Gold Club members. We recommend opening the pattern download in Adobe Acrobat. Let us know if you have any questions! – Ashley, WeLikeSewing
Click on the link in the materials section, not the bottom. I didn’t have a problem getting it from there.
thank you so much
can’t access the pattern 🙁
So adorable, it would have been a great craft for my older Girl Scout Troop
Hi Tove! We’re so sorry for any confusion. This pattern is temporarily available as a free pattern, and you can download the pattern with the link in the Materials list. Please let us know if you have any questions! – Ashley, WeLikeSewing
Why do you say it is free and then to click download at the bottom of the page and then find out in order to click download you have to be a gold member that you have to pay $10 to become……?
Hi Lutrecia! So sorry for any confusion. This pattern is temporarily available as a free pattern, and you can find the pattern download in the Materials list. Please let us know if you have any questions! – Ashley, WeLikeSewing
Icant print it either
Hi Debbie! This pattern is temporarily available as a free pattern, and you can find the free pattern link in the Materials list. Please let us know if you have any questions! – Ashley, WeLikeSewing
I just printed all the instructions to find out I cannot access the pattern. I work and usually have no time for crafts – I just love deer and wanted to do this for gifts this Christmas. I do not want to join.
Can I please get access to the free pattern? Thanks in advance. Karen Murphy
Hi Karen! So sorry for any confusion. This pattern is temporarily available as a free pattern. The free pattern link can be found in the Materials list of this project. Please let us know if you have any questions! – Ashley, WeLikeSewing
so so cute