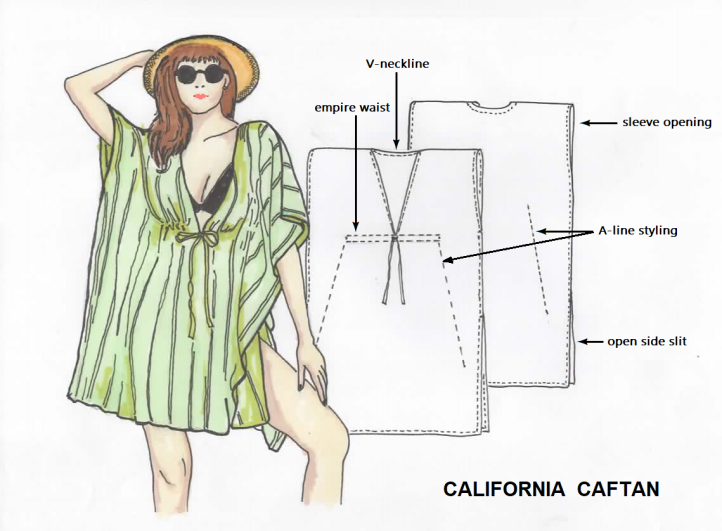
Retro ‘60s style meets California casual in this chic summer caftan. Perfect for lounging by the pool or hot days at the beach, this pull-on caftan pattern features a drawn empire waist, deep v-neckline and three-quarter length sleeves. Made in a gorgeous breezy chiffon, this summer wardrobe essential can be designed in other lightweight fabrics such as cotton gauze, georgette or lawn. Look fabulous during the dog days of summer with this relaxing and versatile garment.
Skill Level: Intermediate (little sewing but plenty of prep work)
Seam Allowance: Single seam allowance = 3/8” wide/ Double turned hem = 1” wide; cut down to finished width
Materials:
- Light-weight diaphanous fabric, 60” wide (about 1.5 yards x height)
- 1 spool of color-matched all-purpose thread
- 1 roll of pattern paper or Kraft paper
- Basting thread
Tools:
- Ruler
- Rotary cutter and mat
- Dressmaker’s silk pins
- Loose powder chalk dispenser
- Pinking shears
- Appliqué scissors
Machine Set Up:
- Stitching – single-needle straight stitch
- Needle Type – Microtex (Sharp), size 10
- Stitch Length – medium (3 of possible 5 setting)
- Tension – medium (4 of possible 8 setting)
- Top-Stitching – 3/8” from edge and 1/8” from edge, parallel to one another
- Pressing – low-to-moderate heat temperature iron and lint-free press-cloth
FABRICATION:
When sourcing fabrics for the California caftan, keep in mind its purpose and occasion – a pull-on beach cover-up for hot-weather days. Choose a luxurious diaphanous fabric to sew up this DIY project, something light-weight (3.5 oz/sq. yd. – 100g/m² or lesser) to keep the body unencumbered and have a smooth “hand” against your skin. It should drape well under its own weight as this is an important factor from an aesthetic point of view and influences a garment’s appearance.\
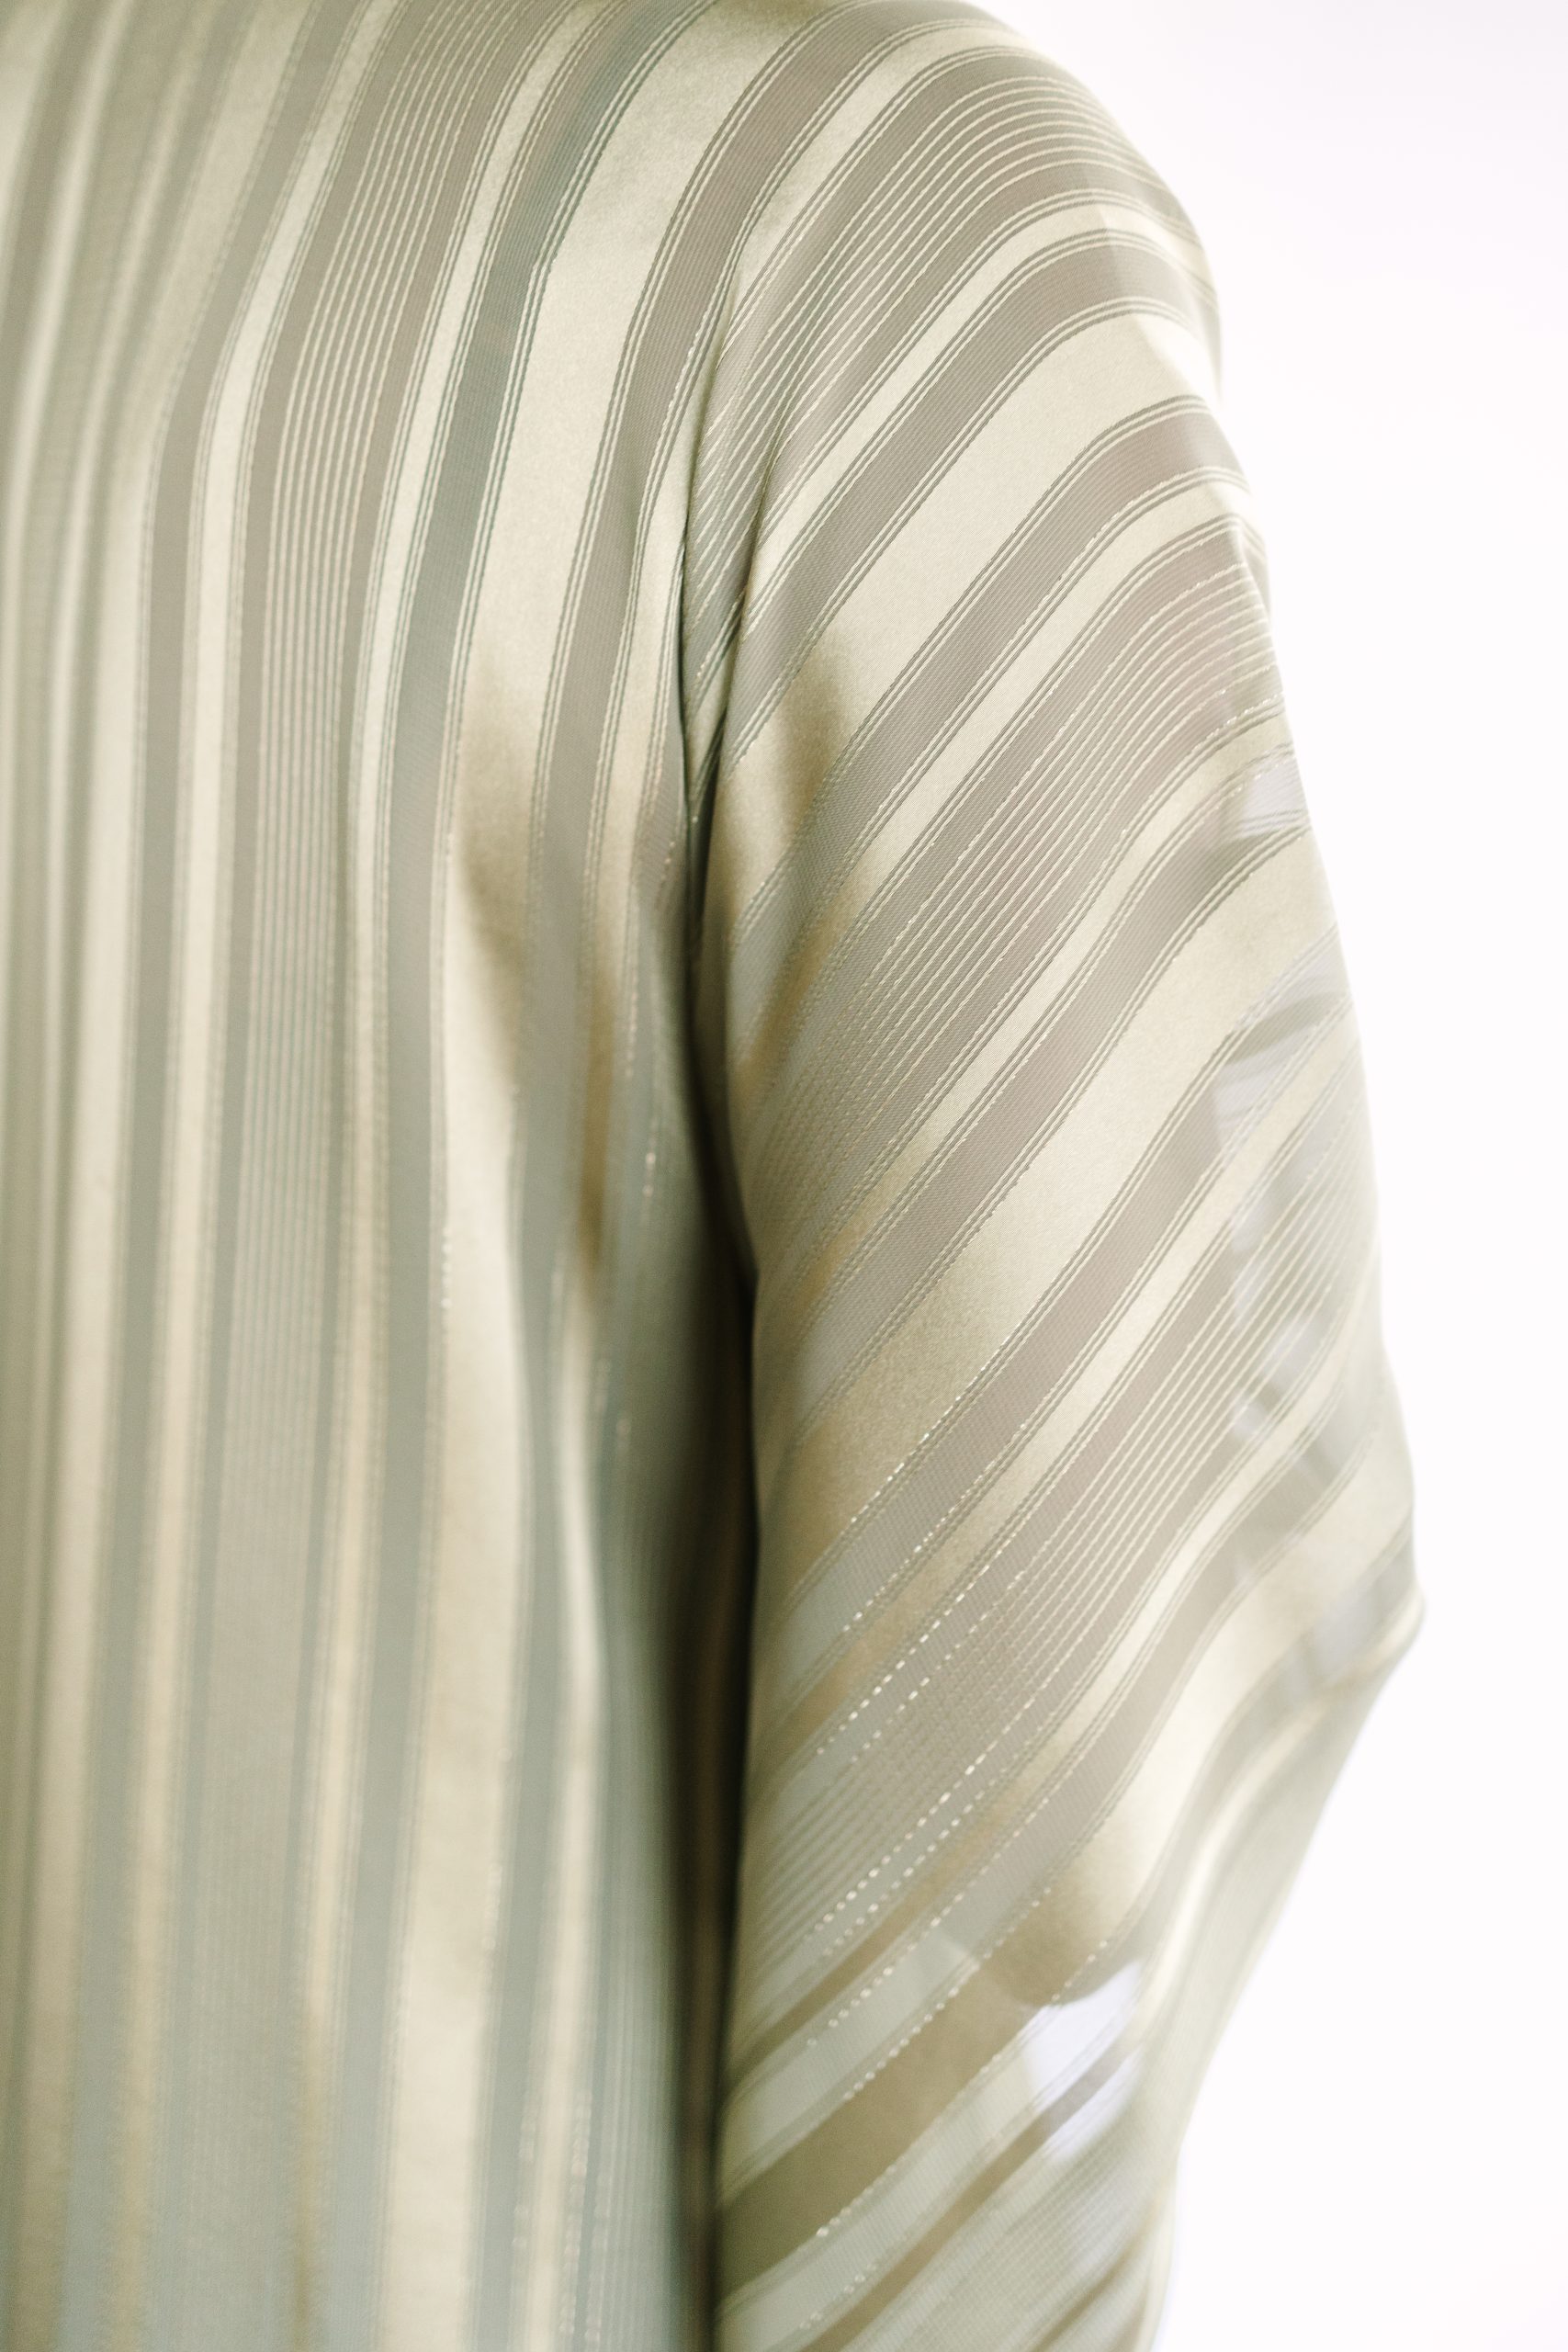
Look for light, airy cloths similar to cotton gauze, crinkle muslin, batiste, voile, or lawn that wick moisture away from the body; or select more elegant weaves similar to chiffon, viscose satin, charmeuse, and georgette that drape well and have a shimmery and diaphanous appearance.
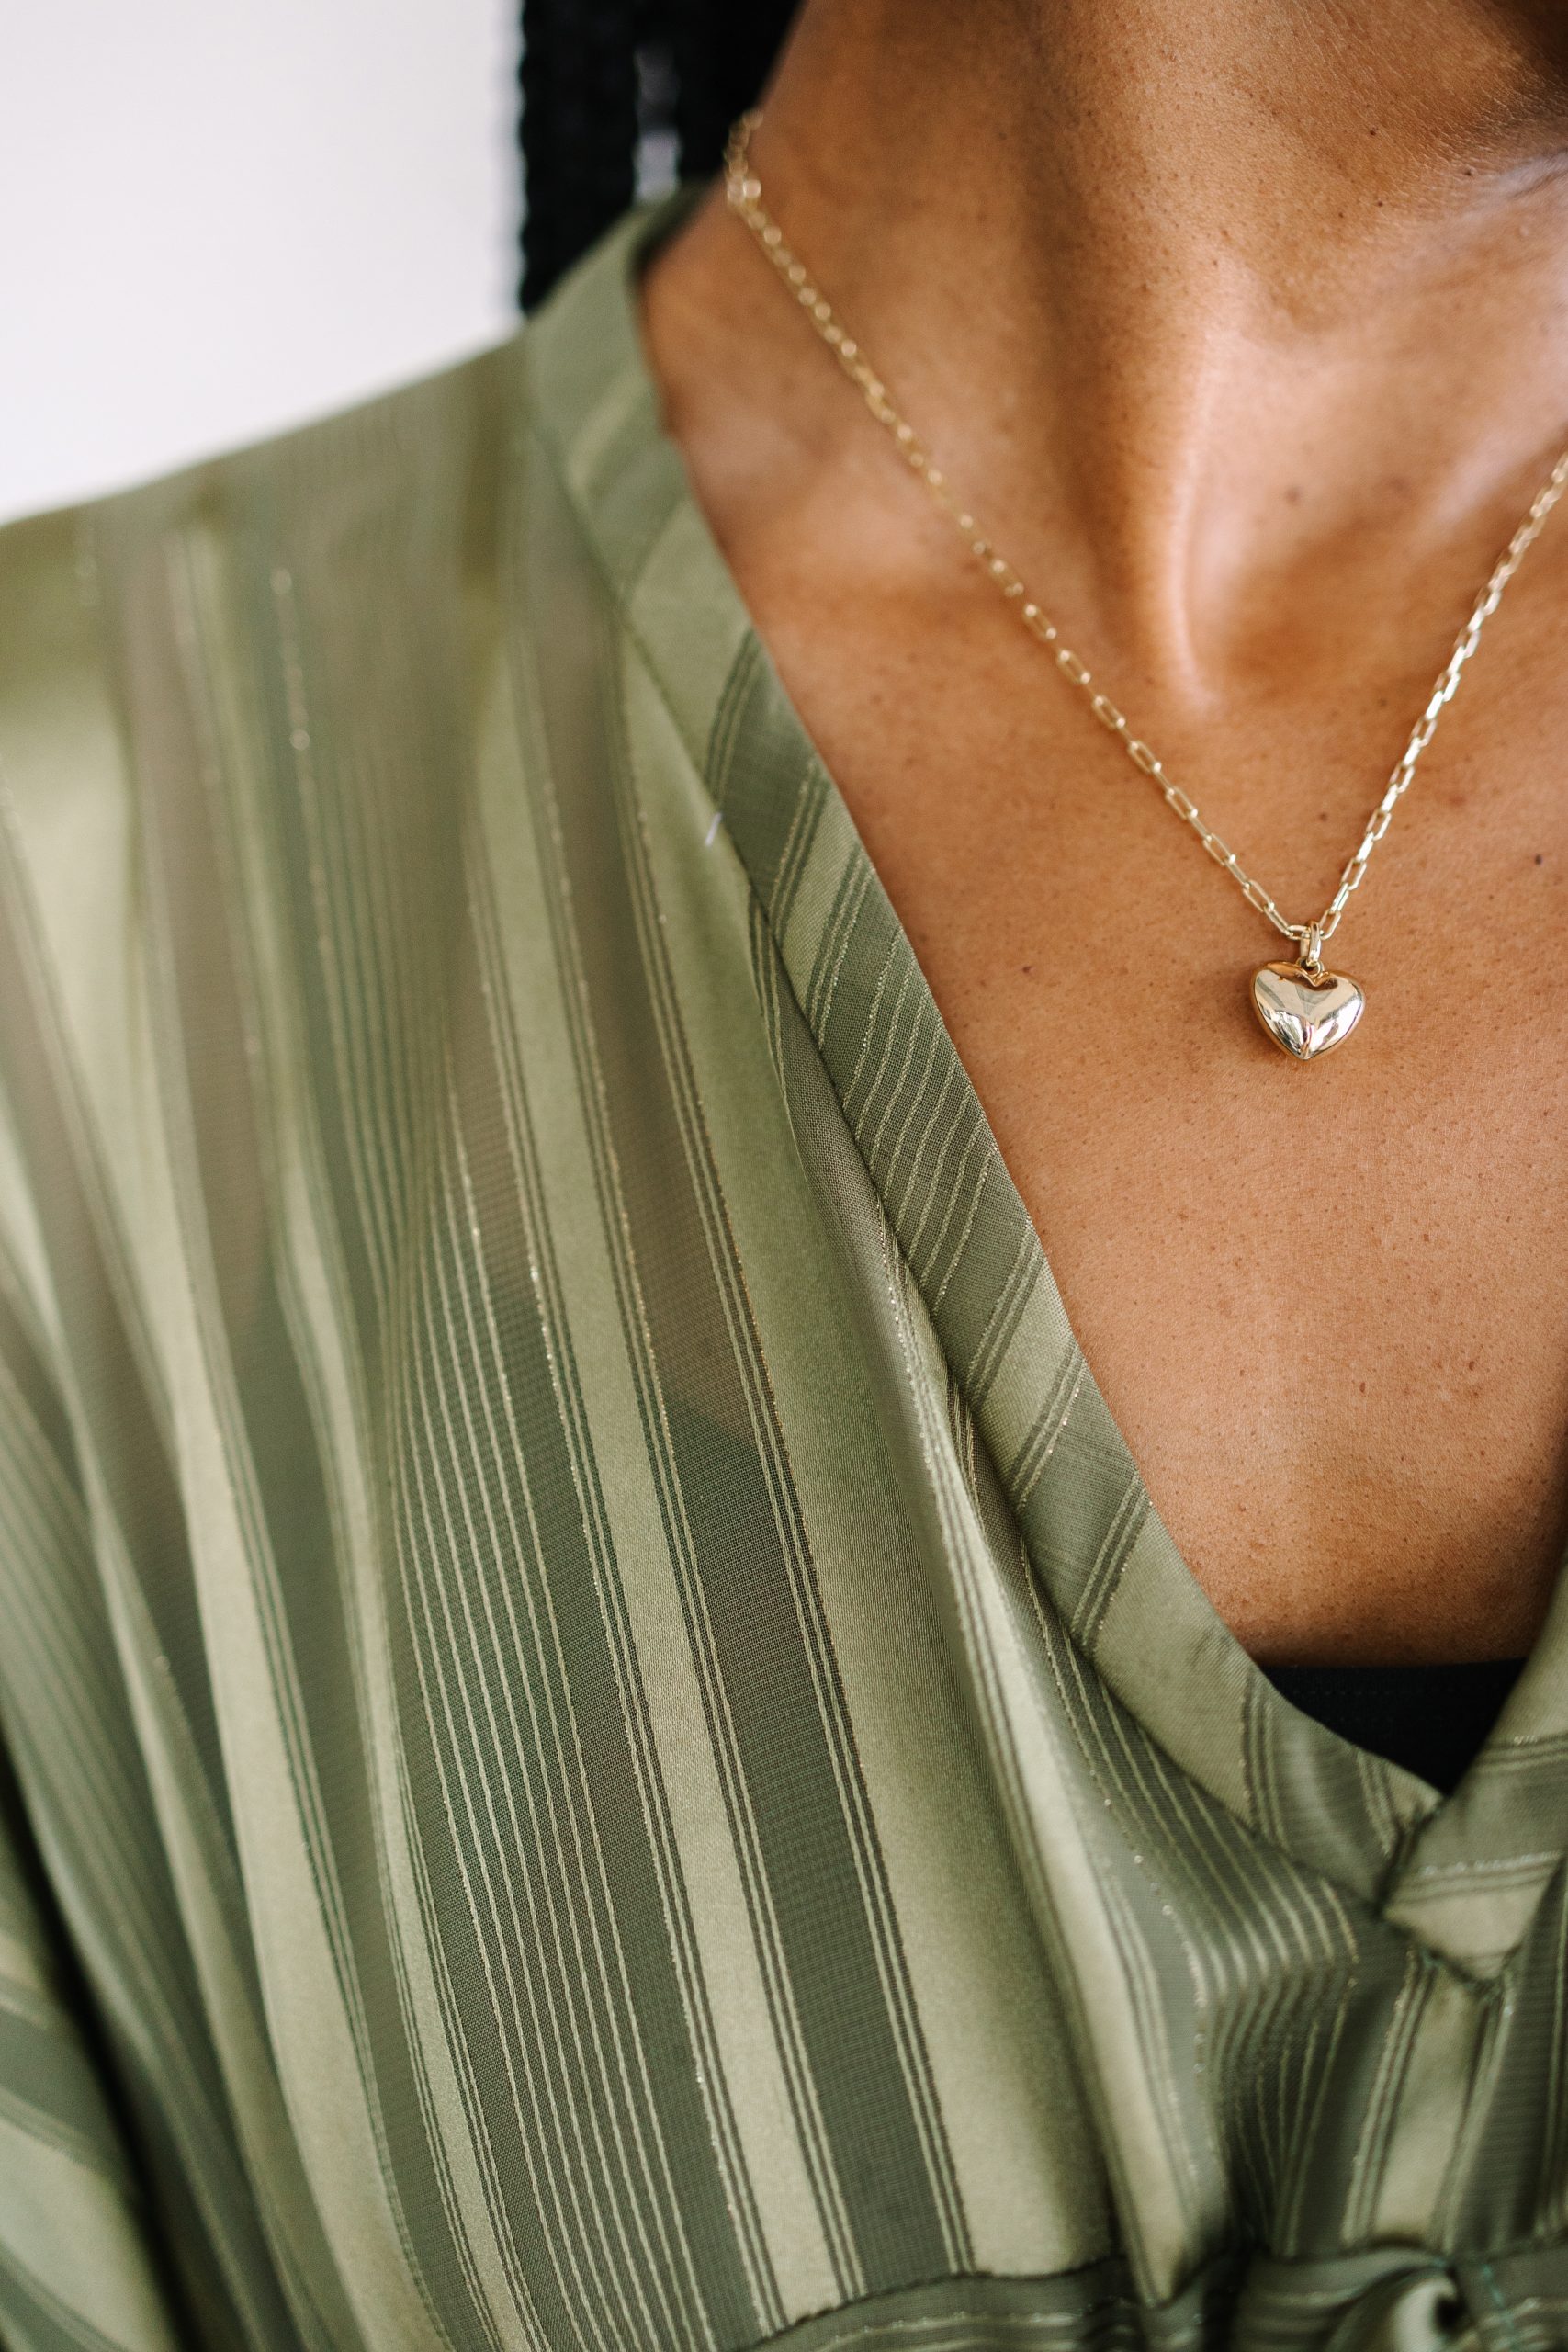
As this caftan is cut all-in-one, prints with one-way directional patterns are not suitable for this project. For the sample model, we chose a stripe patterned polyester chiffon, 60” wide, 85 g/m², in sage green.

FINISHING TECHNIQUES:
As previously mentioned, the caftan is a seamless, waist-less item of clothing that pulls over the head. There is little in the way of construction but raw cut edges must be finished.
Once the fabric is cut, it frays easily. Raw edges need to be bound or turned to stop the fabric from fraying and to neaten the edge. The primary finishing methods used for the caftan are double-turned handkerchief hems for straight edges and French binding for curved edges.
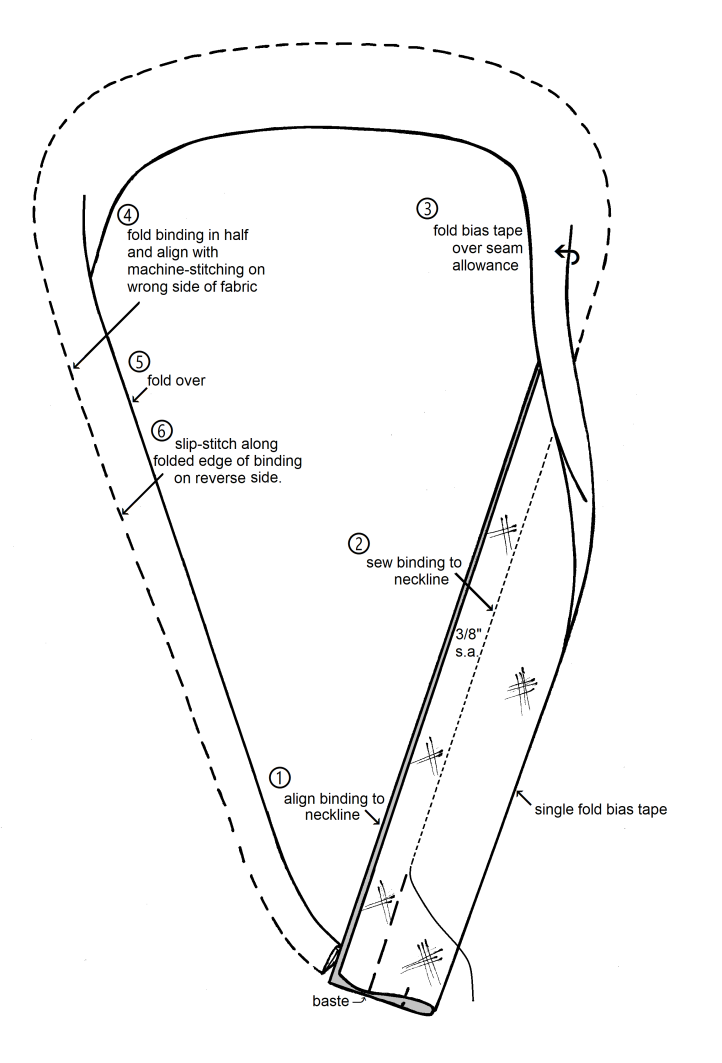
- French binding: French binding employs a single-fold bias-cut binding to enclose, protect, and finish raw edges of curves without applied facings and is ideal for light-weight fabrics. The binding is usually cut from the same fashion fabric as the garment and is cut on the bias so that it can be shaped to fit curves smoothly. The bias binding is cut wider than the finished seam so that the raw edges of the binding can be folded in half to produce a neat folded-edge trim and the raw edge side can be encased inside within the seam. It is applied to the garment in one pass under the machine-foot, then finished by hand with a small slip-stitch on the reverse side of the cloth.On concave curves such as the neckline of the caftan, the French binding is eased to the stitching line and produces a neatly trimmed neckline that lies flat. Note: This sample is sewn with the finished neckline of 26 inches and 3/8” wide but you may make it narrower, if desired.
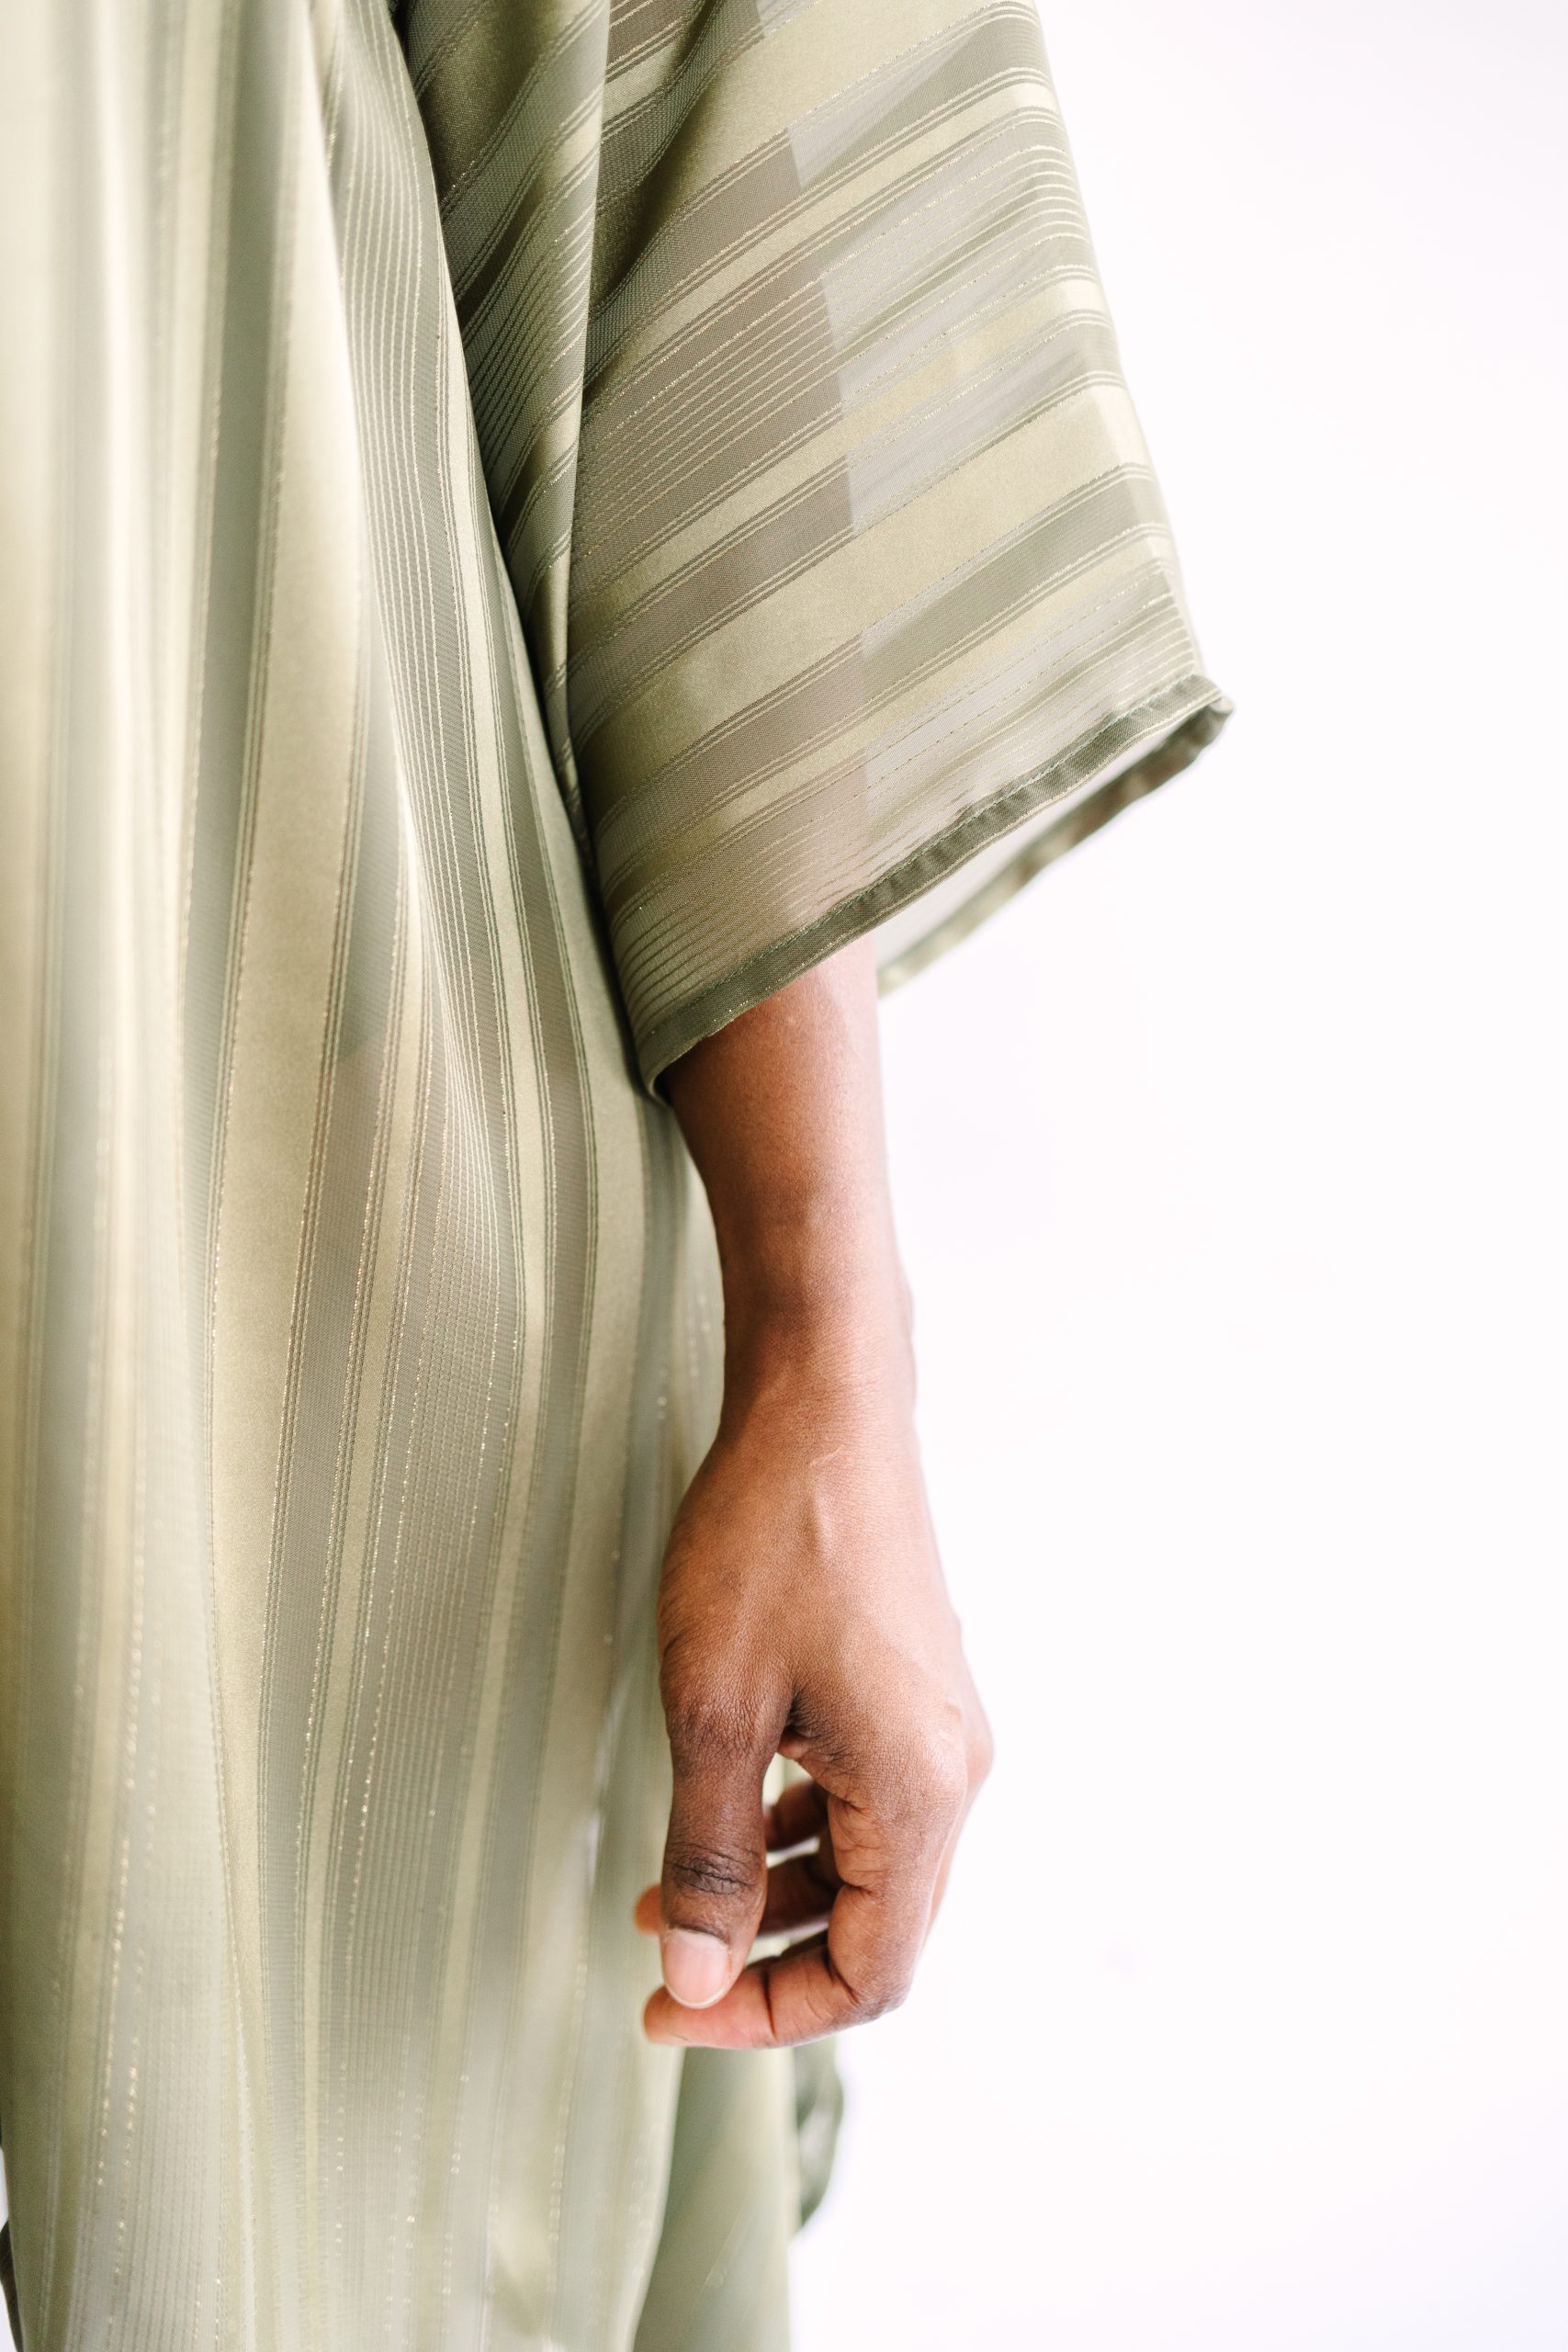
- Double-Turned Handkerchief Hems: The handkerchief hem is part of a group of finishing techniques known as double-turned hems. It is suitable for thin fabrics that are semi-transparent and fray easily. It is made in 2 passes under the foot and forms a narrow self-finish edge.A generous seam allowance is folded to the wrong side of the fabric and edge-stitched using the inside of the machine foot as a guide. Once trimmed, the folded edge is turned once more and stitched. The final turn can range from 1/8” to 1/2” wide depending on the desired final appearance and type of fabric used. Note: This sample is sewn with a finished hem that is 3/8” wide and the seam allowance is 1” wide to reduce fraying while handling. It is folded manually for stitching.
THE CAFTAN PATTERN:
The beauty of the caftan lies in its simplicity to cut and sew. Here is a fun and easy way to draft your own customized pattern based on your height.
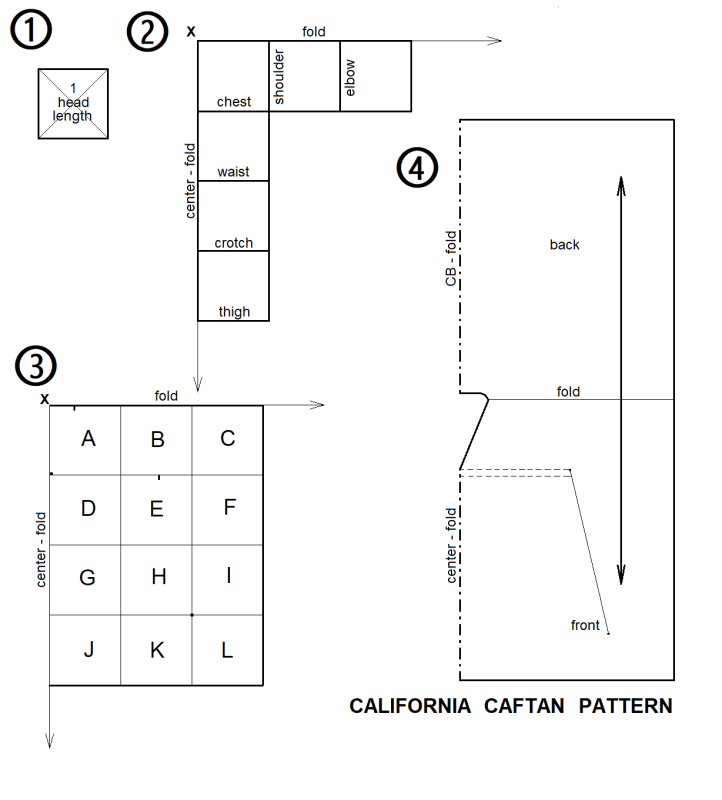
For centuries, artists, sculptors and painters have rendered the “perfect” human figure as 8-heads tall. The length of one head serves as a basic unit of measurement. As this caftan is very loose in fit, we can use this unique drafting-by-height method to draw a proportionately correct cutting pattern even though most bodies aren’t the ideal and all come in different shapes and sizes.
- Measure Your Height: To begin, measure your body height. Tape a sheet of paper to the wall at head level. Stand upright with your back against the wall and your heels touching the baseboard. Have someone assist you and mark the top of the head (scalp), perpendicular to the wall, on the paper. Next, turn to face the wall and look straight ahead. Mark the level at where your chin is perpendicular to the wall, on the paper. Now, measure the distance between the two marks on the paper. This is the head length, our unit of measure used to draw the pattern. Note: For the sample model, the caftan pattern was drafted for a person 5’7” (68”) tall with a medium build. One-head length equal 8 3/4”.

- Draw The Pattern Grid:
- Draw a square with equal sides and 90⁰ corners. Each side is equal to 1 head length. Measure diagonally from corner to corner to confirm that it is a perfect square. Both distances should be the same length. Tip: Glue the drawing of the square to some card stock (an empty cereal box will do) and cut out to make it easier to trace its shape onto the drafting paper.
- On a sheet of pattern paper, draw a straight vertical line parallel to the finished edge of the paper, as the “centerline”. This will be your vertical control. Along the top of the paper, draw a straight horizontal line perpendicular to the centerline at a right angle (90⁰) and label it, “foldline”. This is the horizontal control. All following lines are drawn parallel to the control lines unless stated otherwise. Label the corner where the two control lines intersect one another, as X.
- Place the template of the square at point X so that one side of the square rests on both the vertical and horizontal control lines and trace around the square (1 head unit).
- Create a grid pattern by extending the rows and columns of squares on the paper to produce the outline of the garment. Stack 3 units across and 4 units down from X. In total, twelve squares make up one-quarter of the pattern. To aid in moving about the grid, label squares consecutively, A,B,C, as shown in the diagram below.
DRAWING THE PATTERN:
The design elements of the caftan consists of:
- a deep V neckline
- a tie-drawn empire waist casing
- three-quarter length sleeve opening
- A-line side seams within the torso
- open leg slits
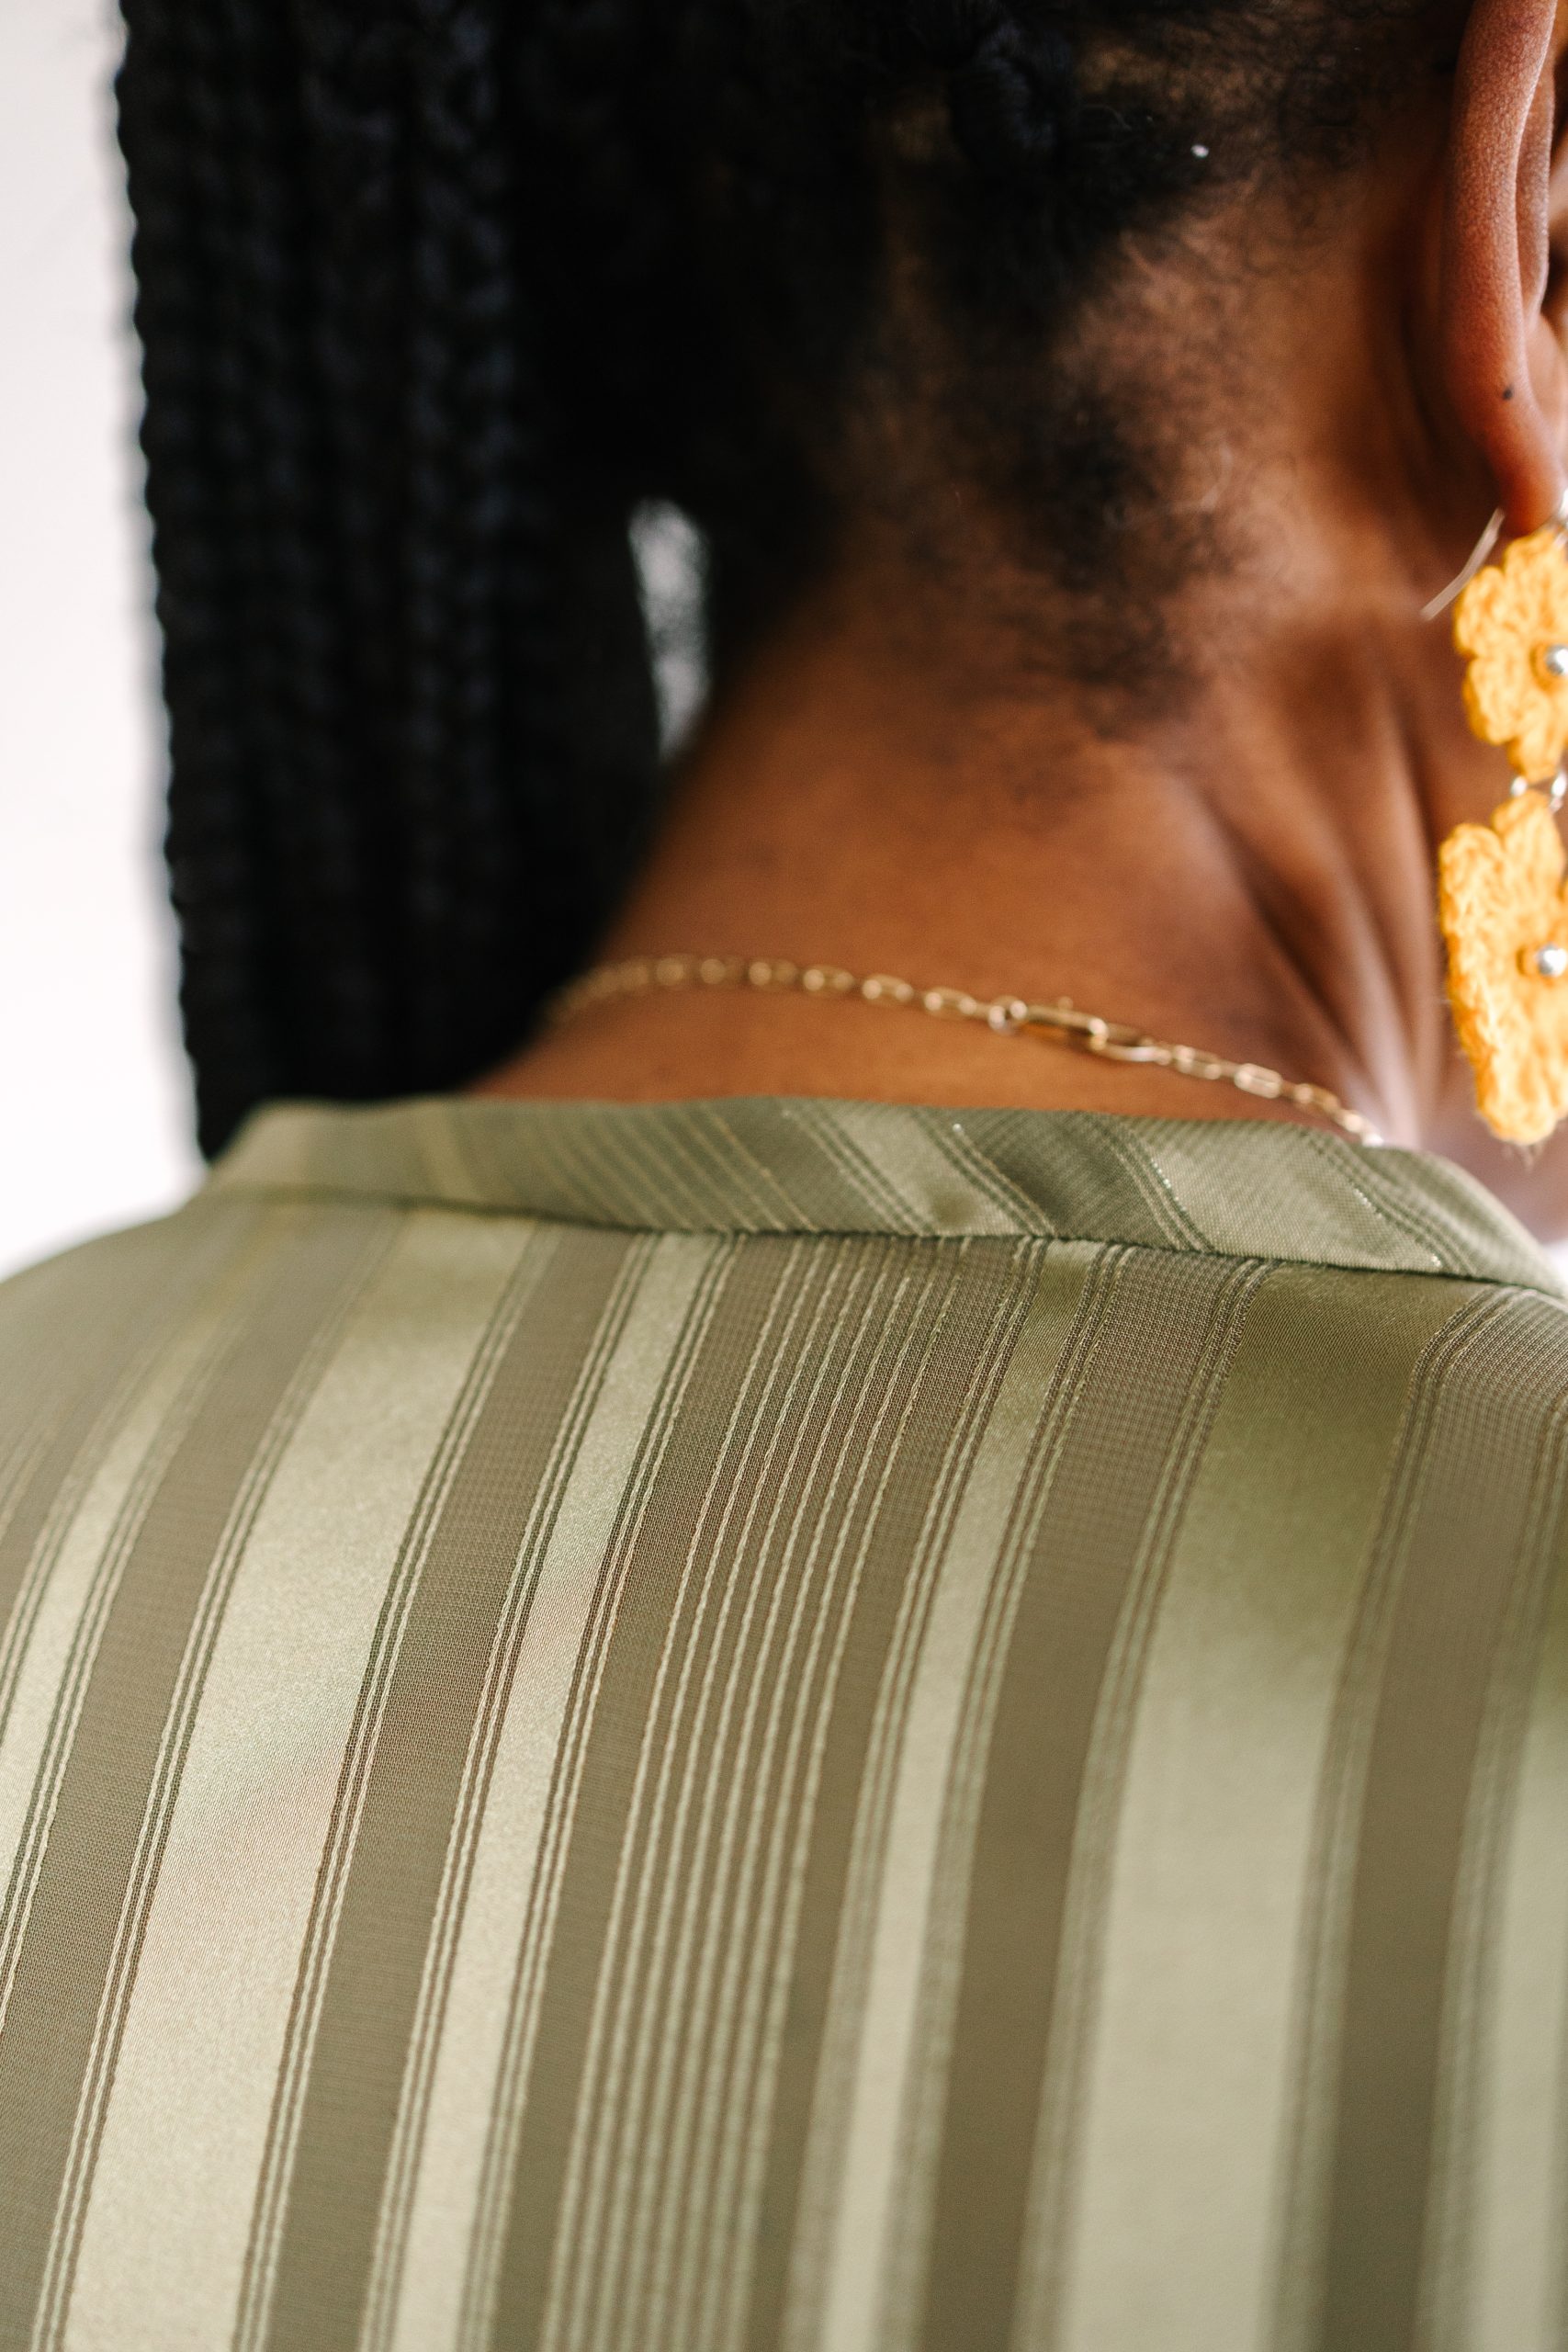
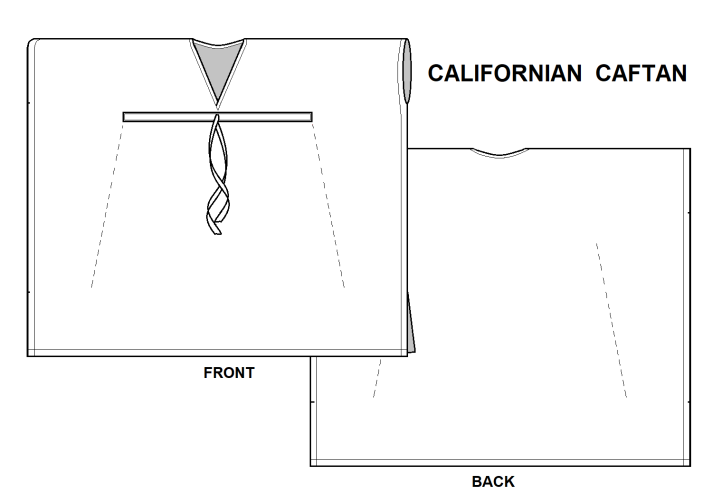
- Draw the Neckline: In square A, draw the neckline. The grid represents half of the front or one-quarter of the whole pattern, so draw only half of the neckline. The V-shape of the neckline is located at the lower left corner of square A and extends diagonally to approximately 3” across from X at the top edge of square A. For the back neckline, draw a straight line 1” below X and parallel to the horizontal control line. Shape the neck with a gentle curve coming off the straight line and connecting to the V-shape line of the front at the high shoulder point. Measure the shape of the drawn neckline, front and back, and double this amount. The neckline measurement must be larger than the circumference of the head for the garment to be put on over the head. If needed, increase the size of the neckline.
- Draw the Placement of the Casing: In square D and E, draw the placement of the draw-tie casing. The top of the casing is located about 2” below squares A and B and run parallel to the top side of squares D and E. Make the casing’s length equal to half the width of square E, from the centerline. The casing will fold from the placement line downward towards the waistline. If desired, the placement line may be lowered within squares D and E.
- Mark the Sleeve Opening: In square C, locate half of the sleeve opening and indicate with a notch at the side seam. The sleeve opening is the same front and back and produces a three-quarter length “sleeve” effect. The sleeve notch is located at the lower right corner of square C.
- Mark the Side Slits: In square L, locate the side leg slit opening and indicate it with a notch at the side seam. The side slits are the same length front and back and are left open. The top of the side slit is located at the top right corner of square L.
- Draw the Placement of the A-line: In squares E and H, draw the placement of the A-line. Once the fabric is folded in half along the foldline to produce the front and back of the garment and the side seams are sewn together, a secondary seam connects the front and back together to add a bit of body shaping to the voluminous shape of the caftan. Draw a straight slanted line (A-line) from the ends of the tie casing down to the top left corner of square L as a guide line. The fit should remain loose but sit closer to the body. Adjust this A-line if needed.
- Complete the Pattern: The grid makes up one quarter of the cutting pattern for the caftan which includes seam allowance. You may add additional seam allowance to the sides and hem allowances of the pattern to accommodate the type of fabric selected for the caftan. Draw a straight grainline through the length of the pattern parallel to the center line.
MARKING & CUTTING:
The pleasure of sewing with diaphanous fabrics is how it gently caresses the body and drapes elegantly over its contours. It is this same trait that makes this type of fabric a challenge to cut and sew. When handled, it collapses under its own weight.
For best results, it is key that the fabric is laid out flat as a single-ply on the work surface. Those fortunate to have a dedicated sewing room can lay out the whole pattern at one time on a cutting table and anchor each corner of the fabric with pattern weights. A rotary cutter and safety ruler will make quick work of marking and cutting the fabric without picking it up as you can walk around the table to reach all sides.
Most of us do not have a sewing room and rely on a spare guest room or dining-room table to do our projects. In this case, you will need a large cutting mat or cardboard cutting board to anchor the corners of the fabric.
You will mark out the pattern onto the fabric by working one quadrant of the pattern at a time. The grid equal one quadrant. It can then be mirrored, rotating horizontally over the centerline, to create the left and right side of the front; then mirrored again, rotating vertically over the foldline, to form the right and left sides of the back. As you mark out each quadrant, X is a fixed point. As not to disturb the flat fabric on the work surface, use a loose chalk dispenser to mark out lines, then follow through with thread-basting before moving onto the next quadrant. Each time you work on a new quadrant, you will need to re-position the fabric flat onto the work surface and keep it on grain. Lay out the grid on point X to start in each quadrant.
- Prepare the Fabric: Prior to marking and cutting out the pattern on the fabric, ensure that the cloth is on straight of grain and squared at right angles. To do this, clip into the selvage at one corner of the cloth and gently draw out a cross-wise thread across the material to the opposite selvedge. A visible channel will be left on the surface of the cloth. Cut along this line using pinking shears to prevent fraying. The fabric’s cut end is now on-grain and perpendicular to the selvedge at 90⁰. Repeat this procedure on the remaining cut edge. Tip: Once the fabric is cut, it is difficult to recognize the face side of the cloth from its wrong side. Put a small piece of low-tack tape on the back of the cloth to indicate the wrong side before cutting the fabric. Using a running stitch, thread-mark a horizontal basting line across the squared fabric to represent the foldline of the pattern and a vertical basting line to indicate the center line of the pattern. The centerline is located in the middle of the cloth, parallel to the selvedges. The foldline is located parallel to the cut edge of the fabric and equal the vertical length of the centerline from top to bottom. The point where the two basted lines intersect is the location of point X.
- Marking Out the Pattern: Note: The pattern is traced out on a single-ply of fabric, face up. You will need twice the length of the centerline in fabric yardage to make this caftan.
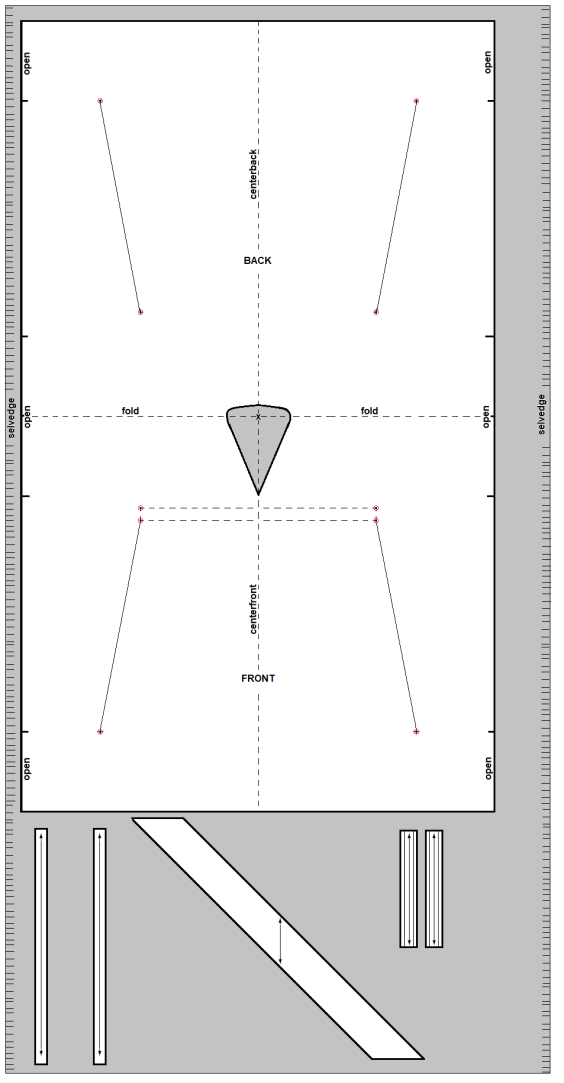
- To mark out the front of the caftan, align point X on the pattern where the two thread-markings intersect so that the centerline and the foldline of the pattern rest on the thread-marking. Chalk out the outline of the pattern and include all notches and drill points.
- Flip the pattern vertically on the centerline to mirror the opposite front. Align point X on the pattern where the two thread-markings intersect so that the centerline and the foldline of the pattern rest on the thread-marking. Chalk out the outline of the pattern and include all notches and drill points.
- Chalk out the V-shape of the neckline on either side of the centerline on the front.
- To mark out the back of the caftan, turn the pattern upside-down and align point X on the pattern where the two thread-markings intersect so that the centerline and the foldline of the pattern rest on the thread-marking. Chalk out the outline of the pattern and include all notches.
- Flip the pattern vertically on the centerline to mirror the opposite back. Align point X on the pattern where the two thread-markings intersect so that the centerline and the foldline of the pattern rest on the thread-marking. Chalk out the outline of the pattern and include all notches.
- Chalk out the shape of the back neckline on both sides of the centerline on the back of the caftan.
- Cut out the caftan with a rotary cutter and safety ruler. Pink the edges to reduce fraying. Thread-baste the outline of the neckline but do not cut out.
- Cutting Bias Binding, Ties and Tie Casings:
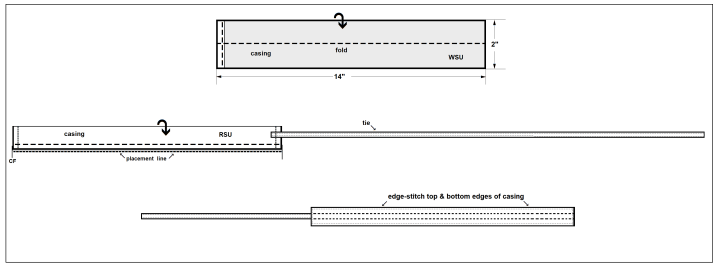
- Mark out and cut 2 ties and 2 tie casings from the remaining fabric on straight of grain. For the tie, the fabric strip is 1 1/2” wide and 3 squares long. For the casing, the fabric strip is 2” wide, by 1 1/2 squares + 2 seam allowances long.
- For the French binding, mark out and cut 1 long strip of cloth from the remaining fabric on bias grain (45⁰). The binding is 6 times the finish width (3/8” wide) and its length is about 6 inches longer than the neckline measurement.
Sewing Instructions:
MAKING THE FRENCH BINDING:
- With wrong sides together, fold the bias strip in half lengthwise and align the raw edges together. Do not stretch or ease the bias, and gently press the folded edge. Turn in ends of the trim for a neat finish.
APPLYING THE FRENCH BINDING TO NECKLINE:
- With right sides together, pin/baste the open edge of the binding along the thread-markings of the neckline. Keep the binding relaxed and do not stretch or distort the bias. Hold the bias binding short when stitching a concave curve and ease it when stitching a convex curve.
- Stitch through all the layers, allowing the seam allowance to be the same width as the finished trim (3/8”) and follow the contour of the neckline.
- Cut away the fabric on the inside of the neckline following the edge of the binding to make the opening (the finished seam is 3/8” in this case). Grade the seam allowance to reduce bulk as there are 3 layers of fabric, soon to become 5 layers.
- Turn the folded edge of the binding over the seam allowance and align the folded edge of the binding to the machine-stitching to stitch the raw edges of the neckline. Pin/baste in place. Finish ends of the binding by butt ends together or overlapping to complete the neckline.
- Sew along the folded edge of the binding by hand to complete the neckline on the reverse side of the cloth.
MAKE TIES AND TIE CASING:
- The ties are cut from straight strips of fabric, generally with the lengthwise grain. The tie is cut in one piece, with a fold at the upper edge and sewn closed at the lower edge. It will not stretch when drawn and tied. Make 2 ties that are twice as long as its casing.
- The tie casings are cut from straight strips of fabric that are slightly wider than the ties and with the lengthwise grain. The short ends of the casings are turned under and stitched. They butt together at the center-front beneath the neckline. The long sides of the casings are turned down once aligned on the placement line. Make 2 tie casings.
APPLY THE TIES AND TIE CASINGS TO THE FRONT:
- With right sides together, attach a tie to the tie casing and sew in place. Mirror this step for the remaining tie and casing.
- Align the open side of the tie casings on the placement line on the front of the caftan and pin/baste together. Butt the casings together at center line of the caftan and have the ties extend outward from the ends of the casings. Sew the open edge of the casings and flip down. Sew along the folded edge of the casing.
- Feed the ties through the channel of the casing and out at the center front opening. Sew the tie end of the casings closed by machine or by hand.
MAKE THE HANDKERCHIEF HEM:
- With the garment wrong side out, place the folded seam allowance, so that the right side of the cloth is face up under the foot. Fold in the raw edge at the desired amount and edge-stitch along the fold using the inside of the machine foot as a guide.
- With wrong side up, anchor your work and use small appliqué scissors to trim close to the edge-stitching. Trim as closely as possible to the machine-stitching.
SEW THE SIDE SEAMS:
- With right sides together, double up the layers of fabric to form the front and back of the caftan. Fold the fabric along the horizontal thread-basting.
- Align the side seams together and match sleeve opening notches and leg slit notches. Pin/baste the side seams together between the notches. Check to see that front and back hemlines meet each other.
- Sew between the notches and overlap stitches at the beginning and end of the seam. Do not back-tack.
- Fold the hemmed edge to the wrong side half the amount equal to the finished hem width, then fold again the same amount. Stitch along the folded edge from the beginning to the end. Do not back-tack.
- Remove all basting threads and press lightly with a low temperature iron.
HEM THE BOTTOM OF THE CAFTAN:
- Apply a double-turned handkerchief hem to the front and back of the caftan. The hem width is 3/8”. Gently press the hemlines.
APPLY THE A-LINE SEAMS WITHIN THE TORSO:
- Lay out the caftan flat on the work surface with fronts facing up. Super-impose the front and back of the caftan one on top of another. With the garment lying flat, baste the A-line sewing line from the end of the tie casing to the level of the open leg slit on both sides of the caftan. Note: At this point, try on the caftan to test for roominess and fit. Adjust as necessary.
- Machine-stitch the front to the back of the caftan together on both sides following the thread-basting. Remove the basting and gently press the garment.