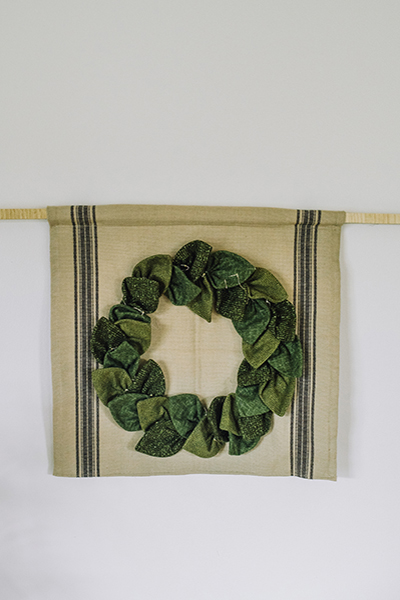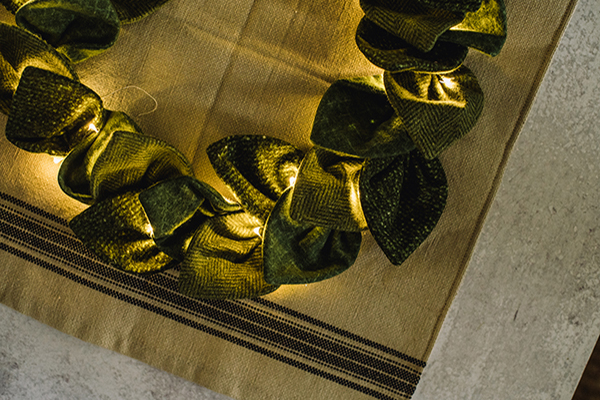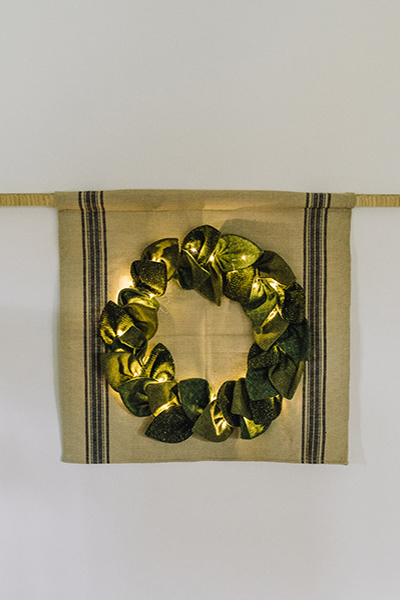
Illuminate dark winter nights with a gorgeous wall hanging that will fill your living space with a warm and inviting glow. This holiday sewing pattern shows you how to create a soft 3D wreath made with hand gathered flannel leaves. Lit with twinkling fairy lights, this sewn wall hanging combines machine and hand stitching to create a beautiful fabric wreath that can be displayed year-round. Place this wreath wall hanging above your mantel to give your home a rustic chic finish.
Materials:
- 1/2 yard flannel (project uses fat quarters of 3 coordinating flannels)
- 1/3 yard toweling (16-18” width)
- Fat quarter or 1/2 yard quilters cotton backing
- 1/2 yard fusible fleece
- Fairy lights – 6-7 feet (I used 2-3 ft. fairy lights)
- Rivet
- Thread to match
- Heavy weight thread – upholstery or button thread
Tools:
- Hand sewing needle
- Fabric marking tool
- Scissors
- Rivet setter
- Sewing machine
- Iron
Designer Notes:
- Create a durable easy-to-trace template from a Dollar Store flexible cutting mat or template plastic.
- Use a seam gauge like the Clover 5 in 1 Seam Gauge to create the perfect circle on your toweling.
Instructions:
WREATH LEAF PREP:
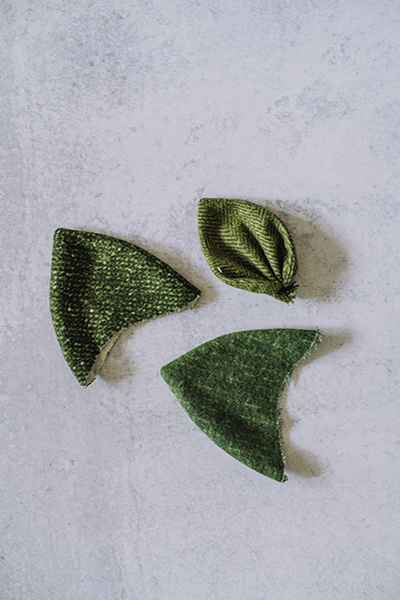
- Fold flannel in half with right sides facing. Trace pattern onto wrong side of fabric using fabric marking tool. Space each about 1/2″ apart and fit in as many as you can. Pin fabric together, avoiding drawn lines.
- Sew along 2 matching curved edges, pivoting at point. Back stitch at start and stop.
- Trim leaves out of fabric, leaving 1/4″ seam allowance around sewn edges and on the concave curve.
- Set seam with iron and turn leaves right side out, pushing out edges and points completely. Finger press edges.
- Thread needle with heavy weight thread. Baste open edge of leaf. Pull thread to gather up edge of leaf and tie thread ends in double knot to secure ends together. Repeat with remaining leaves.
BACKING PREP:
- Measure distance between hemmed edges of toweling. Cut square from fleece 1/2″ smaller than measurement. Cut square of backing fabric width of toweling + 1″.
- Place fusible fleece adhesive side towards back of toweling, centered between seams 1″ from cut edge. Press in place as directed by manufacturer.
- Add a few quilted lines along toweling design stripes the length of the toweling.
- Press top raw edge down 1 1/4″ (TOP). Press bottom raw edge up 1/2″ (BOTTOM).
- Fold backing fabric 1/2″ on each side and press.
- Create battery pack pocket. Cut 3″ x 7″. Fold in half to create 3″ x 3.5″, right sides facing. Sew along 3 open sides, leaving an opening on one side to turn. Turn right side out and press.
- Place on prepared backing fabric, 1″ from bottom and left side corner with folded edge towards top of fabric. Stitch in place 1/8″ from edges on 3 sides, leaving folded edge open.
- Pin backing to back of toweling unit 1″ from top and centered side to side. Stitch 1/8″ from backing edge around all 4 sides.
FINISHING AND ASSEMBLY:
- Draw circle on center front of toweling, about 7 1/2″ in diameter.
- Mark a dot 3/4″ from right bottom side of circle, making sure this isn’t directly over back pocket but close by. Install rivet as directed by manufacturer.
- Place leaves around drawn circle to establish even spacing, alternating direction of leaves to create a full wreath.
- Hand sew leaves in place at base of leaf.
- Feed fairy light strand through eyelet hole, and weave between leaves for desired lighting coverage, stitching in place to secure. This is a good time to add stability to leaf positions as well.
- Tuck battery pack of packs into pocket. Hang with a ribbon.