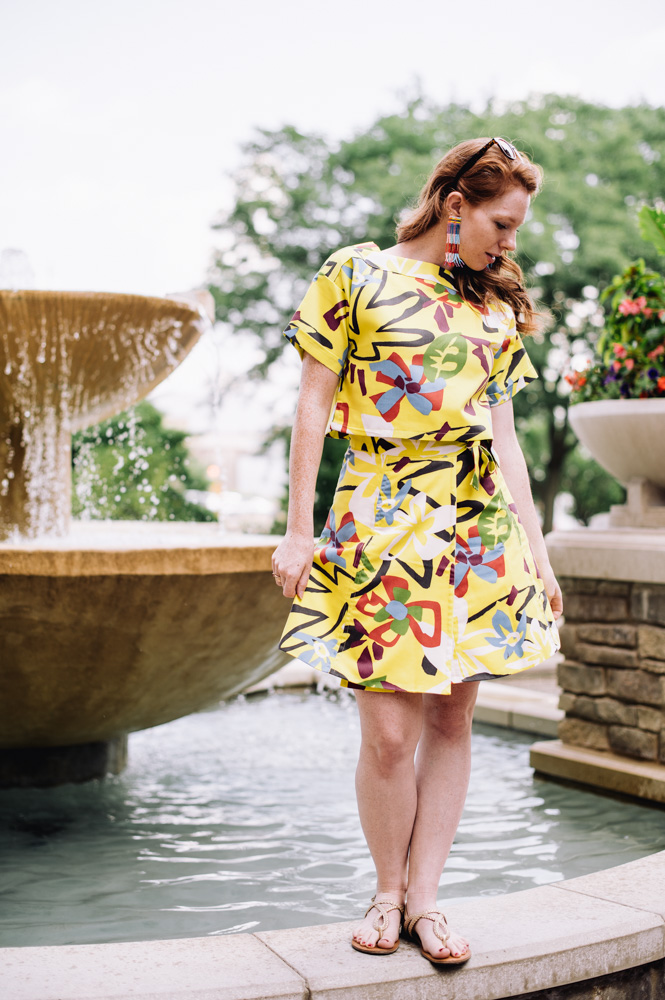
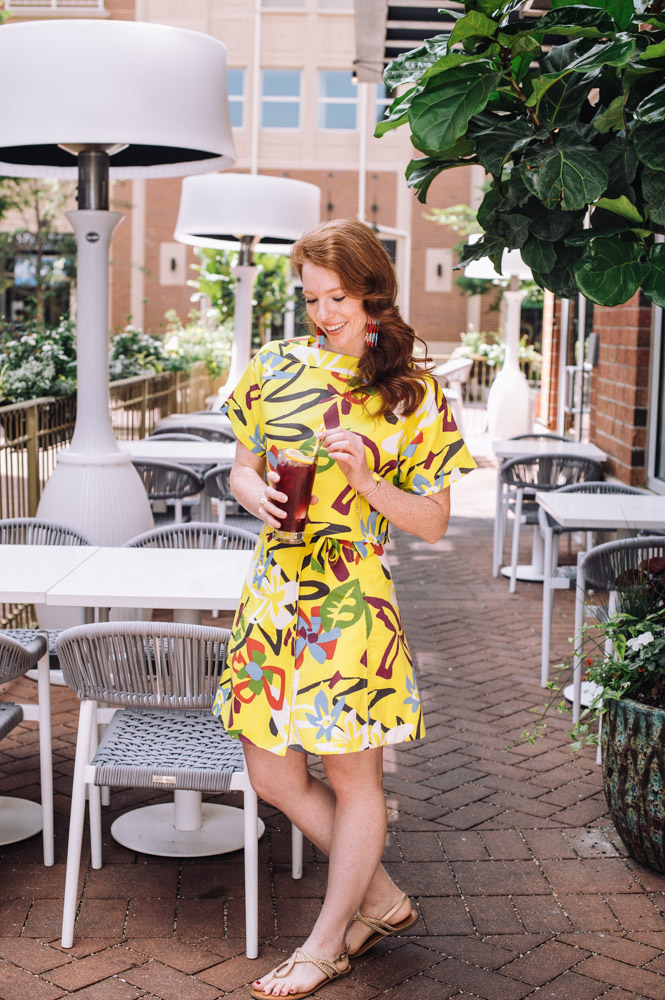
SUMMER PROJECT 2 – REVERSIBLE WRAP-ROUND 7-GORE SKIRT by Don Morin
A simple wrap-round skirt that is quick and easy to make. This garment utilizes a no-pattern-required approach and the design revolves around the width of the fabric. The “pattern” pieces are marked directly onto the cloth.
The reversible aspect of this skirt design creates a 2-in-1 garment and allows it to be self-lined, so there is no need to finish any raw edges. The wrap-round feature allows for a forgiving fit around the waist. Make it as long or as short in length as you wish with as many gore panels as you wish.
Cut & Sew: 3 hours
Skill: Easy
Measurements Needed: waist circumference, vertical distance from waist to knee.
Yardage: 1 yd. – 1¼ yards of summer weight woven fabric, 45” (114cm) wide.
Selecting Fabrics For This Project
Only fabrics without nap (2-way surface) and prints without directional motifs are suitable for this project due to the flipping of gore panels. Obvious diagonal prints are not suitable.No allowance has been made for matching of fabric prints.
Solid colors, mini prints, symmetrical shapes, and abstract patterns are acceptable as cutting does not affect the finished appearance. Due to the reversible nature of this skirt project, contrasting fabrics should be compatible in weight and fiber content for laundering. The simplest choice is to make the reversible side in a solid color to match with one of the colors found in the other fabric’s print design.
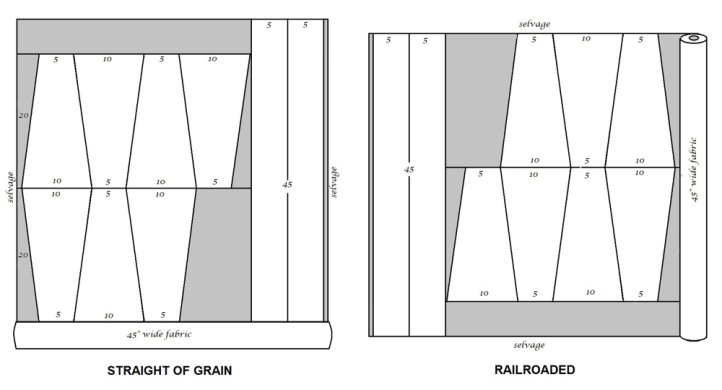
Most fashion fabrics are available in either 45” or 60” widths. Depending on skirt lengths and waist sizes, yardage may vary. For 45” wide fabrics, small to medium sizes will need 2 skirt lengths of cloth while large to extra-large sizes will require 3 skirt lengths.
Plain fabrics and those with symmetrical patterns (such as dots or squares) can be applied both conventionally or railroaded, because it doesn’t matter which way the pattern runs. The term “railroaded” means the design is created from selvage to selvage. Many border prints are railroaded fabrics. The selvage is the finished edge of the cloth usually referred to as straight-of-grain. If your selection allows for it, cut this project on the cross-grain as it is more budget-friendly.
Square Up Fabric For This Project
It is important to square your fabric before beginning any sewing project but especially so here as no pattern is required for this skirt style. The cutting lines are marked directly onto the fabric. This process will ensure your skirt you intend to make is set up for success from the beginning.
Keep in mind the fiber content of the fabric. Preshrink and true up the grain of your fabric selections, if necessary.
Garment Components
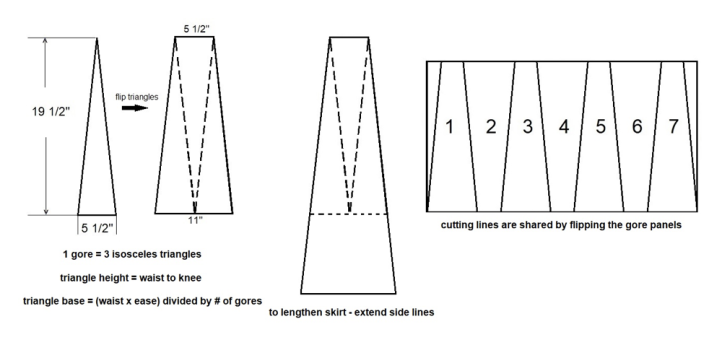
This skirt consists of a waistband with extended sash ties and a multiple of gore panels. Each gore panel is based upon a combination of three isosceles triangles. An isosceles triangle is a triangle that has two sides of equal length. You may have as many gores as you wish. I like to follow the “Rule of Thirds” and use an odd number of panels as it is more pleasing to the eye, however an even number of panels will work too and will provide a balanced symmetry to the garment. Unit of measure is imperial (inches) followed by metric in brackets. The ease amount (including seam allowance) is 1.5 times.
Measure your waist. eg. For misses size 4, waist equals 26” (66cm).
Measure waist-to-knee length. eg. For an average height 5’6” (168cm), waist to knee = 19¾” (50 cm).
Multiply waist circumference by ease amount. eg. 26” x 1.5 = 39” (66cm x 1.5 = 99cm).
Determine how many panels in the skirt. It can be an odd (3,5,7,…) or even number (4,6,8,…). eg. 7
Divide this amount by the number of panels desired. eg. 39” / 7 = 5½” (99cm / 7 = 14 cm).
This number represents the base of the triangle.
The height of the triangle equals the desired skirt length (waist-to-knee).
For 1 gore panel use 3 isosceles triangles. eg. waist = 5½”, base = 11”, length = 19½
Mark out panels based upon the number of gores, alternatively flipping the triangles in succession.
eg. for a 7-gore skirt, you need 21 isosceles triangles across the width of 60” (152cm) wide fabric.
Repeat for contrasting fabric (reversible).
For the waistband, reserve a 10” strip; cut 2x – 5” x 45” strips of cloth (12.5cm x 114cm).
Finished width of waistband = 1.5” (4cm).
Finished length of waistband = left tie + (waist x ease) + right tie = 32” + 36” + 18” = 86 ” (218.5cm).
Right hand tie length = 18” (45.75 cm).
Left hand tie = 1/2 waist + right tie length = 18” + 18” = 36” (91.5cm).
MARKING & CUTTING
The cutting of the skirt revolves around the width of the fashion fabric. Narrow cloth will require more yardage while wider goods will need less yardage. Also the size and the length of the skirt will affect the amount of cloth needed. Larger sizes or longer skirts may require yardage of 3 skirt lengths.
To make the skirt length longer, measure downward from the base of the triangle. As the triangle gets longer its base gets wider, therefore its proportions stay the same.
eg. For a Misses size 4, an 18” long 7-gore skirt would need 1¼ yards (45”) of 45” wide fabric, whether cut on straight grain or railroaded (2 skirt lengths + 2 x 45” lengths for waistband + ties).
If using 60” wide fabric, the skirt would require ⅞ yard (31”) of fabric (1 skirt length + waistband ties)
Marker for Skirt
Before marking out the skirt piece, be certain that your fabric is squared on on straight of grain. Each corner should be a right angle (90º). Straight of grain is always parallel to the selvages of the cloth.
Mark and cut cloth in a single ply. Design ease and seam allowances are included in the calculations.
|
BODY MEASUREMENTS |
PATTERN DIMENSIONS |
||||||||||
|
USA SIZE |
WAIST |
PANEL LENGTH |
1 GORE PANEL = 3 ISOSCELES TRIANGLES |
WAIST BAND |
|||||||
|
Misses |
Girth Range |
5’3” – 5’7½” tall |
|
|
|
|
|
|
|
|
|
|
XS |
0 |
23¼” – 24” |
22” |
12½” x 25” |
9½” x 19” |
7½” x 15” |
6½” x 13” |
5½” x 11” |
4½” x 9” |
4” x 8” |
82” x 5” |
|
2 |
24½” – 25” |
22¼” |
84” x 5” |
||||||||
|
S |
4 |
25½” – 26” |
22⅜” |
13½” x 27” |
10” x 20” |
8” x 16” |
7” x 14” |
6” x 12” |
5” x 10” |
4½” x 9” |
86” x 5” |
|
6 |
26½” – 27” |
22½” |
88” x 5” |
||||||||
|
M |
8 |
27½” – 28” |
22⅝” |
14½” x 29” |
11” x 22” |
9” x 18” |
7½” x 15” |
6½” x 13” |
5½” x 11” |
5” x 10” |
90” x 5” |
|
10 |
28½” – 29” |
22⅞” |
92” x 5” |
||||||||
|
L |
12 |
29½” – 31” |
23” |
16½” x 33” |
12” x 24” |
10” x 20” |
8” x 16” |
7” x 14” |
6” x 12” |
5½” x 11” |
94” x 5” |
|
14 |
31½” – 32½” |
23¼” |
96” x 5” |
||||||||
|
XL |
16 |
33” – 34½” |
23½” |
18½” x 37” |
13½” x 27” |
11” x 22” |
9” x 18” |
7½” x 15” |
7” x 14” |
6” x 12” |
98” x 5” |
|
18 |
35” – 36½” |
23⅝” |
100” x 5” |
||||||||
|
XXL |
20 |
37” – 38” |
23¾” |
19” x 38” |
14½” x 29” |
11½” x 23” |
9½” x 19” |
8” x 16” |
7½” x 15” |
6½” x 13” |
102” x 5” |
Begin by reserving a 10” wide strip of cloth for the waistband ties. The strip should be 3.5 times the waist circumference in length. This strip will be divide into two pieces and joined. For larger waist sizes, 15” wide strip of cloth may be need and joined to obtain the finished dimensions.
Next, mark out the skirt lengths (1 skirt lengths + 2 seam allowances). For cutting on straight grain this will be squared from the selvage and for railroaded, parallel to the selvage. Most sizes will need 2 skirt lengths while larger sizes may need 3 skirt lengths. These lines are parallel to each other.
eg. Skirt length for 5’6” tall person equals 19” + 1” = 20”
Mark out the skirt panels based upon how many gores you would like for your skirt. (see chart)
The ratio for waist to hem is 1:2.
On the bottom of the skirt length line, measure out 2 times the waist and mark the point, then measure out the waist and mark that point.
On the top of the skirt length line, measure 1/2 the waist and mark the point, then measure out the waist and mark the point, then measure out 2 times the waist and mark that point.
Connect waist point to hem point with a straight line. Each panel shares the same cutting line and every second panel is reversed (upside-down). Continue marking along the skirt lengths for the number of gores needed (see fabric layout).
Repeat the procedure for the contrasting (reversible) fabric. Omit the waistband ties instructions as the waistband pieces has be accounted for in the previous instructions.
eg. For Misses size 4 with 7 gores, you need 21 isosceles triangles alternating direction.
For the waistband ties, cut 2 pieces from the reserved cloth – 5” x 45” strips of cloth (12.5cm x 114cm).
Equipment Required
- conventional sewing machine (sample made using Husquvarna -Viking Jade 2.0)
- steam iron & ironing board, point presser & ham
- sewing kit (scissors, thread snips, tailors chalk, tape measure, press-cloth)
Assembly
Cut & Sew: approx. 3 hours
Skill: easy
* All seams are enclosed. Minimal seam allowance is needed and no seam finishes required.
The Skirt Body:
1. Sew skirt panels (gores) together. Face sides together (FST) with 1/4-inch seam allowance.
2. Press seams open, flat.
3. Repeat steps 1 & 2 for contrasting (reversible) fabric.
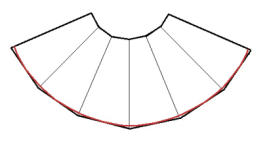
4. You will notice that the assembly has produce a gentle crescent shape with chevrons at the end of each vertical seam. Using your tape measure and tailor’s chalk, measure down the center of one of the panels from top to bottom and apply this amount to each of the seams. Mark points. Draw a smooth arc connecting the points to the center of each panel to create a smooth hemline. Trim away excess.
5. With FST, match up seams along the sweep of the hemline. Pin/baste together. Sew sweep with a 3/8- inch seam allowance. Using a tailor’s ham, press seam open, flat. Grade one of the seam allowances.
6. With FST, stitch front edges from hem to waist using 1/4-inch seam allowance. Using point presser, press seams open, flat. Trim corners diagonally.
7. Turn skirt face side out. Press front edges and hemline flat, using a press-cloth.
8. Pin/baste seams at waist, wrong sides together (WST).
9. Top-stitch along the front edges from hemline to waistline. Width of top-stitching is 3/8” from edge.
10. Top-stitch along the sweep of the hemline from front edge to front edge. Width of top-stitching is 3/8” from edge. Press skirt using your press-cloth.
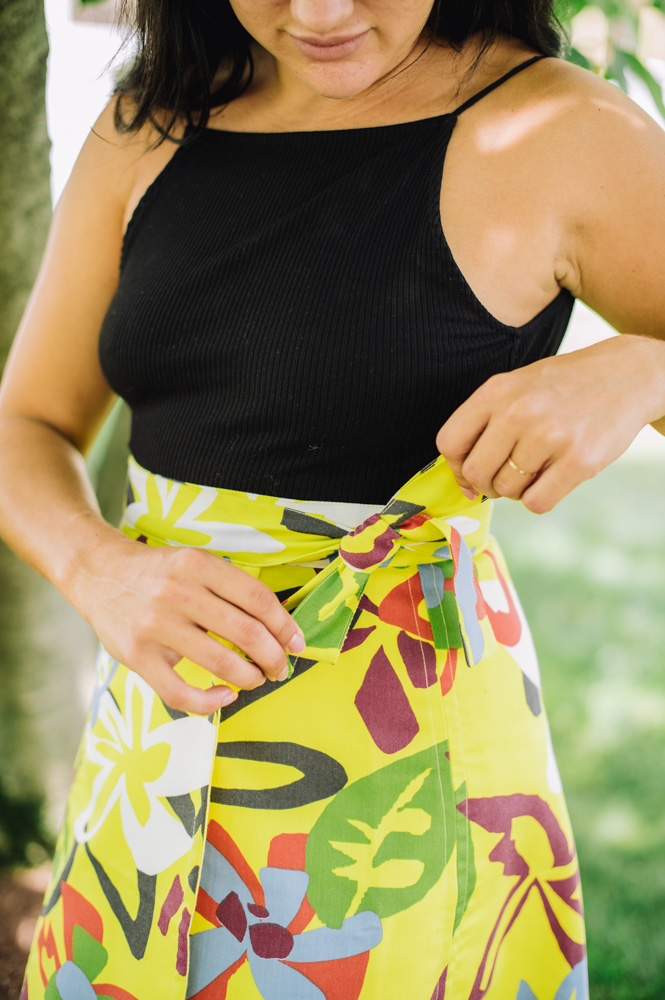
Apply the Waistband & Ties:
1. Sew the two strips of cloth together to make a continuous length for the waistband ties. Face sides together (FST) with 3/8-inch seam allowance. Press seam open, flat. The longer strip should be on your left, face up.
2. On wrong side of cloth, fold long side of waistband 1½” and press flat along foldline. Use a press-cloth to press the face side of the cloth.
3. Fold up 1½” once again and press flat along foldline.
4. The remaining width is the seam allowance. Trim it to 3/8” if necessary.
5. Fold skirt in half to locate center of skirt at waist. Mark point.
6. Match up seam of waistband strip to inside of skirt at center-point. The longer tie should be on the left front of the skirt and the short tie on the right front. Pin/baste along waist seam allowance.
Stitch in place with 3/8” seam allowance. Press seam allowance towards waistband ties. Grade one seam allowance.
7. Turn under short ends of ties ⅜” and press flat to neaten.
8. Wrap waistband over skirt’s waist seam and align folded edge to row of stitching. Pin/baste in place.
9. Edge-stitch from the waistband’s center (at join) and stitch continuously around the perimeter of the waistband and ties, encasing the raw edge between the layers, and back to the center of the skirt.
10. At the waistband’s center seam (join), make a wide buttonhole to receive the tie or alternatively, stitch an outline around the join and carefully unpick the seam.
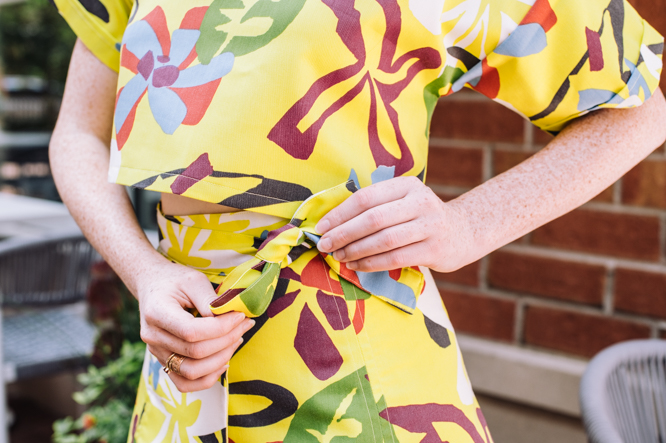
Sunny SoCal Reversible Panel Skirt
Sunny SoCal Reversible Panel Skirt
Don Morin ©2021
How do I download directions
Hi Linda! There is no downloadable PDF for this project. However, if you want to save the instructions to your computer, you can always copy and paste the instructions into a Word doc. Let us know if you have any additional questions. Have a great day! – Ashley, We Like Sewing
Very nice looking skirt!