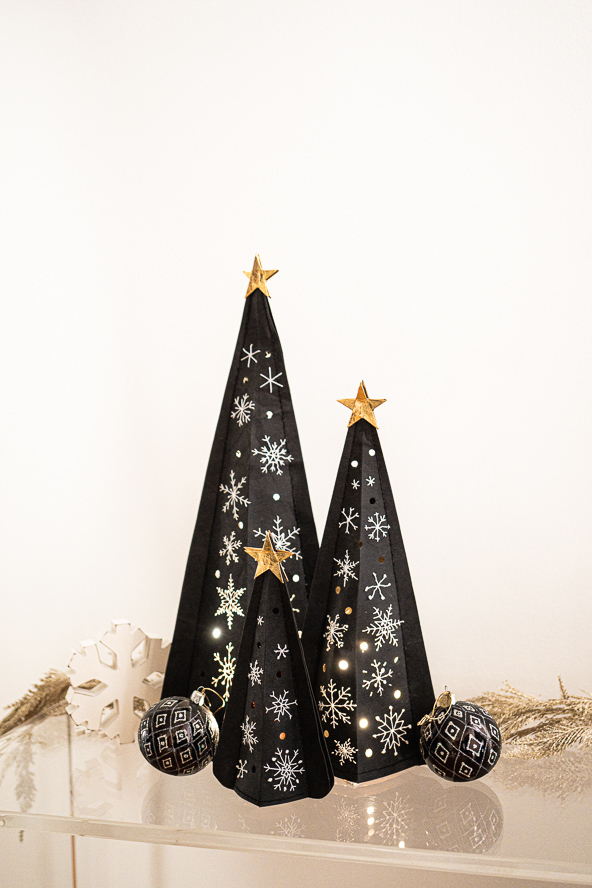
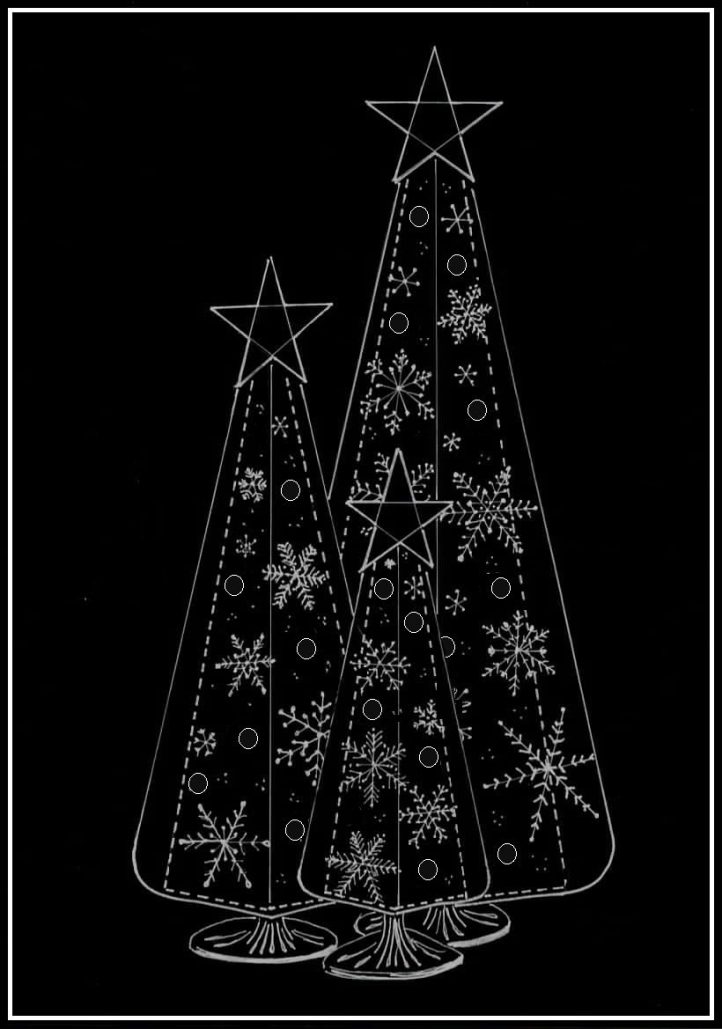
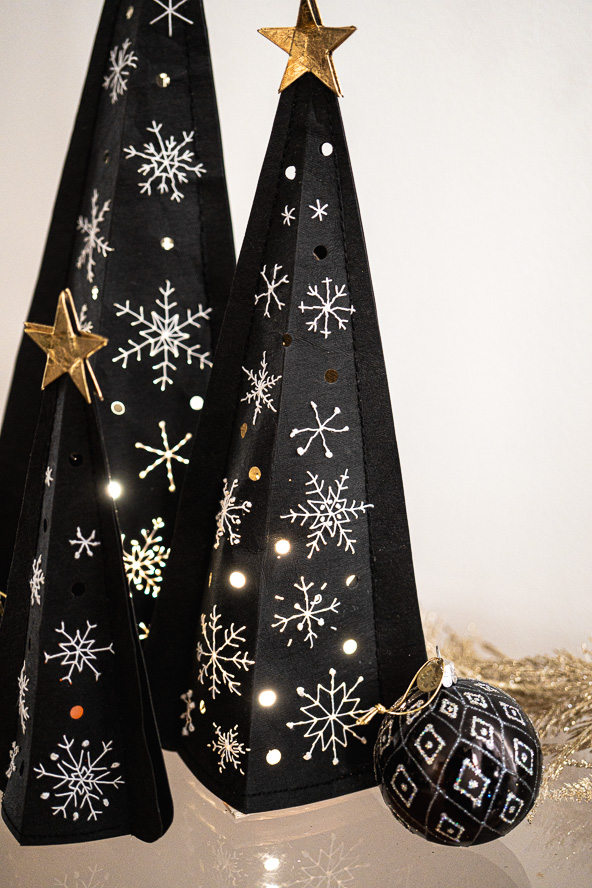
Illuminate your home on a dark winter’s night with these breathtaking tannebaum lumières. Made using vegan leather paper fabric, these sewn winter luminaries are available in three sizes and feature die-cut perforations and hand-stitched snowflakes on their tree-like spires. Topped with golden Christmas stars, these winter luminaries will look stunning on your windowsills or mantel with their modern, sleek look and soft winter glow.
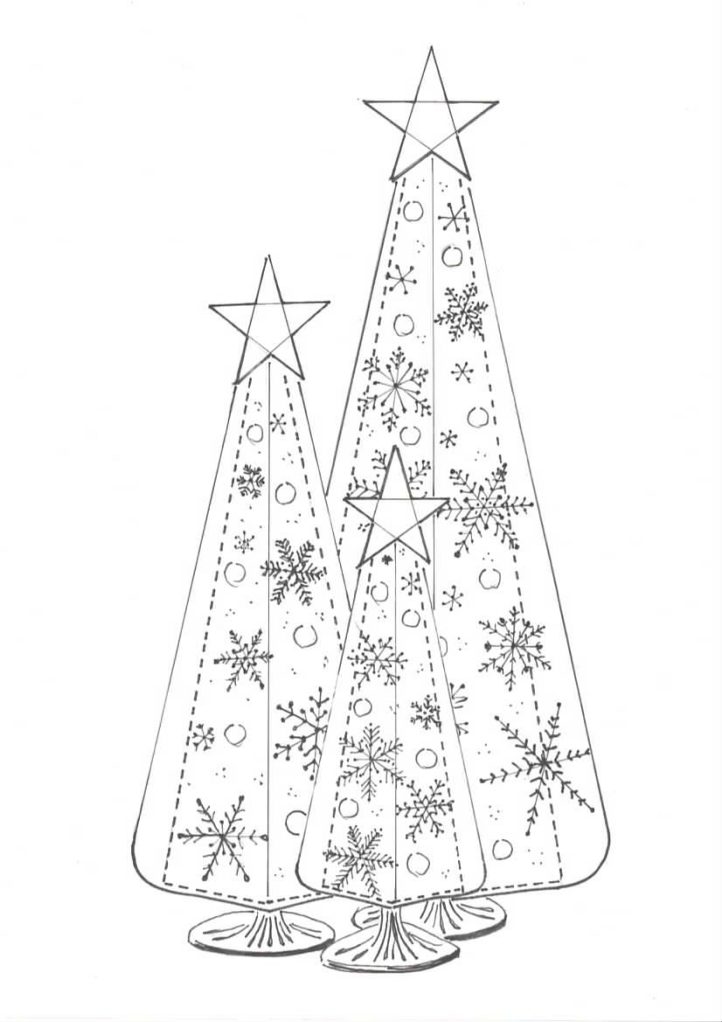
Finished Dimensions: These window ornaments come in three sizes: Large (20” x 8”); Medium (15” x 6”); and Small (10” x 4”).
Materials:
- Sheet of vegan leather paper fabric (22” x 39”) – A modern blend of plant-based fibers (cellulose) and latex (an emulsion polymer). Together, this combination produces a robust non-woven textile that can be cut and sewn like conventional fabric yet behaves like paper. It is sold in pre-cut sheet form and as rolls of weaving strips. This remarkable material is available in an assortment of colors and surface finishes that can be processed very easily, is vegan, completely machine-washable, tear-resistant, abrasion-resistant and eco-friendly. One sheet is enough to make all three sizes for this project or you can mix & match.
- Spool of heavy-duty thread (wt. 40) – For most sewing jobs, all-purpose thread (wt. 50) will do, although a slightly heavier weight of thread, such as upholstery thread, is recommended for added strength, UV protection, abrasion and mildew resistance as the lumières are displayed in a window setting environment.
- 3 LED tea lights – The light source is battery-operated LED candles with realistic flame bulb. Great for all types of lanterns, as a table or window sill decoration, etc. Safe around children and pets. Some are available with manual or timer-controlled continuous 8-hours ON/16-hour OFF cyclical timers. (Note: For the photographed samples, a different light source was used for photography purposes).
- Decorative thread/yarn – Specialty textured thread for tapestry, needlepoint, long-stitch and textured canvas thread work. Most are very pliable and easy to work with. These decorative thread/yarns have a lustrous finish to dress up these Tannebaum Lumières with endless possibilities. Other options are waxed string, embroidery floss, metallic lurex, perle cotton, etc.
- Hand needles for embellishing – Heavier threads may require a larger needle and a larger eye. Even with the elongated eye of an embroidery needle, the eye size will go up as you go larger in needle size. Let the weight of your thread choice guide you.
- All-purpose fabric glue – An all-purpose white glue that has good tack and is ideal for crafting with paper, fabrics, and most other porous materials. The special non-yellowing formula dries clear and remains flexible after application.
- Calico or broadcloth remnant for beanbags – 1/4 yard of muslin or broadcloth, 45” wide.
- Beanbag filler (8 oz.) – Use commercially-available plastic pellets or dried cherry stones; alternatively, use rice or dried beans from the pantry.
- PDF Templates – These are located at the bottom of this page. Please see printing instructions below.
Equipment & Tools:
- Sewing machine
- Steam iron
- Basic sewing notions
- Point turner and creaser
- Hobby knife or rotary cutter
- Cork-backed metal ruler
- Compass
- Hole punch die
- Rubber mallet
- Push pins
- Quilter’s clips
- Pinnable surface – Flattened corrugated cardboard box or a sheet of Styrofoam packing material
- Designer Note: For the prototype sample, the designer used one sheet of PAP FAB™ (black, 22” x 39”), Selfmade™ heavy-duty polyester thread (black; Nm.36/2), Gütermann™ heavy-duty lustre thread, (oyster; Nm. 40) for the embroidery, and a set of 3 North Light™ LED decorative tea lights. For the topper, the designer used a mini sheet of PAP FAB in gold foil finish (8” x 10”) and Sobo™ Fabric Adhesive.
THE PATTERN:
Download the pattern template and trace off the size that you wish to make. Auxiliary parts to these lanterns are optional. Prepare the small auxiliary parts, if using: beanbag weights, support ring, and 5-point star topper. The designer preferred to glue the paper pattern to light cardboard to make it easier to trace around onto the fabric.
PRINTING INSTRUCTIONS:
Note: To download the templates, click on the pattern download button at the bottom of the page. We recommend opening your pattern download using Adobe Acrobat.
Sewing Instructions:
MARKING & CUTTING:
Prepping Fabric:
Vegan leather paper fabric has a smooth surface but it changes texture when washed. You are rewarded with a soft, textured-look and a leathery aged finish.
- For a soft textured finish, crumple a sheet of the fabric into a ball and soak it in a bucket of warm water for about 20 minutes. It will become very pliable. Repeat this procedure as many times as you wish.
- When complete, lay out the damp fabric sheet on a large bath towel and roll up, jelly-roll-style, and allow the towel to absorb the dampness from the sheet. Let sit rolled-up for 20 -30 minutes. Then, hang the sheet to air dry or lay flat on a drying rack. Once dry, the fabric will return to its stiff nature. Press the material flat to remove any wrinkles using a steam iron on a medium heat setting. Use a press-cloth to protect the fabric’s surface.
There is no right or wrong side to the fabric, but you may prefer the color, finish, or texture of one side over the other. That will be YOUR right side. So pick the side you prefer for your project.
The fabric is ready to use.
Pro Tip: Mark an X or put a piece of low-tack tape on the side that will be the ‘wrong side’ of the fabric as it will be difficult to determine once the material is cut.
Marking Fabric:
Vegan leather paper fabric is a non-woven textile which means there is no directional grain to the material and you can mark out your pattern in any direction to be economical and have little waste.
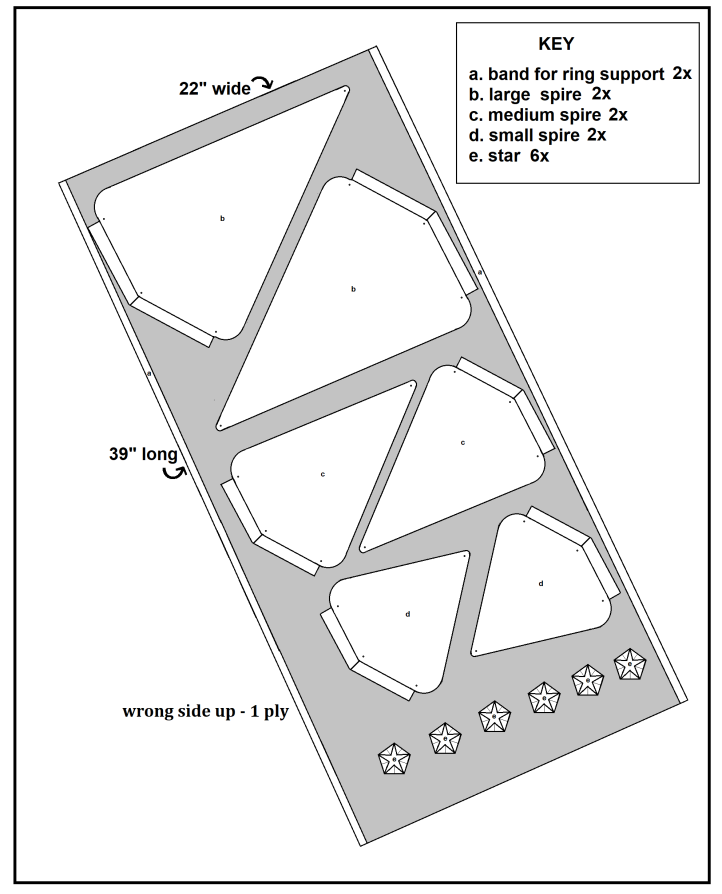
The designer found a soft graphite pencil is the best tool to mark out the pattern but you may want to use a waxed tailor’s chalk for a smoother tracing. One sheet of fabric is enough for all 3 sizes for this project. Use a 1-ply layout.
- Begin by marking the strips used for the ring supports. Along the length of fabric, draw 2 straight lines (1/2-inch wide) parallel to the edge of the material. One strip on each edge.
- Then, starting with the largest size, place the spire pattern piece parallel yet slightly askew to the width of the sheet of fabric so to have little waste. Trace around the template.
- For each tannebaum lumière, you will need 2 pieces to make the front and the back, so flip the pattern and place next to the first copy and trace it out.
- Repeat this step to lay out and trace the next size down and so forth.
- If you are using the 5-point star topper, trace out 2 pentagons for each size.
Use pattern weights or low-tack tape to hold the pattern in place as pins will leave a permanent hole in the material.
Cutting Fabric:
Next, cut out each shape. Make certain the work area is uncluttered and well lit. The designer preferred to cut the straight strips first, then ‘rough cut’ around the remaining pattern pieces prior to actually cutting them out to make it easier to handle.
- For best results, use a sharp hobby knife or rotary cutter, along with a no-slip metal ruler, to cut all straight lines on a cutting mat. Place the ruler on the inside of the cutting line and hold it steady. With the other hand, cut on the cutting line with a sharp blade using a firm pressure in one continuous stroke. Repeat this action on the next cut.
- For curved edges, use scissors to cut the curve smoothly to blend into the straight lines.
- (Pro Tip: Do not use your good fabric scissors on this material; paper scissors are good enough.)
- Collect the cut pieces in pairs and with right sides together, super-impose one on top of the other and match up the edges. Use quilter’s clips to hold the layers together.
- With a push-pin, make a pinhole at points A and D on the template; points B and C are located at the corners. These points will be referred to as alignment points used to assemble the project.
- Pair up the 2 straight-cut strips and set them aside until later.
(Pro tip: To make neat pin-holes through more than one layer, use a Styrofoam sheet or a piece of corrugated cardboard beneath your work to safely apply the pressure.)
Lastly, cut out 2 pentagons for the star at the top of each tannebaum lumière.
Layout:
Beanbag Layout (optional):

Beanbags are used in the cavity of the lumière as a weight to stabilize each structure from tipping. While it is a free-standing structure, the height of the lumière make it top-heavy and its light-weight make it susceptible to tipping.
Mark out one rectangle piece for each size of beanbag. The grainline may be laid on straight-of-grain or on the cross-grain. Use a 1-ply layout. Cut all straight edges with a rotary cutter and metal ruler for quick work.
ASSEMBLING THE SPIRE:
A pair of triangular pattern pieces will produce one 3D pyramidal-shaped spire. The spires are decorated before sewing the triangular pieces together and turned into window lanterns.
Score the Foldlines:
Use a point-creaser tool to score the material without damaging it.
- With right side up, place a ruler on the alignment points A – B. Hold the ruler steady and score between A and B, with the aid of a point-creaser, using a firm pressure in one continuous stroke. Repeat this action on A-C.
- With the wrong side up, place the ruler on the alignment points A – D. Hold the ruler steady and score between A and D, in one continuous stroke. Next, score the hemline, placing the ruler on alignment points, B-D and C-D, and scoring between the points.
- Repeat the above procedures on remaining triangular pattern piece.
Fold the Scored Lines:
A crisp fold makes the spire look professional and allows it to stand up straight when displayed. However, this is one part of the assembly that often gets overlooked. If you think of the fold as being the backbone of creating a 3D effect, you will realize how important it is.
- With the wrong side up, clip the center of the hemline at alignment point, D. Place the ruler on the inside edge of the scored line between alignment points B – D. Hold the ruler steady between B-D and fold the material up against the ruler’s edge, with the aid of the point creaser. Use the point creaser to flatten the fold. Press firmly but not so hard that you mark the material. Repeat this step between alignment points C-D. Trim the overlapping ends of the folds at point D to a mitered point to produce a smooth hem on the base of the spire.
- With the wrong side up, place the ruler on the alignment points A – D. Hold the ruler steady and fold between A and D against the ruler’s edge, starting from the center of the scored line and working outward, top to bottom. Use the point creaser to flatten the fold. Press firmly but not so hard that you mark the material.
- With the right side up, place the ruler on inside edge of the scored line between the alignment points A – B. Hold the ruler steady and fold between A and B against the ruler’s edge, starting from the center of the scored line and working outward, top to bottom. Use the point creaser to flatten the fold. Press firmly but not so hard that you mark the material. Repeat this step for the scored line between A and C.
- Repeat the above procedures on remaining triangular pattern piece.
Turn Under Hem on Baseline:
Doubling the material will reinforce the base of the spire and give it a neat finish.
- Turn the hem to the wrong side and glue it flat or topstitch in place with the sewing machine. Consider using a slightly heavier weight of thread, such as upholstery thread, for added strength, UV protection, abrasion and mildew resistance as the lumières are displayed in a window setting.
- Repeat the above procedure on remaining triangular pattern piece.
Embellish The Spires:
To decorate the spires, or turn them into lumières (lanterns), stop at this point and see EMBELLISHMENTS instructions below before sewing the triangular pieces together.
Attach Sides of Spire:
Use a longer-than-normal stitch length & reduce the tension.
- Gather 2 embellished pattern pieces for each spire. With wrong sides together, super-impose one piece over the other and match up alignment points, A-B-C-D. Hold the layers together with quilter’s clips.
- Machine-stitch on top of the foldlines between A-B and A-C through all layers. Go slowly as the material is thick. Alternatively, join together manually with thread and hand-needle.
- Check the alignment of the flanges on either side of the spire. If needed, trim the edges with a hobby knife.
- Extend your embellishments into the flanged areas, if you wish to do so.
Insert The Support Ring:
The ring acts like a ‘spring’ to keep the base of the spire open.
- Holding the flanged edges of the spire at point B and C, push inward towards the center. The sides will fold inward and the center will fold outward creating a 3D spire with a square base. The side flanges will help balance the spire.
- Insert the ring into the cavity of the base. Opposing forces against the surfaces will hold the base open and hold the ring in place.
Add The Toppers:
Use 2 stars on the top of each spire.
- Flatten the tip of the spire between the two side flanges. Glue a star to the top. Align the top of the star to the pointed end of the tip of the spire.
- Mirror the placement of the second star to that of the first star, on the opposite side of the spire, so that it resembles a Christmas tree.
Designer Note: The star toppers are easy to make but tend to be ‘fiddly’ because of their miniature size. Alternatively, you can use star-shaped notions like buttons, charms, brooches, emblem patches, star-shaped metal studs, etc and sew/glue them on top. Other festive options are miniature ribbon bows with long cascading tails, furry or wooly pompoms, multicolored jingle bells, bejeweled rhinestone buttons. You get the idea: make it look like a Christmas tree!
DISPLAYING THE LUMIÈRES:
These Tannebaum Lumières look great displayed on your windowsills with its warm glow shining out into a dark winter’s night.
The designer preferred to display them balanced over stemware or votive candle holders so that only the base of the container is visible, adding to the look of tree trunks. Place a LED tea light in a wine goblet and perch the spire on top of it. The light from the tea light will illuminate the spire within and turn your ‘tannebaum’ into a lantern. Prop the lumière in front of any reflective surface like a window or a mirror and let the light glow and twinkle. These window ornaments can be ‘stand alone’ or grouped in clusters of three.
Another way to display them is to group them as a holiday centerpiece. Place a cluster of three on a reflective surface like a silver tray or crystal platter and prop each one over a LED tea light nestled upon a beanbag. The weight of the beanbag will keep the spires stationary and less likely to tip. Add a few shiny holiday baubles or sprigs of greenery around the base of the lumières for a festive touch.
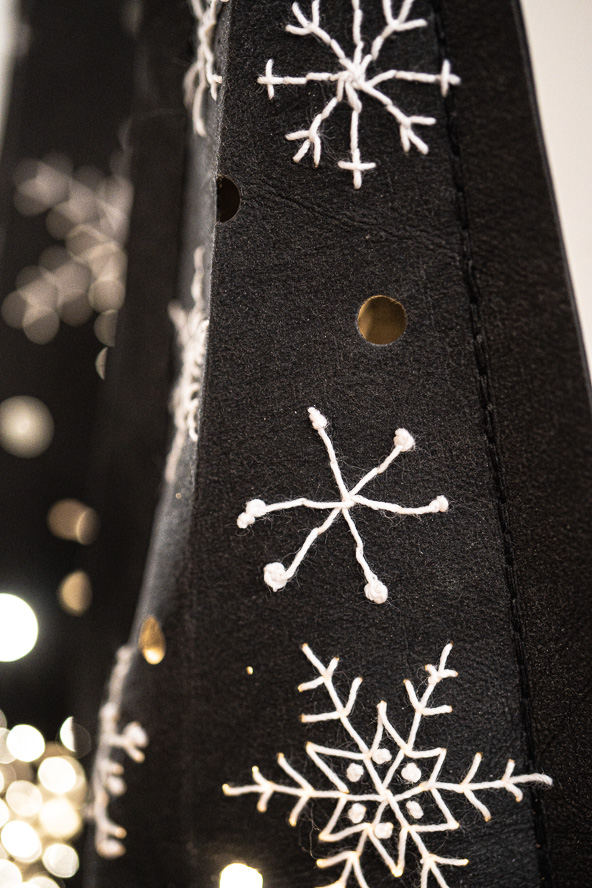
EMBELLISHMENTS:
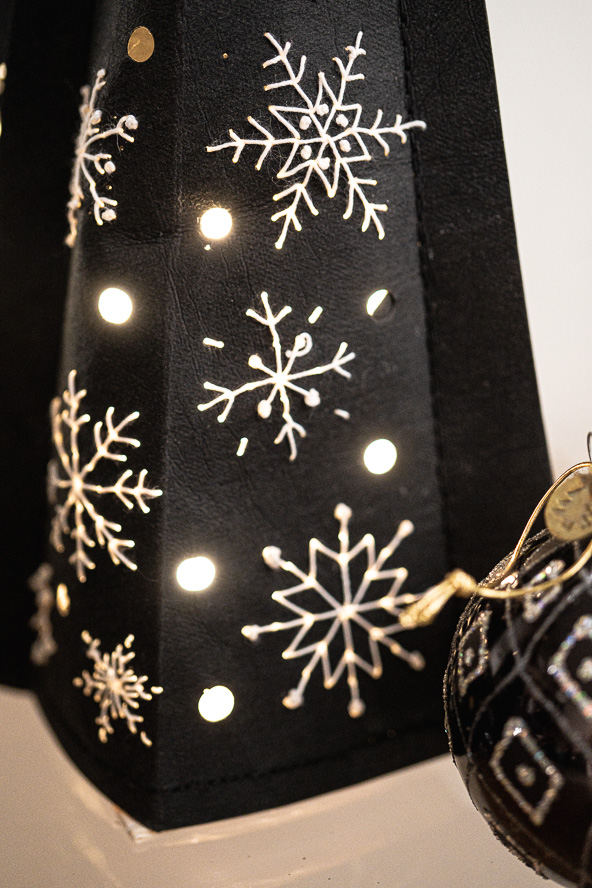
There is no shortage of ways to embellish these Tannebaum Lumières made from vegan leather paper fabric and bring them to life. This fabric can be sewn, embroidered, painted, colored, drawn on, dyed, contoured, stamped, embossed and lots more. From simpler methods like hand-stitching to more complex strategies like dye sublimation, there’s something for all skill levels to try. Your creativity has no limits!
The designer decided upon a snowflake-theme and chose to use a high-contrast palette for a modern look and so that the needlework would pop! Of course, you may choose to follow a traditional color palette like classic holiday red, green, and white, if you wish.
In addition, he wanted to create a lumière effect by adding cut-outs, applied with hole-punch dies, to create a lantern to place in a window and enjoy its charming beauty. LED tea lights are placed behind the perforations, which makes each ‘Christmas tree’ glow and it is safe to use.
Make a Stencil:
Draw your design on a sheet of tracing paper or freezer paper so that you can plan out the motif and re-use it more than once. This will be your stencil to transfer the snowflakes onto the vegan leather pieces.
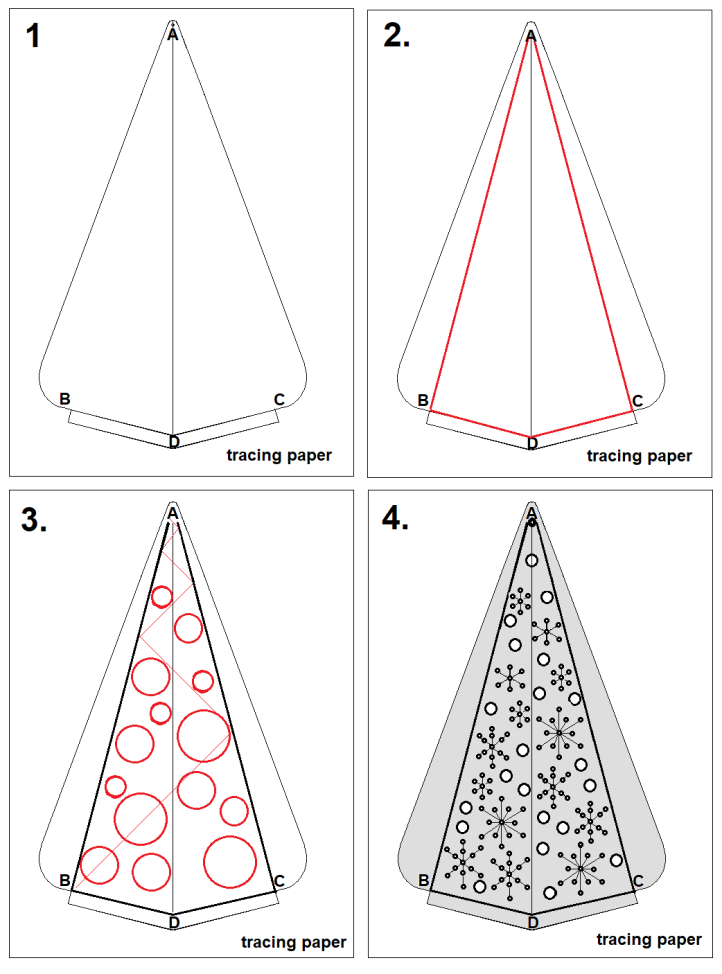
- Begin by tracing the spire pattern shape on tracing paper and mark the alignment points: A, B, C, D. (see dia. 1 below)
- Connect A-B-C-D with straight lines. Draw your design within the confines of these lines. (see dia. 2)
- Using a compass, make circles to represent placement of snowflakes* within the borders of the foldlines and fill the space. It can be random or follow a path. Circles can be uniform or varied in size to fit the space. (see dia. 3)
- Using a push pin or darning needle, pre-punch the stitching holes onto the face of each spire (right side up) and add random punch holes in the negative spaces surrounding the snowflakes, using a hole punch tool and rubber mallet. (see dia. 4)
* See how to make a snowflake below under CREATING A SNOWFLAKE section.
Pro Tip: To make evenly spaced stitching holes, use a spiked tracing wheel along the stitching path to follow before making the pinholes. The track of dots left behind are evenly spaced.
Transfer the Design:
- Place each fabric piece, right-side up over a pinnable surface (the designer used Styrofoam). Lay the stencil on top of the fabric piece and match up with the alignment points. Secure the layers with push-pins.
- Using a push-pin or darning needle, pierce stitching holes along all lines of the design, pressing the tip of the pin/needle through the fabric and into the Styrofoam below.
- Be sure to pierce the material at ALL intersecting lines where the stitching will change direction, and at regular intervals to keep stitches consistent in size.
Pre-piercing the stitching lines helps prevent any accidental creasing in the fabric while embroidering the designs. Be careful not to make the holes too close together to avoid tearing through the material as you stitch, distorting your design.
Embroider the Design:
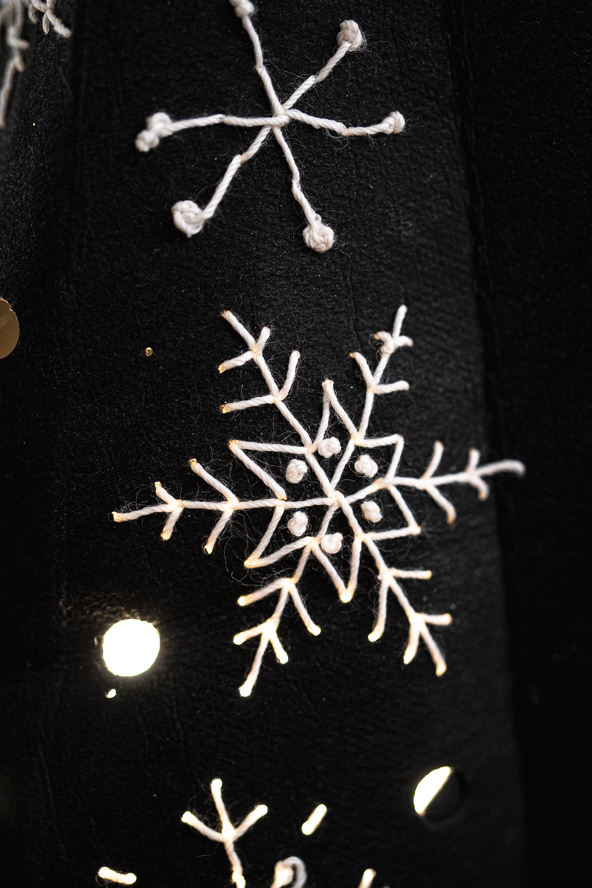
- Once all the stitching holes are pierced, embroider the design with decorative thread/yarn. Start and end your floss using the knot-less method, weaving in the ends. Or, rather than using a knot, you can temporarily hold the end in place with a small tab of removable low-tack tape.
- Basic stitches work best when embroidering on this type of fabric. The sample uses a simple running stitch, back-stitch, and French knots.
Add Cut-outs:
Using a hole punch die and rubber mallet, randomly punch holes in the negative spaces surrounding the snowflakes. These apertures allow light to shine through, creating the lumière effect that can be reflected in a window or in front of a mirror.
CREATING A SNOWFLAKE:
Snowflakes are easy to make. We’ve all made them as school kids. Snowflakes have both radial symmetry and six-fold radial symmetry. In other words, if you draw six evenly spaced lines out from the center of the flake, you will notice that the shape on that line is repeated on the five other lines.
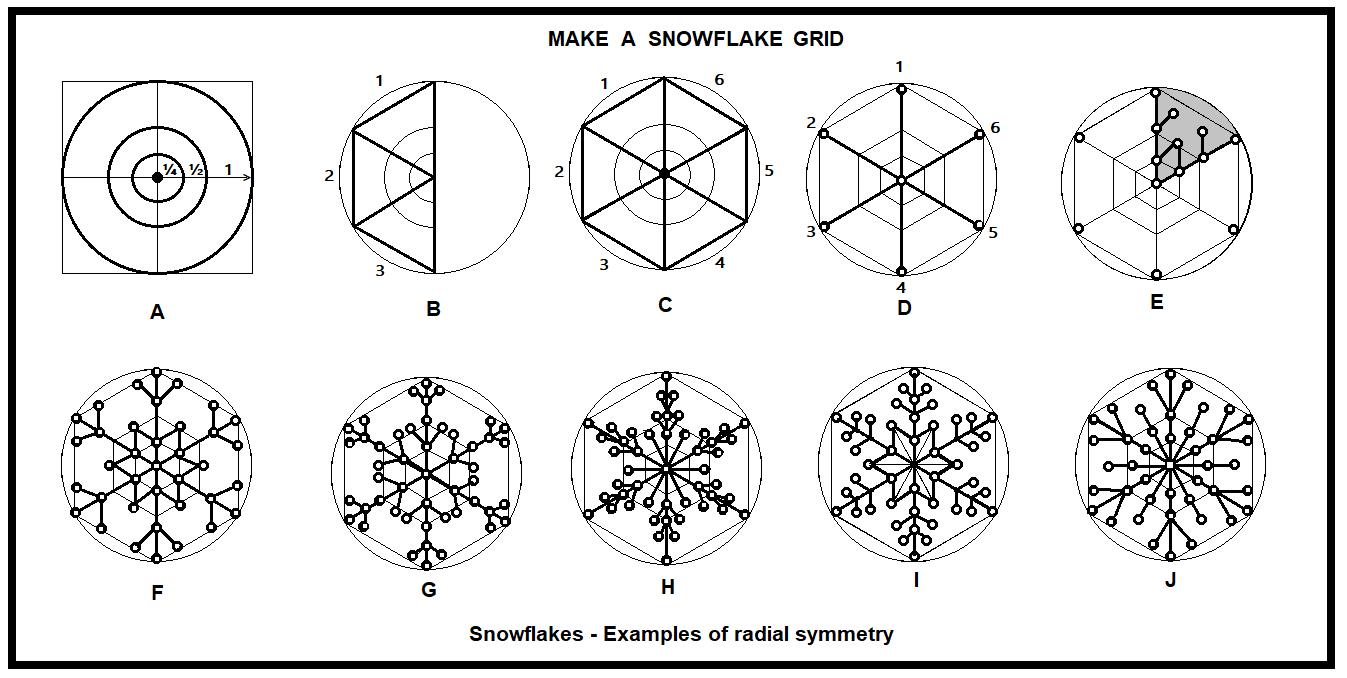
- To design a snowflake, you need a 6-sided grid. From a center point, draw a circle, with the aid of a compass. Its radius can be as long or as short as you wish and will establish the size of the snowflake. Draw another circle, from the same center point, radiating half the amount of the first circle’s radius, and still another, at a quarter of the first radius. These additional circles will be ‘helper lines’ used later in your design. see Dia. A
- Draw a vertical straight line through the center of the circle. Measure the outer edge of the semi-circle and divide it into 3 equal parts. Connect all points with a straight line to the center point and from point to point. see Dia. B
- Mirror the image on the other side of the centerline to produce a hexagon with six sides and six angles. This is your snowflake grid. see Dia. C
- Snowflakes have 6 stellar dendrites radiating from its center. Draw out the snowflake features as shown. The dots represent the stitching holes at the center, and at the end of each dendrite. The bold lines represent the stitching path. see Dia. D
- Dendrite means “tree-like”, which describes the multi-branched appearance of the snow crystals. Stellar dendrites have six symmetrical main branches and a large number of randomly placed side-branches. Use the helper lines to work out a multi-branch design in one of the wedges of the hexagon, then repeat it 5 more times around the center point to create a snowflake. Use combinations of different intersecting side-branches in a tree-like formation to produce unique snowflake patterns. see Dia. E
- Diagrams F, G H, I, and J are examples of radial symmetry that produce unique and spectacular snowflakes. No two are alike and you are only limited by your imagination.
- Transfer the snowflake patterns by piercing only the intersecting lines where the stitching will change direction, and at regular intervals to keep stitches consistent in size. eg. the pinholes.
- Embroider the snowflakes using simple running stitches, back-stitches, and French knots.
AUXILIARY PARTS:
Prepare the small auxiliary parts: beanbag weights, support ring, and 5-point star topper.
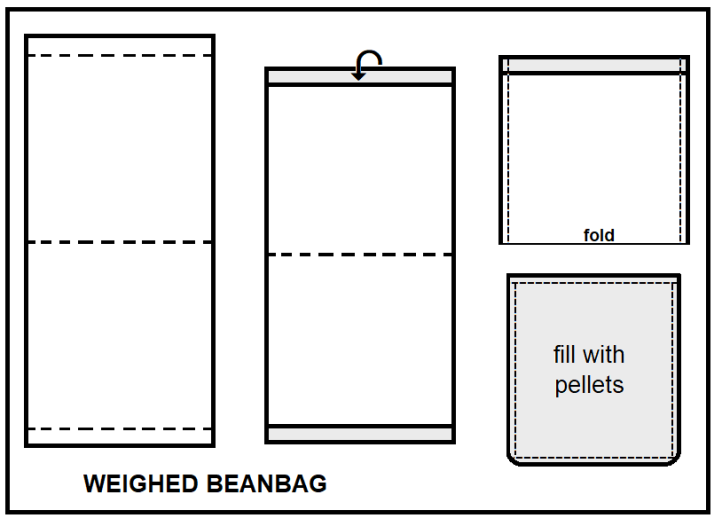
Beanbag Weights (optional):
- For each lumière, make a beanbag to the size of the base.
- Turn under the short ends of the rectangle, 3/8” seam allowances and press flat.
- With right sides together, fold the fabric in half and match up the turned edges.
- Sew side seams. Trim corners diagonally and press seams open. Turn right side out.
- Fill the cavity of the bag with a loose filler (the designer used dried lentils) until satisfactory in shape. For large – use about 8 to 10 tablespoons; medium – use about 4 to 5 tablespoons; and, small use – about 1 to 2 tablespoons. Different fillers will vary in amount needed.
- Sew up opening of beanbag to contain the loose filler. Optional: Sew around all remaining edges if you like to secure seam joins and filler from breaking through seam stitching.
- Use beanbag to add stability to the base of the window ornaments.
Support Ring:
- From the 2 long strips of fabric, measure and cut 3 bands; one for each size of base: Large = about 14 1/2“ long; Medium = about 11 3/4“ long; Small = about 7 1/2“ long. Cut the large, medium, and small bands from the Support Ring strip.
- Cut each band to length and snip off points at the corners of the band to round off.
- Punch a pinhole, centered, 1/2” from each end of the band.
- Gently bend the band into a circular ring without folding or creasing the fabric.
- Align both pinholes, one on top of each other, and sew together in opposite directions.
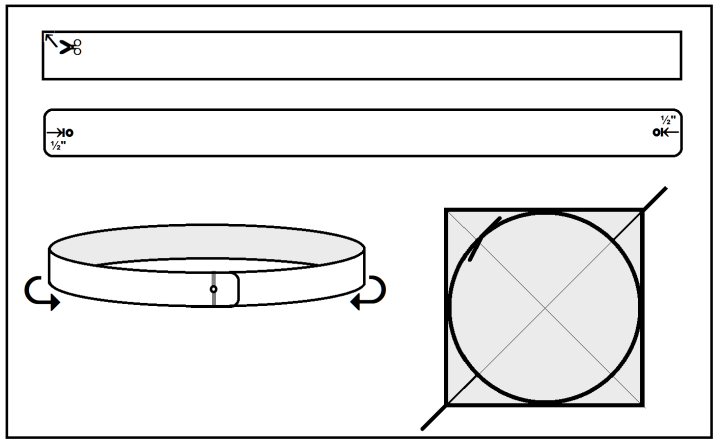
- Insert the ring inside the base of the spire to brace the walls of the lantern.
The Star Topper:
Make a pair of 5-point stars (pentagons) for the topper of each tannebaum lumière.
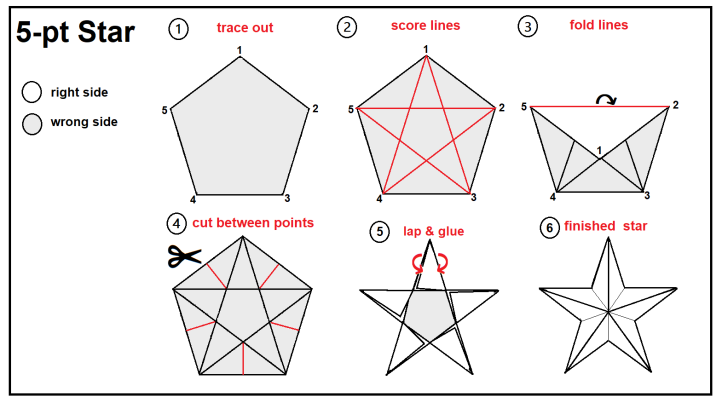
For each 3D star:
- Trace out a pentagon for each star. (dia. 1)
- With wrong side up, score a straight line between every second point of the pentagon. Join 1 to 3, 3 to 5, 5 to 2, 2 to 4, and 4 to 1 with a straight line (marked in red). (dia. 2)
- Fold each scored line against a ruler’s edge, with the aid of a point creaser. (dia. 3)
- Clip between each star point up to the foldline intersections (marked in red). (dia. 4)
- Fold from the end of the cut to the tip of the point, so that it overlaps the star point. Mirror this step on the flap on the opposite side of the star point. Trim flaps to true up the point, if needed.(dia. 5)
- To form each star point, glue one flap over the other and let dry. Repeat for each star point to produce a 5-point star. (dia.6)

i really like the black luminary trees but i cannot find vegan leather paper fabric in my fabric store. can u tell me where I can order the product
Hi Janet! It looks like there are options online for the vegan leather paper fabric. Organic Cotton Plus seems to carry the leather paper fabric, and Mood Fabrics online may have some options. It also seems that you can find this material from several different Etsy stores. Hope this helps! – Ashley, We Like Sewing
In my 50+ years of sewing and crafting, I have never heard of this product. This years, kids and grandchildren received Christmas ornaments and décor to include Styrofoam trees using fabric pieces and was looking for other options for next year – I just found it. Thank you, I start making gifts at the first of the year, timing is great!
We hope you enjoy making this pattern, Pam! Have a great day! – Ashley, We Like Sewing