Think you can’t sew leather at home? Think again. Don Morin shows you how to sew a classic leather wallet for men with this in-depth tutorial. This men’s wallet pattern is designed to be compact but have large carrying capacity, so that you don’t have to worry about leaving necessities at home. Sleek and stylish, this billfold pattern is a great gift idea that Dad is sure to love!
Skill Level: Intermediate + patience
Seam Allowance: Single seam allowance = 3/8” wide, to be pared down later
Materials:
- 1 thin leather skin, 1 to 2 oz. leather is an option (1/64”, 0.4mm thick); or 1/3 yard of PU faux leather, 60” wide
- 1/4 – 1/3 yard of 100% Polyester or Nylon Ripstop Interlining, 60” wide
- 1 closed flat coil zipper, 4” long
- 1 spool of Polyester or Nylon Thread
- Double-Sided Basting Tape / Leather Glue
- PDF Pattern – This is located at the bottom of this page. Please see printing instructions below.
Prototype Sample: For our test sample; the designer used a lambskin split-grain leather (1 small skin / 2 square feet). It is a thin 1 oz. per sq.ft. processed corrected-grain leather that has been dyed. For the support, the designer used a polyester ripstop pongee interlining. For the zipper, the designer used a YKK 4 mm Flat Coil Closed Zipper, Ultralight; size: YKK #25; zipper coil thickness: 1,4 mm (regular 4mm coil [fat 1/8”]: 2mm [skinny 1/16”]); pull type: DA; weight: 5 g.
Machine Set-Up:
- Stitching – Single-needle straight stitch
- Needle Type:
- Leather Wedge, size 14 for real leather
- Denim Needle, size 14 for imitation leather
- Foot Attachment – Dual feed walking foot or Teflon™ foot
- Stitch Length – Longer than average (3.5 of possible 5 setting)
- Tension – Medium (4 of possible 8 setting)
- Thread – 100% polyester thread
- Topstitching – 1/8” from edge of material
PRINTING INSTRUCTIONS:
Note: To download the pattern, click on the pattern download button at the bottom of the page. We recommend opening your pattern download using Adobe Acrobat.
Leather is a timeless material that can be used to create a variety of fashion looks. From clothing and accessories, to footwear and handbags, leather is a classic material that never goes out of style. Ever so trending in the world of fashion, as much as leather is alluring to the senses, its appeal is often not so to the pocket book. Which often leads to begging the questions:
- Can I sew leather at home?
- Can I sew leather with a sewing machine?
- Can I sew leather on a domestic sewing machine?
Well, the single-word answer is YES, but with some limitations and simple modifications.
The challenge with sewing leather, real or imitation, is that a regular sewing machine is not powerful enough to pierce multiple layers of the material. The higher the quality sewing machine you use, the better results you will get when sewing leather. Home sewers working on industrial machines will have little problem sewing it but most of us have only our trusty portable models with small electric motors. Yet with a few upgrades to your regular machine to make it capable of sewing the robustness of leather, it will be the power of your machine’s motor that will determine how thick the leather should be and what type of leather to use for good results.
We’re going to explore this topic by making a men’s leather wallet, to help you make the right decision for your individual needs.
DESIGNING THE WALLET – COMPACT DESIGN, LARGE CAPACITY
A wallet is one of those things that are universal for all men. No matter your job or how you spend your days, every man needs a good quality wallet. A wallet carries your banknotes, debit and credit cards, driver’s license, business cards, receipts, photos of your loved ones, and much more.
When designing a wallet, often the struggle is with finding the right balance between functionality and aesthetics. Given how big of a role a wallet plays in your everyday life, it’s essential that you get one that’s up to the task. Obviously, this means using leather in terms of beauty, function, and durability. In this context, “leather” is used as a collective term in this tutorial whether you are using real leather or imitation leather.
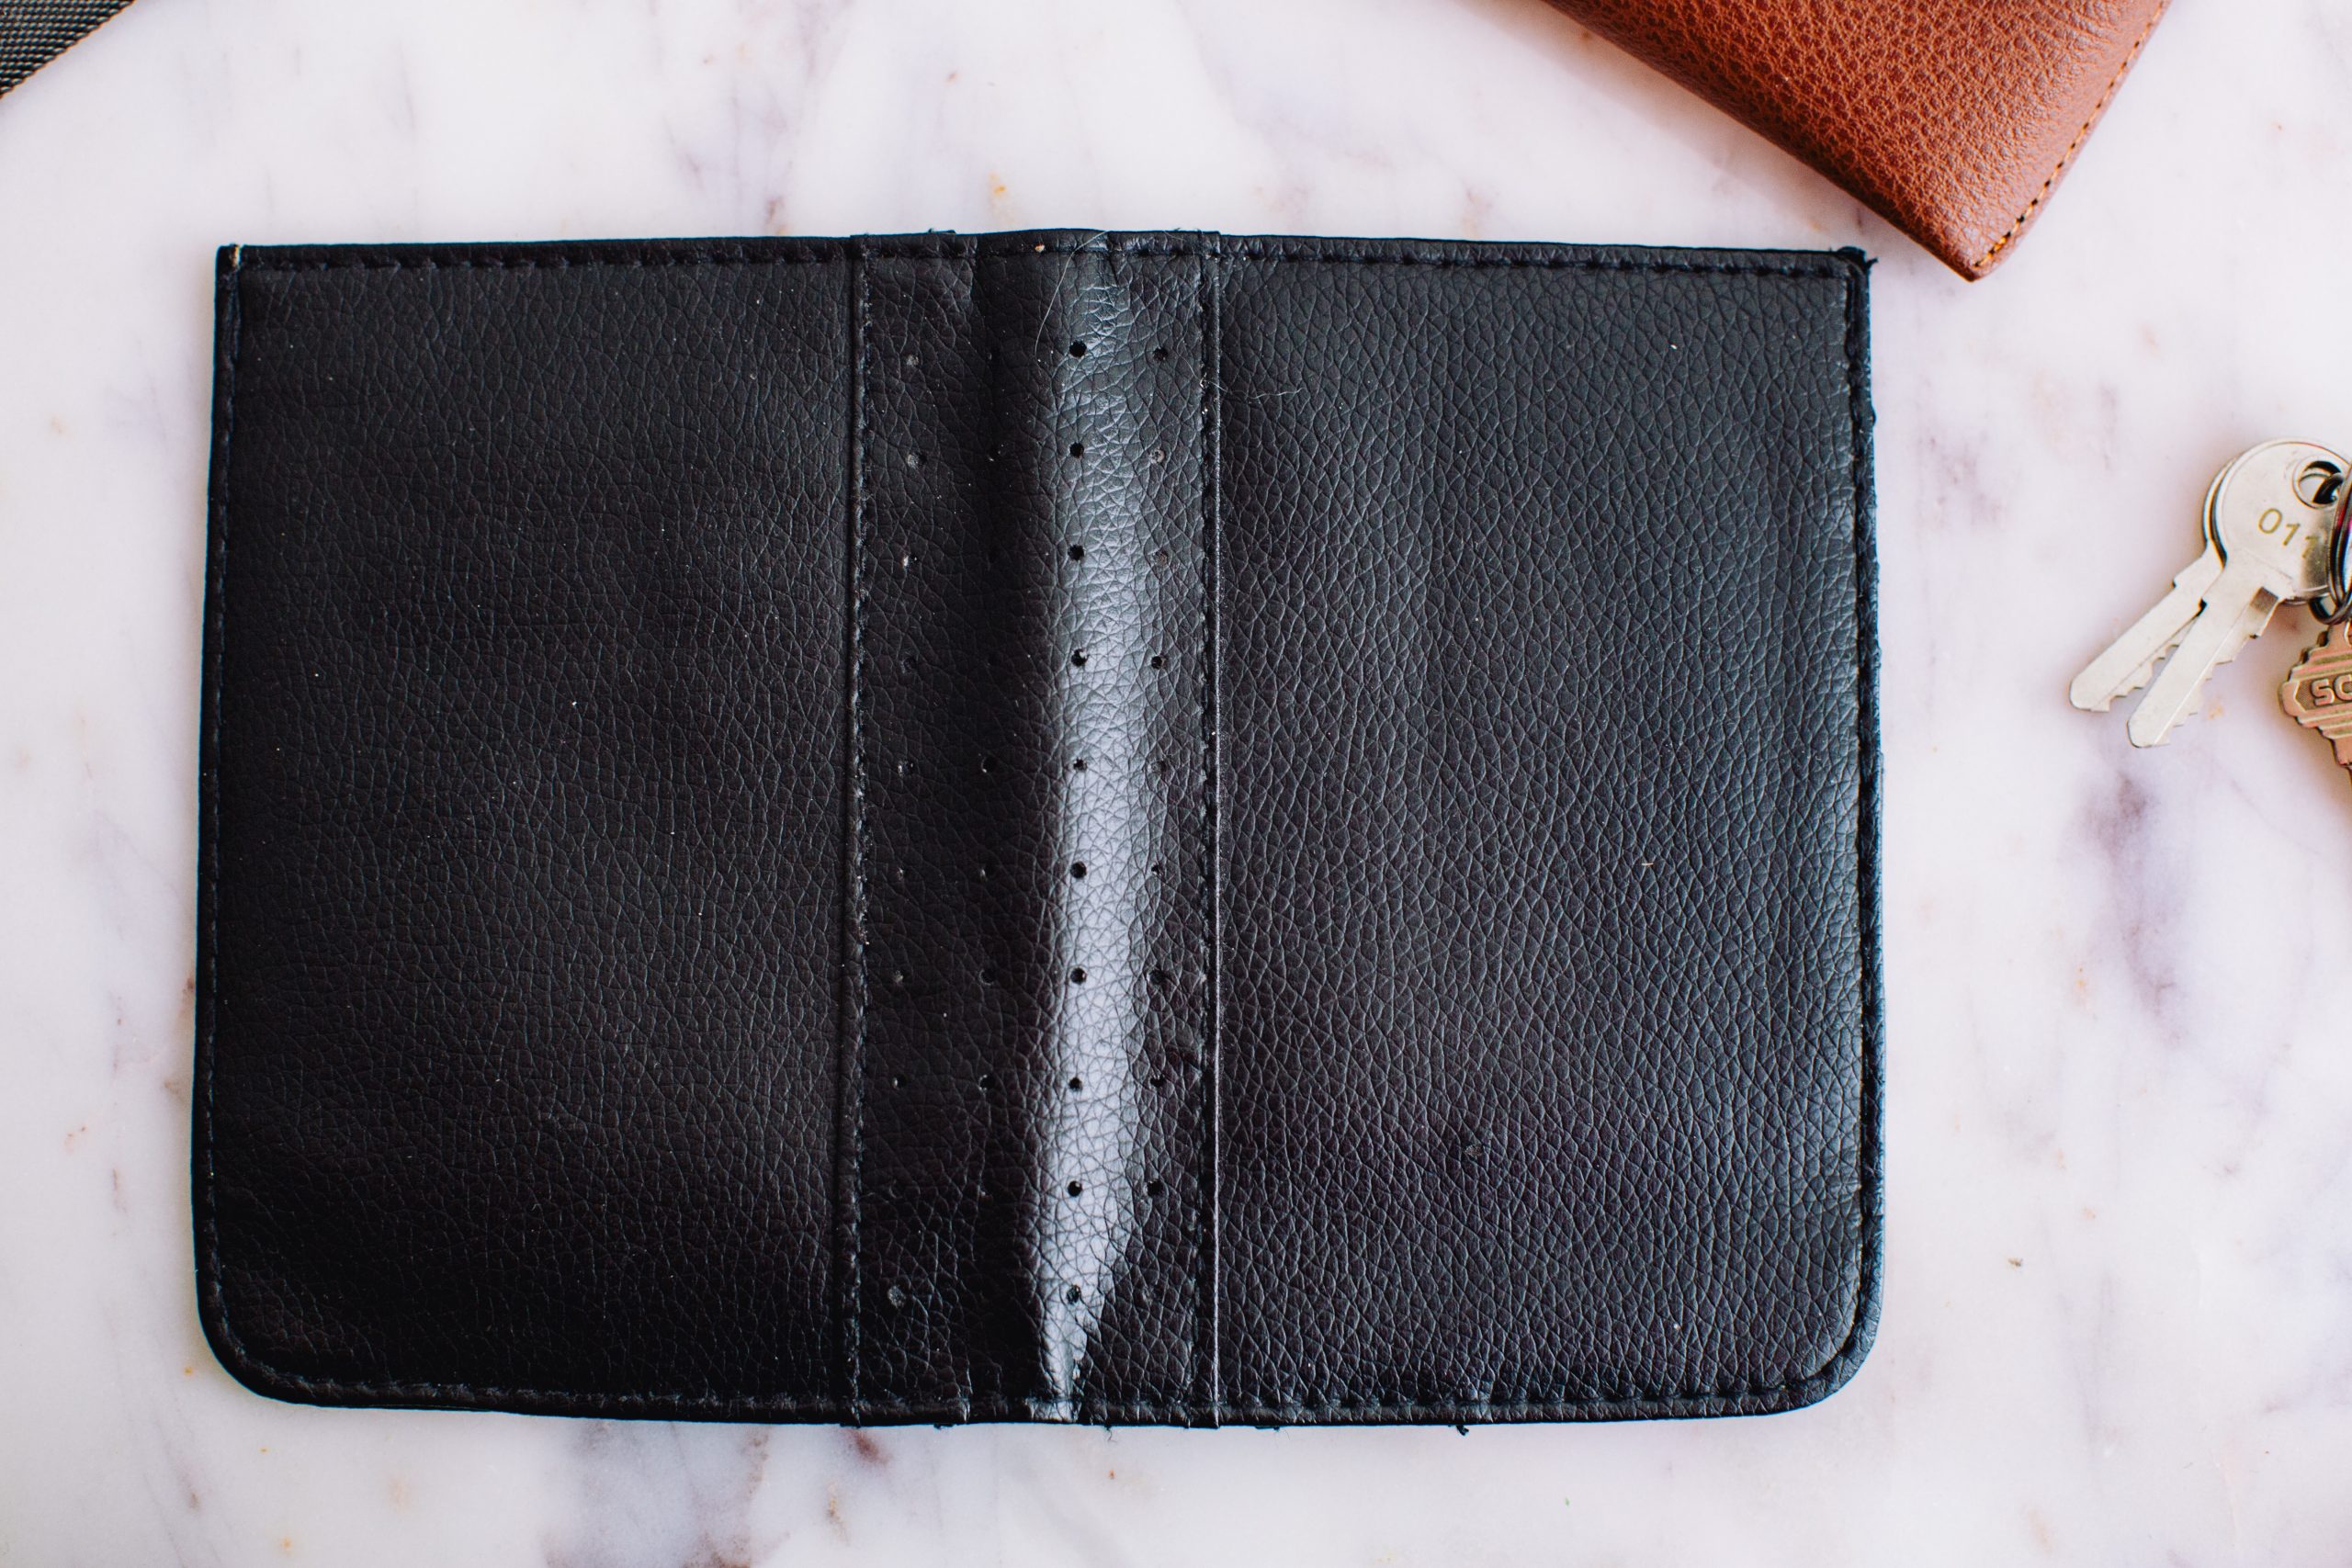
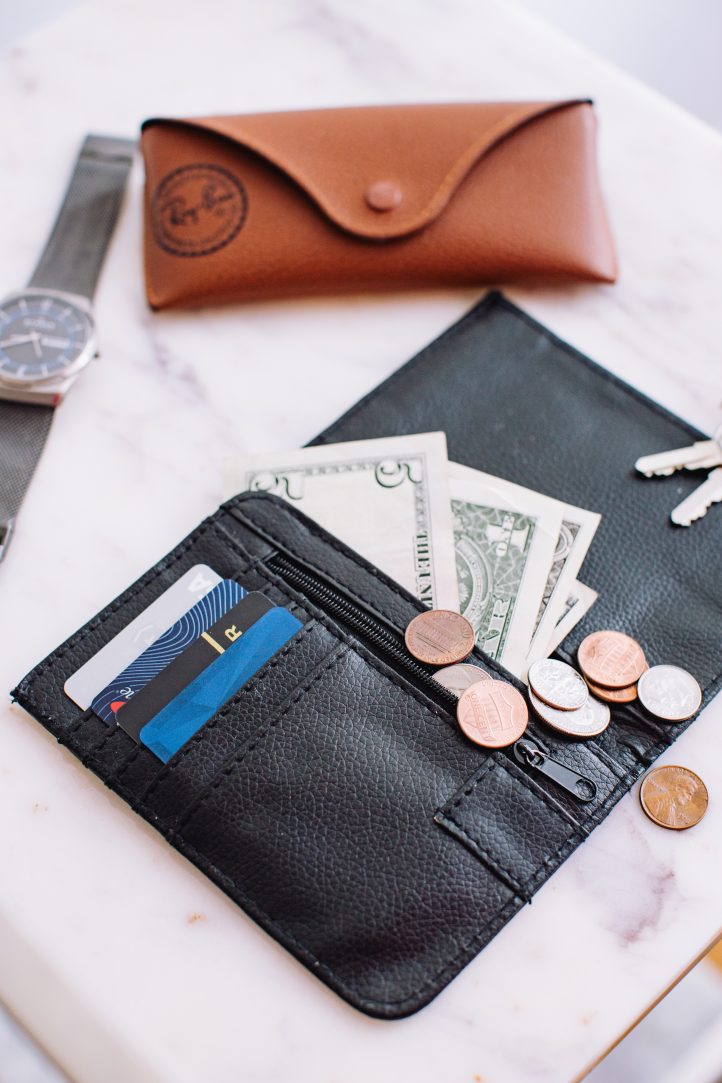
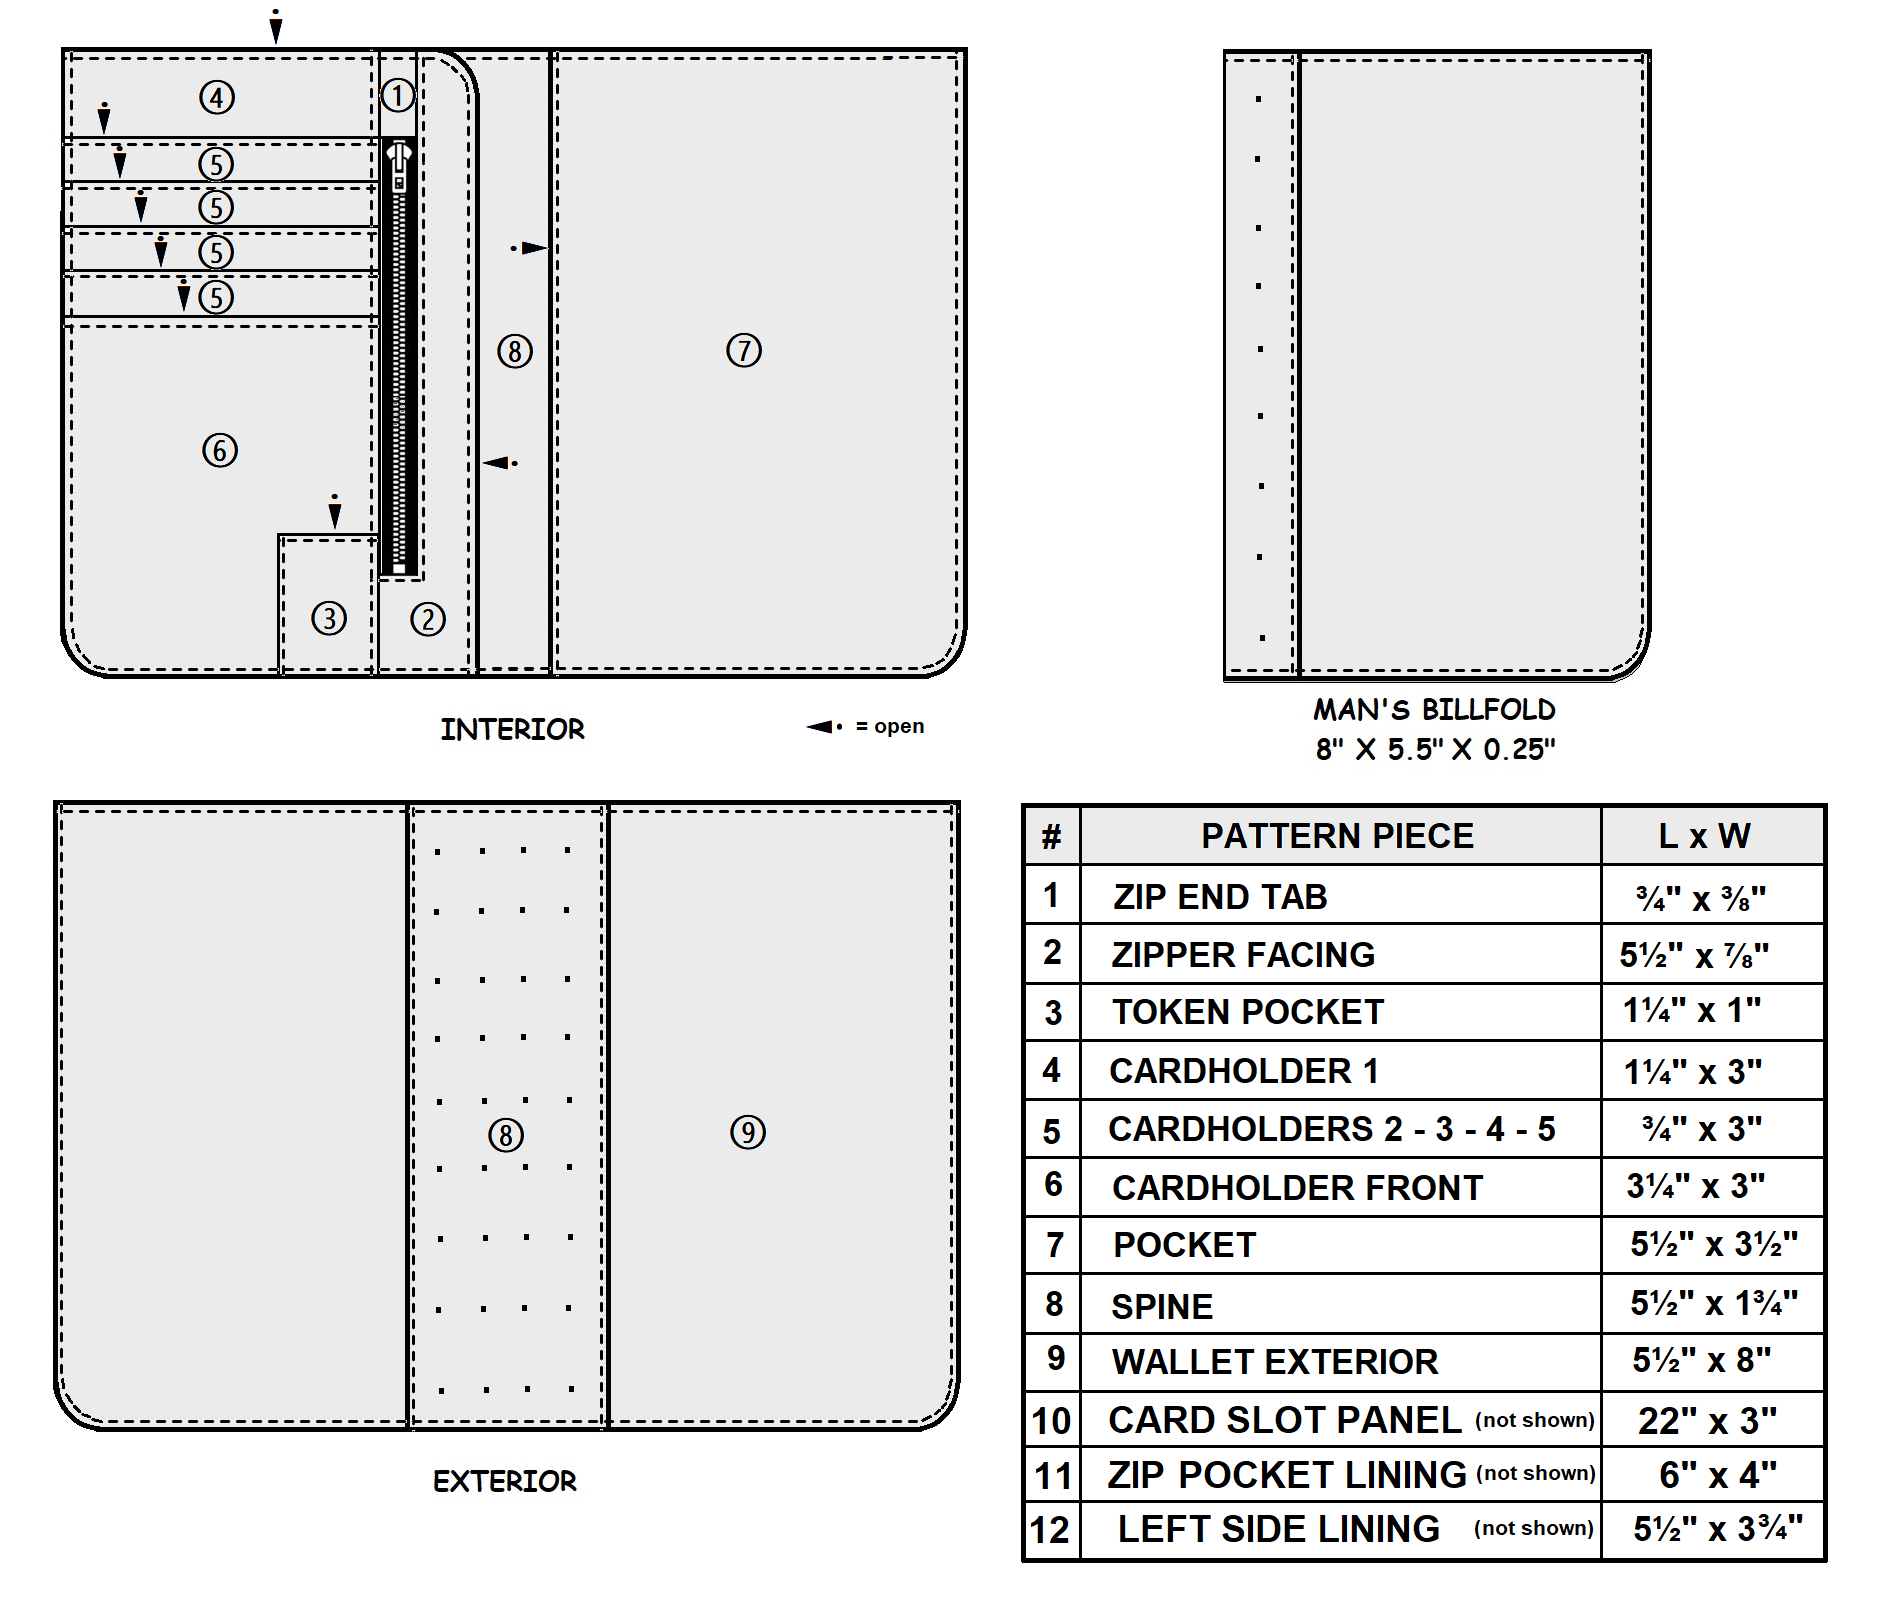
This DIY man’s wallet is styled as a thin billfold to be worn in a jacket lining’s breast pocket (it is 5 1/2” x 4” when closed). It features several cardholder slots, a zippered pouch for loose change, a token pocket, a folder-style sleeve on the left side interior, and an open pocket on the right side interior. Thickness of the wallet when closed is approximately 3/8 inches and opens to a full 8 inches wide.
An ideal wallet must be functional enough for your everyday carry items, sleek enough to look good, and comfortably fit in your pocket.
CHOOSING THE RIGHT LEATHER
The first thing to decide when beginning this leather project is whether or not you want to use real leather or imitation leather that looks almost identical to the real thing and can easily be used in place of leather for certain projects. There are, however, a few key differences between the two materials.
The fundamental difference between real leather and imitation leather is their origin. Real leather is made from animal hides, a by-product of the regional food chain. On the other hand, imitation leather is a synthetic material created from a plastic substance that is then treated with wax, dye or polyurethane to add color and imprinted to mimic the texture of real leather. It is man-made in a factory as yard goods. There are many factors to consider when deciding between real and imitation leather: durability, cost, look, application, and ethics all come into play. Choose what is right for you!
Is real leather more difficult to sew than imitation leather? It really comes down to the type and thickness of the leather. Real leather can be thick and dense, but so can imitation leather. Thick leather can’t be sewn successfully on a home sewing machine — they just aren’t strong enough to handle this material and you can stall or burn out your motor.
Real leather also stretches slightly over time, where imitation leather does not, something to keep in mind. The raw edges of real leather will not fray, but most leather-crafters burnish the edges so they look neat. Imitation leather does not fray either, but the raw edges should be finished to give it a neat appearance. Real leather will wear out your needles very quickly, but imitation leather not so much, so it’s good practice to change the needle before every leather sewing application. Both have surfaces that stick to the face plate and presser foot of the sewing machine.
Sewing leather can seem intimidating, but if you implement the modifications found below, you should be able to follow any design with ease. Leather, real or imitation, does behave differently than other fabrics, but if you learn how to work with them and have patience, you’ll be able to create fashionable, home-sewn, leather projects without a hassle.
SOURCING MATERIALS
Virtually any animal hide or skin can be processed or tanned to produce leather. The animal source used is often a by-product of the regional food chain and the mechanical and chemical processing of the skin render a variety of characteristics suitable for many different applications.
In North America, we eat beef, pork, veal, lamb, and goat; therefore, the leathers that are offered are cowhide, pigskin, calfskin, lambskin, and kidskin. While your local haberdashery does offer imitation leathers sold by the yard, you will need to go to a leather supplier to purchase real leather. It is not sold by the yard like its counterpart, but instead by the linear square foot and by weight.
The leather that is generally used in garment making is 2 ounces in weight, which is just over 1/32” thick, and sewn with industrial leather sewing machines. You can select a leather that is thinner than this or slightly thicker, but any leather under two ounces per square foot is just about right for home sewing using domestic machines. I find that most home machines can sew through a maximum of about three layers of 1 to 2 ounce leather (1/64” – 1/32” thick). Do keep this fact in mind that while working on the folded edges, the layers will be multiplied and you may need a more powerful machine that can go beyond 3 layers. To keep the thickness of a rolled edge uniform, I suggest skiving the seam allowance to reduce any bulk and keep layers flat.
Find a reputable leather supplier, someone you can trust. There are many brick-and-mortar outlet locations across the country where you can touch and feel the available stock. Many suppliers can be found online offering variety and quality in small quantities while allowing you to eliminate the “middle man” by buying direct from the source.
For small projects like this one, you don’t require lots of leather and to save money, remnants might be the right way for you to go. Called “partial hides”, these leather pieces come in all shapes and sizes normally from larger animal hides. While a specific yield cannot be guaranteed, dealers usually try to photograph any significant issue when purchasing online. Each piece is pictured separately and is the exact item you will receive. These leathers are all closeouts, sold as is, so get them while it is available. Many dealers offer large mixed leather scrap in hand-selected 2-pound bags & 5-pound boxes as well. Choose a dealer near you, as leather is heavy therefore costly to ship. Most will ship within the continental U.S.A. Give them detailed instructions on what your application or project is, and ask them what they recommend you use. They are happy to help.
Imitation leather is as diverse as real leather, and different varieties are made from different synthetic fibres. It is manufactured in wide sheets that are uniform in thickness and weight. Because it’s mass-produced, imitation leather is typically much more economical than real leather, especially if you are looking at top and full grain leather, and it is more readily available from fabric stores and online retailers. If you are looking to keep production costs down, imitation leather is your best option. It still provides the “look” of real leather, in most aspects, at a reduced price.
Polyurethane fabrics are typically more expensive than their vinyl counterparts because there is more cost in the manufacturing process. The two major types of plastic-based faux leather — commonly known as “p-leather” — are vinyl (PVC) and polyurethane (PU). The first is a result of adding dye and plastic materials to vinyl, which gives the fabric a more realistic leather look. Polyurethane-based imitation leather is made by coating a woven fabric backing with a polymer-based substance, then treating it to look like real leather. This type of faux leather is more soft, flexible, and breathable than vinyl-based leather, and it is used more for clothing and items that will come in contact with your skin.
Imitation leathers come in all types of finishes, from matte to satin to suede to patent. For home sewing, I recommend choosing a matte or satin finish. Shiny or glossy finishes like that found on vinyl don’t work well on a home machine, as they are too sticky and will drag under the machine foot.
If you live a vegan lifestyle and do not believe in harvesting animals for food and clothing, then imitation leather is definitely what you want. However, be aware that imitation leather is not without its own environmental impact. The processing and production of both faux and real leather take a toll on the planet and create a sizable carbon footprint.
This wallet design is meant to be slim in profile so that it is doable on a home machine, but if you’re planning your own leather sewing project, avoid any patterns or designs with very thick layering.
With that thought in mind, you will need a thin ripstop interlining fabric with similar characteristics of a taffeta or a pongee to support the leather since you cannot apply heat or steam to interface leather and it can act as a lining or backing material. The advantages of using this material is that it is stiff and smooth, light-weight yet robust, with high tenacity and excellent glossiness, it’s shrink resistant, easy to wash, quick-drying and has a good feel against the skin. To keep the layers thin in construction, it’s best to avoid sewing two layers of leather on top of each other. For example, in areas like pockets, use leather on the face side and the interlining fabric underneath to support and back it. It is available at your local haberdashery (often bridal supply stores) and by mail-order online.
Nylon and polyester are both quality synthetics for spools of threads and have pros and cons depending on the specific application. Nylon is more water resistant, and polyester is more UV resistant. Both are suitable for the machine-sewing of leather.
For this project, you will need an extremely thin and flexible coil zipper that is soft and ultralight to lay flat between the layers when the wallet is closed. Odds are you will need to get a skirt length zipper and cut it down to length. Look for a closed zipper that is at least as durable as other 4 mm coil zippers (1/8″) or try an invisible zipper.
MODIFYING YOUR HOME SEWING MACHINE
As previously mentioned, a few simple modifications to your home sewing machine can be made to make sewing leather possible.
- Change your presser foot: A regular presser foot will stick to leather, preventing the leather from feeding correctly through the machine. The good news is, there’s a quick fix for this: simply change out your regular presser foot for a dual-feed walking foot. This special machine foot is the type found on industrial leather sewing machines. The foot is split in two with each half moving in an alternating, ‘walking’ motion so that the material won’t stick to the needle plate or presser foot. It also comes in handy if you do machine-quilting. Other good options are a roller foot or a Teflon® foot, both of which glide easily over leather.
- Change your needle: Swap out your regular needle with a leather needle, as it will make sewing much easier and give you better results. These needles have a strong shaft and a wedge-shaped cutting point so are specifically designed to cut through the leather and will withstand the extra thickness. Generally, leather needles will be in sizes 14-18 for average leather thickness. For imitation leather, substitute a denim needle for your regular machine needle. This needle has a modified medium ball point and a reinforced shaft that penetrates layers and thicknesses with minimum needle deflection, reduced risk of needle breakage and fewer skipped stitches. And PS: Don’t be surprised if you break a needle while sewing thick areas, so be sure to have extras on hand.
- Use the right thread: Never use cotton thread when sewing leather, as the tannins in the leather will erode the thread over time. Instead, use polyester or nylon. You may want to use heavy-duty top-stitching thread; it’s not necessary, but leather does look nice when stitched with heavier thread.
- Change your stitch length: Use a longer-than-normal stitch when sewing leather; I use about a 3.5 out of a possible 5. You can use any stitch length in the general range of longer than a normal stitch but shorter than a machine-basting stitch. This will prevent perforating the material. You may need to adjust the tension on the machine as well to accommodate the thickness of the layers.
TOOLS & EQUIPMENT
Add these tools for working with leather to your sewing kit:
- Double-Sided Tape or Leather Glue: Pins should never be used in leather, as they’ll leave a permanent hole. Instead, hold pieces in place before sewing by taping them together with double-sided basting tape, such as Wonder Tape®. Simply apply a line of tape between the two pieces of leather you want to sew, placing the tape along the edge of your leather, within what will be the seam allowance. Then sew your seam, and the tape will remain inside the seam allowance (no need to try to remove it). Believe it or not, this is a standard leather construction method, and if you could peek inside the seams of commercially-made leather goods, you would likely find tape or glue in the seam allowances. If you choose to use leather glue, choose one that dries clear. Apply it in thin coats and set aside until the glue is tacky to the touch before affixing layers together. Another option with less mess is to use quilter’s clips such as Wonder Clips®. Simply use the spring-loaded clips along the seam to hold two layers of leather together before sewing.
- Pressing: Use a Seam Brayer and a Rubber Mallet: You cannot iron leather as the heat can damage its surface. Instead, open the seam out and press it flat using a rubber mallet or a small roller called a seam brayer (often used in applying wallpaper). It may sound strange to hammer fabric, but since real leather cannot be pressed or steamed, and imitation leather is plastic-based, a steam iron would shrink or melt the material. A seam brayer and a rubber mallet are a great alternative to flatten the material. When a design calls for seams to be pressed, gently hammer them or roll them out flat. If you need your seams to be really flat, you can place a bit of leather glue between them before hammering. This will help to reduce bulk so the machine can stitch the layers together with ease. Projects will lay flatter if they are topstitched in place. Before topstitching, trim the seam allowance of the side that will be covered after topstitching. This helps reduce bulk and allows the seam to lay flatter. It is also ideal to hammer the seam so it will be as flat as possible while you are sewing.
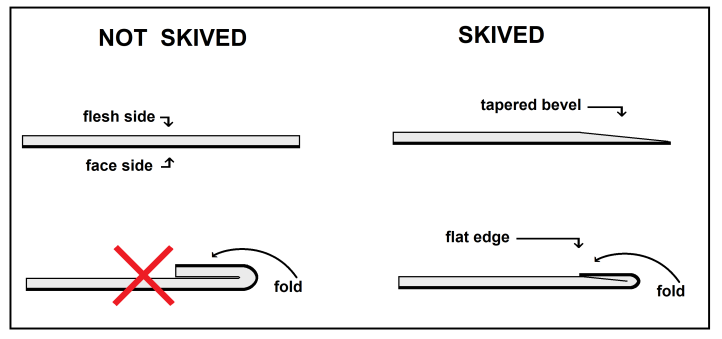
- Skife Blade: Skiving is the process used to reduce the thickness of leather, especially in areas that are to be bent or folded and which must be pliable without becoming weakened. This is easily achieved with a skiving knife or a sharp utility blade will work as well. It is usually performed on the “flesh” side of a piece of leather rather than the “finished” side and results as a “bevel” on the leather’s underside to thin it out and reduce bulk.
- Rotary Cutter and Mat: For cutting straight edges on leather skins and sheets of imitation leather. Use in tandem with a cork-backed safety ruler. You should also be using some pattern weights to keep your material in place while you cut.
- Awl: Used to score foldlines and to puncture holes in leather.
- Pointer Turner and Creaser: A handy tool for sewing enthusiasts. You can use it to turn out the fabric without causing any damage. It can aid in creating sharp creases on the fabric or lets you score foldlines on material. The edge of the creaser can be used to bend the leather before folding it over.
- Glover’s Hand Needles: A three-sided point needle with a large eye for hand-stitching with waxed thread. Use in tandem with a leather thimble.
- Low-Tack Masking Tape: Comes in handy for a multitude of uses: To temporarily hold several layers in place before joining or to mask the edge of a foldline or seam allowance before applying leather cement.
- Magnetic Seam Guide: Magnetic and small, these seam guides can be used with most machines, provided they have metal parts. Keep the seam guide close to the presser foot for smoother sewing and to use as a ‘fence’ to make straight or curved topstitching neat and perfect every time.
SAFETY FIRST:
- Be careful when working with extremely sharp blades.
- Use new blades and needles with each project; a razor sharp edge on your knife is essential.
- Cutting mats are best for smooth cutting and to protect work surfaces.
- Work on an uncluttered stable flat surface that is well-lit.
- Wear safety goggles to prevent injury should a machine needle break.
- Use woodworker’s safety tape on your fingers, if desired.
- This is not a process to engage in when you are distracted or tired.
- It’s always beneficial to practice by dry fitting or test piece first as there are no re-do.
THE PATTERN:
PREPPING THE LEATHER (REAL AND IMITATION):
Real leather in which the grain or surface of the hide has not been altered in any way, except for the removal of hair, have natural markings and texture. These natural markings are visible but are not excessive or unsightly when finished. Healed scars, scratches, insect bites, fat wrinkles and other markings are common and considered by many as the true sign of premium leather, which develops a beautiful patina over time and is valued by leather artisans.
Examine the skins for imperfections and flaws we do not want: tears and holes, branding marks, etc. should be avoided, so tag or mark them with chalk so that these areas can be avoided when marking out and cutting the pieces for your project.
- Blocking: The beauty of natural leather is that it is supple, flexible, and pliable. While we value these traits, they may undermine any attempts to sew it. Leather will often “grow or creep” under the machine foot while it is being sewn. It is important after joining leather pieces together to check its dimensions and correct it, if necessary. To reduce some of this elasticity, try this simple method. You need only a stable source such as a blunt edge of a counter or table. Now lay the leather skin face up as not to scratch the good side of the skin. Let the skin hang over the counter’s edge and while holding the leather flat with one hand, pull the skin downward towards the floor with the other hand. Give it a good stretch. Then reverse the leather in the opposite direction and repeat this process. Do this several times until you are satisfied with the results. Set the leather flat on the work table and let it relax before marking out the pattern pieces.
- Skiving: Another point to keep in mind is the thickness expands when you create a rolled or turned edge. Keep the overall thickness to one-ply by skiving the edge that needs to be turned. Place the leather face down on a flat work surface and mask off the seam allowance just inside the fold line with low-tack masking tape. Hold the leather firmly down on a hard and clean surface such as granite. Choose a work surface that is smooth and cannot be damaged if your blade slips and cuts into it. The tool required is a skiving knife. You can also use a sharp utility blade as well. Apply enough pressure for the blade to bite into the leather and carefully pushing the tool away from you as you would a chisel, peeling away at the edge as you go. The depth of the cut (and therefore the thickness of the leather remaining) is dictated both by the amount of downward pressure exerted and by the angle at which you hold the knife itself; usually between 30 and 45 degrees. Little amounts and often is the key here. You can always keep going over the leather, removing thin strips each time. Remember, you can always take it away but you can’t add it back on. Repeat the skiving motions all over the surface of your leather until you have thinned your piece down to the thickness you wish, then glue or tape the bevel ready for turning. Remember to remove the masking tape.
For imitation leather, its surface is uniform in texture and thickness. It needs very little in the way of preparation. It does not stretch in the same way as real leather so that is not a problem, unless you choose to use a knit-backed leather. Avoid areas near the selvedge of the material as the polyurethane coating is thinner when marking out pattern pieces. Also, like real leather, faux leather will increase in thickness when you create a rolled edge. To remedy this, mask off the seam allowance just inside the fold line with low-tack masking tape and flatten the seam allowance with light taps using a rubber mallet to flatten it as much as possible before turning an edge. Imitation leather does not fray, but any raw edges that are exposed should be finished in a manner of your choice to give it a neat appearance.
If you feel the need to iron out any wrinkles, set your iron to a LOW or SYNTHETIC heat setting. Make sure to always iron from WRONG SIDE of the fabric, and use a press cloth between your iron and fabric. Always keep the iron moving so as not to melt the material and do not use any steam as it will detach the bond. Remember to store any leather on a cardboard roll instead of folding it flat to avoid creasing.
MARKING AND CUTTING:
There is no need to rush with any leather, and it’s much better to be cautious and plan your movements thoroughly. This way, you’ll avoid making any mistakes that you may not be able to rectify later.
Download the pattern provided for this project and mount it onto light card stock. Carefully cut out the different pattern pieces. This step will help with tracing the outline of each piece required. Be sure to indicate orientation and pattern piece number ID on each piece as the pattern pieces are small and look alike. There are twelve pattern pieces in total.
Practice a steady cutting hand with slow yet deliberate movement for a clean result, working in small sections where possible so any mistakes would only affect a small area. Use a safety ruler and a rotary cutter with a new blade.
For the leather: Only cut a single layer at a time as leather creeps and stretches whilst cutting. If you have pieces which need to be cut on the fold, draw around the pattern piece, flip it over on the foldline and draw around the pattern again for its mirror image for a more accurate cut. As you cannot pin the pattern to the leather, weight it down on the face side of the leather and draw around it with chalk, then cut along the lines. To reduce leather waste, two straight edges can share the same cutting line. You can use a rotary cutter for cutting straight lines on real leather or imitation leather, but for curves, you may get better results using trimming scissors. Leather does not have a dedicated grain so it may be cut in any direction. As for PU imitation leather, be sure to follow the backing fabric side grain.
Ensure that the pattern pieces are FACE SIDE UP (FSU) and trace them onto the face side of the leather. Cut one of each piece in leather (1-2-3-4-6-7-9), cut 2 of pattern piece 8, and cut 4 of pattern piece 5.
For the interlining: With polyester or nylon ripstop interlining, the woven fabric will start to fray easily after it has been cut. Use a rotary cutter to produce straight edges and cut pattern pieces on straight of grain. If the fabric continues to fray too much, you may want to “pink” the raw edges or use a sealant like Fray-check™. When applying an interlining, you may want to grade the seam allowances from your seams to reduce bulk after you sew.
For this project, you will need to cut one of each of the pattern pieces in the interlining fabric except for pattern piece (8) and the tops of the cardholders (5) as they will be applied to a long strip of interlining (10) that will be folded to create the card slots. You will need linings for the pockets: cut 1 zip pocket lining (11) and 1 piece of lining for the left side of the wallet (12).
Ensure that the pattern pieces are FACE SIDE UP (FSU) and trace the pattern pieces on the wrong side of the interlining fabric so that the orientation to its leather counterpart is correct. Before cutting the pieces out, put bits of low-tack masking tape to indicate the back of the cloth on each piece.
Instructions:
ASSEMBLY:
Design Note: The basic mantra to sew leather is to go slow with the power of your sewing machine. All pattern pieces have 3/8” (10 mm) seam allowances to allow the work to remain visible under the machine foot. Best practice is to leave a long thread tail and hand tie the end of each seam, instead of back stitching. You can back stitch faux leather, but hand tying looks much more professional. Once the seam is sewn, the seam allowance is either graded or trimmed close to the row of stitching before turning out. Before cutting away any excess material, flatten the edges with a seam brayer or a rubber mallet. For folds and turn-unders, you may need to skive the seam allowance on real leather and hammer the seam allowance for imitation leather.
Always test first: Sewing leather can be unforgiving; any stitches you sew will leave a permanent mark, so it’s not always as easy to fix mistakes as sewing with fabric. For this reason, be sure to use scrap pieces to test your thread, stitch length, tension, and general performance of your machine to make sure you’re on the right track before beginning your actual project.
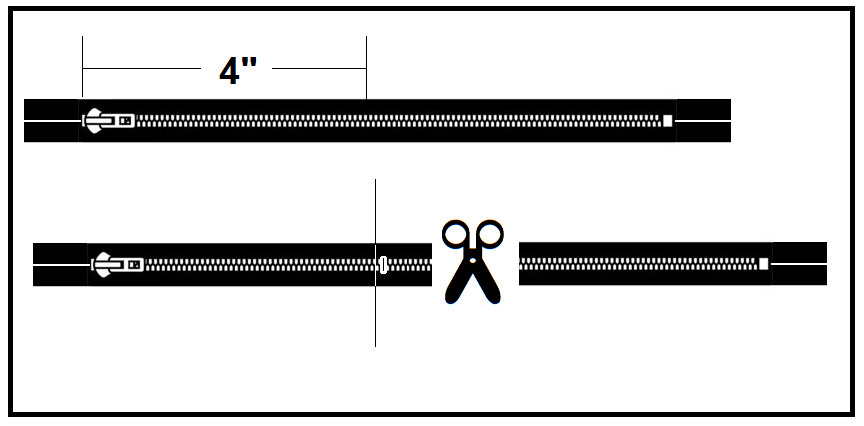
Shortening the Zipper:
You may skip this step if you have a 4-inch long closed zipper.
For this project, you will need to cut a skirt length zipper to length (4” + 1 seam allowance).
- Measure from the top stop on the coil to the desired length and mark that point. Manually, whipstitch a bar-tack around the coil at this point to stop the slide-head from getting dislodged from the zipper.
- Allowing for a seam allowance, cut the excess from the zipper. Set aside.
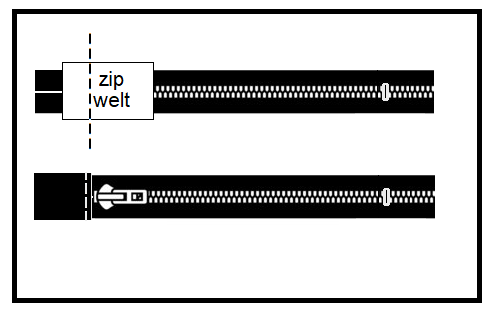
Attach Zip Welt to the Zipper:
Collect the zipper and the zip welt (leather piece 1) together.
- With face sides together, lay the zip welt on top of the open end of the zip. Stitch across the width of the zipper tape to secure.
- Fold the welt back on itself so that it is face side up. Trim the seam allowance on the welt portion by half, and roll the seam flat with the seam brayer.
- Topstitch 1/8” from the seam, through the zip welt and the zipper tape. Trim the welt’s width to equal the width of the zipper tape. Set aside.
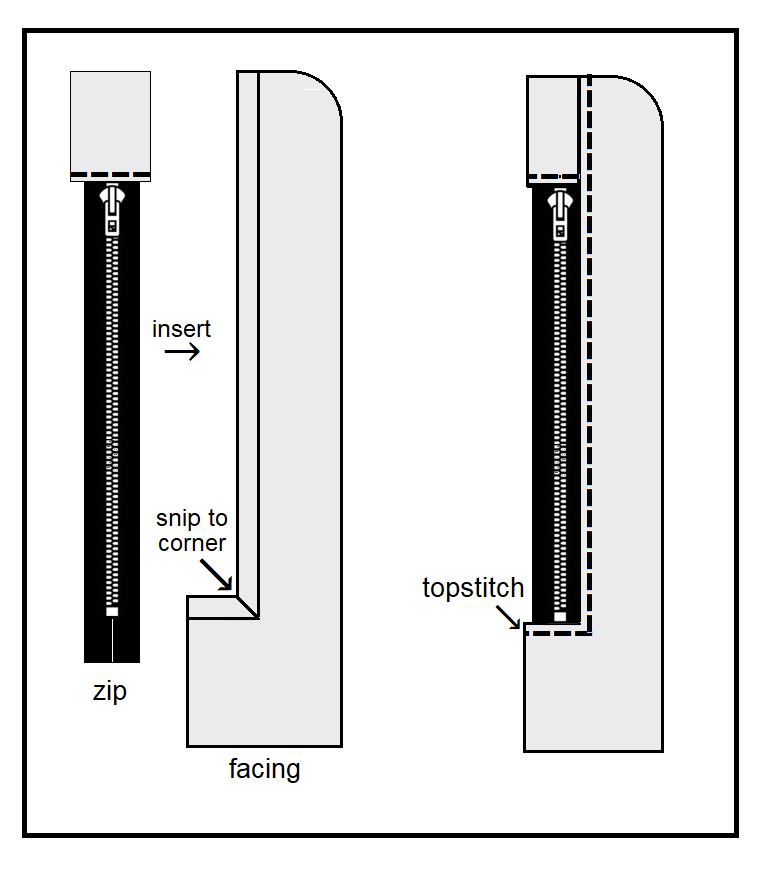
Attach Zipper to Zipper Facing:
Gather zipper and the zipper facing (leather piece 2) together.
- With face side up, score stitching lines on the indented side of the zipper facing. Starting from the top edge, score the width of the seam allowance (3/8”) to the right-angle corner and across the end of the corner, using a point creaser.
- On the inside edge of the corner, punch a hole with an awl. Use an art knife to cut a diagonal straight line from the punched hole outward to the edge to release the seam allowance.
If necessary, on the flesh side of the thicker leather, mask off just outside of the score lines with masking tape, and skive the seam allowances before turning, as described above. - With face sides together, match and align long edge of zipper tape with indented side of zip facing. The zipper should lay from the end of the zip welt to just above the whipstitching at the corner.
- Using a zipper foot attachment, sew down the center of the zipper tape to the corner. Then, sink the needle in the machine and pivot at the corner. Keeping the material face up, realign the bottom edge of the zip across the short side of the corner by spreading open the slashed corner point. Stitch across the bottom portion. Pro Tip: Put some invisible tape (also sold as magic tape™) on the bottom of your zipper foot attachment to make it non-stick. You can put 2 strips of tape on either side of the feed dogs too.
- Fold the leather under and keep the zipper flat. Flatten folded edges with seam brayer or rubber mallet. Use double-sided basting tape to hold leather flat against the zipper. If necessary, on the flesh side of the thicker leather, mask off just outside of the score lines with masking tape, and skive the seam allowances before turning, as described above. Carefully remove the masking tape.
- Topstitch along leather edge of zipper insert. Set aside.
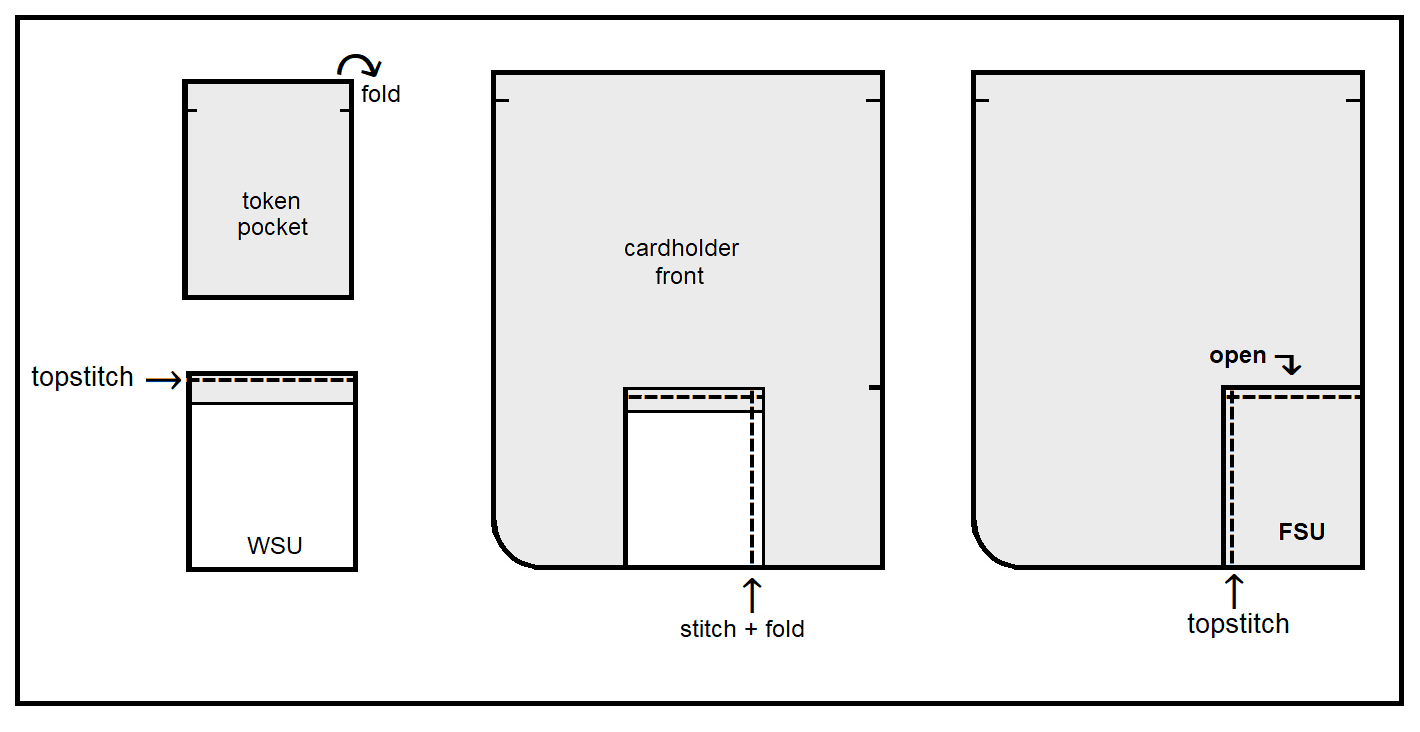
Attach Token Pocket to Cardholder Front:
Collect token pocket (leather piece 3) and cardholder front (leather piece 6) together.
- With flesh side up, score foldline of top edge of token pocket and turn under the edge. If needed, skive and glue down the edge. Flatten with the brayer.
- Topstitch across the fold on the face side.
- With face sides together, match and align right-hand side of token pocket (3) to notch on the bottom edge of cardholder front piece (6). Stitch token pocket from top to bottom. Grade the seam allowance.
- Fold the token pocket face side up onto the face of the cardholder front piece. It should lay flat and match up at the corners.
- Topstitch along left side of token pocket to flatten the edge. Set aside.
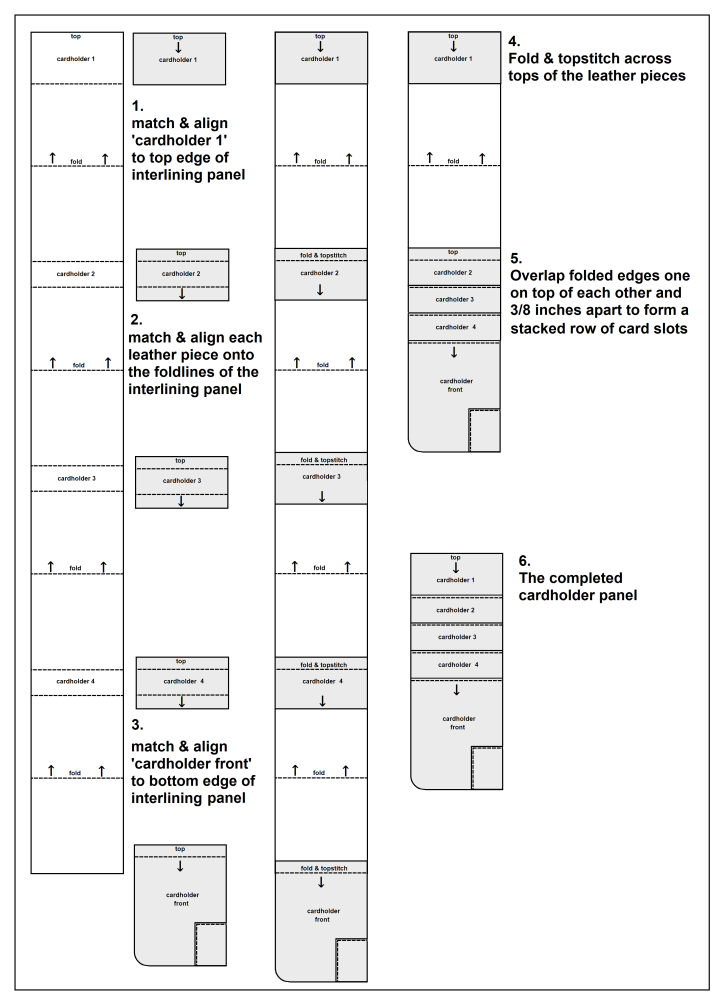
Prep Cardholder Pieces & Cardholder Front:
Gather cardholder pieces (4-5) and front panel piece (6) together.
- On the flesh side of each cardholder piece (5) and the cardholder front piece (6), mask off the top seam allowance with masking tape. * If needed, skive each seam allowance to reduce the thickness. Work perpendicular from the edge of the tape outward to the edge removing thin layers of flesh. Repeat for each piece.
- With flesh side up, brush leather glue along the bottom edge of leather piece (4). Work perpendicular along the edge, applying thin layers. Allow the glue to dry and become tacky to the touch. Carefully, remove masking tape.
Alternatively, you can use double-side basting tape instead of glue. Set aside.
Attach Cardholder Facades to Interlining:
Collect leather pieces for the cardholder section (4-5-6) and the interlining panel (10) together.
- Prep the interlining by folding the strip of fabric, accordion-style, at the notches. Lightly press the pleated cloth flat to create each card slot. (Set the iron to a LOW or SYNTHETIC heat setting and use a press cloth).
- Starting at the bottom edge of the interlining and with the fabric, face side up, match and align the top edge of the cardholder front piece (6) over the seam allowance of cloth to secure in place. Carefully remove the masking tape from the back of the leather and adhere in place. Flatten with the brayer then lightly score the foldline with the point creaser. Turn top edge of the leather under so that wrong sides of the materials are together and crease along the fold.
- Topstitch along the fold through all layers to make the first card slot and to keep it flat.
- Next, at the top edge of the interlining and with the fabric, face side up, match and align the top edge of the cardholder top piece (4) over the entire cloth. Top corners will align and match and layers will be superimposed on top of each other. The glued or taped edge should adhere to the cloth.
- Lastly, with face sides up, position each cardholder piece (5) evenly between the top and bottom pieces. Carefully remove the masking tape from the back sides of the leather and center each piece on every second fold on the interlining at the notches. You may want to dry fit each piece first before adhering in place.
- Flatten each piece with the brayer then lightly score the foldline with the point creaser. Turn top edge of the leather under so that wrong sides of the materials are together and crease along fold.
- Topstitch along the fold through all layers to make each card slot. The card slots should stack off-setting each other by 3/8-inches.
- To complete this section of the wallet, machine-baste the seam allowance on the right-hand side of the stacked card slots to hold the slots in place. Set aside.
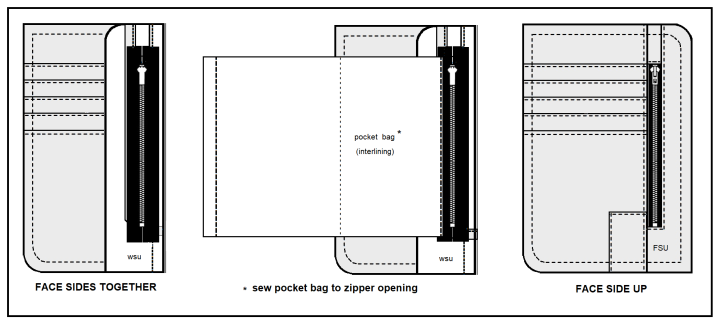
Make Left-Side Interior of Wallet:
Gather the constructed cardholder section, the constructed zippered section, and the zip pocket lining (12) together.
- With face sides together, align the zipper tape edge to the cardholder section and superimpose the layers one on top of the other. (Hold in place with quilter’s clip or basting tape in the seam allowance area). Center the zip pocket lining (12) over the zipper tape, allowing for seam allowances on either side of the zip opening.
- Machine-stitch through zipper tape and zip pocket lining only. Go slow and guide the work straight. Pro Tip: If your machine is having trouble starting to sew at the edge of a thicker seam, place a folded stack of leather scrap at the back of your presser foot. If this stack is the same height as the thick seam, the foot will be held in a horizontal position. This will let the seam start more easily.
- Grade the seam. Before topstitching, trim the seam allowance of the side that will be covered after topstitching. This helps reduce bulk and allows the seam to lay flatter. It is also ideal to hammer the seam so it will be as flat as possible while you are sewing.
- Pull the pocket lining aside (towards the zipper) to clear the seam and with the face side up, topstitch the seam down through all layers, on the cardholder side of the seam.
- With the work face side down, lay the pocket lining flat against the zipper tape and finger-press along the seam. Fold the lining back on itself and over the back of the zipper to form the pocket bag. Sew the unsewn edge of the lining to the zipper tape.
- To complete the pocket bag, flip everything so that it is face up on the face plate of the machine. Lift each side of the work at the ends of the zipper to reveal the pocket lining and stitch the sides of the bag. Use a zipper foot attachment to get as close to the zipper opening as possible. Trim all seams to reduce bulk.
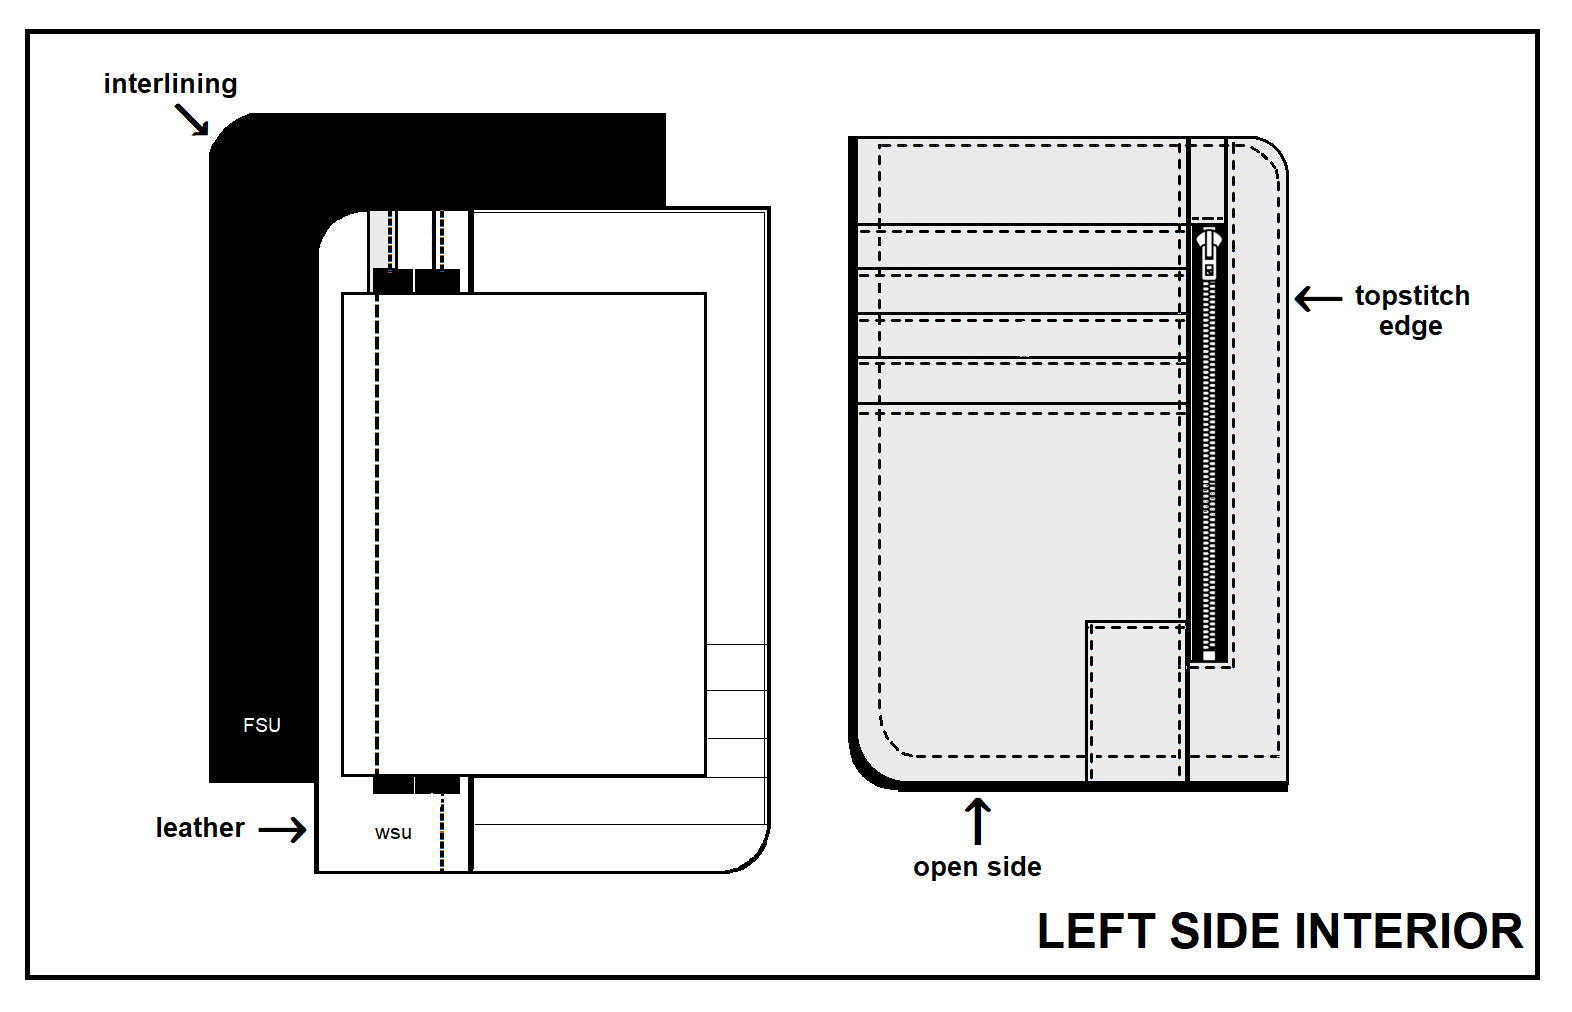
Lining the Left Interior of Wallet:
The left side of the interior is almost complete. You will need left-side lining piece (12).
- With the work face side down on the work surface, trim away as much of the bulk in the layers to keep the thickness to a minimum.
- Score the top and left edges of the work in preparation to turning the edge.
- Mask off the top and side seam allowances, just inside of the score lines with masking tape easing it around the curved edge.
- For thick leather, you may need to skive the seam allowance.
- With face sides together, match and align the leather and left-side lining (12), layering one on top of the other. Hold together on the edge with quilter’s clips or basting tape.
- Machine-stitch along the scored line across the top of the seam (3/8”), round the curve, and down to the bottom of the seam. Carefully remove any masking tape on the leather side.
- Finger-press the seam open. At the curve, take thin notches out of the seam allowance to reduce bulk. Before topstitching, reduce the seam allowance that will be covered after topstitching to allow the seam to lay flatter. It is also ideal to hammer the seam so it will be as flat as possible.
- Turn everything face side out and gently push out the seam at the corner with the point creaser. Work the seam between your fingers so that the interlining lays just inside the convex seam. Hammer or roll the seam so it will be as flat as possible.
- Topstitch the seam. The left side interior of the wallet is complete.
Line the Right Side Pocket:
Gather the pocket piece (7) and the pocket lining (7) together.
- On the flesh side of the pocket, score the foldline and the top edge of the pocket piece (7) , and mask off the seam allowance with masking tape. Skive the thickness, if needed.
- Tape or glue the seam allowance, as before.
- Carefully remove the masking tape and with wrong side of leather to face side of lining, center leather piece over the interlining (lining) and match up at the notches. You may want to dry fit each piece first before adhering in place.
- Turn edge of the pocket opening under, so that wrong sides of the materials are together and align with the interlining.
- Topstitch along the fold through all layers to make the pocket opening. Set aside.

Make the Wallet Exterior:
Gather the exterior piece (9) and the wallet’s spine pieces (8) together.
- Prep the spine: Score the long edges of the spine pieces (8) and turn under the edges. Use tape or glue to hold the fold in place.
- On one of the spine pieces, dock the leather by dotting the surface with pinholes with an awl or leather punch as a decorative accent. Apply the docking guide template and punch the pinholes.
- With face sides up, center the spine piece in the middle of the exterior piece and topstitch it along the turned edges. Set aside.
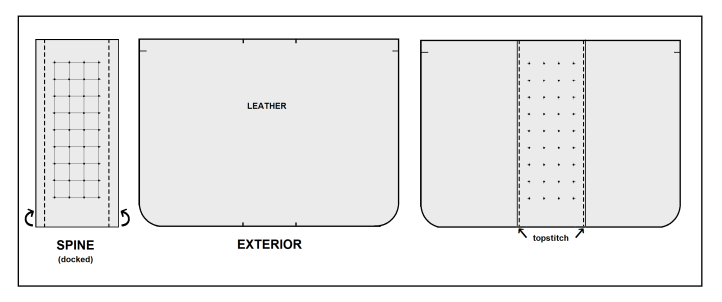
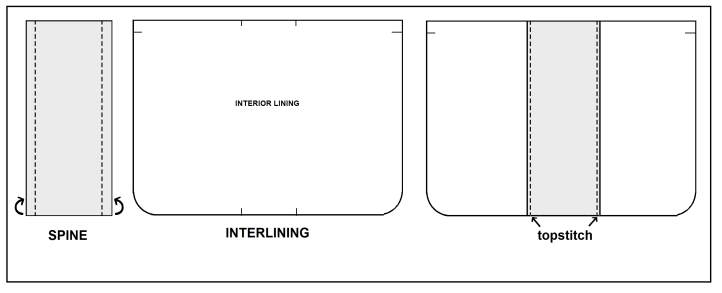
Make the Interior Lining:
Collect the remaining spine piece (8) and the exterior lining (9).
- With face sides up, center the spine piece in the middle of the interlining piece and topstitch the spine in place, along the turned edges. Set aside.
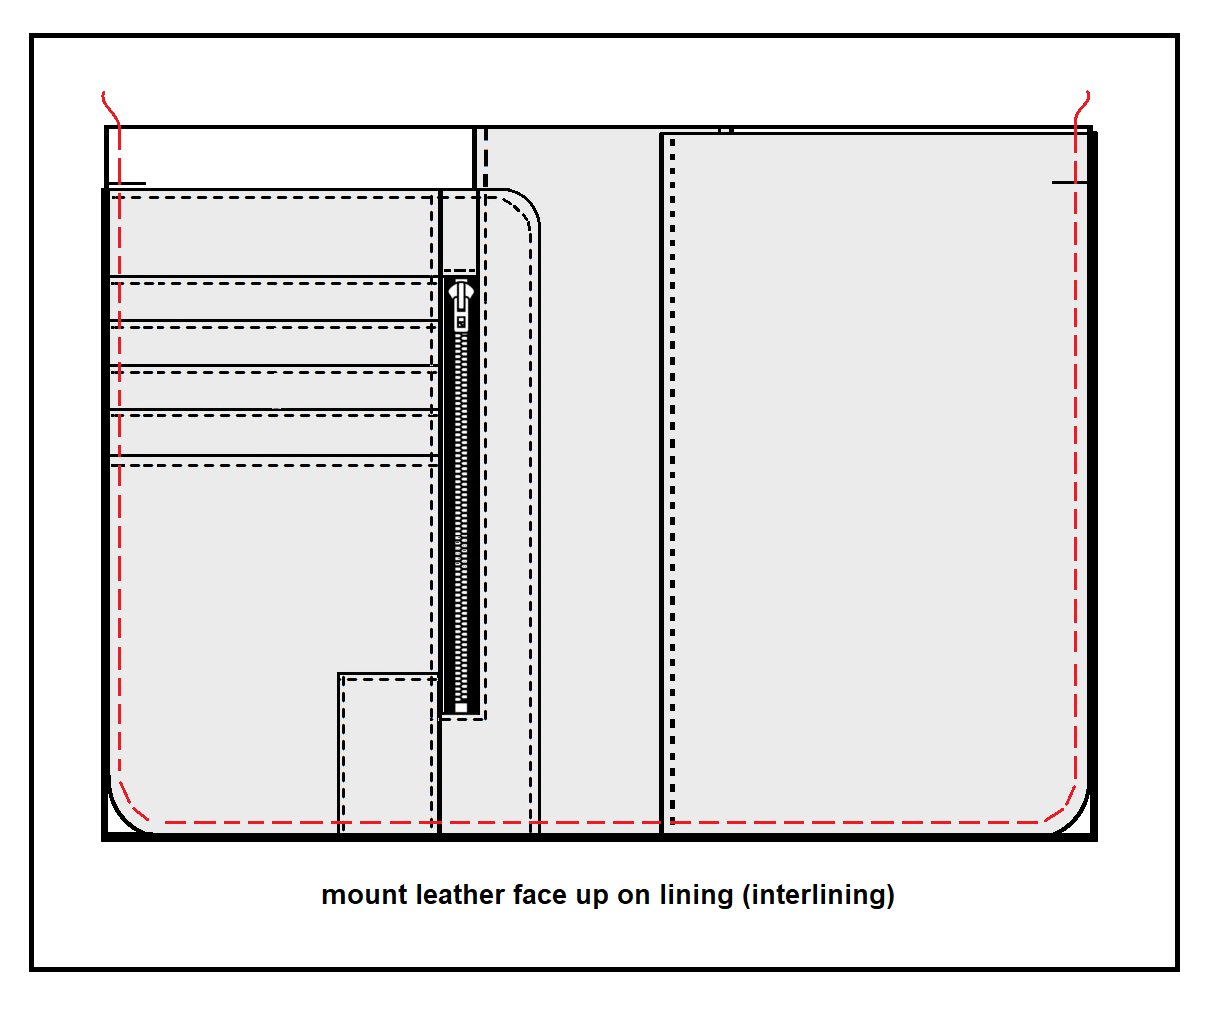
Mounting the Interior Sections to the Lining:
Gather the left-hand side section of the wallet, the right-hand side pocket, and the interior lining together.
- With the face side up, lay the lining flat on the work surface.
- Match and align the open edge of the left-hand side section of the wallet to the left side of the lining. It should slightly overlap the spine so that the interlining is not visible. The top of the lining allows for one seam allowance.
- Match and align the open edges of the right-hand side pocket of the wallet to the right side of the lining. It should slightly overlap the spine so that the interlining is not visible. The top of the pocket should match the top of the lining.
- Machine-baste the layers to the perimeter of the lining 1/4” inside the seam allowance.
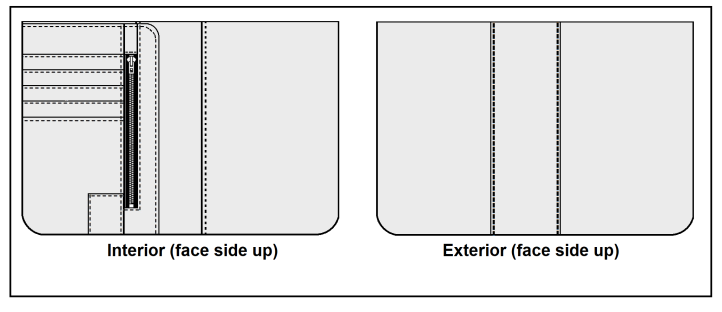
Prepping the Interior and Exterior Sections of Wallet:
Collect the interior and exterior sections of the wallet together.
- Place the exterior section face down on a flat work surface and mark the stitching line around the perimeter (3/8” from the edge). Measure the length and width between the stitching lines to ensure the correct finished dimensions of the wallet (5 1/2” x 8”) and adjust, if necessary.
- Score the stitching lines around the perimeter of the wallet.
- With the leather face down, mask off the seam allowances just inside the stitching line with low-tack masking tape. This will stabilize the leather from creeping while stitching through all the layers. Also, these edges will be turned, so if the leather is thick, skive the seam allowances if needed, as described above, or alternatively, hammer the edges flat, if using imitation leather.
- Crease the top edge of the leather and fold over onto the wrong side. Tape or glue in place. Roll turned edge to flatten.
- For the interior section with the leather side face down on the work surface, mask off the seam allowance across the top edge of the interior with masking tape.
- Score the areas where the leather extends into the seam allowance. As before, compare the length and width between the stitching lines to the correct finished dimensions of the wallet and adjust, if necessary.
- Crease the top edge of the interior section and fold over onto the wrong side. Carefully remove the masking tape.

- Tape or clamp the folded edge in place. Roll with seam brayer turned edge to flatten.
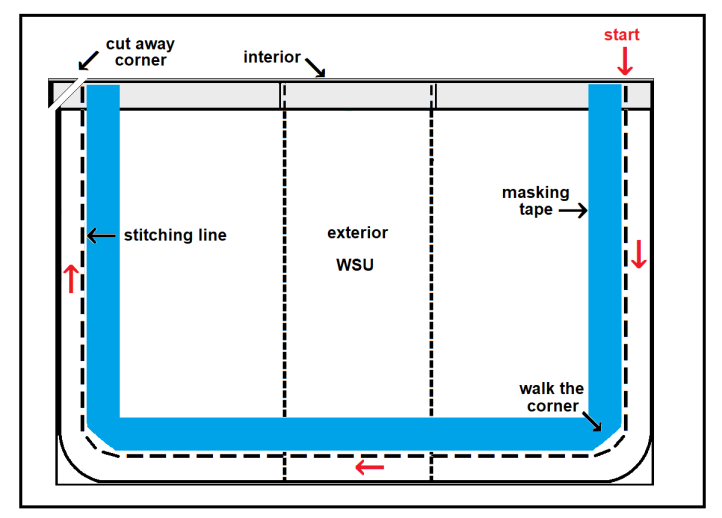
Attaching the Interior to the Exterior of the Wallet:
Note: Reduce any bulk or flatten any thick areas. Depending on the thickness of layers, the machine’s tension may need adjusting.
- With face sides together, superimpose the exterior section on top of the interior section so that the top folded edges are flush with each other. Match and align the perimeter edges of the layers and clamp to hold in place. Check thickness of work. Roll or hammer edges flat, if necessary.
- Starting at the right top corner, slowly stitch along the scored stitching line through all layers and stop just short of the rounded corner with the machine needle in the down position.
- Take your foot off the footpad and manually ‘walk the needle’ around the curve using the flywheel following the edge of the masking tape for best control around the curve.
- Once back on the straightaway, proceed with regular machine-stitching and repeat at next rounded corner.
- The last row of stitching is over the folds of the cardholder slots. Go slowly and over thick areas you may have to walk the needle manually to avoid breakage or skipped stitches. Pro tip: Should the machine needle skip stitches while sewing, the designer recommends to continue sewing and finish the seam. Then come back and fix the missed stitches by filling the existing holes by hand with needle & thread.
Turn Out Wallet:
- Carefully remove masking tape. Tie off thread ends as close as possible to the row of stitching.
- Cut the top corners on the seam allowance on the diagonal to reduce the number of layers before turning out.
- With the aid of a straight edge and a rotary cutter, reduce the seam allowances by half (3/16”) along the sides and across the bottom edge.
- At the rounded corners, cut away small slices and angle the straight edge around the curve as you do so.
- Roll out the edges to flatten any bulk.
- With the aid of a point creaser, gently turn the material face side out through the top opening. Use the point creaser to coax the rounded corners to lie flat. Roll the straight edges between your fingers to have the seam turn at the very edge. Flatten with the seam brayer or tap the edges with a rubber mallet.
Finishing Wallet:
Pro tip: If you have not already done so, switch out your machine needle for a new one. As you no longer have a wide seam allowance, you may want to set up a seam guide to aid in topstitching the edges of the wallet.
- Match and align the top edge of the interior with the top edge of the exterior so that they are flush with each other. Clamp or tape opening close.
- With the interior of the wallet face up, contort the upper left corner of the wallet by lifting the top edge of the fold of the compartment to have access to the top edge of the wallet at the seamline. Starting as close as possible to the corner and keeping the material flat, topstitch 1/8” from the edge from this point across the top of the wallet to close up the opening. Go slowly as you approach the thicker leather edge on the right side of the wallet. Tie off thread ends as close as possible to the corners.
- Flip the wallet so that the exterior is face side up. Sink the machine needle either to the right of the previous row of topstitch or directly below the row of topstitching (whichever gives better access) and topstitch 1/8” from the turned edge along the sides and bottom edge of the wallet to complete the wallet. Tie off the thread ends.
- Fold the wallet so that front and back edges align and crease the spine of the wallet.
The men’s leather wallet is complete.