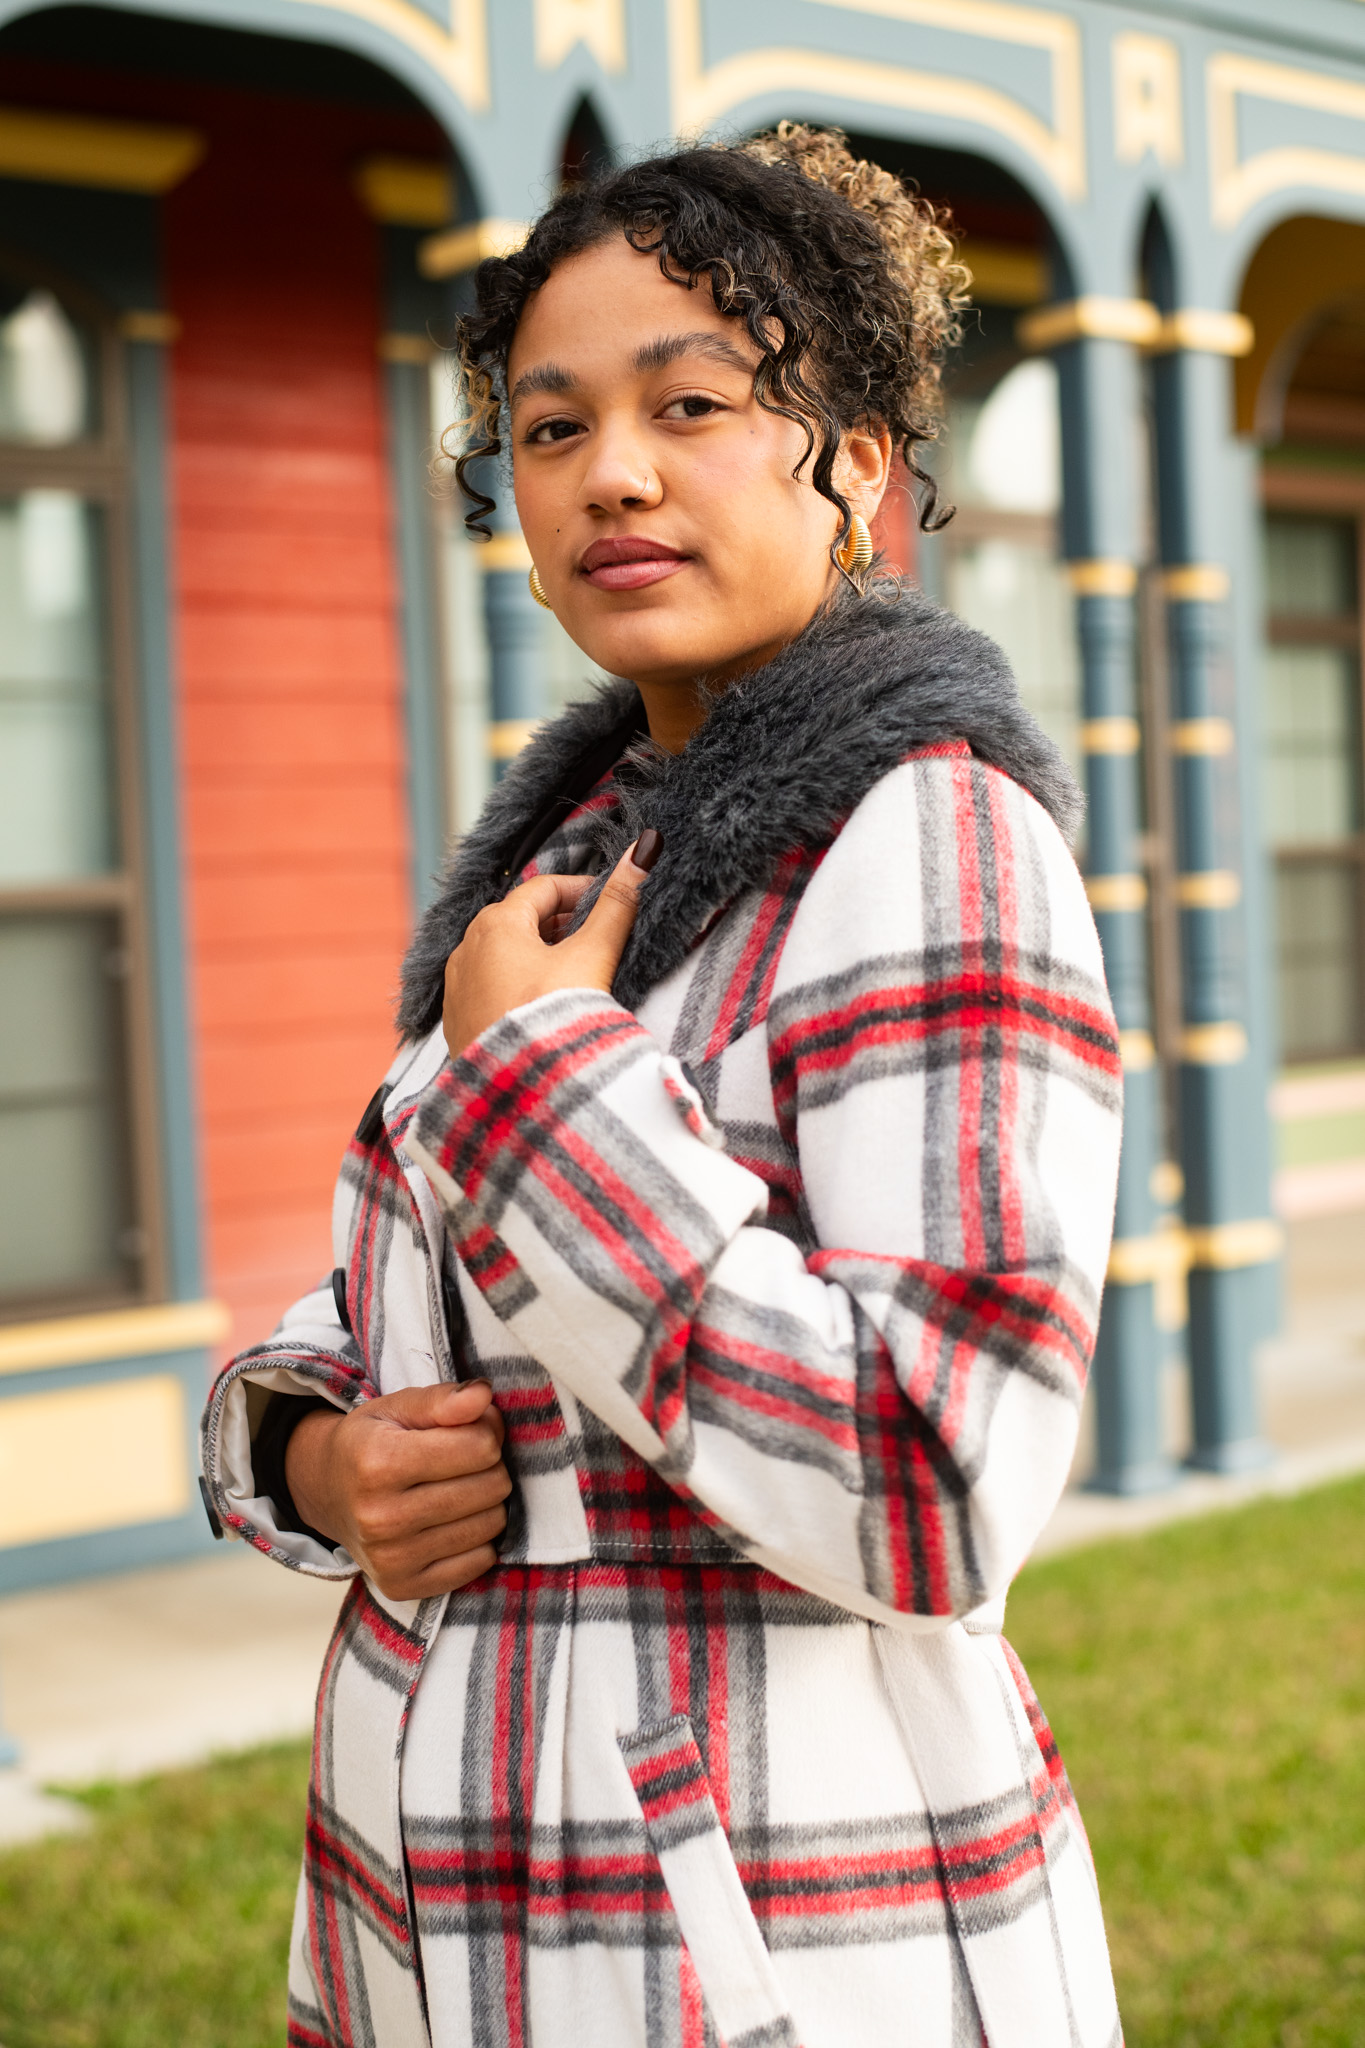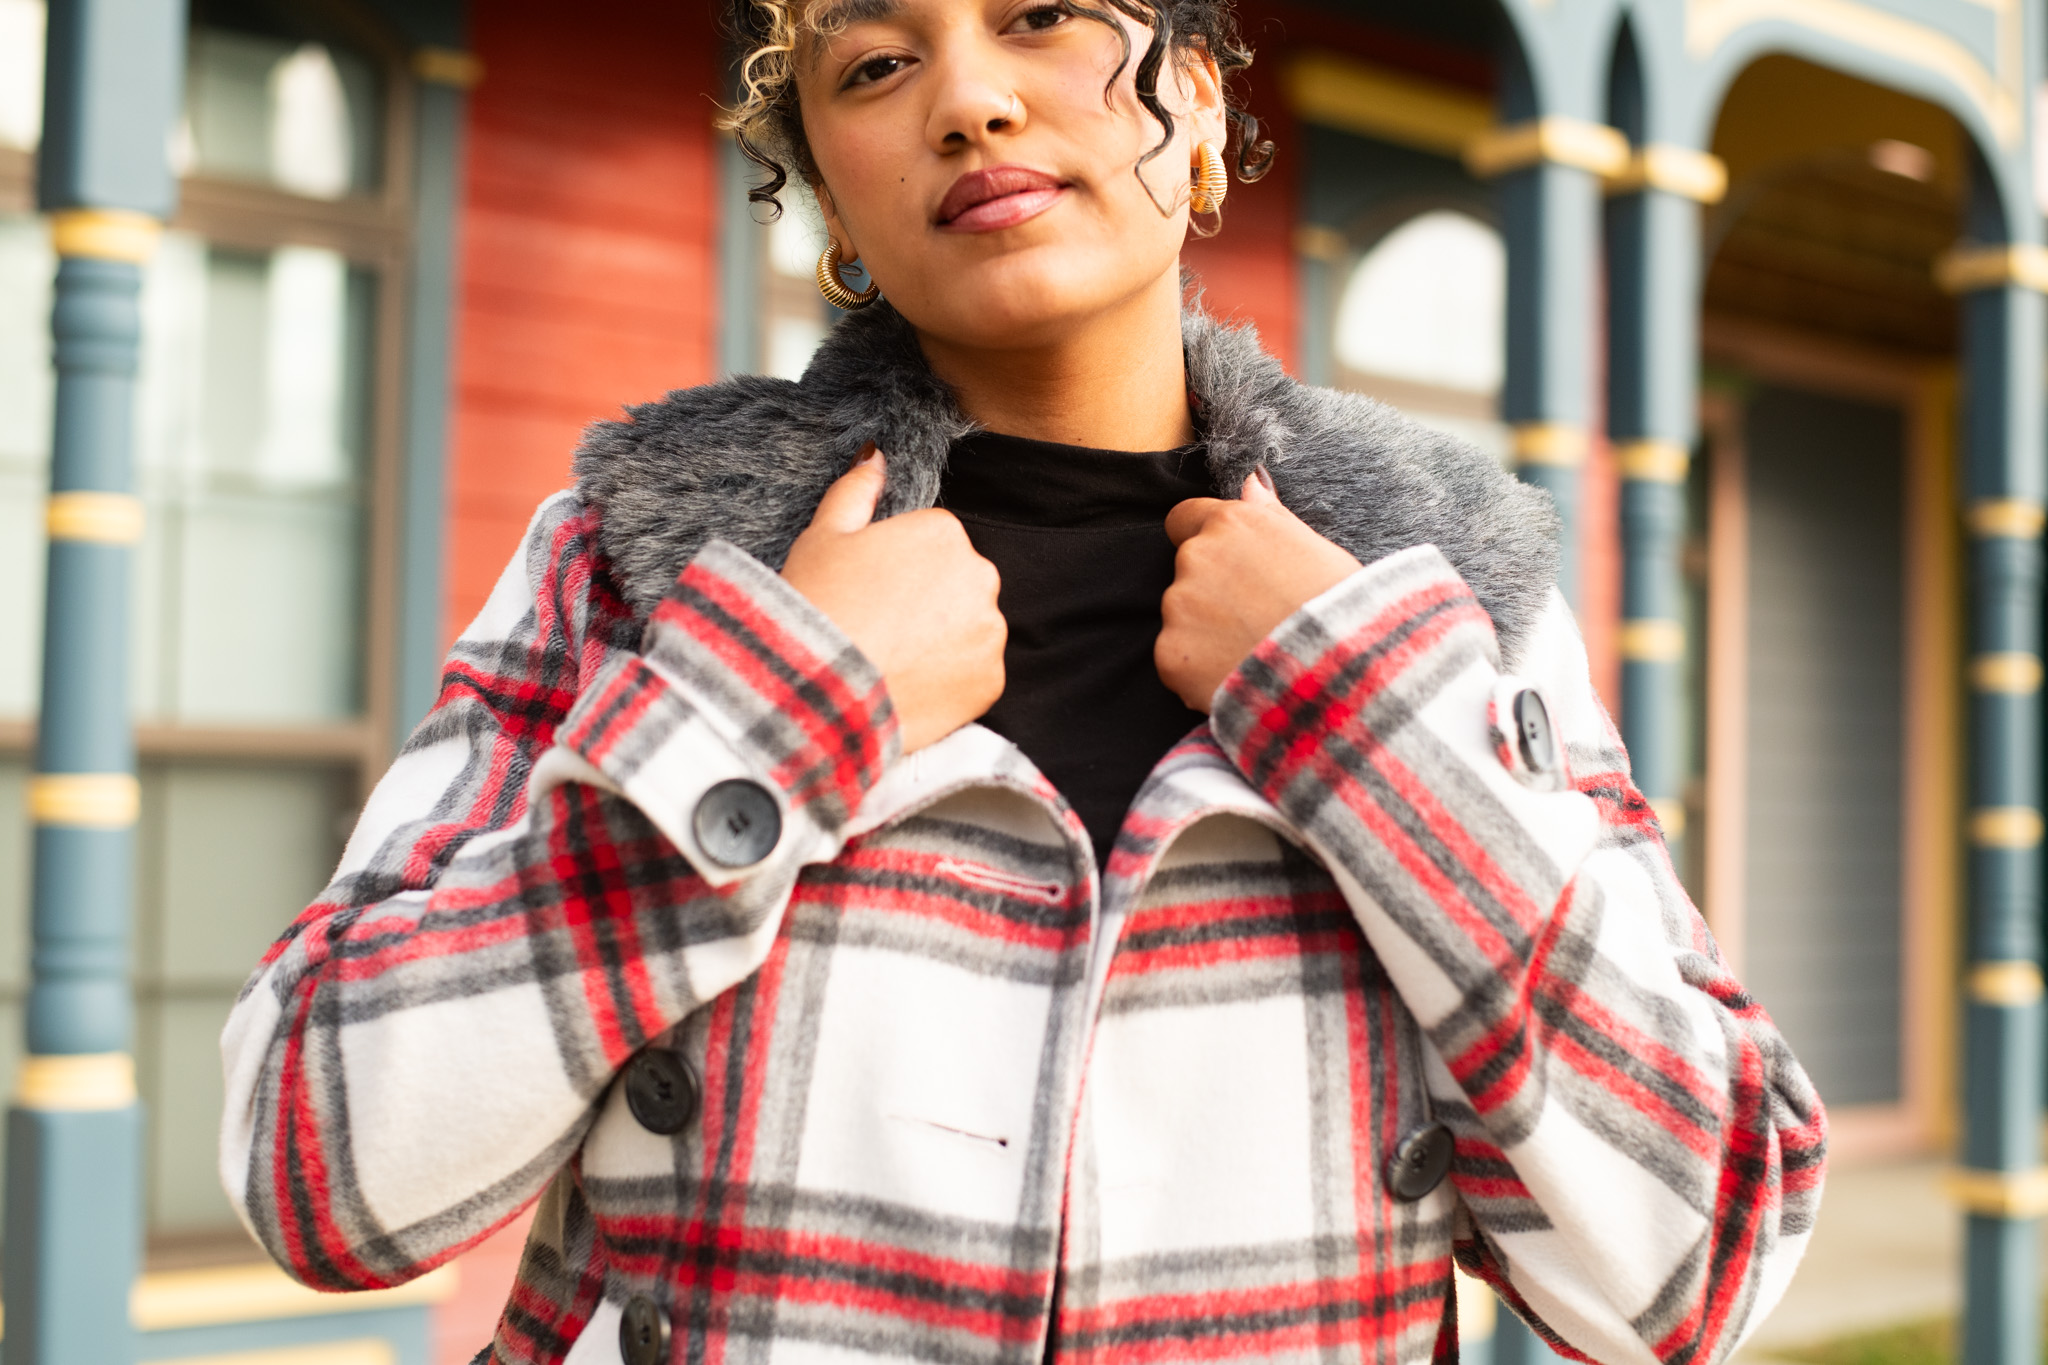
Add a little luxury to your favorite winter coat by sewing a beautiful faux fur collar. In this new pattern from Don Morin, you’ll learn how to work with faux fur to craft an elegant DIY collar, as well as how to choose the right type of faux fur to best suit your needs. This sewn accessory pattern pairs perfectly with Don’s detailed article on how to sew, preserve, and create patterns using faux fur, which can also be found within our January issue!
Fabulous faux fur looks almost indistinguishable from real fur and it is just as soft and suitable to use for winter collars. Wonderfully soft and cuddly, a faux fur collar is always a fantastic eye-catcher and instantly makes your outfit a little more elegant. Designer Don Morin shows you his method of how easy it is to make your own DIY faux fur collar to add some seasonal style to your wardrobe.
Designer Note: Each custom detachable collar is unique. Yardage may vary based on the size and shape of your collar.
Materials:
- 1/2 yard faux fur fabric, 60” wide
- 1/2 yard satin lining fabric, 56” wide
- 1/2 yard thin polyester wadding, 40” x 40” square
- 1 spool of heavy-duty polyester thread
- 2 1/4 yards twill tape or India seam tape, 1/2-inch (12 mm) wide
- 2 1/4 yards twill tape or India seam tape, 3/4-inch (20 mm) wide
- 40” elastic button-loop tape, 1/2″ wide loop x 3/8″ button spacing
Tools:
- Betweens or ball-point sewing needles, assorted pack
- Beeswax
- Quilter’s clips
- Art knife or safety razor
- Waxed tailor’s chalk
- Point creaser
- Wide-toothed comb or pet brush
- Optional: Vacuum or lint brush
CHOOSING A FAUX FUR:
Faux fur is now absolutely everywhere, whether in the street (coats, accessories, hoods …) or at home (throws, blankets, cushions …), this alternative choice is respectful of wildlife, is economical compared to real fur, and allows for great fantasy in terms of choice of animal skins, pile depths, colors, textures and patterns.
Faux fur fabrics are sold by the yard from your favorite fabric retailer or exclusively from its own manufacturer. Generally, faux fur fabrics are soft, supple and warm, just like the real thing; but made from 100% synthetic fibers; available in generous 59″/ 150 cm widths; with an even, uniform surface, that is washable, durable, and resistant to shedding.
Modern technology now allows for the most efficient manufacturing methods (weft knit/warp knit) to develop a realistic and comfortable faux fur fabric. Therefore, all the more realistic, as the difference between real and faux fur becomes virtually indistinguishable to the eye and touch. These faux fur manufacturing processes allows for all kinds of variations in hair length (pile), texture, and color pathways.
- Short-haired fur: The pile is short and soft, but also resistant to shedding allowing as many hand-washes (or dry-clean as necessary) and air drying for a better lifespan; with a simple brushing of the fur, it will be like new for new occasions. Pile height ranges from approximately 1/4-inch to 3/4-inch in length. Find all kinds of patterns, whether natural (Persian lamb, zebra, pony, Dalmatian, etc.) or fantasy (motifs or abstracts), as well in plain colors or mixed, dyed in vibrant fashion colors.
- Medium-haired fur: The pile is soft and plush. Pile height ranges from approximately 1-inch to 1 1/2-inch in length. Find all kinds of patterns, whether natural (mink, rabbit, chinchilla, leopard, etc.) or fantasy (polka dots, stripes, plaids,…), as well in plain colors or mixed, dyed in vibrant fashion colors.
- Long-haired fur: A very fluffy pile with a luxurious look, both visually and textually, in trendy modern colors and animal prints (fox, badger, raccoon, coyote, lynx,…). Pile height ranges from 2-inches or longer.
- Curly-haired furs: The finest synthetic yarns and the most efficient manufacturing methods (double raschel knit or boa knit) produces a texture with a tight or loose curl. The pile height can be short & tight (such as Sherpa), medium and curlicued (such as poodle), or long and frizzled (such as Mongolian lamb) creating a very realistic faux fur fabric with a frizzy look, both visually and textually.
- Hobby/fun furs: Fabric manufacturers are aware of the need for sustainability and a transition to more environmentally-friendly materials. This is a range of faux fur fabrics made from 100% recycled raw materials and done up in vibrant colorways and sculpted textures. Available in a width of 59”/150 cm, these budget-friendly furs will allow you to make all kinds of clothing creations, decorative soft home furnishings, cosplay costumes, team mascots, throw rugs, pet beds, etc.
There is no limit to your imagination and you can do so with a clear conscience.
NAP VS. PILE:
Napped fabric is made through the process of napping, also called brushing. The surface of a flat woven or knit textile is treated with special brushes to create a soft, fuzzy texture. Familiar examples include wool flannel, brushed cotton, and polar fleece. In most cases, the fabric’s weave includes some loosely twisted yarns, which are broken and fluffed by the brushes, creating the nap. The brushes may have wire bristles, but for delicate, fine wool and fibers such as cashmere, the fabric is brushed with the dried pods of the teasel plant, which have stiff bristles. Raising abrades the surface of the cloth and can affect the fabric’s durability and wear patterns.
Fabrics made of long staple fibers, such as woolens and mohairs, can have a nap that is almost fur-like in appearance. A napped finish tends to have a clear “direction of view,” which is referred to as “nap” in pattern layouts. A “with nap” layout takes this into consideration, so all garment sections appear the same color.
Like napped fabrics, pile fabrics also have fuzzy fibers on the surface. However, in pile textiles, these fibers are part of the textile’s weave or knit structure. Additional warp or weft yarns are incorporated into the fabric matrix, as in the making of velvet for instance. Looped yarns may be cut and then further brushed, as in corduroy or sheared terrycloth.
Faux fur fabrics, with short or long pile, may be woven, knitted, tufted (pile yarns are inserted into a backing fabric with needles), or stitch-bonded (pile fibers are sewn to a backing with a special machine). Like napped fabrics, pile fabrics typically have a pronounced directional appearance and should be cut using a with-nap layout.
MAKING THE COLLAR TEMPLATE:
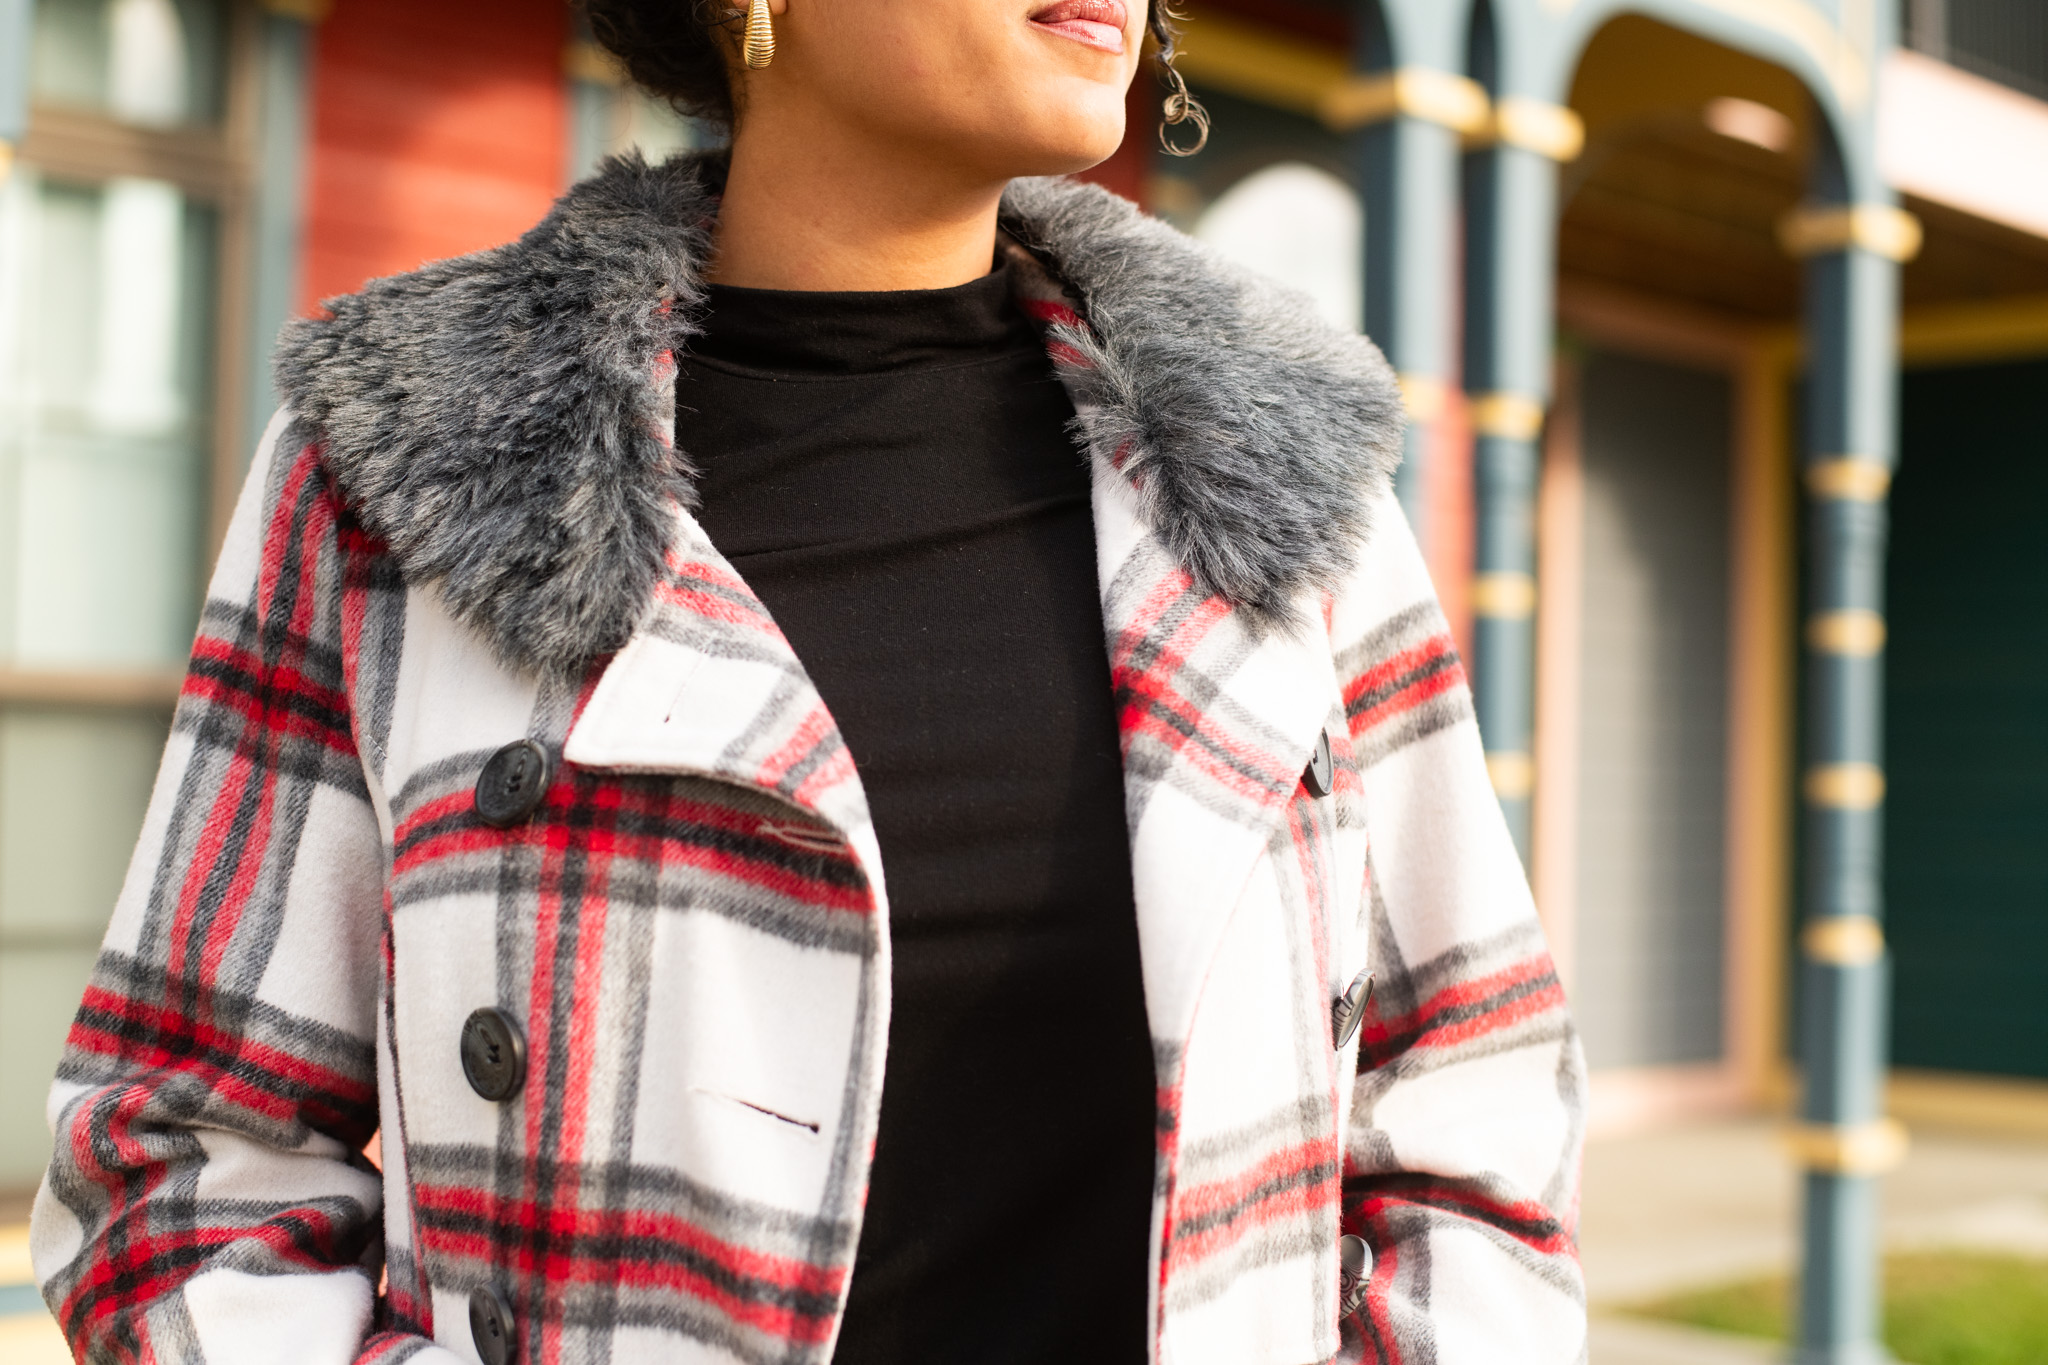
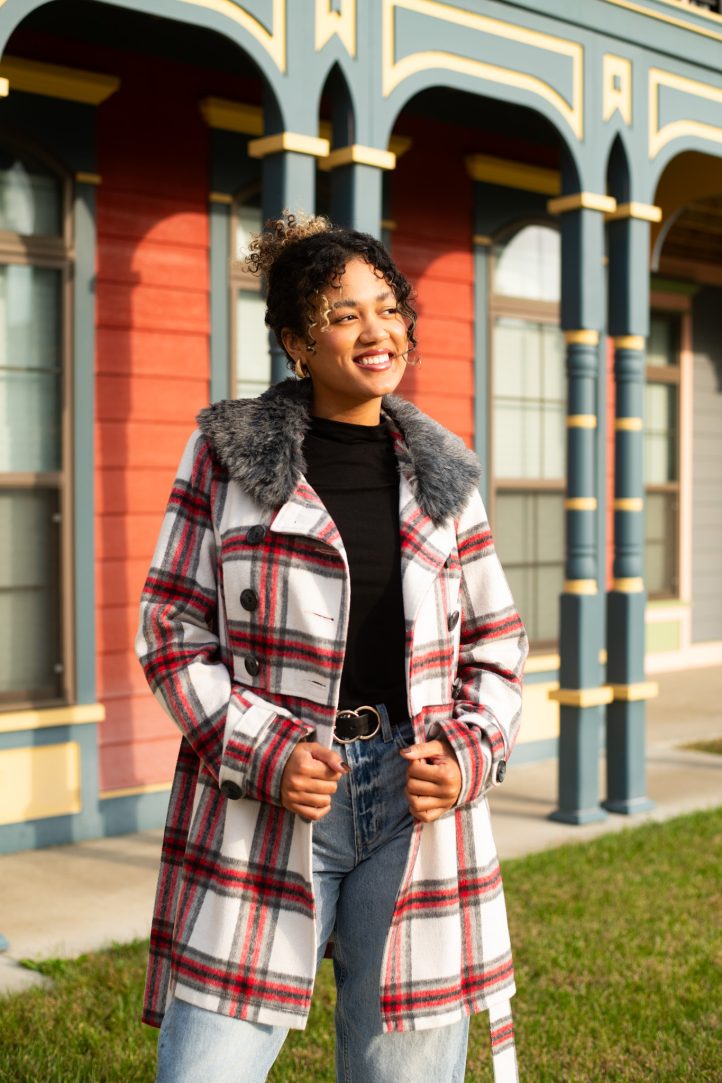
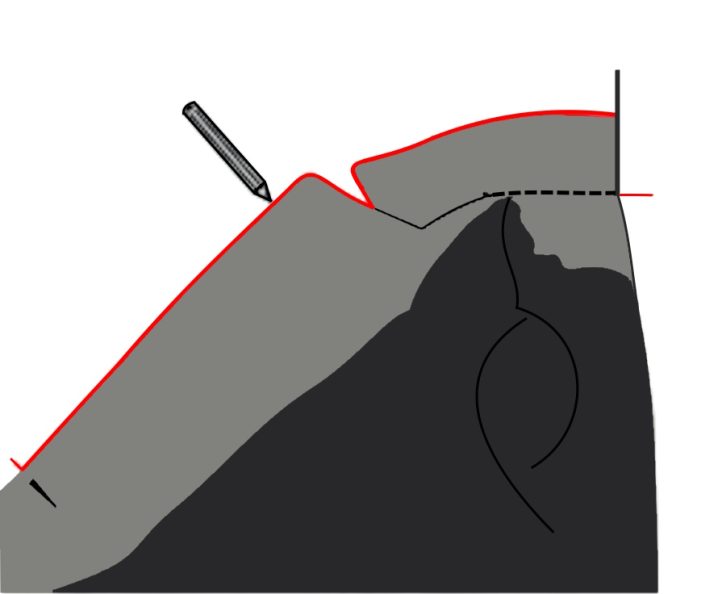
In clothing design, the focal point of any garment is the collar as it frames the face of the wearer and attracts the eye. A fur collar instantly makes your outfit a little more elegant.
Select a garment that you wish to add a faux fur collar. For the sample model, a double-breasted A-line topper with a notch lapel and collar was chosen, but you can choose any coat style you wish.

Contemplate what style of collar you want to make with the type of faux fur you have selected as there are a few options.
For instance, if using a short-haired fur where the pile is nappy but short, you might want to make the fur collar exactly like the actual notch lapel and collar on the garment or perhaps only the collar portion. Either style would look wonderful as the pile would not hide the collar shape or its details.
On the other hand, if using a long-haired fur where the pile is fluffy and deep, the pile will hide the collar shape and details due to the length of the hairs. In this case, Don recommends simplifying the shape of the collar and making a shawl collar as the notch detail will disappear into the depth of the fur pile. Let the faux fur be the star instead.
Likewise for a medium-haired fur, there is a little bit more flexibility as you can go either way as the pile is somewhat in-between these two extremes. A notch would slightly show at the fur’s edge or you can cover it up all together with a different collar style as the designer has done for the sample model.
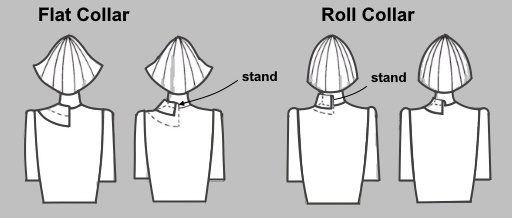
Most often collars found on outerwear come in two style groups, either a flat collar or a roll collar. Flat collars sit flat (or almost flat) around the shoulders, while roll collars stand up around the neck (or stand), roll over, then fall. Roll collars may be attached to a rever to form a lapel creating a notch lapel or a peak lapel. Check to see if there is a collar stand. The collar stand plays a key role as to how close the collar sits around the neck. If the outer edge of the flat collar is reduced, it sits higher on the neck, increasing the stand. If the outer edge of the roll collar is widened, it sits lower at the neck, reducing the stand. If there is no collar stand, then simply follow the shape of the neckline.
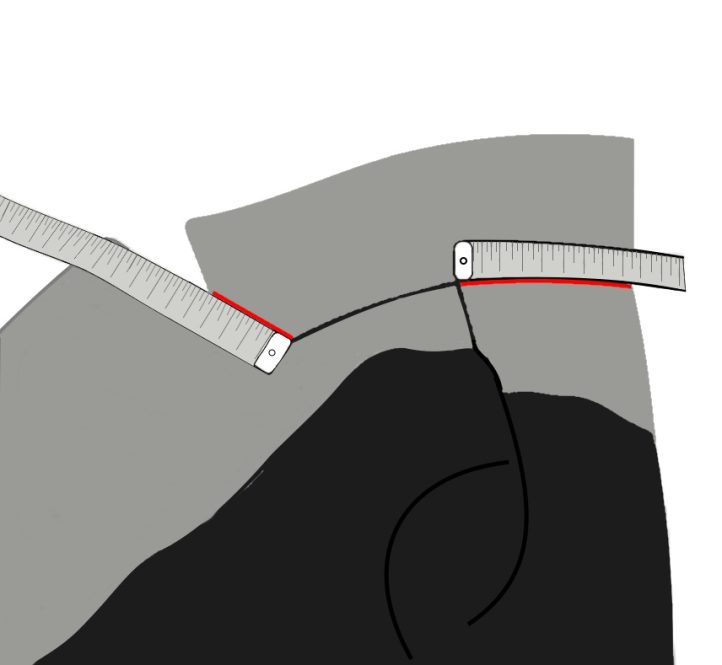
Drawing the Collar:
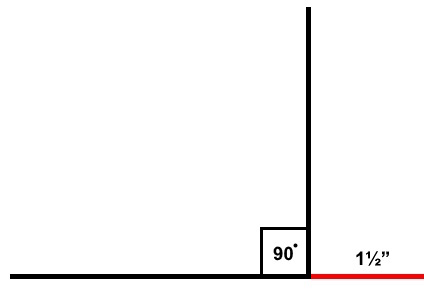
- Draw two lines approximately 6” perpendicular to each other. These are your control lines. Extend the horizontal line, about 1 1/2” to the right.
- Fold the collar in half and place it on the drawn angle. The collar neck seam on the back of the garment must be on the horizontal line and the centerback of the collar must be on the vertical line. Trace around the outer edge of the collar, drawing all the way down to the top buttonhole.
- Measure the neck seam of the collar on the back of the garment to the shoulder seam; in this example, it is 3 1/2” and measure the lapel seam of the collar, if this case, it is 1 3/4”.
Drawing the Fur Collar Pattern:
- Place the tape measure from the neck seam of the collar on the back (in the ex. 3 1/2”), on the horizontal line, and draw a notch at the location of the shoulder seam.
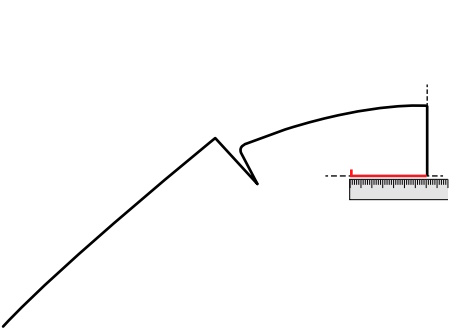
- Set off the measurement from the lapel seam of the collar; in this example, 1 3/4”, in extension of collar line on the front of the garment.
- Draw a slight arc from the shoulder notch, passing through the end of the lapel seam line, and down to the point at the top buttonhole. This line represents the roll line of the garment and cannot be altered in any way. In this case, it was 9” long from the shoulder point to the top button.

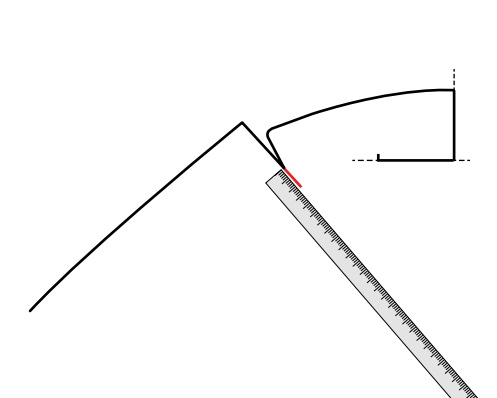
- Now that you have the shape of the garment’s collar and lapel, you can now design the fur collar. First, increase the size. Add approximately 1 1/2” at the collar centerback, 1 1/2” – 2” at the collar tip, and 3/8” at the top buttonhole. Draw the outer style line of the new collar forming a gentle curve passing through these three points to create a shawl collar shape. Add 3/8” along the inside edge of the neckline and add a notch at the location of the lapel seam. Label the centerback seam. Draw a grainline 45 degrees off the centerback of the collar. This will allow for the direction of the fur pile. The faux fur collar pattern is ready to use (there is no seam allowance on the faux fur pattern).
- Should you want to alter the style line of the outer edge of the fur collar, you can do so by slashing from the outer edge to nil at the roll line. If the outer edge of the collar is reduced, the fur collar will sit higher on the neck, increasing its stand. If the outer edge of the collar is widened, the fur collar will sit lower at the neck, reducing its stand. To complete, reshape the outer edge of the pattern so that it is a smooth gentle curve.

- Before cutting the faux fur, the designer recommends to “proof” the pattern with a muslin test collar. A jacket or coat collar should have more ease than a similar collar in a lighter, less lofty fabric, so don’t over-fit. If needed, pinch in or let out any of the material to make the collar lie properly over the existing collar and alter your pattern accordingly.
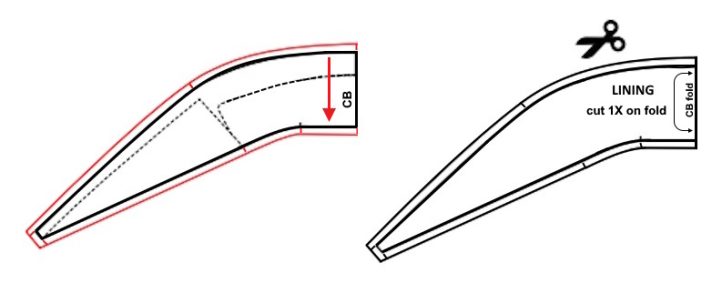
MAKING THE LINING PATTERN:
The underside of the faux fur collar has a lining. To make the lining pattern, trace the fur collar pattern onto fresh paper.
Draw a 1/2-inch seam allowance around the perimeter of the collar but not along the CB seam. Add notches at shoulder point, lapel seam, and top buttonhole. Draw the direction of the grainline arrow parallel to the centerback of the collar. This will allow the lining to be on grain at the centerback while the rest of the collar is on bias. Cut out the pattern.
Sewing Instructions:
MAKING THE FAUX FUR:
Mark the direction of the pile: Mark a big arrow on the backside of the fur fabric to indicate the direction of the nap/pile. Place the pattern’s grainline following the direction of the arrow.
Always work on the backside of the fur fabric (knit backing is face up), it will be easier to trace your pattern and make your cuts. For your markings, you can use a soft-lead pencil for lighter fabrics (the backing of the fabric is usually the same color as the hair side), or a tailor’s waxed chalk for darker fabrics.
Note: Do not add any seam allowance to the collar pattern.
Mirror the Collar Pattern: Following the straight grain of the knit fabric (eg. parallel to the selvage), lay out the collar pattern following the “grainline rule”. Hold the collar pattern down with pattern weights or if the faux fur is very thick, use a heavy book as a better alternative. This method has the added benefit of making your pattern pieces easy to position and reposition quickly.
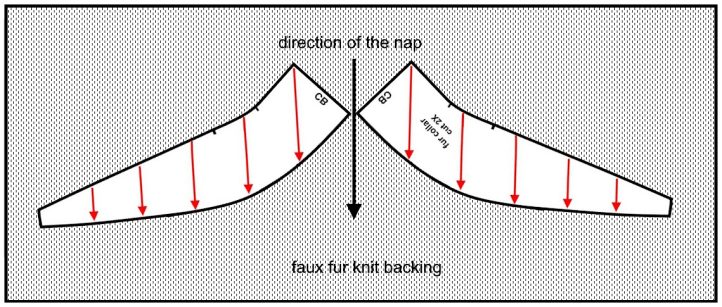
Trace around the pattern piece with waxed chalk and note how many of each piece is needed. For example, cut 2X means trace the pattern piece, flip it over, reposition it, and trace it again, for a total of 2 fur pieces.
CUTTING THE FAUX FUR:
Pro Tip: Ideally, place yourself on a carpeted area, which will prevent the fur from flying everywhere. Don uses a small non-slip door mat on his cutting table and does his cutting on top of it. Then he just vacuums it all up when he’s finished.
Use only a sharp art-knife with a fresh blade or safety razor blade. Do not use fabric scissors or a rotary cutter.
Place the fur, hair down, on the work surface and have the knit backing face up in front of you.
While following your cutting line, pick up the fabric with one hand and make a blade slice with the other hand, cleanly through the knit backing and enter as little as possible into the fur; pull the excess material away from your cut as you go. Cut on the inside of the line as the chalk adds thickness to the lines and proceed slowly, in small successive cuts/slashes, until you finish your cut.

Detach your cut-out from your main fabric, proceeding slowly so as not to make hairs fly everywhere.
You may see some hairs that fall out after cutting; it’s normal, as they got in the way. To remove them, “pull them out” all along your cut. You just have to pull on them by small handfuls, without pulling too hard, and all the hairs that have been cut will come off easily. Those which were not cut will remain perfectly fixed, do not worry. Gently “comb” the fur on the edges of the cut sections towards the center of the fabric piece to remove any stray unwanted hair.
After each cut, put the knife in a safe place, and then vacuum (on a low setting) along the edge you just cut to collect any loose hairs. This keeps your work space and your clothing fuzz-free, with minimal cleanup needed once all the collar pieces have been cut.
MARKING AND CUTTING INTERLINING AND LINING FABRICS:
To give body to the silhouette and to protect the fabric lining, you want to interline the fur material. A needle-punched polyester fleece fabric or thin flat wadding are ideal for this and is available in a variety of weights and thickness.
Chalk out the silhouette of fur collar pattern onto the interlining fabric following the grain of the fabric. From the CB line, mirror the collar shape by flipping the pattern along CB line and trace out the silhouette again. Cut 1X on a single-ply lay. Set aside.
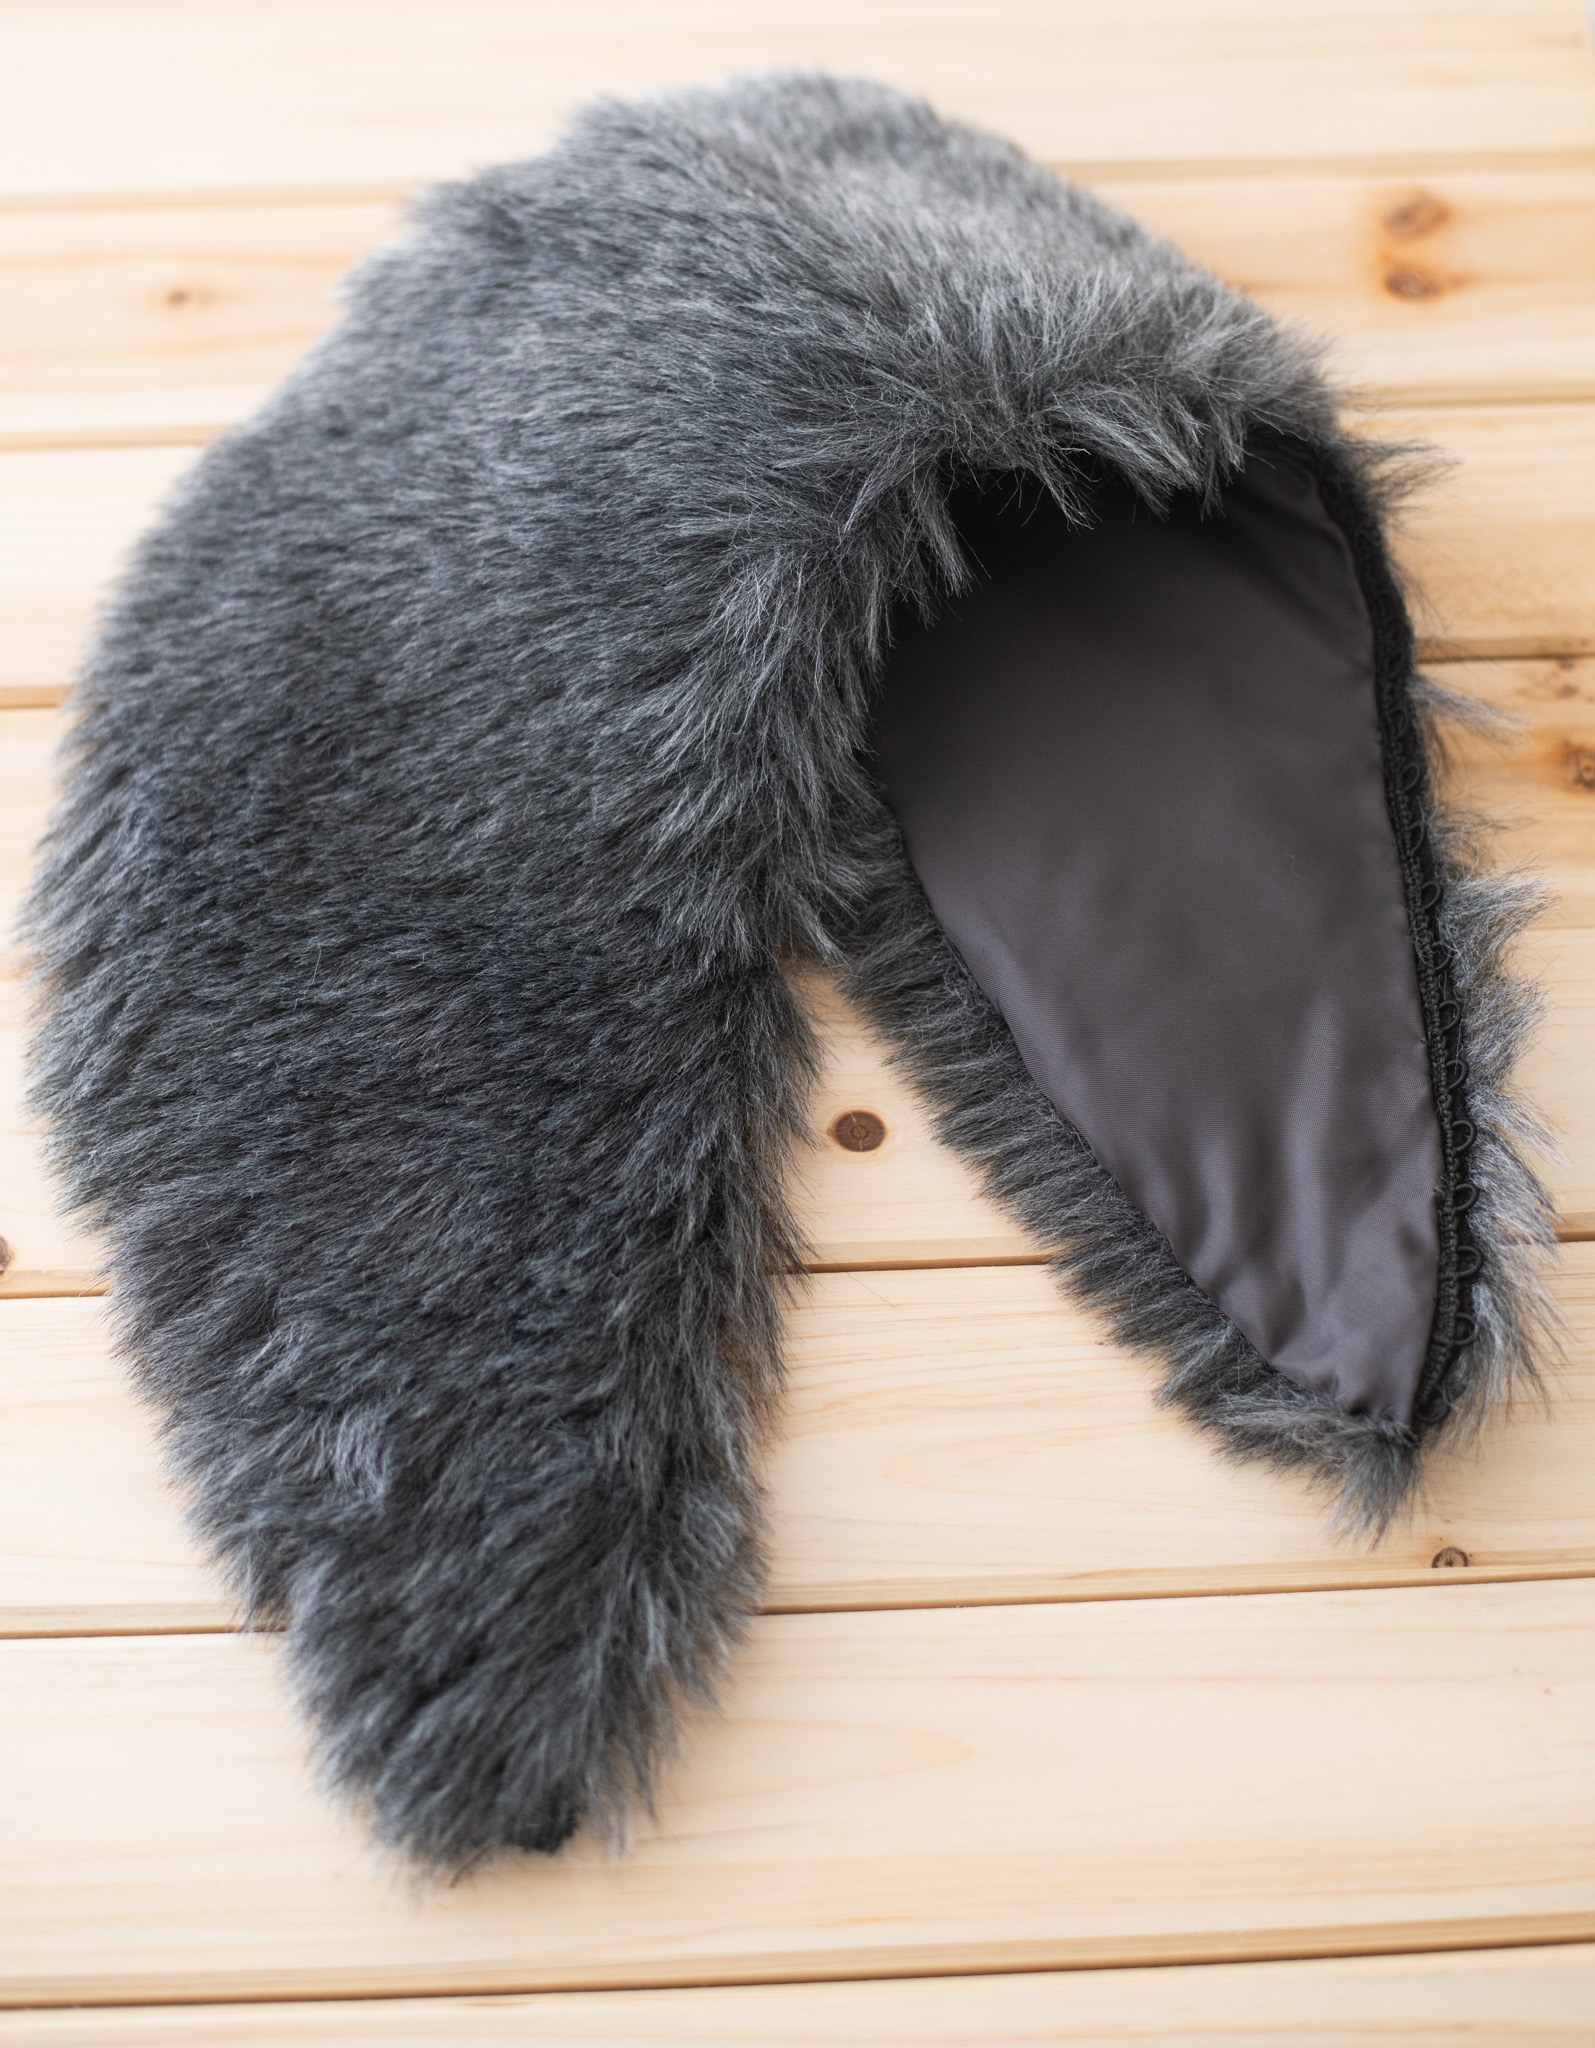
For the underside of the faux fur collar, finish it with a silky lining. Try to get something of the same or similar fiber content as the faux fur fabric to make care maintenance easier. The designer recommends a flannel-backed Kasha™ lining or crisp satin fabric; all are ideal for this type of collar and selection is available in a variety of weights and colors to match your faux fur.
Cut 1X on the CB fold line using the lining pattern on a dressmaker’s lay. Set aside.
FUR PREPARATION:
Stay Taping:
Just like real fur, faux fur has “give” and edges may stretch out of shape when handled. In such a case, stay-taping the edges will solve that problem as well as provide a secure edge to sew.
Using narrow stay-tape (1/2-inch or 12 mm wide), baste the tape along the outer edges of the fur pieces. (fig.1) At corners, flip tape over and continue basting the edges of the fur fabric.

fig.1
Use long stitch lengths and a single-strand of waxed thread. The stitches will not be visible on the fur side. Be consistent with your manner of hand-stitching.
SEW THE CENTERBACK SEAM OF THE FAUX FUR COLLAR:
Design Note: All the sewing construction of the Faux Fur Collar is done manually using the furrier method. It produces a beautiful fur collar with high-quality artisanal workmanship.
Sewing the CB Seam:
With the fur edges stabilized, butt the CB edges of the two fur pieces with right sides together. Use quilter’s clips to hold the seam together. Use a point creaser to poke any stray hairs back to the fur side and align the taped edges together.
To sew the seam, you will make a whip-stitch, which is one of the basic sewing stitches. This type of stitch is ideal to use when sewing fur by hand as it is strong and very easy to perform. Start by drawing your thread through the beeswax to lubricate the thread. Wax can smooth fibers, add weight and thickness to thread. This leads to fewer tangles while sewing and reduces friction.
For a hand needle, Don prefers a tailor’s betweens needle but you could use a ball-point needle for knits, as well. Betweens are very short fine needles with a large open eye traditionally used by furriers for hand stitching seams. More widely used in quilting nowadays but still the best needle choice for easy handling when you want to sew quickly. A thimble can help push the needle through the material.
The Whip-Stitch:
Taking the two collar pieces, place them fur side together and align the taped edges of the collar’s centerback (CB) to one another. Place quilter’s clips at the start and end points of the seam. Add supporting clips between the 2 first clips if you want.
- Taking the hand needle with waxed thread, enter perpendicular to the edge from the back of the fabric of the first layer (1). Keep the length of waxed thread manageable, about 16”-18” long and use 1 strand. Sew in the direction of the nap (pile).
- Pull all the way through until the knot stops in the fabric. As you sew, try to catch the edge of the stay-tape as well in your stitching.

- Enter the second layer of fabric from the face side, keeping close to the edge and including some of the stay-tape (2). Then, pull through both layers and loop over the edge and go through the back of the first piece again and repeat.
- Repeat as often as needed until the seam is finished. Keep your stitches small and uniform.
For a flat seam, the designer finds that a 1/16-inch spacing between stitches produce good results. For a ridged seam, keep 1/32-inch spacing between stitches. The hand stitches will not be visible on the fur side as long as you tuck in any stray hairs back into the seam before stitching.
With wrong sides up (knit backing), the seam is spread out and flattened with a point creaser, leaving an edge that is low-bulk and an invisible seam from the face side of the fur.
Turn your work over, and comb very delicately the fur along the seam. This will allow you to remove hairs that have fallen out. You can also pass a velvet upholstery brush along your seam to remove any stray fluff.
Then, using the point of a straight pin, pluck out the last hairs that would have gotten stuck in the seam. Finally, brush the seam hairs with a pet brush or a wide toothed comb to smooth out the hairs that were bent in the seam, for an absolutely perfect look. The pile will hide the seam therefore invisible to the eye.
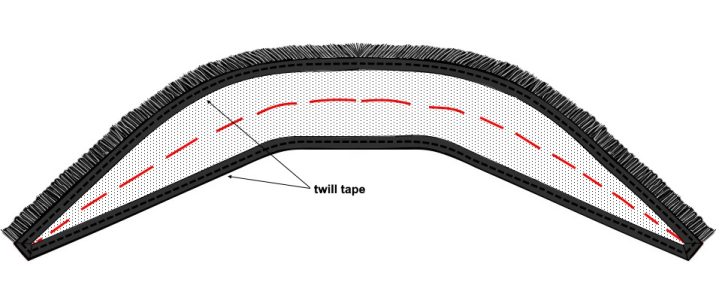
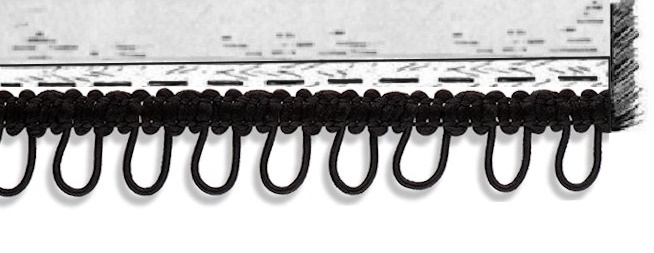
TAPE THE FAUX FUR COLLAR:
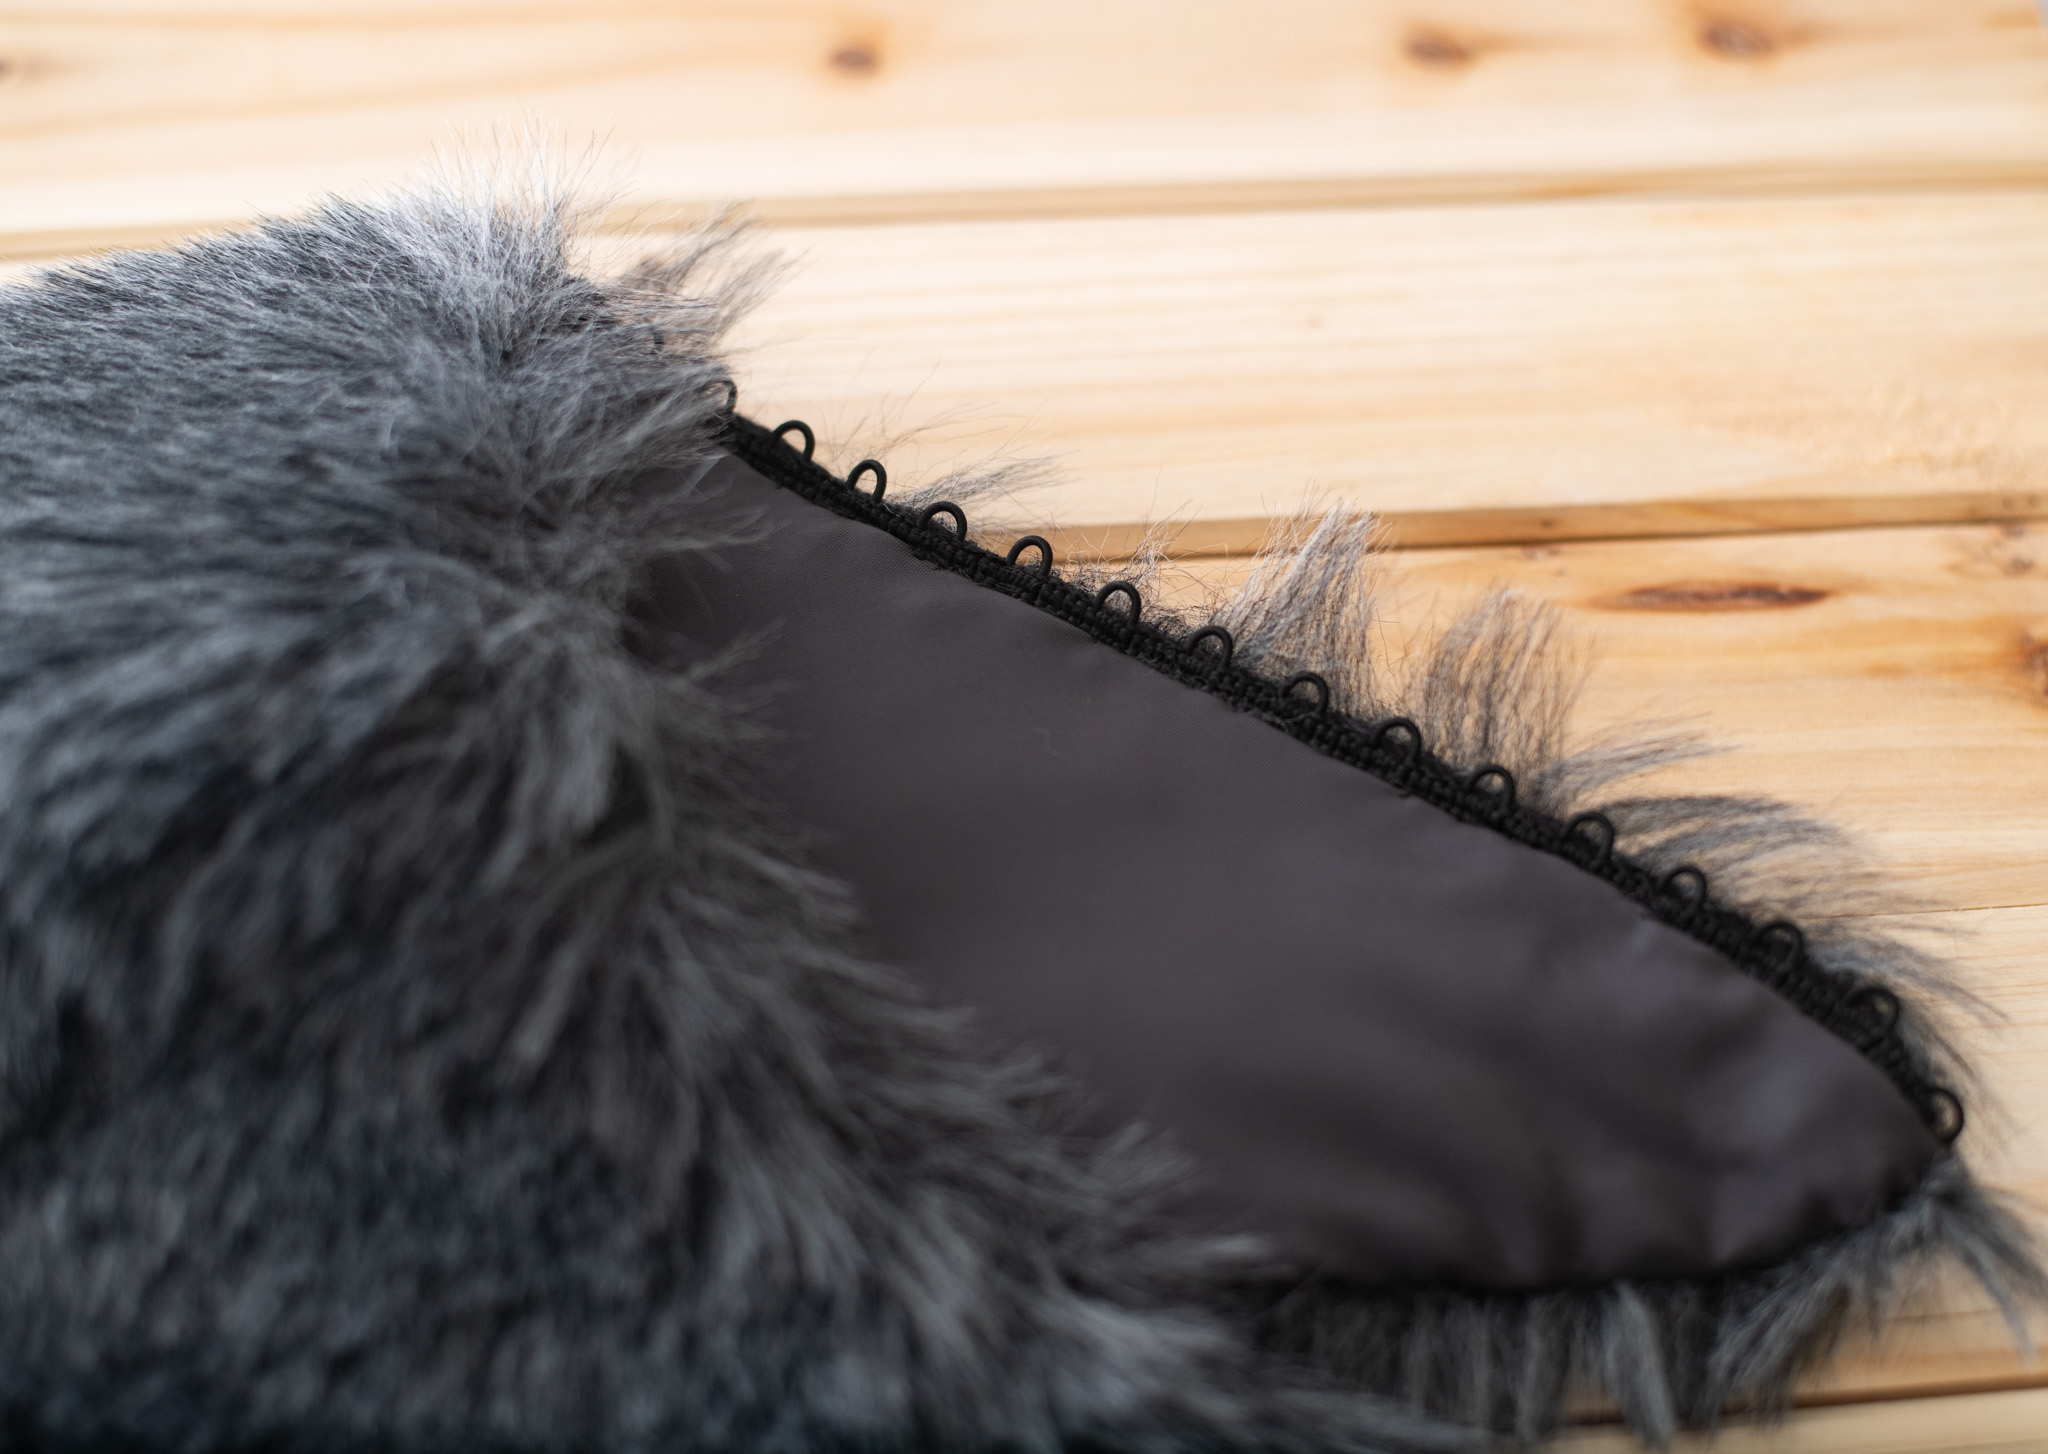
For a desired finished edge on the faux fur collar, sew a wide stay tape (3/4 -inch or 20 mm wide) along the taped edge of the fur. This time the stay-tape is applied on the hair side of the fur and the edge is whip-stitched, encasing both tapes and the raw edge. (fig. 2)
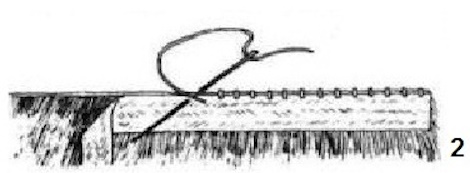
fig. 2
APPLICATION OF INTERLINING:
To give body to the silhouette and to protect the fabric lining, you want to interline the fur material. Don used a thin-loft flat wadding to pad out the fur collar and to protect the satin lining from abrasion.
Center the wadding on the knit backing and the edges of the wadding with the edges of the collar. Using long stitches, baste through the middle of the wadding starting from the CB seam and work outward to the collar points. Repeat basting along the outer edge of the collar and neckline of the collar.
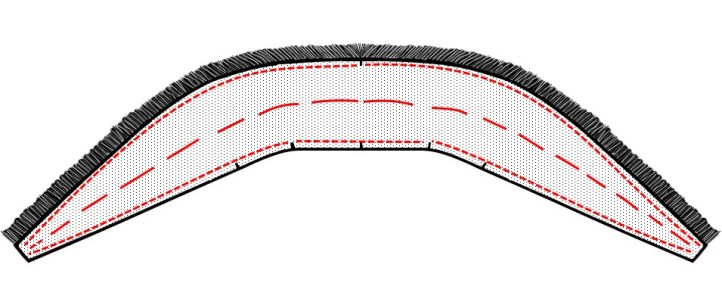
To complete, fold over the wider tape over the stitched edge and the interlining. Baste it to the back of the fur collar with long basting stitches. Do not worry, as the hair pile will hide the long stitches and the finished edge is neat. (fig. 3)
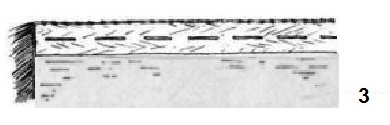
fig. 3
When the fur has been properly taped, the stitches will say in place without trouble and stabilize the edge while also providing a neat rolled finish to the fur’s edge.
MAKING IT DETACHABLE:
You can sew your faux fur collar directly on top of your garment’s existing collar using silk thread. Back in the day, silk basting thread was the norm – it was the only thing we used.
Silk truly is the gold standard. Using it to attach your faux fur collar onto your garment will remind you why it’s absolutely heavenly for sewing by hand. It glides in, it glides out when it’s time to remove, it doesn’t leave an impression on the fabric if due to wear and tear or if it’s been pressed -in short, it’s perfect for the job.
However, there are some modern day sewing notions at your local haberdashery to add to your faux fur collar that are often handy for finishing detachable collars so that they can be removed when the garment needs laundering. There are different options available such as: butterfly pin collar tacks, invisible low-profile metal snaps, magnetic buttons, and button-loop tape by the yard.
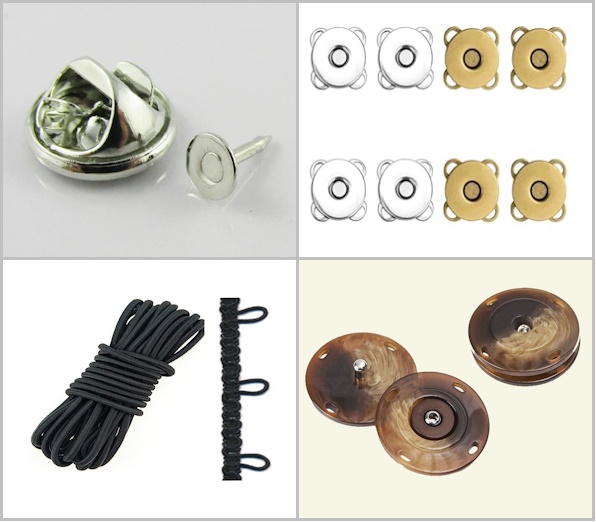
The low-profile metal snaps and the magnetic buttons are stand-alone 2-piece sets, each half of a pair of connecting fasteners is conventionally assigned the designation as male or female as they interlock. They are sewn as you would sew a button at balance points or stress points. In this case, attach one set at the nape of the neck, another at each shoulder point on the neckline, and at end points of the collar. More detachable fasteners may be added but this is the bare minimal set-up.
For items like hinged toggles and butterfly clasp collar tacks that have no way to be sewn into place because they are made of metal, a cloth mount must be provide. This is simply a stable woven or non-woven strip of fabric that houses the metal hardware. For instance, for the butterfly collar pin, the pronged portion of the hardware is separated from the clasp portion and pushed through the cloth strip. The cloth is folded over the head of the pin thus encasing the hardware. The covered pin can now be attached to the collar’s inside edge by sewing the cloth mount securely to the interfacing or interlining inside the collar before attaching the lining. You would need a minimum of 5 – 7 pins, each sewn like an appliqued patch at balance points.
The last option is the method the designer likes the best. Make your own elastic buttonloops or purchase button-loop tape by the yard. Generally, it is used on evening gowns for making buttoning easier. While the loop is elastic, the header is non-elastic and stable. Each loop is 1/2″ wide and button spacings are 3/8″ apart. Most textile goods retailers have it available in a variety of colors to match your faux fur.
Simply sew a length of button-loop tape to the neckline of the faux fur collar before attaching the lining. The loops should protrude just beyond the edge of the tape and run from end-to-end along the inside edge. This type of finish allows you to use tiny clear “backer” buttons or small brass safety pins to attach the collar in place.
This is the detachable option used on the model sample.
FINISHING THE FAUX FUR COLLAR:
Turn your work over and comb the fur along the seams. This will allow you to remove the last cut hairs that have not yet fallen out. Pluck out any hairs that would have gotten stuck in the hand-stitching, using the point of a straight pin. Finally, brush the fur in the direction of the nap (pile) with a wide-toothed comb or brush to smooth out the hairs for an absolutely perfect finish.
With the collar fur side down, add the lining to cover all of the interior work and stitching.
Center the lining, face side up, onto the back of the collar so that there are equally amounts of seam allowance round the outer edges of the collar. Pin from the centerback seam working outwards to position the lining in place. At the outer edge of the collar, tuck under the lining fabric’s seam allowance and align the fold of the turn to the edge of the taping. Start at the centerback and work outward to the front collar points.
Once the outer edge of the collar is pinned, proceed to the inner edge of the collar (neckline) and repeat these steps keeping the lining fabric on grain. If you are using items like collar pins, gently poke the pins through the lining fabric. You may want to fuse a bit of Knit-Fuse™ interfacing at these spots. For the elastic button-loops, cover the header of the loop tape with the lining.
To finish, slip-stitch the lining along its folded edge onto the stay-tape of the collar to complete.
Now, go add a bit of wonderfully soft and cuddly style and elegance to your winter wardrobe.