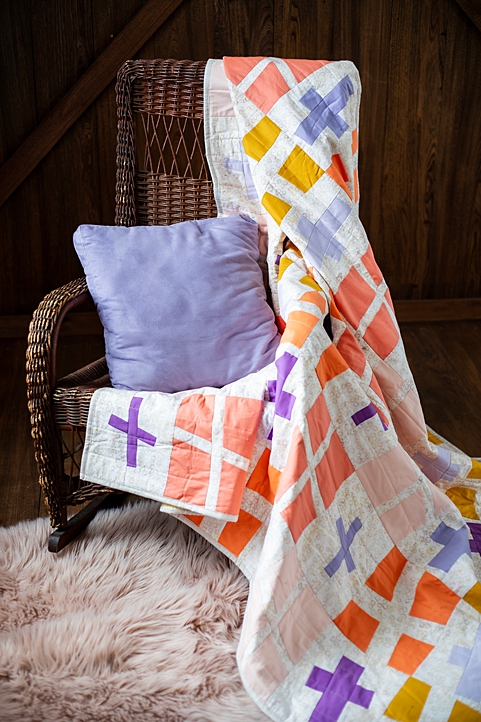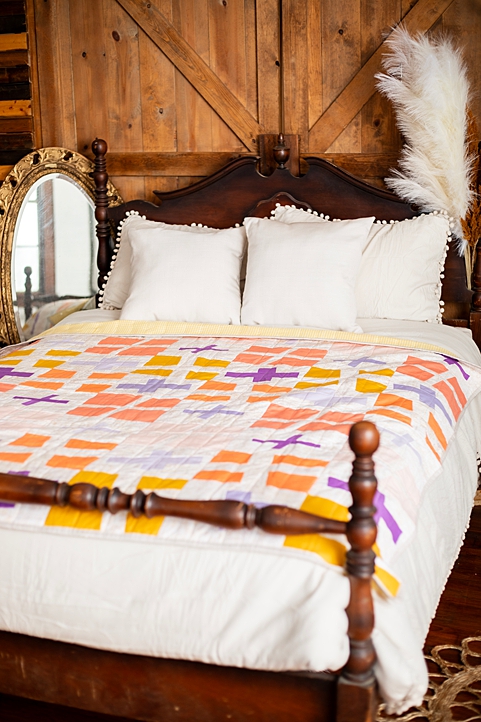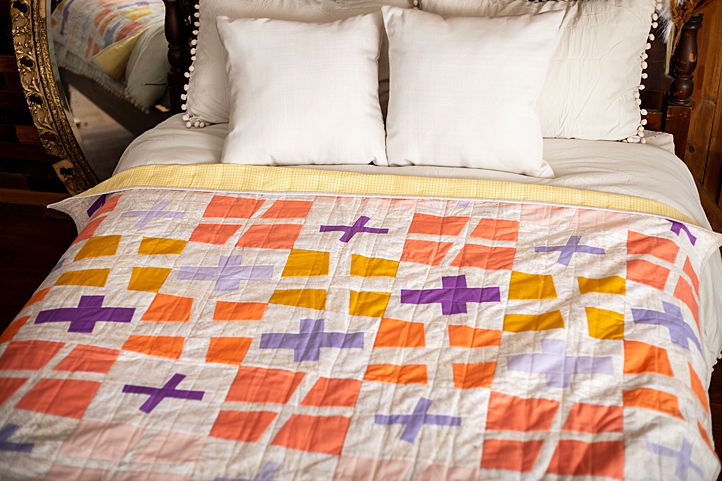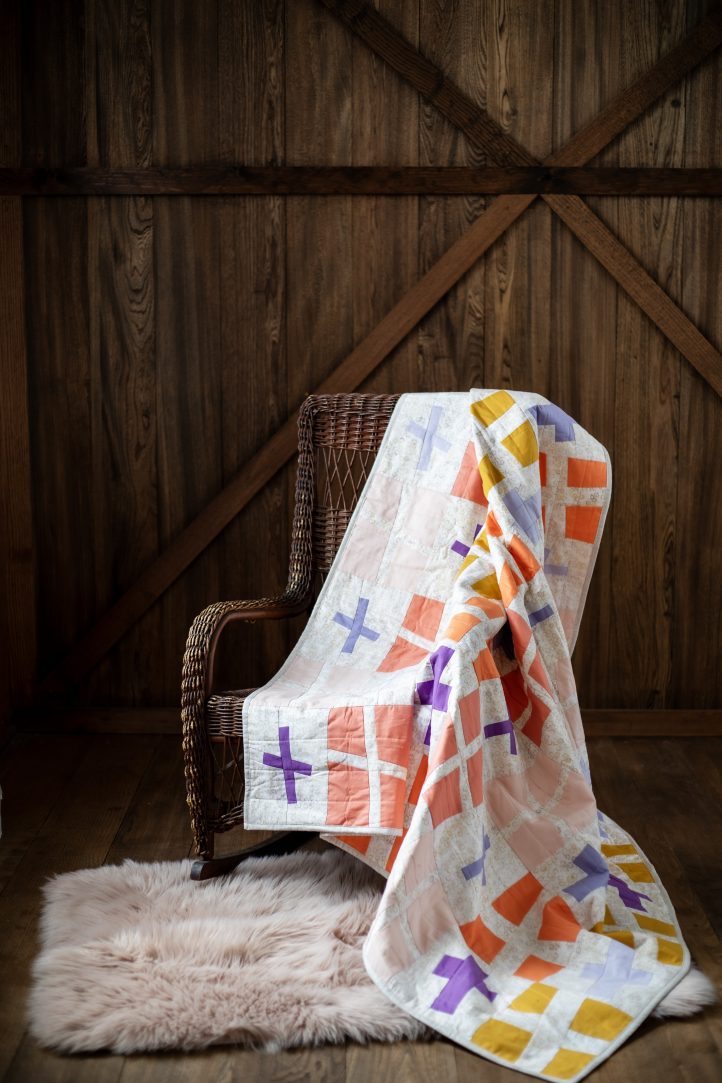
Create a stunning wonky plus quilt in colors of the spring sunrise with this pattern from Janice Bailor. Finishing at 60 x 65 inches, this easy throw quilt pattern features a variety of wonky plus signs in pastels like cantaloupe, peach and lavender. This pattern is an excellent quilt to make for the upcoming Easter holiday, as the wonky plus design also resembles a traditional cross.
Skill Level: Easy
Finished Dimensions: 60”w by 65”l throw quilt
Seam Allowances: 1/4” for all patchwork
Materials:
- 4- 1/2 yard solid fabric (Kona Cotton colors shown: 1144 Bellini, 1483 Salmon, 59 Cantelope, and 476 Grellow)
- 3- 1/4 yard or fat quarter solid fabric (Kona Cotton colors shown: 1383 Violet, 1189 Lavender, 1266 Orchid)
- 1- 3 yard batik fabric (shown: Timeless Treasures Tonga Batiks)
- 1- 3 1/2” yard coordinating cotton fabric backing
- 6- 2 1/2in. By WOF cotton strips for binding
- 1- cut batting 68” square or one throw-sized batting package
- PDF Templates – These are located at the bottom of this page. Please see printing instructions below.
Special Notions:
- Walking foot
- Rotary cutter, mat, and acrylic ruler
- “RST” means Right Sides of fabric together
PRINTING INSTRUCTIONS:
Note: To download the templates, click on the pattern download button at the bottom of the page. We recommend opening your pattern download using Adobe Acrobat.
Cutting Instructions:
- Line up selvages and press all fabrics to remove any creasing or wrinkles.
- Neaten and trim the cut edges along the WOF (Width of Fabric) with a rotary cutter, ruler, and cutting mat as required to create an even edge.
- From the newly trimmed edge, use the cutting mat grid and acrylic ruler to cut:
- Batik fabric:
- 14 – 8” wide by 10” high rectangles for B Blocks
- 14 – 7” wide by 9” high rectangles for D Blocks
- 56 – 1 1/2” by 2 1/2” rectangles
- 28 – 1 1/2 by 4 1/2” rectangles
- 14 – 1 1/2” by 11” rectangles
- 56 – 2 1/2” squares
- 28 – 2 1/2” by 4 1/2” rectangles
- 14 – 2 1/2” by 11” rectangles
- Solid fabric:
- Kona Cotton 1383 Violet:
- 10 – 2 1/2” squares
- 10 – 1 1/2” by 2 1/2” rectangles
- 5 – 1 1/2” by 6 1/2” rectangles
- 5- 1 1/2” by 7 1/2” rectangles
- Kona Cotton 1189 Lavender:
- 4 – 1 1/2” by 7 1/2” rectangles
- 8 – 2 1/2” squares
- 8 – 1 1/2” by 2 1/2” rectangles
- 4 – 1 1/2” by 6 1/2” rectangles
- Kona Cotton 1266 Orchid:
- 5 – 1 1/2” by 7 1/2 rectangles
- 10 – 2 1/2” squares
- 10 – 1 1/2” by 2 1/2” rectangles
- 5 – 1 1/2” by 6 1/2” rectangles
- Kona Cotton 1144 Belini: 7 – 8” by 10” rectangles
- Kona Cotton 1483 Salmon: 7 – 8” by 10” rectangles
- Kona Cotton 59 Cantelope: 7 – 7” by 9” rectangles
- Kona Cotton 476 Grellow: 7- 7” by 9” rectangles
- Kona Cotton 1383 Violet:
- Batik fabric:
Sewing Instructions:
CREATING BLOCK A:
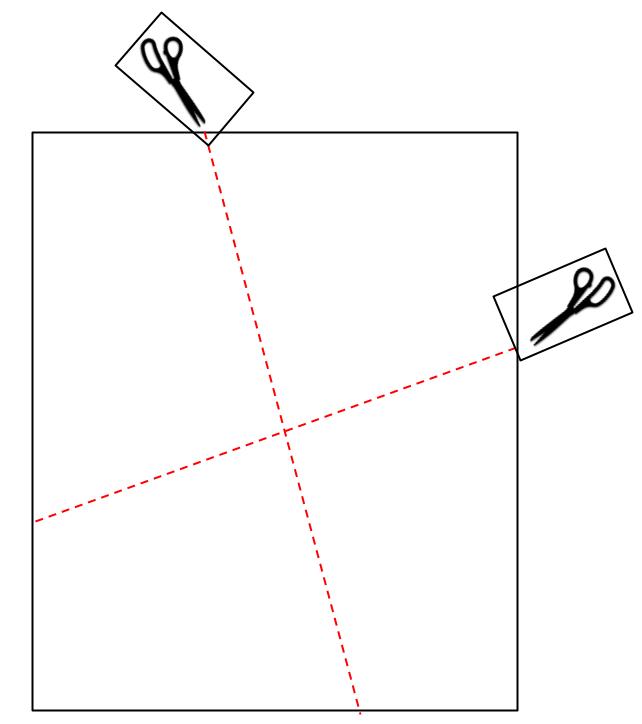
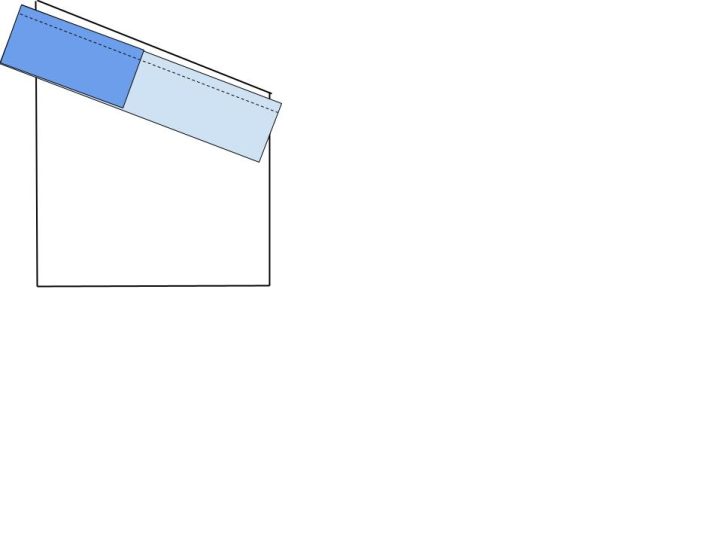
- Place one 8” high by 10” wide solid color rectangle on the cutting mat. Using an acrylic ruler, find the approximate center of the vertical and horizontal crossing of the block.
- Then tilt the ruler to a slight 15-degree angle and slice vertically through the center of the rectangle. Repeat for the horizontal line of the rectangle, or use the Block A/B Template to make 4 quadrilaterals.
- From the 1 1/2” by 4 1/2” batik strips, line one up RST along one of the bottom quadrilateral horizontal slash cuts and sew. Note: The strips will slightly overhang the quadrilateral background pieces. Press open. Repeat for the opposite side.
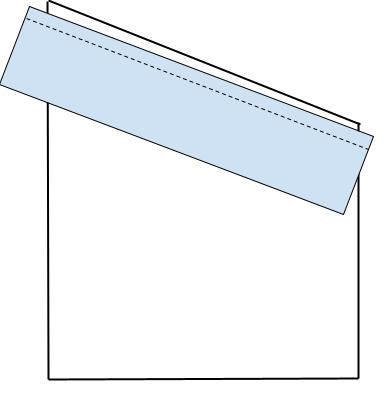
- Trim off the overhang along the interior and exterior of the unit if desired.
- Place 1 1/2” by 11” batik strips RST along one side of joined quadrilaterals and sew in place. Press open.
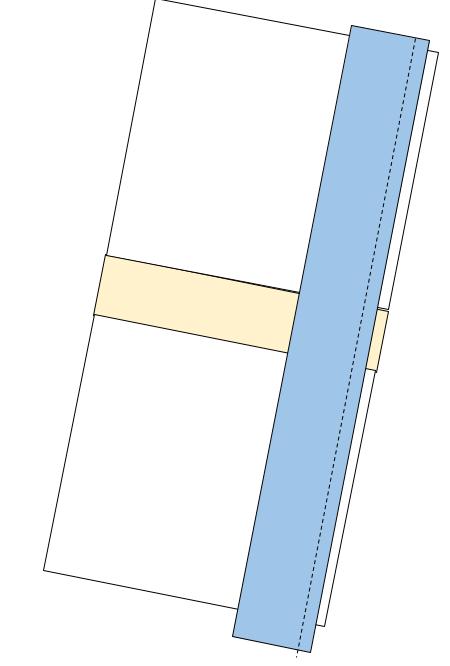
- Line up the remaining joined quadrilateral side on top of the 1 1/2” by 11” strip and sew in place.
- Press all seams flat, then trim to a neat 8”w by 10”h rectangle to complete the block.
- Make 7 each in 1483 Salmon and 1144 Belini.
CREATING BLOCK B:
- Place one 8” high by 10” wide batik rectangle on the cutting mat. Using an acrylic ruler, find the approximate center of the vertical and horizontal crossing of the block.
- Then tilt the ruler to a slight 15-degree angle and slice vertically through the center of the rectangle. Repeat for the horizontal line of the rectangle, or use the Block A/B Template to make 4 quadrilaterals.
- Join one 1 1/2” by 2 1/2” batik strip with one 1 1/2” by 2 1/2” solid color background strip to make a pieced strip totaling 4 1/2” long.
- Working from the center out, line up one of the pieced solid background and batik strips RST along one of the bottom quadrilateral horizontal slash cuts with the solid toward the center of the block and sew. Note: The pieced strips will slightly overhang the quadrilateral background pieces. Press open. Repeat for the opposite side.
- Trim off the overhang along the interior and exterior of the unit if desired.
- Join one 1 1/2” by 2 1/2” solid color background strip to both ends of a 1 1/2” by 6 1/2” batik strip to make a pieced strip totaling 11” long.
- Place 1 1/2” by 11” batik and solid pieced strip RST along one side of joined quadrilaterals and sew in place. Press open.
- Line up the remaining joined quadrilateral side on top of the 1 1/2” by 11” pieced strip and sew in place.
- Press all seams flat, then trim to a neat 8” by 10” rectangle to complete the block.
- Make 4 in 1189 Lavender. Make 5 each in 1266 Orchid, and 1383 Violet.
CREATING BLOCK C:
- Place one 7” high by 9” wide solid color rectangle on the cutting mat. Using an acrylic ruler, find the approximate center of the vertical and horizontal crossing of the block.
- Then tilt the ruler to a slight 15-degree angle and slice vertically through the center of the rectangle. Repeat for the horizontal line of the rectangle, or use the Block C/D Template to make 4 quadrilaterials.
- From the 2 1/2” by 4 1/2” batik strips, line one up RST along one of the bottom quadrilateral horizontal slash cuts and sew. Note: The strips will slightly overhang the quadrilateral background pieces. Press open. Repeat for the opposite side.
- Trim off the overhang along the interior and exterior of the unit if desired.
- Place 2 1/2” by 11” batik strips RST along one side of joined quadrilaterals and sew in place. Press open.
- Line up the remaining joined quadrilateral side on top of the 2 1/2” by 11” strip and sew in place.
- Press all seams flat, then trim to a neat 8” by 10” rectangle to complete the block.
- Make 7 each in 59 Cantelope and 47 Grellow.
CREATING BLOCK D:
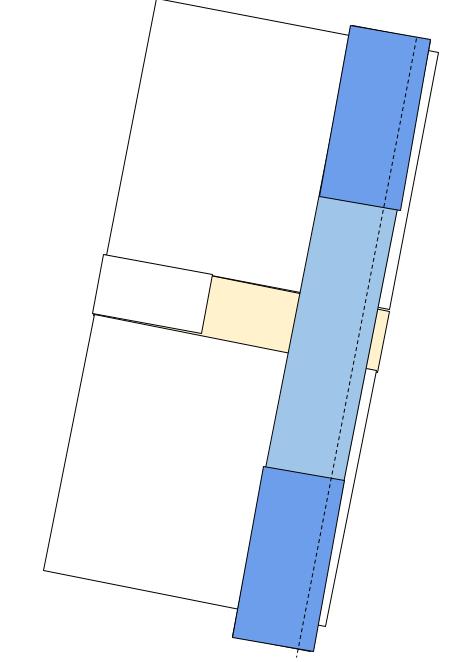
- Place one 7” high by 9” wide batik rectangle on the cutting mat. Using an acrylic ruler, find the approximate center of the vertical and horizontal crossing of the block.
- Then tilt the ruler to a slight 15-degree angle and slice vertically through the center of the rectangle. Repeat for the horizontal line of the rectangle, or use the Block C/D Template to make 4 quadrilaterals.
- Join one 2 1/2” by 2 1/2” batik square RST with one 2 1/2” by 2 1/2” solid color background square to make a pieced strip totaling 4 1/2” long.
- From the pieced background and batik strips, line one up RST along one of the bottom quadrilateral horizontal slash cuts with the solid toward the center of the block and sew. Note: The pieced strips will slightly overhang the quadrilateral background pieces. Press open. Repeat for the opposite side.
- Trim off the overhang along the interior and exterior of the unit if desired.
- Join one 2 1/2” by 2 1/2” batik background square to both ends of a 2 1/2” by 7 1/2” solid strip to make a pieced strip totaling 11” long.
- Place 2 1/2” by 11” batik and solid pieced strip RST along one side of joined quadrilaterals and sew in place. Press open.
- Line up the remaining joined quadrilateral side on top of the 2 1/2” by 11” pieced strip and sew in place.
- Press all seams flat, then trim to a neat 8” by 10” rectangle to complete the block.
- Make 4 in 1189 Lavender. Make 5 each in 1266 Orchid, and 1383 Violet.
ASSEMBLING THE WONKY PLUS QUILT TOP:
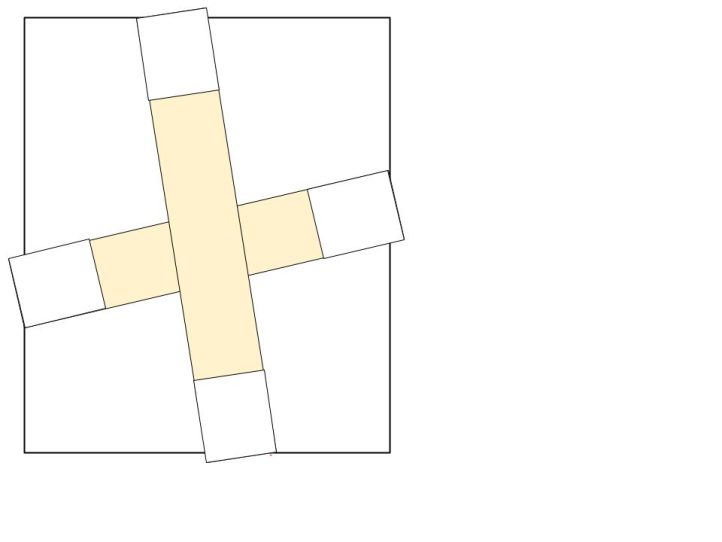
- Arrange the Wonky Plus Quilt Top by columns of 8 blocks by 7 rows, alternating sizes and backgrounds of the plus of the blocks as you work across the row.
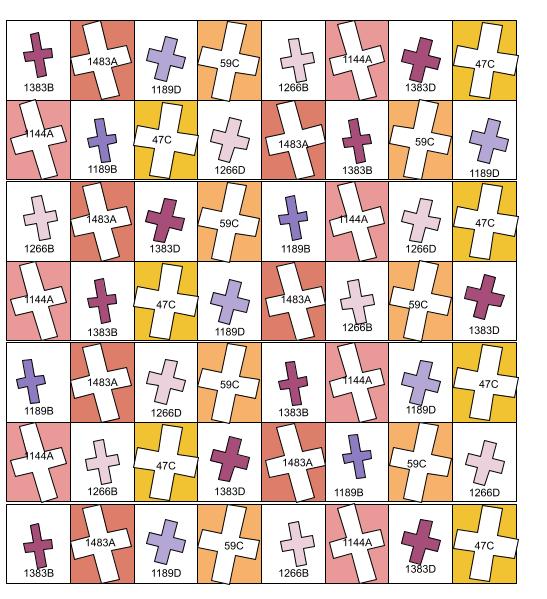
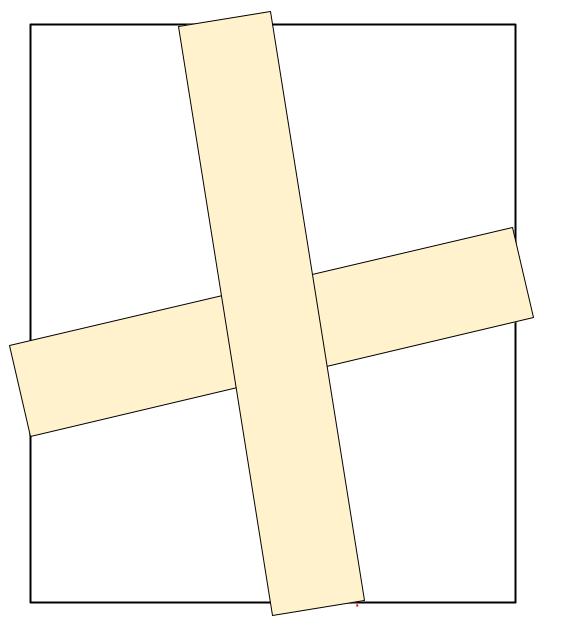
- To begin Row 1, arrange one 1383B next to one 1483A and join the pair RST.
- Continue joining the next pair of 1189D RST to one 59C.
- Join the next pair 1266B to 1144A, as shown in Fig.8 (above) RST.
- Complete the final pair of 1383D to 47C by sewing RST to complete the 4 pairs of Row 1.
- Join all pairs RST in sequence as shown in Fig. 8.
- After finishing Row 1, proceed to the following 6 rows following Figure 8 joining pair groups then the entire row to complete all 7 rows of the quilt top.
- Join all seven rows to complete the 60”w by 65”l throw quilt top.
QUILTING AND FINISHING:
- Cut a strip of batting and backing approximately 2” to 3” wider and longer on all sides than your finished quilt top.
- Assemble the quilt sandwich for the quilt by laying out the backing (right side down), batting in the center, and quilt on top, right side up. Baste and quilt as desired and trim edges. The cover quilt has been quilted in a straight line pattern following the seam lines of the piecing.
- Prepare the binding by cutting 2 1/2” by WOF strips of fabric and attaching all strips together on the diagonal. Press strips wrong sides together in half lengthwise along the entire length of the binding to complete.
- Attach binding to the quilt sandwich by lining up all raw edges, and mitering the corners as you go.
- To miter corners, sew into the corner stopping 1/4 inch from the end, backstitch, and remove the quilt from the sewing machine.
- With the quilt lying flat, fold the binding up and away from the quilt, making the binding straight with the unsewn side.
- Fold the binding down to the sewn side, leaving a diagonal fold on the underside of the binding and pin fold in place.
- Place the quilt back into the sewing machine, sew down the fold, and continue sewing binding.
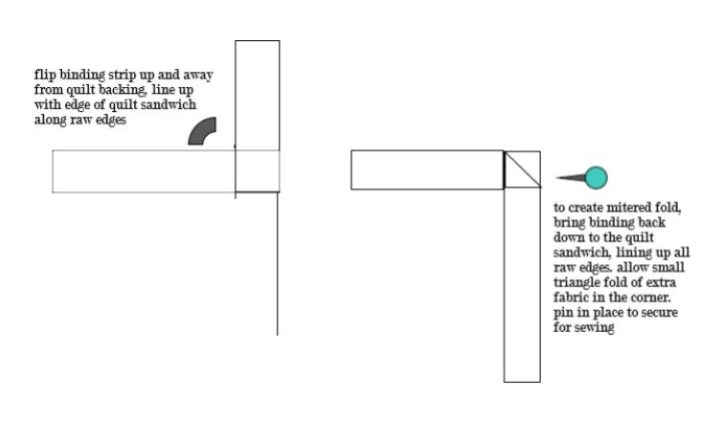
- Make a miter at each corner, adjusting the amount of fold as necessary.
- Join the ends of the binding together where they meet and attach to the quilt sandwich.
- Press and fold the binding over to the opposite side of the quilt to finish. Tuck the mitered corner flat, pinning it into place as necessary.
- Finish the binding with your preferred method, either by hand stitching in place or by machine stitching.