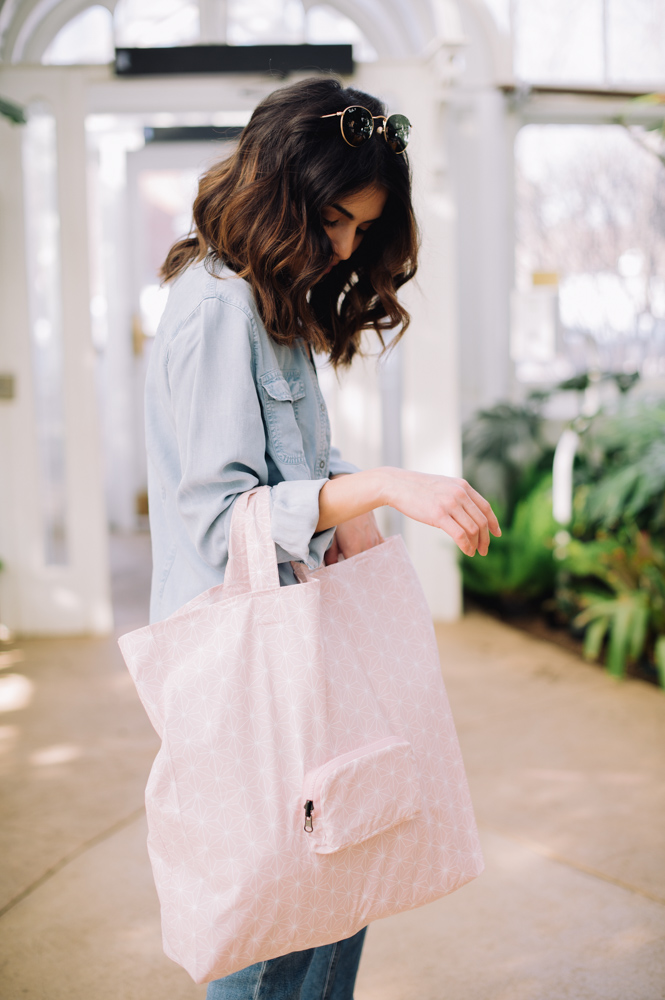
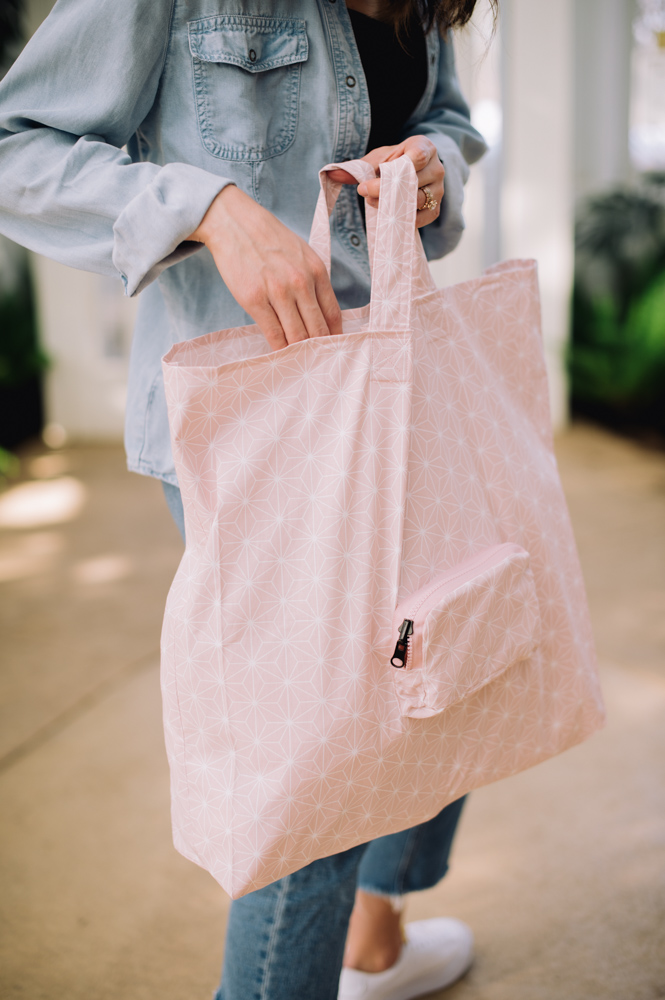
Say “Bye-bye” to paper and plastic grocery bags! This farmers market tote is a stylish and sustainable option for carrying books to the library, daily essentials to work, and of course, veggies from your local farmers market. Our favorite element of this tote bag is that it folds down to fit into its own zippered pouch, making it easy to store until you need it. Embrace sustainable living with a custom market tote in a fun spring print with this bag tutorial.
Materials:
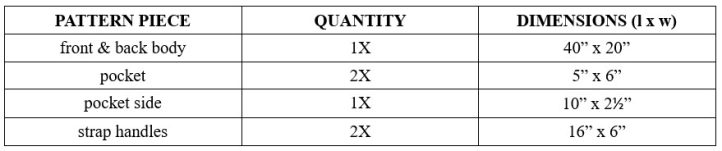
- 1 1/4 yd. (1.143 m) lightweight tightly-woven fabric, 45″ wide (115 cm)**
- NOTE: If your fabric choice has a directional printed design, you will need to cut the body section in half. With wide goods, you’ll only need half the required yardage as the front and back sections can be cut side by side across the fabric’s width. No allowance made for matching the print.
- 1 reversible zipper, 10″ long (25.5 cm)
- 1 spool color-matched thread
PATTERN INFO:
The pattern itself is based upon a simple flat grid, which fits into a long rectangle, of which the size depends on the desired depth of the style (in this example, 4″).
No actual pattern template is required as all the pieces are rectangles, though a template is provided. You can mark out the shapes directly onto the cloth by following the cutting list below. Be sure to square up your fabric prior to cutting.
- For a limited time, you can download the pattern template for free by clicking here. PDFs are usually reserved for our Gold Members only.
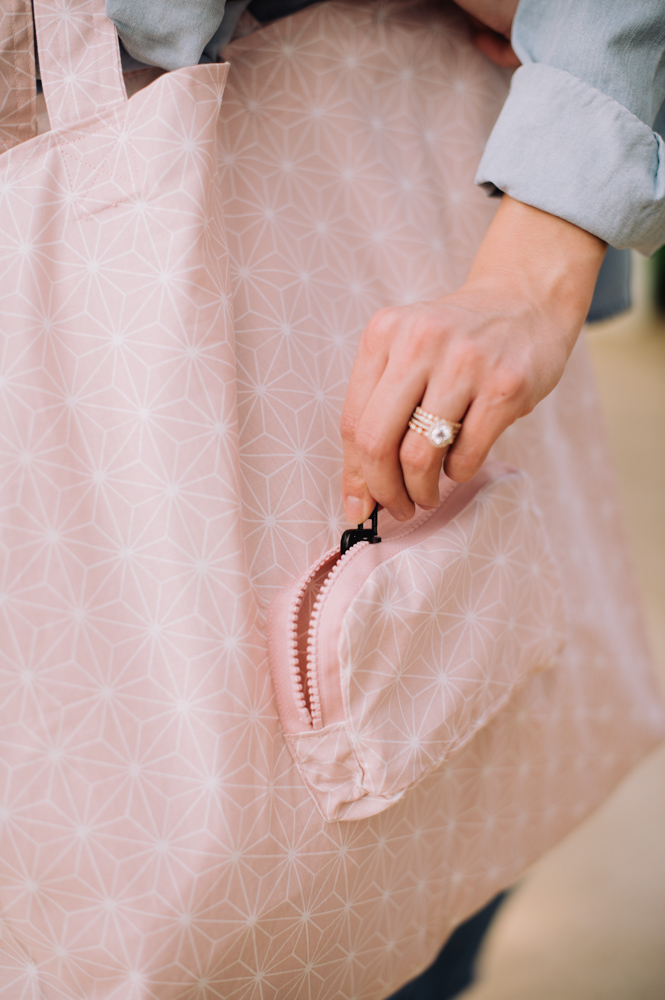
The exterior pouch is a zippered pocket that can be used to carry keys, wallet, etc. When not in use, the tote bag can be folded into the pouch for storage.
Seam allowance (1/2″) or [12 mm] is included in this pattern-draft.
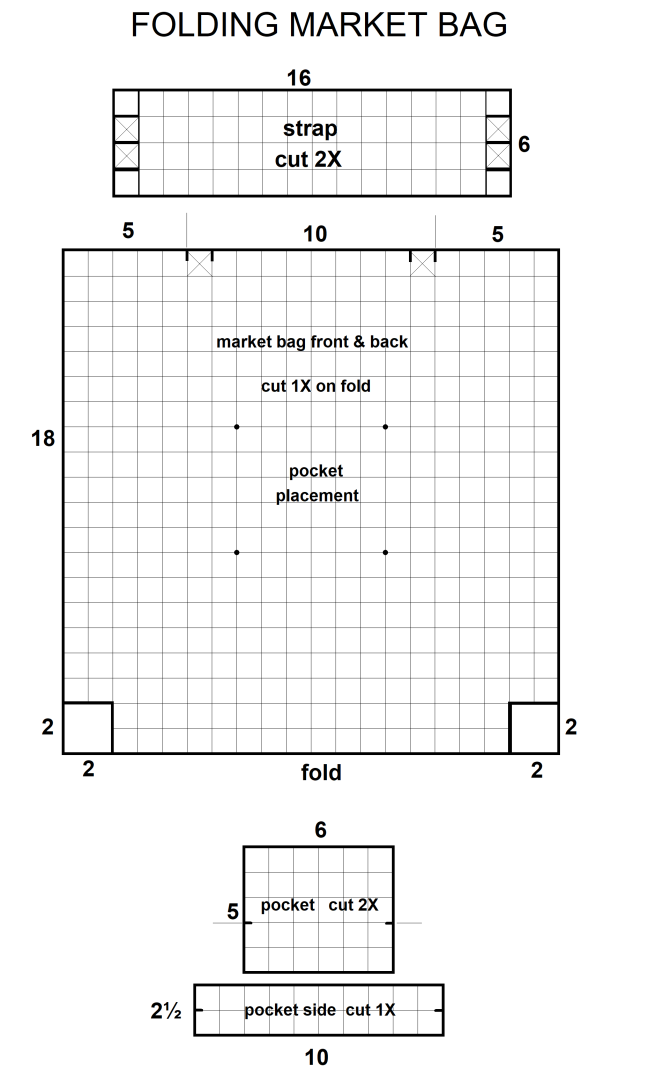
Scale: 1 square = 1”
SELECTING AN IDEAL FABRIC:
Any light-weight and tightly-woven fabric may be used for this sewing project. The cloth must be tightly woven so that the bag is sturdy and durable and will not stretch out-of-shape. When not in use, the bag is folded up, therefore a thin material (something light to medium in weight) is desirable so that it may be folded without being bulky. The primary construction method used in this project is a French seam for strength and a neat seam finish, so the fabric used should be thin to achieve good results when sewing.
Choose your favorite solid color or print. Be aware that no consideration has been made for matching prints yet most abstract, geometric, or mini-print will appear unaltered after being cut. If your fabric choice has a directional printed motif, you may need to get additional yardage if the front and back sections of the bag cannot be cut side by side across the fabric’s width.
MARKING & CUTTING INFO:
Construction Methods:
THE X-STITCH:
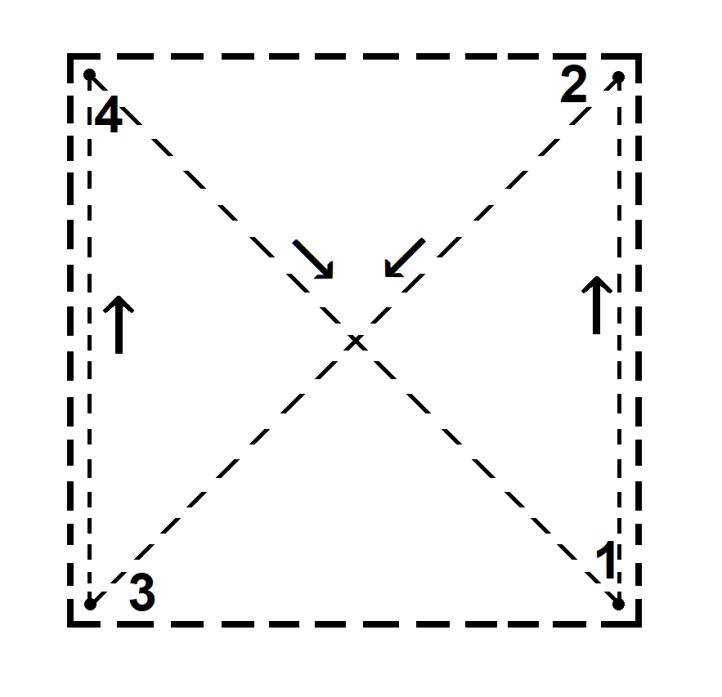
Use an all-in-one X-stitch in your sewing projects to secure all types of straps and webbing. It’s simply a stitched box with an “X” through the middle. This stitching pattern provides a high level of strength and stability. In this project, we use the X-stitch to hold the handle straps in place and to secure the handles to the bag.
To sew the X-stitch, begin by attaching the strap ends to the bag opening with a box shape where each side of the box is equal to the width of the strapping.
Once the strap is positioned, secure the ends of the strap by sewing the X-stitch in one run. Begin at the bottom right (1) and sew up to the top right (2), with the needle sunk into the feed-plate, pivot the material 45 degrees and sew diagonally across to the bottom left corner (3), then with the needle sunk into the feed-plate, pivot the material 45 degrees and sew up to the top left corner (4), pivot the material as before and stitch diagonally across to the starting point (1), backstitching at end to secure stitching in place.
FRENCH SEAM:
A French seam is an enclosed seam and is used to enclose the raw edges of fabric within the seam. French seams are constructed in two steps: the first run being wrong sides together, and the second run being right sides together. This double row of stitching reinforces the construction of the seams on the tote bag.
In this project, the French seam on non-sheer fabrics encloses the seam allowances and keeps the interior of the tote bag neat and tidy.
How to Sew a French Seam:
- Determine the finished width of the French seam.
- Place wrong sides of fabric together and pin/baste in place.
- Sew one row of stitches the length of the piece of fabric using half of the width of the seam allowance provided.
- Press seam open, then flat to create a knife edge and set the stitches.
- Trim the seam allowance by half, close to the stitching line.
- Turn the fabric pieces inwards so that right sides are facing each other.
- Press flat along the stitched edge.
- Sew the second line of stitches, using the remaining width of the seam allowance, enclosing the raw edges of the cloth.
- Press flat to finish the seam.
Sewing Instructions:
SMALL PARTS PREPARATION:
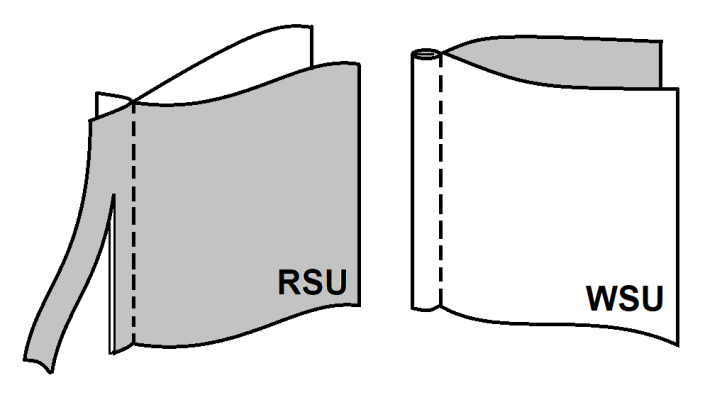
- Make the bag handles. With wrong sides together (WST), fold the STRAP piece in half lengthwise and press the fold flat. Unfold the material and fold wrong sides together so that the raw edge aligns with the center foldline and press fold flat. Repeat for opposite side of the STRAP piece.
- With the folds wrong sides together, fold the STRAP piece in half lengthwise and match the folded edges so that they align one on top of the other. Machine-stitch the layers together along the open edges by top-stitching. Repeat top-stitching along the folded edge. Make two bag straps and set aside.
- Make the pocket pouch. With right sides together (RST), fold the POCKET SIDE piece in half lengthwise, and wrap around the end of the reversible zipper. Stitch across the short end. Repeat this step with opposite end of zipper.
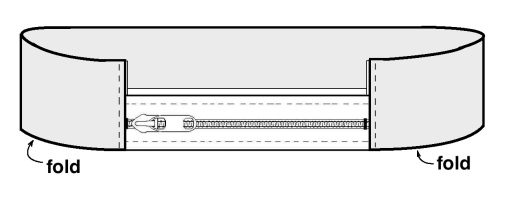
- Turn fabric right-side-out and press seams flat. Top-stitch across ends of zipper.
- Align the “open” side of the POCKET SIDE to the edge of one of the POCKET pieces. The seaming of the zipper should be in the middle of the shorter sides of the rectangle. Pin/baste the POCKET SIDE to the POCKET piece. There is no seam allowance value on the zipper tape itself, so stitch along the edge of the zipper tape when joining the two sections. Sew around the perimeter of the POCKET SIDE and clip seam allowance in the corners if the fabric does not lie flat. Grade (i.e. trim the seam allowances to different widths) the excess material in the seam allowance.
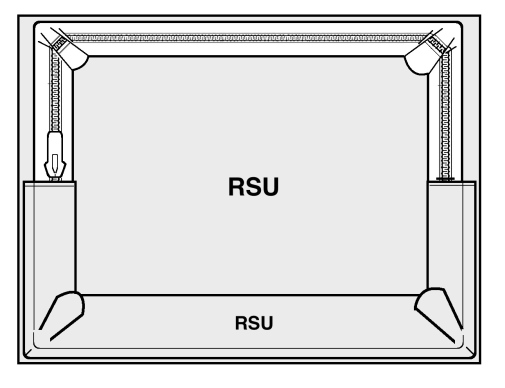
- Place remaining POCKET piece on top of the pouch assembly, with RST, and match in the corners. Flip the whole assembly over so that the previous line of stitching is visible. Pin/baste perimeter of rectangles together. Beginning slightly inside the lower corner, stitch following previous stitches, around the lower corner, up the side, across the top, down the side, and around the last corner, leaving an opening to turn out the fabric. Trim diagonally at each corner to reduce any bulk. Turn pocket out through the opening and slip-stitch opening close. Set aside.
- Apply pouch to body. Position pocket with zipper facing toward top edge of bag. Place it in the center of the front bag section, approximately 7.5″ [19 cm] from the top edge and 8″[20 cm] from either side seam. Pin/baste in place. Sew along the edge of the folded fabric and zipper tape to install.
MAKE THE MARKET BAG:
- Hem the bag opening. Sew a narrow 1/4″ double-rolled hem to complete the bag opening.
- Add bag handles. Position each bag strap, 6″ [15 cm] from each corner of the bag, on the inside of the bag (wrong side of fabric) to form a loop for the bag handle on each section and X-stitch in place to secure.
- Complete tote bag. Fold the fabric with WST, and match at corners. Sew French seams on both sides of the bag, by stitching a 1/4″ seam allowance, then trimming seam allowance close to stitching. Turn bag inside-out and sew another 1/4″ seam allowance along side-seams; press seams flat.
- NOTE: If using a directional printed fabric as in this tutorial, cut the body section in two and add a 1/2″ seam allowance. Sew a French seam along the bottom edge of the bag before closing the sides.
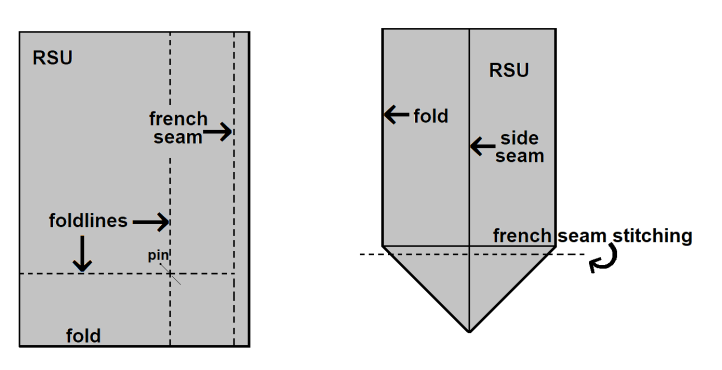
- Miter the gusset end by marking with a pin where the gusset end fold will come on front and back panels, (in this case, it is 2″ in and 2″ up from edges). Align the side seam with the folded bottom edge of the bag where the gusset will be formed; then, fold in the corner triangle to the pins. Press along the folds. French seam across the triangle from pin to pin to create each box corner for the tote bag.
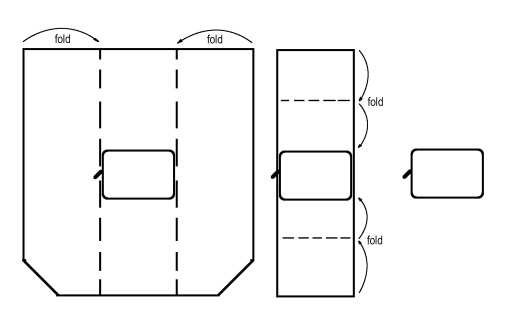
HOW TO FOLD YOUR TOTE:
The tote bag when flattened folds vertically into thirds towards the center, then the layers fold horizontally two times from the bottom and two times from the top, both resting on top of the pocket pouch, which is itself reversible and wraps around the stacked layers. To contain the tote bag, the pocket zips closed. The smaller unit can now fit easily into a coat pocket or purse, ready to be used when needed.
View this post on Instagram
Peachy Keen Foldable Farmer's Market Tote
Peachy Keen Foldable Farmer's Market Tote
I’m gold member, it says gold member download here, but I tried to click on it nothing.