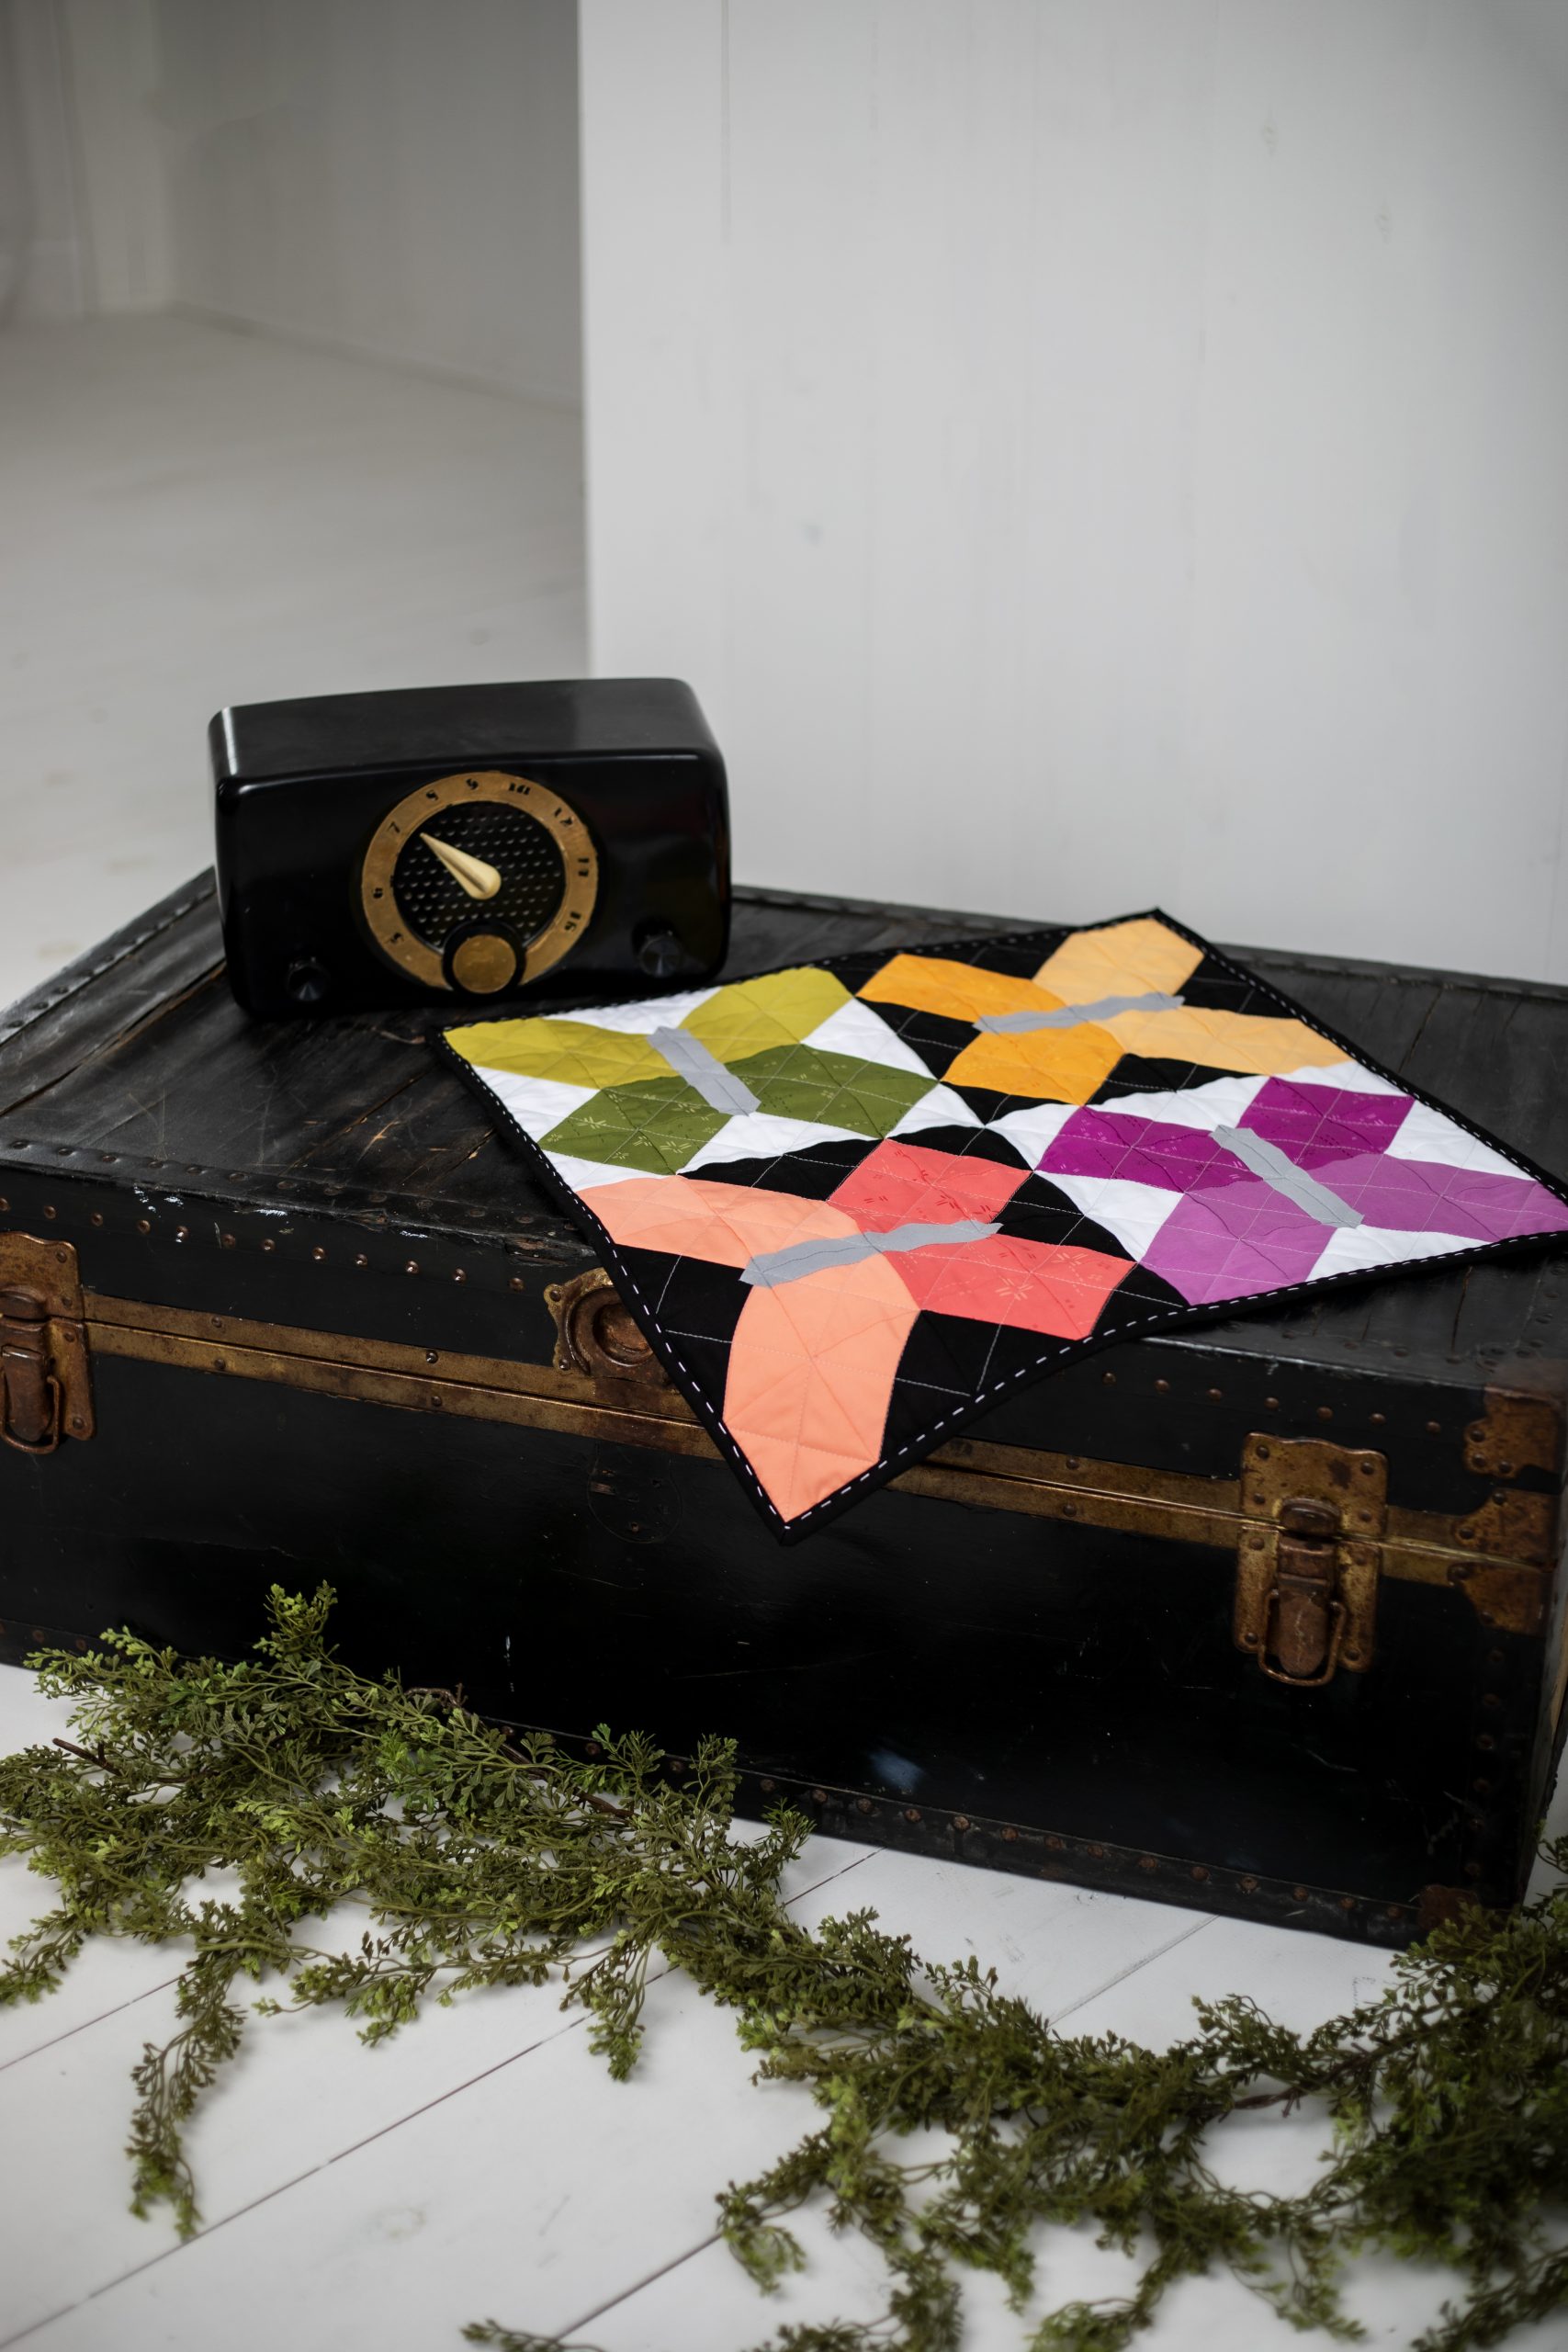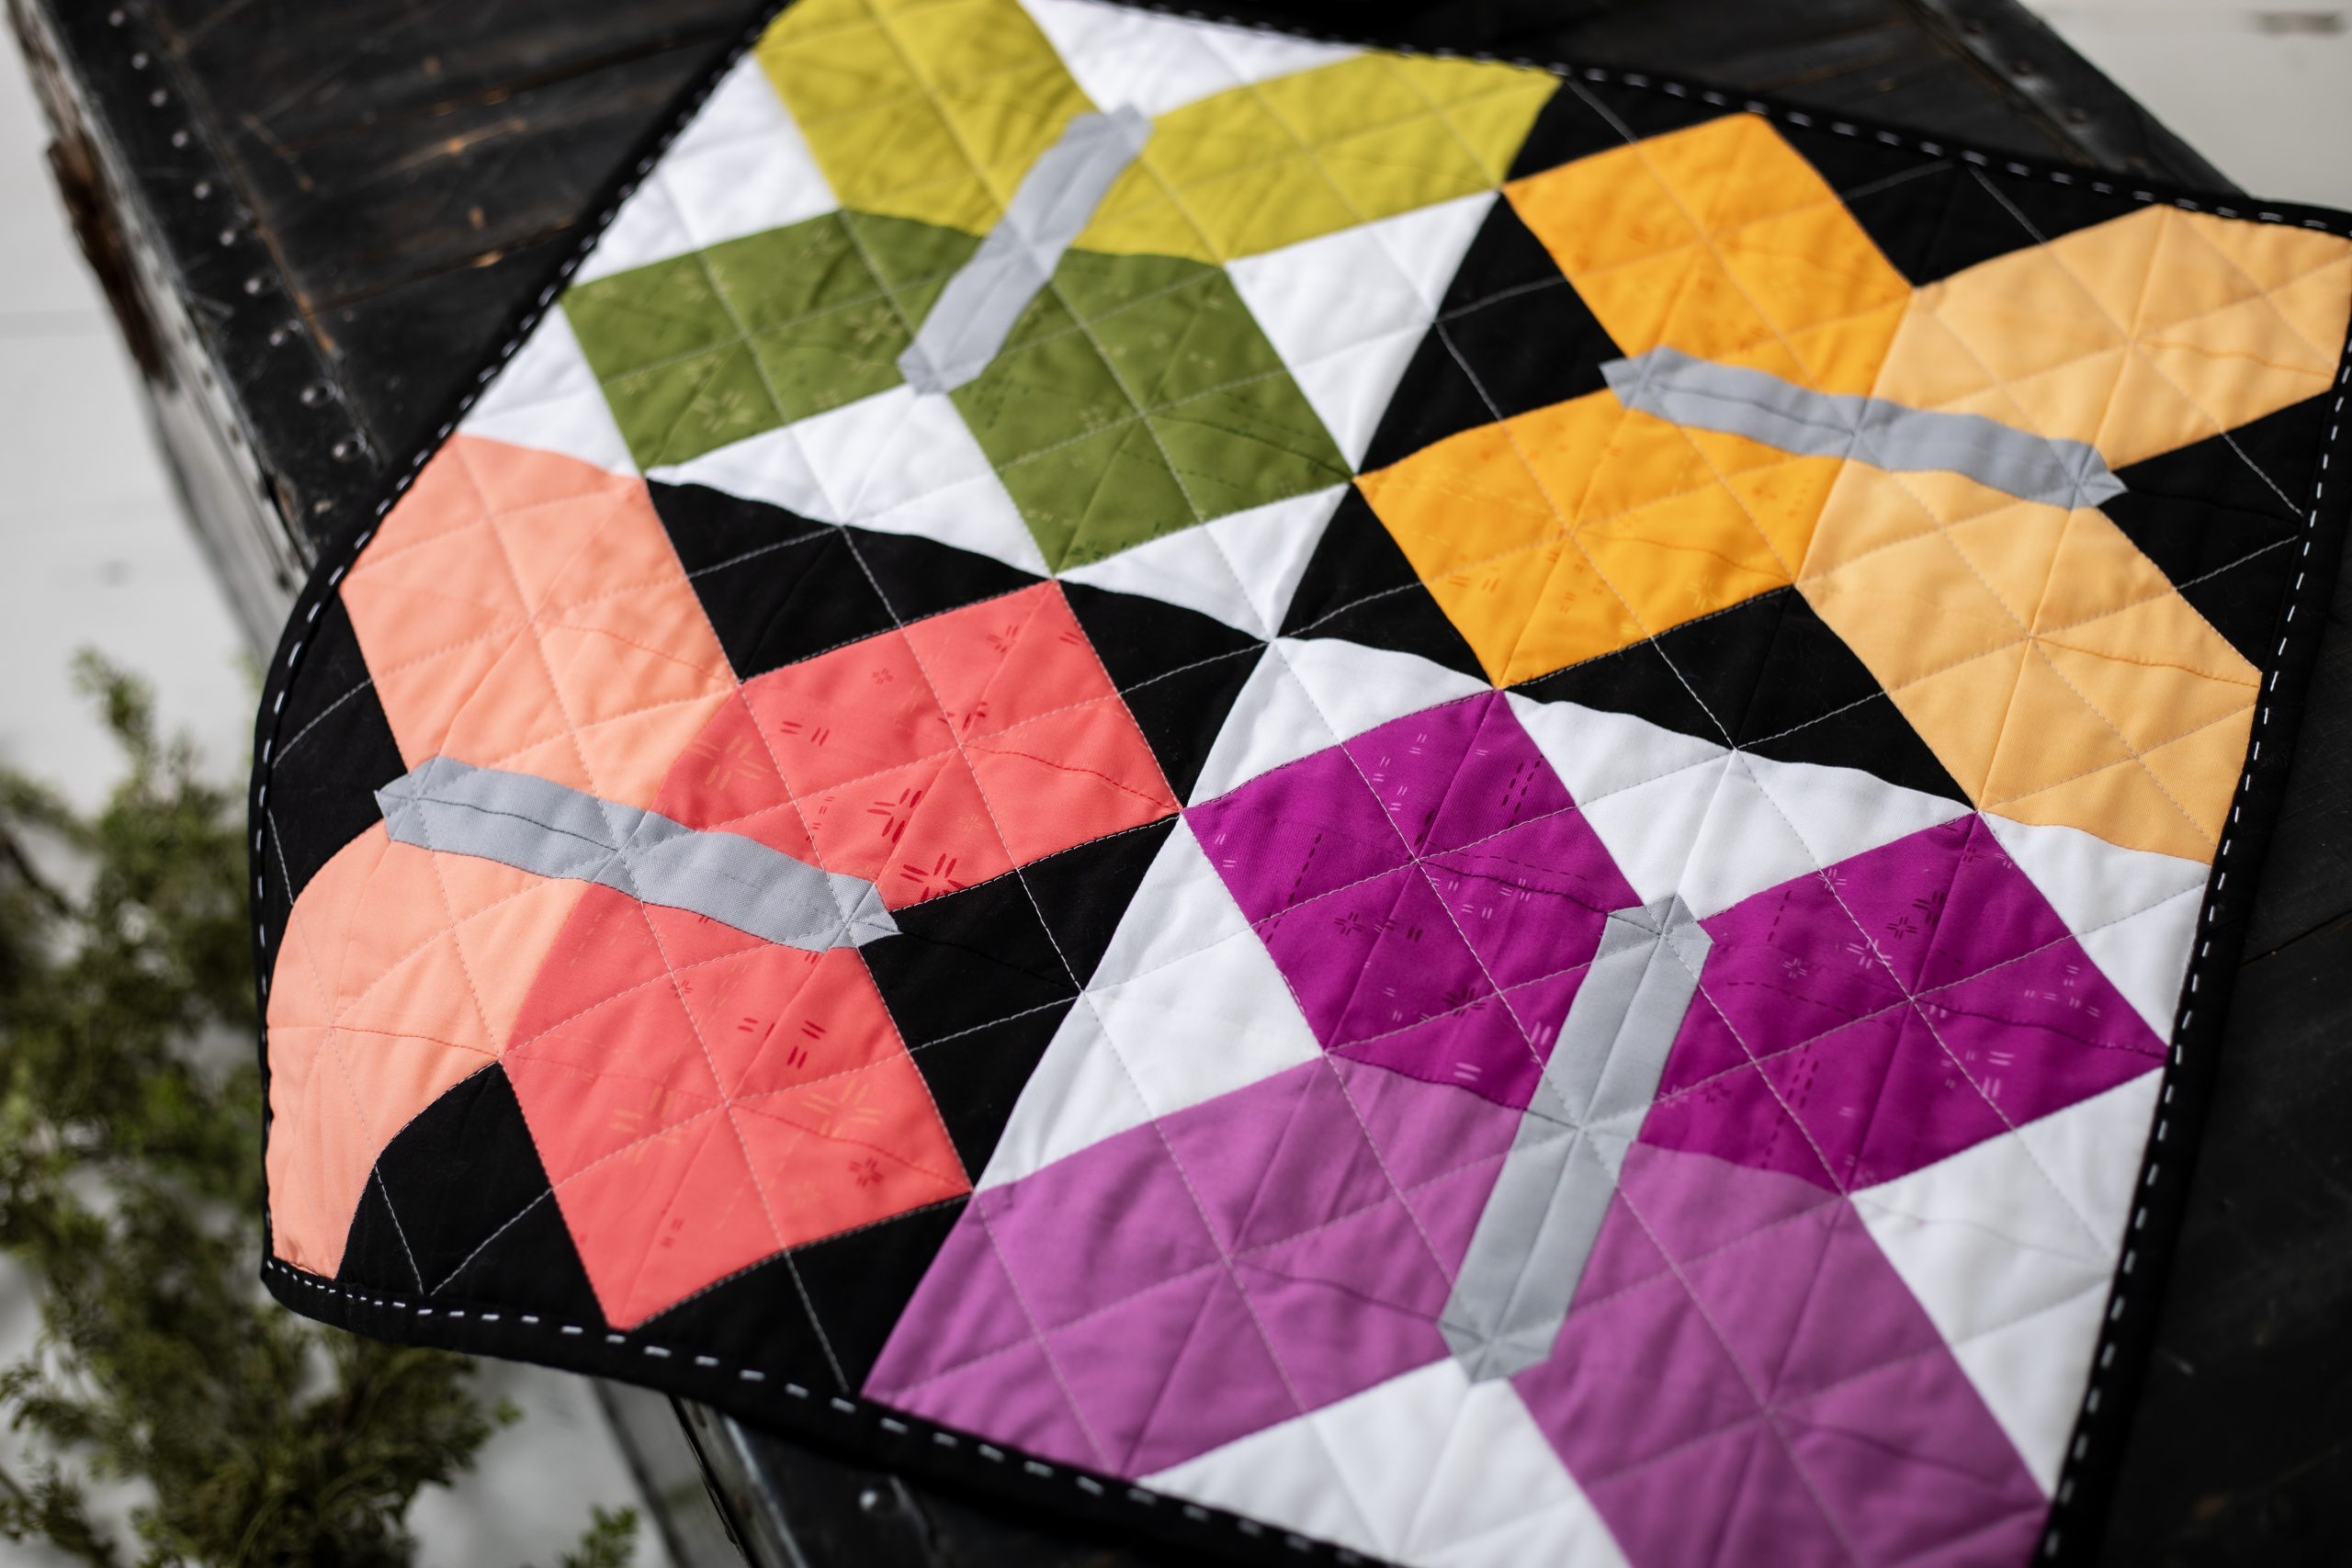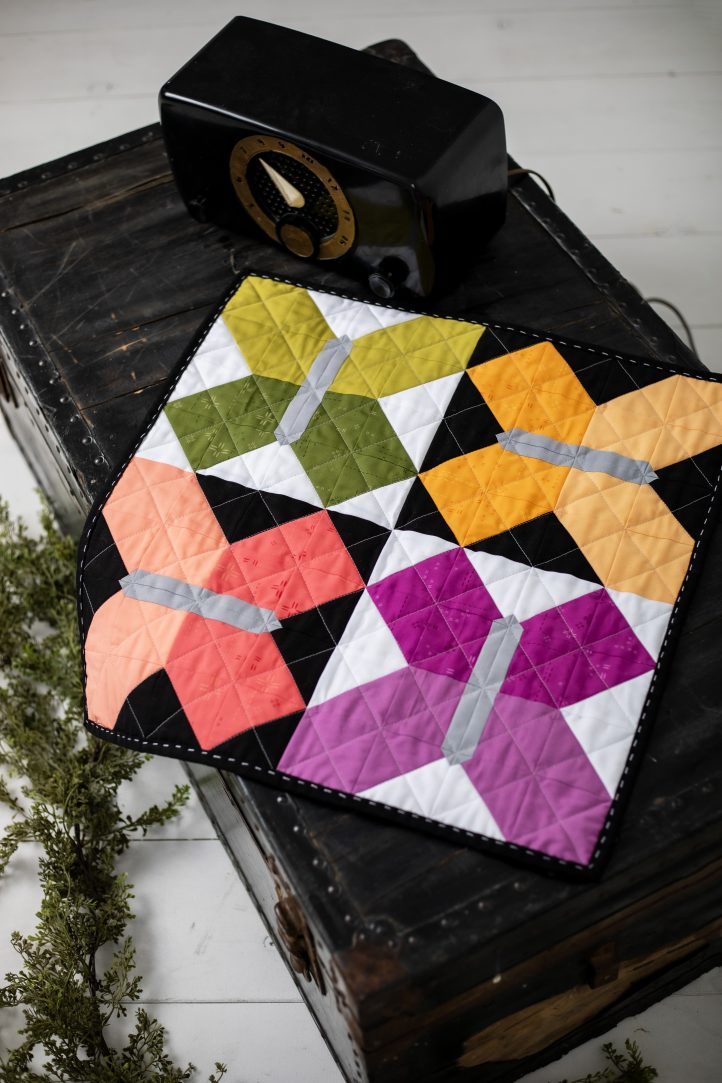
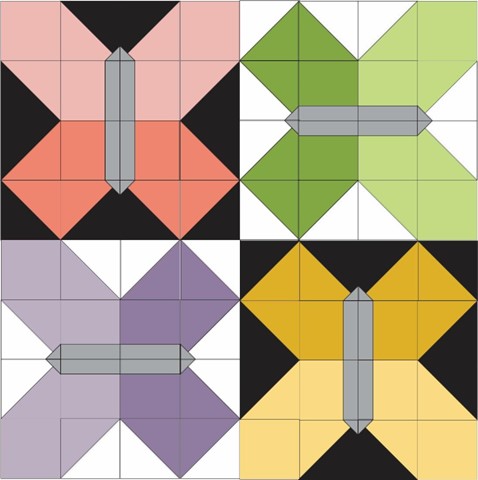
One of the most beautiful symbols of spring is the metamorphosis of caterpillars into butterflies. If you love all things butterflies, then you’ve got to see this magical mini quilt pattern from Staci Wendland. Featuring four colorful butterfly blocks, this spring mini quilt pattern can be made with precuts like fat eighths and includes two corner pockets for easy hanging.
Finished Size: 20″ x 20″
Seam Allowances: 1/4″
Abbreviations:
- RST = right sides together
- WOF = width of fabric from selvage to selvage
- HST = half square triangles
Materials:
- Cotton fabric requirements (40” wide):
- Dark peach: 1/8 yard
- Dark green: 1/8 yard
- Dark gold: 1/8 yard
- Dark purple: 1/8 yard
- Light peach: 1/8 yard
- Light green: 1/8 yard
- Light gold: 1/8 yard
- Light purple: 1/8 yard
- Grey: 1/8 yard
- White: 1/8 yard
- Black: 1/3 yard (includes binding)
- Backing: 3/4 yard
Cutting Instructions:
- Dark peach:
- (3) 3 1/2” x 3 1/2”
- (2) 3″ x 2 1/2”
- Dark green:
- (3) 3 1/2” x 3 1/2”
- (2) 3″ x 2 1/2”
- Dark gold:
- (3) 3 1/2” x 3 1/2”
- (2) 3″ x 2 1/2”
- Dark purple:
- (3) 3 1/2” x 3 1/2”
- (2) 3″ x 2 1/2”
- Light peach:
- (2) 3 1/2” x 3 1/2”
- (2) 3″ x 3″
- (2) 2 1/2” x 3″
- Light green:
- (2) 3 1/2″ x 3 1/2″
- (2) 3″ x 3″
- (2) 2 1/2″ x 3″
- Light gold:
- (2) 3 1/2″ x 3 1/2″
- (2) 3″ x 3″
- (2) 2 1/2″ x 3″
- Light purple:
- (2) 3 1/2″ x 3 1/2″
- (2) 3″ x 3″
- (2) 2 1/2″ x 3″
- Grey:
- (16) 1″ x 3″
- (16) 1″ x 1″
- White: (10) 3 1/2″ x 3 1/2″
- Black:
- (10) 3 1/2″ x 3 1/2″
- (3) 2 1/2″ x WOF (for binding)
- Backing: (1) 27″ x 27″
- Batting: (1) 27″ x 27″
Sewing Instructions:
- Using a fabric marking pen, draw a diagonal line on the wrong side of the following pieces:
- (3) dark peach 3 1/2” x 3 1/2”
- (3) dark green 3 1/2” x 3 1/2”
- (3) dark gold 3 1/2” x 3 1/2”
- (3) dark purple 3 1/2” x 3 1/2”
- (2) light peach 3 1/2” x 3 1/2”
- (2) light green 3 1/2” x 3 1/2”
- (2) light gold 3 1/2” x 3 1/2”
- (2) light purple 3 1/2” x 3 1/2”
- (16) grey 1″ x 1″
- Place each dark peach, dark gold, light peach, and light gold 3 1/2” square RST with (1) black 3 1/2” square. Sew 1/4” from each side of the drawn line on each pair.
- Cut on the drawn lines. Press HSTs open with the seams toward the black. Trim each HST to 3″ x 3″.
- Repeat Steps 2-3 with dark green, dark purple, light green, and light purple 3 1/2” squares, pairing each with (1) white 3 1/2″ square. Press the seams away from the white.
- Place (1) grey 1″ x 3″ with (1) dark peach 2 1/2” x 3″ RST with the left edges even. Sew 1/4” from the left edge.
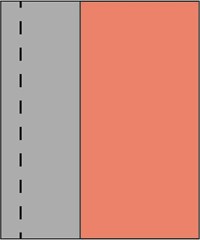
- Press open with the seam toward the grey.
- Place (1) grey 1″ x 3″ with (1) dark peach 2 1/2” x 3″ RST with right edges even. Sew 1/4″ from the right edge.
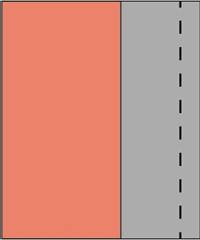
- Press open with the seam toward the grey.
- Repeat Steps 5 – 8 with (14) grey 1″ x 3″ and (2) dark green, (2) dark gold, (2) dark purple, (2) light peach, (2) light green, (2) light gold, and (2) light purple 2 1/2” x 3″. Each color pair should have (1) grey to the left and (1) grey to the right.
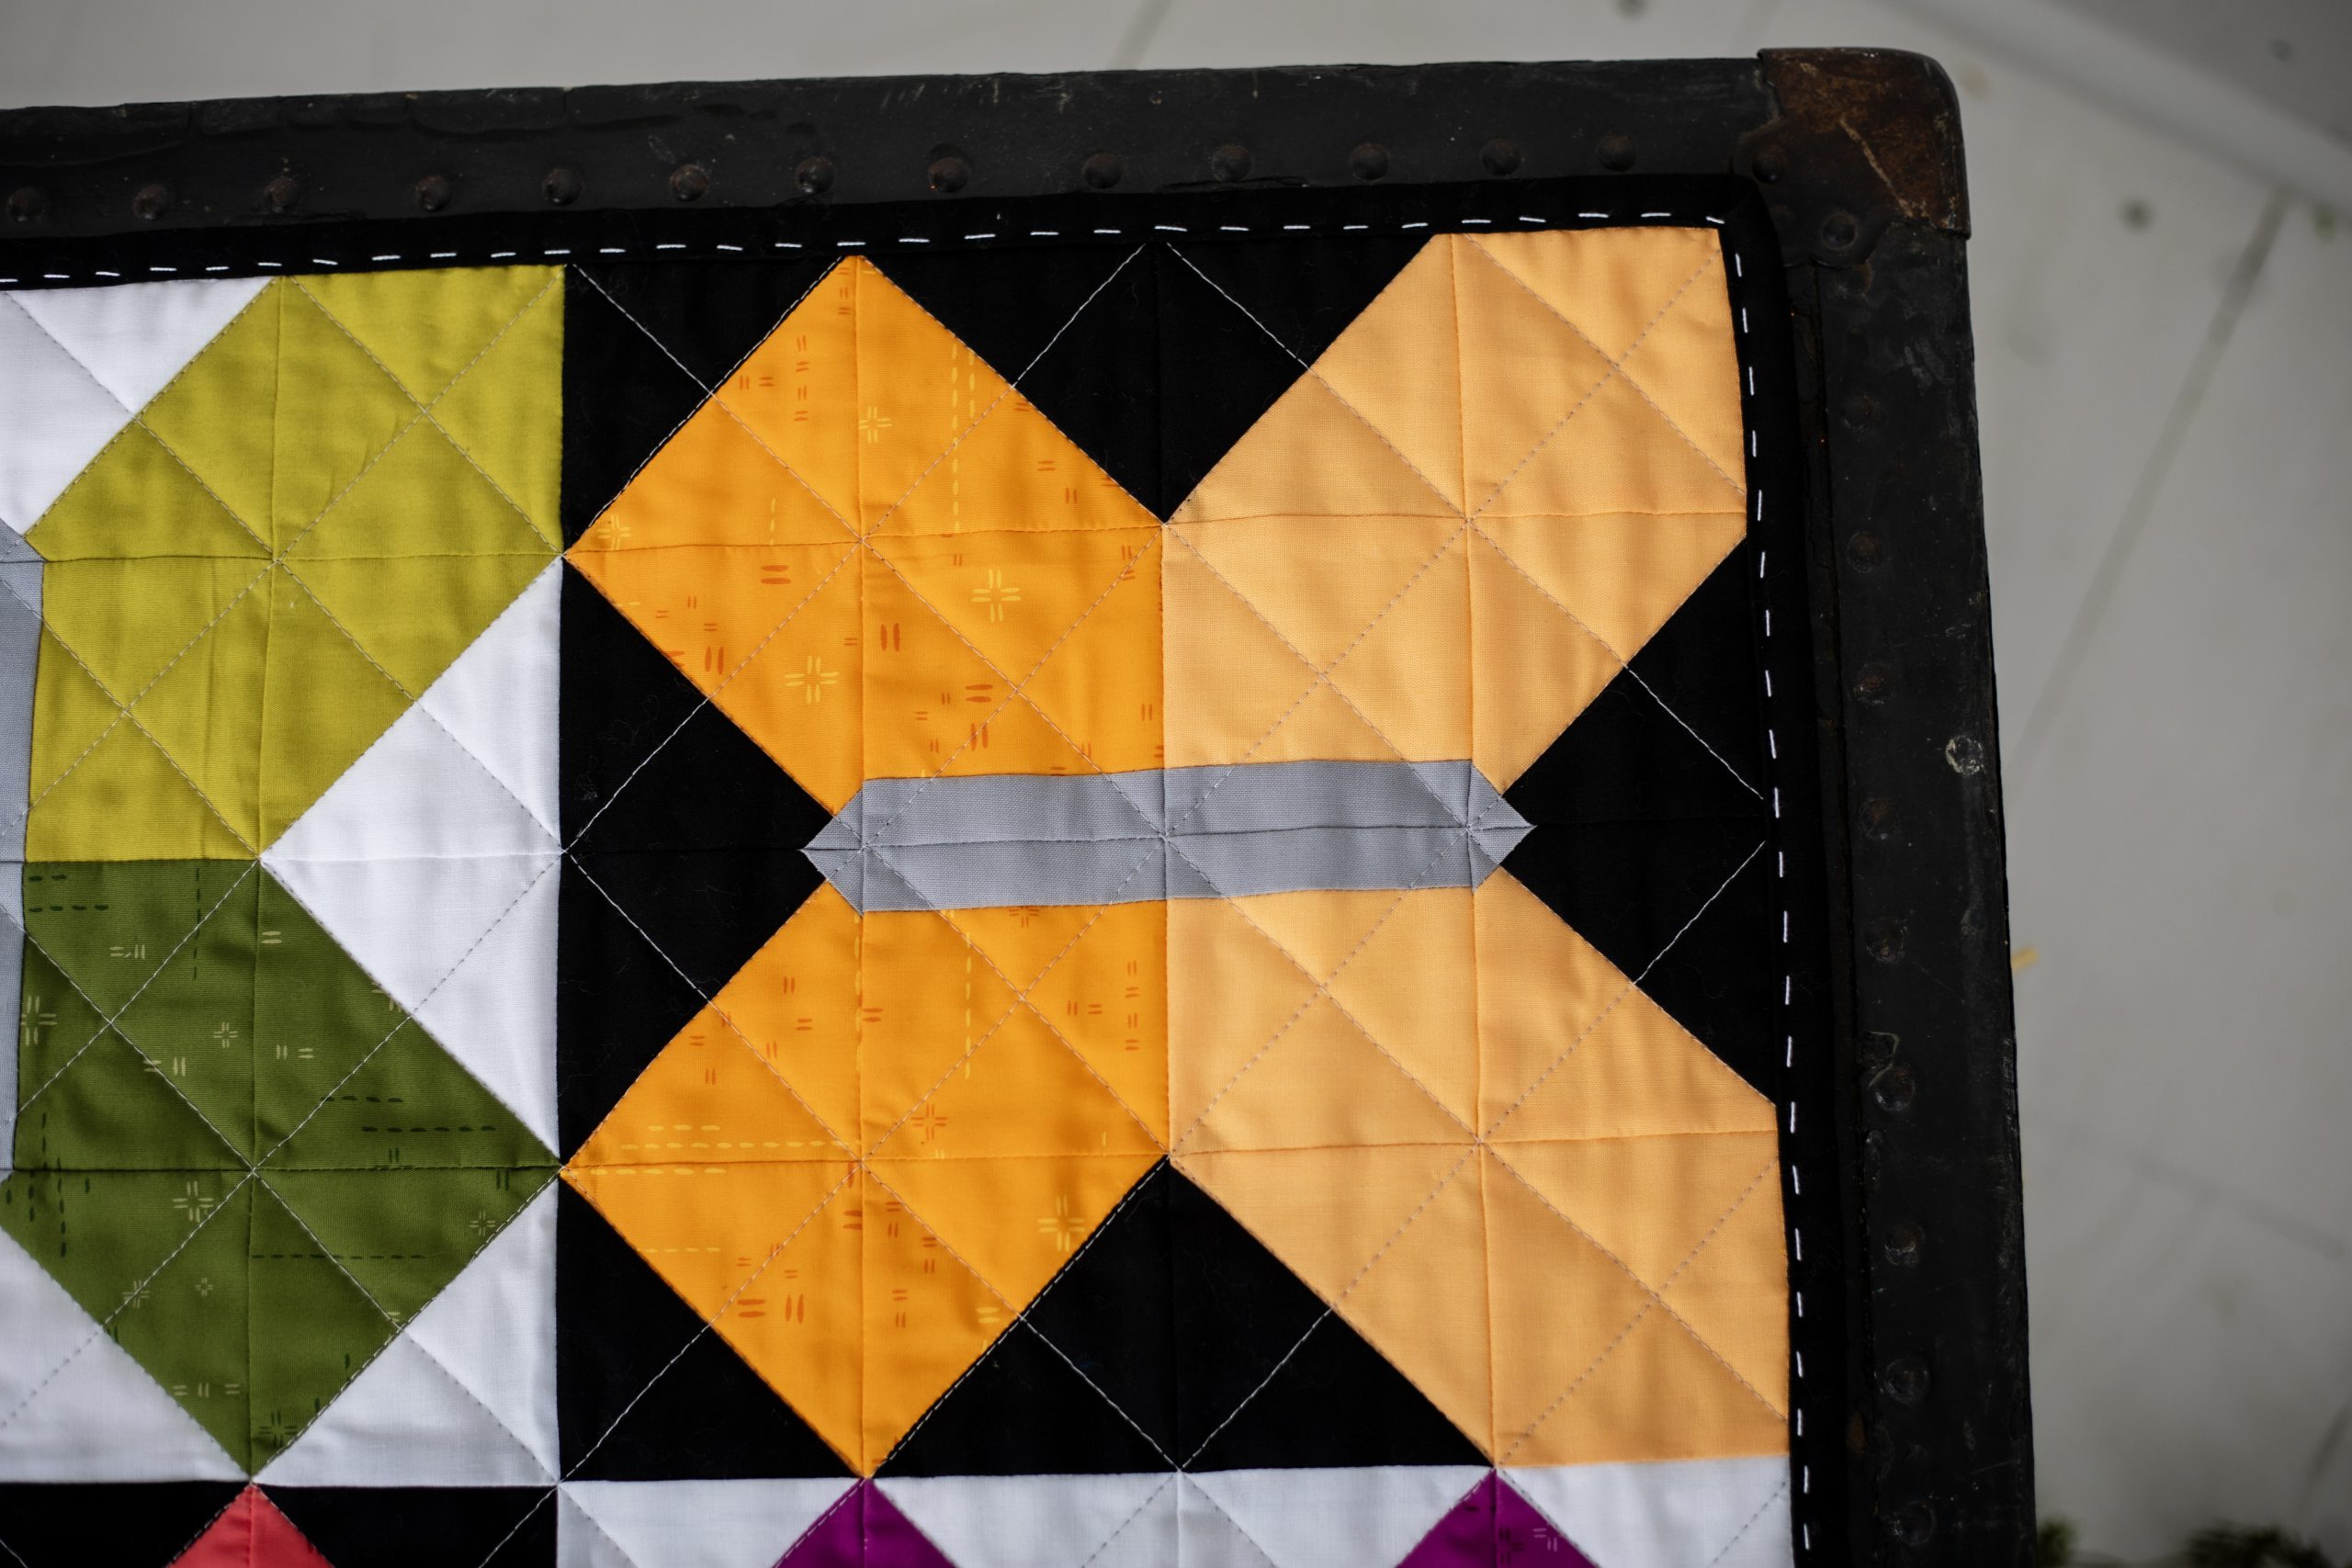
- Lay out (1) light peach and black HST with the light peach on the lower left and the black on the upper right. Place (1) grey 1″ x 1″ on the lower right corner with the drawn line from the lower left to upper right.

- Sew on the drawn line. Trim 1/4″ from the drawn line toward the lower right corner.
- Press the corner open with the seam toward the grey.

- Lay out (1) light peach and black HST with the light peach on the lower right and the black on the upper left. Place (1) grey 1″ x 1″ on the lower left corner with the drawn line from the upper left to lower right.
- Sew on the drawn line. Trim 1/4″ from the drawn line toward the lower left corner.
- Press the corner open with the seam toward the grey.

- Repeat Steps 10 – 15 with (2) light gold and black HSTs and (2) grey 1″ x 1″.
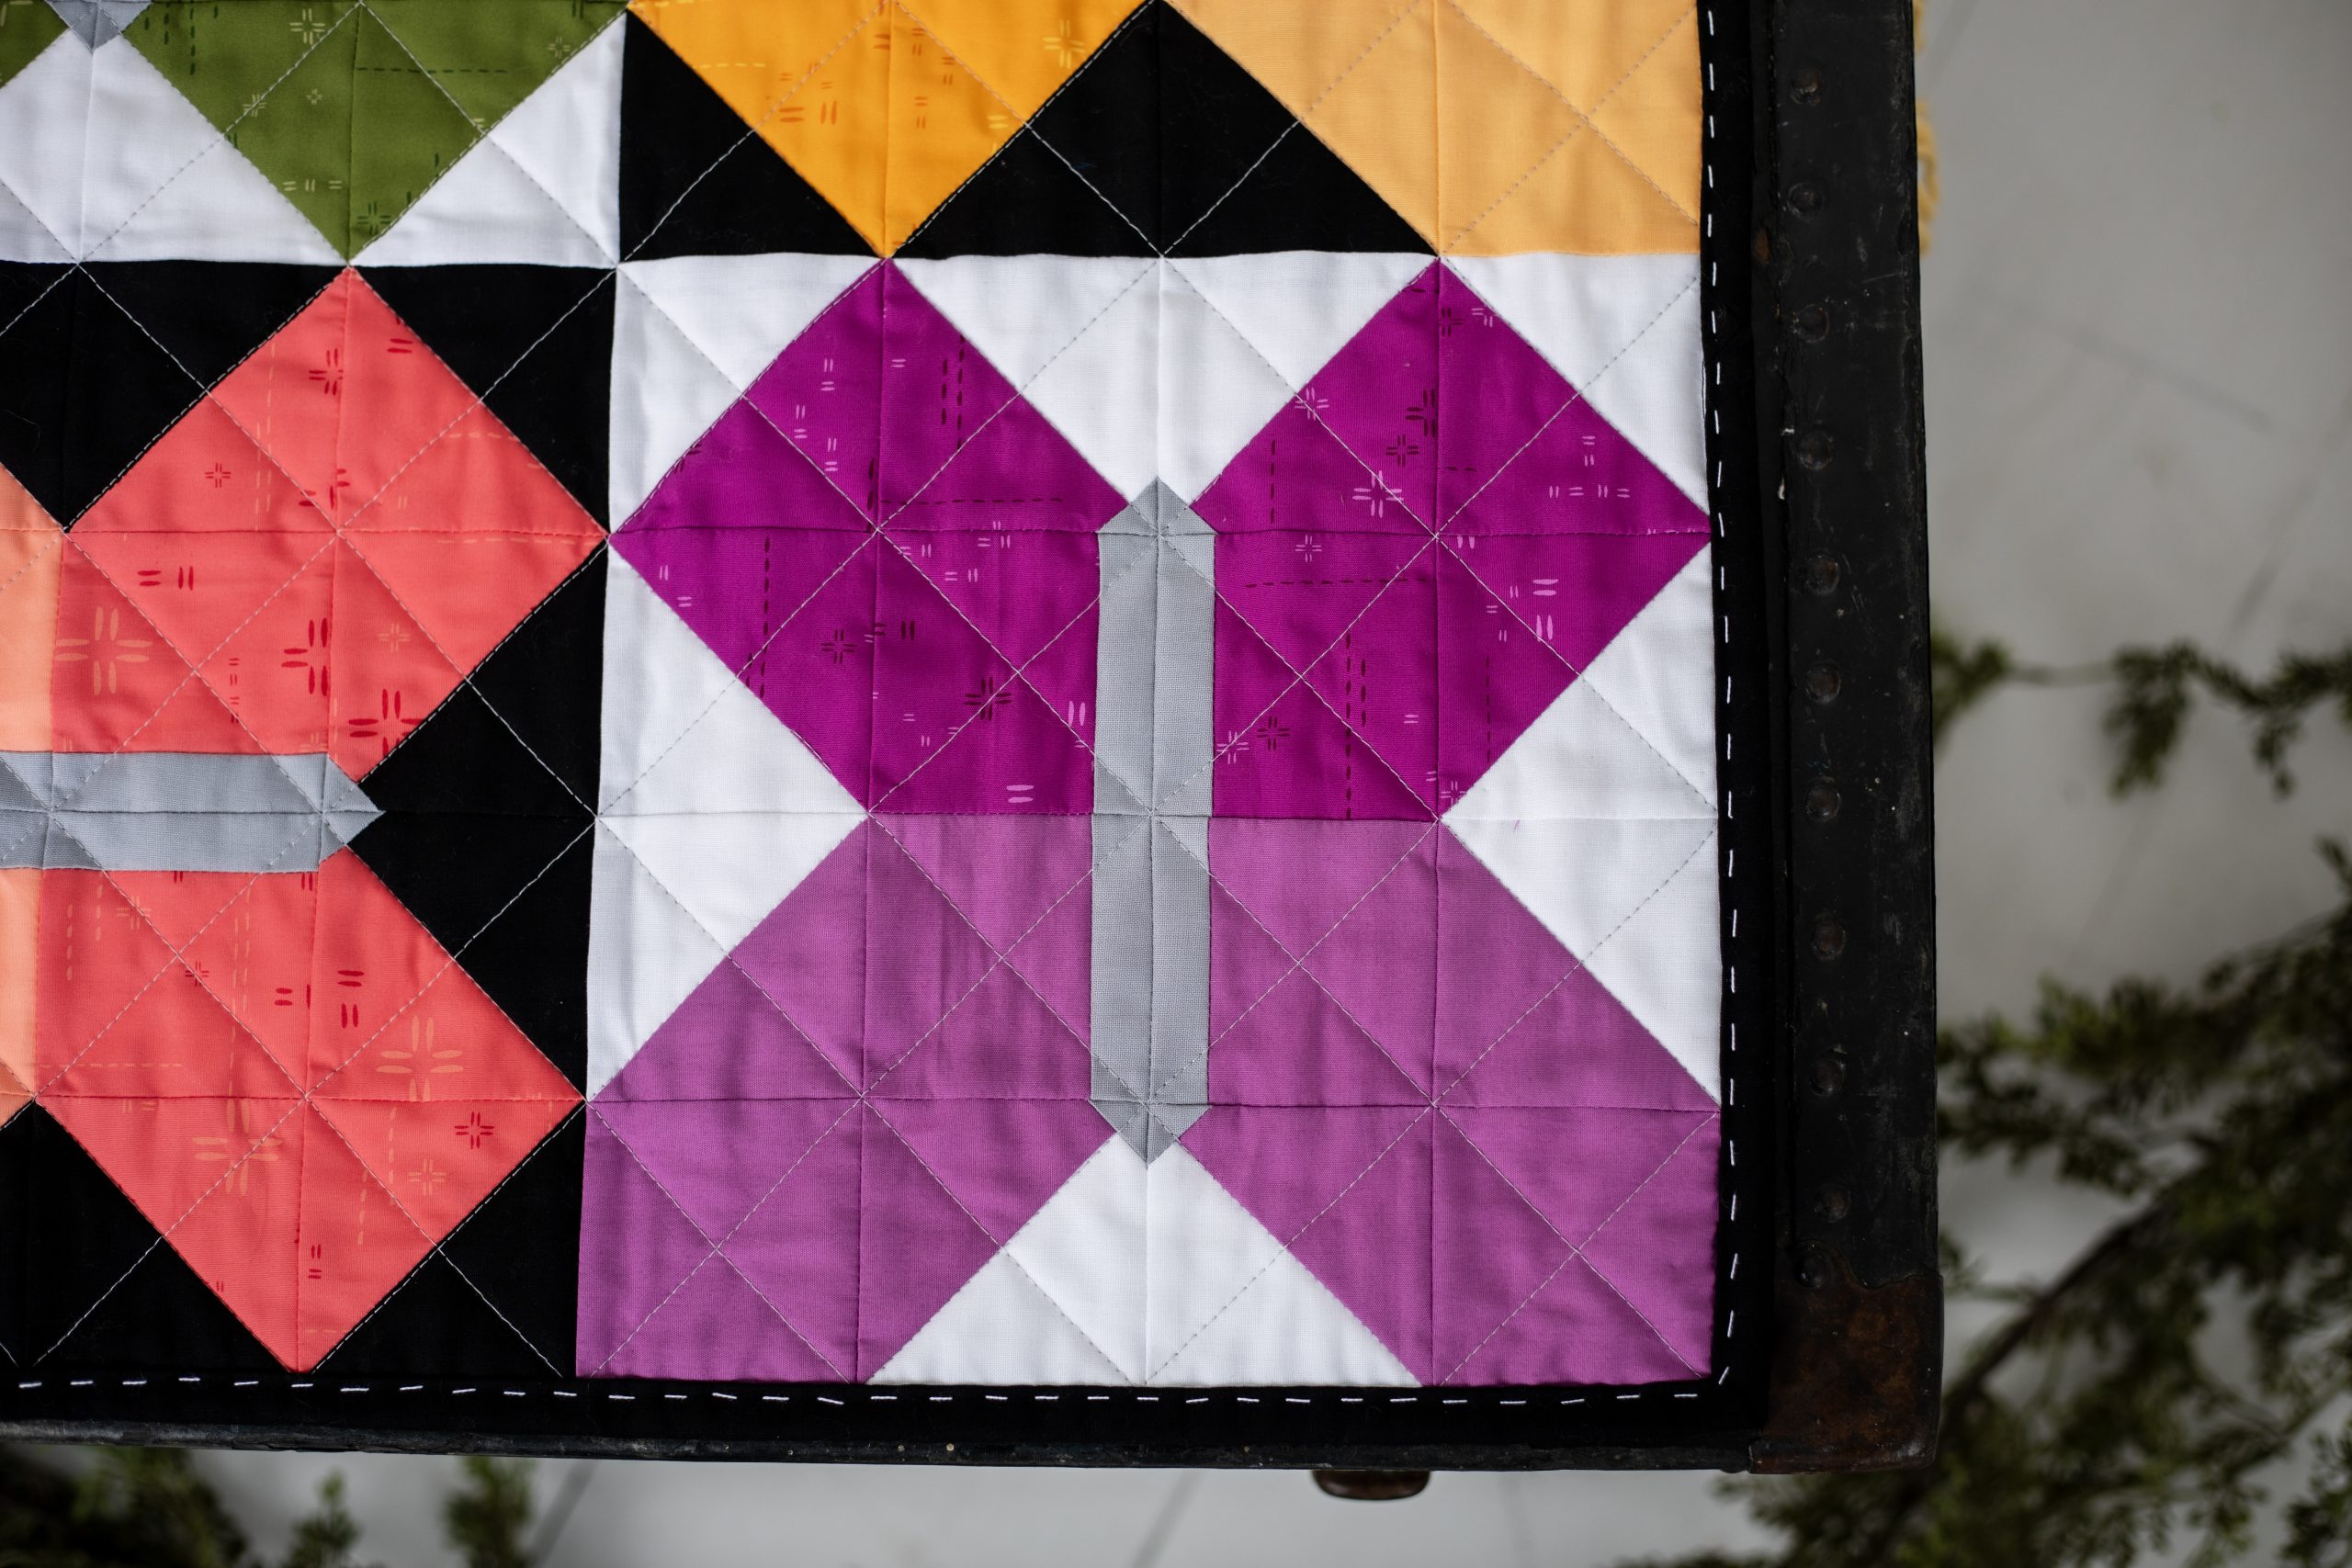
- Repeat Steps 10 – 15 with (2) light green and white HSTs, (2) light purple HSTs, and (4) grey 1″ x 1″, but where black is indicated in the instructions is now white.
- Lay out (1) dark peach and black HST with the dark peach on the upper right and the black on the lower left. Place (1) grey 1″ x 1″ on the upper left corner with the drawn line from the lower left to the upper right.
- Sew on the drawn line. Trim 1/4″ from the drawn line toward the upper left corner.
- Press the corner open with the seam toward the grey.

- Lay out (1) dark peach and black HST with the dark peach on the upper left and the black on the lower right. Place (1) grey 1″ x 1″ on the upper right corner with the drawn line from the upper left to lower right.
- Sew on the drawn line. Trim 1/4″ from the drawn line toward the upper right corner.
- Press the corner open with the seam toward the grey.

- Repeat Steps 18 – 23 with (2) dark gold and black HSTs and (2) grey 1″ x 1″.
- Repeat Steps 18 – 23 with (2) dark green and white HSTs, (2) dark purple and white HSTs, and (4) grey 1″ x 1″, but where black is indicated in the instructions is now white.
- Lay out the blocks and remaining pieces in (8) rows of (8) blocks or pieces as shown.
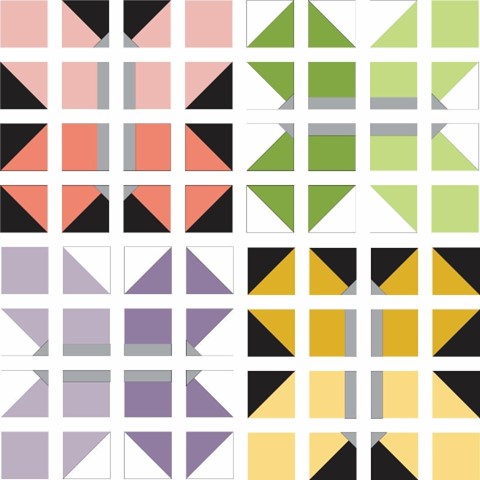
- Sew the blocks RST into (8) horizontal rows. Alternate pressing the seams to the left or right between rows so the seams will nest.
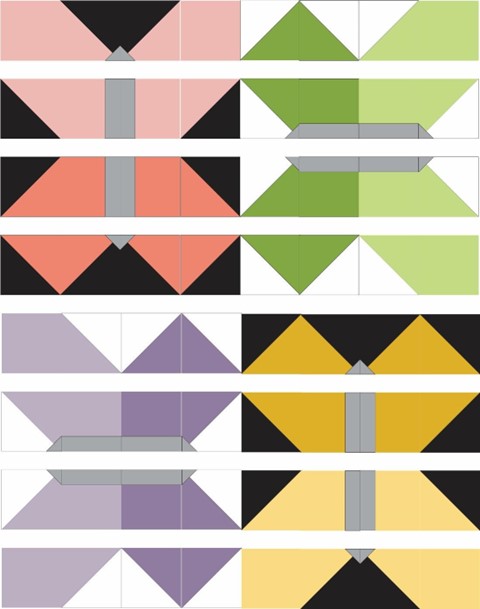
- Sew the rows RST to complete the top. Press the seams toward the bottom.
- Trim the selvages from the (3) 2 1/2″x WOF binding pieces. Sew the ends RST to make (1) continuous strip.
- Cut (2) 2 1/2” x 2 1/2” squares from one end of the strip.
- Fold each square in half diagonally with wrong sides together. Press. Set aside.
- Layer the backing with the right side down, batting, and the quilt top with the right side up. Pin or baste.
- Quilt using your preferred method and design. Trim the batting and backing to match the quilt top.
- Pin the folded squares in the upper left and right corners on the back of the quilt with edges even and the folds to the inside.
- Sew the binding around the edge using your preferred method, stitching over the edges of the folded squares.
- Cut a dowel to fit into the corner pockets on the back to hang the quilt.