
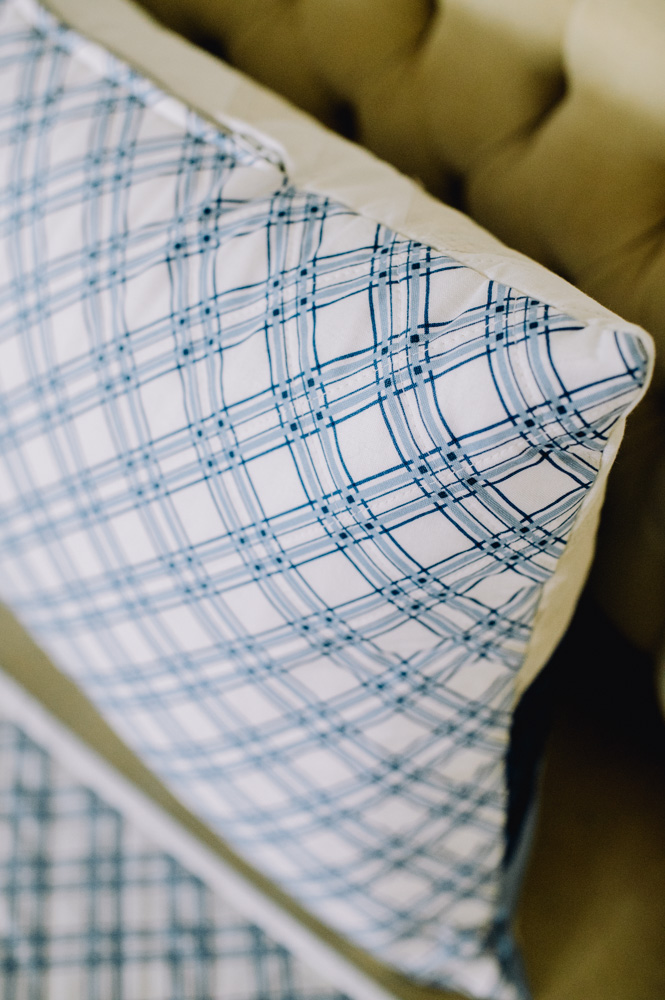
Give your country chic décor a modern edge with this quilted throw pillow pattern. Designed to match the Up and Down Mini Quilt Pattern from our August 2021 issue, this throw pillow is made using beginner-friendly half square triangles in shades of blue and white. This charming quilted pillow would be a darling addition to your couch or bed and fits perfectly into the popular modern farmhouse aesthetic. Follow the handy diagram below to piece together a pretty accent pillow for your country cottage!
Finished Size: Approximately 16″ x 24”
Seam Allowances: 1/4”
Materials:
- Fabrics
- Beige cotton fabric – cut 6 – 5 1/8″ x 5 1/8” – A
- White cotton fabric – cut 6 – 5 1/8″ x 5 1/8” – B
- Light blue cotton fabric – cut 6 – 5 1/8″ x 5 1/8” – C
- Dark blue cotton fabric – cut 6 – 5 1/8″ x 5 1/8” – D
- Cotton fabric for back – cut 1 – 16 1/2″ x 24 1/2”
- Muslin – cut 2 – 17 1/2″ x 25 1/2”
- Cotton batting – cut 2 – 17 1/2″ x 25 1/2”
- 12” – 14” zipper
- 16” x 24” pillow insert
Instructions:
ASSEMBLY:
This pillow front is made using half square triangles.
- To begin the quilt, draw a diagonal line, corner to corner, on the wrong side of each piece A and C.
- Pin 3 pieces C to 3 pieces B with right sides together. Stitch 1/4” from the drawn line on each side. Cut along the line.
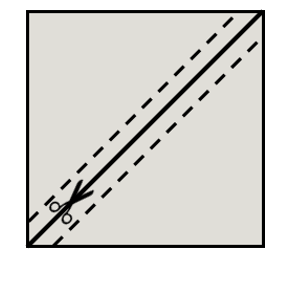
- Press each square open with the seam toward the darker fabric. The squares should measure about 4 3/4” at this point. Trim each to 4 1/2 x 4 1/2”.
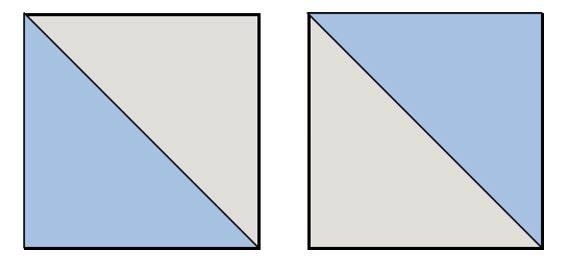
- Repeat the process by sewing 3 pieces C to 3 pieces D, 3 pieces A to 3 pieces D, and 3 pieces A to 3 pieces B.
- Lay out all the squares to match the diagram.
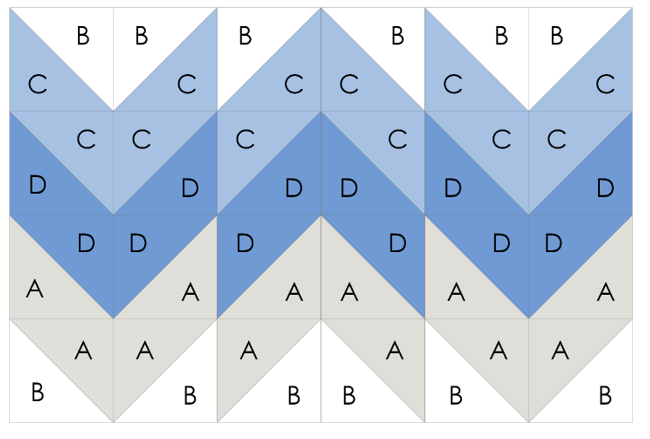
- Sew the squares together in horizontal rows. Alternate the direction the seams are pressed between each row so they’ll fit together well in the next steps.
- Stitch the rows together, matching the seams.
- Layer the muslin with wrong side up, the batting, and the quilt top with the right side up. Pin. Quilt in the design of your choice.
- Repeat with the remaining muslin and batting, with the pillow back right side up. Pin and quilt.
- Trim away the excess batting and muslin to match the pillow front. Trim the back to the same size.
- Lay the pillow front on the back, with right sides together. Center the zipper next to the bottom edge. Make a mark on the edge of the fabric where the zipper begins and ends.
- Pin the bottom edges of the pillow front and back together. Stitch 1/2” from the bottom edge, switching to a long basting stitch between the two marks. Backstitch before and after the longer stitches.
- Transfer the marks to the inside of the seam with an indelible marker. Press the seam open.
- Center the zipper face down over the seam between the marks. Pin well.
- Switch to a zipper foot, then stitch around a scant 1/4” from the zipper, down both long sides and across the ends.
- Carefully remove the basting stitches from the seam over the zipper. Unzip the zipper most of the way.
- Fold the seam at the zipper so the pillow front and back are right sides together, with the edges even. Pin in place.
- Stitch 1/2” from the remaining three unsewn sides.
- Trim the corners. Turn the pillow right side out through the zipper.
- Push the pillow insert in through the zipper and zip up.
I can’t wait to make this for my bedroom