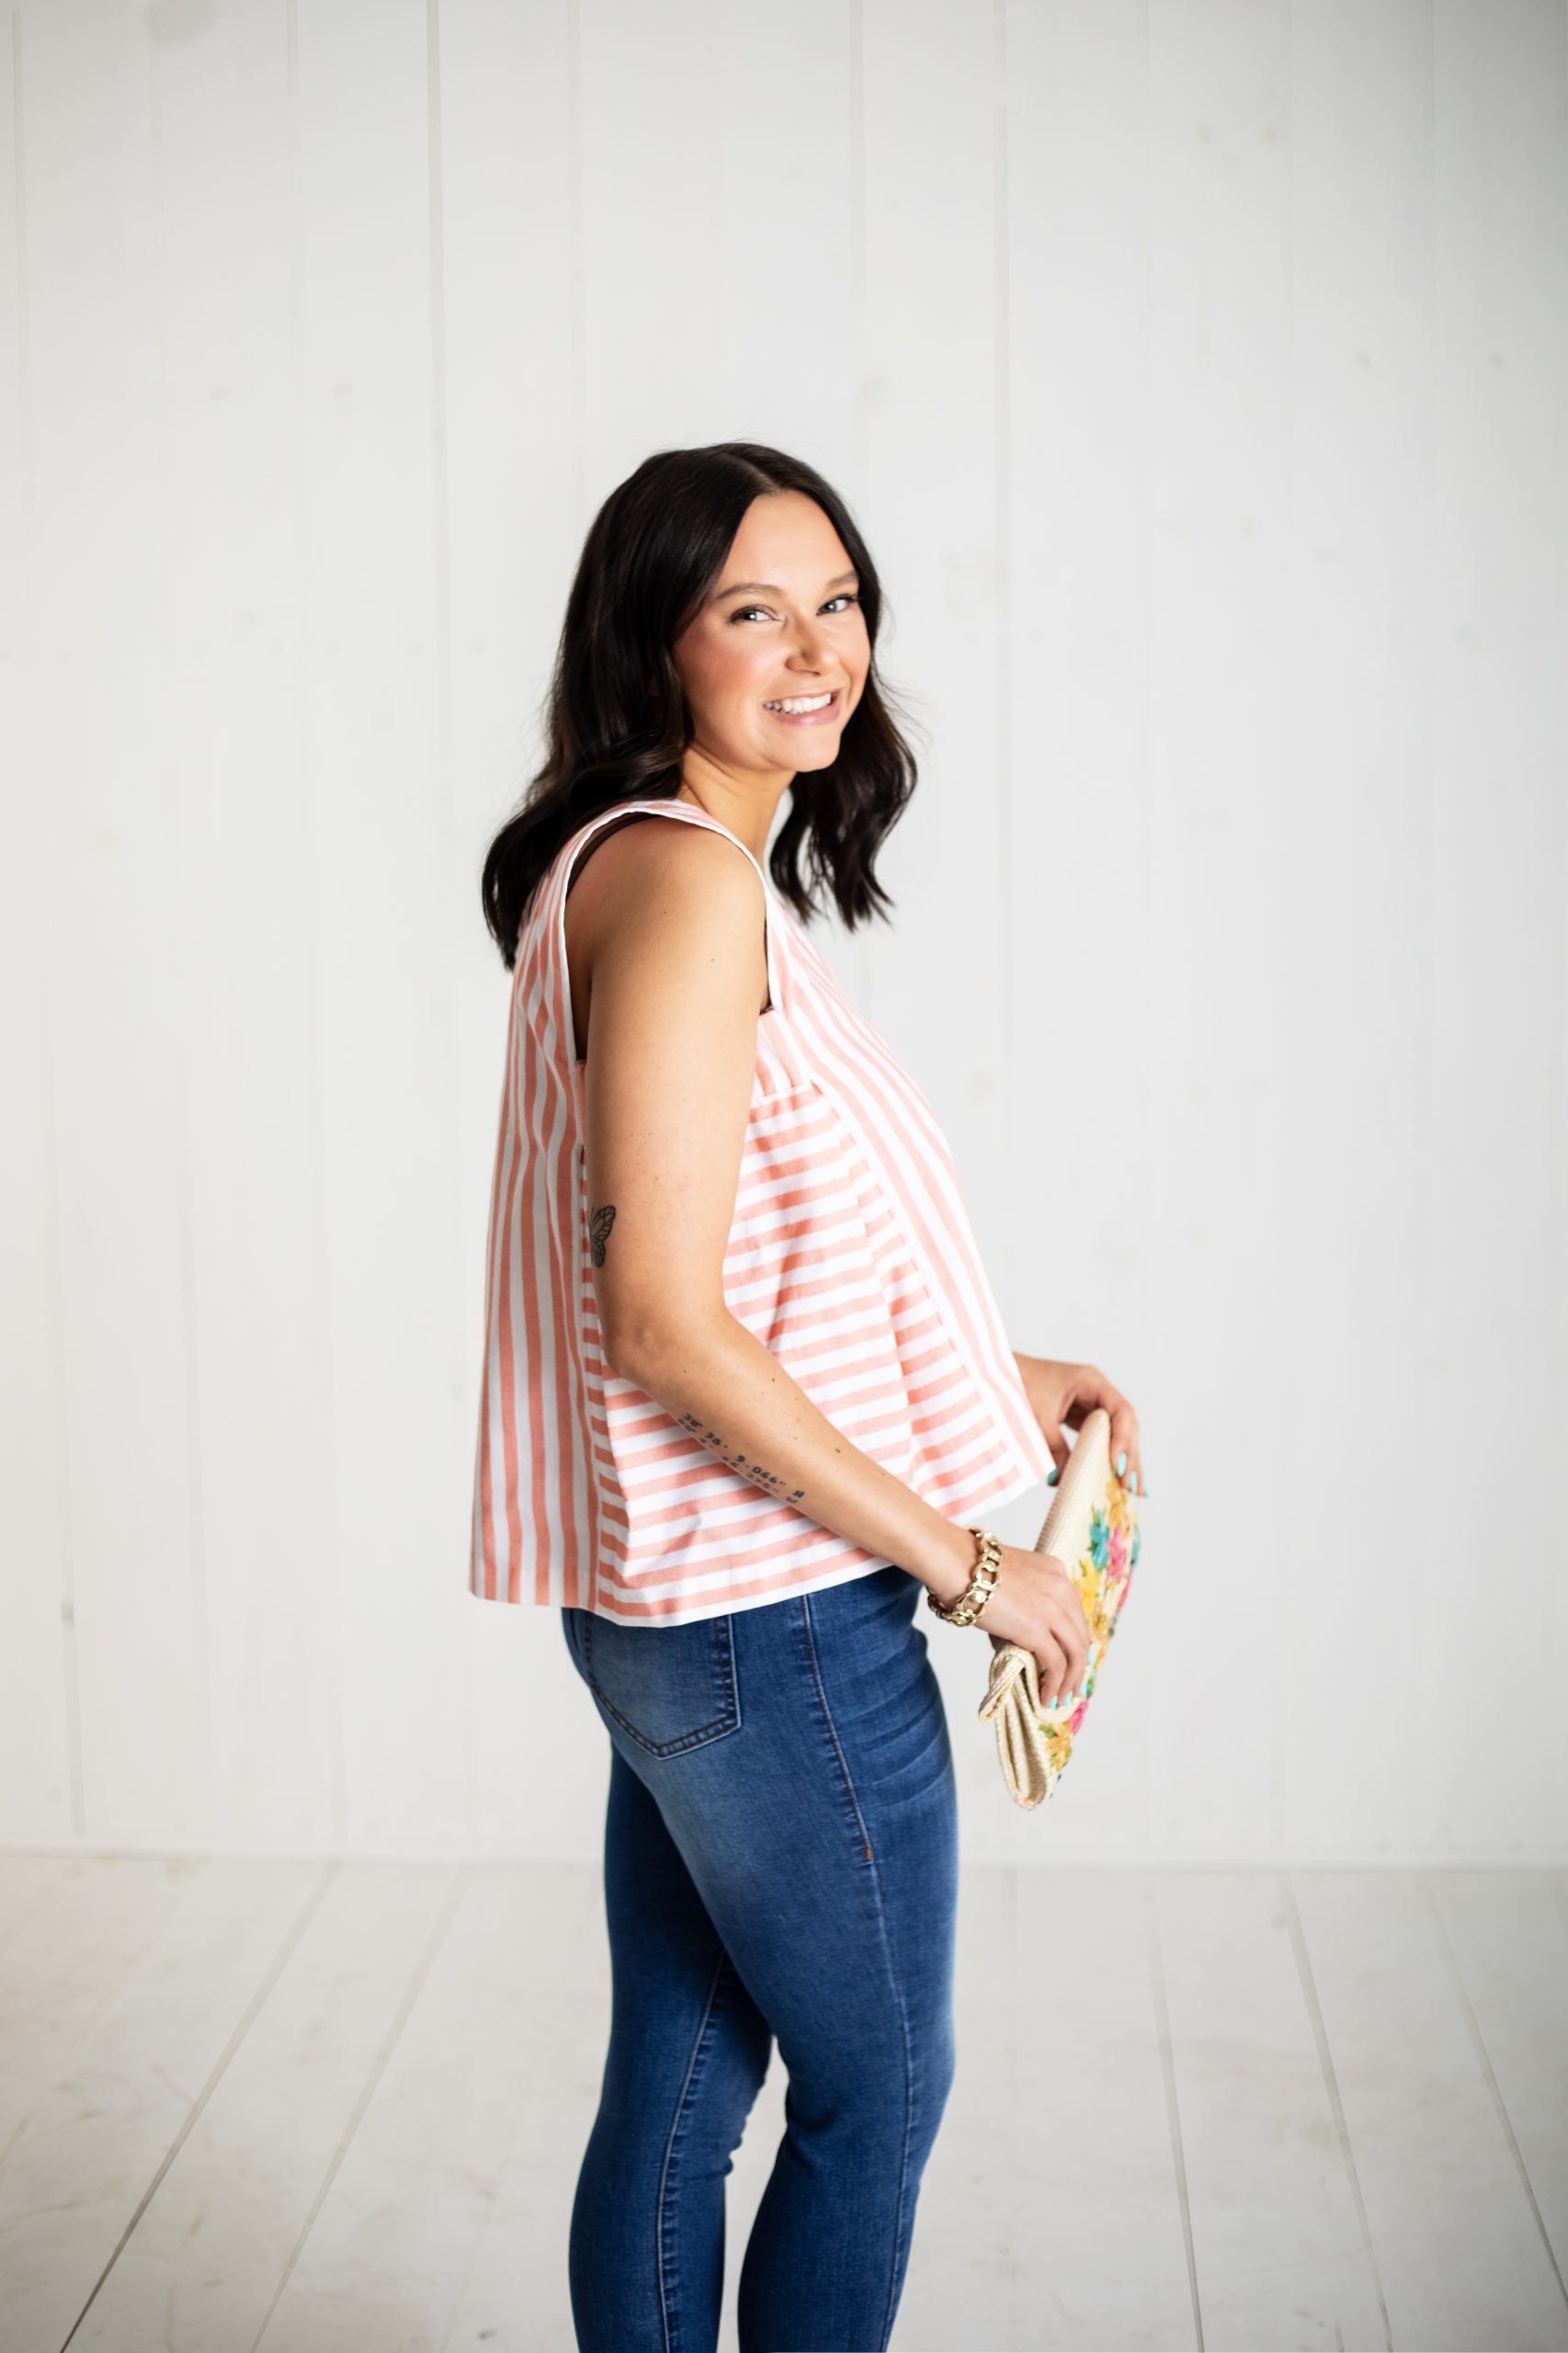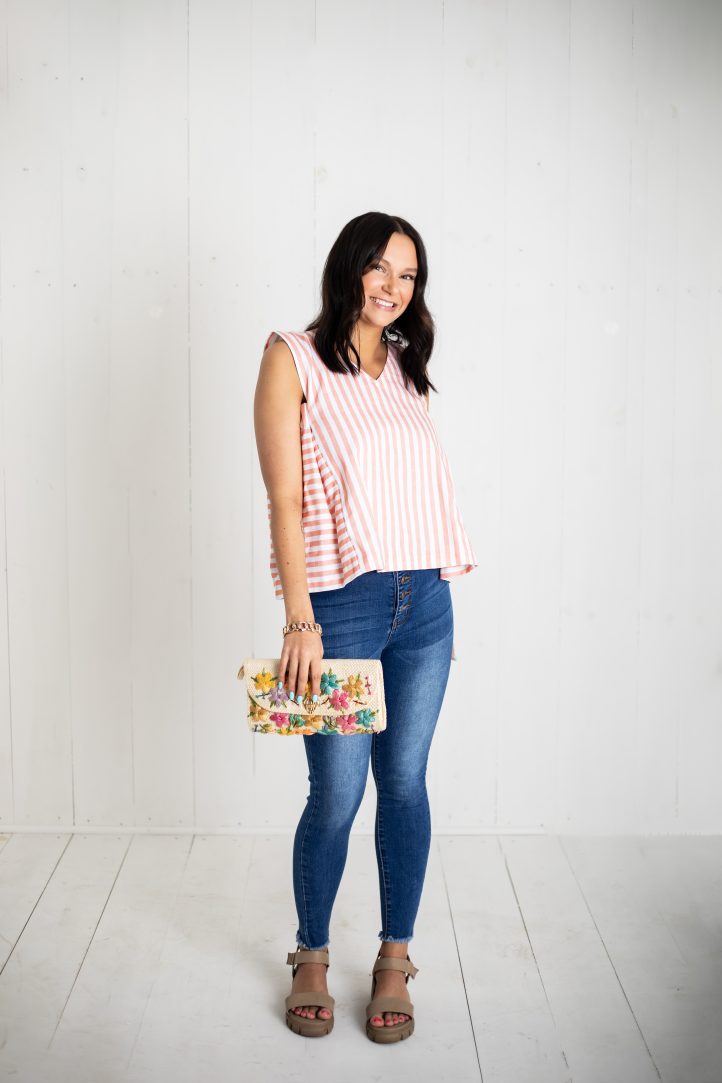
Sew up an easy summer top just in time for sunny days and warm weather with this tutorial from Don Morin. Perfect for showing off your sun-kissed shoulders, this top sewing pattern is drafted based on your height and body shape, making it a great project for beginners looking to expand their pattern drafting skills. Made in a beach chic peach and white stripe, this floaty summer top features a flattering A-line silhouette and teardrop neckline.
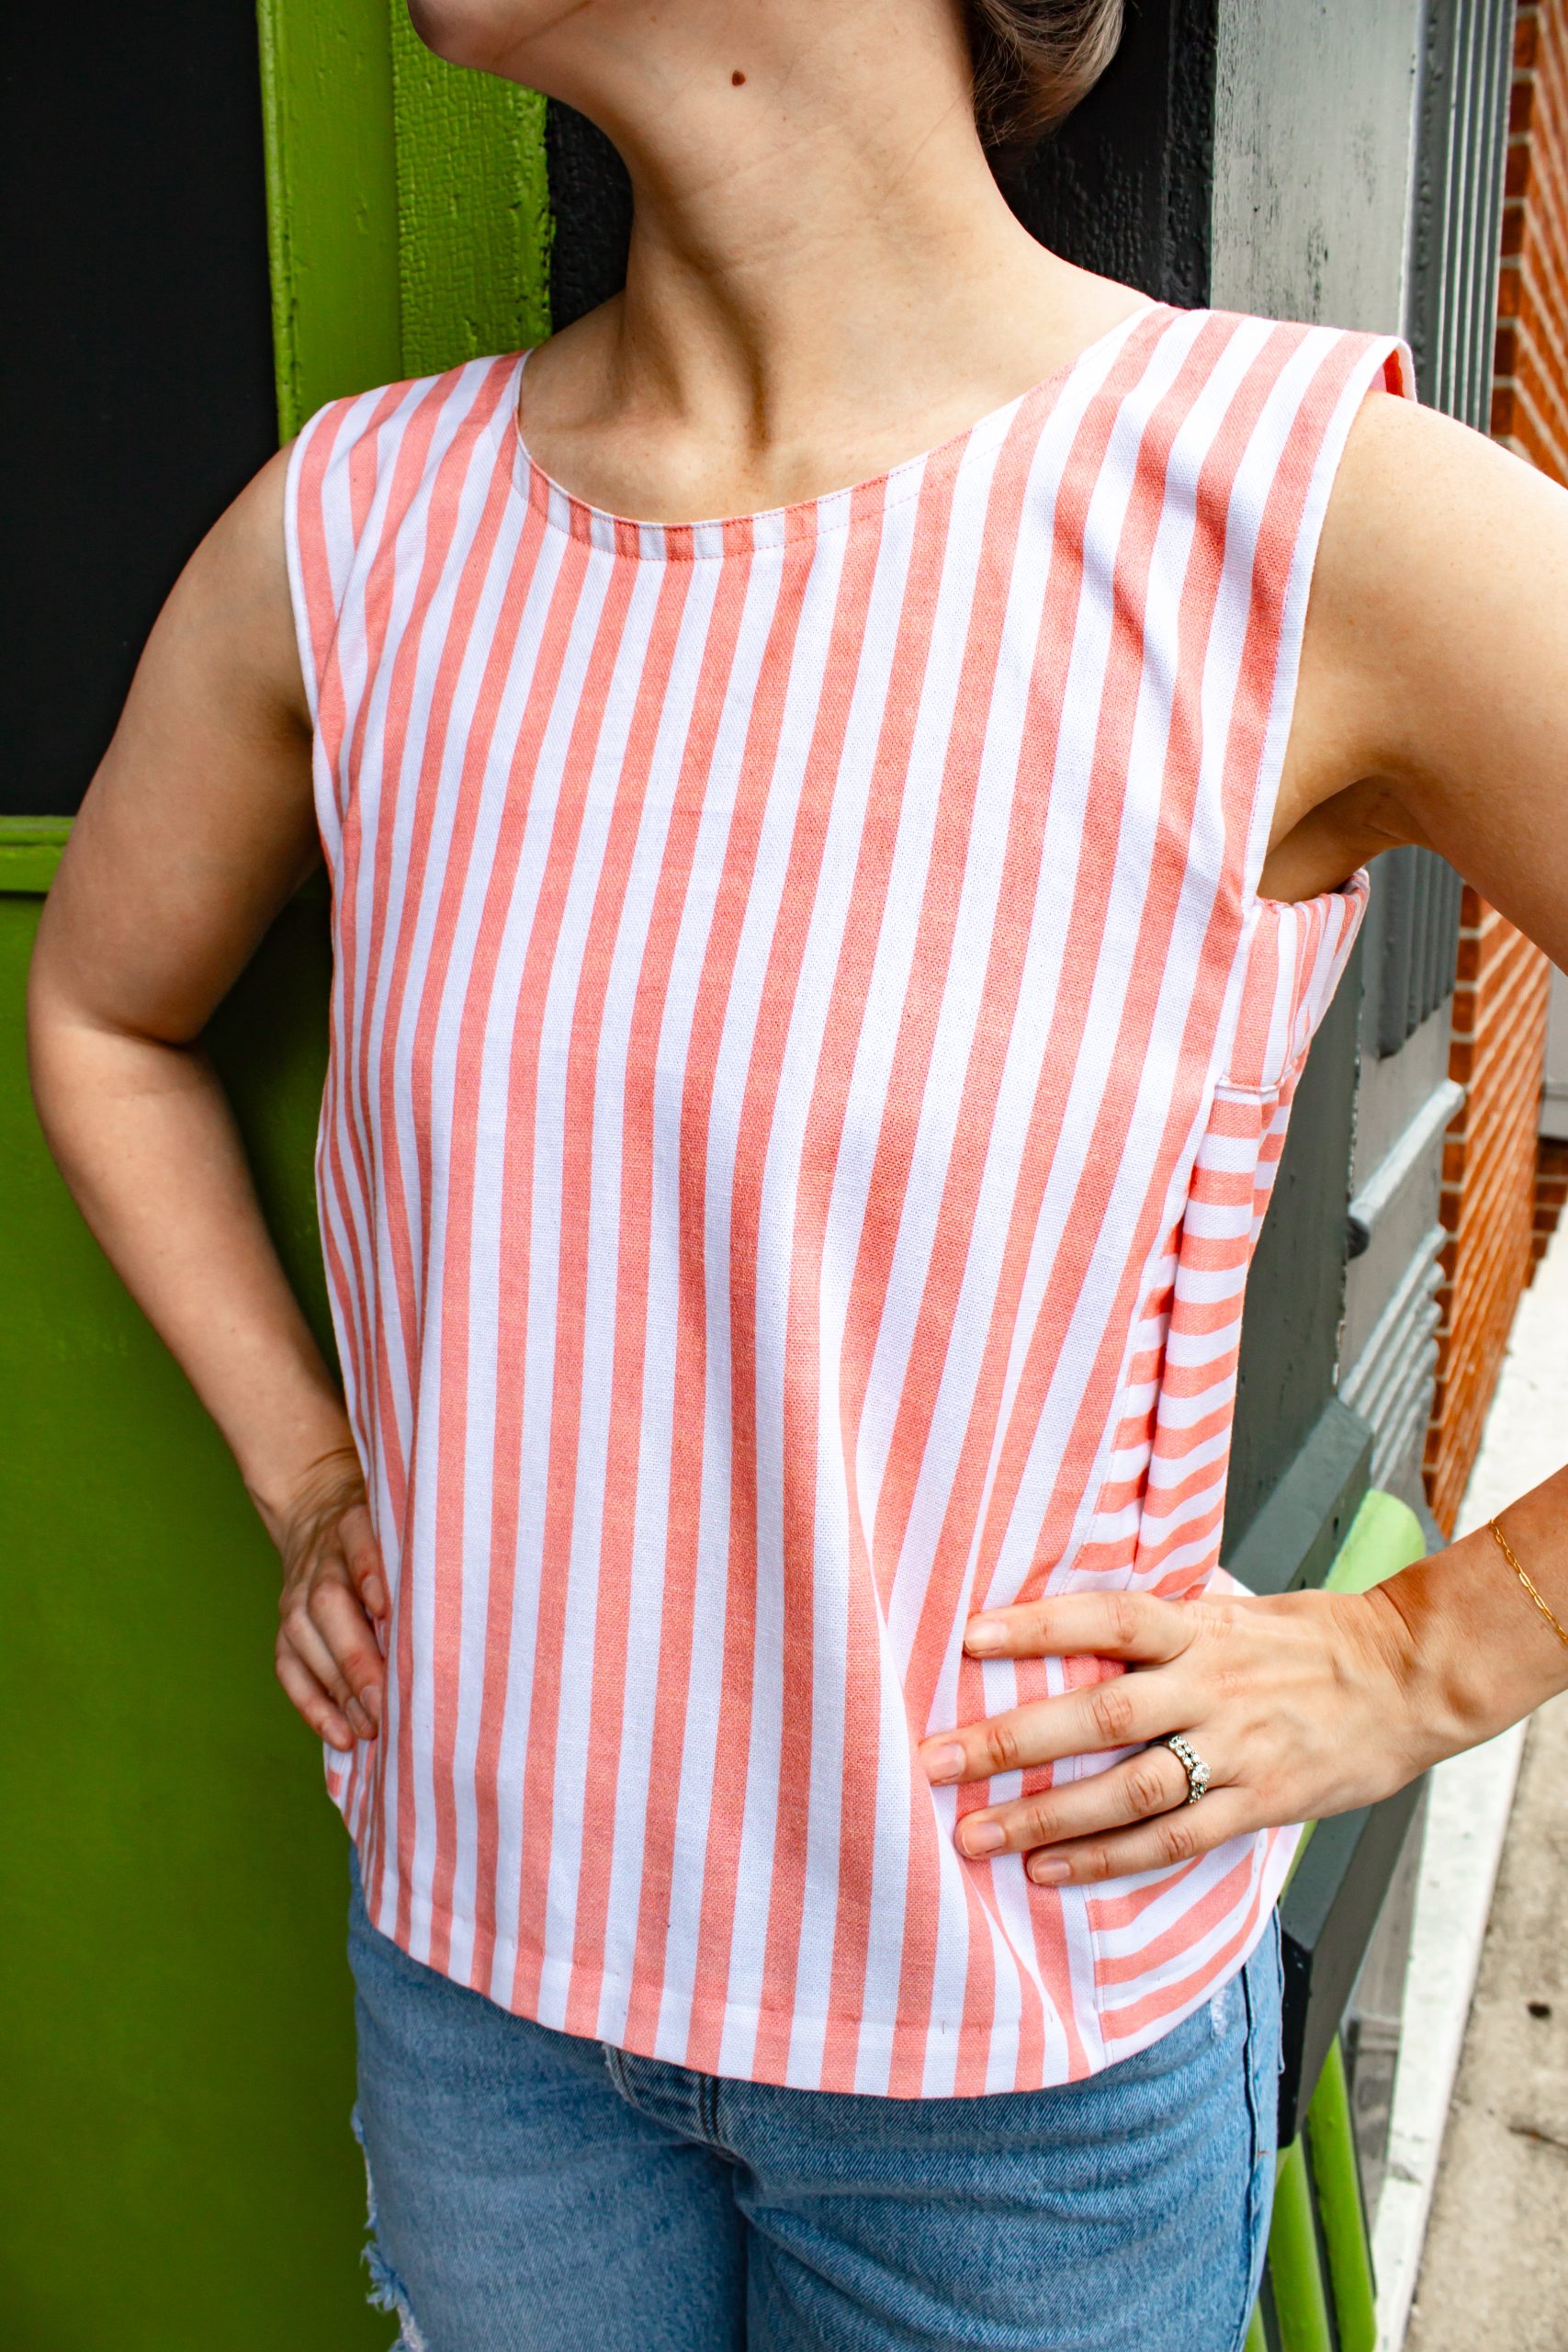
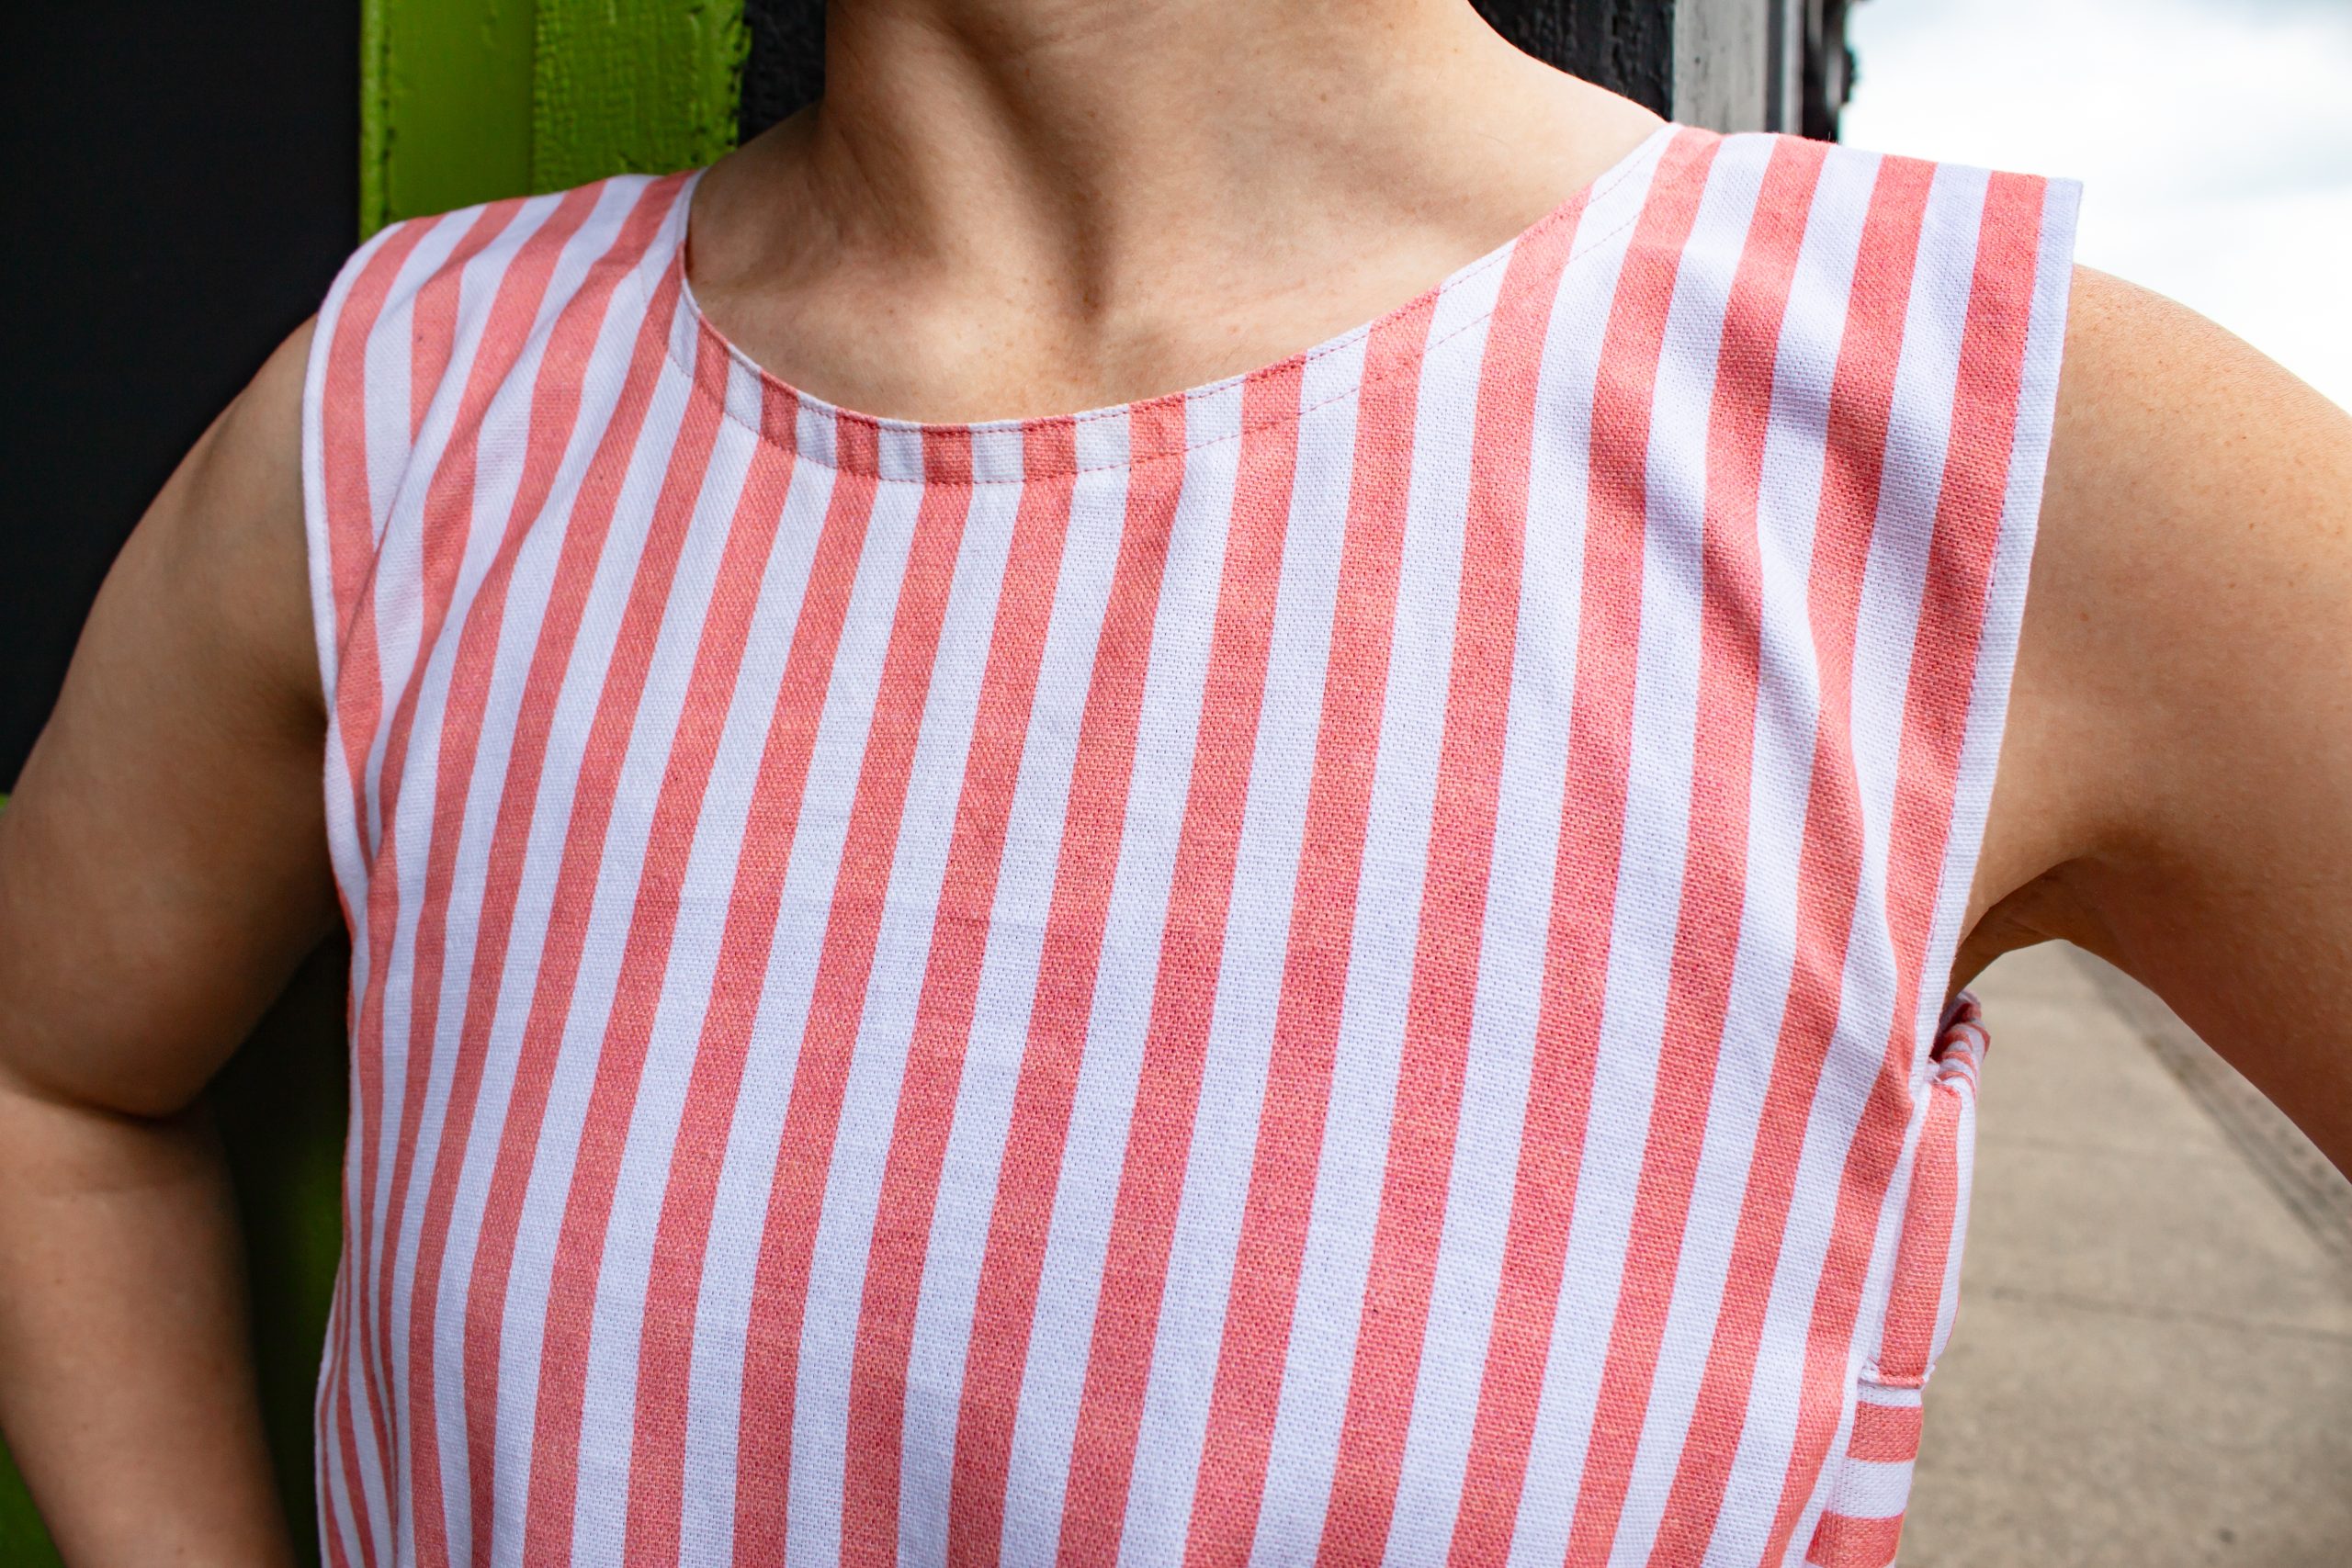
Editor Note: Please note that this top can be worn with the scoop neck as the front neckline or with the v-neck as the front neckline. We have photographed the top both ways for readers (see additional photos at the bottom of this pattern).
Designer Note: As the Gershwin tune goes, “summertime and the livin’ is easy”. This sweet babydoll top is a great example of easy summertime sewing that you can whip up quickly in your favorite color or print. Sleeveless for sun-kissed shoulders and bare arms, and a sweet teardrop neckline, this flattering A-line silhouette falls straight from the shoulders into a sweeping hem length of your choice flattering many different body shapes. The relaxed fit is based upon your height and body shape, rather than your garment size, and requires no pattern.

Seam Allowance: 5/8” (see note about seam allowance below) for double rolled seam finishes.
Hem Allowance: 1 1/2”; finished hem = 1”.
Top Stitch: 3/8”; first pass: 1/8” from edge, second pass: 1/4” from first row of stitching.
Hem Finish: Blind hem stitch by machine; or slip stitch manually with needle & thread
Skill Level: Intermediate; simple novice level sewing but having good knowledge of clothing construction in your repertoire will really help as you step away from the safety net of commercial sewing patterns, including their assembly instructions.
Materials:
- Light-to-medium weight fashion fabric of your choice, 45” wide (114 cm)
- Note: Fabric yardage depends on desired finished length of the garment. Generally, you need 2 times the finished length plus 2 hem allowances. No allowance has been made for matching of prints.
- 1 spool of matching mercerized cotton or all-purpose thread
- Approx. 1/2 yard of elastic, 2” wide (50mm)
- 1 yd. of bias fold tape, 3/8” wide (10mm)
- 1 roll of pattern paper or parcel wrap
Note: For the model sample, I used a mid-weight half panama (100% cotton) with longitudinal stripes in salmon/white; Coats™ single-fold bias tape in white; Gütermann™ white mercerized cotton thread; and a soft 2” wide YKK woven elastic.
DRAFTING BY HEIGHT:
There are many simple garments that can be sewn from scratch without the use of a pattern. For instance, take a square of fabric and fold it in two, stitch the open edge together to form a tube, add an elasticized casing on one end of the tube and a rolled hem on the other end. Voila, you have a gathered skirt… no pattern required.
This type of styling is often far more simple and relaxed offering a no-fuss approach to your summer sewing. The garment shape/pieces are so simple that you can actually plot directly on the fashion fabric and then cut out the number of pieces needed, ready to be sewn.
As is the case for my Sweet Babydoll Top, it is simply a collection of rectangles sewn together into an A-line shape that gets pulled over the head. Who cannot draw a rectangle?…It’s child’s play, right?
The method I use is known as “drafting by height” and while I did say no pattern is required, I do make a grid template on paper to establish how big to make my rectangles plus add seam and hem allowances making it easier for me to lay out my garment pieces on grain on my fabric.
Many design books on the subject of the aesthetics of the human figure suggest that head height be used as a yardstick for other lengths in the body: their ratios to it provide a consistent and credible structure. This is the approach I used to make my so-called “pattern”.
An average person is generally 7-and-a-half heads tall (including the head). You must determine your “head height”, as a unit of measure, based upon how tall you are. Next, since the garment hangs directly from your shoulders, you need to know the shoulder span across the back. The choice of garment length and neckline shape are yours, as you’re far more likely to end up with something that suits your style, personality, and figure. I think you’ll be impressed by the relative speed, ease, and simplicity of it all.
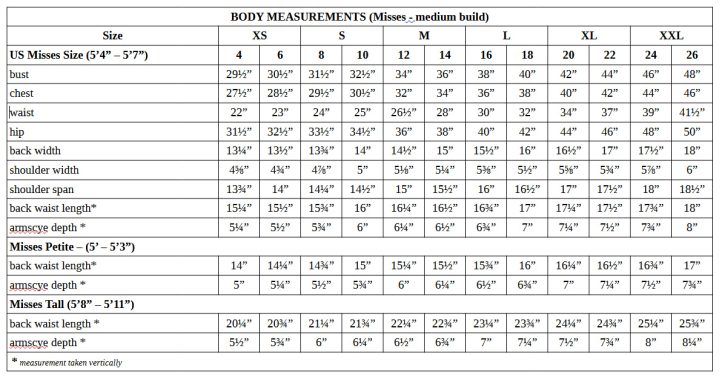
Standard Misses Body Measurement Chart (US Sizes 4 – 26)
SOURCING FABRIC:
Any light-to-medium weight woven fabric in your favorite summer color or print can be used for this garment. Due to the simplicity of the cut, napped fabrics and those with 1-way directional prints are not appropriate for this project.
I recommend choosing a cloth made from natural fibers such as cotton, linen (flax), silk, bamboo, or hemp, as they feel smooth against the skin, allow air to pass through it easily, and have good wicking properties, making them ideal for hot summer weather. Some fabric suggestions are: batiste, chambray, cretonne (broadcloth), eyelet, gingham (vichy), half panama, lawn, muslin (gauze), poplin, seersucker, sateen (cotton satin), and voile to name a few. You can also choose easy to care for blends with the higher percentage being natural fibers. Cotton blend fabrics are versatile and are used to make all types of garments. Blends don’t shrink or change shape like their 100% counterparts do, this quality makes most blended fabrics easier to wash and dry. And thanks to the natural fiber component in the blend, garments made from, for instance, cotton-polyester blends are more breathable compared to pure polyester products.
When choosing prints, look for those that do not require matching at the seams. Longitudinal stripes and mini prints like polka-dots, stars, hearts, etc., or abstract prints work best as the print appears the same once the cloth has been cut. Stripes can be used as a design detail as well by using them vertically, horizontally or in a chevron pattern.
DRAFTING:
As mentioned previously, this Sweet Babydoll Top is designed based upon your height and body shape and is a combination of rectangular shapes so simple that you could plot them out directly onto your fabric without a pattern. When plotting the rectangles onto the fashion fabric, be sure that the fabric has been squared and on straight grain before proceeding and check the distance each rectangle is from the selvage so that your garment pieces are parallel and aligned correctly.
Alternatively, for the sake of upholding the grainline rule, draw these different rectangular shapes out on paper first before marking out on fabric and trace each shape onto the fabric as many times as needed.
I offer you two options for drafting by height: draft a customized pattern or use a cutting list.
Option 1:
To customize this summer top to flatter your own figure, you will need three measurements:
- your height (without shoes)
- your shoulder span
- your desired garment length
Measure your height from the top of your skull down to the back of your heels and divide this amount by 7.5 (A); this ratio will dictate proportional divisions of the body. One head represents the distance from the shoulder to the bustline, two heads represents the distance from the shoulder to the waistline, and three heads represents the distance from the shoulder to the hipline, all based upon how tall you are.
Next, since the garment hangs directly from your shoulders, measure your shoulder span across your back. Enlist the help of a friend to take this measurement for you. This measurement is taken horizontally over the fullest part of the shoulder blades (approx. 4” below the nape of the neck) from armpit to armpit.
Divide this amount by 2 (B), to establish how wide the head unit is in proportion to the rest of your body. As with all measurements, precision and accuracy will produce the best results.
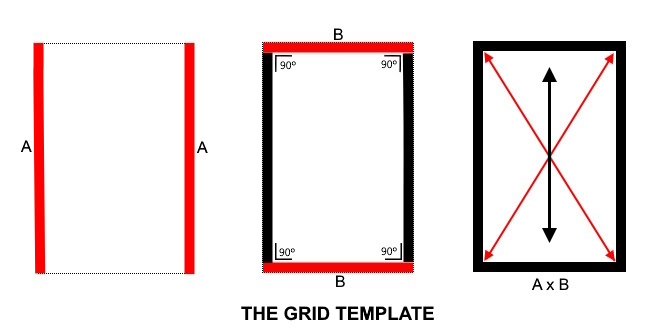
Draw a rectangular template of the head height to use as a grid to plot the main body, gussets, and side pieces. The vertical sides of the rectangle are equal to A and are parallel to one another. The horizontal sides of the rectangle are equal to B and are parallel to one another and at right angles (90º) to the vertical sides. To confirm that the area of the template is accurate, measure on the diagonal between opposing corners: the distances should be the same.
Add a straight grainline for orientation to the fabric’s selvage.
Pro Tip: Draw out your template on cardstock so that it is easy to trace around. I used an empty cereal box.
Use the template to set up a grid on pattern paper and draw out the rectangular pattern pieces based on your head height.
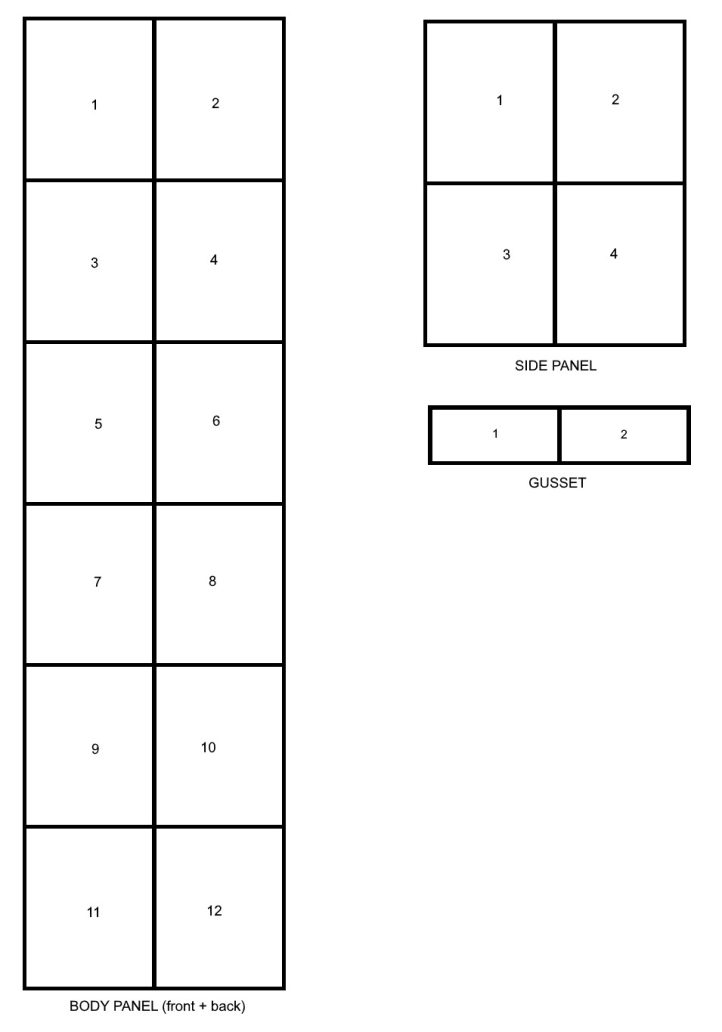
Trace the template side-by-side and one on top of another to draft the shape of your rectangles, as shown in the diagram. The body is 2 heads across and 6 heads down. The side panel is 2 heads across and 2 heads down. The gusset piece is 2 heads across and 2 times the width of the elastic.
The finished length of the garment can be cropped at the waist for those who want to show off a curvy figure (4 heads in total), or cut longer for a tunic length (as shown here) that skims across the top of the legs embracing wider hips and hiding the waist (6 heads in total).
For the model sample, I have chosen a finished garment length between these two options so that the hemline rests at the high hip level (5 heads in total) for comfort and versatility, making it suitable for most body types. The choice is up to you.
Now that you have the shape of the rectangles needed, add seam allowance and hem allowance based upon your fabric choice. See notes about “Seam Allowance” below. You already have a grainline to follow, it is parallel to the length of the head height template for orientation.
Option 2:
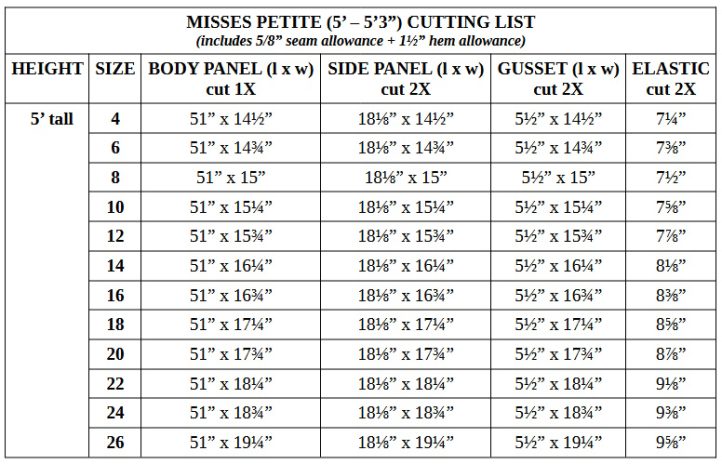
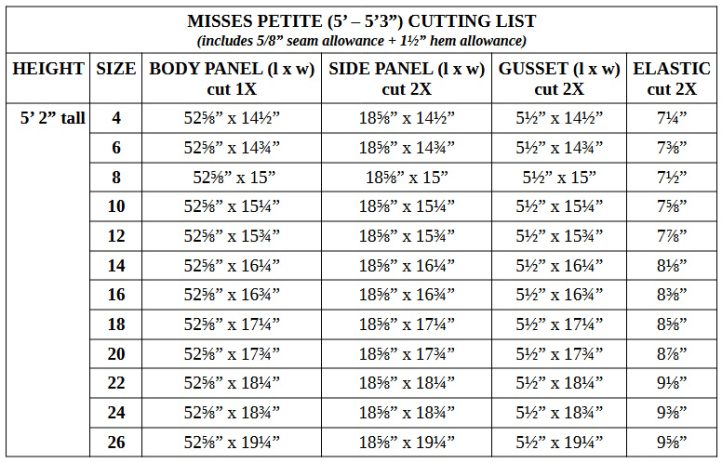
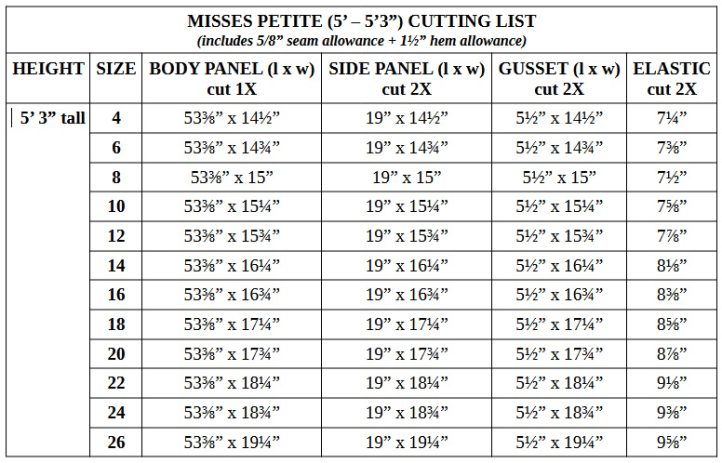
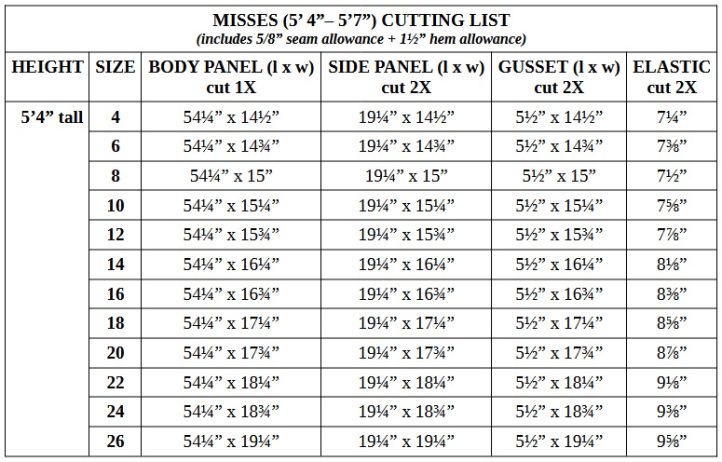
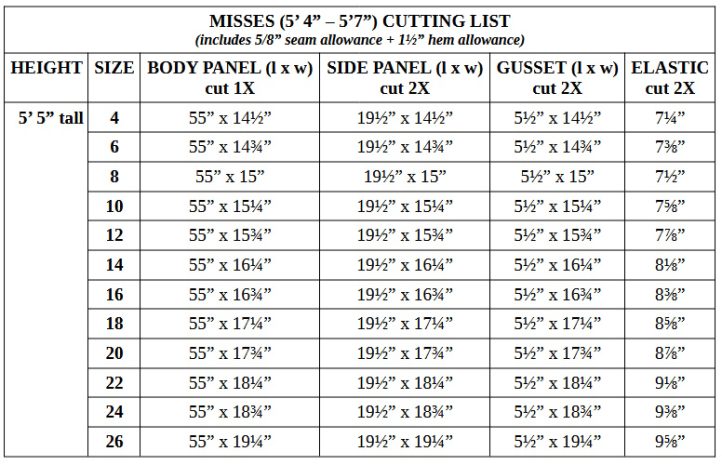
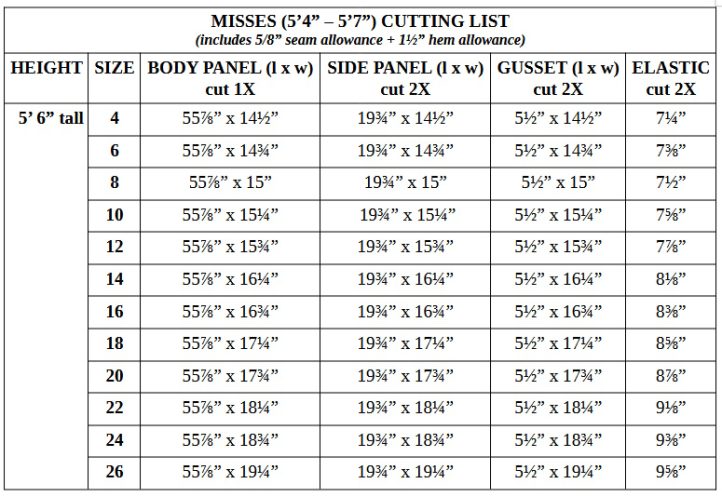
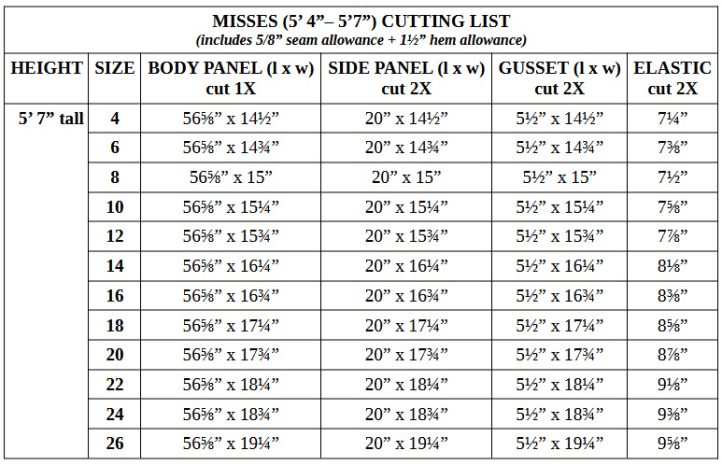
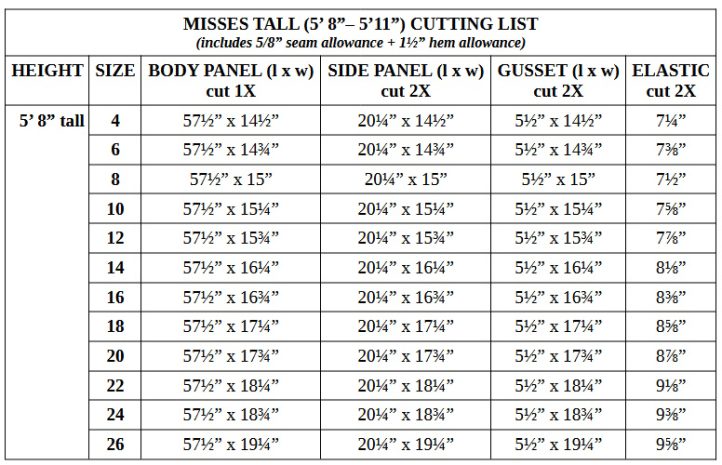
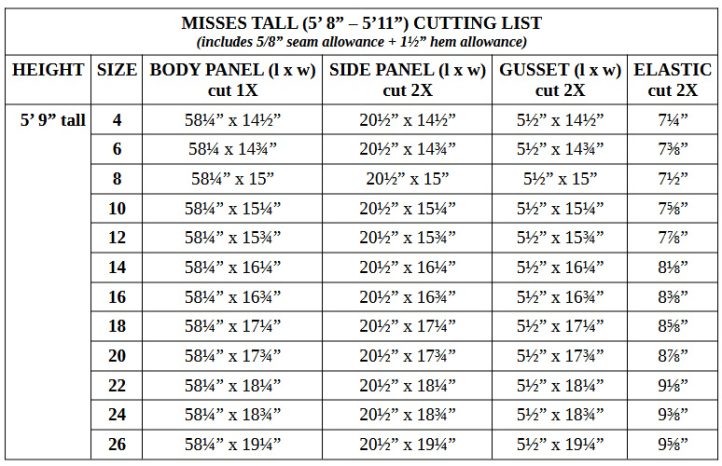
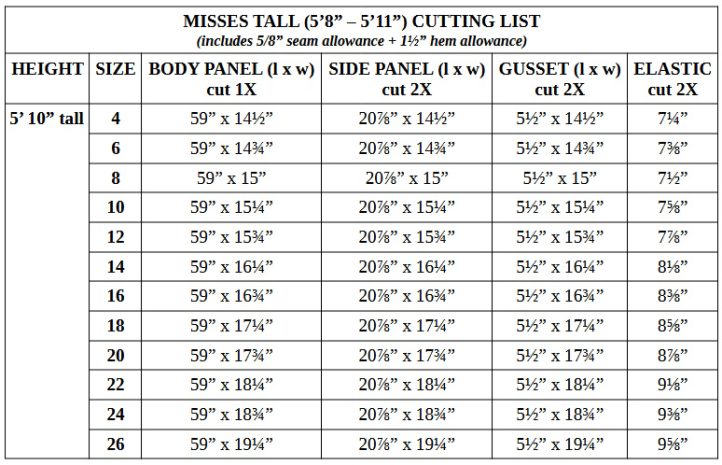
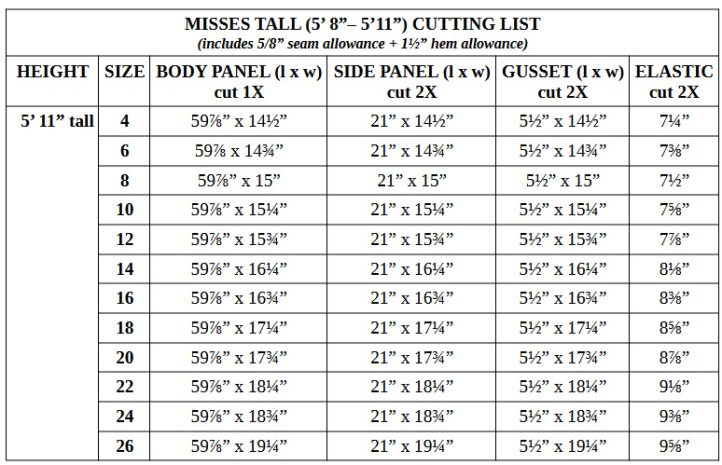
The second option is that you can use one of the cutting lists provided to determine the cut size of the rectangles for a tunic length. You will need two measurements to make this sweet babydoll top:
- your height (without shoes)
- your bust circumference
Select your height from the cutting lists provided and find your size based on your bust circumference. If the bust measurement falls between sizes on the chart, round up to the next size.
Note: The term “size” in this instance refers to the pattern size, not your garment size that you use when you go clothing shopping.
Under each heading, you will find the dimensions of the rectangular panels you need to mark out onto your fabric and how many you need. Seam and hem allowances are included in the amounts.
Draw out on paper, each rectangle (length x width) with right angle corners (90º) and confirm that the area of the rectangle is accurate by measuring diagonally the distances between opposing corners; the distances should be the same. Add a straight grainline parallel to the length of the rectangle for orientation.
Design Note: The dimensions given in the cutting lists are for a tunic length top that stops just above the top of the legs. Should you want a shorter garment length, fold the main body rectangle in half width-wise and measure from the fold downward, the finished garment length you desire. To that amount, add 1 1/2” for hem allowance. Cut away, through both layers of paper while the rectangle is folded, the excess amount. Whatever the amount that was cut away, remove that same amount from the bottom edge of the side panel rectangle.
The pros of this option is that I have done the math for you; you simply have to draw the rectangle to size including seam and hem allowances. The cons of this option is that the majority of women are a combination of two size (one size above the waist and another below the waist) and do not fall neatly into a one-size category. As this summer top is very loose fitting, the only measurement of any concern is the bust circumference. Compare your own with that in the chart.

STRAIGHTENING THE FABRIC GRAIN:
This is basic Sewing 101 stuff that every sewer should know. All clothing design is designed for the standing figure and every garment is designed to hang either from the shoulders or from the hips, so it is important that the fabric you use be on the straight of grain to hang properly on the body. What I’m not so sure about is do, you know what to do if the fabric is truly off-grain, so it’s worth reviewing what to do.
To make sure that the lengthwise and crosswise threads are at right angles, and that the fabric is on the straight-of-grain, it’s necessary to straighten one of the cut ends. If there is a prominent design line, such as a woven stripe or plaid, cut along the design line. Do not use printed lines as a reference; the print may not have been matched up with the grain.
If there is not a design line to follow, you need to pull a crosswise thread. Snip through the selvage, find one crosswise thread and draw it up, like a gathering thread, until you reach the opposite selvage. If the fabric is loosely woven, you might be able to pull the thread completely out of the fabric in one go. If it is tightly woven, you will need to draw up the threads every few inches or pull it slightly so it puckers; then slide the thread and push the fabric repeatedly until you reach the opposite selvage. Cut the fabric along the snagged line. This new cut edge is now at right angles to the selvage and you have a squared corner. Once you have a perfectly straight cut edge, fold the fabric in half lengthwise (aligning the selvages). If the cut edge is not straight, or the corners don’t form right angles, the fabric is off-grain and needs to be corrected.
CORRECTING A DISTORTED GRAIN:
If a woven fabric is only slightly off-grain, pin together the selvages and one cut edge, placing pins every few inches. Steam press the fabric starting at the selvages and pushing the fabric toward the fold with the iron. This should ease the grain of the fabric back into place.
If the fabric is truly off-grain, pull the fabric on the bias, in the direction it needs to be straightened. Pull firmly until the edges are even and all corners form right angles. Repeat for the length of the fabric.
Refold the fabric to check that the squared ends are even. Take care not to pull too strenuously, or the fabric will stretch out of shape. If a fabric is off-grain when the print is applied, once you straighten the fabric grain, the print will be off-kilter. Carefully inspect printed fabrics before purchasing, and avoid any fabrics with a print that is badly off-grain.
You will never be able to correct it. Fabrics with special finishes cannot be pulled on-grain either; examine them carefully before purchasing.
SEAM ALLOWANCE:
True confession time! I rarely put seam allowance on my paper patterns whenever I design clothing.
I do add hem allowance to my patterns because the hem and hemming method are often part of my design. The reason why I don’t add seam allowance is for efficiency sake but the key reason is that I haven’t selected a fabric yet. I want to create something with the least amount of wasted time, money, and effort on my part. Only after I plot out each pieces onto the fabric, do I add seam allowance directly onto the cloth with chalk so that the fabric can be cut and joined together later in the assembly.
Not all fashion fabrics are alike. They differ by fiber content, texture, weight, thickness, and weave. The kind of fabric you choose for a project dictates the appropriate width of seam allowance needed for its production; the other thing to keep in mind is the seam construction to be used, often they require different seam allowance widths.
Wider seam allowances not only require more skill and time to sew accurately but they also require more fabric than narrow ones. They are used on seams that are straight or very slightly curved, on more expensive garments, fabric that fray or slip, complex seams that are self-finished, and seamlines that might be altered at a later time. By contrast, narrow seam allowances are generally used at edges that join separate facings (enclosed seam); intricate design lines; on lingerie; stretch knits and active wear; children’s garments; and on inexpensive garments.
Most home sewers are accustomed to commercial sewing patterns that have seam allowances that are generally 5/8-inch (1.5 cm) wide. It is a dependable seam allowance to use, as it provides enough extra between the seam line and the cut edge of the fabric to sew a plain seam and allow for a seam finish, such as pinking a zigzag edge or serging it with an overlock machine. However, it involves a lot of grading of seams and trimming away of bulk. Frankly, it is a bit confining and laborious.
I prefer to use a combination of seam allowance widths when performing clothing construction. I use a combination single-stitch/zigzag presser foot on my sewing machine that is 3/8” from needle to its edge. The width of the foot acts as my seam guide. All minor seams (they tend to be the horizontal ones related to height) get 3/8” (10 mm) wide seam allowance as they rarely need to be altered, while major seams (the vertical ones), those that are affected by girth, get a seam allowance of 3/4” (20mm) in width. The wider seam allowance provides enough extra material for a clean seam finish (1/4”) along the raw edge and leaves me with 1/2” as a finished width, sizable enough should I need to let out for more girth. In instances when I select a fashion fabric that frays easily or a thick bulky fabric for outerwear, the seam allowances get bumped up to
1/2” (12.5 mm) for minor seams and 1” (25 mm) for major seams so that it is easier to sew and press. Once the seam is completed, the excess can be trimmed away to reduce bulk.
For this project, I used 5/8 -inch seam allowance, enough material to make a double rolled turn, and a hem allowance of 1 1/2” wide for a finished 1” hem.
Instructions:
MARKING AND CUTTING:
Pre-shrinking fabric is an essential step in creating a garment that retains its quality after laundering. Fabric care changes significantly from fiber to fiber, but as a rule of thumb, pre-wash fabric using the same method that you intend to wash the finished garment. Of course, this rule has its limitations. For delicate fabrics or fibers prone to shrinking (such as cotton, linen, and rayon) and as well as keeping rich deep colors looking their best, consider cold-water washing and hanging to dry. Once your fabric has been washed and is thoroughly dry, give it a final press to remove any creases and wrinkles. Your fashion fabric is ready to use.
- If you choose to plot the rectangles directly onto the fashion fabric, be sure that the fabric has been squared and on straight grain before proceeding. Lay out the fabric face side up in a single ply. Chalk out the shapes working parallel to the selvages of the cloth to ensure the corners of your pieces are at right angles. Check this by measuring from each end of the rectangles to the selvage. If the measurement is the same at both ends, then your garment piece is parallel and aligned correctly. You can use a clear ruler or a tape measure for longer distances.
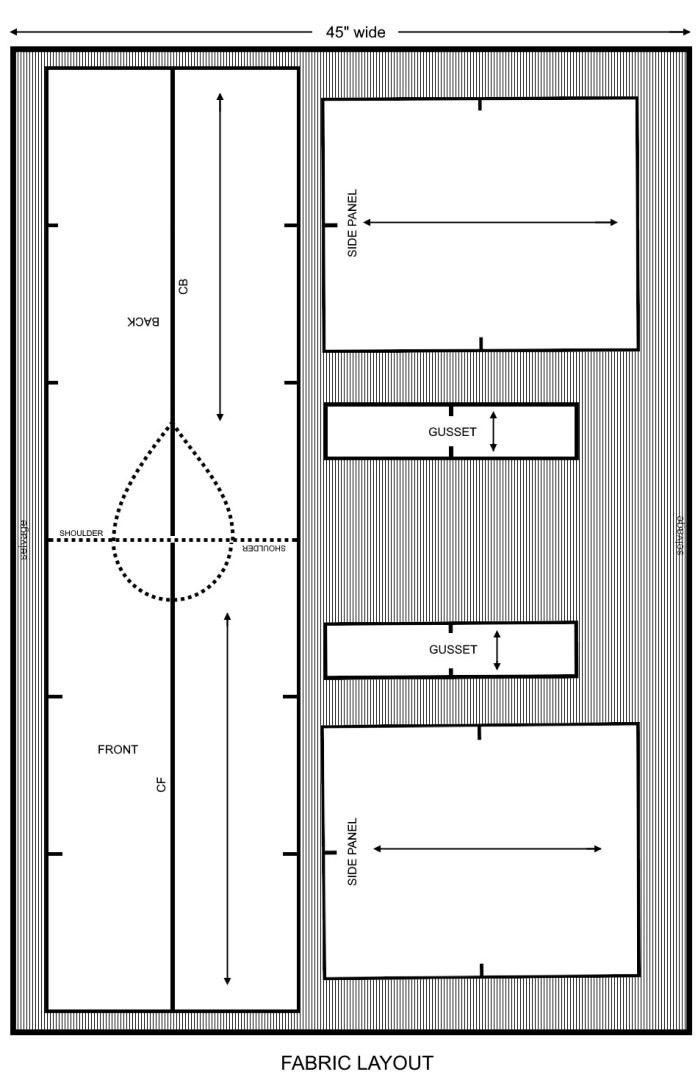
- If you choose to use a paper pattern, arrange all the rectangles according to the pattern layout, shown above. Ensure that the grainline marked on each rectangle is aligned with the grain of the fabric. Check this by measuring from each end of the grainline arrow to the selvage. If the measurement is the same at both ends of the arrow, then your pattern piece is parallel and aligned correctly.
- But, sometimes rules can be broken! Notice that I have not laid out all my rectangles on the fabric following the grainline rule. The main body piece and the gusset pieces are laid out parallel to the selvages but the side pieces are laid perpendicular to the selvages since they do not hang from the shoulders. I want to take advantage of the longitudinal stripes on my fabric as an extra style detail to my overall design. A petite person may want to have the direction of the stripes all running on grain since vertical stripes give the illusion of added height. A tall person may chose to have the stripes run horizontally to give the illusion of greater girth. However, to have the main body perpendicular to the selvage, one would need to use a fabric that is wider than 45”. Generally, most fashion fabrics widths are available in 45” (114 cm) wide or 54” (137 cm). If you are using a print, look and see if changing the orientation of the rectangles brings an added touch of creativity, all to your delight.
- Hold your pattern down with weights. While many people use dressmaker’s pins to hold their pattern in place, using pins can pinch and distort your fabric, and significantly affect the final shape and fit. A heavy book is a better alternative. This substitution has the added benefit of making your rectangles easy to position and reposition. Just remember to lay out the pattern pieces beginning with the largest/longer piece first and progressively work down to the smallest/shortest piece. Remember, some pattern pieces require that you mark out 2 or more of that piece and if they mirror each other, you must flip the pattern over before marking out the second one. You can use just about anything small and heavy as a pattern weight, such as large metal washers or bean bags.
- Next, use fabric shears or a rotary cutter to cut around all pattern pieces. Be careful not to trim away any of the paper pattern as you cut. If when cut, you cannot tell the difference between the front and the back of the cloth, stick a piece of masking tape to the back of the cloth before picking up the pieces so that you aren’t confused later when assembling.
ASSEMBLY:
Prepping the Neckline:
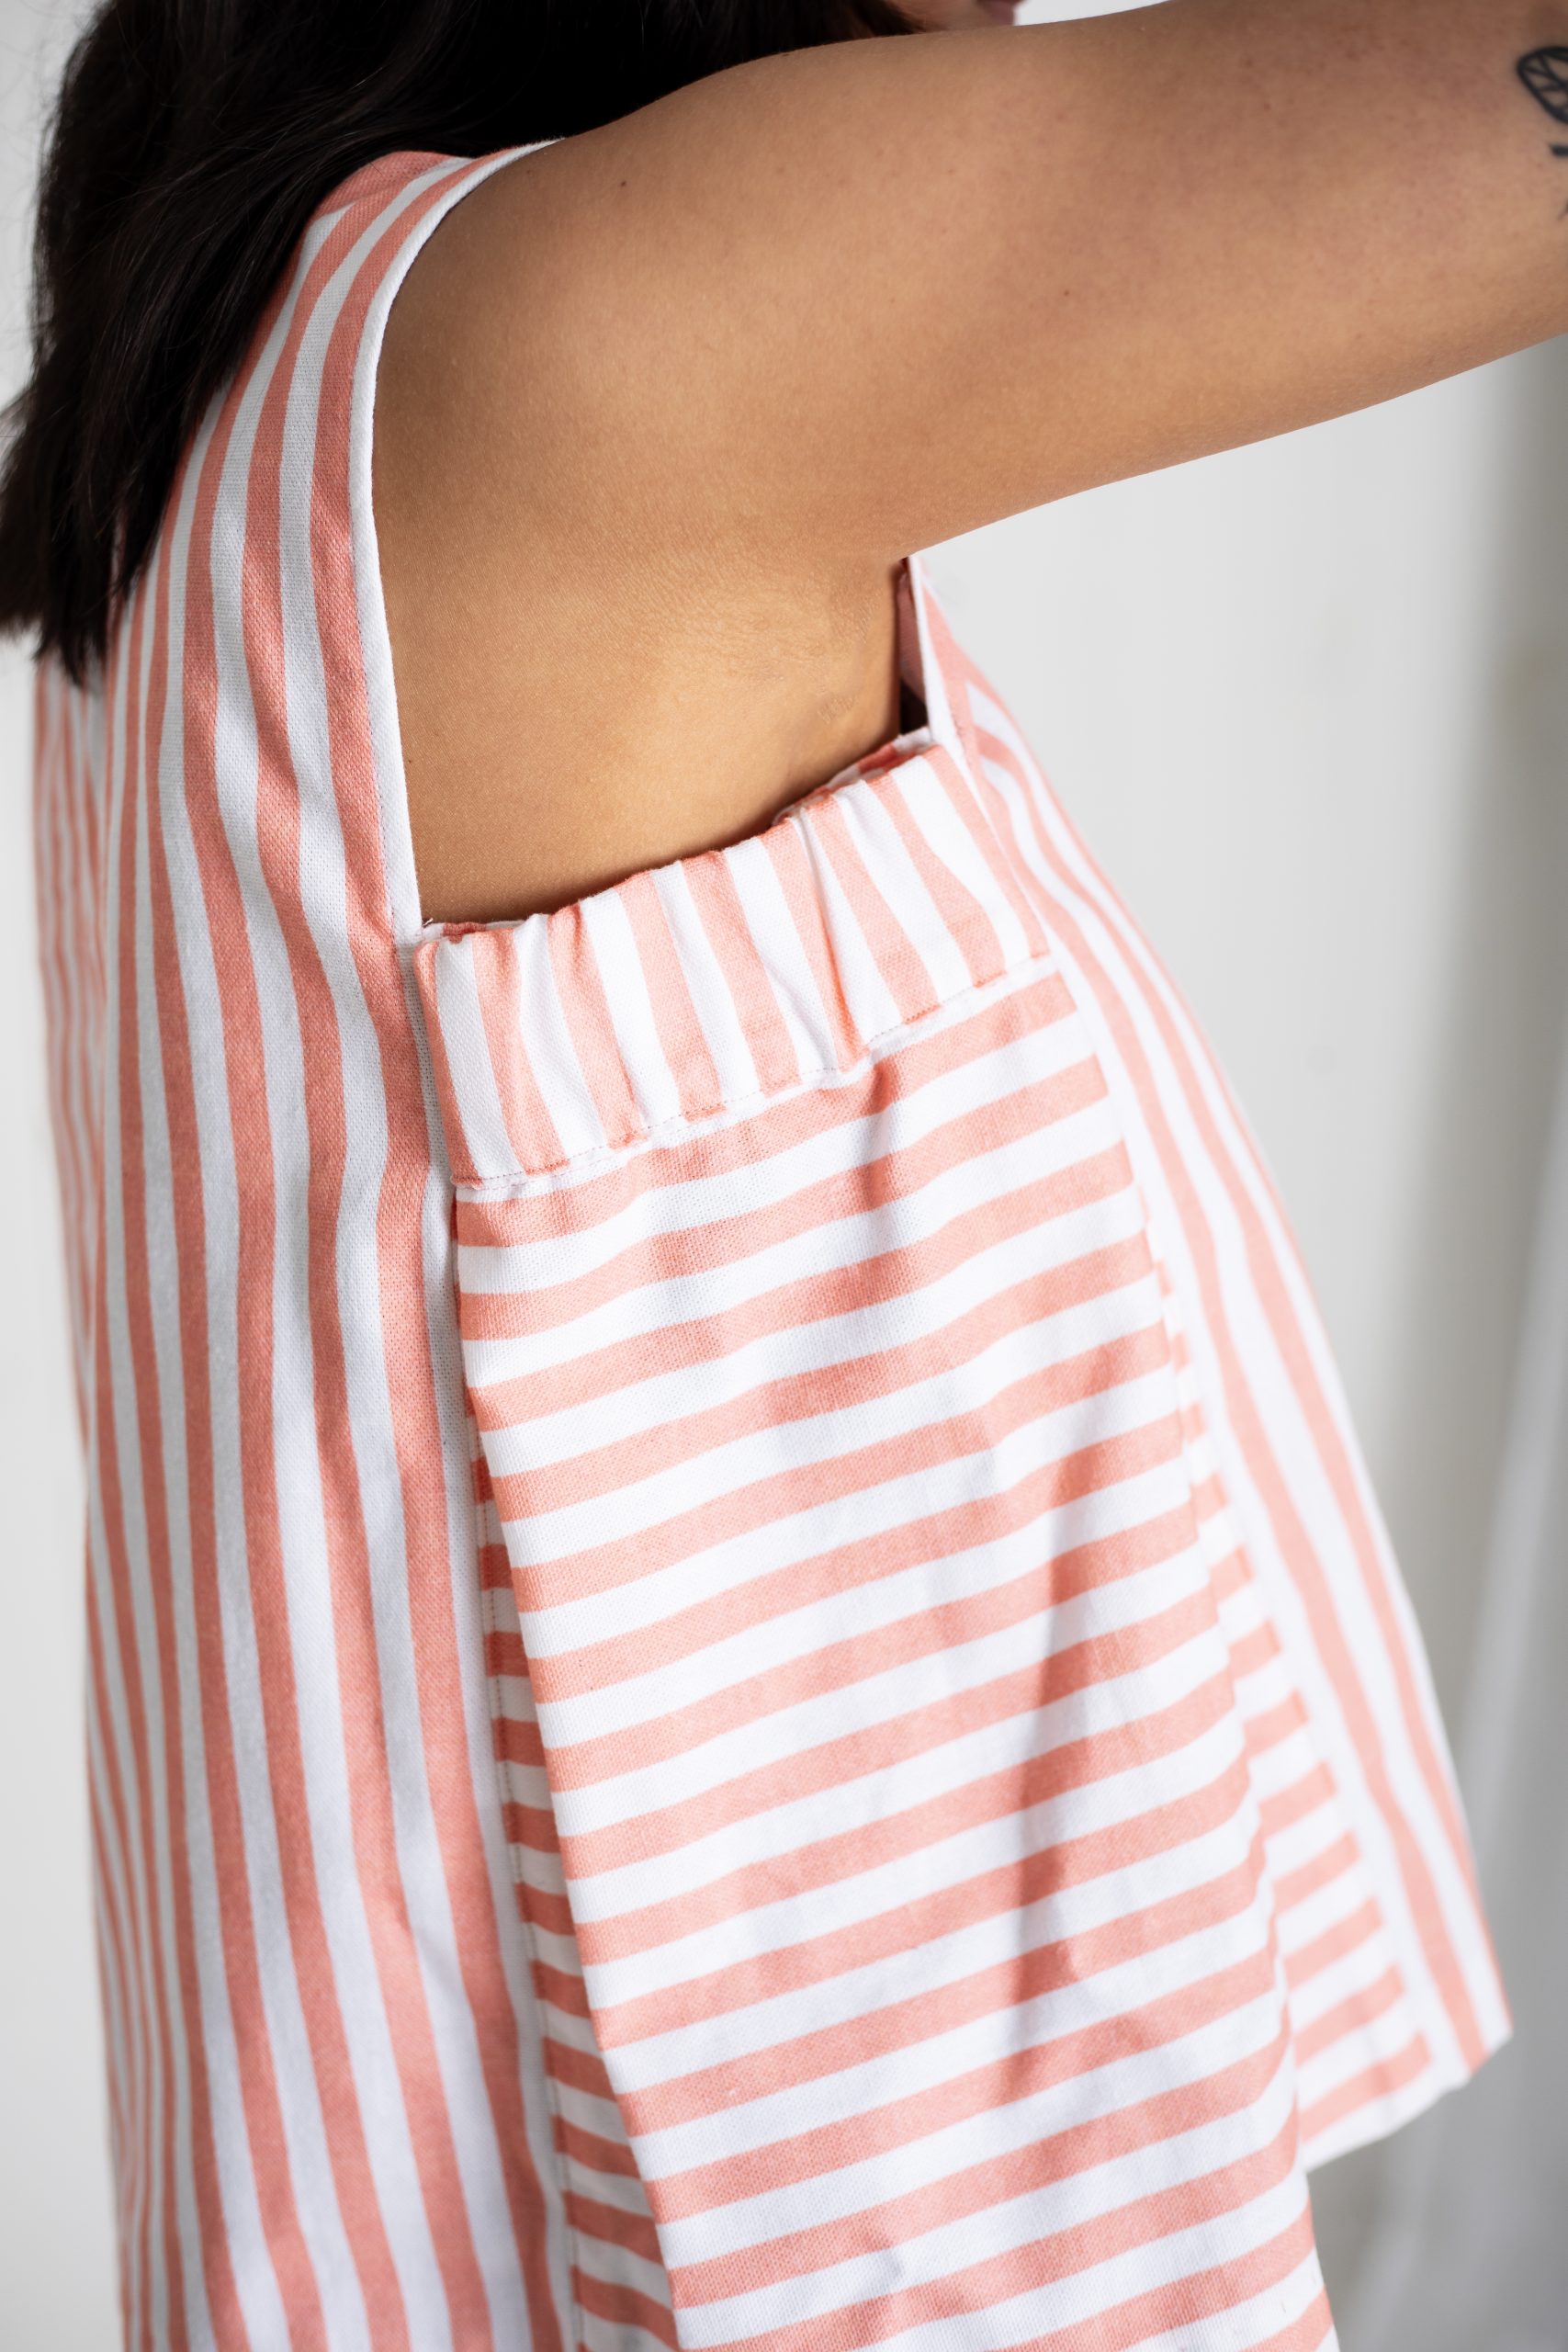
The design features a sweet teardrop-style neckline and the top is put on over the head for easy dressing. The panel construction allows the top to be worn back-to-front or front-to-back, granting the wearer two different necklines, a V-neck or a scoop, suitable for a wide range of activities and occasions.
- To make the neckline, begin by folding the main body panel in half length-wise and match the corners, front to back. The fold of the cloth is the shoulder line. Baste a running stitch along the fold, edge to edge, to mark the shoulder line.
- Next, open the panel flat and measure 1 head height from the shoulder for the front section and another for the back section at the edge of the panel. At each location, sew a tailor tack to mark its location. Repeat this step for the opposite side of the panel.
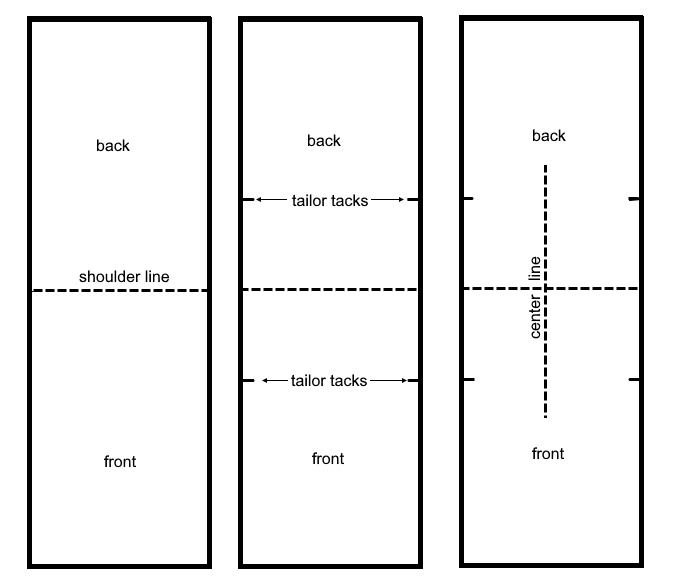
- Lastly, fold the main body panel in half width-wise and match the ends of the shoulder line together and align the tailor tacks, front and back. The fold of the cloth is the center line of the garment. Baste a running stitch along the fold, front to back, to indicate the center of the garment.
- Lay the main body panel flat and face up on the work surface. The point where the two basting lines cross each other is the center of the cloth. On the shoulder line, divide the shoulder width into 3 equal parts and place a pin at each point for reference.
- Working from the center of the cloth, chalk out a circle onto the fabric. The radius of the circle should be equal to half the head height. Measure the circumference of the circle. It should be large enough to pass your head through it. Adjust the shape, if necessary.
- Half of the circle lies on the front section of the panel and forms a scoop neck. The other half of the circle lies on the back section of the panel. On the back section, select a mid-point on the center line between the edge of the circle and at the level of the tailor tacks, and place a pin at the mid-point for reference. Chalk a line from the shoulder line to the placement point on the centerback and repeat from the opposite shoulder. This produces a V neck on the back section and completes the teardrop-shaped neckline.

Making the Neckline:
- Stay-stitch the shape of the neckline to stabilize the stretch of the grain. Working from the shoulder line to the center line, stitch directly on the chalk line. Sew in the direction of the stretch, working from the sides to the center, doing each quarter of the neckline individually. This is the actual shape and size of the neckline balanced on the center of the fabric.

- Once the stay-stitching is complete, chalk a narrow seam allowance (1/4” wide) within the neckline and cut away the center of the neckline. Using bias tape or a strip of bias-cut cloth to face the neckline, align and match edges of the tape to the edges of the neck shape. Sew the tape in place, easing it as you go, following the shape of the opening and overlap the bias tape at the V point.
- With the bias tape face up, understitch the bias tape to the seam allowance of the neckline. Clip the seam allowance at the point of the V and also clip into the seam allowance on the curved portions of the neckline to release the tension in the cloth.
- Turn under the facing (bias tape) and press the edges of the neckline flat. Shape the bias tape if necessary so that it lies flat. With the neckline face up, edgestitch (1/8”) around the neck opening and tuck in the ends of the tape to follow the V point.
- Do a second pass and topstitch (1/4”) parallel to the first row of stitching to complete the neckline. Set aside.
Prepping the Sides:
- Collect 1 gusset piece and 1 side piece for each side of the garment.
- Place gusset (right side up) onto side piece (wrong side up) and sew across the top edge of the side piece. Grade seam allowance and press it towards the gusset piece.
- Cut elastic (2” wide) half the width of the gusset piece (2:1 gathering ratio).
- Design Note: Elastics enables clothing items of all kinds to perfectly conform to the wearer’s body, which helps make these items better fitting, more comfortable, and easier to move around in. The main differences between the types of elastics are their size, length, and level of stretch. Test the range of stretch of your elastic and use the cutting list only as a guide. In many cases, when adding elastic to sewing projects, the elastic should be slightly shorter than the length of the fabric encasing it. You may have to adjust yours to fit.
- Measure inward from each end of the gusset piece, 2” plus seam allowance and chalk a mark in the seam allowance. Baste the ends of the elastic from chalk mark to chalk mark.
- Wrap the gusset fabric over the elastic and turn under the raw edge to align with the seam stitching. Edgestitch, following the seamline to make the casing and stretch the elastic to allow the fabric to lie flat while doing so.
- With the elastic now encased, sew a regular stitch across the basting at the ends of the elastic, through all layers. Expand the elastic as far as it will stretch to distribute the fullness evenly. Remove any basting threads.
- Repeat procedure for the remaining side and gusset. Set aside.
Attach Sides to Body Panel:
- Collect main body panel and completed side panels.
- Turn under seam allowance on either side of body panel and press flat.
- From the shoulder line, measure depth of the armhole plus 1” on the front section and mark its location on the seam allowance. Do the same for the back section.
- With right sides together, pin/baste side piece to body piece on the front section from bottom of armhole to the hem. Note: Depending on the depth of the armhole and the size of the gusset, the side piece may be slightly longer than the body panel and can be trimmed later.
- Sew front seam and press seam open.
- Repeat Step 4 for the back section of the body and sew back seam and press seam open.
- To complete the armhole, clip into the seam allowance on the body section approximately 1/2” below the armhole, front and back, and double turn the seam allowance (1/4” plus 1/4”) toward the body panel to form a neat edge on the garment. Topstitch double hem in place.
- Below the armhole, press all of the seam allowances towards the side panel, front and back. Add an appropriate seam finish to the raw edges of the fabric, such as machined-overlocked stitch or a hand-cut zig-zagged edge with pinking shears.
- Do the same procedure for the remaining side of the garment. Remove any basting threads.
Finishing the Garment:
- To control the fullness of the garment at the bustline, fold a pleat at each corner of the armholes, front and back. Each pleat is 2” deep. From the inside of the garment, stitch through all layers of fabric, 2” from the fold of the pleat on the gusset to secure the pleat. Hand-stitch the gap at the top of the pleat to close it.
- If you haven’t done so already, trim away any excess material from the side panels, if needed.
- Turn under bottom edge of garment, 1/2” all around and press flat. Then, turn under 1” all around to form a hem. Hem may be machine-stitched using a blind hem foot attachment, or sewn manually using an invisible hem stitch with needle and thread.