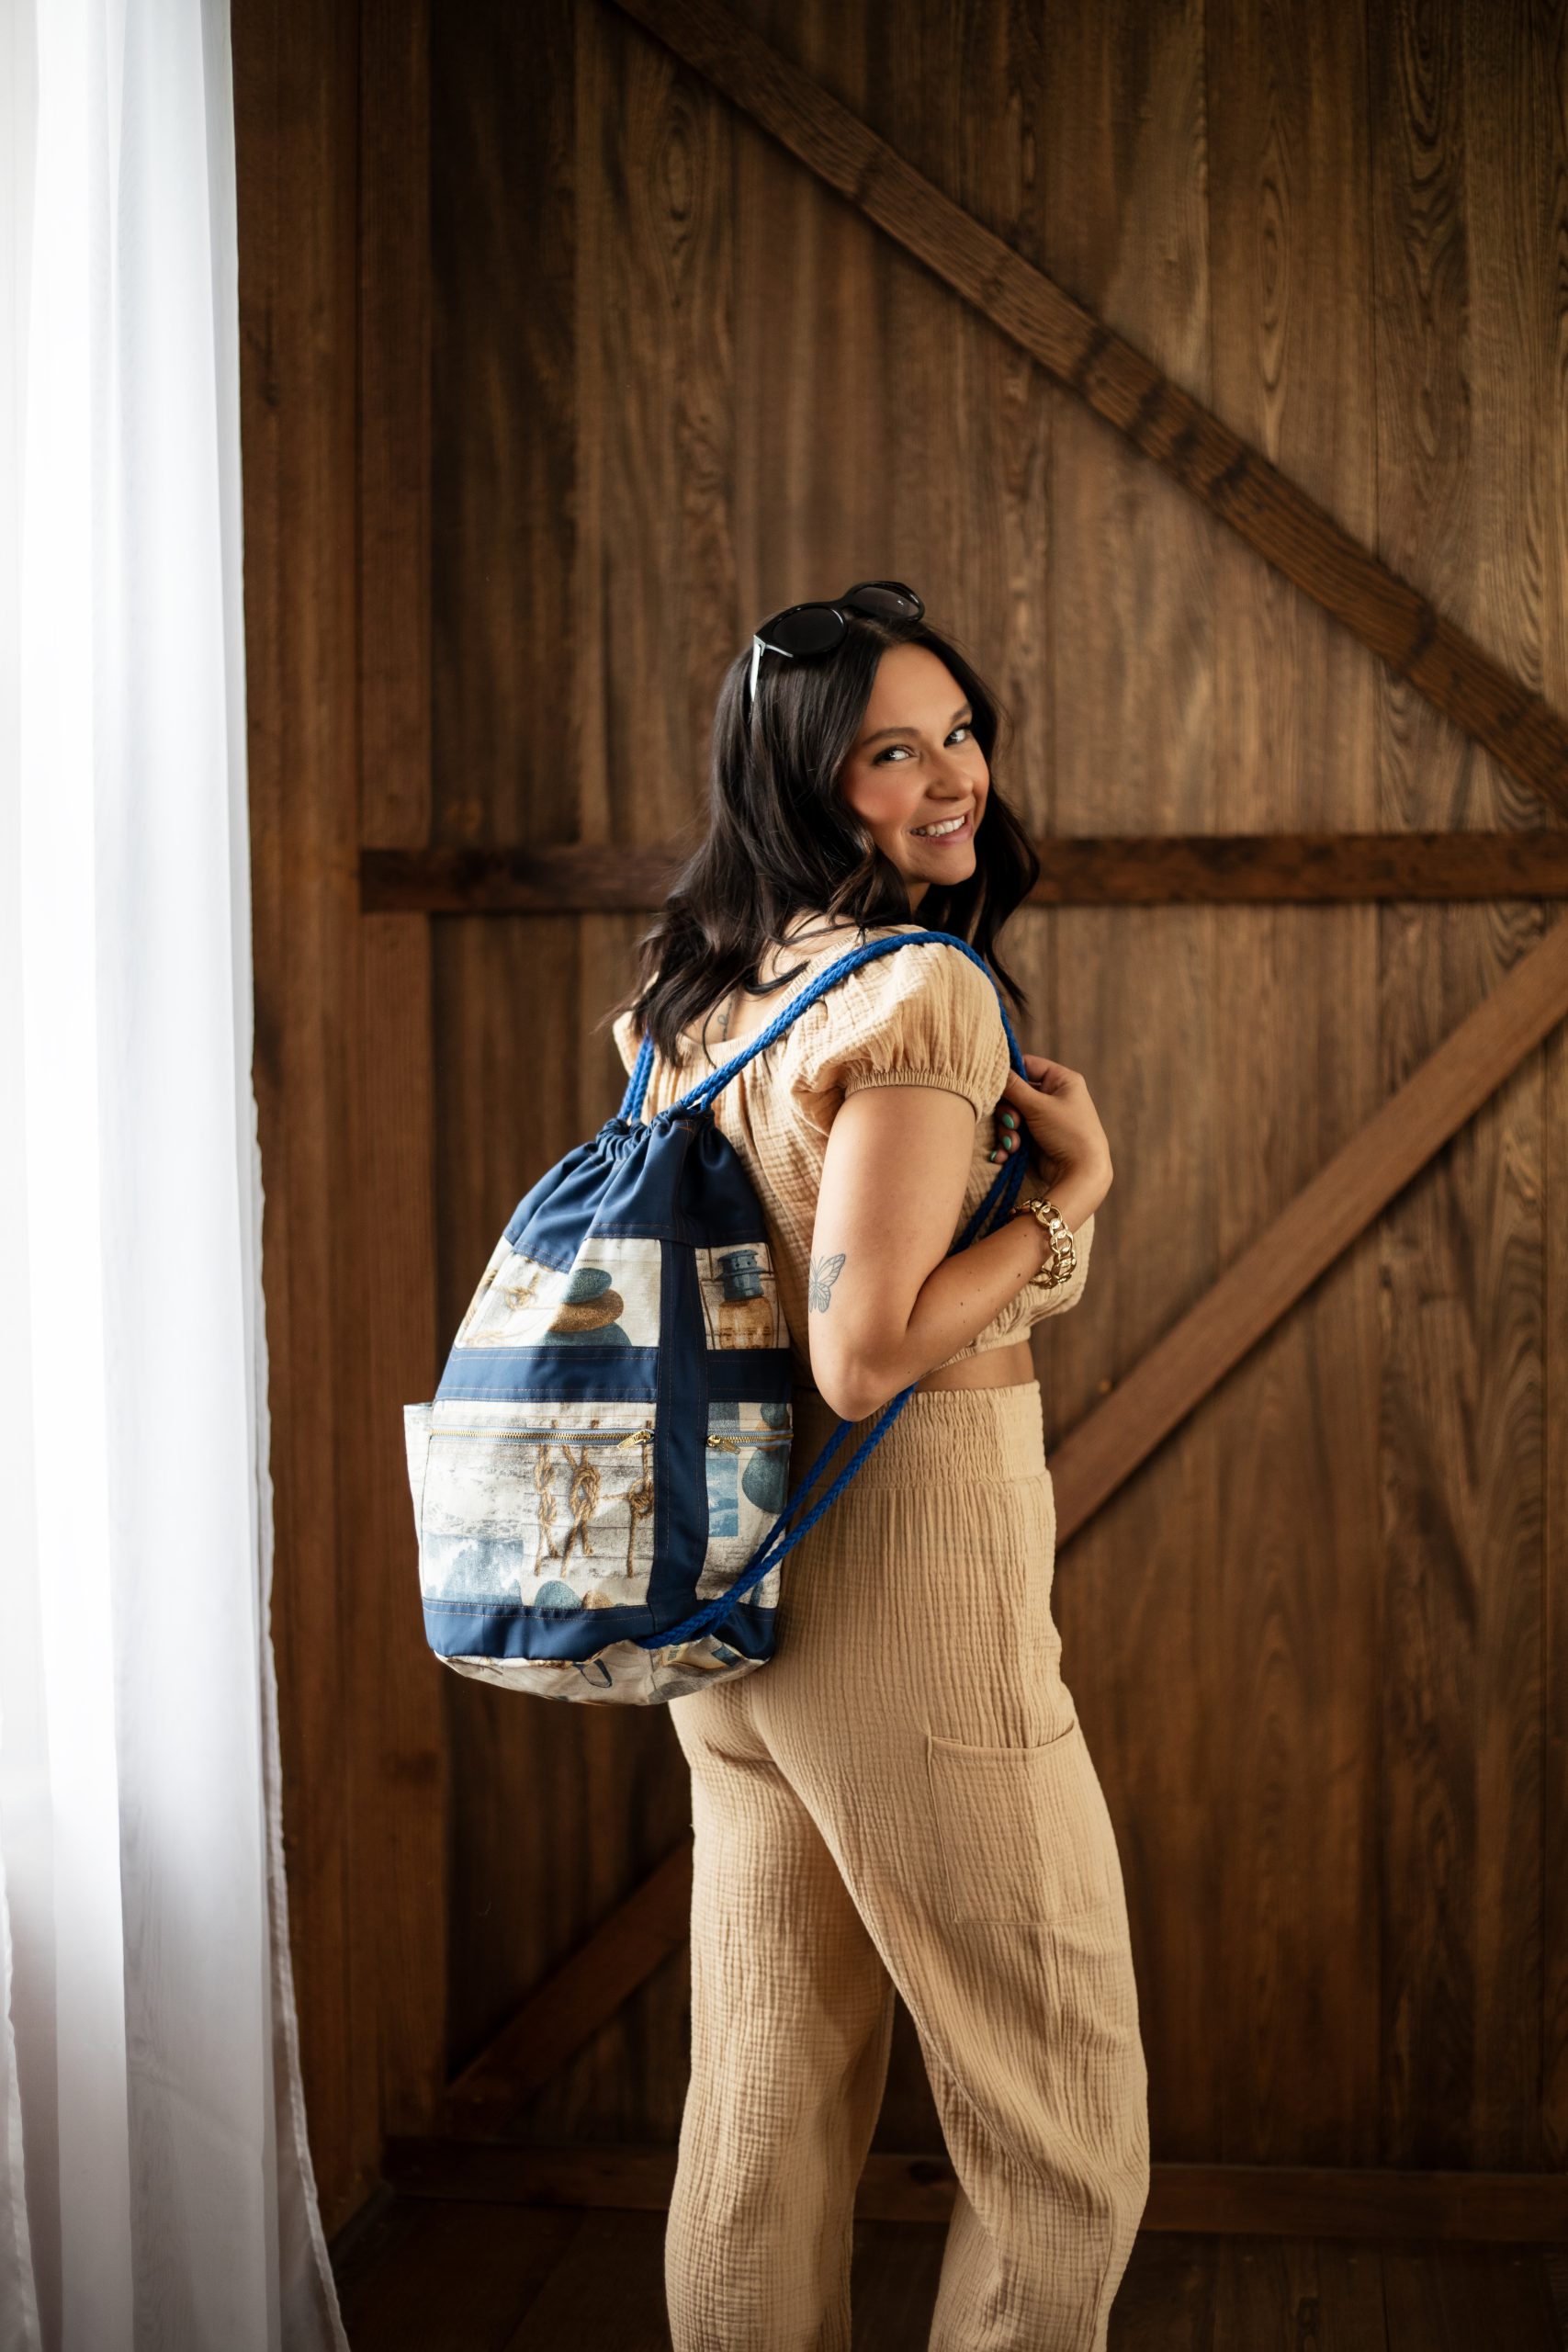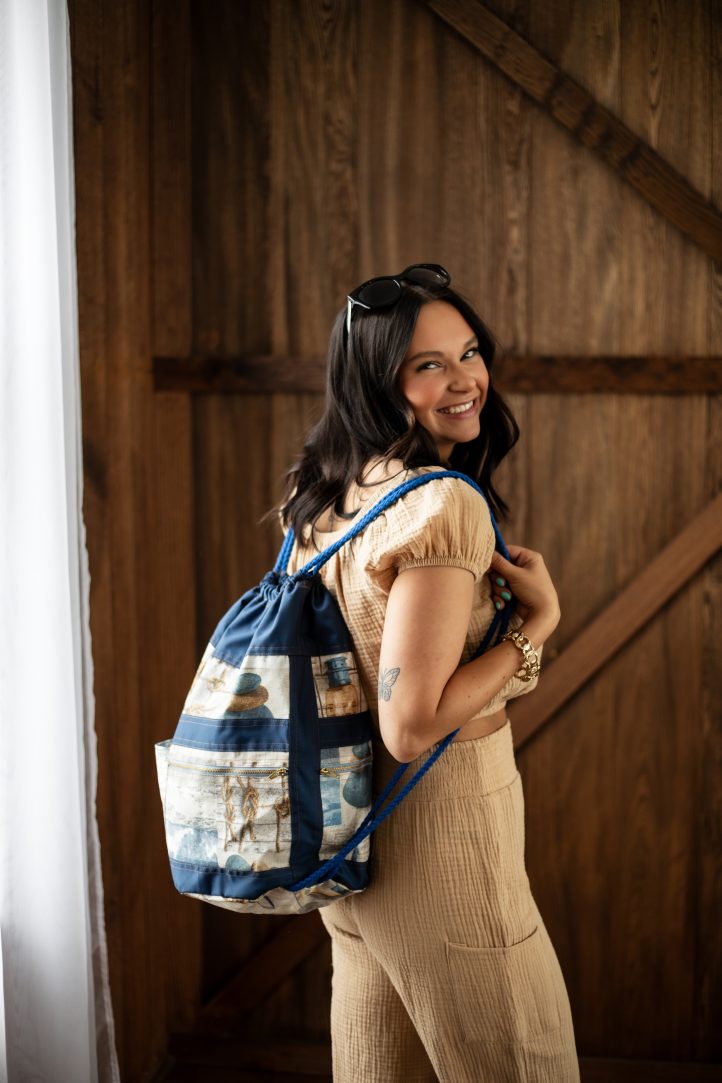
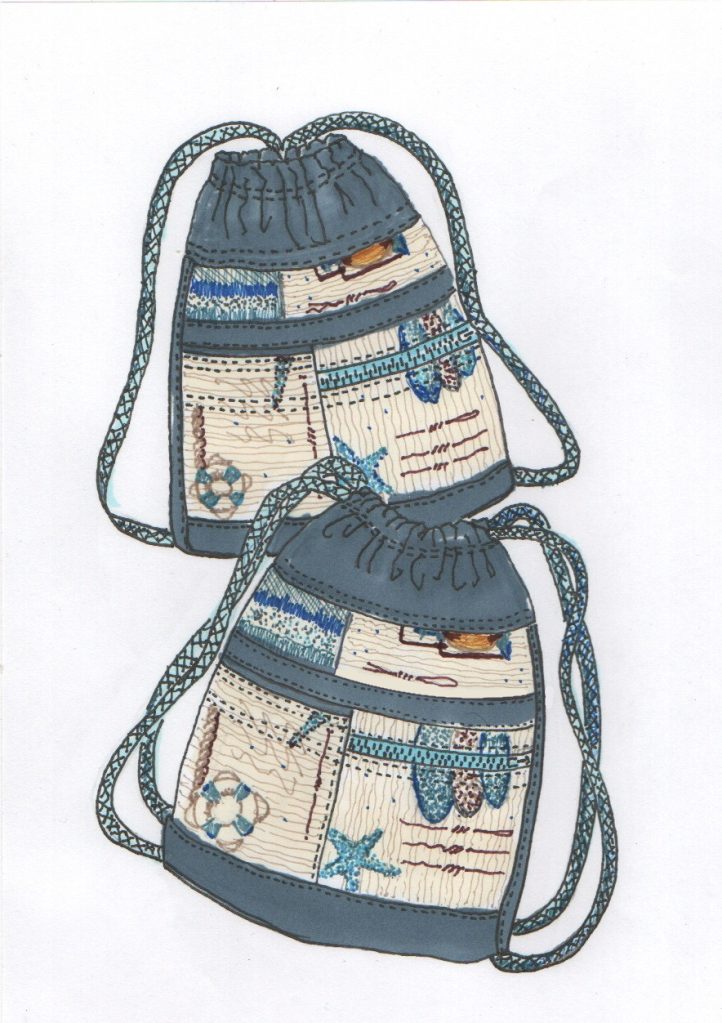
Keep your beach day necessities organized and safe with this roomy wet bag pattern. Another wonderful project from Don Morin, this bucket-style wet bag is an excellent alternative to single-use plastic bags and is ideal for holding your wet swimsuits and beach towels after a fun day spent waterside. Made with water-resistant fabric, this summer bag sewing tutorial has a drawstring closure and outer storage compartments.
Sewing Skill: Beginner level; easy
Seam Allowance: 3/8” unless otherwise stated
Top Stitch: Double topstitching (1/8” from edge, 1/4” from first row of stitching)
Pressing: No pressing recommended
Summertime is the best time to get active with your family and it’s extra fun when the activities involve water. You’ll want to sew up this bucket-style wet bag for every member of the family to add to their summer fun.
It’s large enough to hold clean, as well as, wet beach towels, swimming gear, and all your must-have essentials like suntan lotion, lip balm, sunglasses, paperback novel, and sun-hat for a fun day at the beach.
Perfect for keeping all the family’s wet and dirty stuff neatly separated from your dry clothes until you’re home again to deal with the mess, it’s a real lifesaver for any parent’s summer arsenal. Yet, its resourcefulness goes way beyond the obvious. The deep bucket styling comprises of a seamless interior cavity on a circular base to form a water resistant, light weight and reusable bag, a perfect alternative to single-use plastic bags. Use it for your dirty laundry, smelly dog towels, iced-packed picnic tote, a potty training or diaper bag, or even for chucking your rubbish into after day-tripping on the water… the possibilities are endless!
Materials:
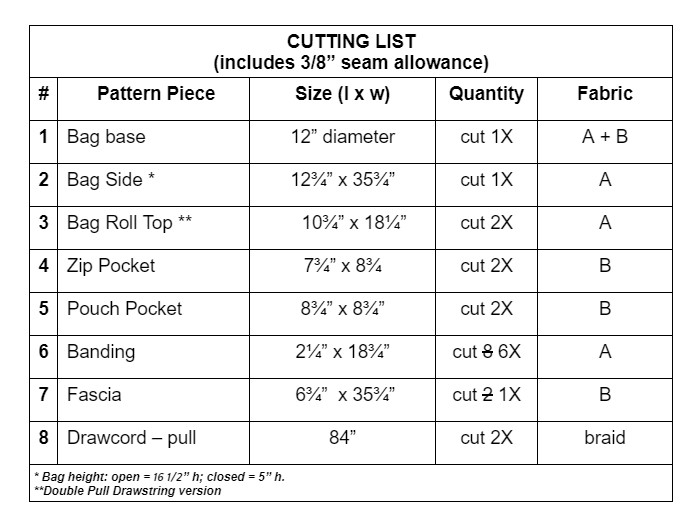
- 2/3 yd. (24”) indoor/outdoor PUL-coated fabric of your choice, 55” wide (140 cm)
- 1/2 yd. (18”) contrasting fabric for pockets, 55” wide (140 cm)
- 1 spool of matching all-purpose thread or upholstery thread
- 2 1/2 – 5 yds. braided cord, 8mm thick
- 1 yd. of bias fold tape, 1/2” wide (12 mm)
- 2 closed pocket zippers, 8” long (20 cm)
- 1 roll of pattern paper or parcel wrap
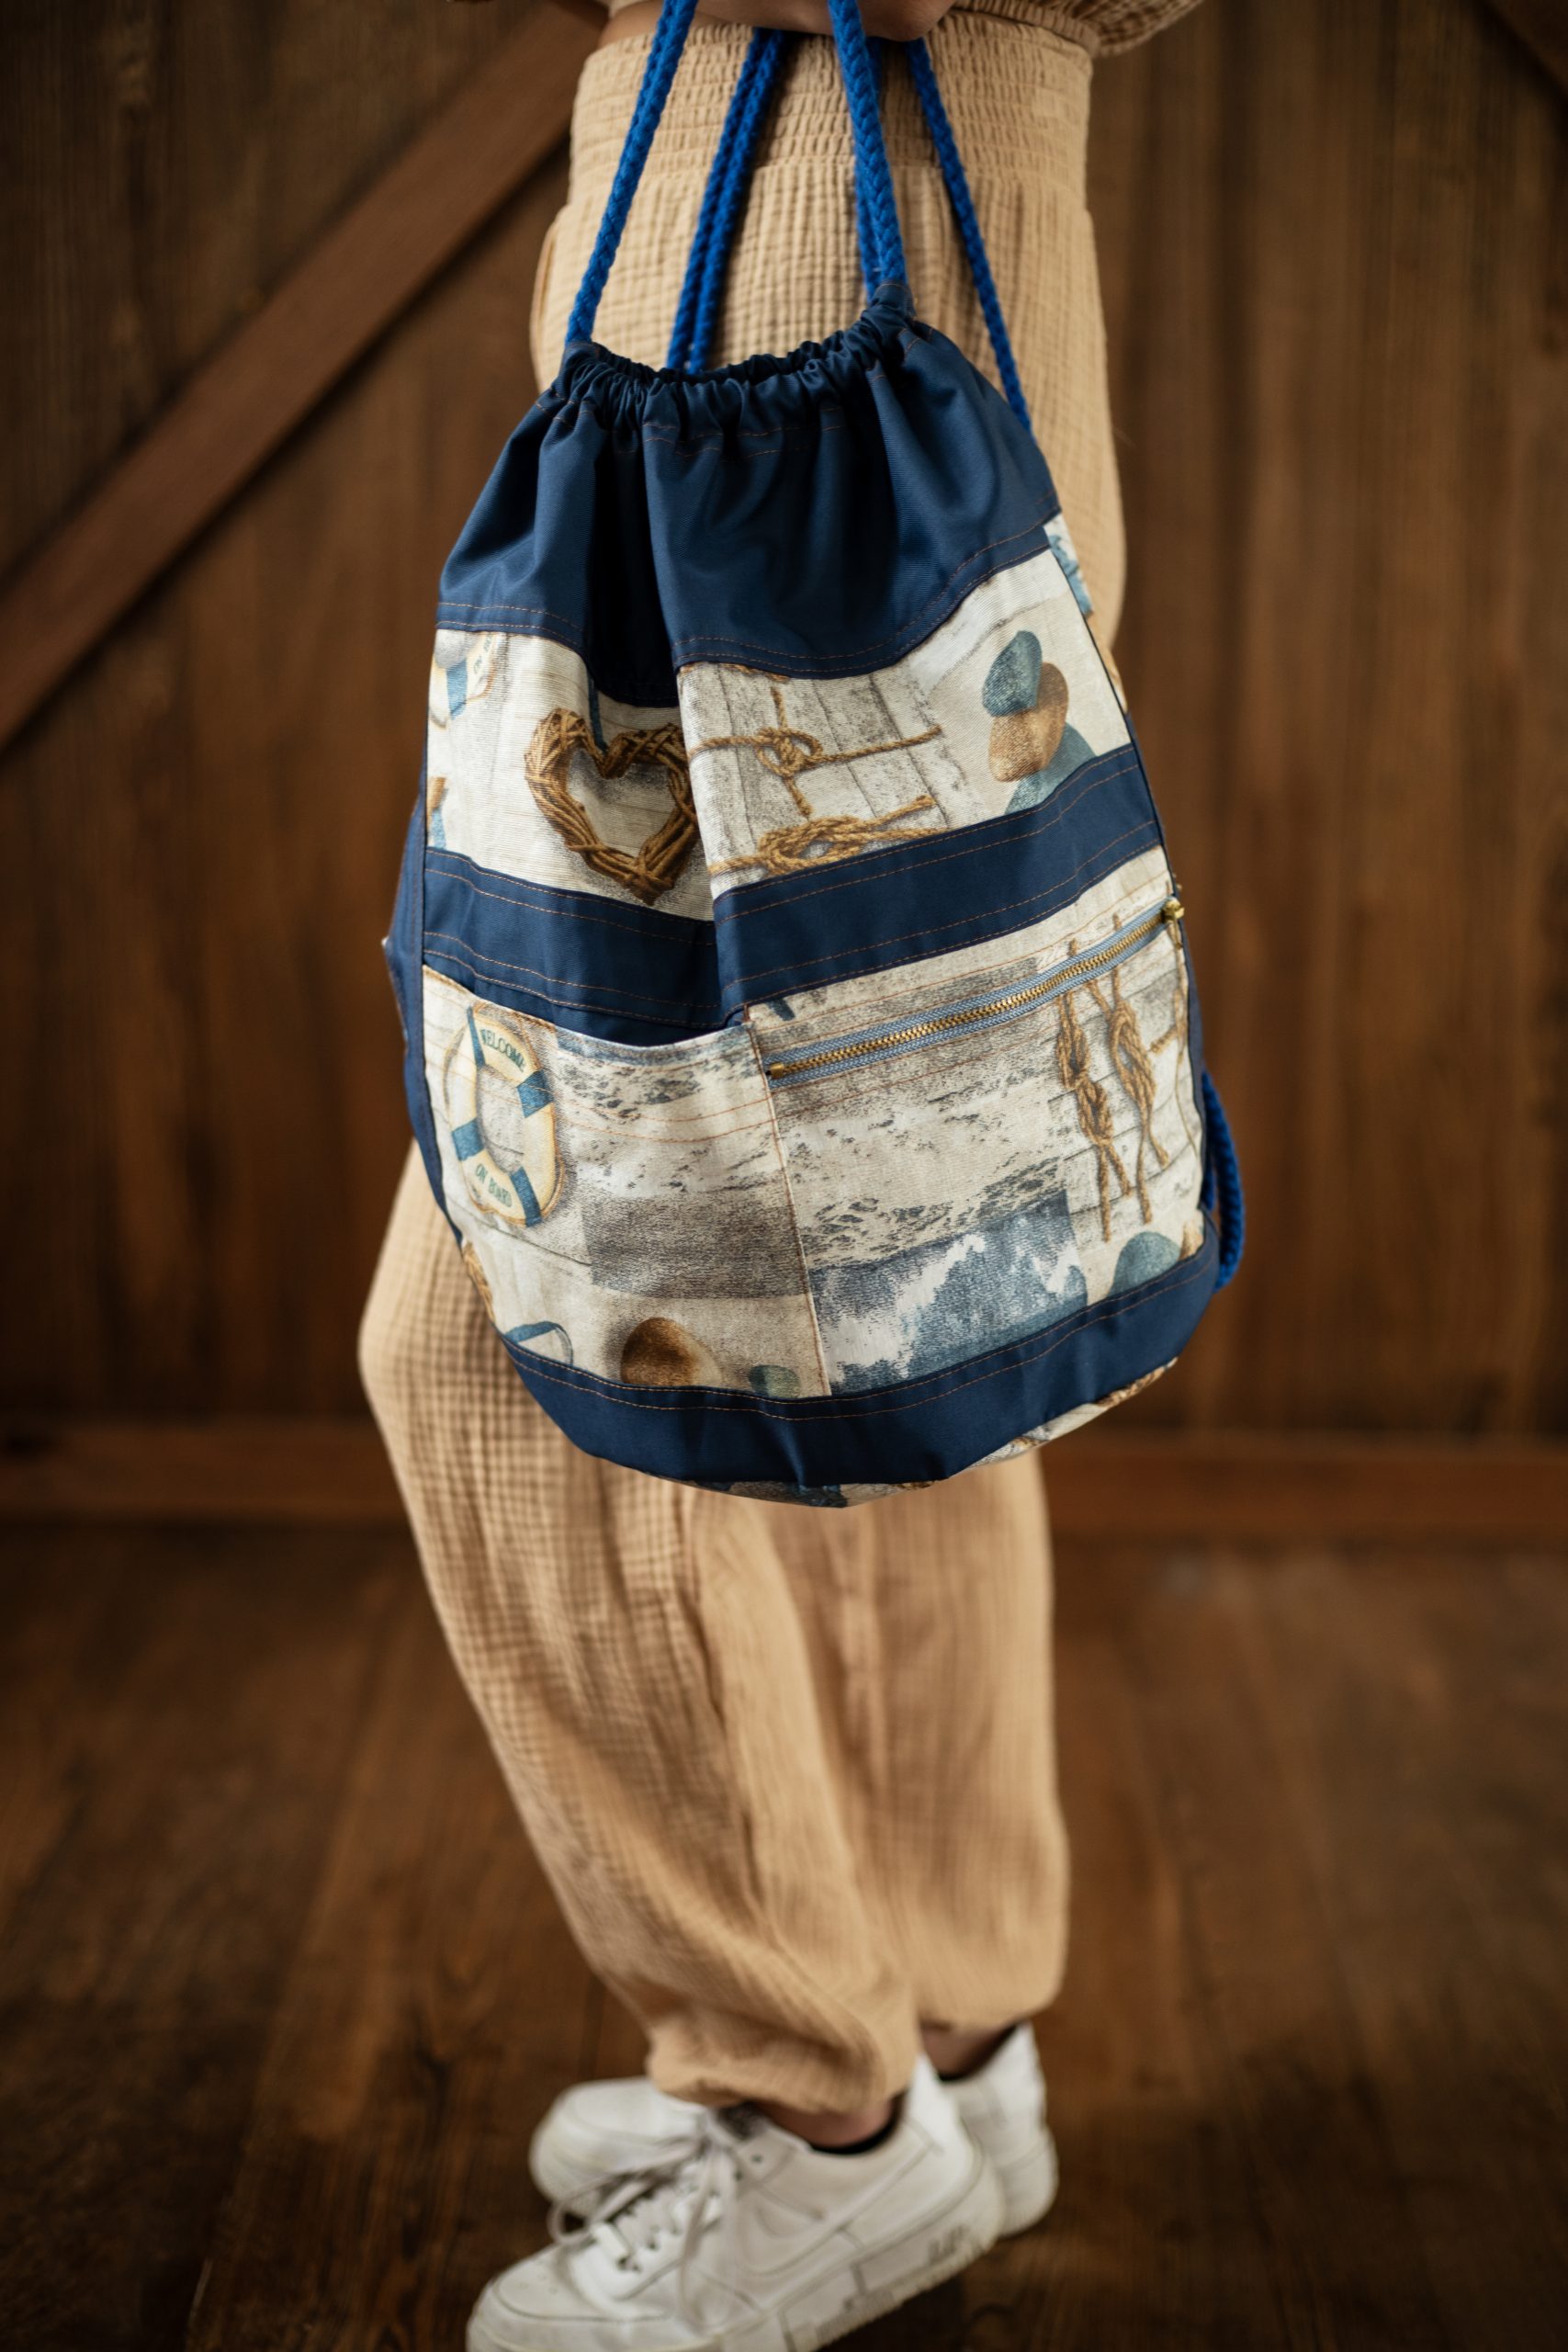
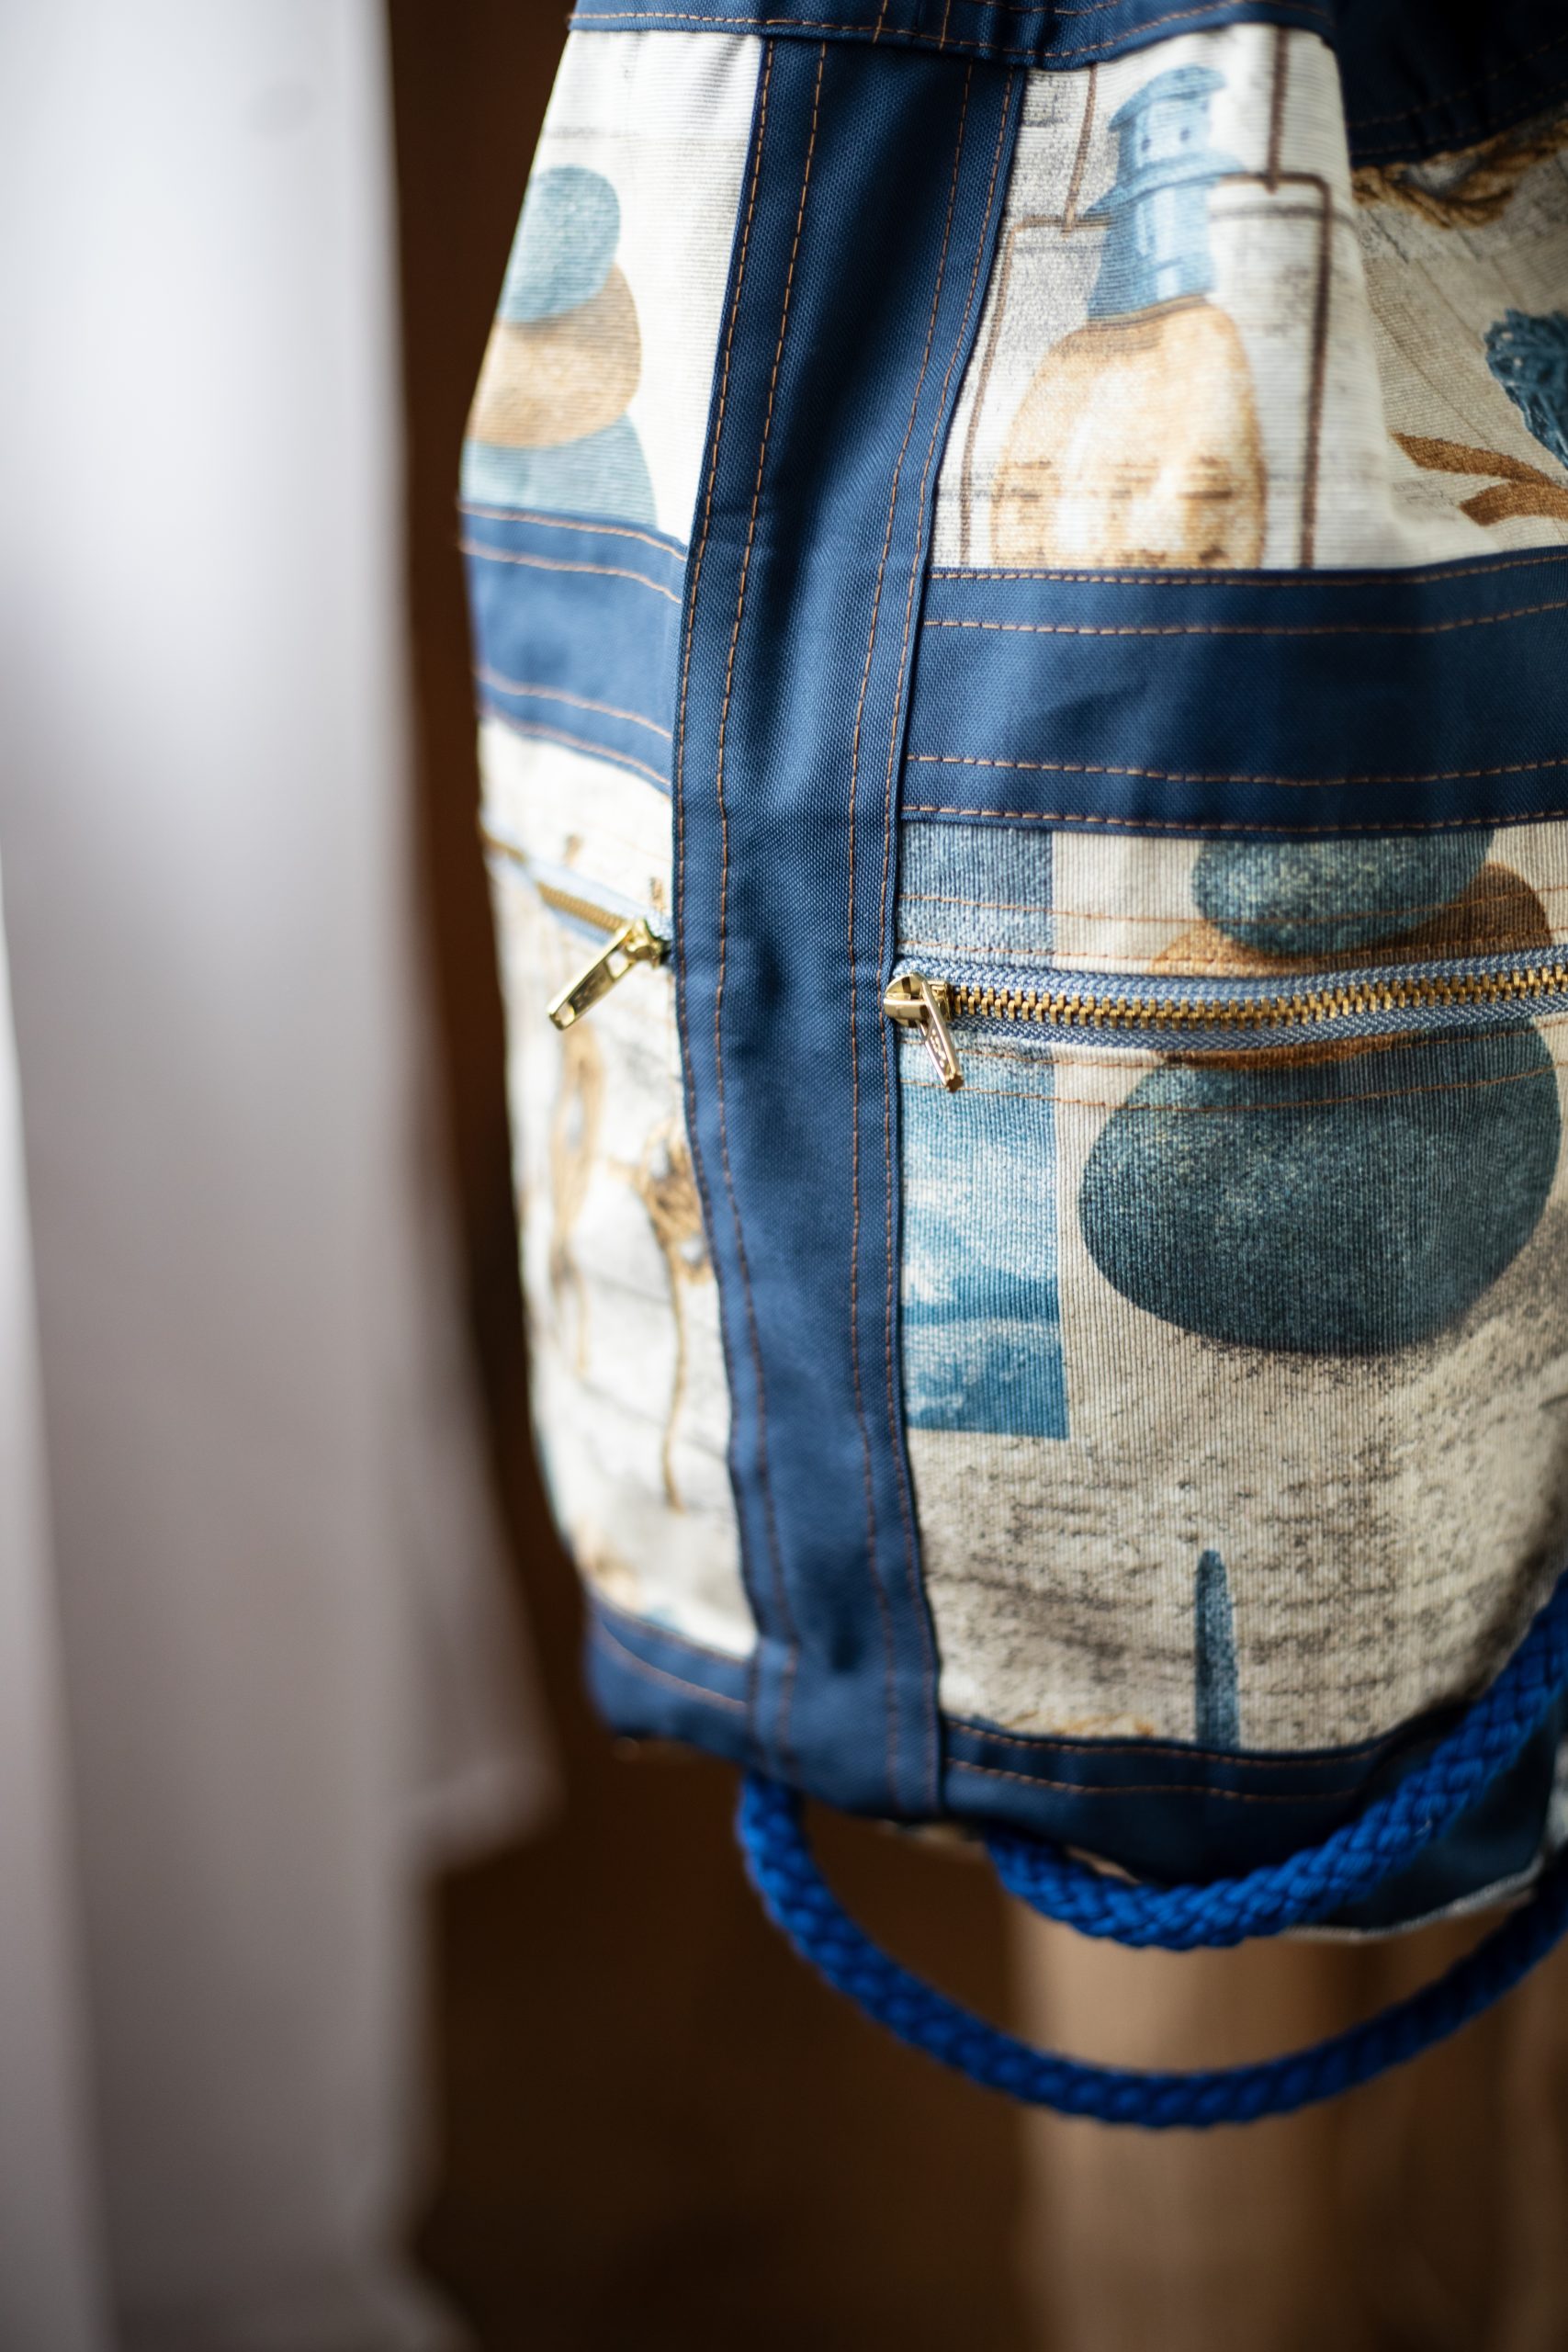
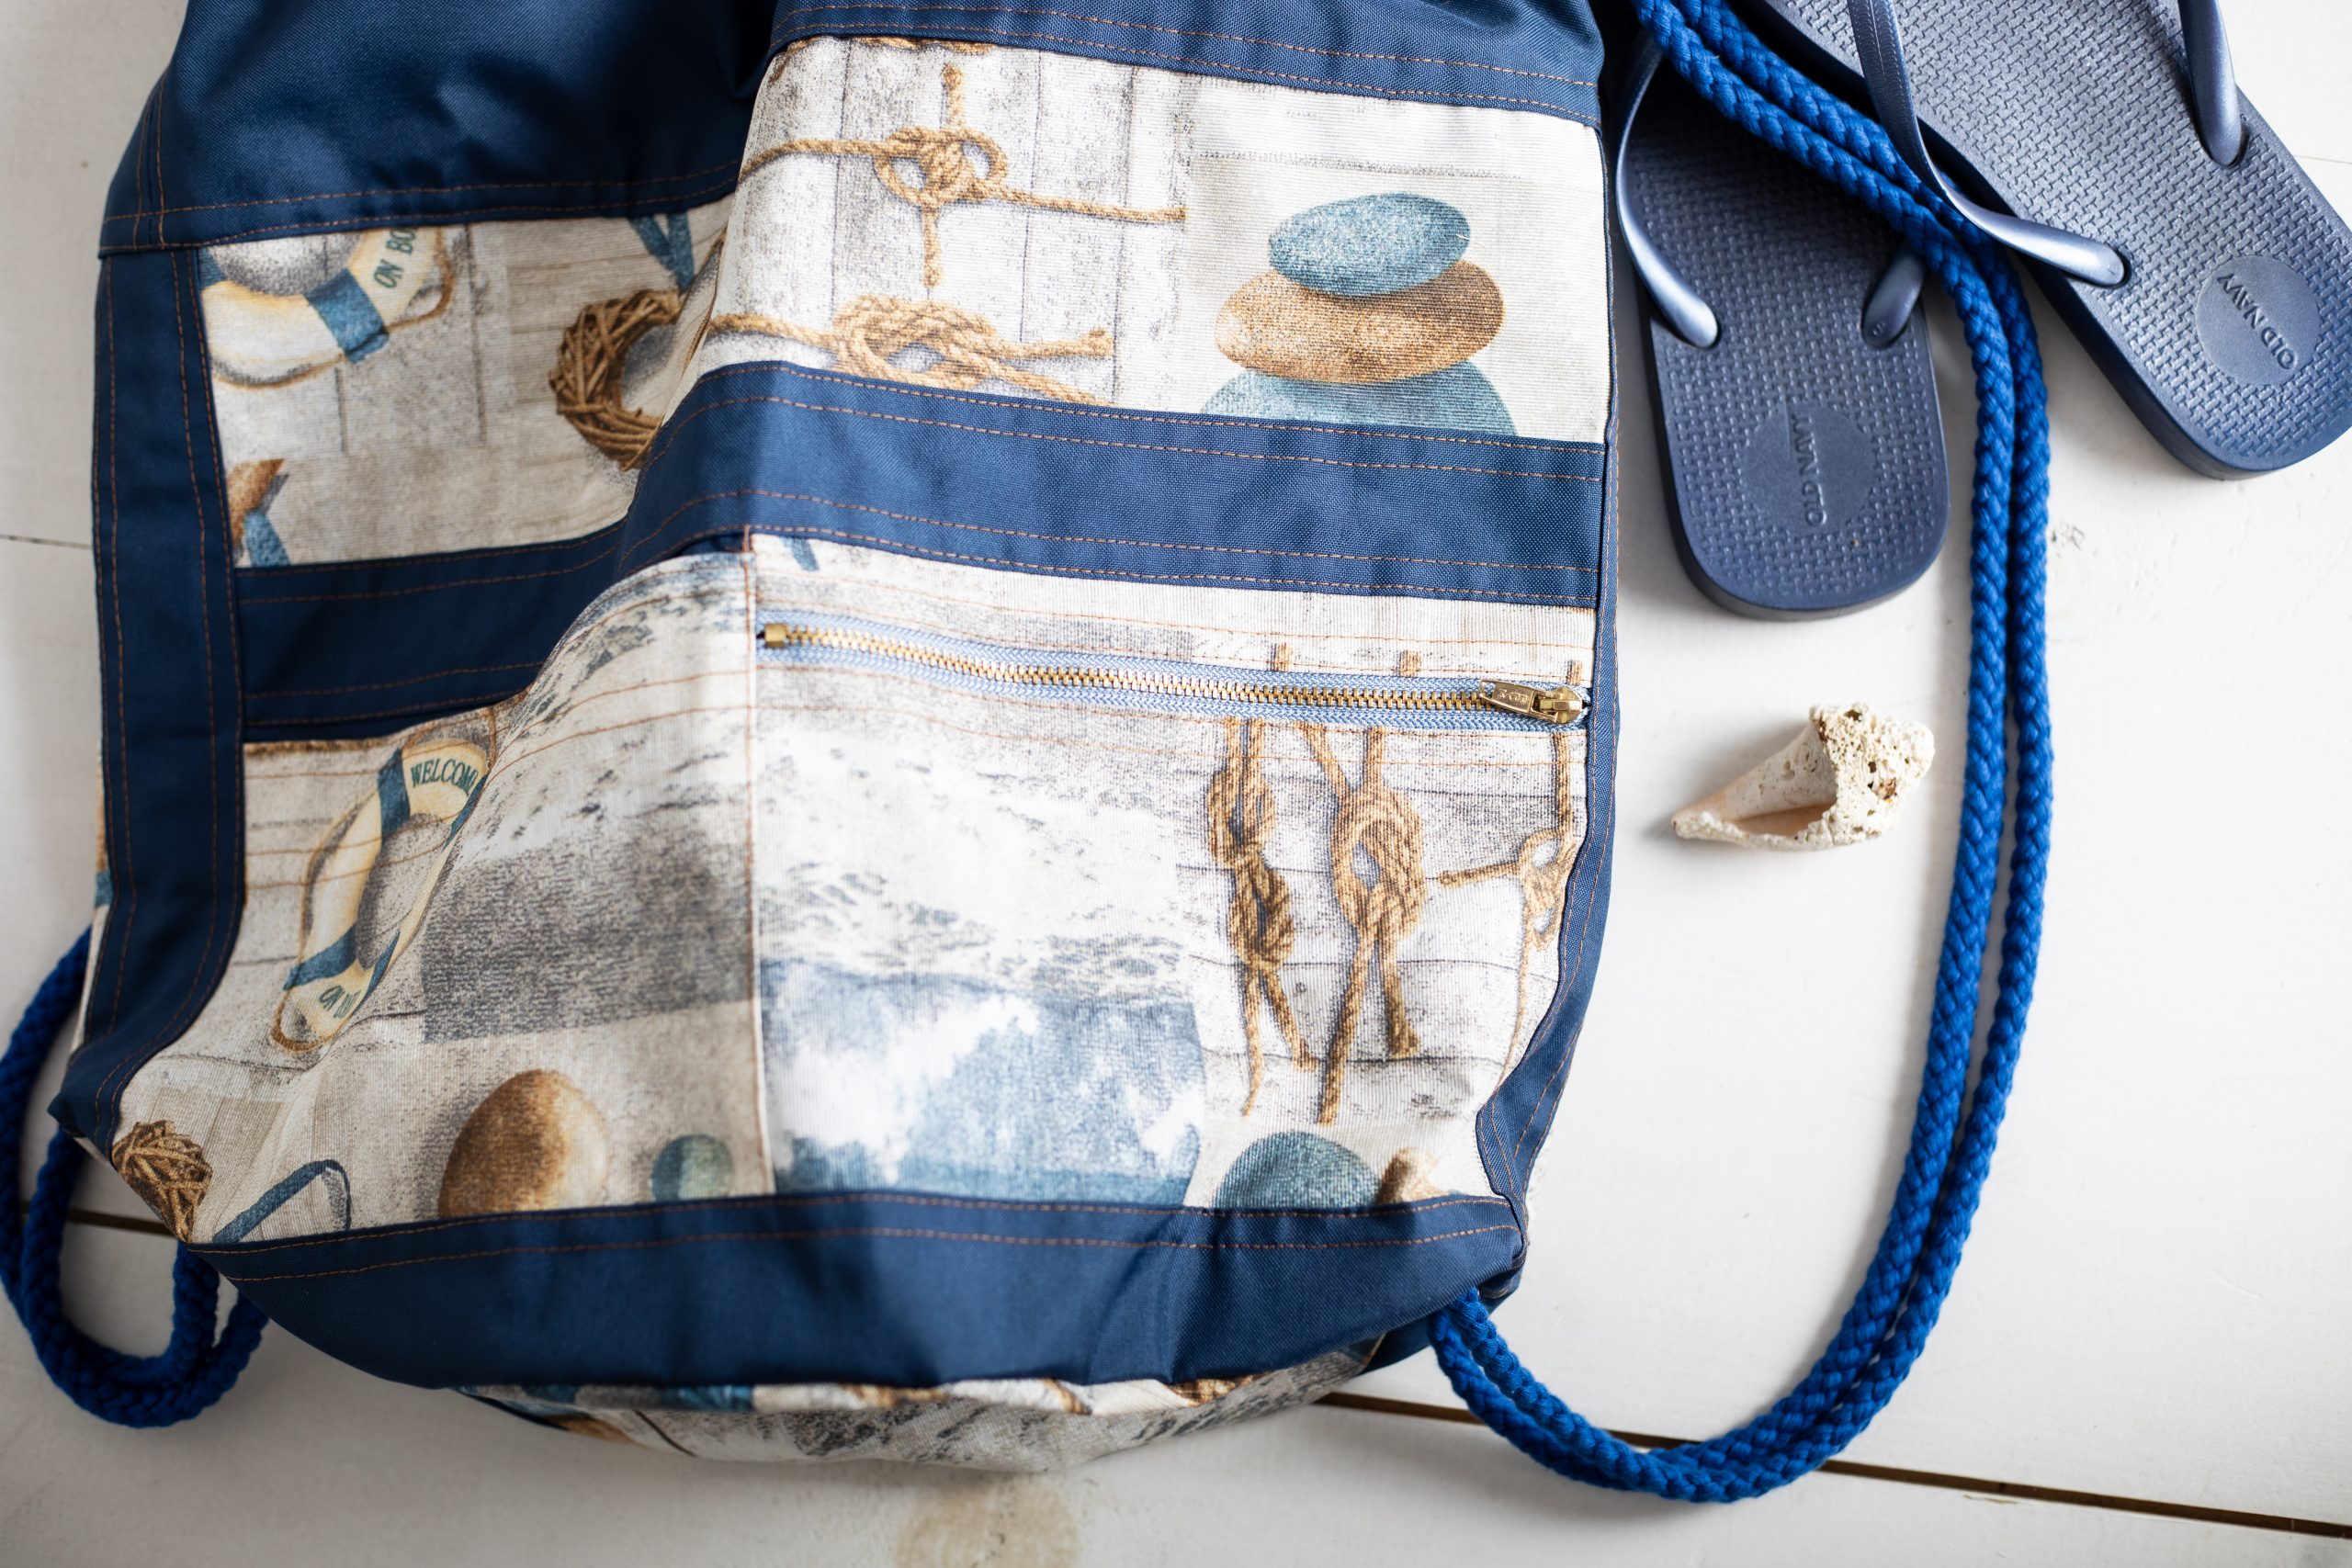
Designer Note: For the project bag, I used waterproof Dralon™(100% poly-acrylic) in navy blue; treated cotton (100% cotton) with a Maritime/seaside print; Prym™ denim zippers (8”), and braided cotton twine (8mm) in denim blue.
Design Specifications:
- 17 1/2” W x 16 1/2” H x 12” D with drawstring (no zip)
- Outer storage compartments (2 with zips)
- Material: Water-Resistant printed PU treated cotton
- Durable, double-stitched seams to keep moisture inside
- PVC, phthalate (plasticizers) and lead free (OEKO-TEX® STANDARD 100 certified)
Care Instructions:
- Simply wipe down using a vinegar and water solution in between uses
- Rinse in cold water; avoid fabric softeners, bleach or dryer sheets
- Use an everyday mild detergent (preferably natural!)
- Air dry
THE PATTERN DRAFT:
Whenever I need to create a template for a bag design, I often begin with my “givens” (the things I know) and make a wishlist of what I would like to pack in my designated bag and for what purpose.
For example, I know for my day at the beach the conditions will be sunny, sandy, and wet. Therefore, I will want to pack a beach towel, swim trunks, a soft-brimmed hat, sunglasses, sunscreen lotion, lip balm, bottled water, and a good read. Oh! and there should be a safe place to store my cellphone from splashing water and loose sand.
Furthermore, I want the bag material to be robust, waterproof, easy to care for, and reusable, so that I can keep wet and smelly items separate from my dry things and say goodbye to single-use plastics.
There you have it, I have created my specially-designed wet bag to suit my own needs!
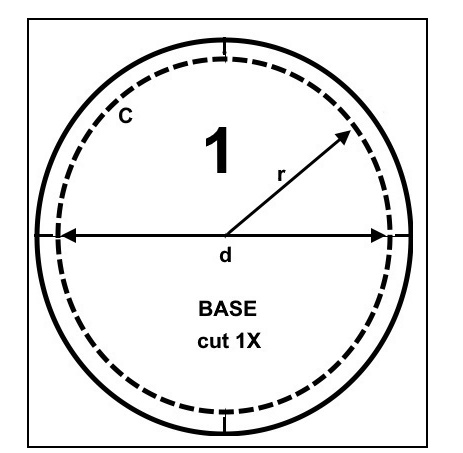
- Capacity: To make a “bucket-style” bag, I need a cylindrical shape with a circular base at one end, but how large to make the bucket? This will depend on what you have on your wish list. Obviously, large and bulky items will take up a lot of room inside the cavity of the bag than smaller/flatter things so we must estimate the minimum capacity needed for bag size. For instance, from my wishlist the largest and bulkiest item is the beach towel. A standard beach towel is approximately 70” x 40”. The most efficient way to carry a towel is to roll it up jelly roll-style. Rolled up, the beach towel measures 12” long x 18” around x 6” thick. These measurements will give me a good idea for the dimensions I need to make my pattern. The height of the bag should be at least 12 inches tall with a base of 12 inches in diameter and making the roll top about 5 inches wide, this makes the bag height about 17 inches when open, more or less.
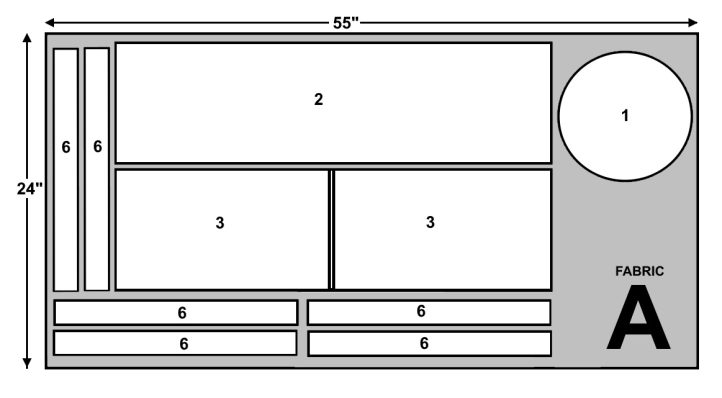
- The Base: All bag dimensions are proportionate to its base. The bucket bag style is simply a collection of rectangles with a circle for the base of the bag. The radius of my circle is 6”, based on the thickness of the largest item to be packed, making the diameter of the base (d=2r) equal to 12”. To make a wet bag larger or smaller than the project bag, choose a different amount for the radius (r). Trace around a round object with a diameter of 12” to make the pattern piece for the bag’s base onto pattern paper (I used a 12” pie pan); or draw a circle with a radius of 6” using a compass. This produces a base that is 37⅝” 37 5/8” around. Draw the stitching line onto the base pattern, 3/8” (10 mm) inside the edge of the circle. The finished dimensions are 11 1/4” wide and 35” around. All subsequent measurements relate to the base.
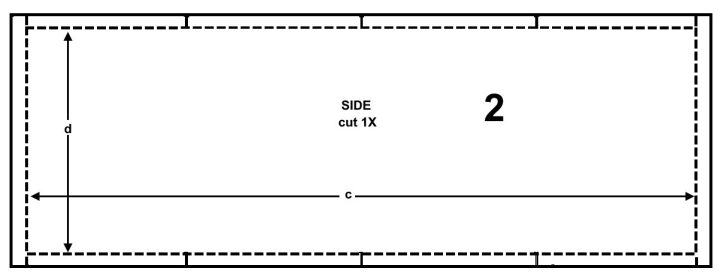
- The Sides: Measure the stitching line and this amount is how wide to draw the rectangle for the bag’s sides. Add 2 seam allowances (2 x 3/8”). For the height of the rectangle, make it equal to the diameter of the base plus 2 seam allowances (2 x 3/8”). Confirm that the rectangle is squared and true by measuring diagonally the linear distance between opposing corners. If the amounts are the same, the rectangle is correct. The Side pattern piece is 12 3/4” long x 35 3/4” wide.
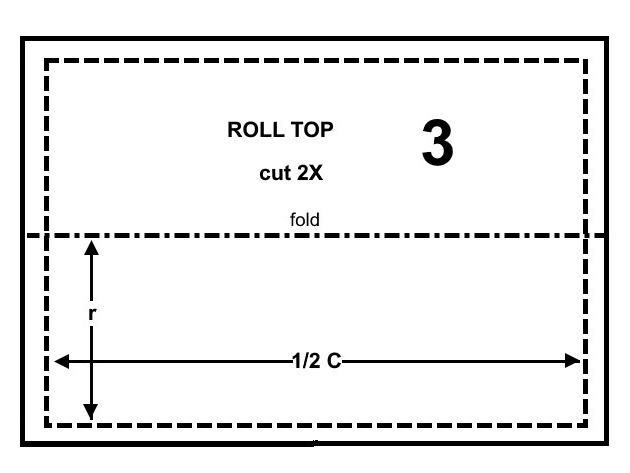
- The Roll Top: The closure for the wet bag is a flexible roll top with a single pull or double pull drawcord.
- For the single pull option: Trace out the side piece pattern but do not include the seam allowance. Add a foldline across the center of the rectangle. Divide the rectangle in two vertically, then add seam allowance. Label cut 1X. The cutting dimensions are 10 3/4” x 35 3/4”.
- For the double pull option: Trace out the side piece pattern but do not include the seam allowance. Add a foldline across the center of the rectangle. Divide the rectangle in two vertically, then add seam allowance. Label cut 2X. The cutting dimensions are 10 3/4” x 18 1/4”.
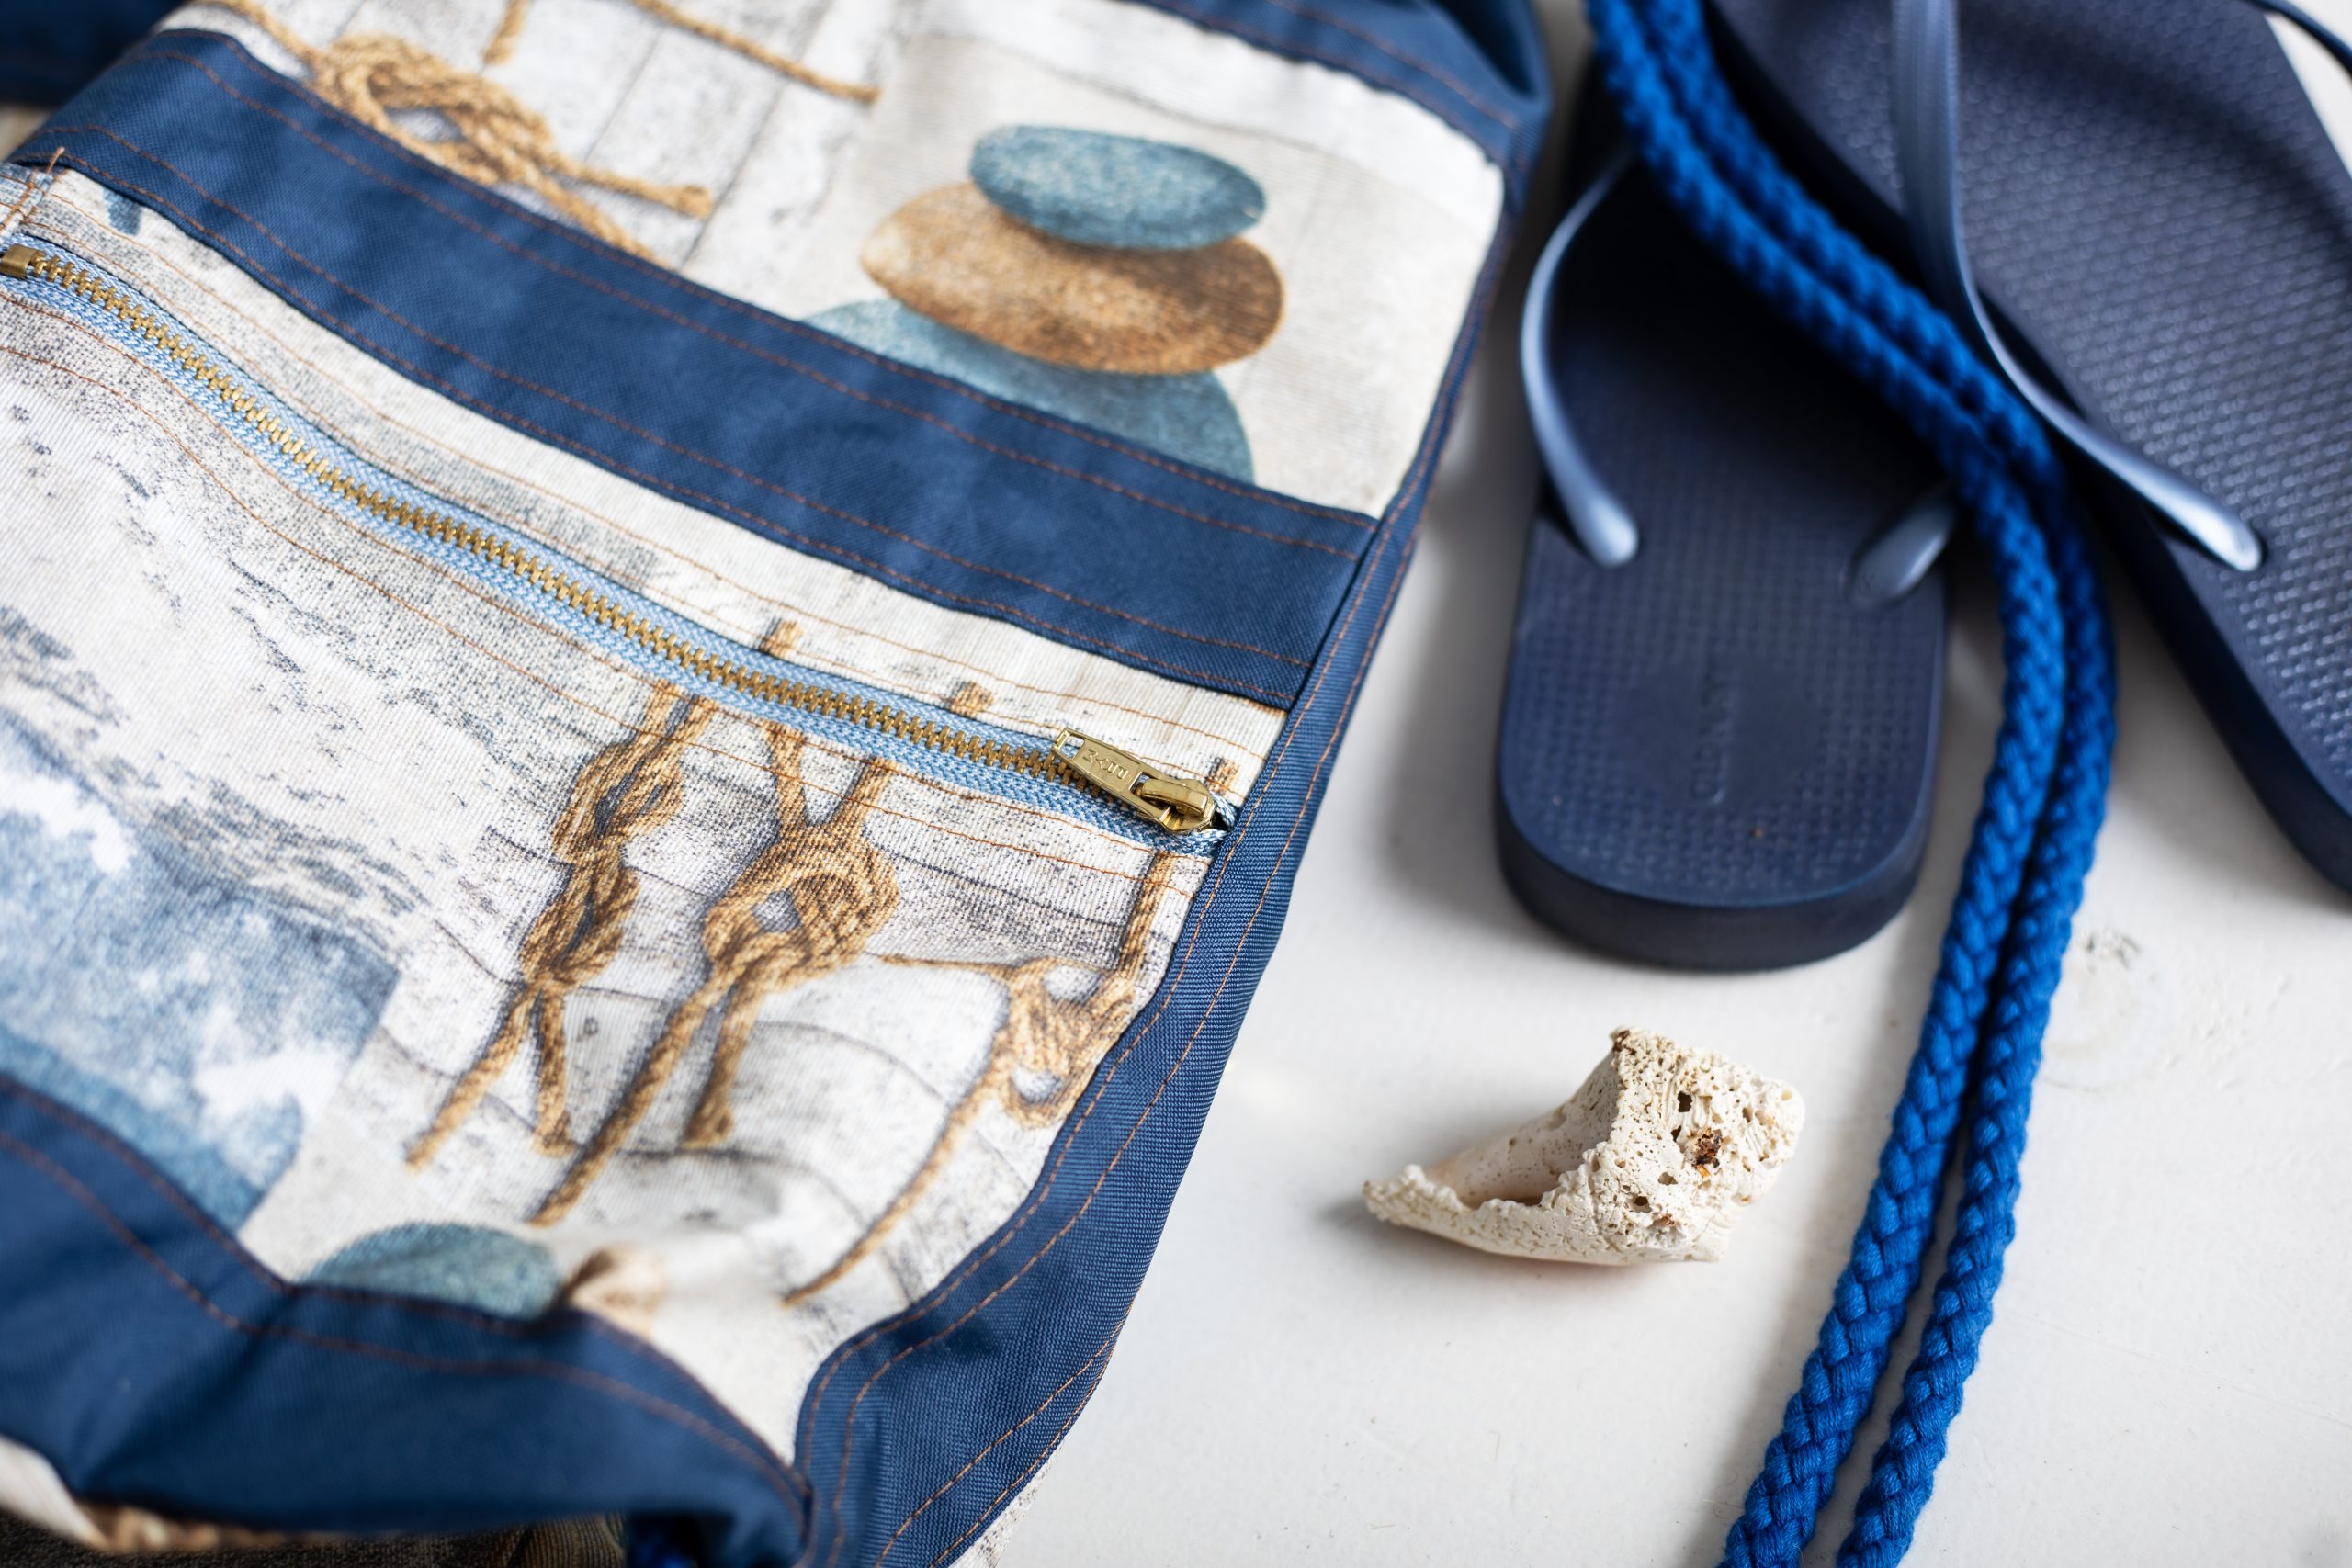
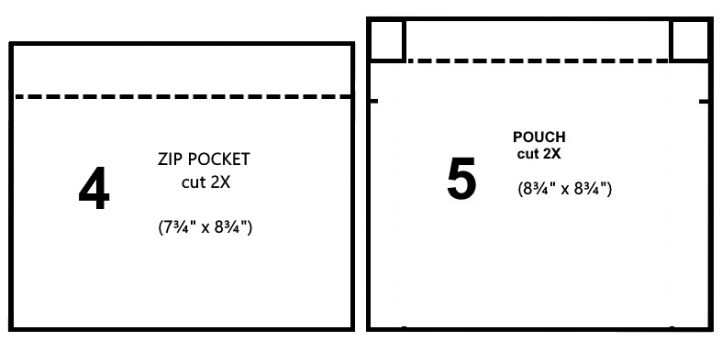
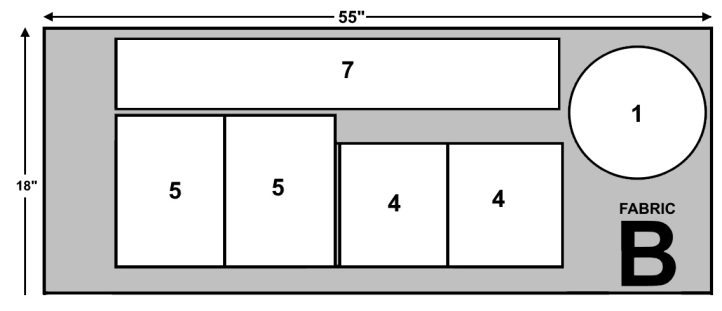
- External Storage: Add storage compartments to the exterior of the bag for smaller items as they will not alter the shape of the pattern. The variety, quantity, and size is to your preference. On my wishlist, I wanted to add a safe place to store my cellphone from splashing water and loose sand. You can choose to add any type of patch pocket as a storage compartment for smaller items to the outside of the bag. For added security, add zippers, dome snaps or Velcro™ tabs to your pockets. The pockets can be sized to accommodate the things on your wishlist. For the project bag, I chose to have 4 exterior storage compartments to store my smaller things. Two zip pockets (7 3/4” x 8 3/4”) to keep things secure like my cellphone; and two pouch pockets (8 3/4” x 8 3/4”) to keep things handy like my sunglasses and paperback novel. The pouch pockets may be divided into smaller compartments. The addition of exterior pockets mean you won’t be rummaging for small items in the bottom of the bag’s interior.
- Trim: Vertical and horizontal bands (1 1/2” wide) are added to the structure to keep the bucket upright and to hide the raw edges of the pocket construction. Add 3/8″ to each end for seam allowance will give you a 2 1/4″ x 18 3/4″ rectangle. Six are needed in a solid color for a contrasting trim.

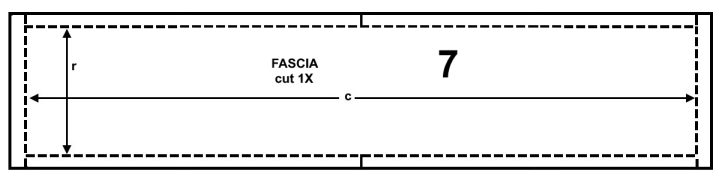
- Fascia: A further piece of fabric acts as a fascia to disguise the top of the exterior of the bag and hide the raw edges of the pockets. It is a rectangle equal to the circumference of the base and the radius of the base. Confirm that the rectangle is squared and true by measuring diagonally the linear distance between opposing corners. If the amounts are the same, the rectangle is correct. Add seam allowance (3/8”) to all sides. The Fascia pattern piece is 6 3/4” long x 35 3/4” wide.
SOURCING FABRIC:
On my wishlist, I wanted the bag material to be robust, waterproof, easy to care for, and reusable. You’ll find materials that meet this criteria in the indoor/outdoor section at your favorite fabric merchant or at a marine supply store.
Poly-acrylic fabrics (aka Dralon® brand) are an all-rounder for outdoor use projects.
They are extra light and weather resistant yet very durable. Due to the special fiber structure, they are also easy to care for. Poly-acrylic fabrics dry quickly, are less susceptible to mildew and easy to wipe clean. Therefore, they are suitable for making wet bags that can hold damp clothing items.
If you are looking for additional water-repellent choices for your wet bag, or you want to protect your belongings against water splashes, then you can realize your ideas with treated cotton! Treated cotton fabrics are particularly robust and durable, while its PU coating makes it salt water resistant, water repellent, and dirt repellent. For this reason, the material is particularly suitable for sewing projects for water-sport activities.
Spend the summer seaside with colorful wax cloth and oil cloth. Wax cloth is excellent to use for wet bags because it is water-repellent and wear-resistant. Thanks to the coating, the fabric is wonderfully easy to care for with a simple wipe down! Along the same line, Sunbed fabrics are special outdoor fabrics (often a Dralon®/polypropylene blend) made to fit perfectly on deck chairs and do not need to be finished along the side edges. In addition, sunbed fabrics are mold resistant, UV light resistant, water repellent, and dirt repellent. You can buy these fabrics in different colors and stripes to make a wet bag a real eye-catcher on the beach.
Rain wear fabrics are generally warp knits that feel smooth in the hand and drape easily. Their PUR coating makes it waterproof and dirt-repellent, ideal for rain gear, marine wear, and all-weather soft furnishings. Another option in the same category is nylon ripstop. It is ultra lightweight yet hard-wearing, showerproof because of its water repellent properties, and dries quickly. In the event that the fabric does get punctured, the square grid pattern holds its structure so that the fabric does not tear easily. As with other nylon fibers, Taslan™, a Teflon-coated polyester, and Tactel™, a nylon microfiber, are hygroscopic and absorbs moisture out of the air or out of its surrounding (such as our wet bag). The higher the humidity, the faster nylon will absorb moisture, until it becomes saturated. When exposed to dryer air, the moisture will evaporate and the fiber will dry out. Two other important aspects of microfibers are its breath-ability and noticeable strength. All three suggestions are good possibilities for making up a soft-sided wet bag.
All the above are available in many color/print options and wide fabric widths, generally ranging from 55” (140 cm) wide to 60” (152.4 cm) wide. The coating treatments on this category of textiles should be OEKO-TEX® STANDARD 100 certified to be safe for you and the environment, ensuring they are free from harmful PVC, phthalate (plasticizers), and lead. An additional benefit of using treated fabrics is that the coating prevents the cloth from fraying once cut, therefore no seam finish is required.
Be mindful that many of these specialty textiles suppliers do not recommend machine washing and drying. Most are easy to care for with a simple white vinegar & water solution to stop mold and mildew and left to air dry. Although many treated fabrics have water and dirt repellent properties, sometime odors or grime need to be removed. A gentle cold-water wash by hand is suggested using a mild detergent (natural if possible) and avoid fabric softeners, bleach or dryer sheets. Rinse well and let to air dry.
Be aware that specialty fabric treated to be waterproof are downgraded to water-resistant whenever sewn, as the machine needle punctures the material and leave a trail of tiny holes allowing water to seep in. Special seam tapes makes your projects waterproof at the seams by ironing the seam tape on the underside of the seam to prevent water from entering the seams.
TECHNIQUES USED IN THIS PROJECT:
Appliqué:
Appliqué is ornamental needlework in which pieces or patches of fabric in different shapes and patterns are sewn or stuck onto a larger piece to form a picture or pattern. In fashion, it is commonly used as decorative element on clothing. The word appliqué is used both as a noun and a verb, as it implies that something is applied to a surface. It is a practical way to add a patch pocket to a garment and also to mend and repair holes in tents, blankets and clothing. The word appliqué itself comes from the French verb, appliquer, meaning “to put on,” a technique that has been practiced globally for ages. In the context of this project, for example, strips of banding are used as appliqué to cover and hide seam allowances on the exterior of the wet bag. It is a separate piece of fabric added to the primary work, generally for the purpose of distracting the eye from not having to match motifs or direction in a print that has been cut into smaller pieces.
With appliqué, the weight and structure of fabrics become important and poses unique challenges. The technique influences the choice of textile to use.
There are three main methods of application when it comes to types of appliqué, with each of these being able to create unique and different styles: machine-applied, hand-applied, and fused-applied. The most common way to attach textiles is with sewing, in fact many people define appliqué by needlework. Choosing a method of application really depends on the final look you’re after and how advanced your sewing skills are, but there’s no right or wrong way to go.
Machine applique is the primary method for applying the storage pockets to the exterior of the bag. The raw-edge method of appliqué is perfect for smaller projects like this one, and essentially means sewing pieces of fabric onto a background piece of fabric without finishing or turning the edges to form the exterior pockets. It can be done by hand or machine to create some sophisticated construction without the extra work.
In traditional appliqué, the smooth-edge method is used to complete the appliqué. The raw edges would have been neatened by zig-zagging or satin-stitching to cover edges of the patchwork. For the project bag, the raw edges of the pockets are hidden by applying strips of fabric to cover the stitches. These bands have turned or finished edges and are top-stitched in place to the background piece of fabric as a decorative trim.
Under-Stitching and Top-Stitching:
The specialty fabrics used for this project cannot be pressed with a hot iron; therefore an alternative method is needed to hold turned edges in place. We do this by using a combination of under-stitching and top-stitching.
Under-stitching is a line of top-stitches that is sewn close to the edge of a facing or lining to keep it from rolling toward the outside. It comes in especially handy when sewing around an opening, such as a neckline or a pocket opening. It keeps the facing or lining firmly on the inside of your garment without any stitches showing on the outside.
As this stitch is part of the top-stitch family, the stitching is done on the face side of the cloth facing or lining. The difference is that you are sewing only through 1 ply of cloth and its seam allowance beneath it; whereas with conventional top-stitching, you are sewing through 2 layers of cloth and its seam allowances from the face side of the garment.
Bias Bound Seam Finish:
A Bias Bound Seam uses bias tape to encase and finish off a raw edge. The bias tape can be applied to both seam allowances separately (a pressed open seam) or to both seam allowances at once (a seam pressed to one side). This project uses this finish and applies the bias tape to both layers of the seam allowance at the base of the bag. When doing this, keep in mind the number of layers in the seam so that the seam doesn’t end up too thick. Keep the outer layers uniform and reduce any bulk within these two outer plies.
The width of bias tape you use is up to you. For this project, I have used a 1/2-inch single-fold bias tape. You can use purchased commercial tape or make your own. Sew your seam as you usually would, typically sewing right sides together. If following a pattern, use the seam allowance given in your instructions. You want the width of the bias tape to be less than your seam allowance. I have used a 3/8″ (10 mm) seam allowance. You may grade or trim the seam allowances to fit the tape.
The finishing of the bag is with the base and the side sewn together with right sides together, then press the seam to one side. Add the bias tape and wrap it around the seam allowance pinning parallel to the seam. If one side of your bias tape is slightly wider than the other, put the wider side underneath. Sew along the bias tape close to the edge, catching both layers of the tape at the same time to complete.
MACHINE SET-UP:
- Machine Needle – medium, size 11 Universal
- Stitch Length – straight stitch, slightly longer than normal (4 of a possible 5)
- Stitch Tension – regular tension (4 of a possible 9)
- Foot Attachments – single-stitch foot; zipper foot
MARKING AND CUTTING:
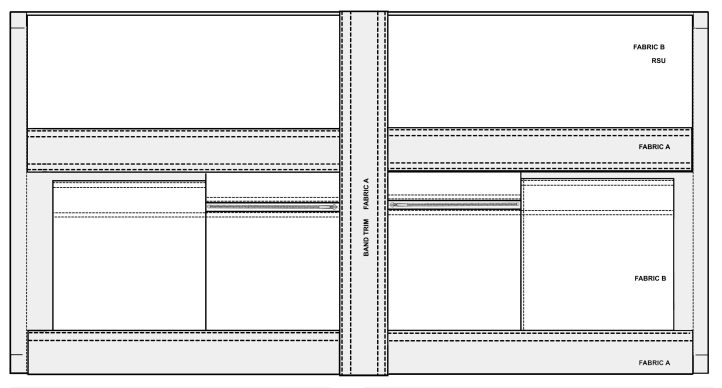
For this bag design project, two fabrics are used to create the wet bag. The first fabric (Fabric A) is a waterproof synthetic fabric that is used to create the basic components of the bucket shape of the bag. Banding strips are also cut from this specialty cloth as trim that will cover the exterior of the bag. The second fabric (Fabric B) is a polyurethane (PUL) treated natural print fabric that is water and dirt repellent. It will be used to make storage compartments on the exterior of the bag.
A simple way to cut fabric and decrease waste is in a single layer, face side up, instead of on the fold. Wiggle pattern pieces around, nestle pockets or patched-on pieces into the empty spaces surrounding the main pattern pieces.
Generally, bag designers lay and cut with the grain and work across the cloth, yet you might want to railroad the fabric and follow the cross-grain, and this principle can be also adopted by choosing prints that do not require matching at the seams. Longitudinal stripes and mini prints like polka-dots, stars, hearts, whatever you may have, and abstract prints work best as the print appears the same once the cloth has been cut. Stripes can be used as a design detail as well by using them vertically, horizontally or in a chevron pattern.
Yokes or yoke facings can be pieced together, allowing smaller bits of fabric to be used up creating efficient use of the materials at hand. Bias strips and banding can also be pieced from small scraps instead of fresh expanses of fabric. Facings and linings can also be cut from the leftover scraps of another project.
Begin with your largest piece and work in descending order, following the straight grain of the fabric (eg. parallel to the selvage). Hold your pattern down with weights. While many people use dressmaker’s pins to hold their pattern in place, using pins can pinch and distort your fabric, and significantly affect the final shape and fit. A heavy book is a better alternative. This substitution has the added benefit of making your pattern pieces easy to position and reposition. You can use just about anything small and heavy as a pattern weight, such as large metal washers or bean bags.
Trace around each pattern piece and note how many of each piece is needed (eg. cut 2X means trace the pattern piece, reposition it, and trace it again, for a total of 2). If you are using more than one fashion fabric, ensure that the correct pattern pieces are used for each fabric.
Next, use fabric shears or a rotary cutter to cut out all bag parts following the chalk marks. If when cut, you cannot tell the difference between the front and the back of the cloth, stick a piece of masking tape to the back of the cloth before picking up the pieces so that you aren’t confused later when assembling.
Instructions:
ASSEMBLY:
Designer Notes:
- Use a longer than normal stitch length throughout the construction unless stated otherwise.
- Seam allowance is 3/8” (10mm) wide throughout the construction unless stated otherwise.
- The solid colored fabric will be referred to as Fabric A or the background fabric; and the print fabric will be referred to as Fabric B or the appliqué fabric in the assembly instructions.
Prep Exterior Pockets (Fabric B):
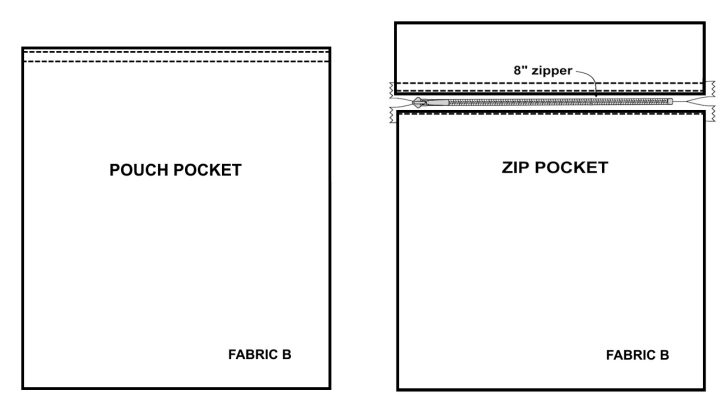
- For the pouch pocket: Fold under facing on top edge and crease flat along the fold. Double topstitch along the fold. Repeat method for second pocket. Set aside.
- For the zip pocket: Cut a strip,1” plus seam allowance, from the top edge of pocket. Insert zipper in between these two pieces. Attach one side of zip (1/4”) to top edge of pocket using a zipper foot attachment. Attach the other side of the zip to the lower edge of the strip in the same way. Turn out pocket flat to expose zipper and edgestitch on the upper side of zipper. Topstitch a second stitch 1/4” from edgestitch on the strip piece. Repeat this method for second pocket but reverse the direction of the zip opening. Set aside.
Joining The Exterior Pockets:
- Collect 1 pouch pocket and 1 zip pocket for each unit.
- With right sides together, layer pouch pocket on top of zip pocket and align side seam of pouch pocket with that of closed end of zip pocket, allowing for seam allowance. Sew a vertical straight seam as close as possible to the closed end of the zipper on the zip pocket. Grade and fold the seam allowance toward the pouch section of the combo. Crease flat the seam on the face side.
- Beginning from the opening end of the zipper, edgestitch the lower side of the zipper and continue sewing across the width of the pouch pocket to secure its facing.
- Do a second pass, 1/4” away from the first, to produce the appearance of a double topstitch.
- On the upper side of the zipper, edgestitch 1/4” from pouch pocket and zip pocket join by aligning the stitching with the top of the pouch pocket. Set aside.
- Repeat Steps 3-5 for remaining pocket pieces. Set aside.

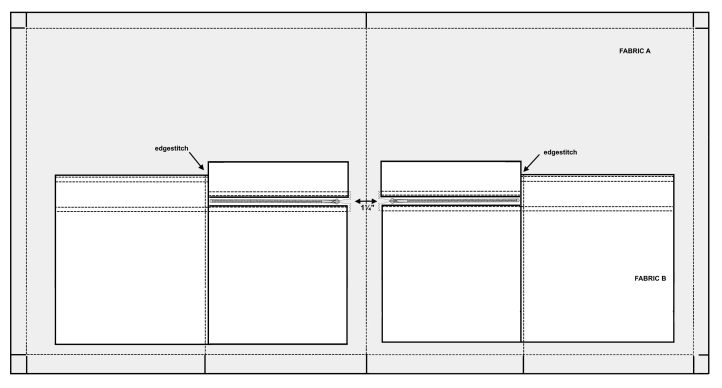
Appliqué Pockets To Exterior Side Piece:
- Collect 1 pair of pockets (Fabric B) and exterior side piece of bucket bag (Fabric A).
- With the exterior side piece face up, chalk mark the seam allowance at each end of the rectangle and the center point of the background fabric.

- Position the pocket units, face up, on top of the background fabric with the zip sliders facing each other. Align and match the bottom edge of the pocket units to the lower edge of the background fabric excluding the seam allowance at each end of the background fabric. There should be a narrow space between the 2 units at the center of the background fabric. Adjust and center, if necessary.
- Attach the pockets to the background fabric by sewing across the lower edge of the background fabric through the double layers of cloth.
- To separate the pocket cavities, edgestitch along the vertical seam on the pouch side of the pockets and back-tack at the top of the pocket opening.
Add Contrasting Trim:
Apply the banding (contrasting trim) while everything is flat for easy access under the presser foot. Also if using treated fabrics, it is generally not recommended to press the fabric or if absolutely necessary, use a low-heat setting and no steam with an iron. To keep turned edges in place, topstitch along turned edges.
- On the bottom edge of the side section of the bag, with right sides together, align a pair of contrasting strips of trim across the width of the background fabric parallel to the bottom edge, to make a banding that will cover and seal the lower edge of the pockets. The distance from the edge of the side piece to the strips is 1 1/4”. Using a narrow 1/4” seam allowance, sew 2 strips of fabric side-by-side across the width of the background fabric. Do not attach to the vertical seam allowances at each end as you can have a narrow space between them at the center.
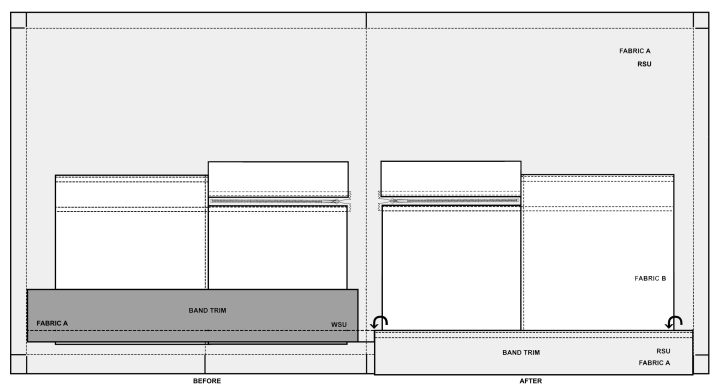
- Fold the strip of trim down, face side up, to cover the bottom edge of the bag’s sides. Sew a double topstitch along the folded edge of the banding.
- Sew across the banding at the lower edge of the background fabric using 3/8” as seam allowance.
- Across the top edge of the pockets and with right sides together, align a pair of trim strips across the width of the background fabric parallel to the upper edge of the background fabric, to make a banding that will cover and seal the top edge of the zip pockets while positioned a scant 1/4 from the pouch pocket openings. Using a narrow 1/4” seam allowance, sew 2 strips of fabric side-by-side across the width of the background fabric. Do not attach to the vertical seam allowances at each end as nd you can have a narrow space between them at the center.
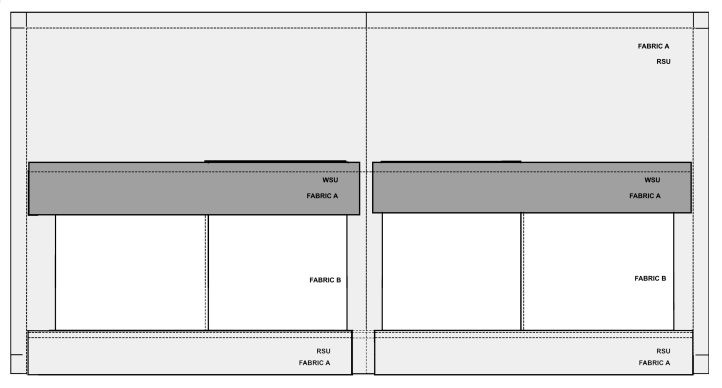
- Before making the banding, position the fascia piece, right side up, onto the face side of the background fabric. Align the lower edge of the fascia flush to the stitching line on the trim. Note: It is alright if the fascia piece hangs over the top edge of the background fabric.
- Fold the strip of trim face side up, to cover the fascia piece. Sew a double topstitch along the folded edge of the banding.
- Turn under 1/4” seam allowance on upper edge of banding and sew a double topstitch across the top edge of the banding to secure the fascia piece to the background fabric.
- Trim the top edge of the fascia flush with the top edge of the background fabric, if needed. Do not attach the fascia piece to the vertical seam allowances of the background fabric at each end.
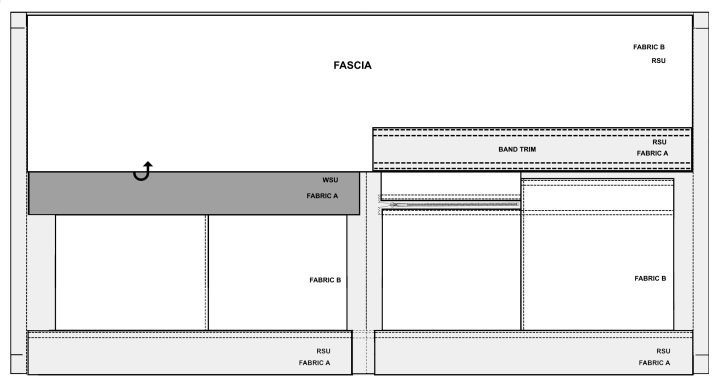
- Use a banding strip vertically to divide the bag’s side in half at the center of the background fabric and to cover the open sides of the pockets. Turn under a slant 1/4” seam allowance on the banding and crease the folded edges. Position the width of the band (1 1/2”) between the 2 zip sliders from top to bottom. Using a zipper foot attachment, edgestitch 1/8” from the folded edges of the banding through all the layers of material, then switch to a regular presser foot and do a second pass, 1/4” parallel to the previous row of stitching to complete the topstitching.
Closing the Side of the Bag:
We have reached the point where we can no longer keep the work flat. This next step will produce the 3-D shape for the bucket styling. The closing seam will be sewn on the exterior of the bag so that the interior cavity is seamless and cleanly finished.
- With wrong sides together, fold the background fabric in half width-wise and align and match the 2 sides of the rectangle together. Pin/baste the seam together and sew a vertical seam using a 3/8” seam allowance. This step will produce a cylindrical “tube” for the bucket bag. Crease the seam allowances flat.
- To hide the seam on the bag’s exterior, cover the seam allowances with a banding trim in the same manner as before. Turn under a slant 1/4” seam allowance on the banding and crease the folded edges. Position the width of the band (1 1/2”) equally on either side of the seam and close the open side of the pockets.
- Using a zipper foot attachment, edgestitch 1/8” from the folded edges of the banding through all the layers of material, then switch to a regular presser foot and do a second pass, 1/4” parallel to the previous row of stitching to complete the topstitching.
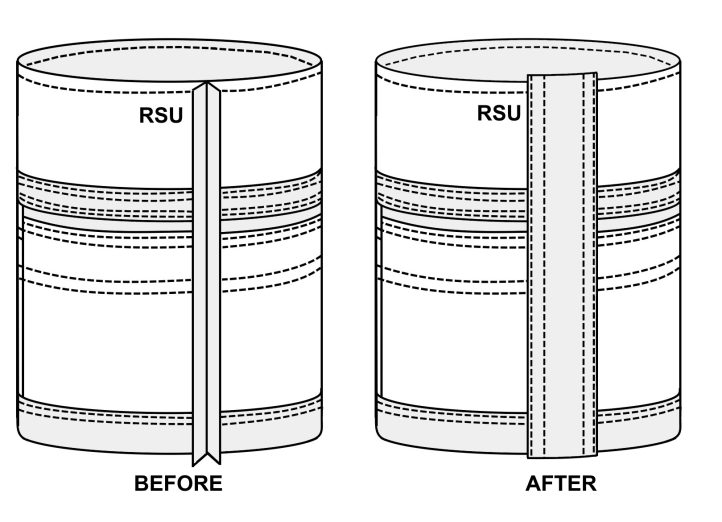
- At this point I prefer to use a longer length of banding as it is a tight fit beneath the presser foot. Turn the cylinder wrong side out and with the trim hanging over the edge of the cylinder, start to edgestitch the banding to cover the seam and inch your way forward keeping 2 or 3 inches flat in front of the needle. Work your way to the end and extend the trim over the edge.
- Turn the cylinder around and repeat step 3 for the other side of the banding. Then, switch to a regular presser foot and do a second pass, 1/4” parallel to the previous row of stitching to complete the topstitching.
- Turn the cylinder right side out and trim the ends of the trim flush to the background fabric. Set aside.
Making the Roll Top:
The closure for the wet bag is a flexible roll top with a single-pull or double-pull drawcord option. The choice is up to you. The project bag uses the double pull option.
For the Single Pull:
- Collect the single Roll Top piece and length of drawcord.
- With right sides together, fold the fabric in half width-wise and align & match the short sides of the rectangle together. Pin/baste the seam together and sew a vertical seam using a 3/8” seam allowance. This step will produce a cylindrical “tube” for the bag’s opening. Crease the seam allowances flat open, edgestitch 1/4″ parallel to the stitching through background fabric and one layer of seam allowance on each side.
- Divide the opening ends of the tube of fabric into quarters and do the same for the side of the bucket bag. With right side of the roll top to the wrong side of the background fabric together, align the roll top seam to the interior of the bag between the vertical band trim. Pin/baste around the circumference of the cylinder and sew through all the layers using a 3/8” seam allowance.
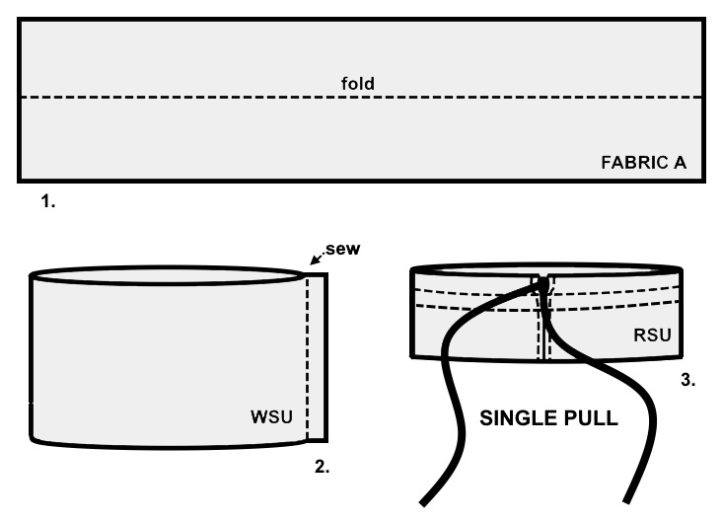
- Turn out the roll top section to increase the height of the bag. Turn under the seam allowance of the roll top piece and position the folded edge over the previous machine-stitching by folding the roll top lengthwise with wrong side together and matching the seam. Crease the fold flat.
- Edgestitch 1/8” along edge of roll top to attach it to the bag. Do a second pass, 1/4” parallel to the previous row of stitching to complete the topstitching and to produce a neat finish to the seam join on the roll top.
- Measure 1” from the fold at the top of the roll top and sew a double topstitch parallel to the fold to form a 5/8” casing for the drawcord.
- Undo the stitching in the roll top seam from the double topstitching to the fold of the fabric. Insert the cording through this opening and draw the cord through the casing until it reaches the opposite side. Pull the length of the drawcord evenly through the casing. Set aside.
For the Double Pull:
- Collect the 2 Roll Top pieces and 2 lengths of drawcord.
- With right sides together, match the short sides of the rectangles together. Pin/baste the seams together and sew a vertical seam using a 3/8” seam allowance on each end. This step will produce a cylindrical “tube” for the bag’s opening. Crease the seam allowances flat.
- Divide the long sides of the fabric into quarters and do the same for the side of the bucket bag. With right side of the roll top to the wrong side of the background fabric together, align the roll top seams to the interior of the bag at the vertical band trim. Pin/baste around the circumference of the cylinder and sew through all the layers using a 3/8” seam allowance.
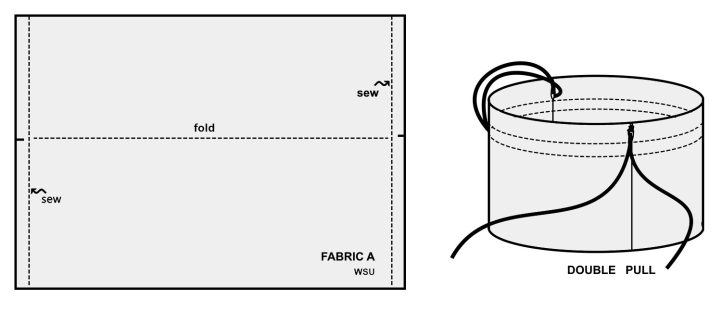
- Turn out the roll top section to increase the height of the bag. Turn under the seam allowance of the roll top and position the folded edge over the previous machine-stitching by folding the roll top lengthwise with wrong side together and matching the seam. Crease the fold flat.
- Edgestitch 1/8” along edge of roll top to attach it to the bag. Do a second pass, 1/4” parallel to the previous row of stitching to complete the topstitching and to produce a neat finish to the seam join on the roll top.
- Measure 1” from the fold at the top of the roll top and sew a double topstitch parallel to the fold to form a 1” casing for the drawcord.
- Undo the stitching in the roll top seams from the double topstitching to the fold of the fabric.
- Insert one cord through this opening and draw the cord through the casing until it reaches the other opening. Insert the cord through the second casing and pull the length of the drawcord evenly through the casing.
- Insert the second cord in the same manner as above but start and end through the second opening.
- Pull the length of each drawcord evenly through the casings with equal lengths of cord hanging. Set aside.
Attaching the Base of the Bag:
The 2 pieces of the base are sewn in tandem as a single ply and produces the shape for the bucket styling.
- Collect the 2 base pieces cut from the solid and print fabrics.
- Divide the circumference of the base into quarters.
- With wrong sides together, pin/baste the base pieces together at the four points.
- Divide the bottom edge of the bag’s cylindrical side into quarters. Clip notches into the seam allowance every half-inch to ease the seam allowance around the circumference of the base.
- With right sides together, pin/baste the cylinder shape to the circular base. At the locations of the vertical banding trim, insert the ends of the cording between the sides and the base.
- Using a zipper foot attachment, sew a 3/8” seam around the circumference of the bag and ensure that the ends of the cording are caught in the stitched seam. Try to flatten the cord ends as much as possible and gently walk the machine needle over the bulkiness in the seam.
- Use bias tape to encase the raw edge of the base with a bias bound seam finish. The bias tape is applied to both seam allowances and wrapped over the raw edge of the cloth. When doing this, keep in mind the number of layers in the seam so that the seam doesn’t end up too thick. Sew the bias tape parallel to the circumference seam for a neat finish and double-stitched for strength.