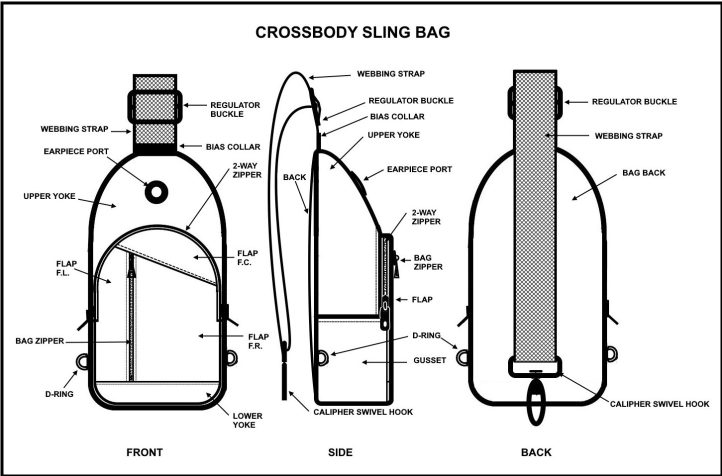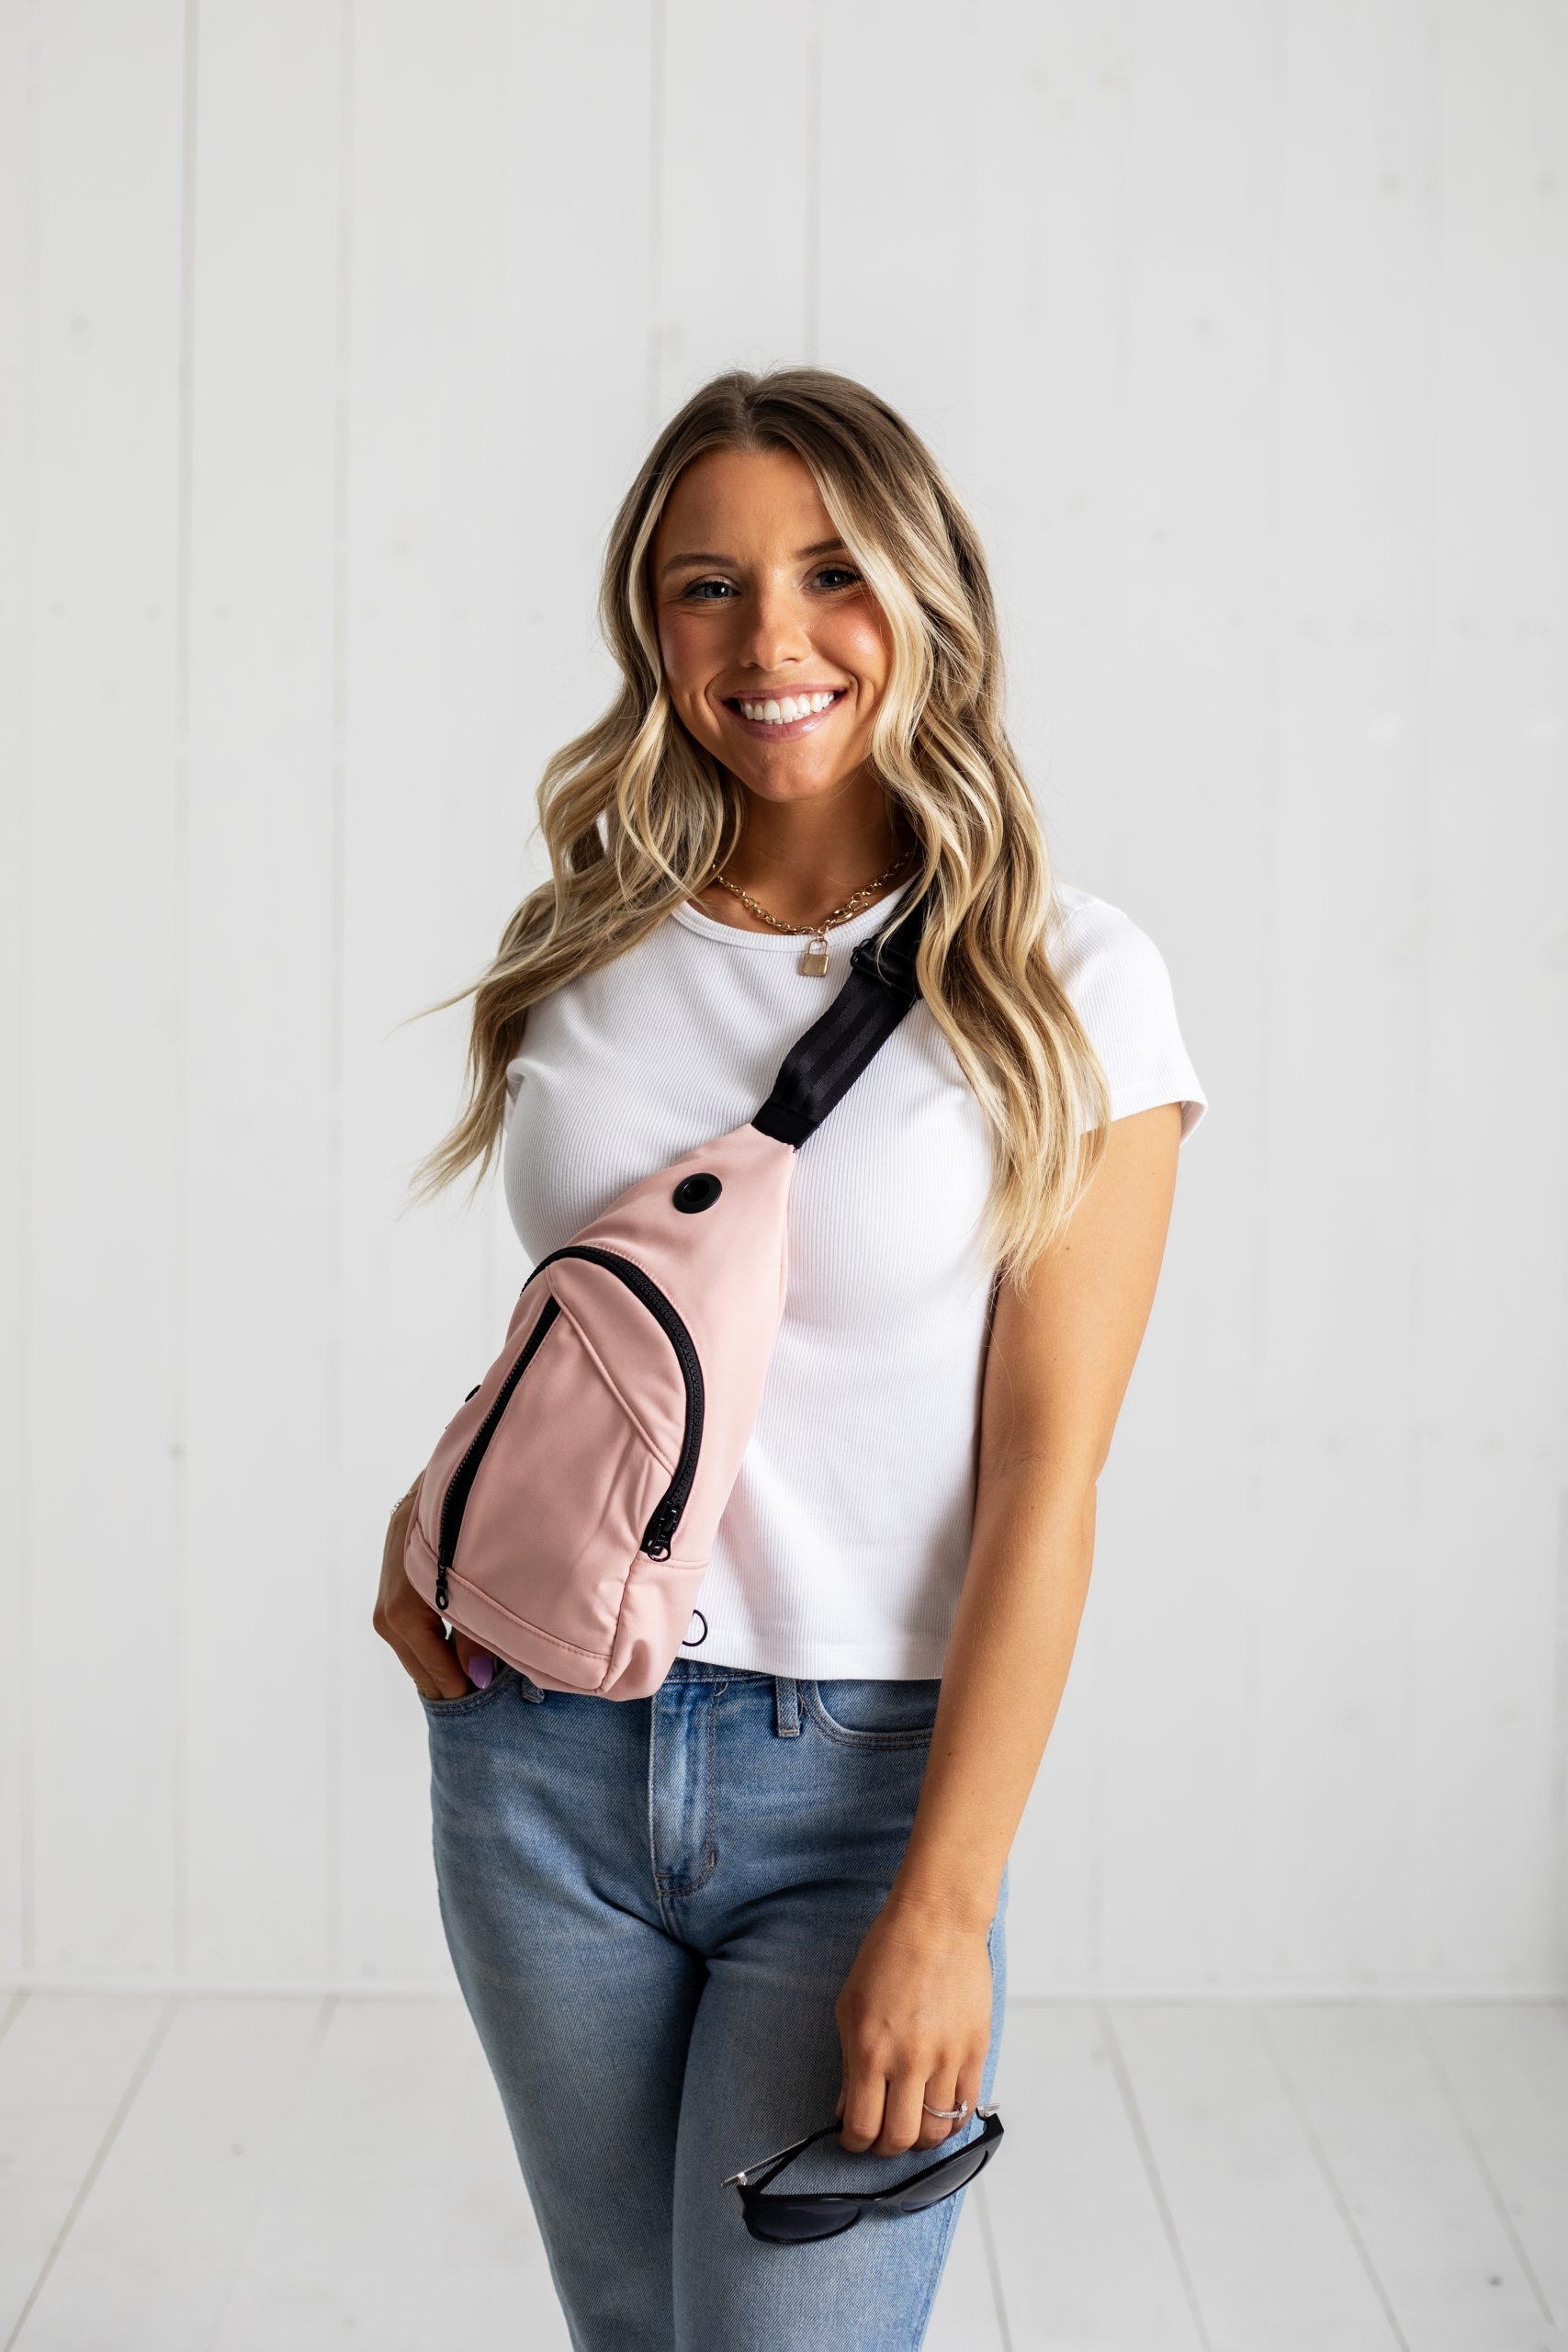
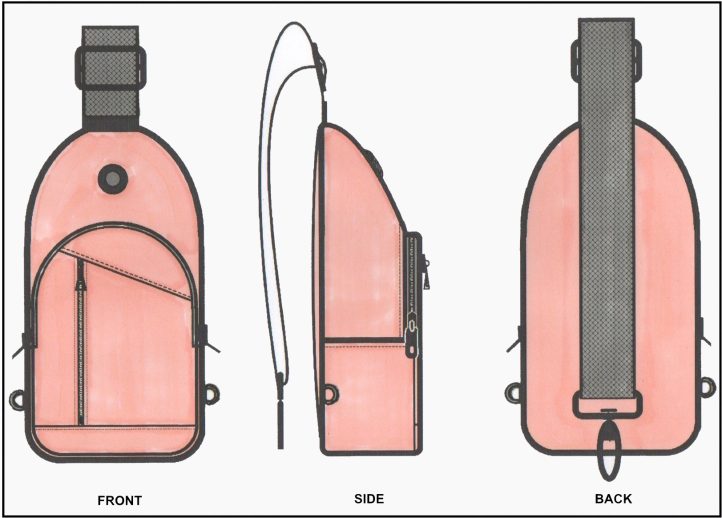
We’ve been spotting crossbody bags everywhere lately, which is why we can’t wait to share this sporty bag pattern from Don Morin. Made in blush pink, this unisex bag pattern features an adjustable shoulder strap and hardware in a sharp, contrasting black. This small bag pattern has a large carrying capacity and can hold all of your everyday essentials for your daily commute.
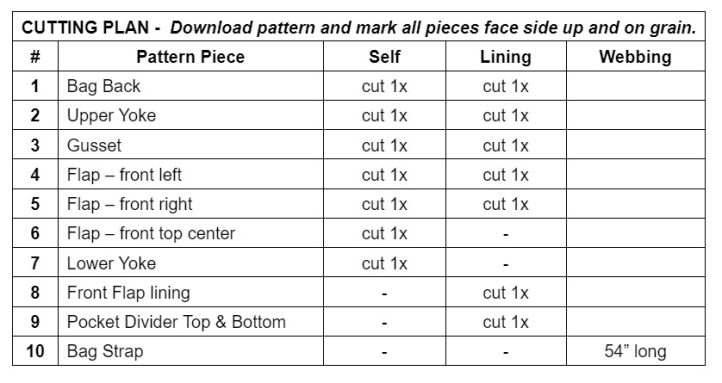
Skill Level: Intermediate (many small pieces/parts)
Finished Dimensions: 6.5″ wide x 2.5″ deep x 11.5″ height. The adjustable shoulder strap length is 25 inches and spans to 50 inches.
Seam Allowances: 3/8-inch (10mm)
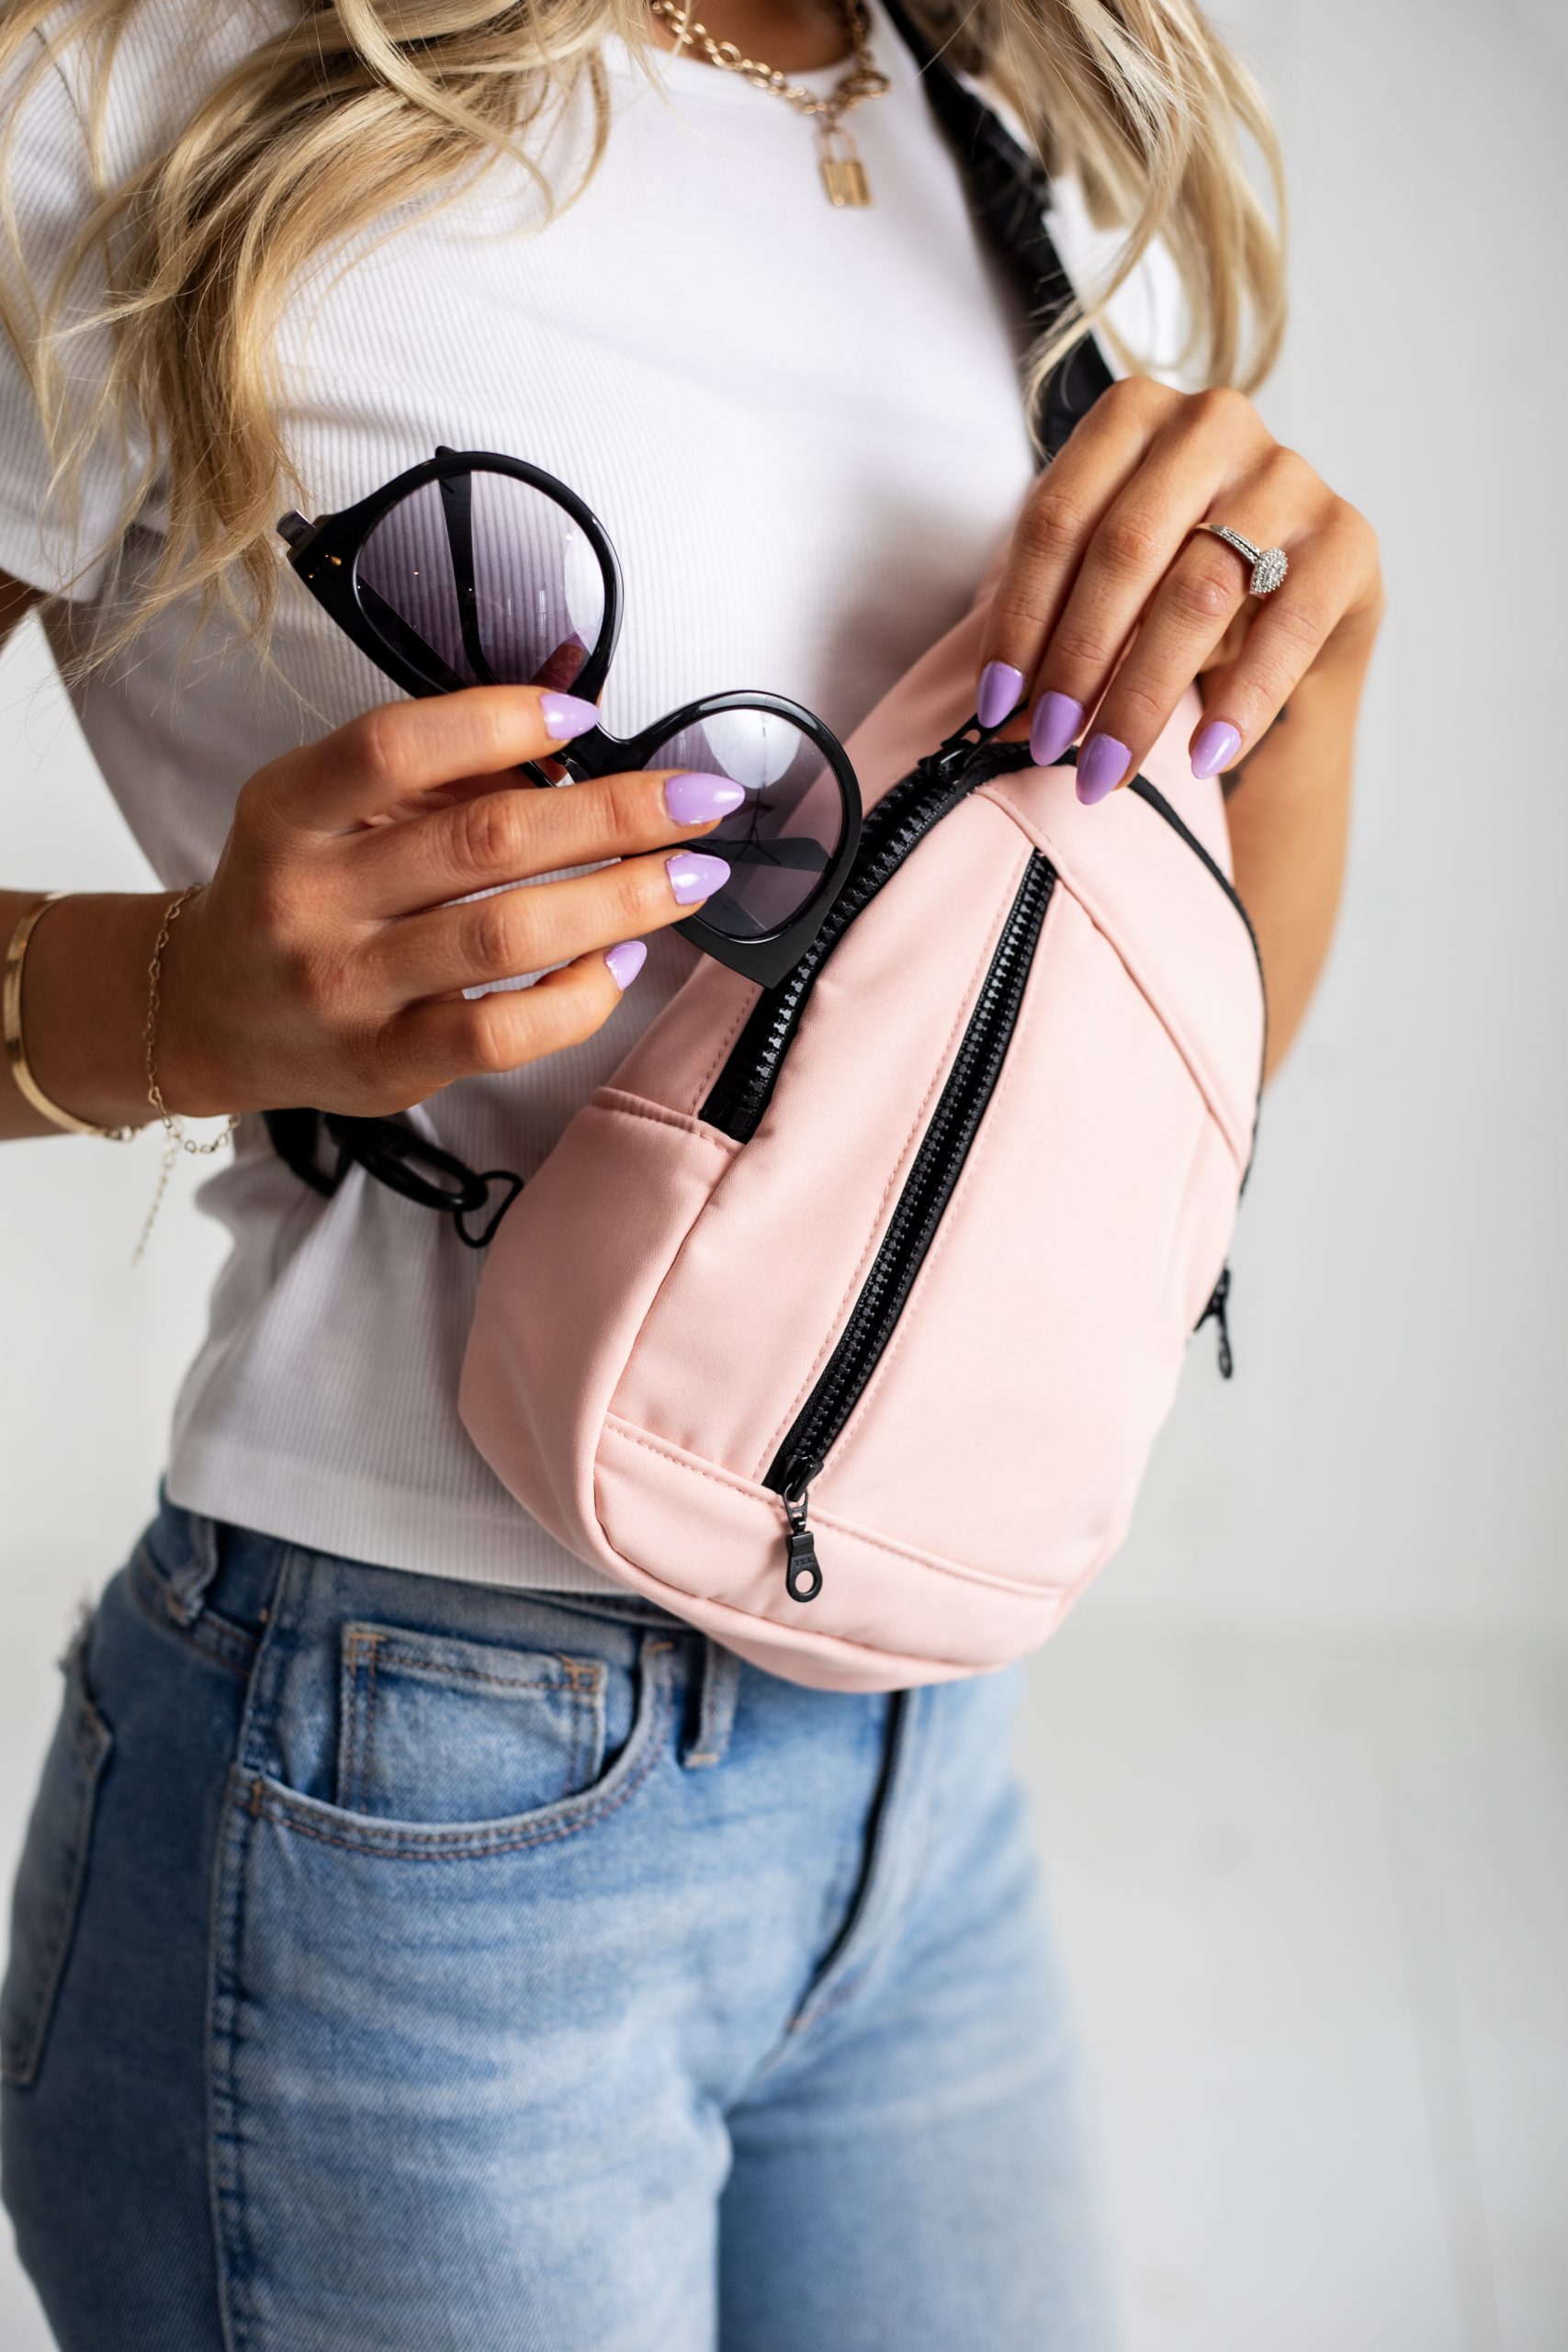
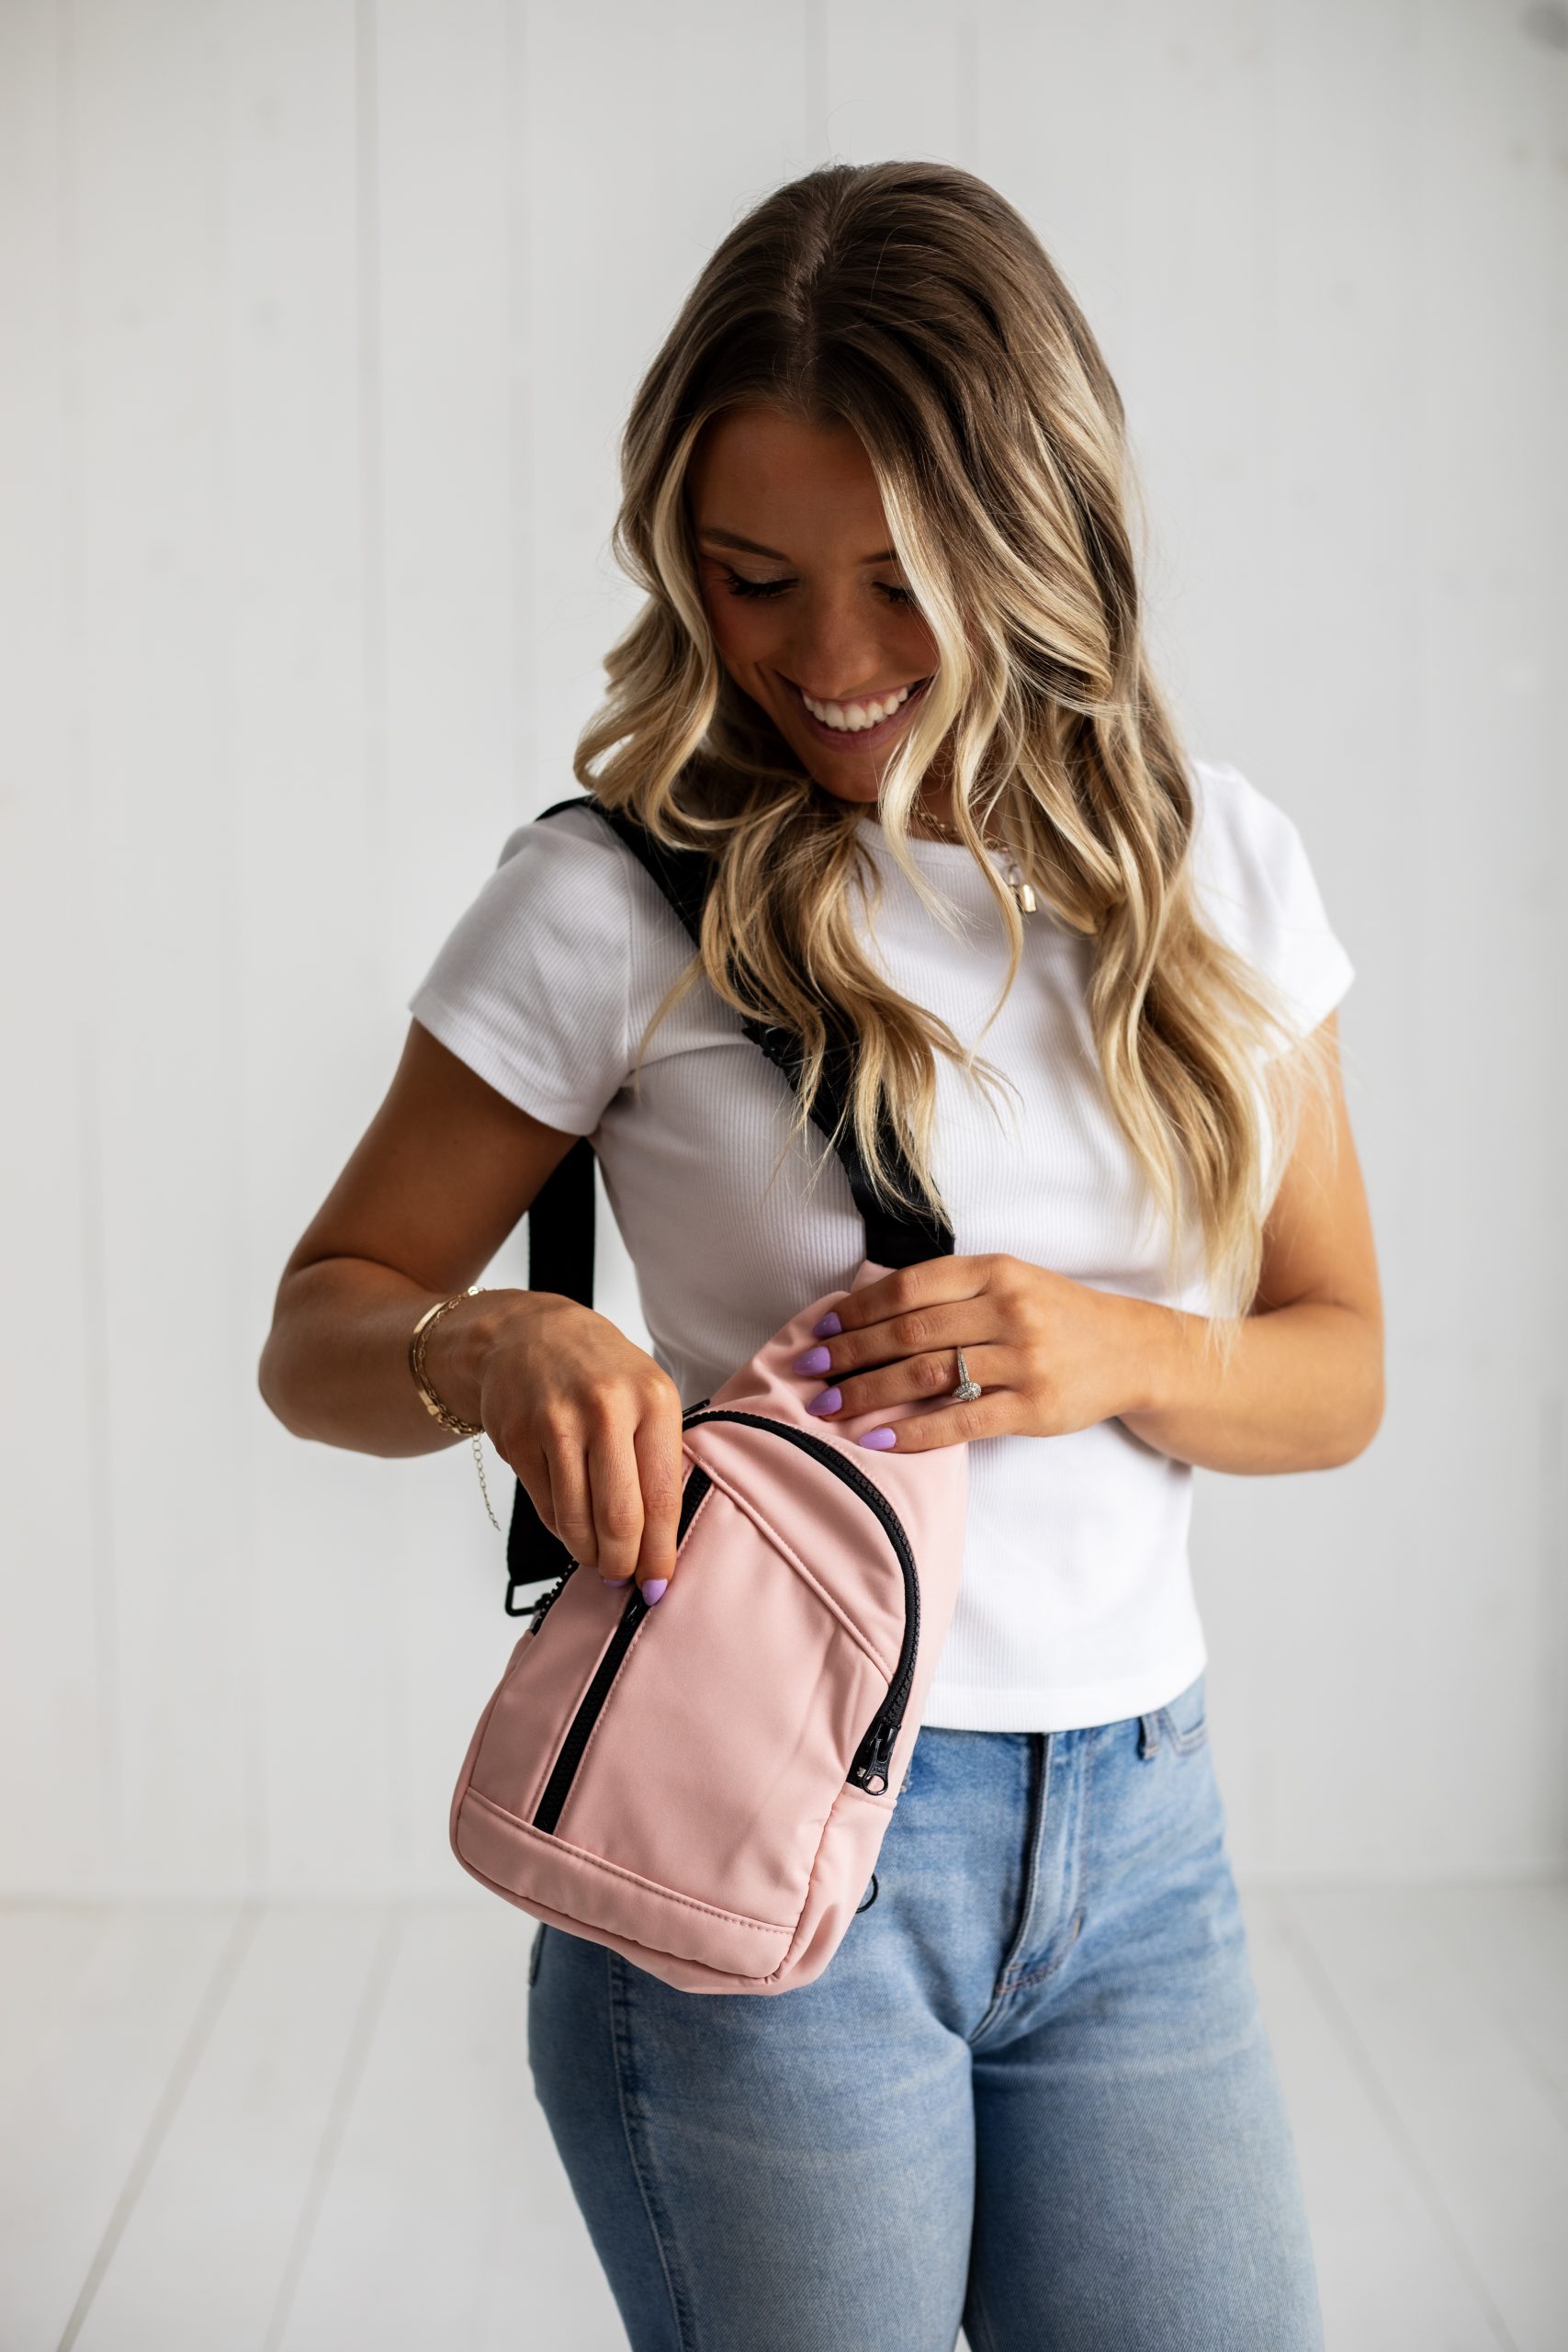
Small in size yet large in capacity, this unisex crossbody sling bag is a must-make for your next sewing project. Featuring durable construction with storage compartments large enough that you can fit all of your on-the-go must-haves inside. Such as iPad mini, cellphone, keys, transit card, power bank, spare socks/mitts and other daily essentials, it’s ideal for your daily commuting and travel.
The adjustable shoulder strap makes the bag easy-to-carry and hands-free, latching onto D-rings at the sides to wear either over the shoulder or across the body, while providing easy access to your frequently used items, plus an anti-theft earpiece porthole on the top of the storage compartment for you to enjoy music anytime, anywhere.
Materials:
- 1/2 yard (45.5 cm) bonded fabric for the bag exterior, 55” wide (140 cm)
- 1/2 yard (45.5 cm) broadcloth or percale for the bag lining, 55” (140 cm)
- 1 1/2 yards (137 cm) of nylon webbing for the strapping, 1 1/2” wide (38mm)
- 2 yards (183 cm) of single-fold bias tape, 1/2” wide (12.7 mm)
- 1 yard (91.5 cm) of twill tape, 3/8” wide (10mm)
- 7” (18 cm) of elastic, 1/2” wide (12.7 mm)
- 1 separating 2-way zipper, 12” long or longer (30.5 cm)
- 1 closed pocket/bag zipper, 6” long (15 cm)
- 1 closed invisible zipper, 8” long (20 cm)
- 2 metal end-stops or 2 sets of hook & bars, 1/4” wide (6 mm)
- 1 spool of all-purpose thread, color-matched
- PDF Pattern – This is located at the bottom of this page. Please see printing instructions below.
Hardware:
- 1 regulator slide buckle, 1 1/2” inner dia. (38mm)
- 1 calipher swivel-hook, 1 1/2” inner dia. (38mm)
- 3 mini D-rings, 1/2” inner dia. (12.7 mm)
- 1 plastic grommet with backing plate, 9/16” inner dia. (14 mm)
PRINTING INSTRUCTIONS:
Note: To download the pattern, click on the pattern download button at the bottom of the page. We recommend opening your pattern download using Adobe Acrobat.
SOURCING MATERIALS AND BAG HARDWARE:
When it comes to crossbody sling bags, the foundation materials are fundamental. The most beautiful design will crumple if forged from a cheap polyester and the most elegantly designed silhouette will fall short if crafted with the wrong textures. Generally though, any durable fabric can be used to sample for this project. Different types of bag materials for the exterior of the bag are available for an array of styles so being familiar with options is beneficial. Use fun fabrics to give this bag a wow factor.
Nylon – Flexible and Affordable
Nylon is one of the most common materials carrying bags are made from. An economical fabric option made from a thermoplastic silky polymer, nylon crossbody sling bags are a great option for fashionistas looking to stay on a budget. This highly flexible fabric can easily hold its shape, while still being flexible and bearing weight. However, when it comes to longevity, these kinds of bags often have a short shelf life. Backpacks, athletic bags, and more affordable handbags are all commonly made from nylon.
Canvas – Perfect Choice for Daily Use
Canvas (cotton, bamboo, or hemp), is actually a type, not a particular fashion fabric. This material is most commonly made from natural fibers and patterned in a plain-weave style. It’s extremely durable, easy to water-proof, and flexible. When considering what material is used to make bags, canvas is the right choice for those that will see heavy daily use. It’s no wonder that tote bags and reusable grocery bags are most commonly made from canvas. And, as crossbody sling bags have been a major trend recently, fashion houses are experimenting with canvas to make more interesting shapes and patterns to sample for your creativity.
Bonded Fabrics – Heightened Durability and Sophistication
Bonded fabric is the result of merging two fabric layers and adhering them together using lamination techniques. This fusion imparts heightened durability and improved adaptability to the material. This versatile method finds application across various product types and color palettes, including the production of crossbody sling bags.
Typically, this process is employed when a product necessitates a robust outer fabric coupled with a softer, more comfortable, flexible, or moldable inner fabric. Typically, these backings are interlock (knit) or felted cloth (non-woven) and act as a stabilizer that makes the fabric more stable and firm so that it retains its shape better. Many of these bonded textiles have a Martindale of 20,000 which indicates the wear resistance of the fabric. The higher the Martindale, the more durable the fabric, which is great news for any robust bag-making material. Add to this, that many bonded fabrics have been certified according to STANDARD 100 by OEKO-TEX®, it is therefore not harmful to you and your health and has less environmental impact.
The objective of utilizing this type of bonded fabric into your design is to imbue items with a quality that fills and permeates the whole design. This implies that, beyond aesthetics, the resultant product enjoys an extended lifespan.
Interior Lining and Storage
To hide all of the construction seams, add support for interior storage, and to neaten the main compartment’s interior, a lining fabric is used. Seek out light-weight yet durable fabrics that compliment your exterior fabric choices. Options are nylon cordura, percale pocketing, simplex mesh, or any high-thread count broadcloth to name a few. Lined interiors offer added protection for the contents of the bag, as the lining material acts as a barrier between the exterior and the items inside. This is particularly important for delicate items like laptops, books, and important documents. A lined interior can also help to reinforce the structure of the bag, ensuring its durability over time. As a bag maker, you can customize the interior to serve all your needs.
Color-wise, the exterior and interior do not have to match though they can if you wish it. When I’m designing a bag, I often follow this recommendation: subtle exteriors get colorful linings and colorful exteriors get somber linings. In that way, no two will clash with each other and it always puts a smile on your face when you use it.
Interior pockets and bag linings go hand-in-hand. Many people leave out pockets because they add several more steps. They require additional planning, cutting and sewing. If the pockets have zippers that is even more time and material. That being said, this is your opportunity to customize the bag to fit your own needs such as organization or security. Bag linings with storage compartments, especially strategically placed pockets are far more preferred than bags without pockets. If a bag doesn’t have pockets, many people will not even consider it as an option. Bags do not need 10 pockets or anything, but even just two well-planned, well-placed, well-sized pockets will take a bag to the next level. Besides, everyone always loves a secret pocket!
It’s always a good idea to make a wish list of all the different features you like in a bag style and implement some of those ideas when you making your own bag design.
Bag Hardware
When selecting hardware for DIY bags, I always try to match the hardware color and finish with my bag zippers to give a sense of continuity and harmony to my overall bag design. Start with the metal and plastic fittings of the zippers being used. There are many options available: nickel, brass, gold copper, pewter, rose gold, etc. for zipper teeth and head sliders colors to choose from. Plus, different metal finishes like polished, matte, antiqued, satin, chrome, brushed, etc. for the metal surfaces. This is often my starting point in choosing the rest of the hardware for my bag design. Plastic and coil zippers offer another approach… color options for accents and trims. Many plastic and coil zippers are available in a variety of fashion colors. Here is an opportunity to add eye-popping accents for a modern fashion look. While we’re on the subject of zippers, get high-quality zippers for smooth operation and durability to add to pockets, sleeves, and storage compartments to provide anti-theft/security element to your design. Most often, you’ll find them in the notions department of your favorite sewing supply dealer, leather-craft supply sources, and luggage repair centers.
Once you have the zippers selected, choose the remaining hardware such as, caliphers, swing latches, regulator buckles, adjustable slide buckles, D-rings, O-rings, rivets, dome snaps, grommets, etc. to coordinate with your selection. Also, keep in mind that the inner diameter of the hardware must fit the width of the strapping used, which leads us to bag straps options, namely webbing.
Bag Strappings
Webbing is a strong fabric woven as a flat strip or tube of varying width and fibers. It is a versatile component used in bag and luggage manufacturing, automobile safety, towing and load-securing, plus many other fields. It may be made of hemp, cotton, or linen, but also synthetic fibers such as nylon, polypropylene, or polyester. Webbing can also be made from exceptionally high-strength materials, such as Dyneema™ and Kevlar™. Webbing is light-weight yet strong, with breaking strengths readily available in excess of 10,000 pounds-force (44 kilonewtons). Webbing is often used for outfitting with various forms of attached hardware to extend its range of abilities (and create a carrying strap). This hardware can take the form of:
- End fittings (caliphers, swivel-hooks, flat hooks, etc.)
- Fasteners (rivets, dome snaps, grommets, etc.)
- Buckles (slide buckles, regulator buckles, interlocking buckles, etc.)
There is also hardware associated with the various end fittings to attach them to a surface, such as footman’s loops, square brackets and D-rings fittings. While webbing sizes in general are standardized, buckles in general are proprietary. Therefore, if one part of a buckle breaks (i.e. female or male end) both parts usually have to be replaced (female and male end). When choosing webbing to act as bag strapping, keep in mind that the width of the webbing must fit into the inner diameter of the bag hardware and vice-versa. Color-wise, webbing is available in many fashion colors, so choose a solid or a pattern that compliments your color palette or take your cues from the color of the zippers.
Designer Note: For the prototype model, I used a water and dirt repellent Softshell™ with a felt backing in old rose; Stoff & Stil™ cotton broadcloth in black for the bag lining; and, Selfmade™ nylon webbing in black for the bag strapping. For the bag hardware, I used YKK™ bag zippers for the exterior and a coil invisible zipper for the interior; mini D-rings, calipher swivel-hook, & regulator slide-buckle, all in black matte finish, and a round plastic loop grommet in black for the earpiece porthole.
MARKING AND CUTTING:
TECHNIQUES USED IN THIS PROJECT:
Bias Bound Seam Finish:
A Bias Bound Seam uses bias tape to encase and finish off a seam edge. The bias tape can be applied to both seam allowances separately (a pressed open seam) or to both seam allowances at once (a seam pressed to one side). This project uses this finish and applies the bias tape to both layers of the seam allowance at once in its bag lining. When doing this, keep in mind the number of layers in the seam so that the seam doesn’t end up too thick. Keep the outer layers uniform and reduce any bulk within these two outer plies.
The width of bias tape you use is up to you. For this project, I have used a 1/2-inch single-fold bias tape. You can use purchased commercial tape or make your own. Either way, make sure you pre-shrink your bias tape. The last thing you want is for your tape to shrink AFTER you’ve put it on all your seams! If you are making your own tape, wash the fabric before you make the tape to sort out any shrinkage.
Sew your seam as you usually would, typically sewn right sides together. If following a pattern, use the seam allowance given in your instructions. You want the width of the bias tape to be less than your seam allowance. I have used a 3/8″ (10 mm) seam allowance. You may grade or trim the seam allowances to fit.
The finishing of the lining is with the lining fabric face up and seam allowances sewn together, press the seam to one side. Take the bias tape and fold under the ends to neaten, then wrap the bias tape around the seam allowance. Pin parallel to the seam. If one side of your bias tape is slightly wider than the other, put the wider side underneath. Sew along the bias tape close to the edge, catching both plies (halves) of the tape at the same time to complete.
Under-Stitching:
Under-stitching is a line of topstitches that is sewn close to the edge of a facing or lining to keep it from rolling toward the outside. It comes in especially handy when sewing around an opening, such as a neckline or a pocket opening. It keeps the facing or lining firmly on the inside of your garment without any stitches showing on the outside.
As this stitch is part of the topstitch family, the stitching is done on the face side of the cloth facing or lining. The difference is that you are sewing only through 1 ply of cloth and its seam allowance beneath it; whereas with topstitching, you are sewing through 2 layers of cloth and its seam allowances from the face side of the garment.
Refitting a Zipper:
Chances are that obtaining a bag zipper in the color, finish, and length that you need for your bag design is not available from your supplier. That is why in mass-production, the bag manufacturers make their own zippers. You can do the same by refitting a purchased zipper.
Purchase a high-quality bag zipper (RiRi™ or YKK USA™) that glides smoothly and is a little longer in length than what you need. Look for any special features such as reflective zipper tape, 2-way sliders, or head-to-head sliders, etc., whatever you desire. Most times these zippers are offered as separating zipper styles for outerwear. Check with your supplier if they stock metal end-stops or zipper repair kits. They are handy to have to keep the ends of the zipper secure so that the head(s) do not slide off.
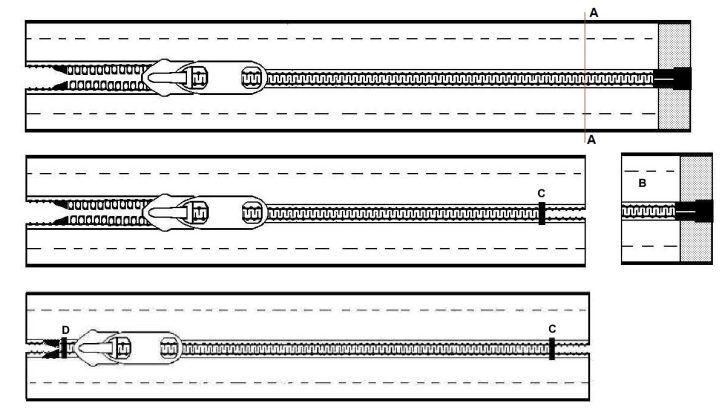
- Measuring from the top of the zipper downward, mark the finished length needed (A). This is the placement point for the new end stop – (if you don’t have a metal end stop, use a metal bar from a hook and bar set, put in a couple whip stitches right by the metal bar to keep the open end closed.) Ensure that the head slider(s) are located on the zipper chain (teeth) before attaching the end stop.
- The end-stop resembles a pronged metal staple (C). Place the end-stop across the width of the zipper teeth and push the prongs into the zipper tape from the face side of the zipper. Fold back the prongs on the back of the end-stop with bent-nosed pliers to flatten. Alternatively, if you do not have an end-stop, use the bar component from a hook and bar set and place the bar across the width of the zipper teeth and sew it in place on the face side of the zipper tape to block the head slider from slipping off. Hook and bars sets are available in black finish and in many different widths and sizes.
- Trim the zipper tails off (B) allowing for seam allowances so they are just beyond the metal stops at the end of the zipper and discard. Remove excess teeth from the zipper tape with nippers so as to not break any sewing needles later in the assembly.
- You may apply this method, if you are using a length of zipper chain and making your own zipper from scratch, to the open end of the zipper (D) if you wish to close both ends but it is rarely required on a purchased zipper as there are already end stops in place.
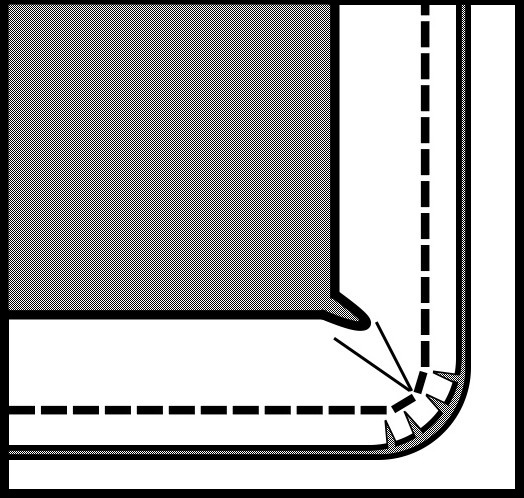
Application of a Gusset:
People naturally want to match raw edges perfectly when pinning, but that doesn’t work very well for three-dimensional things, like this crossbody sling bag.
Here is how to sew a curved edge into a straight edge. The raw edge of the curved corners on the bag will be longer than a straight edge of the gusset piece that’s sewn to it. However, that is not actually true. If you measure the stitching line on either piece, they are equal, that is, they are the same length. What makes the curved edge longer than the straight edge is the allotted seam allowance, thus making it tricky to install when assembling the bag’s gusset(s).
If you are having trouble getting panels of any bag to fit together, first make sure your pattern pieces are printed correctly. Then, start over and take the three-dimensional factor into account.
Some people prefer to lengthen the straight panel (gusset) to be able to fit the raw edges of the curved panel (main panel) and be easier to pin together. This is okay, however the straight panel will end up being a little “poofy”, as it will gather to match the shorter seam line length of the curved panel. I suggest sewing the pattern as it was designed.
First, pin the gusset to the main panel, pinning first at the center notch and pinning the ends in place. Continue to pin along only the straight edges of the main panel, matching edge for edge (there is no fiddling for these points) until you reach the rounded corners.
At this point, snip slightly into the seam allowance of the straight (gusset) panel to release the tension in the seam allowance, if needed.
Remember, this is a three-dimensional thing you are making. So, tuck the main panel inside the gusset, matching the raw edges and pinning as you go. The raw edge of the main panel will ruffle, that’s okay, as long as there are no tucks at the seam’s stitching line.
When I sew the layers together, I like the piece with the curves to be on the bottom feeding into the machine. The feed dogs naturally gather fabric just enough to help prevent puckers. But either way is okay. You will see the pieces fit perfectly at the seam line, while the seam allowances (raw edges) are clearly a different length.
MACHINE SET-UP:
Design Note: This project was sewn on a conventional home sewing machine. However, no two fabrics sew alike. I recommend doing a test swatch using your fabric selection sewn on your sewing machine. Use this machine set-up as a guide and adjust accordingly. Look over your results. Check both sides of the fabric. Stitches should lay flat against the fabric and neither pull nor pucker the fabric. You shouldn’t see any loops of loose thread. Adjust stitch length and thread tension appropriately if you spot issues. Your sewing machine’s manual will have specific directions on adjusting stitch length, stitch style, and thread tension. You may even want to sew a mock-up sample of the bag before you cut into your fabric, if you have a limited amount or if it was costly.
Attachments: Zipper foot
Machine Needle: Universal #80 (130/705H)
Stitch Length: Straight stitch – slightly longer than average (4 of a possible 5)
Thread Tension: Normal (4 of a possible 9)
Thread Type: All-purpose sewing thread (wt. 50) or matching the fiber content of your fabric.
Additional Tools: Along with a sewing kit, you may need bent-nosed pliers and end nippers to refit a purchased zipper; an awl or leather punch comes in handy for applying the grommet.
Instructions:
ASSEMBLY:
Design Note: Follow the sequence of operations when constructing this project as some steps need to be done before completing others. The important thing to remember about the order of operations is that you want to keep all the project pieces flat for as long as possible. This makes each of the sewing processes easier to manipulate under the presser foot and to complete on a domestic machine.
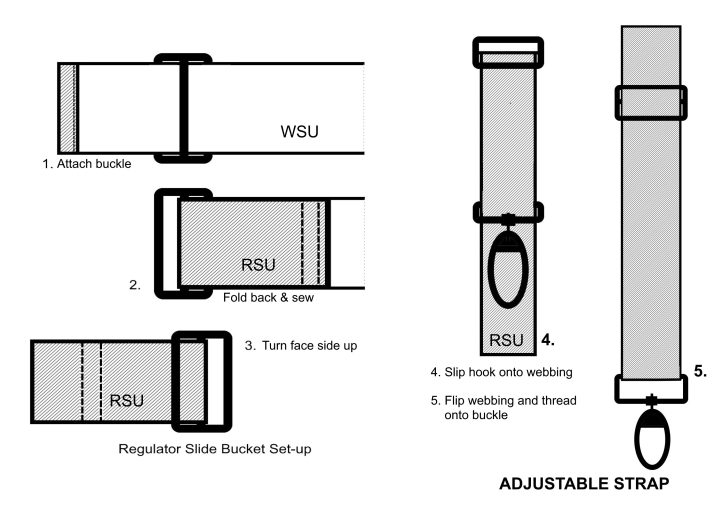
Make the Bag Strap:
The adjustable shoulder strap length is 25 inches long and spans to 50 inches via the regulator buckle. A calipher swivel-hook clasps onto D-rings at the sides of the bag, which allow the user to wear the bag either on the right or left of the body. You can use it as a shoulder sling bag, or a crossbody sling bag by adjusting the strap.
- To make the bag strap, gather the webbing, bias tape, regulator buckle, and calipher swivel-hook.
- Cut the webbing to length (50”) plus 4 inches (2”overlaps at each end).
- On one of the short ends of the webbing, wrap a piece of bias tape, with its cut sides turned under, around the webbing to encase it and neaten the raw edge. Sew the bias tape in place through the thickness of the strap.
- Slip the webbing onto the regulator buckle, lacing the strap under and over the sliding center bar of the buckle, and then fold it back on itself to align with the width of the webbing. The amount to fold back should be minimal: short enough to encase the buckle without too much slack but long enough to get under the presser foot. Sew through the double layer of webbing to attach the buckle in place.
- From the opposite end of the webbing (open end), slide on the calipher swivel-hook.
- Flip the webbing over and take the open end of the webbing and loop it through the regulator buckle to produce a closed loop of webbing with a swivel-hook attached to it.
- Draw up on the webbing to fold it in half (~25” long) allowing for an overlap (~2”) beyond that of the regulator buckle. This extension will later be attached to the top of the bag. Set aside.
Prep The Small Parts:
For D-rings:
- Gather together 3 D-rings and twill tape.
- Cut 3 lengths of twill tape approximately 2 inches long.
- Wrap the twill tape through a D-ring and fold the tape back onto itself.
- Sew as close as possible to the D-ring to produce a sewable tab fastener on the D-ring.
- Repeat for remaining D-rings and set aside.
For Refitting Zipper: (review notes above)
- Gather together purchased separating zipper and metal end-stops (staple).
- Measure length needed to bag opening and insert end-stop across zipper teeth and fasten in place.
- Allow for a seam allowance and cut away excess. Use nippers to cut away any zipper teeth remaining on the zipper tape beyond the end-stop. Zipper is ready to be inserted. Set aside.
Make Interior Pocket and Divider:
In the main storage compartment of the crossbody sling bag, the interior cavity has a divider panel with a zippered inset pocket attached to the back lining of the bag. The panel allows for a division of organized space, while the zippered pocket produces a secured “secret” pocket running the width of the bag for additional storage.
- Gather together pocket lining and 8” coil zipper.
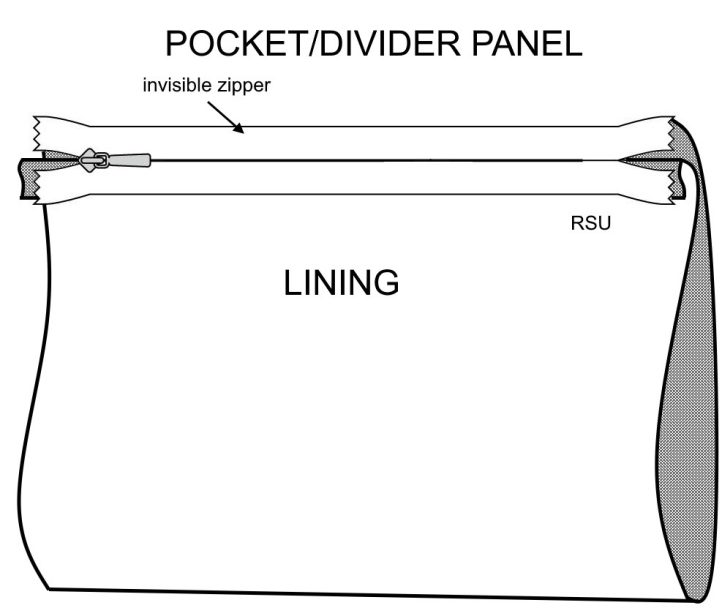
- With wrong sides together (WST), align and center zipper, face side up (FSU), to wrong side of cloth, across the width of the fabric. Pin/baste zipper tape in place and sew zipper tape to the fabric. Trim away seam allowance and fold back zipper onto the right side of the cloth. Press flat.
- Top-stitch zipper tape to face side of fabric to encase the raw edges.
- Repeat the above steps for the opposite side of the zipper to produce a closed “tube” of fabric. At the topstitching stage, open the zipper so that you can set it flat under the presser foot.
- With face sides up, flatten the tube along the edge of the zipper. Press flat along the top and bottom of the pocket.
- Reinforce the top edge of the pocket by topstitching the outer portion of the zipper tape from one side to the other. Set aside.
Make Front Flap:
The front flap of the crossbody sling bag attaches to the front edges of the gusset and to the zipper opening of the main compartment to form the front of the crossbody sling bag. Within the front flap, there is a vertical zippered slot pocket. With many of the seam construction in this project, each seam receives two passes under the presser foot therefore producing reinforced seams resulting in a more durable construction.
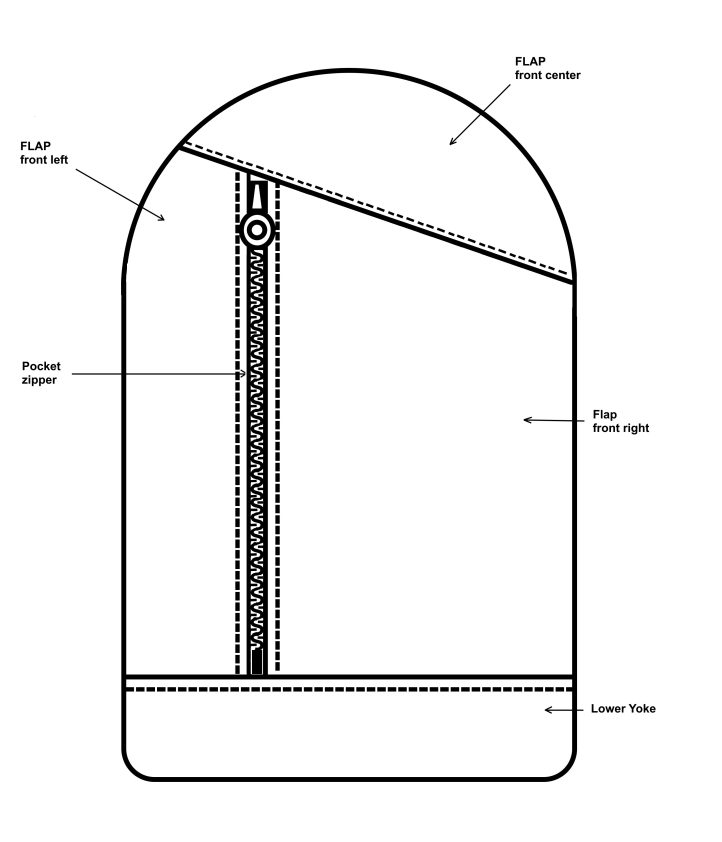
- Gather together the front left flap piece and lining, the front right flap piece and lining, the front center piece, the lower yoke piece, the front flap lining, and a 6” bag zipper.
- With RST, align and match the zipper (face down) from the bottom, upward, on the front right flap piece. Allow the zipper tape to go beyond the end of the seam, if needed. Pin/ baste in place. Sew close to the teeth of the zipper.
- Flip the work over and with RST, align and match the front right lining to the front section. Pin/baste in place. Follow the previous row of stitching that was laid down and sew the lining in place.
- With face sides up, fold back the lining and press flat. Understitch the lining to the seam allowances. Note: If the seam allowance is too bulky, grade the seam allowances.
- With face sides up, fold back the front right section of the flap (self and lining are WST) and topstitch along the seam through all layers.
- With RST, align and match the zipper (face down) from the bottom, upward, on the front left flap piece. Pin/ baste in place. Sew close to the teeth of the zipper.
- Flip the work over and with RST, align and match the front left lining to the front section. Pin/baste in place. Follow the previous row of stitching that was laid down and sew the lining in place.
- With face sides up, fold back the lining and press flat. Understitch the lining to the seam allowances. Note: If the seam allowance is too bulky, grade the seam allowances.
- With face sides up, fold back the front left section of the flap and topstitch along the seam through all layers.
- With RST, align and match the front’s lower yoke (held up-side-down) to the bottom edge of the zippered section of the front flap. Pin /baste in place and be sure to include the pocket lining. Sew across the width of the flap.
- With RST, align and match the flap’s front center section (held up-side-down) to the upper edge of the zippered section of the front flap. Pin /baste in place and be sure to include the pocket lining. Sew across the width of the flap.
- With WST, align and match the front flap to its lining all round its perimeter. Pin/baste the sides between the horizon seams. Fold back the upper section of the flap and sew the diagonal seam next to the previous row of stitching. Do the same for the lower section of the flap. Fold back the lower yoke and sew across the width following next to the previous row of stitching. With this step, a lined pocket is produced.
- Lastly, topstitch through all layers along the lower yoke of the front flap and the diagonal center section at the top of the front flap. Set aside.
Insert Zipper Onto Upper Yoke:
The upper yoke creates the top section of the crossbody sling bag’s front. It has an earpiece porthole (grommet) at the top that allows the cord from an earpiece to insert into the bag and connect with a digital audio player for you to enjoy music without being on display. The 2-way head slider zipper is mount to the yoke as a secure way to enter the main compartment of the bag and provides flexibility to make it easy to wear, hands-free, and whether you prefer wearing it on the right or left side of your body.
- Gather together the upper yoke piece, yoke lining piece, plastic grommet, and 2-way zipper.
- With right sides together (RST), place the zipper, face side down, on the bottom face edge of the upper yoke. Center the zipper and align and match the zipper tape to the raw edge of the cloth. The ends of the zipper should match up with the horizontal seam allowances.
- Pin/baste the zipper in place and sew close to the teeth with the aid of a zipper foot attachment.
- With RST, align and match the upper yoke lining onto the upper yoke so as to encase the zipper between the two layers. Follow the previous row of stitching, just inside the seam, to attach the lining in place. (Note: If the concave curve buckles under the strain, snip into the seam allowances to relieve the stress, as needed).
- With face side up, understitch the lining to its seam allowance.
- With wrong sides together (WST), align and match outer edges of the upper yoke and its lining to reveal the zipper. Topstitch through all layers to partially complete the zipper installation. (Note: The exposed tape on the opposite side of the zipper will become the seam allowance for attaching the zipper to the front flap and makes up the width of the gusset).
- Pin/clasp/baste the outer edges of the upper yoke and the lining together following its shape as that it lies smooth and acts as a single unit.
- Mark location of plastic grommet for earpiece port and cut out a hole through the outer fabric and lining. Whipstitch around the opening to secure the 2 layers together. Separate the plastic grommet in two pieces and insert the top half on the face side of the yoke and snap/twist the back half onto the grommet stem from the lining side to complete the installation, or follow manufacturer’s directions. Set aside.
Attach Gusset to Upper Yoke:
The gusset makes up the base and lower sides of the crossbody sling bag.
- Gather together gusset and gusset lining pieces, plus the completed upper yoke.
- With right sides together, align and match the short ends of the gusset to the short ends of the upper yoke.
- Pin/baste across the seam including zipper ends and sew close to zipper stops and across the fabric with the aid of a zipper foot attachment.
- With RST, align and match the gusset lining onto the gusset so as to encase the short end of the upper yoke between the two layers. Follow the previous row of stitching, just inside the seam, to attach the lining in place. Grade any bulk in the seam allowances.
- With wrong sides together (WST), align and match outer edges of the gusset and its lining to reveal the sewn seam. Press seam flat. Topstitch through all layers to complete the gusset.
- With WST, machine-baste long edges of the gusset and gusset lining together so as to act as one unit. Do this on both edges. Set aside.
Attach Front Flap to Upper Yoke:
Note: Beyond this point the exterior fabric and the lining fabric are sewn together as a single ply. Review notes regarding application of a gusset and sew in the direction of the stretch.
- Gather together the front flap section and the upper yoke section with gussets.
- With right sides together (RST), divide the outer edge of the front flap into quarters and do the same for the upper yoke and gusset. Locate the center notch at the top and bottom of the bag pieces and 2 side notches (X).
- Align and match the zipper’s mid-point to the front right flap piece at the center notch and the lower yoke of the front flap to the gusset at the center notch.
- Match the ends of the zipper seams to the gusset at point X at the sides of the front flap. Keep straight edges even and ease curves into straight edges. Clip into seam allowances of straight edges, if necessary, to ease around curved edges (the stitching line remains equal). Avoid any tucks or pleats in the stitch zone. Pin/baste in place.
- Using the zipper foot to get close to the zipper teeth, feed the layer with the curve edges on the bottom of the pile and the layer with the straight edges on the top, as the bottom layer feeds into the sewing machine faster than the top.
- Attach the zipper tape to the upper portion of the front flap, easing the straight zipper tape into the curved bag opening, and continue down the sides easing the straight edge of the gusset into the curved edge of the front flap, and across the straight bottom edge.
Finishing the Front of the Crossbody Sling Bag:
Apply a bias bound seam finish with single-fold bias tape to finish the raw lining edge.
- First, grade all seam allowances between the two lining layers. Trim away any bulk at intersecting seams, and neaten edges of lining layers to fit within the folded bias tape.
- Next, wrap the raw edges of lining with bias tape. Resist the urge to hold the tape taut as you apply the tape, as this action will make the seam “buckle”. Relax the tape and ease it as you sew. The bias tape should not extent beyond the seam stitching.
- Sew through all layers (bias tape & outer seams) to neaten and encase the seam allowances. If one side of the bias tape is wider than the other, place the wider edge on the bottom layer of the feed. Press the wrapped edges flat.
- The front of the bag is complete. Set aside.
Make the Back Lining:
The back portion of the bag lining features the interior pocket with zipper within the dividing panel, and an elastic band with a D-ring for securing keys, pens, power charger, and other small items. It can be configured to your needs and must-haves for your daily commute.
- Gather together the back lining piece, the completed pocket/divider, 7” length of elastic, and a mini D-ring.
- With face sides up, position the divider atop the back lining piece, aligning the lower half of the zipper at the side notches (X). Match the sides of the pocket to the sides of the back lining piece and stitch together. This will cause the pocket to protrude and extend beyond or above a surface of the lining and create the depth of the divider (about 1 inch).
- With face sides up, position the elastic band atop the back lining piece, approximately 2” above the top of the pocket/divider. Match the ends of the elastic band to the sides of the back lining piece and tack down. This will cause the elastic to protrude slightly above the surface of the lining.
- Center the D-ring under the elastic band and allow for some slack on either side of the elastic. Sew across the bottom and top of the D-ring, to secure the D-ring tab and elastic to the back lining. Set aside.
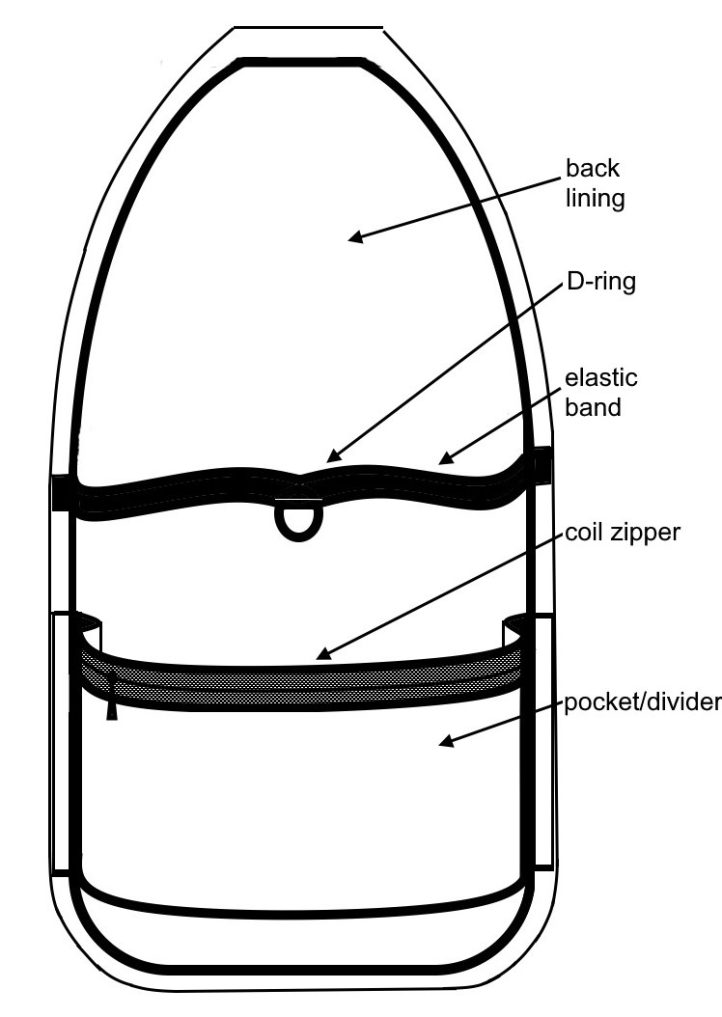
Design Note: This was my configuration for the interior. Feel free to change it to meet your needs and make it your own.
Attach Hardware to Back of Bag Exterior:
- Gather together the exterior back piece of the bag, 2 mini D-rings, and the adjustable bag strap.
- Position a D-ring tab on each extended tab on the back piece of the bag so that the hardware in facing inward and aligning with the stitching line. Machine-baste in place.
- With the bag strap face up, extend the cut end of the bag strap 1 1/2” beyond the top edge of the back piece. Center the webbing across the top of the back piece (face side up) and stitch webbing to the fabric. Turn under seam allowance of the top of the back piece and extended part of webbing to the wrong side of the cloth.
- With face side up, sew an X-stitch at the top of the back piece to secure the webbing in place. (Tip: Roll up the bag strap and secure with a rubber band to keep it out of the way while sewing).
Attach Lining to Back of Crossbody Bag:
Gather together back piece of bag and its lining.
- With wrong sides together, align and match perimeter edges of lining to back piece of bag.
- Machine-baste outer edges. Set aside.
Attaching Bag Front to Back:
Note: Beyond this point the exterior fabric and the lining fabric are sewn together as a single ply. Review notes regarding application of a gusset and sew in the direction of the stretch.
Attaching the front of the bag to the back of the bag will form the storage cavity of the bag and give its 3D shape. Be certain to open the zipper prior to putting the two sections together and position the bag strap within the bag before sewing around the outer edges.
- With face sides together, align and match the back section of the bag to the front section of the bag with the gussets. First, pin/clasp the center notch at the base. Then, pin the ends of the zipper opening at the side notch (X).
- Continue to pin along only the straight edges of the bag, matching edge for edge (there is no fiddling for these points) until you reach the rounded corners.
- At this point, snip into the seam allowance of the gusset (straight side) to release the tension in the seam allowance, if necessary. Ease the gusset into the rounded corners of the back section, matching the raw edges and pinning as you go. There should be no tucks at the seam’s stitching line.
- Sew the layers together with the aid of a zipper foot to get as close as possible to the stitching line and the D-ring hardware. Have the back piece with the curves to be on the bottom while feeding into the machine and pull aside the slack of the divider panel so it does not get caught in the stitching. Start at the top and sew in the direction of the stretch until you reach the center of the bag at its base. Repeat this procedure on the opposite side of the bag.
Finishing the Crossbody Bag:
Apply a bias bound seam finish with single-folded bias tape to finish the raw lining edge on the back seam.
- First, grade all seam allowances between the two lined layers. Trim away any bulk at intersecting seams, and neaten edges of lining layers to fit within the folded bias tape.
- Next, wrap the raw edges of lining with bias tape. Resist the urge to hold the tape taut as you apply the tape, as this action will make the seam “buckle”. Relax the tape and ease it as you sew. The bias tape should not extent beyond the seam stitching.
- Sew through all layers in the seam allowance to neaten and encase the seam allowances. If one side of the bias tape is wider than the other, place the wider edge on the bottom layer of the feed.
- Turn out the bag through the zipper opening and push out seams.
Closing the Bag:
As the bag has now taken its 3D form, it can no longer fit flat under the presser foot.
- With the face side up, extend the seam allowance of the front of the bag and the lining outward as far as possible towards the webbing strap.
- Flip the bag and with the aid of the zipper foot, sew as close to the connection of the strap (webbing) to the top of the bag. Sew through all layers to catch the extended seam allowance on the front.
- To neaten the raw edge of the seam allowance, wrap a length of bias tape around the webbing at the seam to form a collar around the strap to hide the seam. Topstitch across the top and bottom edges of the bias tape through all layers.
- Adjust the strap length as desired and latch swivel-hook onto a D-ring.