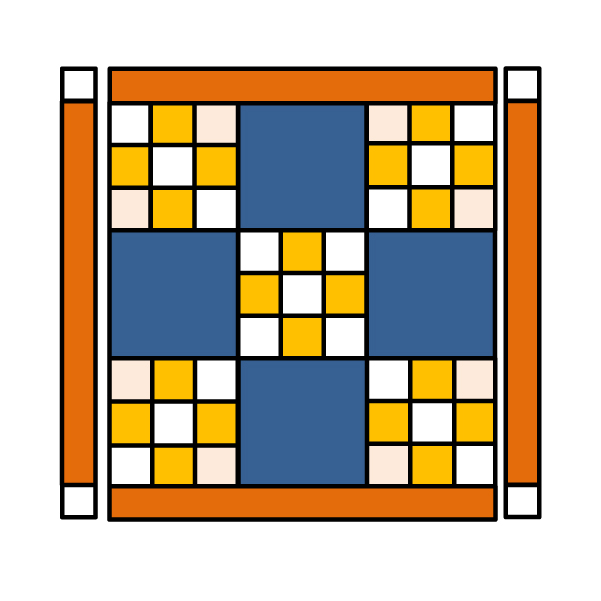
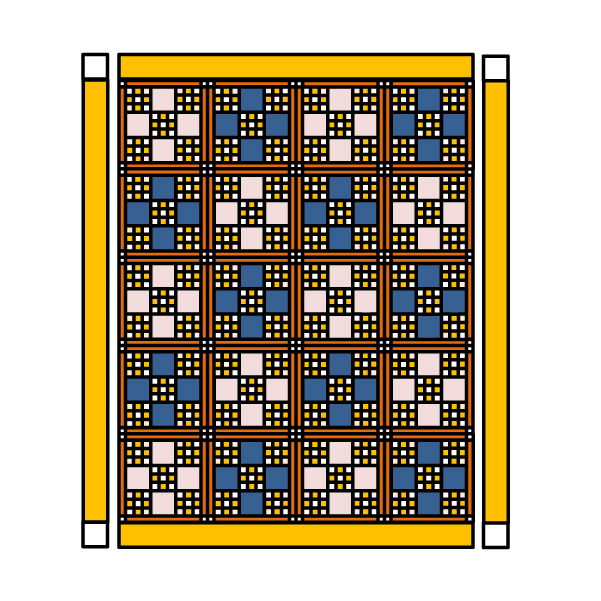
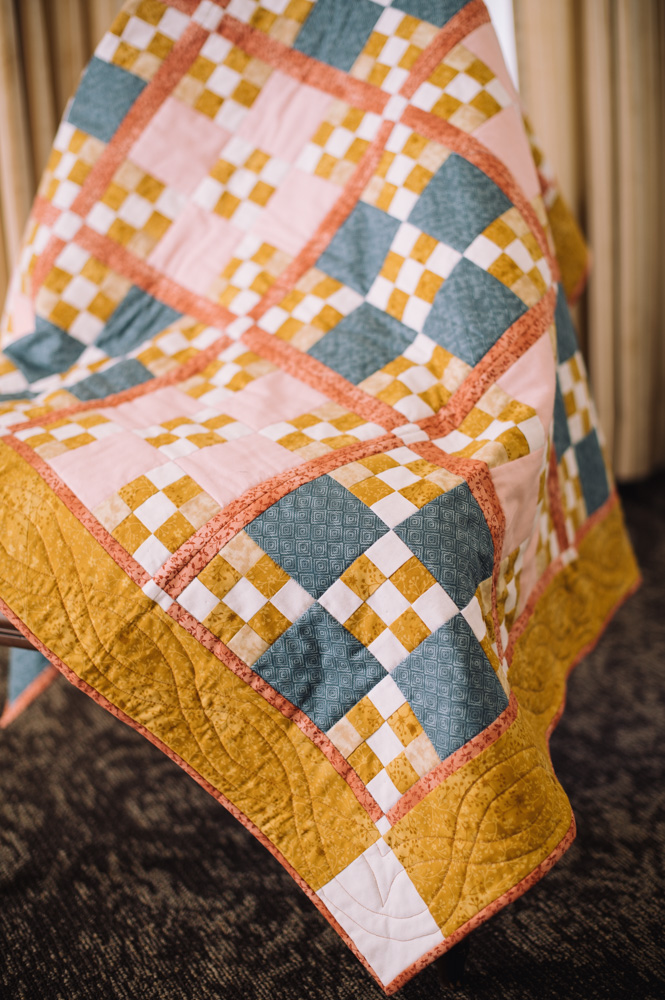
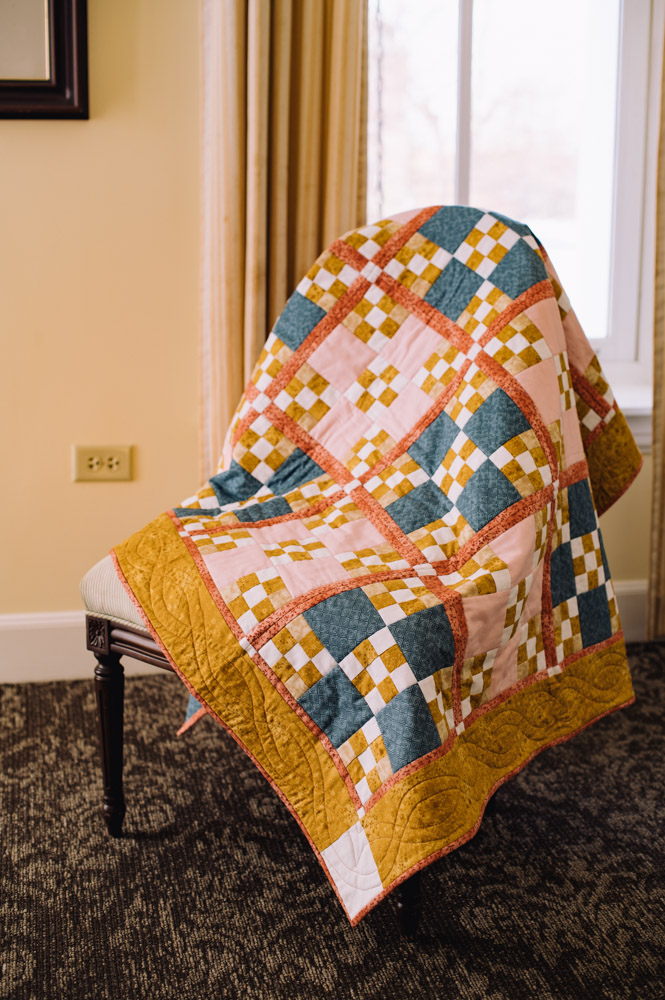
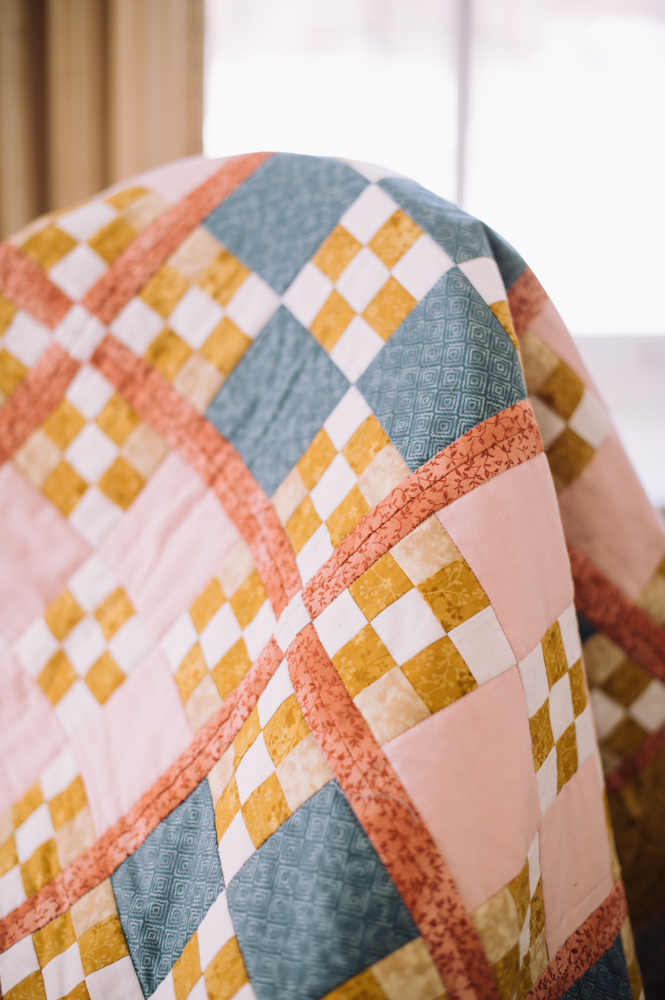
Brighten up your home by designing a jaw-droppingly gorgeous Irish chain quilt. Made in cheery shades of blue-green, goldenrod, and cream, this quilt pattern uses tiny nine-patch blocks to create the beloved Irish chain design. This quilt pattern finishes at approximately the size of a large lap quilt, and its eye-catching design is sure to attract nothing but compliments. If you love classic quilt patterns, you won’t be able to resist adding this project to your quilt collection!
Finished Size: Approximately 54″ x 63″
Materials:
- Fabric Requirements:
- A (blue) – 4 yards
- B (gold) – 2 yards
- C (tan/brown) – 1 yard
- D (white) – 1 yard
- E (pink) – 0.5 yards
- F (beige) – 0.5 yards
- Batting – 2 yards
- Heat Press Batting Together 1 1/2” tape – 16 yards
Designer Notes:
- Scant 1/4” seam allowance used throughout.
- WOF = Width of fabric
Cutting Instructions:
- A (blue):
- Forty 3 7/8” squares (for quilt top)
- Twenty 13 1/2” squares (for backing)
- Two 4 1/2” x ~51 1/2” (for backing borders) – don’t cut till quilt together
- Two 4 1/2” x ~63” (for backing borders) – don’t cut till quilt together
- B (gold):
- Seventeen 1 5/8” x WOF (for quilt top)
- Two 4 1/2” x ~43 1/2” (for top borders) – don’t cut till quilt together
- Two 4 1/2” x ~55” (for top borders) – don’t cut till quilt together
- C (tan/brown):
- Two 10 1/2” x WOF (for sashing)
- Six 2 1/2” x WOF (for binding)
- D (white):
- Fifteen 1 5/8” x WOF (for quilt top)
- Two 1” x WOF (for sashing)
- Four 4 1/2” squares (for border corners)
- E (pink):
- Forty 3 7/8” squares (for quilt top)
- F (beige):
- Seven 1 5/8” x WOF (for quilt top)
Piecing Instructions:
PIECED STRIP 1:
B – Eight 1 5/8” x WOF strips
D – Four 1 5/8” x WOF strips
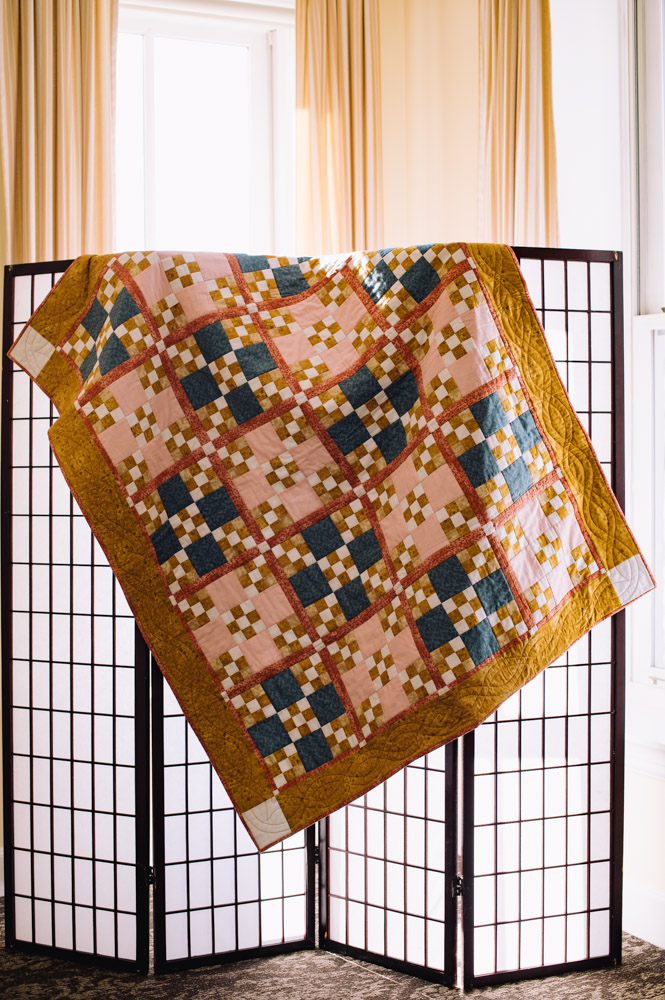
- With right sides together, stitch the long edge of a 1 5/8” B strip to the long edge of a 1 5/8” D strip.
- With right sides together, stitch another 1 5/8” B strip to the opposite long edge of the D strip.
- Repeat to make four sets in total.
- Press in one direction.
- Sub-cut the strip into 1 5/8” strips.
- For each block, sub-cut – five strips.
- For quilt top, sub-cut – 100 strips.
PIECED STRIP 2:
B – Two 1 5/8” x WOF strips
D – Four 1 5/8” x WOF strips
- With right sides together, stitch the long edge of a 1 5/8” D strip to the long edge of a 1 5/8” B strip.
- With right sides together, stitch another 1 5/8” D strip to the opposite long edge of the B strip.
- Repeat to make two sets in total.
- Press in one direction.
- Sub-cut the strip into 1 5/8” strips.
- For each block, cut – two strips.
- For quilt top, cut – 40 strips.

PIECED STRIP 3:
B – seven 1 5/8” x WOF strips
D – seven 1 5/8” x WOF strips
F – seven 1 5/8” x WOF strips
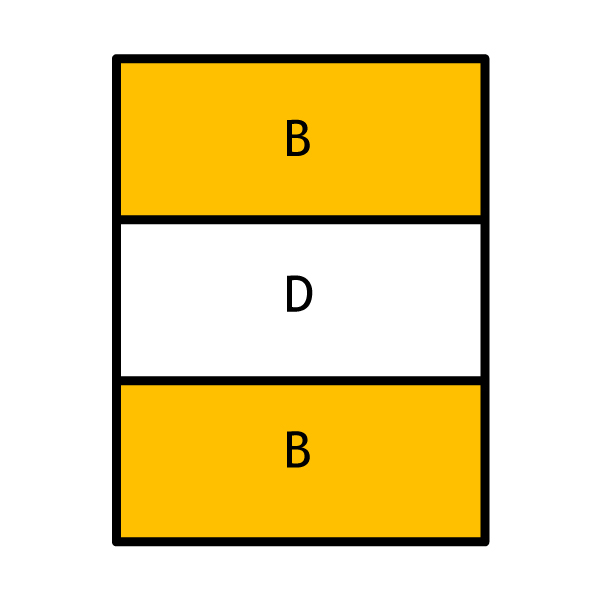
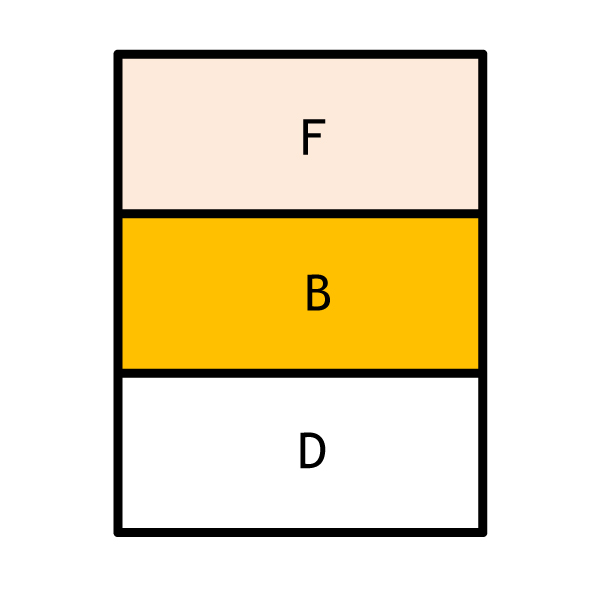
- With right sides together, stitch the long edge of a 1 5/8” B strip to the long edge of a 1 5/8” D strip.
- With right sides together, stitch a 1 5/8” F strip to the opposite long edge of the B strip.
- Repeat to make seven sets in total. Sew top to bottom Four-F->B->D and Three-D->B->F.
- Press three strips towards the D strip and four strips towards the F strip.
- Sub-cut the strip into 1 5/8” strips.
- For each block, cut – 8 strips.
- For quilt top, cut– 160 strips.
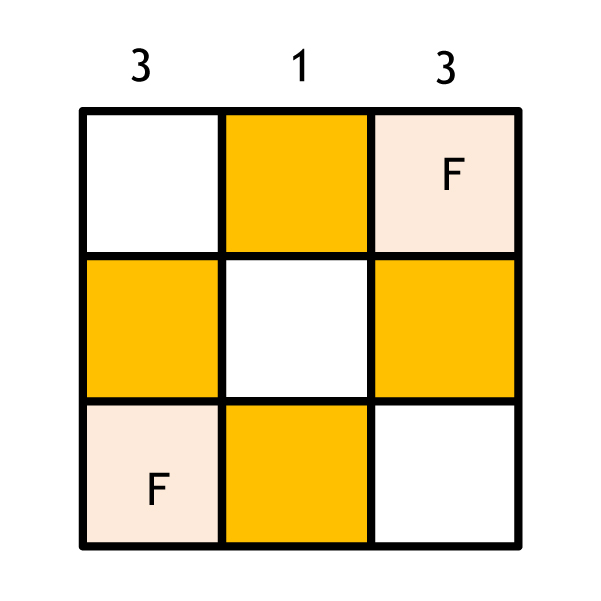
CORNER NINE PATCH:
1 – one strip
3 – two strips (pressed in opposite directions, so they will nest with the pieced strip 1)
- With right sides together, stitch the long edge of a pieced strip 3 to the long edge of a pieced strip 1.
- With right sides together, stitch the other pieced strip 3 to the opposite long edge of pieced strip 1, making sure that the F fabrics are in opposite corners.
- Press the Nine Patch in one direction.
- For each block, make – 4.
- For quilt top, make – 80.
MIDDLE NINE PATCH:
1 – one strip
2 – two strips (turn one so it will nest with the pieced strip 1)
- With right sides together, stitch the long edge of a pieced strip 2 to the long edge of a pieced strip 1.
- With right sides together, stitch the other pieced strip 2 to the opposite long edge of pieced strip 1.
- Press the Nine Patch in one direction.
- For each block, make – 1.
- For quilt top, make – 20.

Blocks:
Corner Nine Patch – four
Middle Nine Patch – one
A/E – four 3 7/8” squares
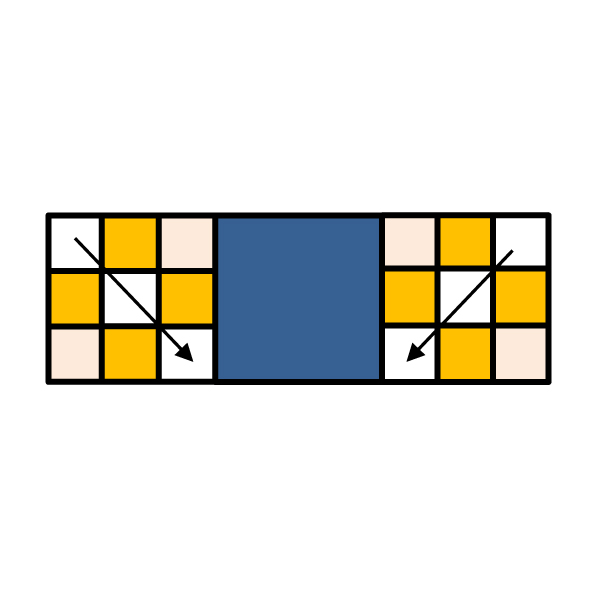
Top and Bottom Rows:
- With right sides together, stitch the corner nine patches to opposite sides of an A/E square, making sure D travels towards the middle of the block.
- Press the seams in one direction.
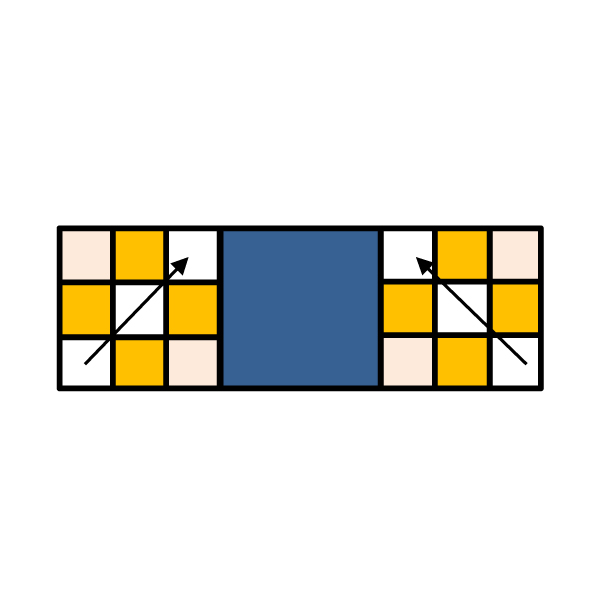
Middle Row:
- With right sides together, stitch the A/E squares to opposite sides of the middle nine patch.
- Press the seams in the opposite direction to the top and bottom rows.
Further Block Instructions:
- With right sides together, stitch the top row to the middle row, nesting the seams.
- With right sides together, stitch the bottom row to the middle row, nesting the seams.
- Press the seams in one direction.
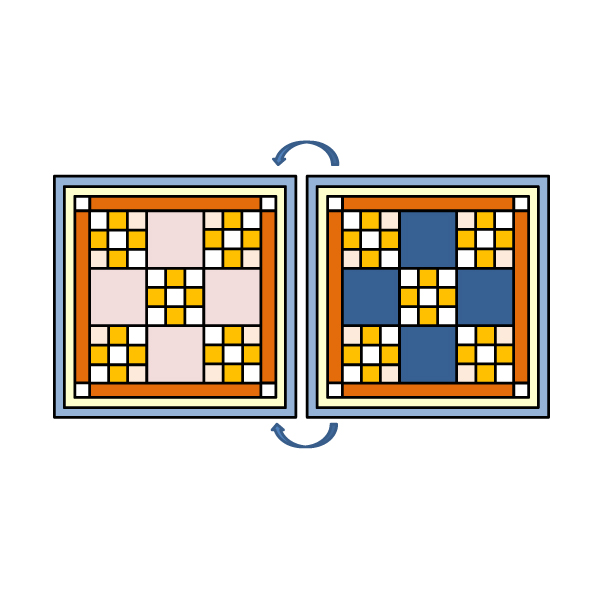
- Make ten blocks with fabric A.
- Make ten blocks with fabric E.

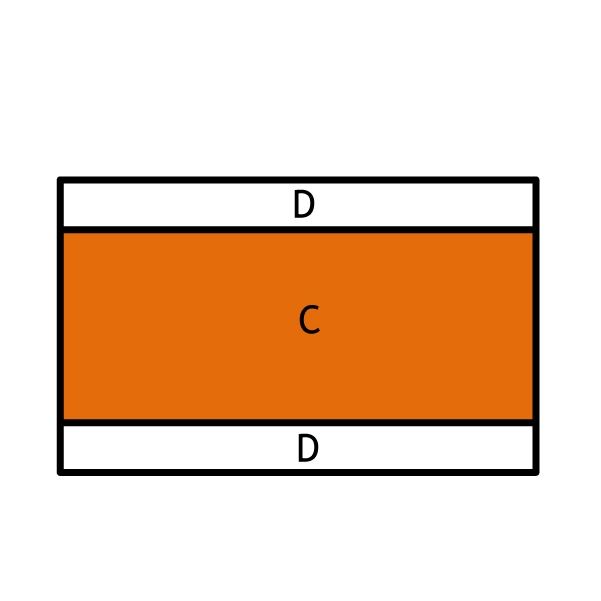
SASHING:
C – two 10 1/2” x WOF strips
D – two 1” x WOF strips
Long Sashing:
- With right sides together, stitch the long edge of one D strip to the long edge of a C strip.
- With right sides together, stitch the other D strip to the opposite long edge of the C strip.
- Press to the D strip.
- Sub-cut into 1” strips.
Short Sashing:
- Cut the other 10 1/2” C strip into 1” strips.
- Make 40 long sashing strips.
- Make 40 short sashing strips.
FINISHING THE BLOCKS:
10 A blocks
10 E blocks
40 short sashing strips
40 long sashing strips
Short Sashing:
- With right sides together, stitch a short sashing strip to the top of a block.
- With right sides together, stitch a second short sashing strip to the bottom of a block.
- Press towards the sashing.
Long Sashing:
- With right sides together, stitch a long sashing strip to the left side of the block, nesting the seams.
- With right sides together, stitch a long sashing strip to the right side of the block.
- Press towards the sashing.
- Make 20 sashed blocks.
LAYERING UP AND QUILTING THE BLOCKS:
One sashed block
One 12 1/2” square batting
One A 13 1/2” backing square
- Place the A backing square right side down and lay a batting square centrally on top.
- Place a block right side up centrally on the batting and pin/baste in place.
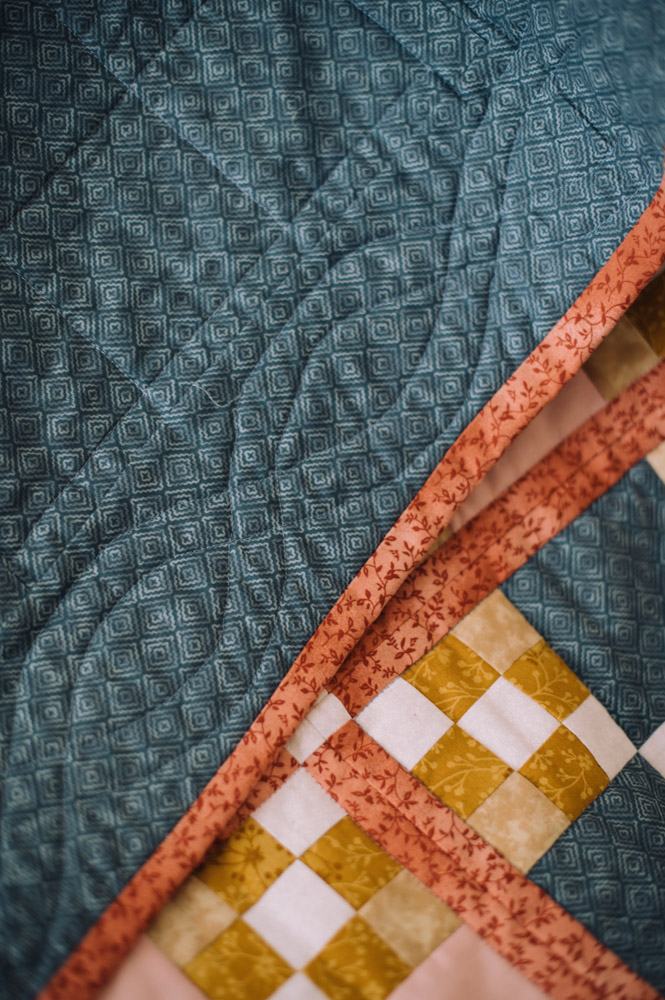
- Without quilting the sashing, quilt the main block as desired. A diagonal pattern through the chain or stitch in the ditch along the seams is effective.
- Stitch in the ditch between the main block and sashing (sashing stitches).
- Layer and quilt 10 A blocks.
- Layer and quilt 10 E blocks.

JOINING THE BLOCKS:
One layered E block
One layered A block
- With right sides together, fold back the batting and backing of each block, pin and stitch the sashing together, nesting or matching the seams.
- Press the seam in one direction.
- Lay the blocks right side down and trim the batting so it meets in the middle. Use Heat Press Batting Together tape to join the batting between sashing stitches.
- Trim one backing piece so it does not overlap the backing piece of the other block. Fold the untrimmed piece wrong sides together so the raw edge meets the sashing stitches. Arrange the fold so it covers the trimmed piece up to the sashing stitches and pin.
- Hand stitch the layers together between the sashing stitches.
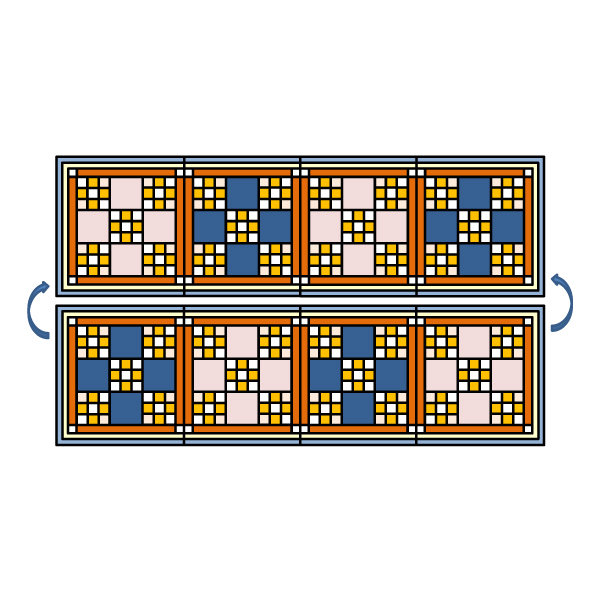
- Join two A and two E blocks alternately to form one row of four.
- Make five rows, three rows starting with fabric E, two rows starting with fabric A.
JOINING THE ROWS:
- With right sides together, fold back the batting and backing of each row, pin and stitch the sashing together, nesting or matching the seams.
- Press the seam in one direction.
- Lay the rows right side down and trim the batting so it meets in the middle. Use Heat Press Batting Together tape to join the batting between sashing stitches.
- Trim one backing piece so it does not overlap the backing piece of the other row. Fold the untrimmed piece wrong sides together so the raw edge meets the sashing stitches. Arrange the fold so it covers the trimmed piece up to the sashing stitches and pin.
- Hand stitch the layers together between the sashing stitches.
- Join rows 1 and 2, 4 and 5.
- Join row 1/2 to row 3.
- Join row 1/2/3 to row 4/5.
BORDERS:
A – backing borders
B – quilt top borders
- Square the batting and backing to the quilt top.
- Measure the quilt width through the middle and cut the top and bottom borders (quilt top and backing) to this length.
- Measure the quilt length through the middle and cut the left and right borders (quilt top only) to this length.
Short Borders:
- With right sides together, stitch the B quilt top and the A backing borders to the top and bottom of the quilt.
- Cut the batting to the same length and join to the quilt top batting with Heat Press Batting Together tape.
- Press the seams of all short borders.
Long Borders:
- Measure the quilt length through the middle and cut the left and right borders (the A backing only) to this length.
- With right sides together, stitch two D 4 1/2” squares to opposite long ends of the quilt top borders. Press the seams to fabric B.
- With right sides together, stitch the quilt top and backing borders to the top and bottom of the quilt, nesting the seams.
- Cut the batting to the same length and join to the quilt top batting with Heat Press Batting Together tape.
- Press the seams of all long borders.
- Pin and quilt as desired. A cable design would look effective.
- Baste the quilt all around the edge 1/8” from the edge of the border and trim back to the quilt top.
- Bind the quilt as normal.
This would make a really beautiful table cloth too!
Hi Mona! Both of these are great ideas! And we agree; Zoe’s quilt is a stunner. Happy quilting adventures! – Ashley, WeLikeSewing
This is a beautiful quilt! Much easier to male than it appears! I am thinking about using this basic pattern to make some beautiful place mats for gifts.