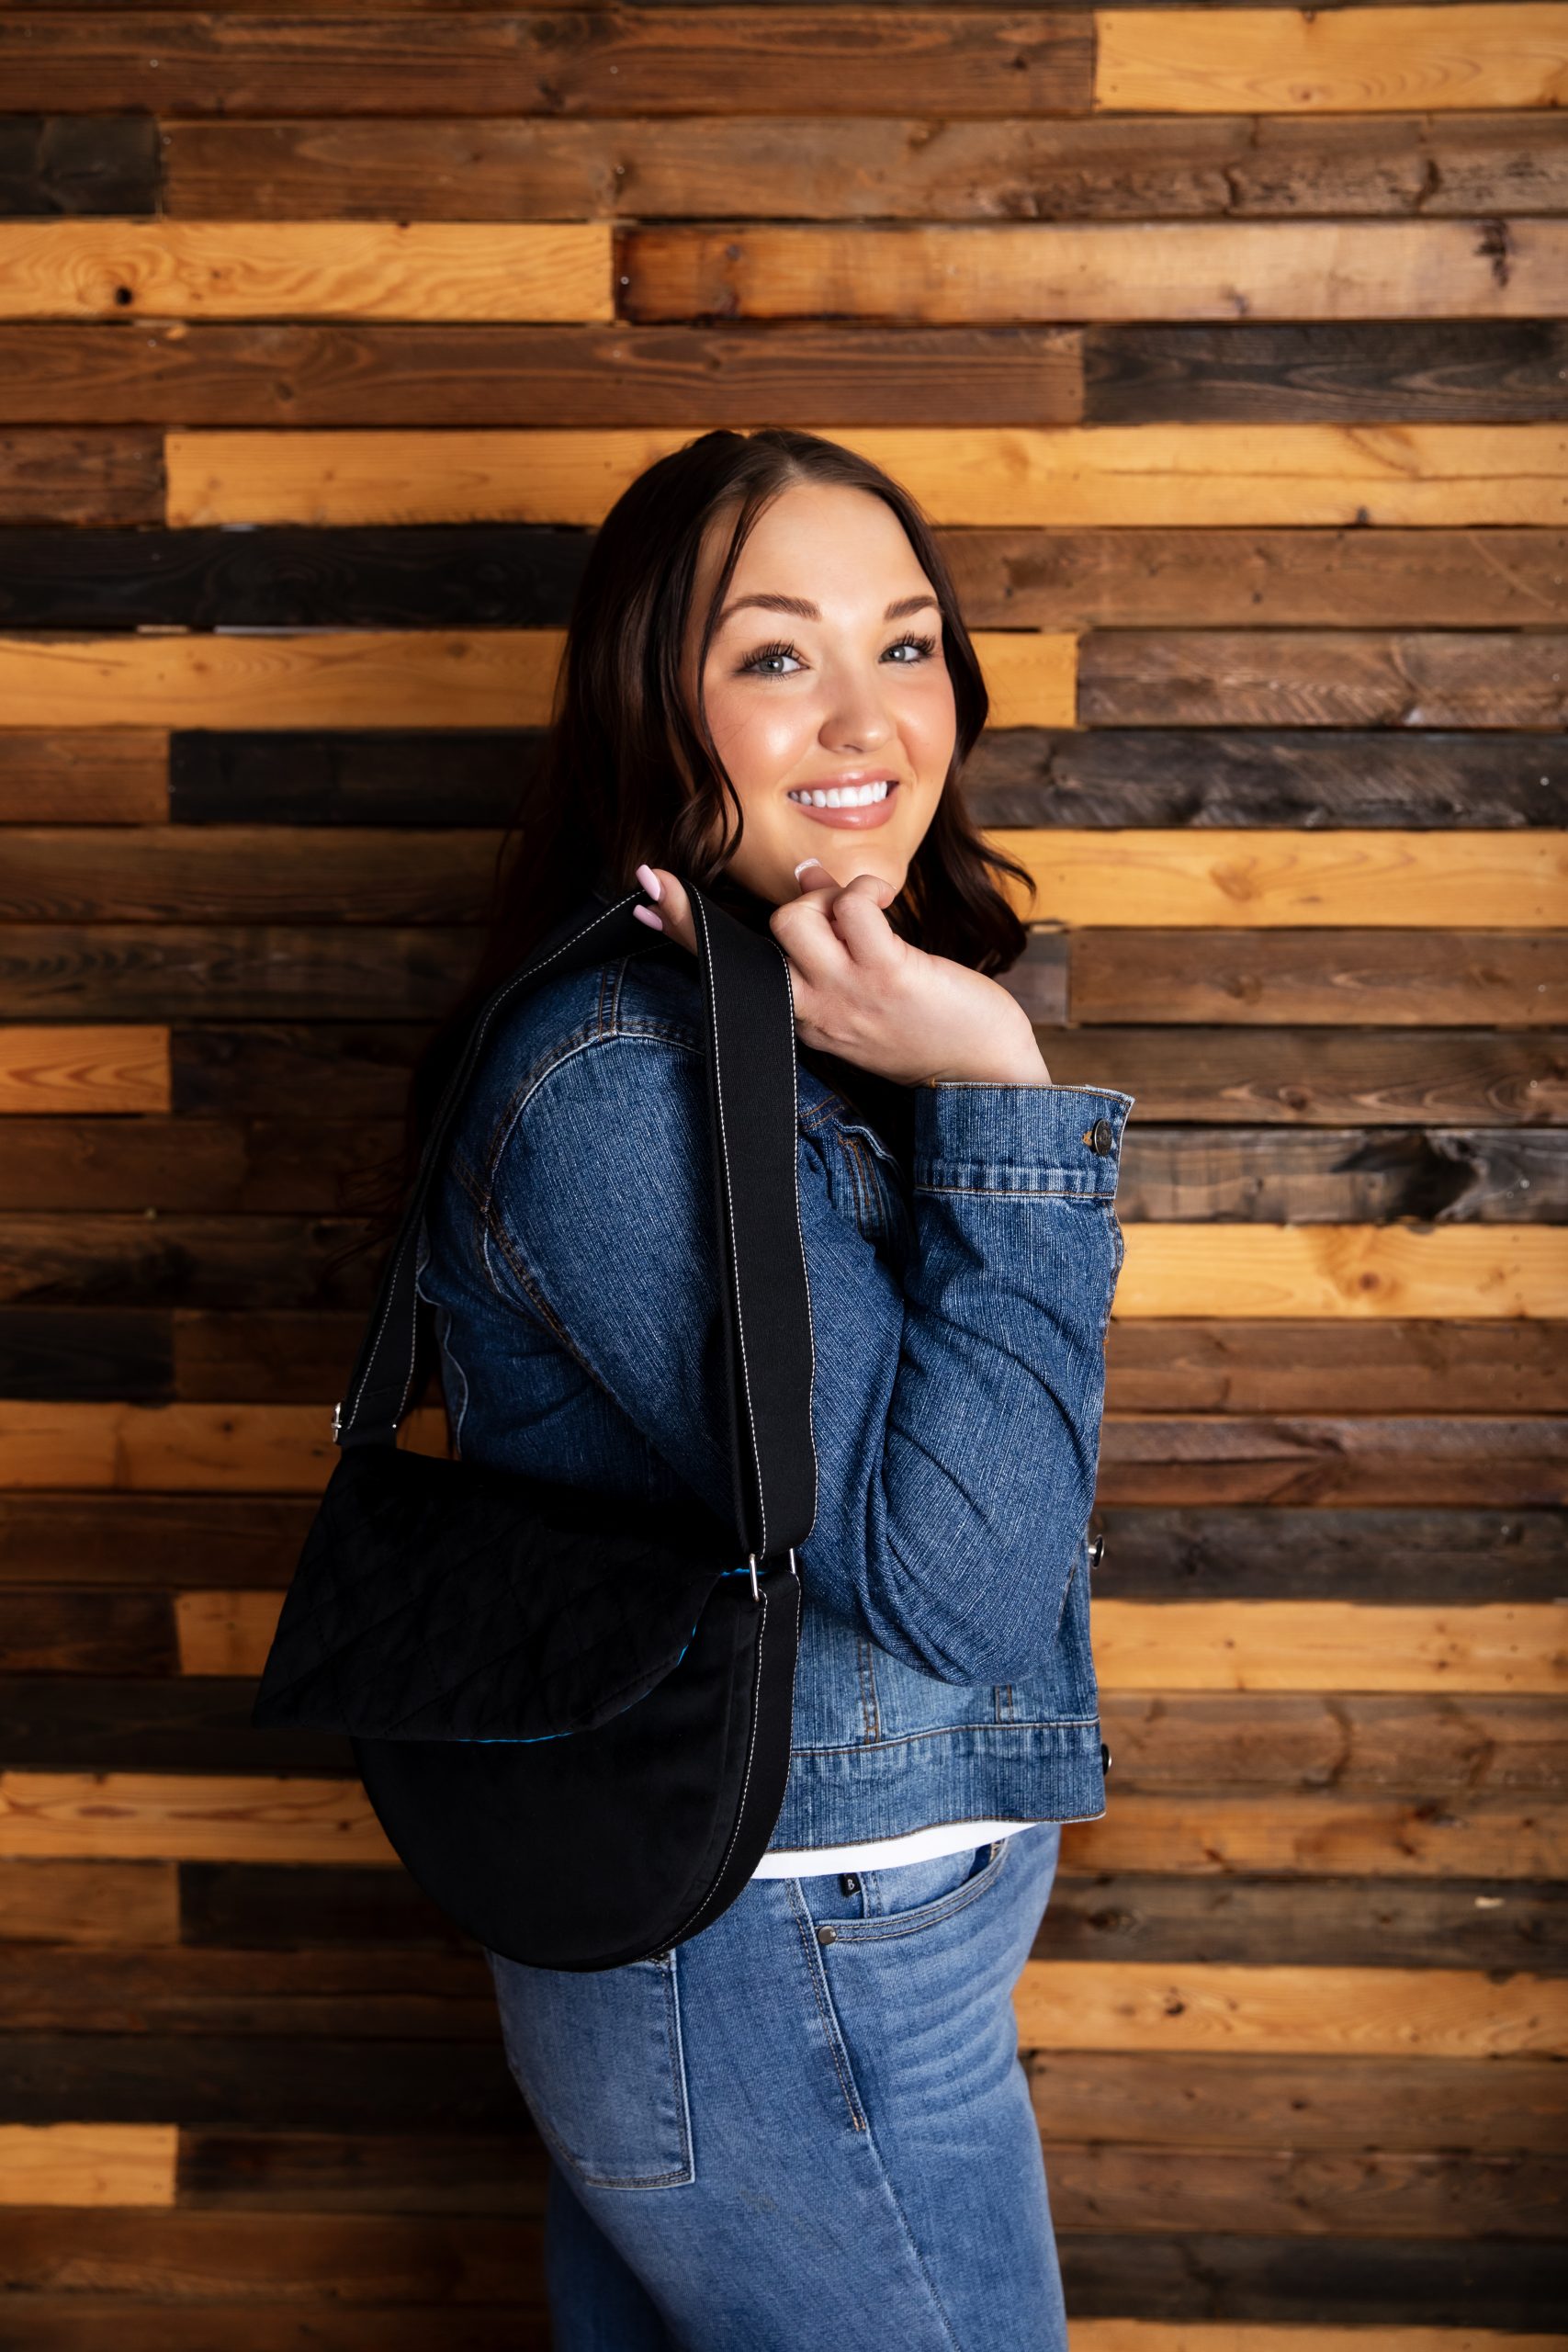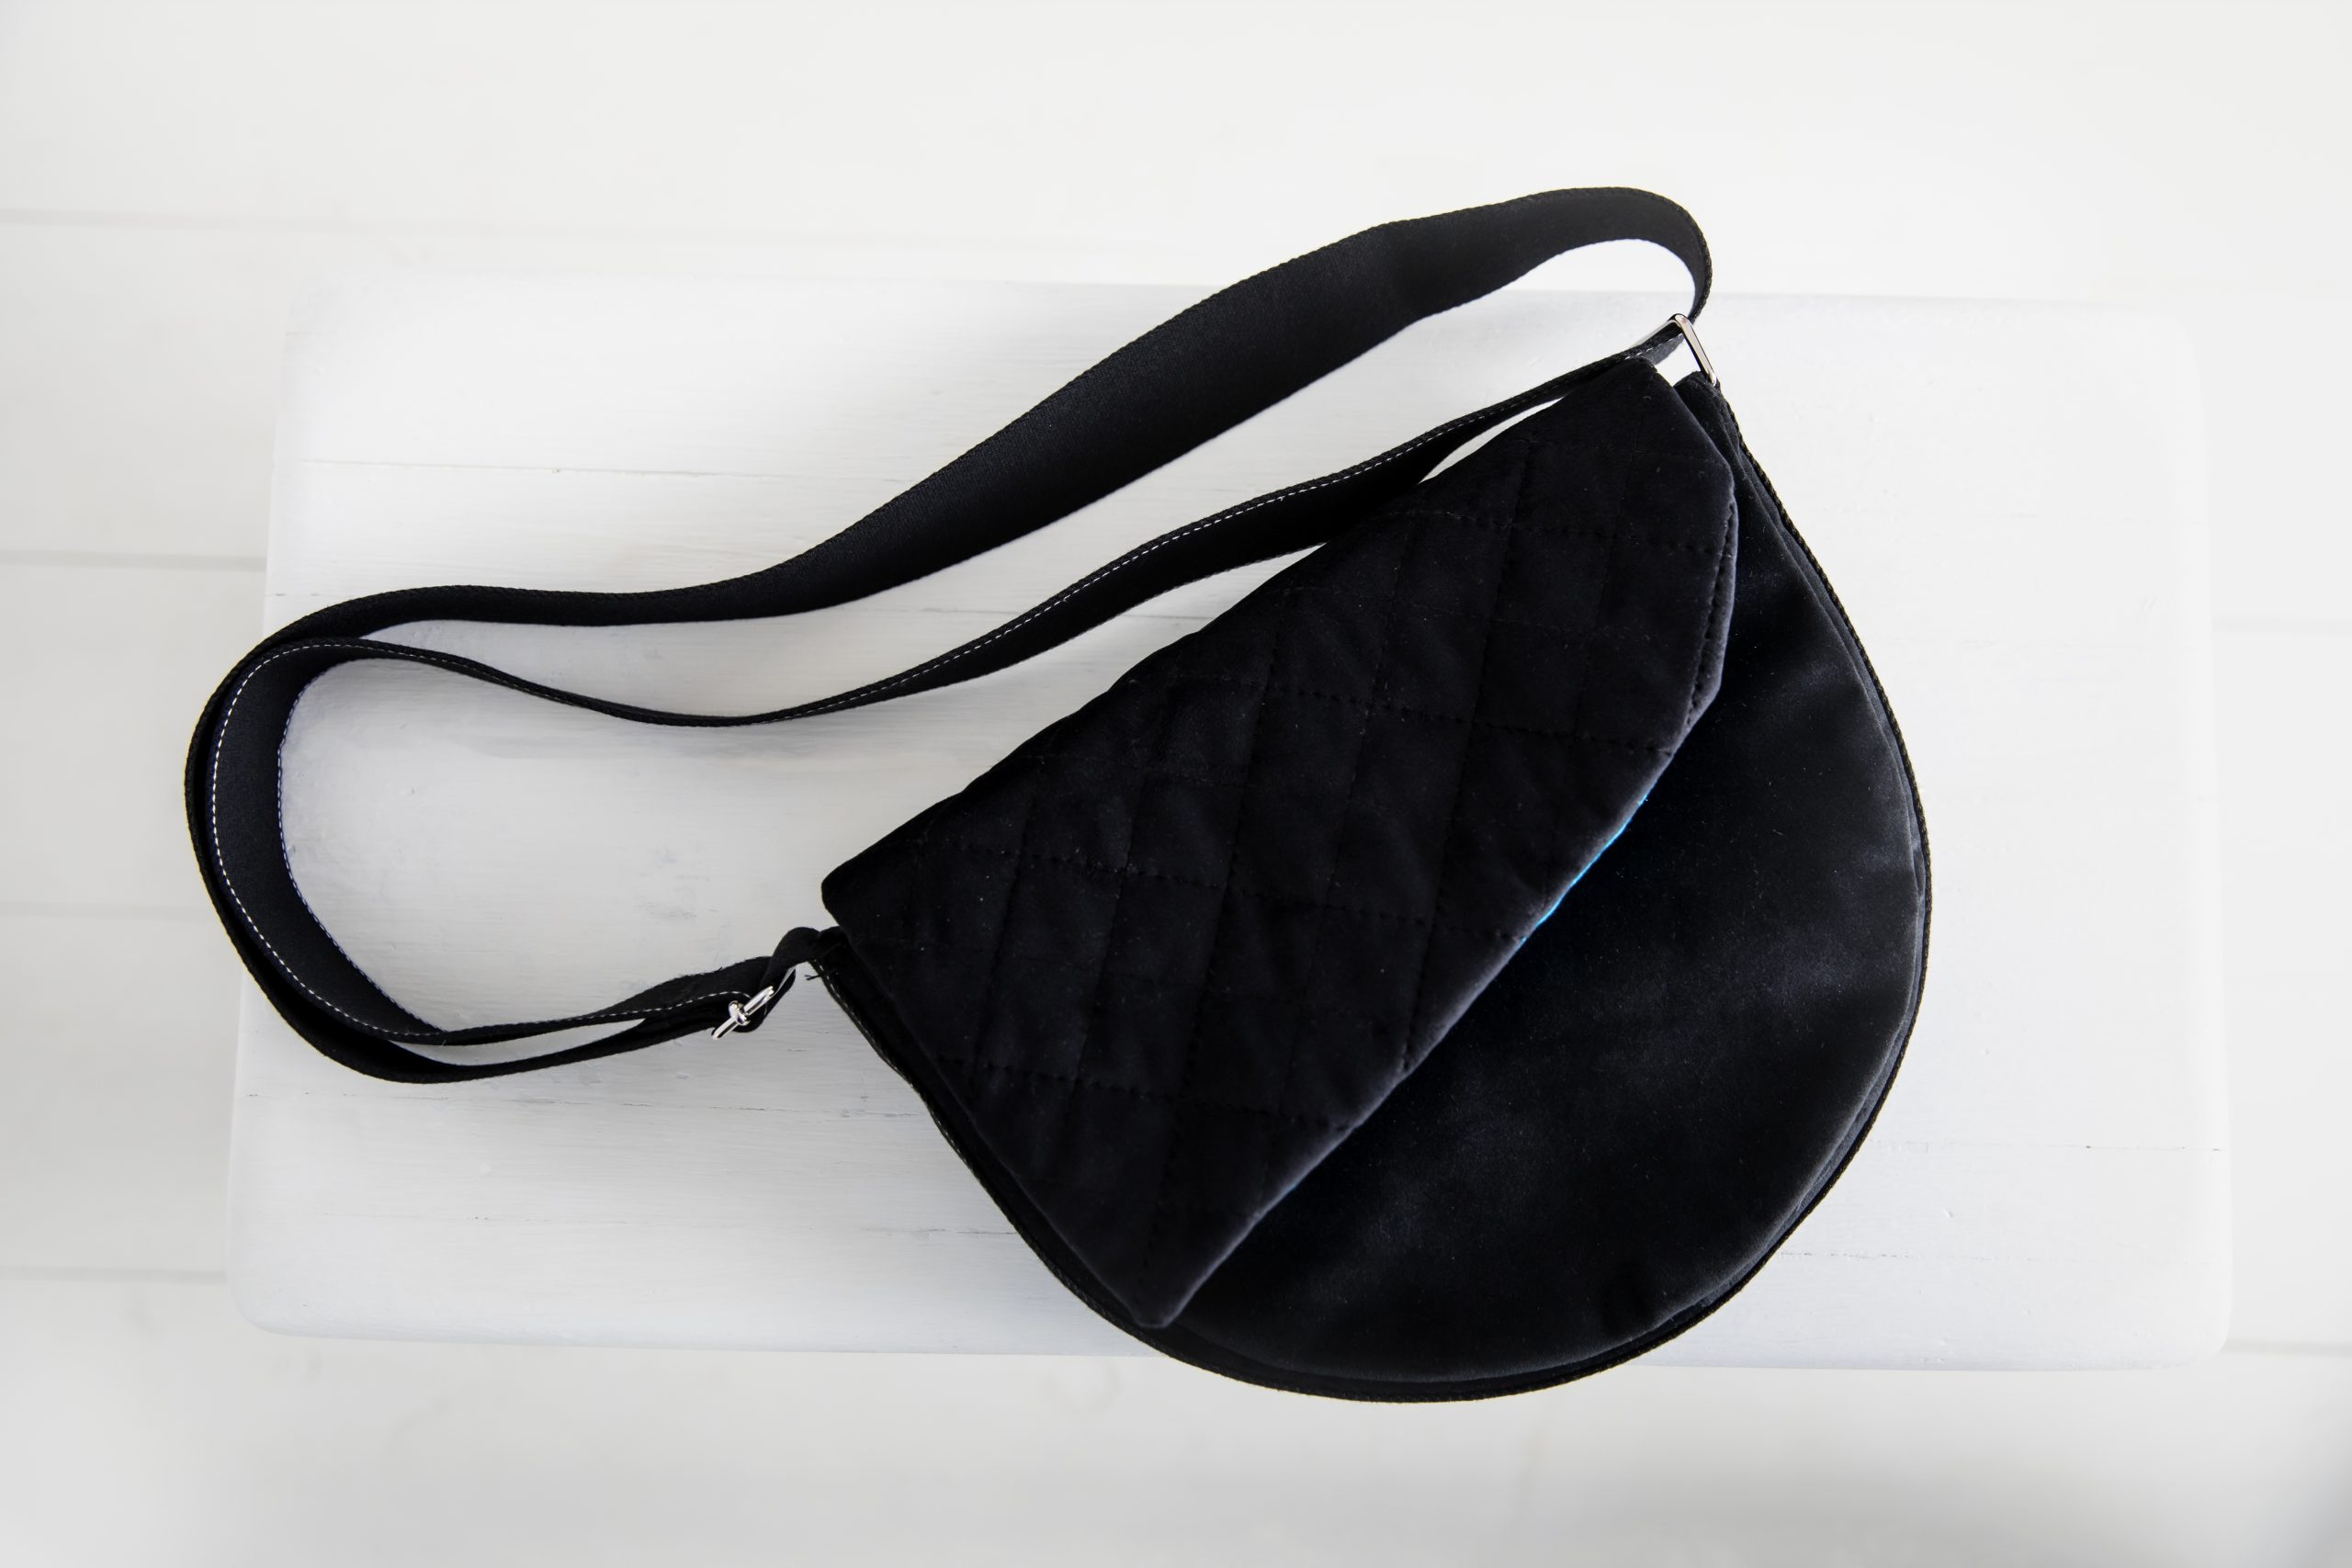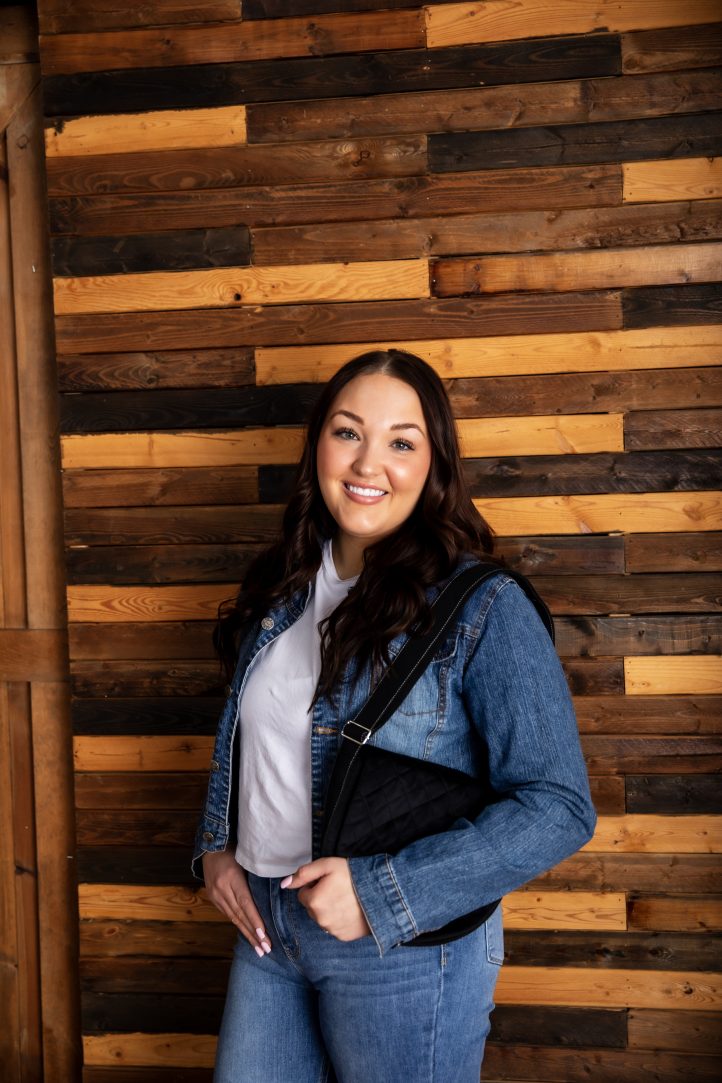
Every woman’s wardrobe needs a go-to purse, that one bag that goes with every outfit, holds your daily necessities and looks timelessly chic. Don Morin’s simple and stunning saddle bag pattern is a must-sew accessory for your spring wardrobe. Made using luxurious upholstery velvet, this bag sewing pattern features a quilted saddle flap and bright, contrasting lining for a gorgeous pop of color. Create your own saddle bag as Don walks you through every step of the design process.
Skill Level: Intermediate
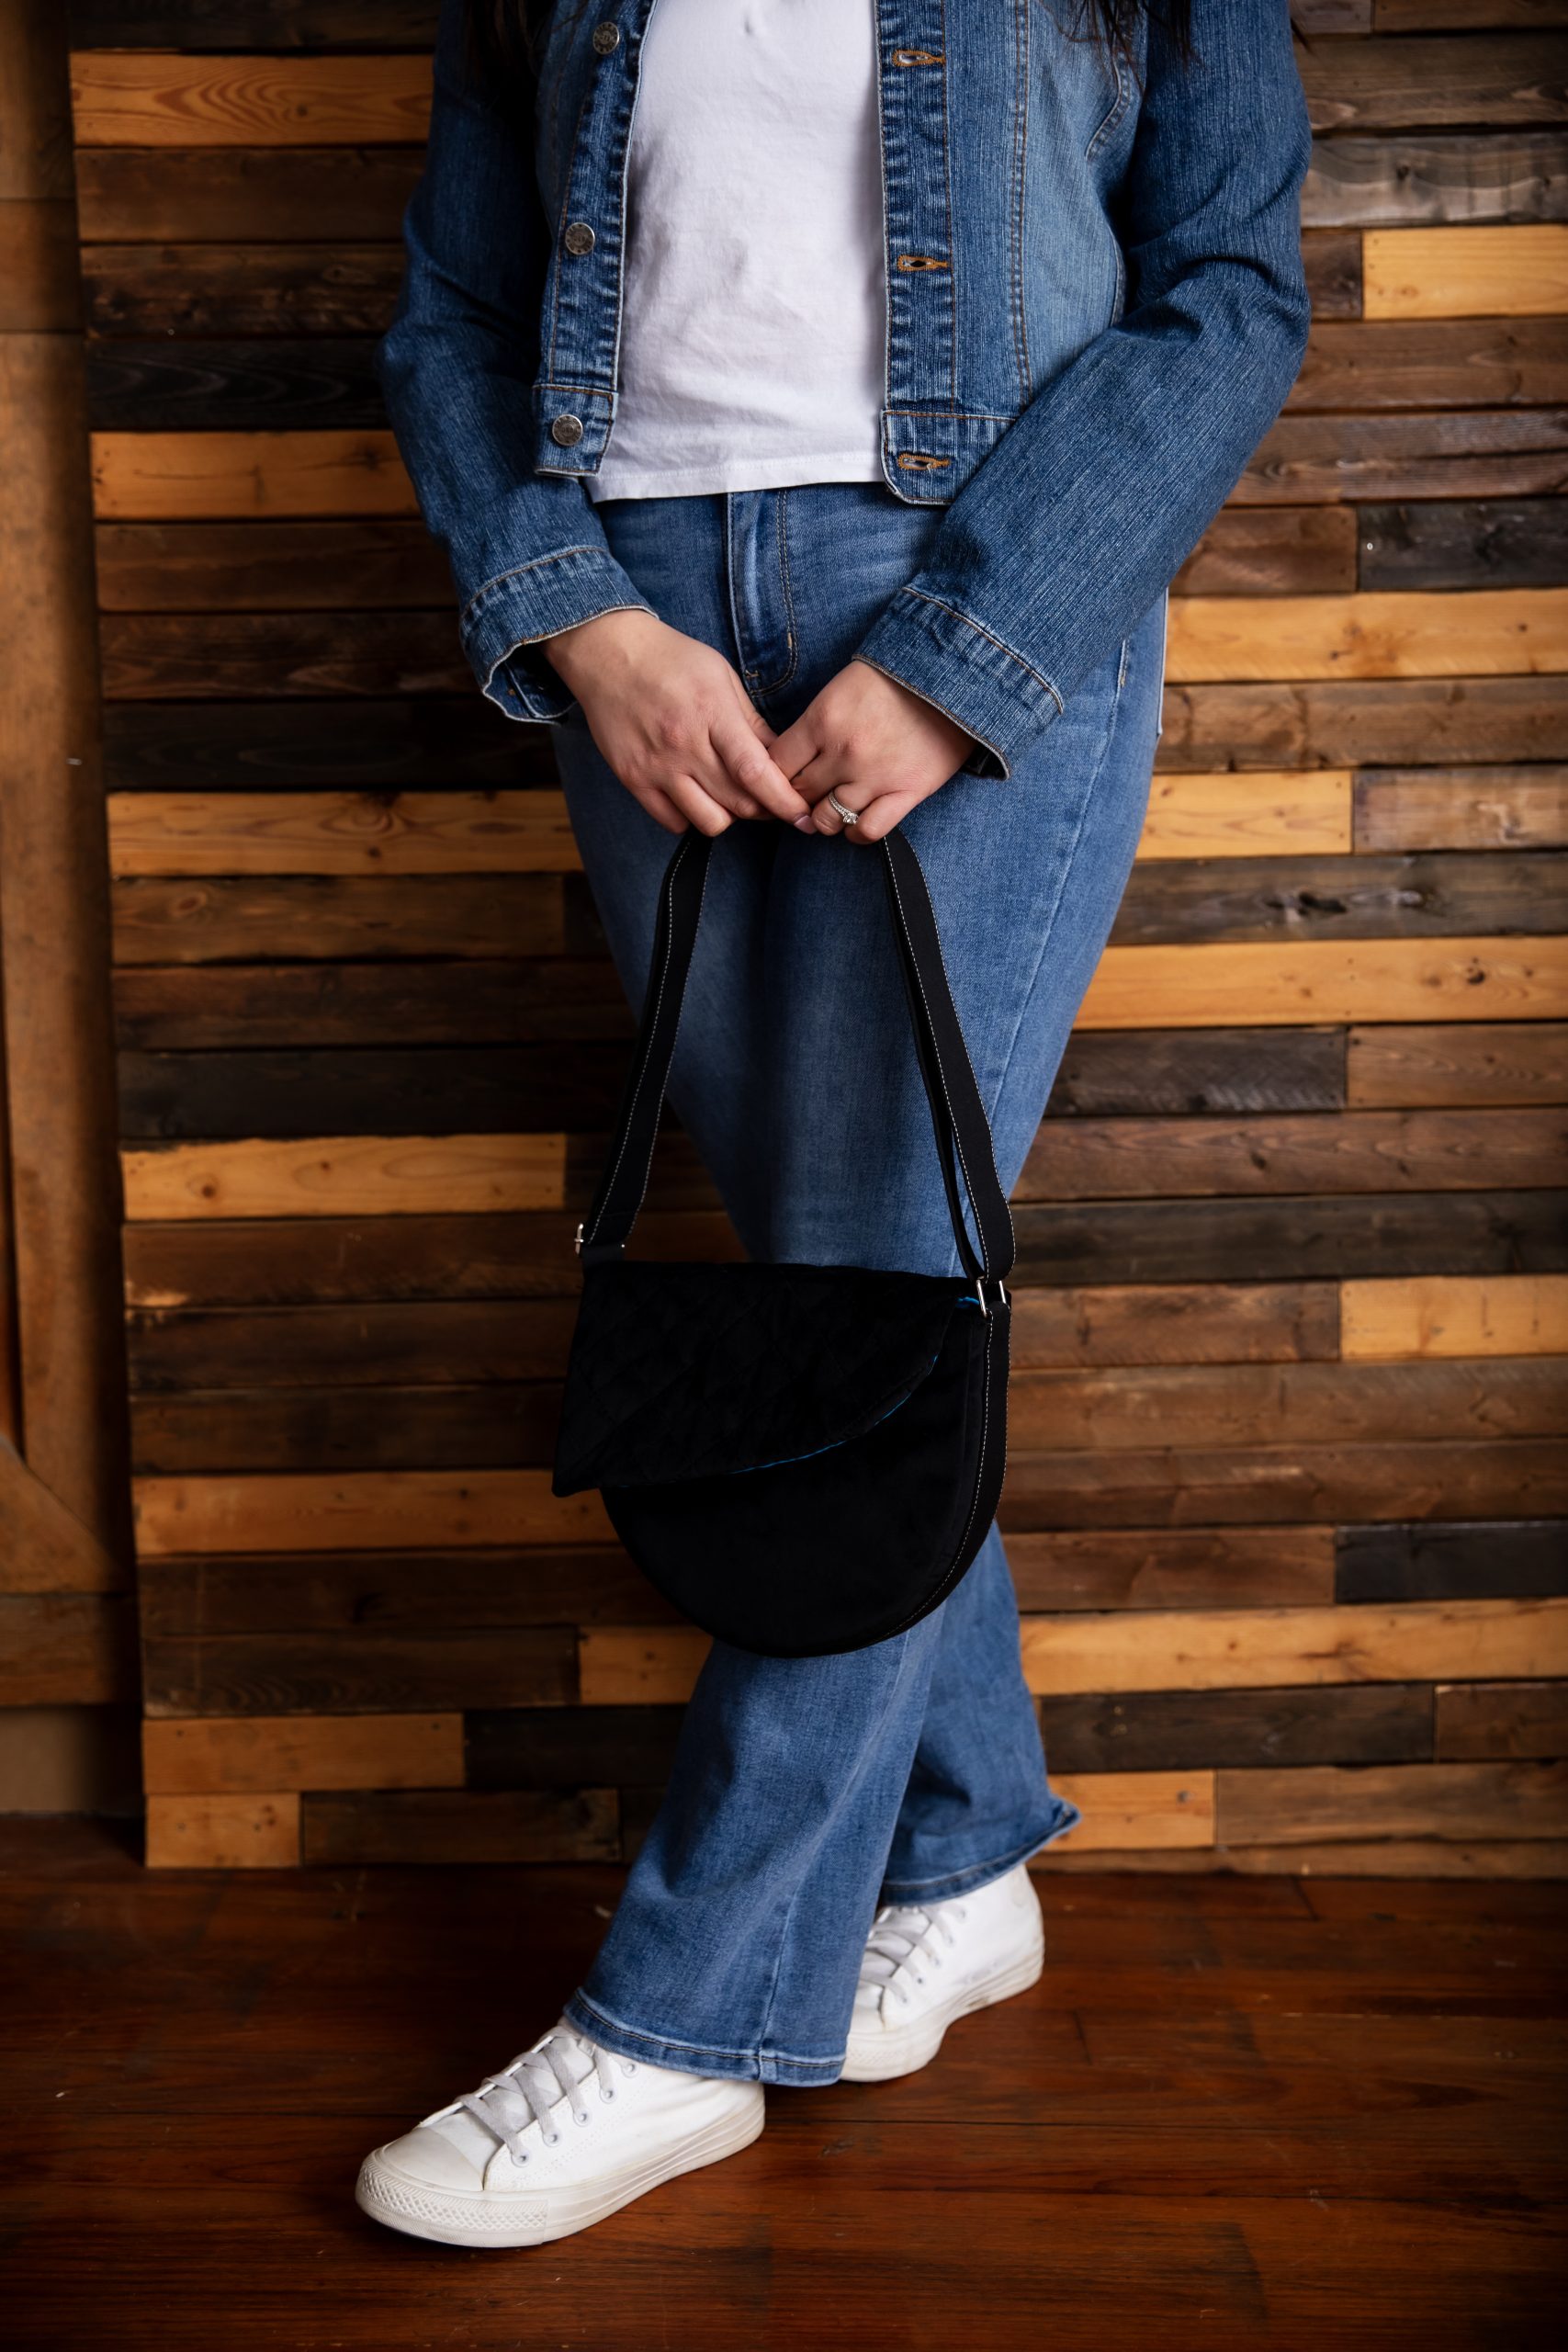
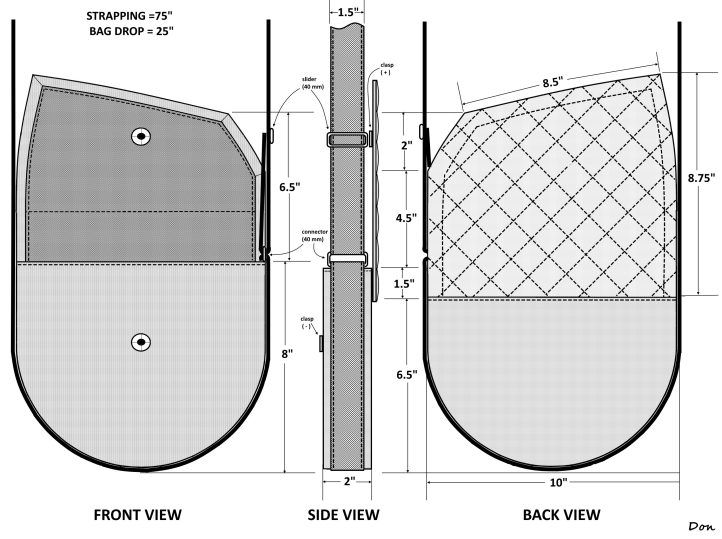
Bag Dimensions: 8” x 10” x 2” (H-W-D)
Bag Shoulder Strap (adjustable): 25” to 50” long x 1 1/2” wide.
Bag Strap Drop: 11” minimum to 24” maximum
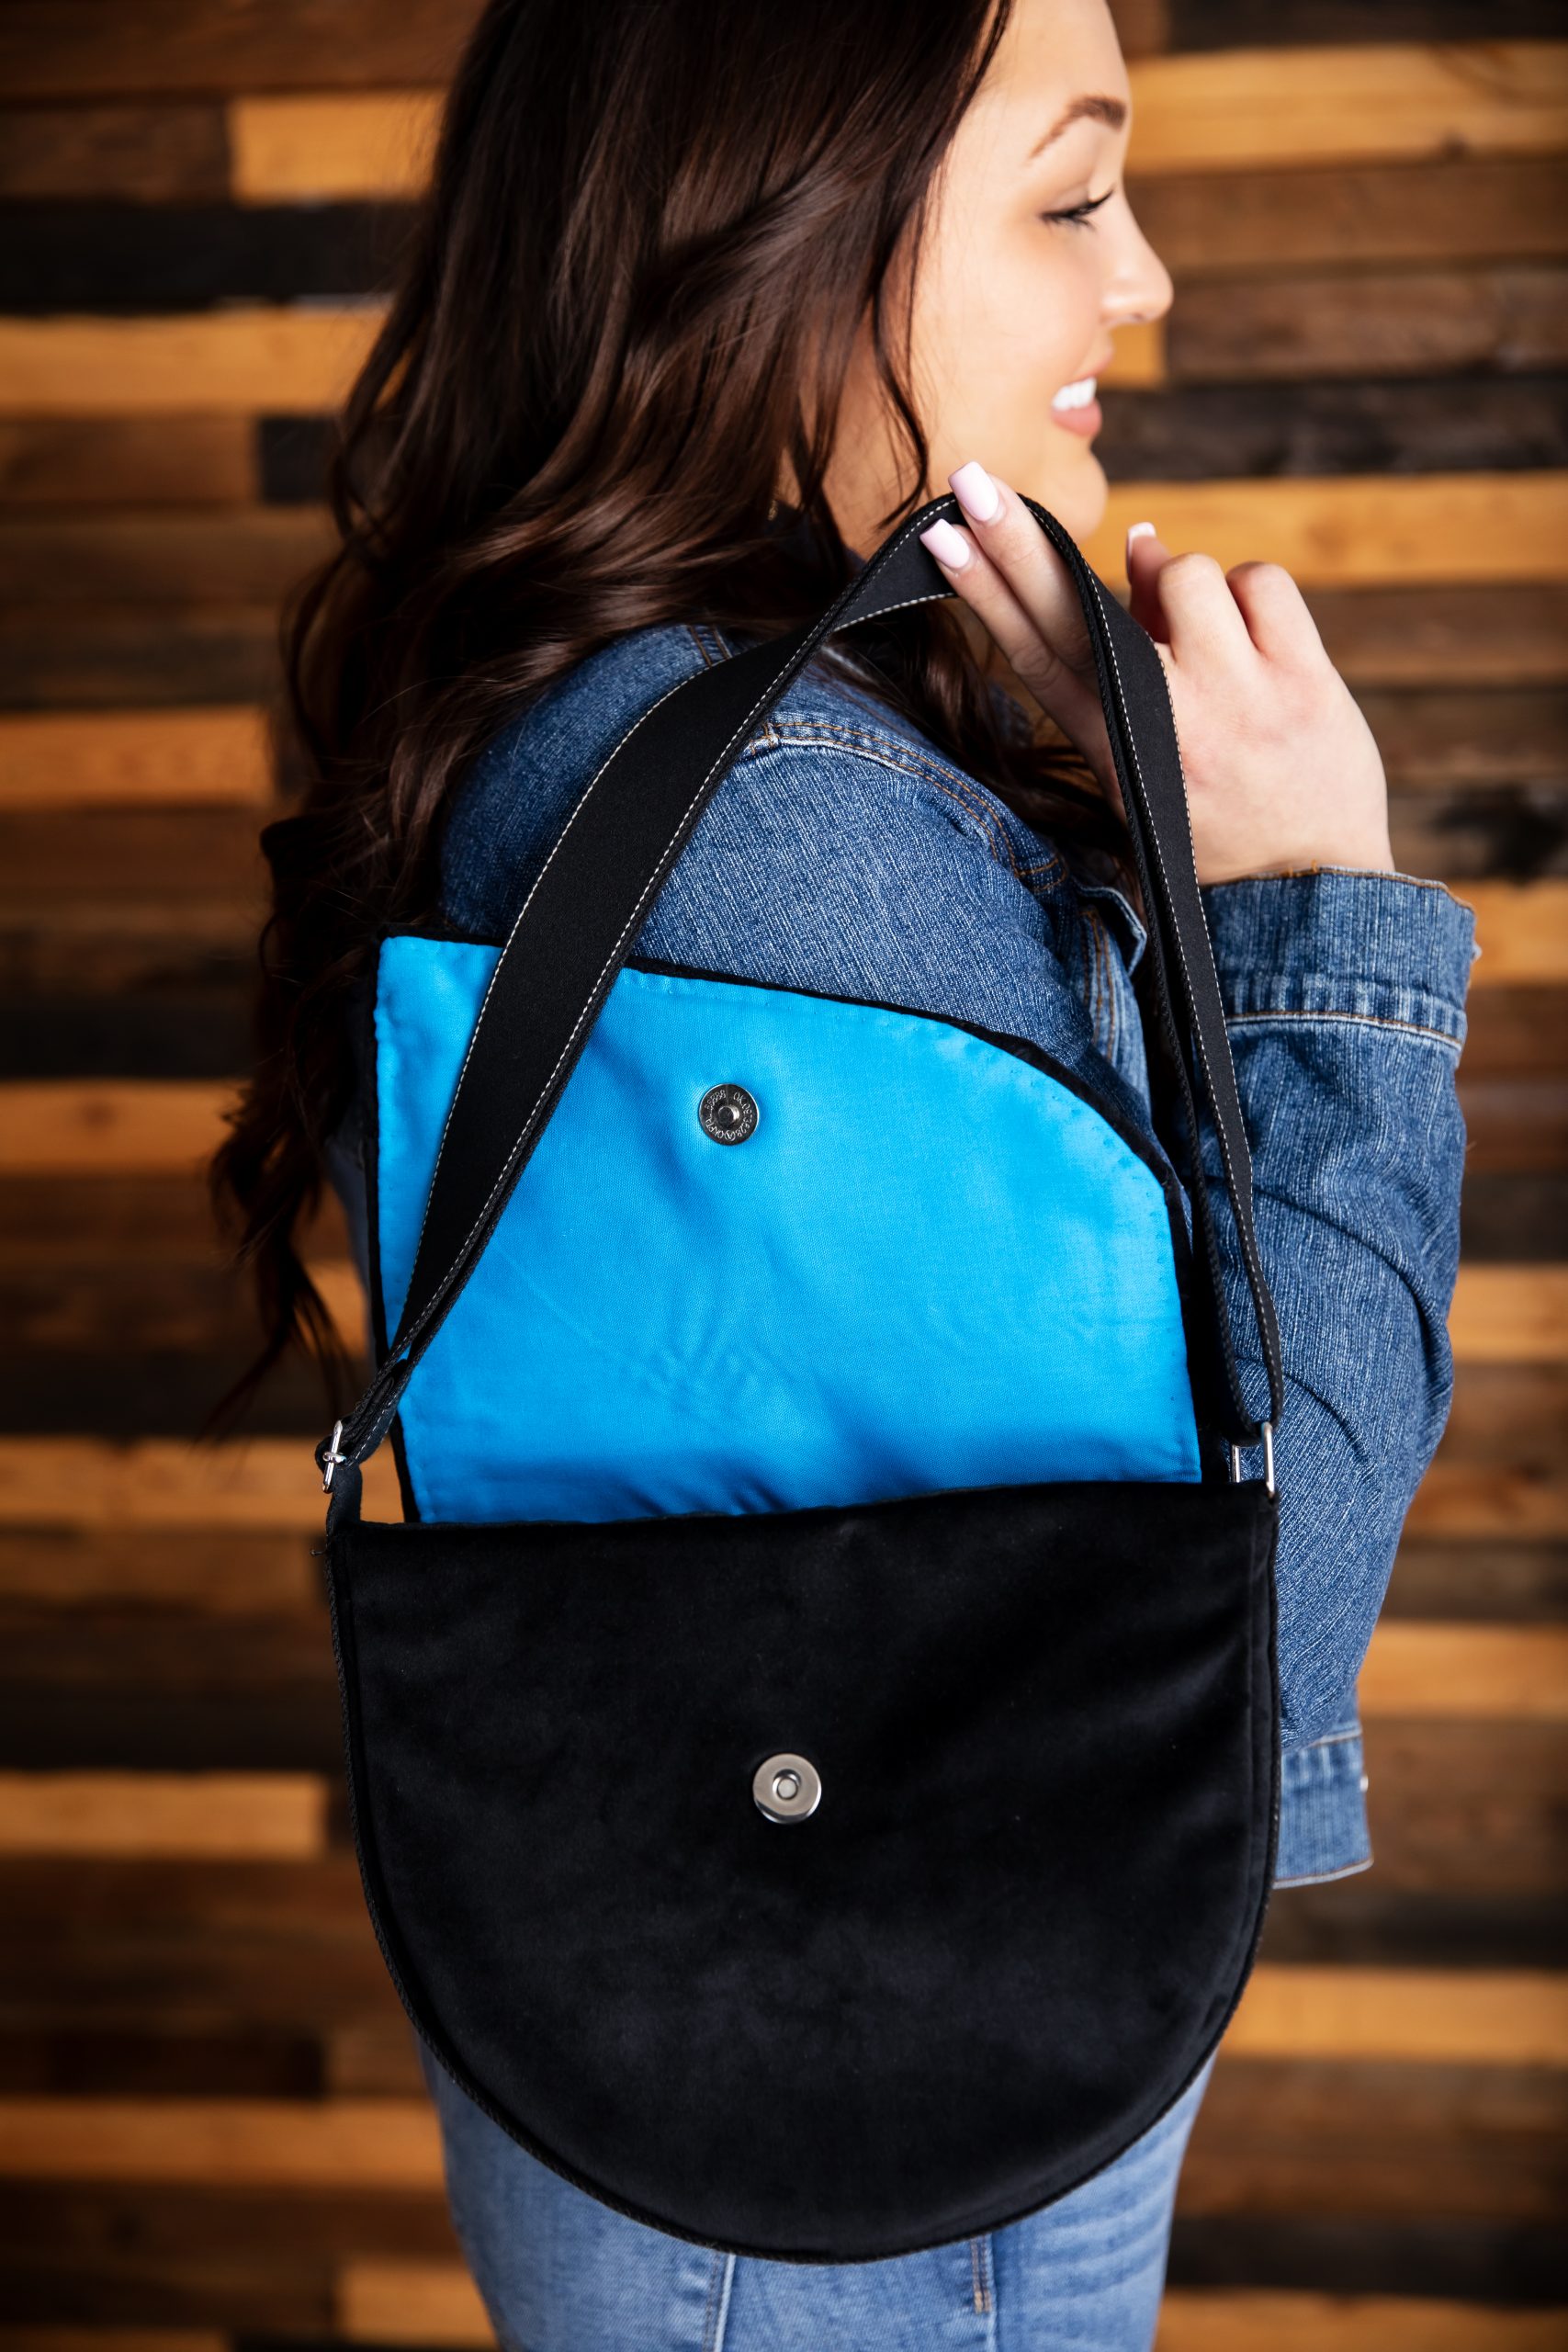
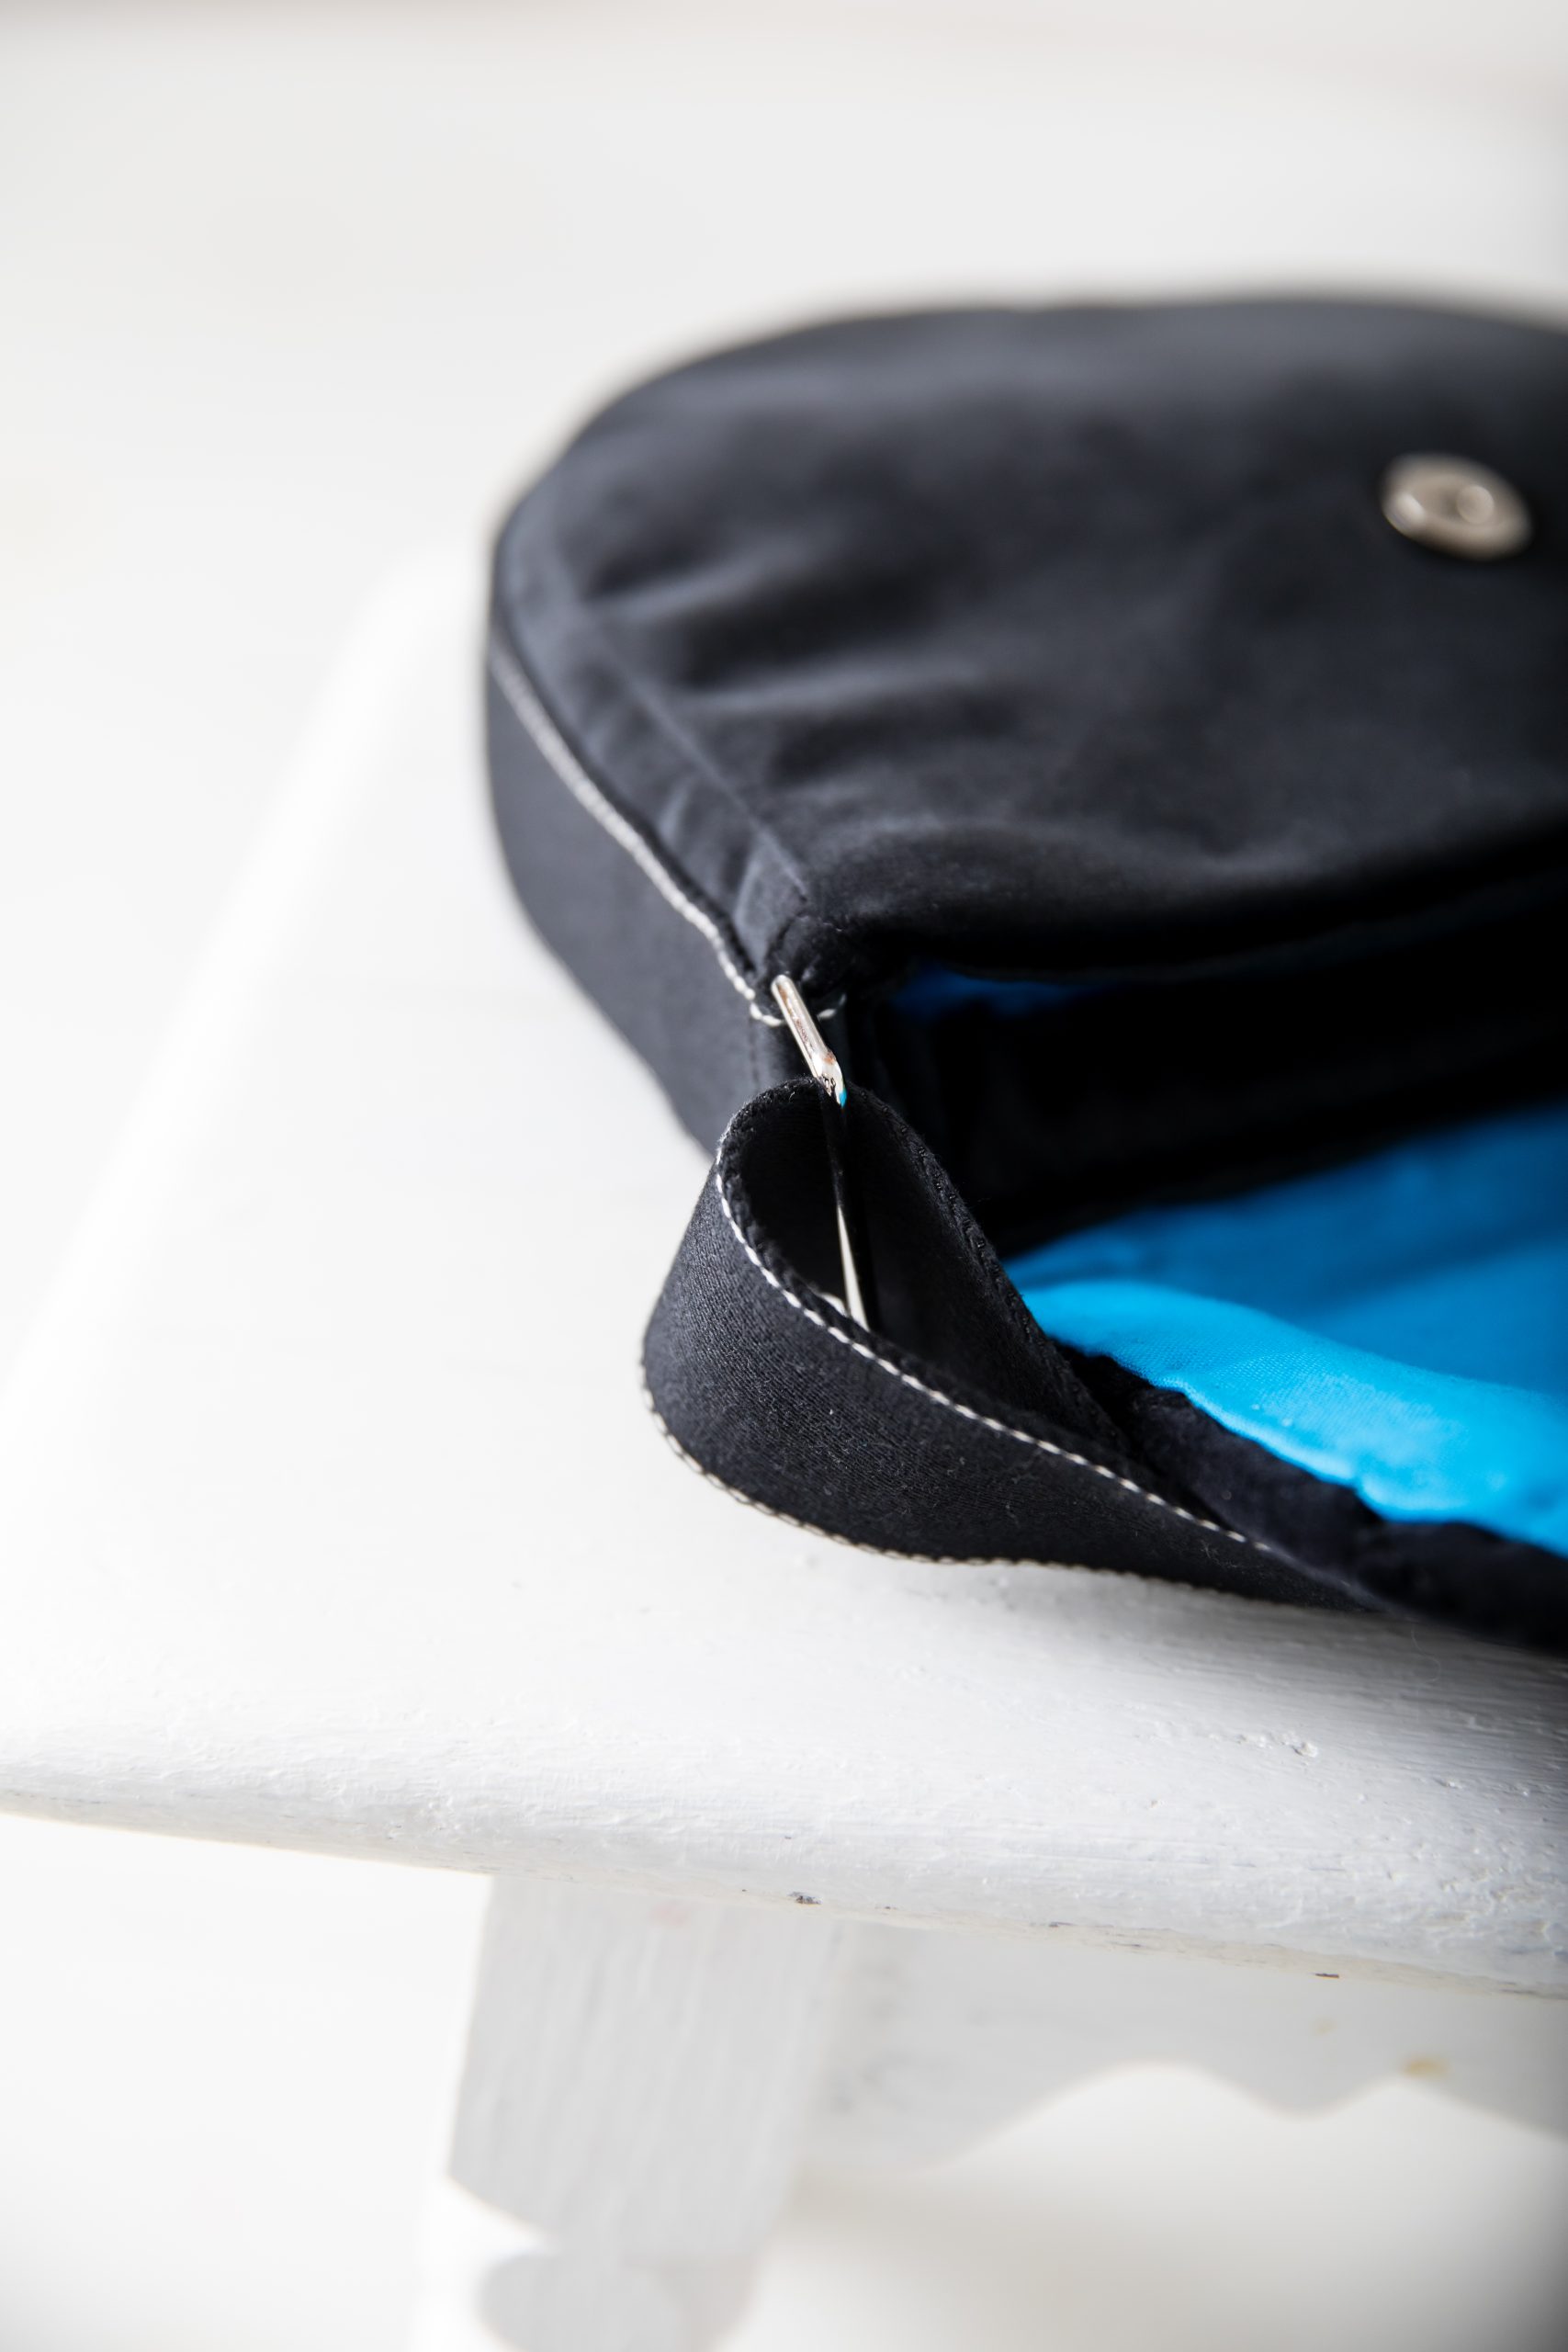
Bag Interior: Drop-in lining with 8” zippered pocket
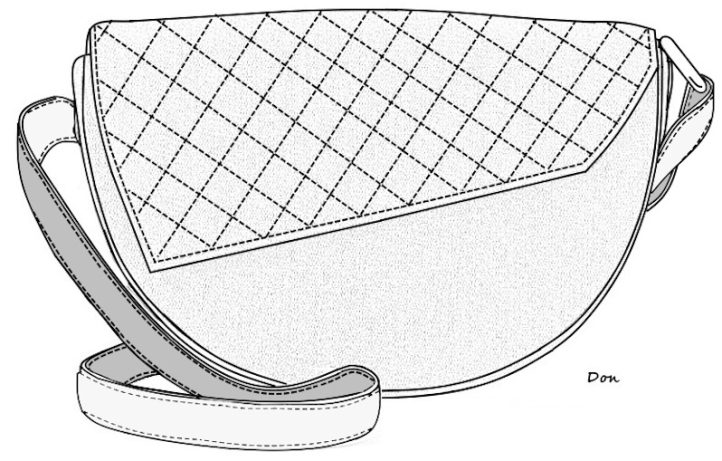
Soft, rich, and endlessly touchable — upholstery velvet brings an unexpected touch of luxury to handmade fashion accessories. In this project, we’ll re-imagine this sumptuous fabric as the star of a DIY saddle-style handbag, complete with a graceful semi-circular shape, quilted saddle flap, and a continuous shoulder strap that gives a sleek, modern finish.
Upholstery velvet’s plush surface mimics the look and feel of suede leather, yet it’s wonderfully manageable on a standard sewing machine. With a few smart construction techniques and some insider tips, you can achieve crisp seams, clean edges, and that structured “boutique” finish — all from your home sewing space.
Perfect for confident bag-makers, ready to level up, this tutorial walks you through every step of creating a handbag that looks and feels professionally made. The result? A sophisticated, tactile fashion piece that pairs timeless style with a truly handmade touch.
Why Upholstery Velvet?
Upholstery velvet might not be the first fabric that comes to mind for handbag making, but it’s a secret weapon for home sewists who want that rich look of suede leather without the factory machinery or specialist tools. This fabric offers the best of both worlds: luxurious texture and approachable handling, while keeping budgets and ethics in check.
Unlike genuine suede, which can be fussy and unforgiving under a domestic sewing machine, velvet glides through the feed dogs with relative ease — especially when paired with a walking foot. It shapes beautifully around curves, giving your saddle bag that softly structured silhouette that defines professional leather-work.
Compared to imitation suede or microfiber faux suede, upholstery velvet has a denser pile and subtle sheen that catches the light, adding visual depth and sophistication. It’s also sturdier than fashion velvet, with a woven backing designed to hold its shape, perfect for a handbag body that needs both structure and durability.
In short, upholstery velvet lets you capture the essence of suede’s elegance while enjoying a fabric that behaves beautifully, sews smoothly, and still delivers that tactile, high-end finish.
Bag-Making-Grade Stiffeners and Foundation Materials
Upholstery velvet does require some special considerations when making a saddle-style handbag, both in terms of interfacing and tools/machinery because of its texture and pile. Here’s a detailed breakdown:
1. INTERFACING REQUIREMENTS
Upholstery velvet is a soft and pliable napped fabric, so for a structured bag like a saddle-style handbag, you’ll need to reinforce it carefully to add body and structure:
- Type of interfacing:
- Use a sew-in interfacing (rather than fusible) to avoid crushing or flattening the nap with heat.
- Nonwoven sew-in interfacing, buckram, or canvas-weight cotton are good choices, depending on how firm you want the body to be.
- Placement:
- Apply interfacing to the lining fabric, not directly to the velvet, to preserve the pile.
- For areas like the flap, base, and gusset, you can also insert a layer of foam stabilizer or stiff felt between the velvet and lining for added structure.
2. TOOLS AND MACHINERY
Upholstery velvet’s texture can make it tricky to handle, so the right tools help maintain the nap and prevent fabric slippage:
- Walking foot (even-feed foot): Prevents the velvet layers from shifting while sewing, since the pile tends to “creep.”
- Teflon foot or roller foot: If you’re combining velvet with leather or vinyl accents (common in saddle-style bags), these feet glide smoothly over textured or sticky surfaces.
- Sharp microtex or universal needles (size 80/12 or 90/14): To avoid snagging the pile or leaving visible needle marks.
- Clips instead of pins: Pins can leave holes or impressions; use Wonder Clips™ or similar fabric clips.
- Steam and press tools: If pressing seams, always use a needle board or thick terry towel under the velvet and steam lightly from the wrong side to avoid crushing the nap.
3. CONSTRUCTION TIPS
- Directional cutting & sewing: Velvet has a nap—make sure all pieces face the same direction for consistent color and texture. Machine-stitch seams in the direction of the nap.
- Stabilized seams: Baste or stay-stitch curved areas (like the saddle flap and side gusset) before final assembly to prevent distortion.
- Order of operations: The “order of operations” in bag-making is the specific sequence of steps to efficiently construct a bag design, ensuring a professional finish. This process prioritizes keeping pieces flat for as long as possible to fit under the machine foot, and sometimes the way a project is structured means that you need to add some of the hardware (eg. magnetic bag clasp) before putting the other pieces together while you can still access its placement. Figuring out the most efficient order of operations is one of the most important parts of planning any project. Keep in mind that time spent planning this way is not time wasted, it is time and money saved.
Saddle-Style Bag Stabilizer Guide for Home Sewists
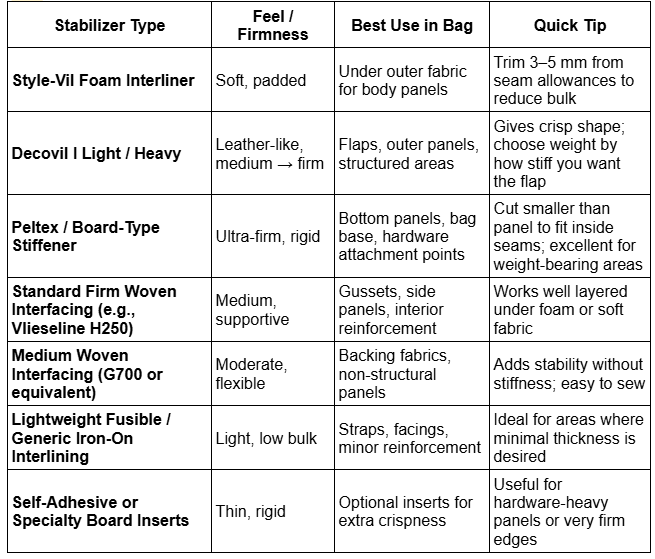
- Pellon™ brand is widely available in U.S. bag-making supply stores (e.g., Pellon™ Decovil Light, Decovil Heavy).
- Foam stabilizers like Pellon™ Flex Foam are available online through U.S. craft suppliers.
- European brands (Vlieseline™ Style-Vil, Decovil I) can be ordered from international or U.S. import shops — check shipping charges and width/yardage conversions.
- Always check whether the version is fusible or sew‐in — for velvet + foam layers, the sew‐in/non-fusible version is often preferable.
- Compare widths (inches vs cm) and price per yard/meter to budget correctly. Many retailers list both fusible and sew-in versions by the same name.
Saddle Bag Specifications
Materials and Supplies:
- 1/2 yard upholstery velvet, 55” (140 cm) wide
- 1/2 yard polyester lining, 58” (148 cm) wide
- 1 yard foam stabilizer, 28” (72 cm) wide
- 1/2 yard quilt wadding/batting, 60” (150cm) wide, 3/8” (10 mm) thick
- 1 yard fusible interfacing, 35” (90cm) wide
- 2 yards bag strapping, 1 1/2” (40mm) wide
- 1 set of magnetic clasp with prong backing, 3/4” (20mm) diameter
- 1 metal slider, 1 1/2” (40mm) diameter
- 1 metal ring connector, 1 1/2” (40mm) diameter
- 1 closed invisible zipper, 8” (20 cm) long
- 1 spool heavy-duty thread
- PDF Pattern – This is located at the bottom of this page. Please see printing instructions below.
Tools:
- Microtex or universal needles (size 80/12 or 90/14)
- Dual-feed walking foot attachment
- Wonder clips™ or similar
- Adhesive basting spray or double-side basting tape (optional)
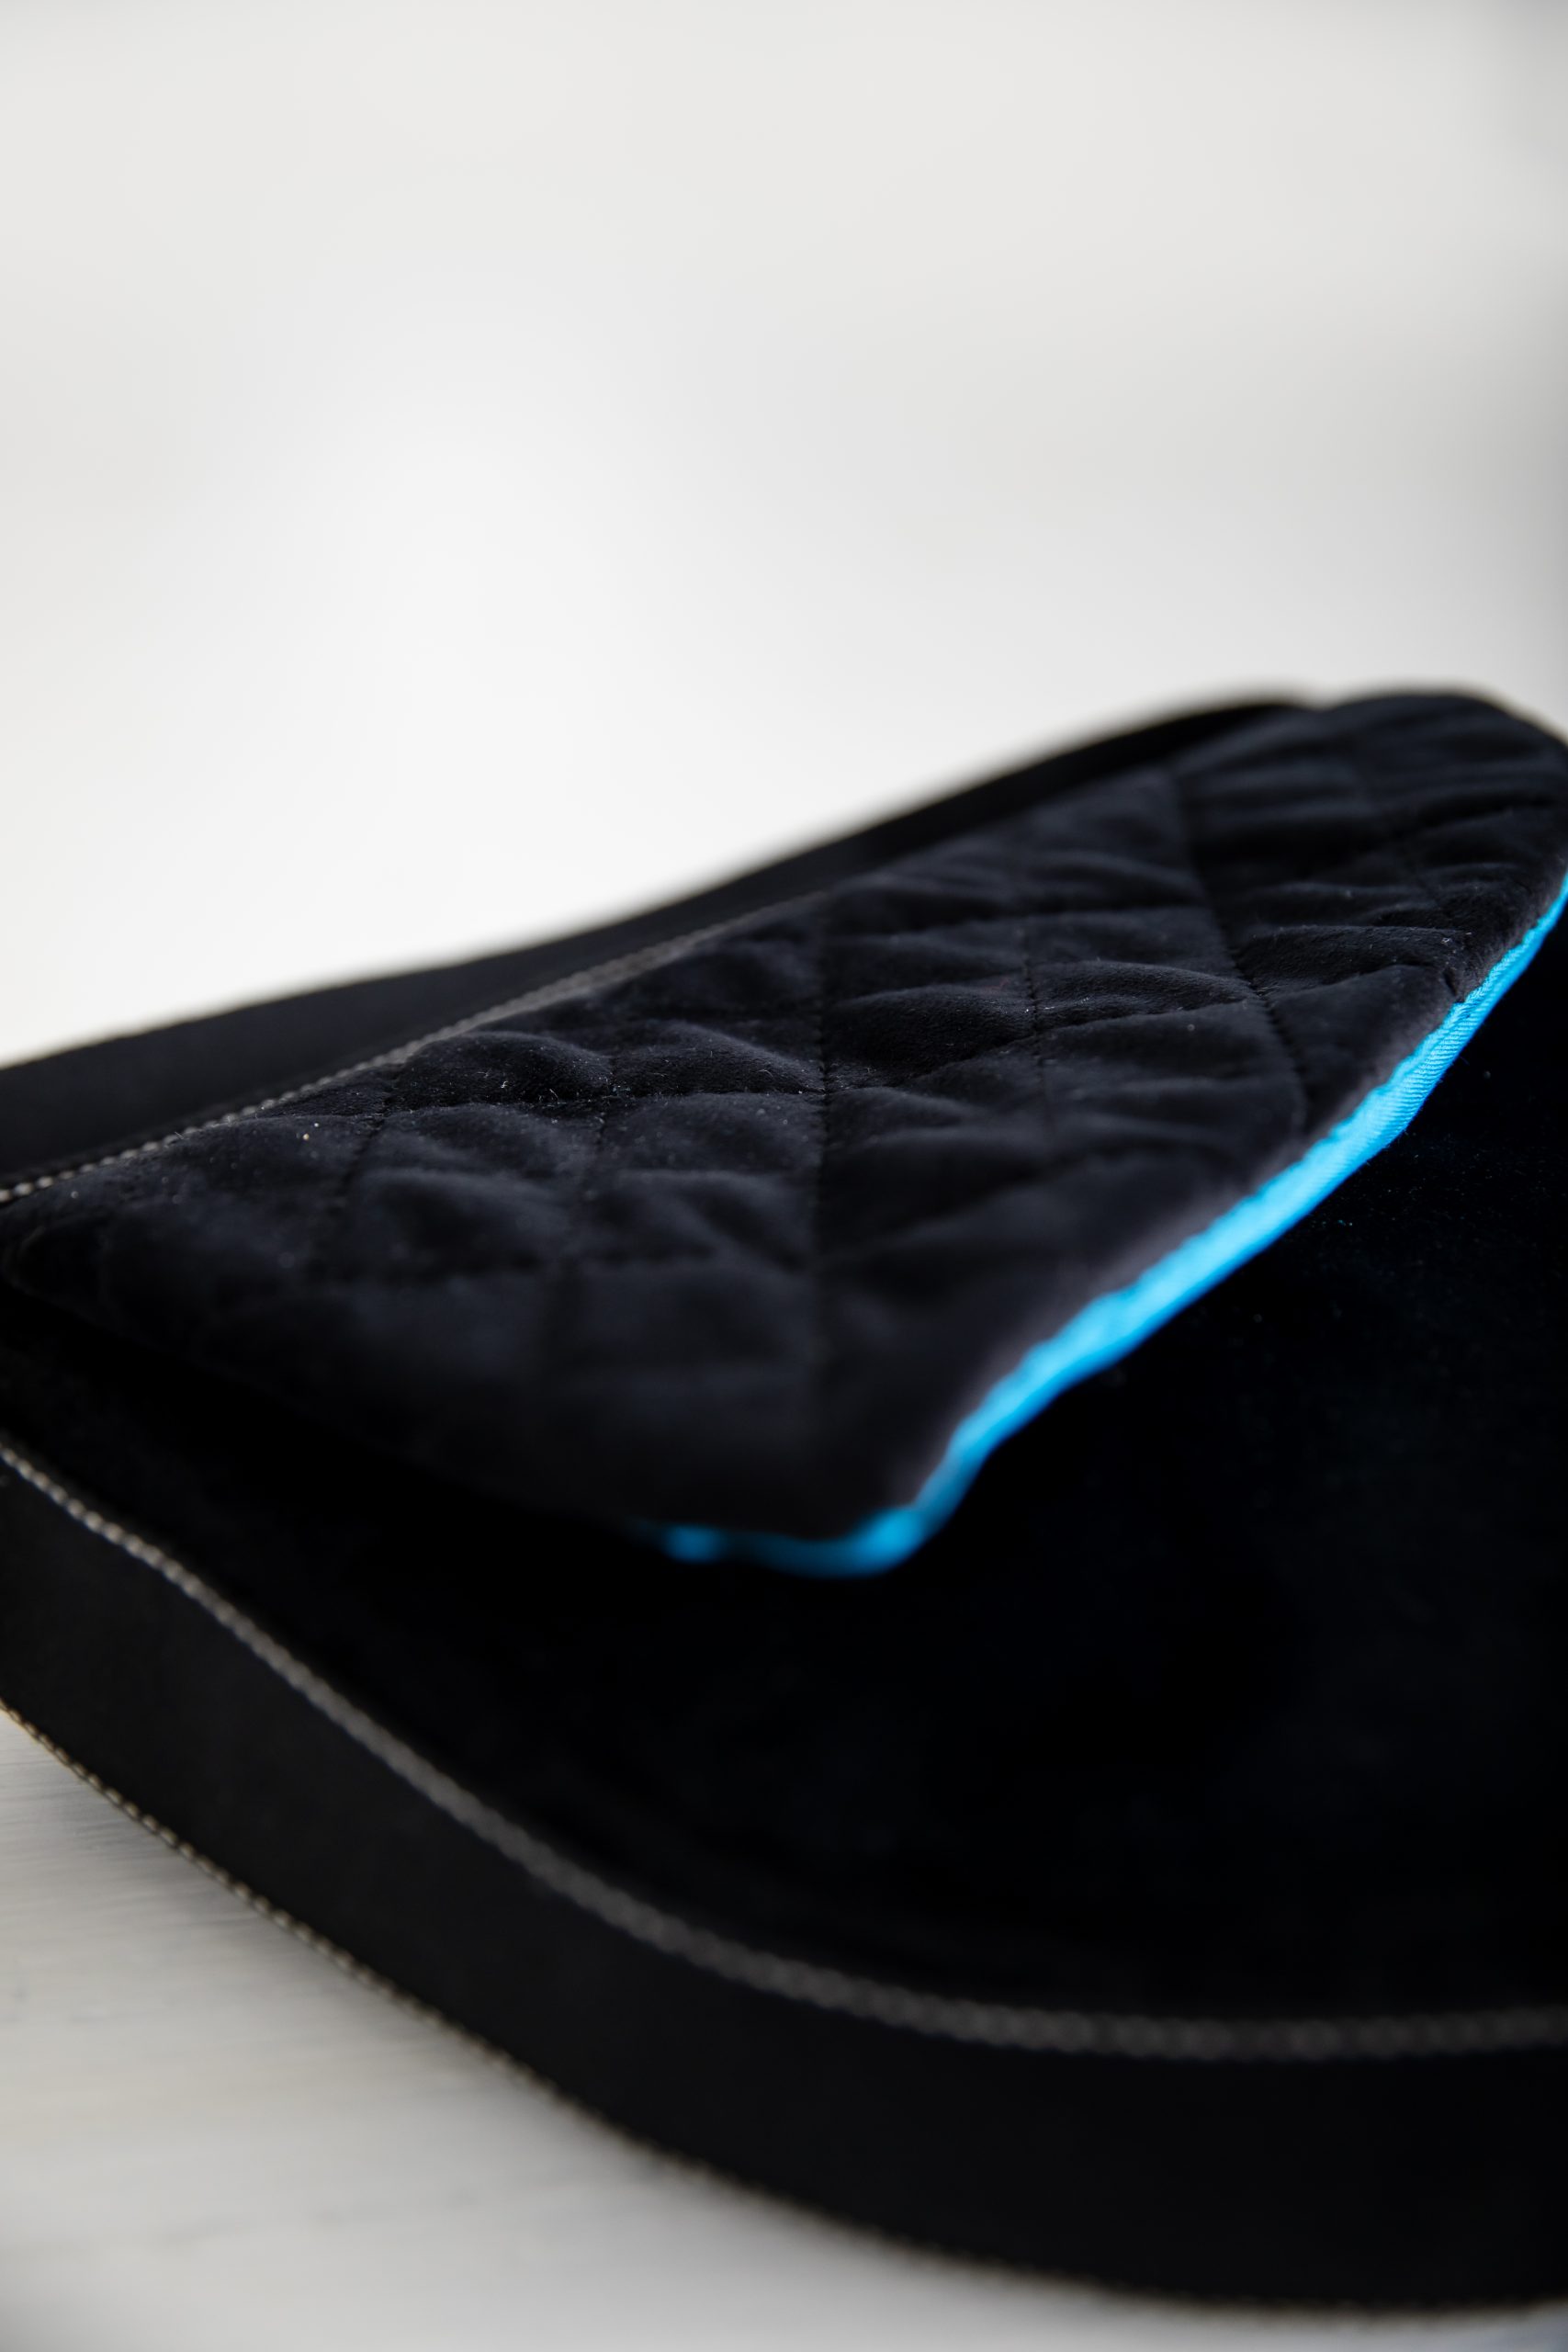
Design Tip: For my sample model, I chose basic black upholstery velvet for the exterior of the handbag to mimic black suede leather but you will find it in many color variations that resemble dyed leathers to meet your tastes. Whenever you are creating a fashion accessory with a subtle or somber color for its exterior, opt for a bright or colorful lining choice for the bag’s interior. It always produces a smile on your face. If the handbag has a glitzy or ornamental exterior, then the opposite is the integral choice, a somber neutral lining color for its interior.
PRINTING INSTRUCTIONS:
To download the PDF pattern, click on the download button at the bottom of the page. We recommend opening your download using Adobe Acrobat.
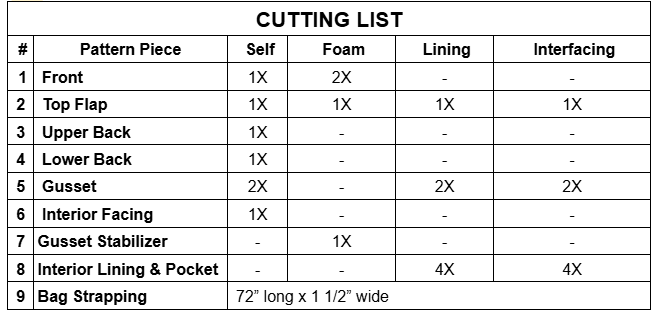
Marking and Cutting
Your cutting layout ensures consistent nap, clean seams, and perfect alignment for a professional-looking velvet handbag. Keep orientation clear by double-checking nap arrows on your velvet pieces; all should flow in the same direction. The Bag Flap (#2) has an asymmetrical shape; be sure to lay the pattern piece, face side up (FSU), on the velvet and mirrored for the lining of the flap. Label the inside of each piece (e.g., front top,” “flap”) with masking tape on the back side, not on the face side. Follow the “Cutting List” below.
1. BEFORE YOU START, PREPARE YOUR WORKSPACE
- Large, flat surface: Velvet likes to shift around, so use the largest flat surface you have (a clean floor works if needed).
- Good lighting: Velvet’s nap (the direction the pile lies) can make it hard to see markings, so good lighting helps.
- Mind the Nap (Pile Direction): Run your hand across the velvet. One direction feels smooth, the other feels rough. Mark an arrow on the back of the fabric to remind yourself.
- Be consistent: Decide if you want the nap to run UP (richer color but slightly rougher hand) or DOWN (softer to the touch but looks slightly lighter). All pieces must be cut in the same direction of nap to avoid color shading differences.
- Before marking and cutting the bag flap: Quilt the velvet before cutting out. (See notes at Assembly #2 below)
- Single-ply cutting: Do not fold your fabric. Velvet tends to creep, so cut one layer at a time.
- Use pattern weights instead of pins: Pins can leave holes or distort the pile. Use small objects or washers to keep the pattern in place. You will use the same pattern pieces for different materials of the handbag to maintain the shape and size of the bag.
- Mark with tailor’s chalk or washable marker: Mark lightly on the back (non-pile) side.
2. LAYOUT AND MARKING THE UPHOLSTERY VELVET (BAG EXTERIOR)
- Place pattern pieces with arrows following nap direction: Ensure the templates are face down for correct orientation. Quantities required are under “Self” header in chart.
- Trace around patterns on the wrong side with chalk or washable marker.
- Sharp shears or rotary cutter: Velvet frays and crushes easily, so a clean, confident cut is best. Cut one layer at a time for accuracy – do not fold fabric – lifting pieces gently to avoid pile distortion.
- Minimal handling: The less you move it after cutting, the better. Velvet edges can stretch slightly. Label each piece on the back with masking tape (name + nap arrow).
3. LAYOUT AND MARKING THE LINING (BAG INTERIOR)
- Avoid fashion lining fabrics: They are not strong enough for bag-making. Instead opt for synthetic blends of plain-weave fashion fabrics. Broadcloth, percale, treated cotton, or nylon make good options. To reinforce and add body to lining, fuse interlining to back of fabric.
- Dressmaker’s Lay: Fold lining fabric right sides together; align selvages and grain lines.
- Place lining pattern pieces following grainline rule: Ensure the pattern pieces are parallel with the selvage of the cloth. Quantities required are under “Lining” header in chart.
- Trace around patterns with chalk or washable marker: Lining pieces are the same size as velvet pieces (no trimming).
- Cut lining pieces: On the double for mirrored pieces and face down for single pieces.
- Transfer all markings (notches, zipper pocket placement).
- Fuse interfacing: Trace and cut interfacings. Quantities required are under “Interfacing” header in chart. Apply a fusible interfacing (on the wrong side) before cutting or immediately after. This helps with structure and reduces fraying. Fuse interfacing only to the lining pieces, using a press cloth.
4. LAYOUT AND MARKING INTERLINING (FOAM STABILIZER)
Use foam or other sew-in stabilizers to give your bag its structured body.
The goal: Keep the velvet supple but add structure inside the bag.
How to cut:
- Use velvet pattern pieces as templates: Cut the interlining (canvas, foam stabilizer, or batting) to match your outer pieces by using the same pattern piece. Quantities required are under “Foam” header in chart.
- Grade Seam Allowance: Trim off the seam allowance (1/4″ to 3/8″) all around on all sides to keep seams thin. Follow assembly instructions before trimming the foam.
5. SECURE VELVET TO FOAM
There are three safe ways to keep the velvet and foam from shifting:
Option A — Basting Stitch (Recommended)
- Hand or machine baste just inside the seam allowance (1/8″ from edge) around each piece.
- Use long stitches (4–5 mm) and slightly loosen top tension if machine-basting.
- A walking foot helps feed the layers evenly.
Option B — Spray Basting (Optional)
- If you prefer, you can use a temporary fabric adhesive spray (light mist only!) to attach velvet to foam.
- Always test on a scrap first — some adhesives can leave marks on velvet or interfere with nap.
Option C — Edge Stitching (for structured pieces)
- On areas needing extra control (like a curved flap), stitch close to the edge to “quilt” the velvet lightly to the foam.
Machine Set-Up:
Machine Needle – size 70-80 universal needle or size 90/14 microtex needle
Stitch Length – slightly longer than average stitch length (3.5 of a possible 5)
Stitch Tension – regular tension (4 of a possible 9)
Foot Attachments:
- dual-feed walking foot for velvet fabric
- zipper foot for lining pocket
- single needle foot for lining fabric
- spacing guide attachment for quilting
Pressing – no iron / steam only
Seam Allowance: 1/2” (12 mm) wide
Quilting Pattern: diamond (1” x 1” spacing)
A Few Notes Before You Sew
A few mindful habits will keep your project looking flawless from first cut to final stitch.
Mind the nap: Velvet has a directional pile, meaning it can look lighter or darker depending on how it’s laid out. Always check that all your pattern pieces run the same way down before cutting — it’s the secret to an even, professional finish. The designer recommends that you chalk an arrow on the back side of the fabric or place masking tape on the back of each cut piece with a name and nap direction, to aid you in orientation when assembling.
Handle with care: Pins and excessive pressure can crush the pile. Use fabric clips or fine silk pins within the seam allowance only. In place of pressing, hover and steam gently from the wrong side of the fabric over a thick plush towel — never press flat.
Control shifting: Velvet’s plush surface tends to slide against itself. A walking foot or even-feed foot keeps layers moving together smoothly. If you’re new to velvet, Don recommends a line of hand or machine basting before stitching your main seam to give added control without stress. After each step, check the pattern dimensions are the same for your basting dimensions before you machine-stitch.
Skip the fusing: Heat-applied interfacings doesn’t pair well with velvet’s pile. Instead, use foam or sew-in type stabilizers to give your bag its structured body — they add shape without damaging the texture. Use fusibles only to reinforce lining fabrics.
With these simple precautions, upholstery velvet becomes not a challenge but a delight yielding a handbag that feels refined, touchable, and unmistakably high-end.
Sewing Instructions:
PREPARE THE LINING PIECES:
- Strengthen each lining piece by fusing interfacing to the wrong side.
- Trim the interfacing’s seam allowance by 1/4″ (6 mm) to reduce bulk.
- Center it on the fabric and fuse with a medium-heat steam iron for about 8 seconds (or follow the product instructions).
- Repeat for all lining pieces.
QUILT THE UPHOLSTERY VELVET:
Prepare the Quilt Sandwich:
- Cut the velvet about 1″ larger than the Bag Flap pattern (#2). Be mindful of the nap.
- Cut the batting and lightweight non-woven interfacing to the same over-sized shape.
- Layer them in this order: interfacing (bottom), batting (middle), velvet (top).
- Lightly baste through the center vertically and horizontally to hold the layers together.
Mark and Stitch the Quilting Lines:
- Mark a 45° guideline using a quilting ruler or the diagonal line on a cutting mat.
- Attach a walking foot and lengthen your stitch. Stitch along the marked bias line, sewing in the direction of the nap. Back-tack at both ends.
Quilt the Velvet:
- Use the first stitched line as a guide and sew additional parallel lines 1″ apart across the fabric. A spacing bar attachment can help keep rows even.
- Once the first set of diagonal lines is finished, repeat in the opposite direction to form a diamond pattern.
- Remove basting threads. Your quilted fabric is now ready to cut out the Bag Flap pattern piece (#2).
MAKE THE BAG FLAP:
Gather Your Pieces:
- You’ll need the quilted flap piece (#2), the interfaced lining flap piece (#2), the foam stabilizer (#2), and the magnetic clasp with backing plate.
Fit and Trim the Foam:
- Trim the seam allowance from the foam at the sides and bottom edge only.
- Center the foam on the wrong side of the quilted flap so the top edges align.
- Fold the flap edges over the foam to check that they turn under smoothly. Trim the foam further if needed if the foam is thick.
Score the Foam:
- On the top edge of the foam, mark the seam allowance.
- From there, mark two more parallel lines: The first 1 1/2″ (38 mm) below the seam allowance.
- The second is same distance as the bag’s depth (e.g., 2″ / 50 mm) below that.
- Machine-baste along both lines to help the flap fold neatly.
- Trim away the top seam allowance on the foam.
Attach and Shape the Flap:
- Re-center the foam and clip it in place.
- Fold the flap’s sides and bottom over the foam and clip. Confirm the top width is 10″ (25.4 cm) wide.
- Hand-baste the turned edges to the foam, forming neat mitered corners. Keep checking the front of the flap for smooth edges.
Install the Magnetic Clasp:
- Mark the clasp placement on the lining using the pattern.
- Add a small square of fusible interfacing behind the mark for reinforcement.
- Fold the lining in half, snip two small slits for the clasp prongs, and insert the clasp.
- Add a small piece of foam and the backing plate on the wrong side; bend prongs outward.
Attach the Lining to the Flap:
- Place the lining against the back of the quilted flap and align the top edges. Clip in place.
- Turn the lining’s edges under along the sides and bottom to cover the foam and previous stitching.
- Slip-stitch the lining to the flap. When you reach the scored fold lines, gently fold the flap to release tension before stitching.
- Leave the top edge of the flap open and set aside.
MAKE THE INTERIOR BAG LINING:
Gather Your Pieces:
- Grab your interior facing (#6), four interfaced lining pieces (#8), two lining gusset pieces(#5), and an 8″ closed zipper for the pocket.
Attach the Lining Gusset:
- Place the two gusset lining pieces right sides together and join one short end. Press the seam open.
- With right sides together, pin one side of the gusset lining to a lining piece (#8). Start at the center of the curved bottom and pin your way up to the top. The gusset will look a little long on purpose—about 2″.
- Sew the gusset to the lining wall (1/2″ seam allowance), keeping the curved edge on the bottom as you go. Back-tack at the beginning and end.
- Repeat method on the other lining piece. Check that both gusset ends have the same extra length and adjust if needed.
- Trim off the extra gusset length at the top.
Add the Interior Facing:
- Fold the bag facing piece (#6) in half (short ends together), right sides in. Sew the short ends and press the seam open. Top-stitch on both sides of the seam from the right side.
- With right sides together—and keeping the nap direction in mind—pin the interior facing to the top of the lining bag. Match the facing seam to the center front notch on the lining and pin around until you reach the pocket-opening notches. Repeat on the other side.
- Sew from one pocket notch to the other. Hand-baste the pocket opening closed for now.
Add the Zipper Pocket:
You’ll need the last two lining pieces (#8) and your 8″ zipper.
- Between the pocket notches, place the zipper face-down over the seamline and pin it in place.
- Using a zipper foot, sew the zipper to the seam allowances only.
- Trim 3/8″ (1 cm) off the straight edge of one lining piece—this becomes the front of your pocket bag.
- Sew the trimmed edge to the zipper opening, then flip it down.
- Take the remaining lining piece and sew its straight edge to the opposite side of the zipper opening. This is the back portion of the pocket bag.
- With right sides together, pin and sew the curved sides of the pocket bag from zipper top to zipper bottom. (Note: The layers will not match up). Trim any extra fabric in the seam allowance.
- From the outside, bar-tack the zipper ends to keep everything secure. Set the lining aside.
ATTACH THE BAG FLAP TO THE BACK:
Gather Your Pieces:
- You’ll need the finished flap(#2), the upper (3#) and lower back pieces (#4), and the foam stabilizer.
Sew On the Flap:
- Center the flap along the top edge of the lower back piece, right sides together. Pin and sew.
- Place the upper back piece right side down on top, sandwiching the flap. Sew across the whole top edge. Remove any basting threads.
Fit and Trim the Foam:
- Trim 1/2″ of seam allowance off the curved edge of the foam.
- Mark a line 2 1/2″ down from the top of the foam.
- Center the back-and-flap piece on the foam so the top edges line up. Using a zipper foot, sew along the flap seam through all layers, starting from the center and working toward each side.
- With the back section facing up, fold the upper back piece up so it meets the foam’s top edge. Trim only the foam so there is a 1/2″ fabric seam allowance.
- If needed, trim edges of the foam more if it covers up the seam allowance on the velvet.
Set aside.
ATTACH THE BAG STRAP TO THE GUSSET:
Gather Your Pieces:
- Two velvet gusset pieces (#5), one foam gusset strip (#7), the bag strapping (#9), and one metal connector.
Build the Gusset:
- With right sides together and nap direction matching, sew the gusset pieces together at one short end to mirror one another. Finger-press open and top-stitch on both sides of the seam.
- Hand-baste a 1/2″ seam-allowance guideline down each long side so the space between them is 2″ (5 cm).
Add the Shoulder Strap and Foam Foundation:
- Lay the gusset right side up. Place the strapping right side up on top, centered between the basting lines. Let about 1″ (2.5 cm) of the strap extend past the short end. Roll up the rest of the strap and secure it with an elastic so it doesn’t wander.
- Slide the metal connector onto the strap and push it out of your way. Sew across the short end to anchor the strap, allowing for the seam allowance.
- Slide the connector back to the seam, then stitch as close to the hardware as you can using a zipper foot.
- Flip to the back side and center the foam strip between the basting lines, securing it with basting tape or glue. The foam should start just below the hardware and extend past the opposite end of the gusset piece.
- Flip back to the right side and top-stitch the strapping down along both long edges, stitching through all layers. When you reach the far end, pivot, sew across, and come back down the other side. Trim any foam sticking out at the short end past your stitching. Set aside.
JOIN THE BACK OF THE BAG TO THE GUSSET:
Gather Your Pieces:
- Grab your interlined gusset piece (#5) and the back piece (the one with the flap).
Join Gusset To Back Section:
- Lay the back piece right side up.
- Place the gusset right sides together with the back. Pin the top right corner first (where the hardware sits), then the top left (where the strap tail is).
- Match the gusset’s center seam to the notch at the bottom curve of the back.
- Ease the gusset around the curve like you’re wrapping a ribbon around a gift—pin or clip only in the seam allowance.
- Hand-baste 1/2″ from the raw edge. Make sure both sides look balanced around the flap and adjust if needed.
- Switch to a zipper foot. With the curved seam against the feed dogs, sew right along the foam’s edge, then remove your basting.
JOIN THE FRONT OF THE BAG TO THE GUSSET:
Gather Your Pieces:
- You’ll need the front piece (#1), the other half of the magnetic clasp, a tiny foam square, and a 10″ piece of narrow elastic or remnant piece of seam binding.
Insert the Clasp:
- Mark the clasp position on the wrong side of the front. Snip two tiny slits for the prongs.
- Insert the clasp from the front, slide the foam square over the prongs on the back, add the backing plate, and bend the prongs flat.
Attach Bag Front To Gusset:
- Pin or baste the gusset to the front just like you did with the back section.
- Stitch with your zipper foot, then remove the basting.
- Stretch your elastic across the front section (from side to side) and stitch it down just above the level of the clasp.
INSERT THE FOAM STABILIZER:
You won’t fit the whole bag under the machine after this—so enjoy this last machine-free moment!
Turn the Bag Right Side Out:
- Turn slowly and gently—think “yoga for fabric.” Work in small sections, easing the fabric through the opening with your fingers or a blunt tool (no pokey sticks!). Support the seams as you go. Try as you can, not to fold the foam stabilizer too much; let the front of the bag take most of the distortion.
Fit and Trim the Foam:
- Trim 1/2″ off the foam along the top and curved edges.
- Slide the foam between the lining and the elastic. Test the fit. If it’s too thick or won’t lie flat, shave a tiny bit (about 1/8″) from the curved edge.
- Once it’s snug, fold the top edge of the bag over the foam by 1/2″. Secure the seam allowance with tailor-basting or a herringbone stitch to keep everything neat and in place.
FINISH THE SHOULDER STRAP:
Time for the slider hardware.
- Thread the slider onto the strap: under → over the center bar → under again. Push it out of the way.
- Without twisting the strap, feed the free end through the metal connector and back toward the slider.
- Open the loop around the slider’s center bar, fold the strap end under by 1″, and stitch across both layers to secure.
- Adjust the strap to your perfect length.
DROP IN THE LINING:
- Turn under the seam allowance on your lining’s facing and baste the fold.
- Slip the lining into the bag cavity. Match the gusset widths on each side, place the zip pocket toward the back, and align the facing’s center front with the bag’s center front. Clip in place.
- Use strong thread and a ladder stitch to sew the bag facing neatly around the bag’s opening. Then go around the inside edge one more time with a hand-picked under-stitch to hold it all in place.