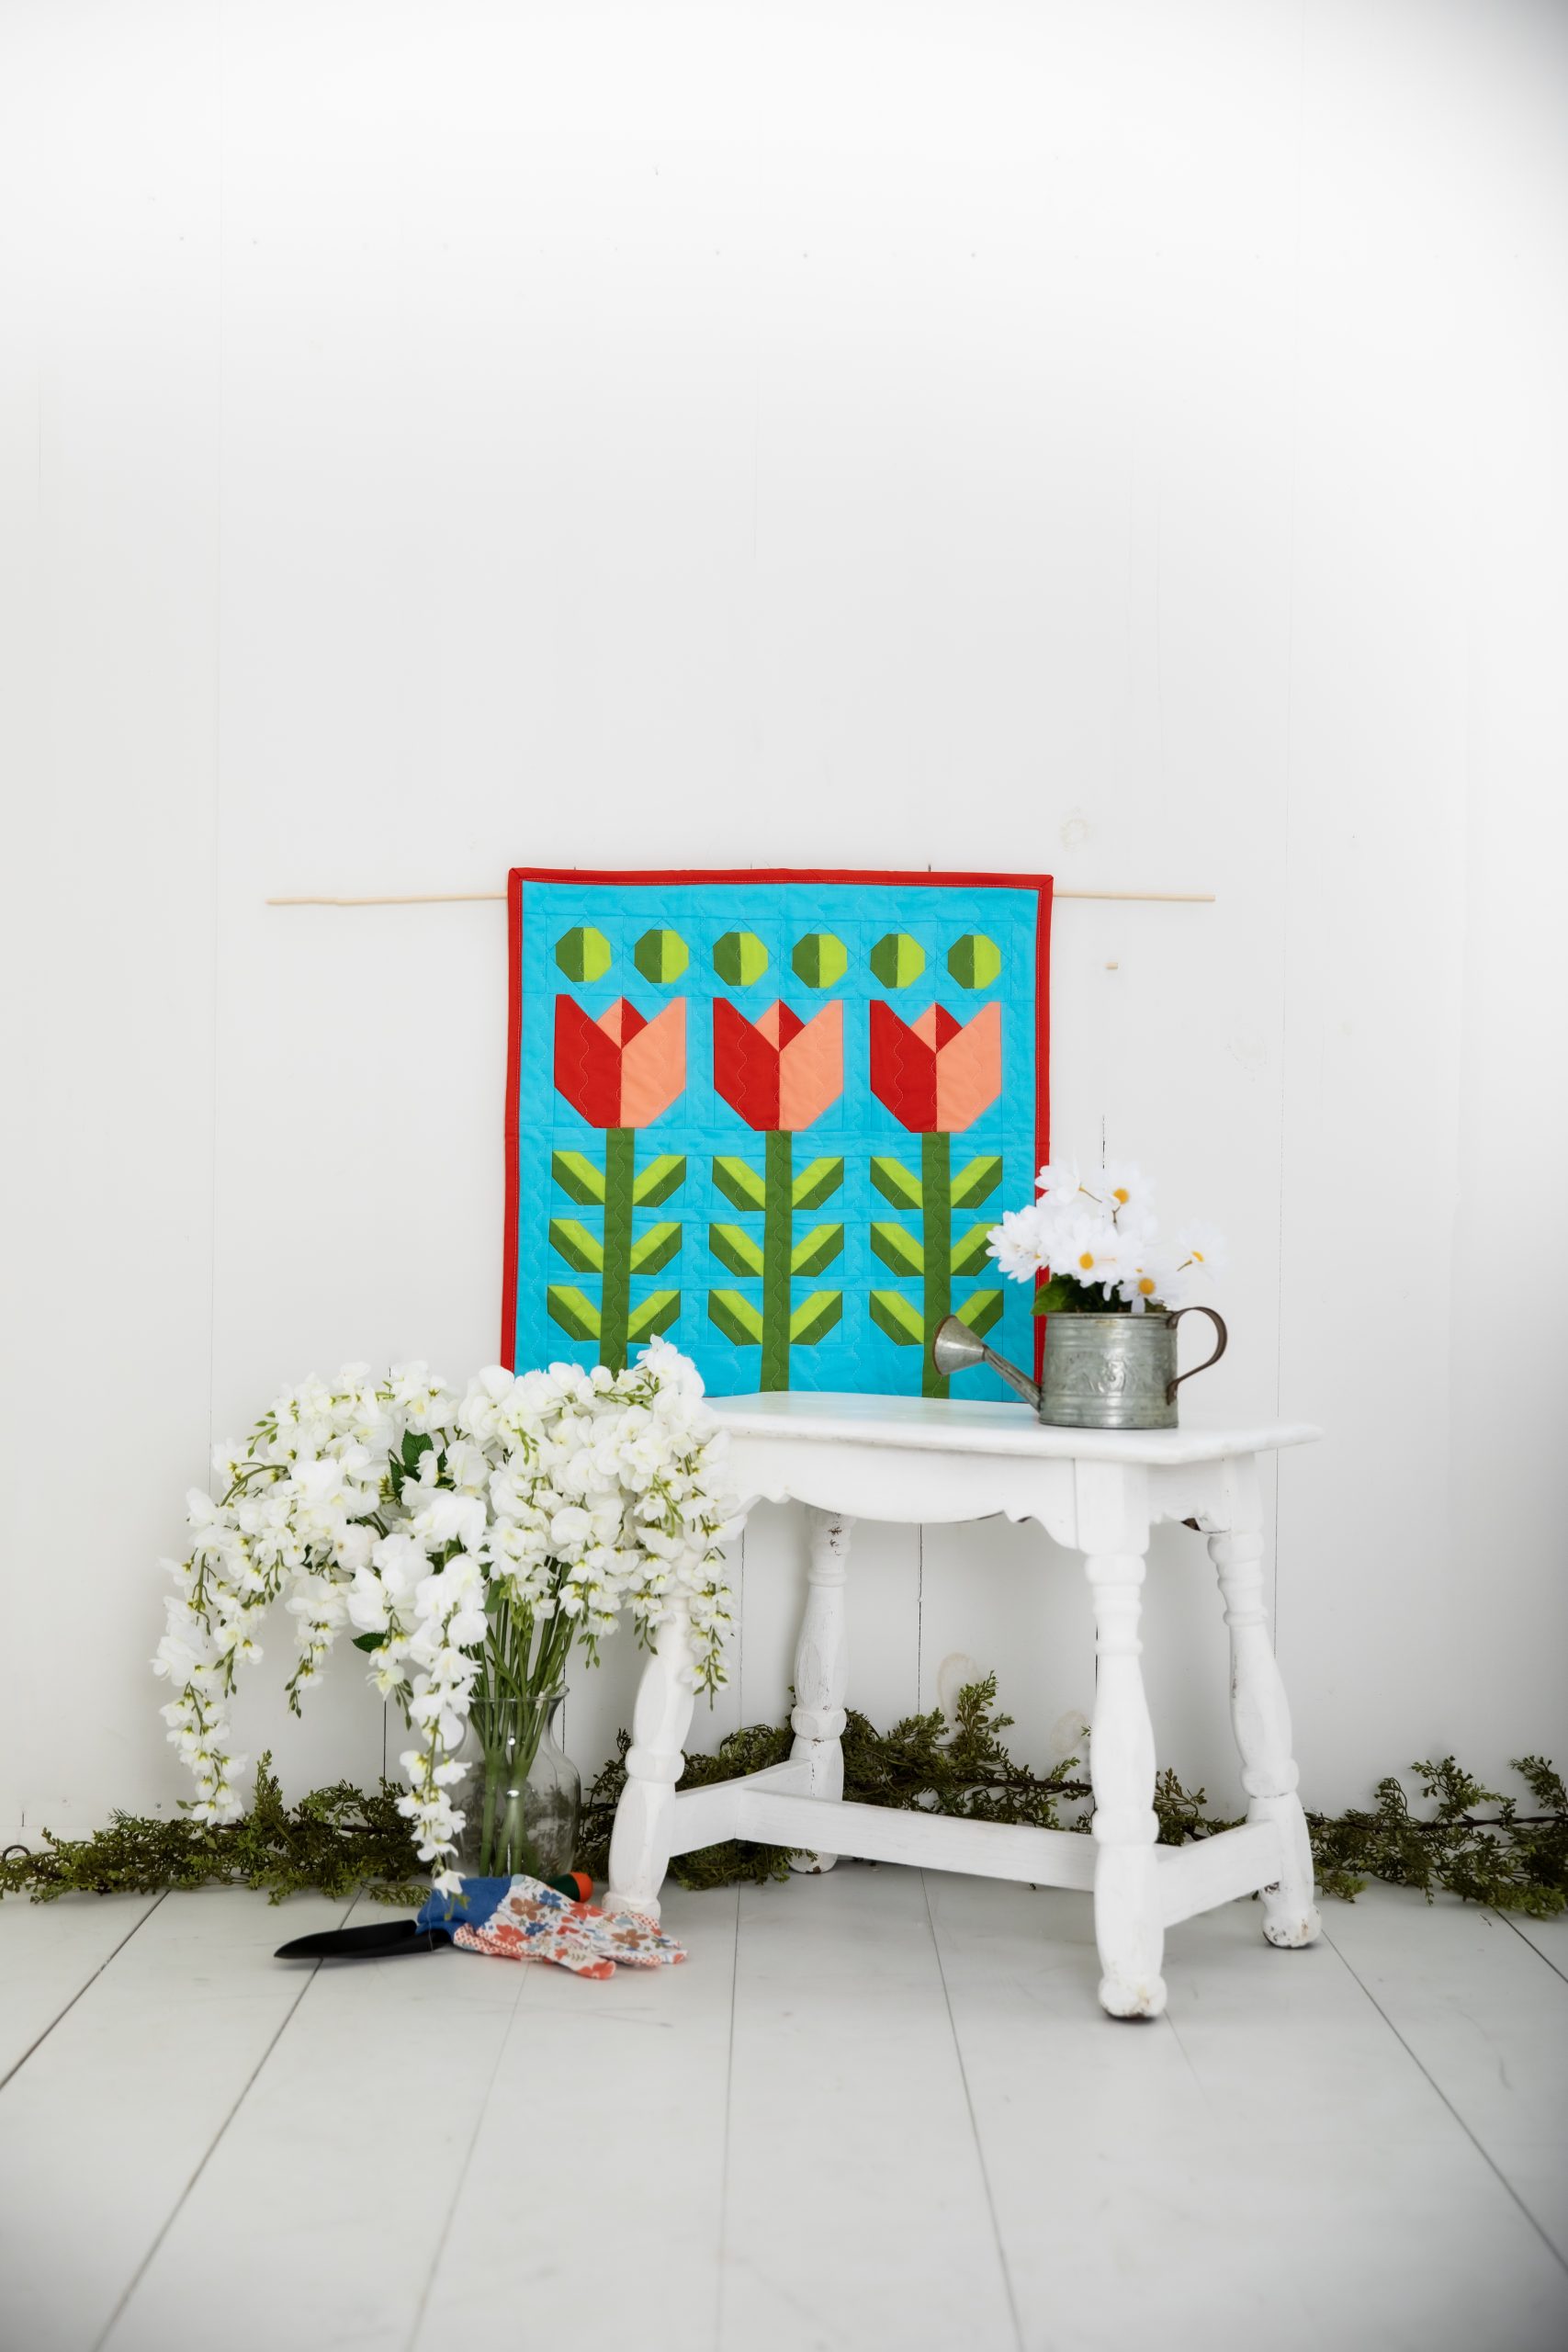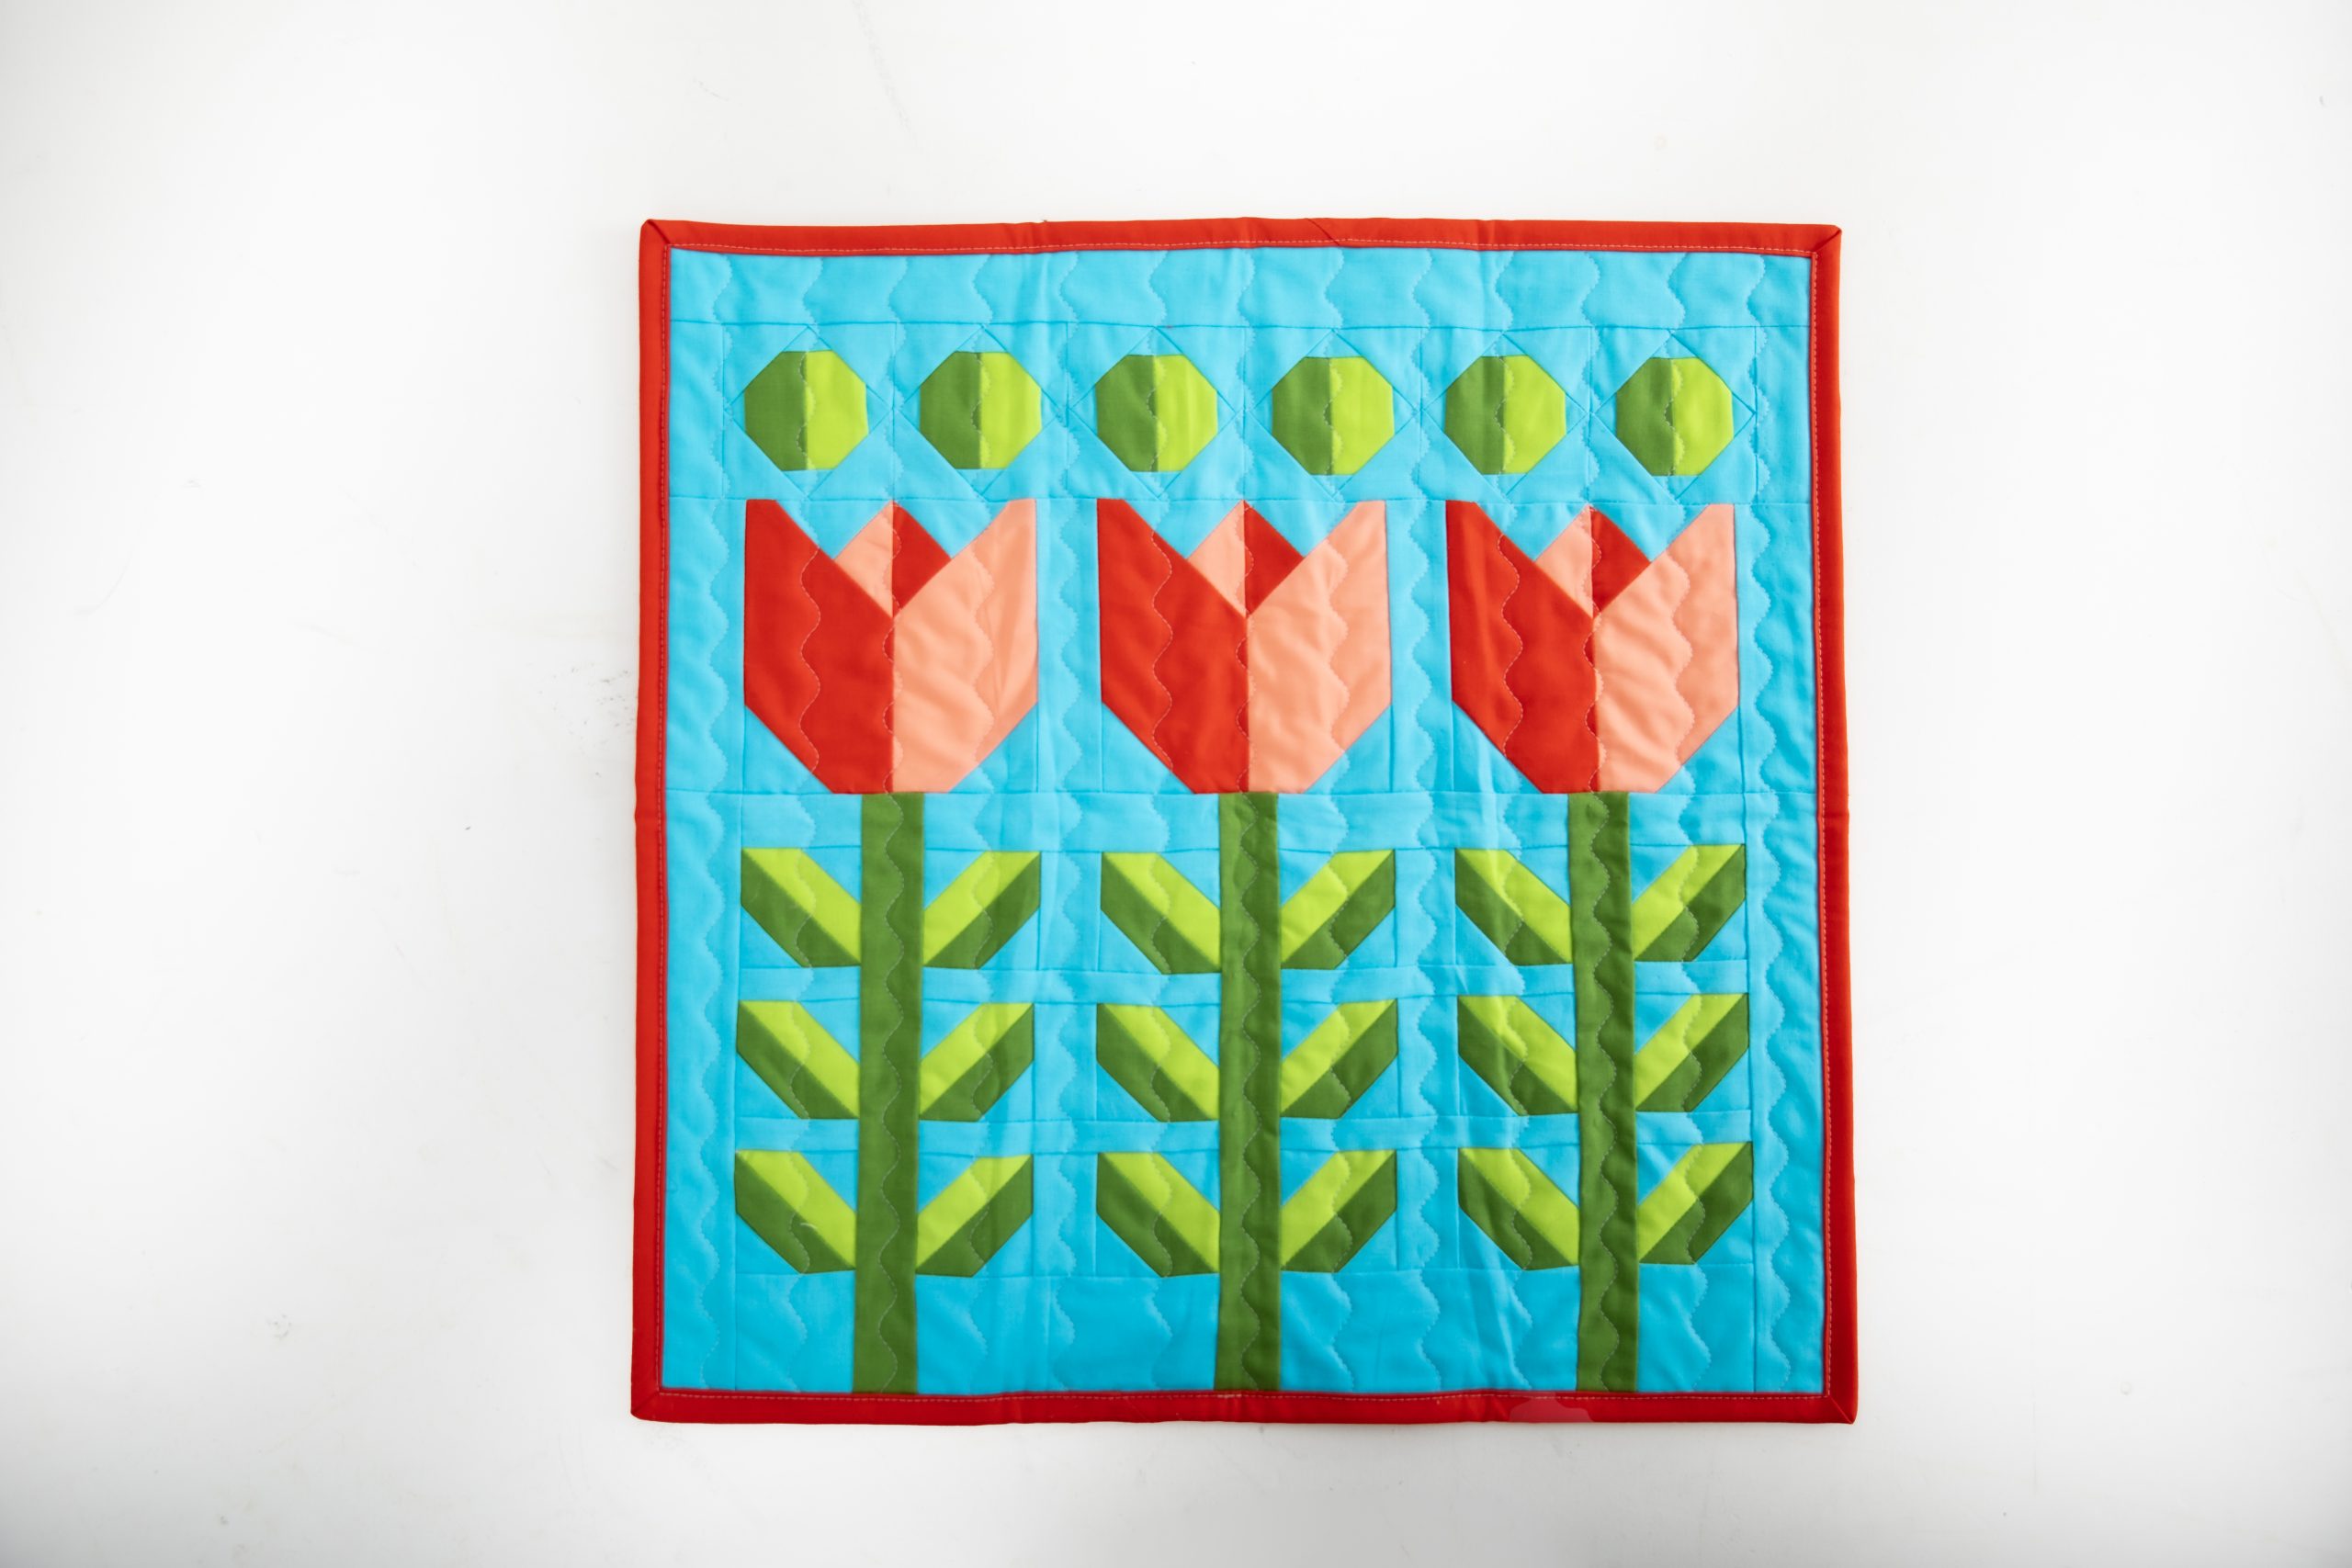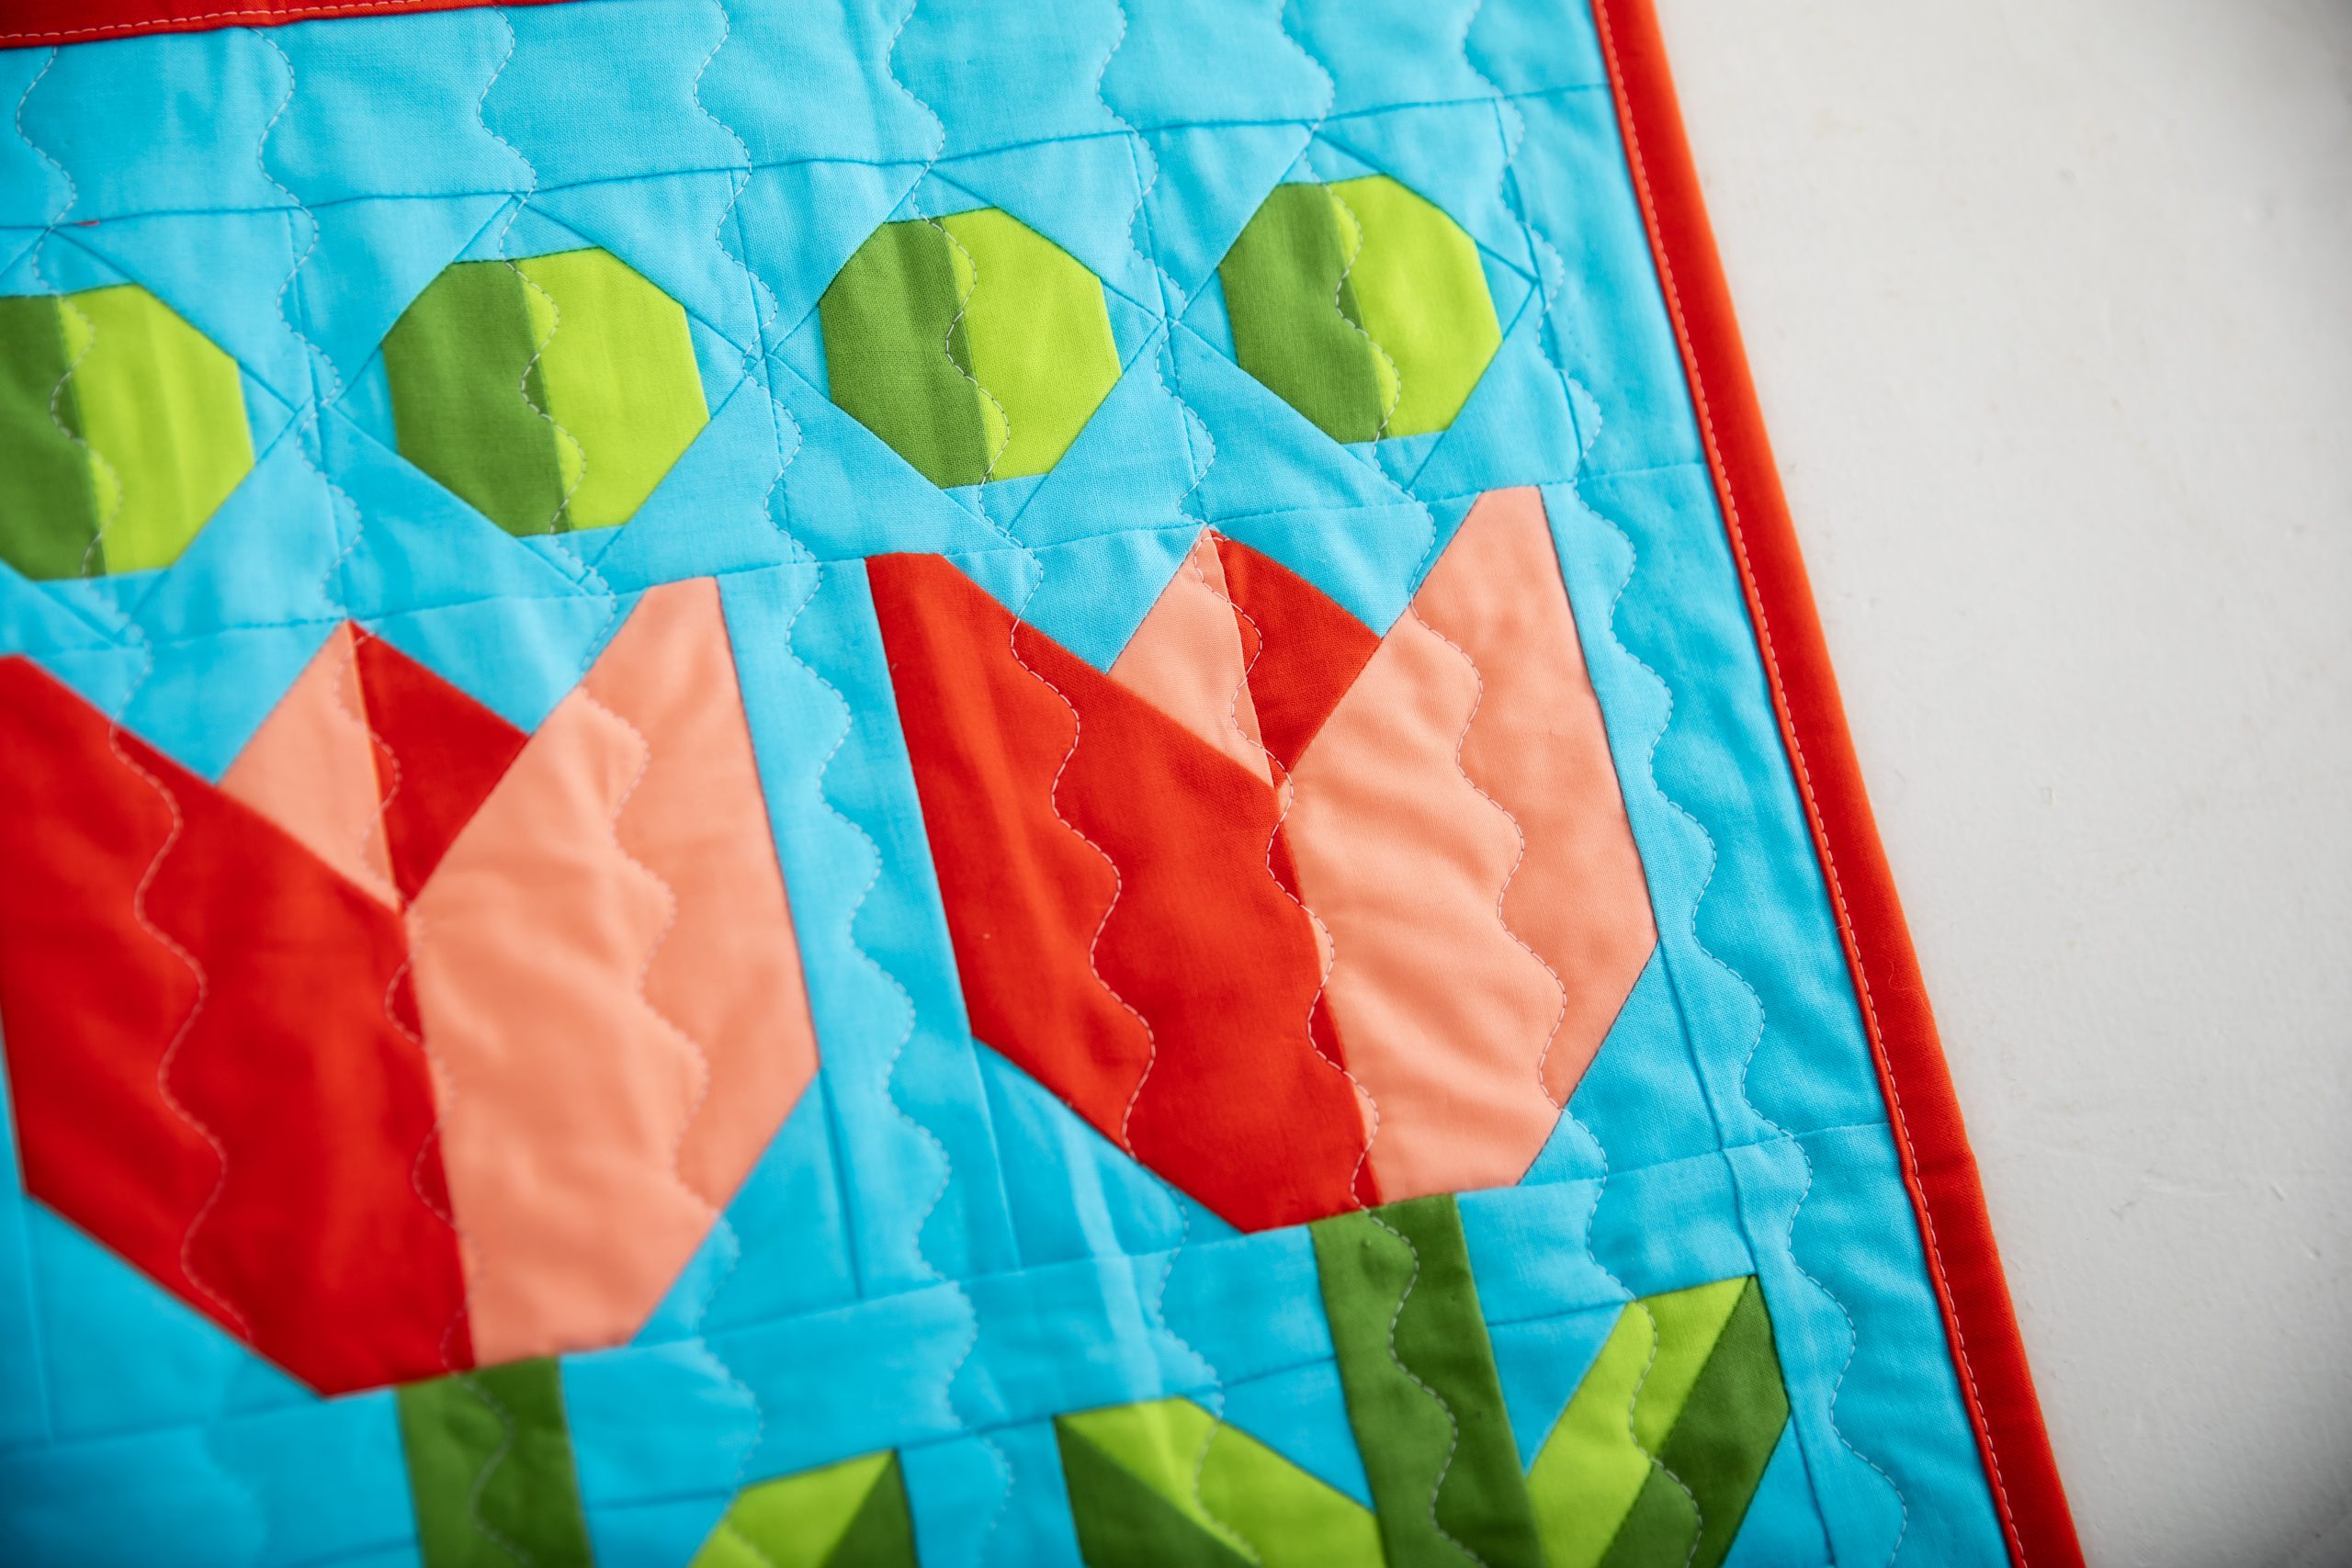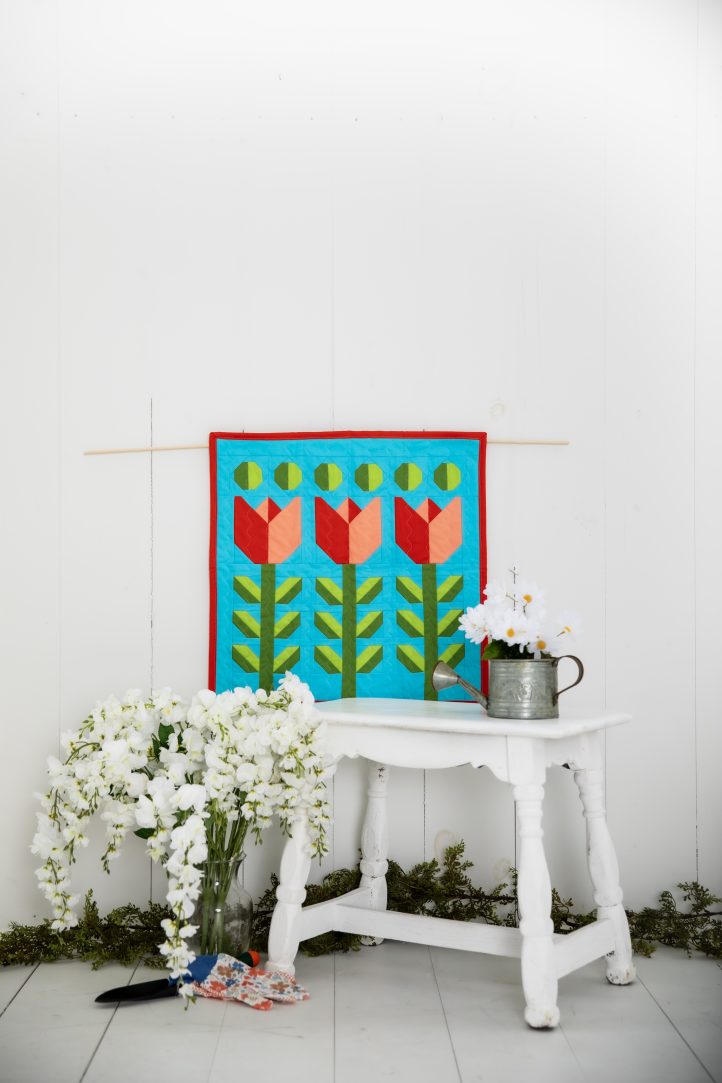
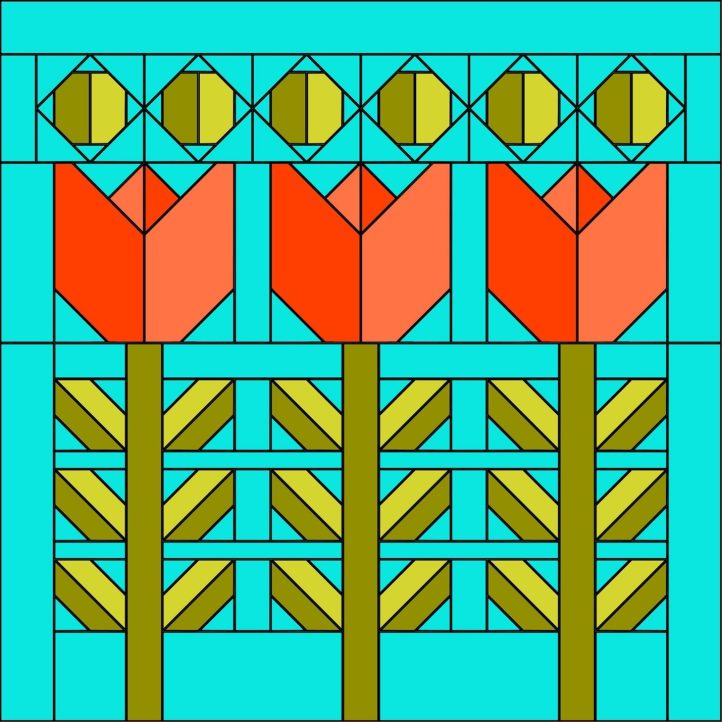
Raise your hand if you’re also obsessed with Mid-Century inspired designs! Welcome spring with a stunning mini quilt pattern from Staci Wendland. Taking design inspiration from Mid-Century Modern motifs, this mini quilt pattern features three cheerful pink tulips against a vibrant, turquoise sky. This pattern finishes at a 20-inch square and you can easily add a quick sleeve to its back to turn your mini quilt into a stylish spring wall hanging.
Finished Size: 20″ x 20″
Seam Allowances: 1/4″
Abbreviations:
- RST = right sides together (all pieces are sewn RST)
- WOF = width of fabric
- WS = wrong side of fabric
- HST = half square triangle
Materials:
- Turquoise cotton fabric: 2/3 yard
- Dark green cotton fabric: 1/4 yard
- Light green cotton fabric: 1/4 yard
- Red cotton fabric (includes binding): 1/2 yard
- Pink cotton fabric: 1/8 yard
- Backing fabric: 1 yard
- Batting: 28″ x 28″
Cutting Instructions:
Turquoise:
- A – (16) 1″ x 2 1/2″
- B – (12) 1″ x 3 1/2″
- C – (4) 1″ x 5 1/2″
- D – (36) 1 1/2″ x 1 1/2″
- E – (8) 1 1/2″ x 2 1/2″
- F – (2) 1 1/2″ x 3 1/2″
- G – (4) 1 1/2″ x 5 1/2″
- H – (30) 2″ x 2″
- I – (2) 2″ x 5 1/2″
- J – (2) 2″ x 11″
- K – (1) 2″ x 20 1/2″
- L – (6) 2 1/2″ x 2 1/2″
- M – (2) 2 1/2″ x 3″
- N – (2) 3″ x 5 1/2″
Dark green:
- O – (6) 1 1/2″ x 2 1/2″
- P – (3) 1 1/2″ x 11″
- Q – (18) 2 1/2″ x 2 1/2″
Light green:
- R – (6) 1 1/2″ x 2 1/2″
- S – (18) 2 1/2″ x 2 1/2″
Red:
- T – (3) 2 1/2″ x 2 1/2″
- U – (3) 3″ x 5 1/2″
- Binding – (3) 2 1/2″ x WOF
Pink:
- V – (3) 2 1/2″ x 2 1/2″
- W – (3) 3″ x 5 1/2″
Backing: (1) 28″ x 28″
Sewing Instructions:
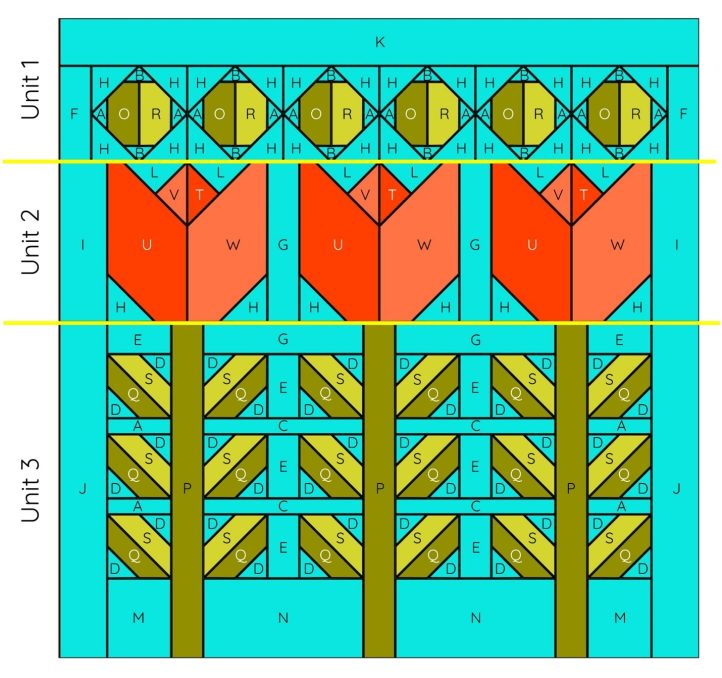
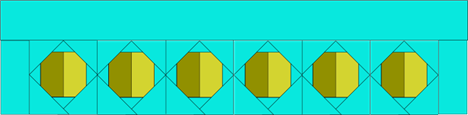
ASSEMBLY – UNIT 1:
- Gather (12) A, (12) B, (2) F, (24) H, (1) K, (6) O, and (6) R.
- Draw a diagonal line on the WS of (24) H.
- Sew (1) O to the left of (1) R. Press to O.
- Sew (1) A to the left and (1) A to the right of O/R. Press to the center.
- Sew (1) B to the top and (1) B to the bottom of O/R. Press to B.
- Place (1) H on the upper left corner of O/R with the line from the lower left to upper right. Sew on the line. Trim. Press to H.
- Place (1) H on the upper right corner of O/R with the line from the upper left to lower right. Sew on the line. Trim. Press to H.
- Place (1) H on the lower right corner of O/R with the line from the lower left to upper right. Sew on the line. Trim. Press to H.
- Place (1) H on the lower left corner of O/R with the line from the upper left to lower right. Sew on the line. Trim. Press to H.
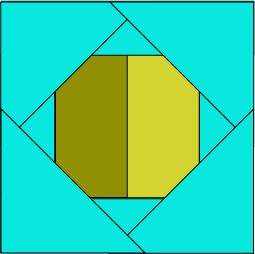
- Repeat Steps 3-9 to make (5) more identical sections.
- Sew the (6) O/R sections together side by side. Press open to reduce bulk.
- Sew (1) F to the left and (1) F to the right of the unit. Press to the outside.
- Sew (1) K to the top to complete Unit 1.
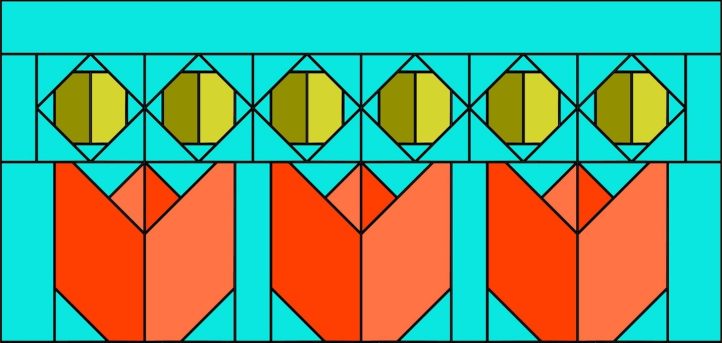
ASSEMBLY – UNIT 2:
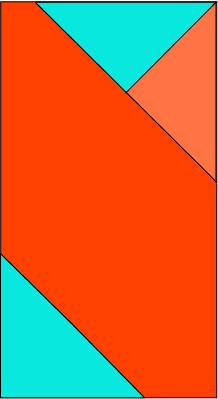
- Gather (2) G, (6) H, (2) I, (6) L, (3) T, (3) U, (3) V, and (3) W.
- Draw a diagonal line on the WS of (6) H and (6) L.
- Place (1) L on (1) V. Sew on the line. Trim. Press to L.
- Turn the HST right side down with L at the upper left corner. Draw a line from the upper left corner to the lower right corner.
- Place the HST on the upper right corner of (1) U. Sew on the line. Trim. Press to U.
- Place (1) H on the lower left corner of U with the line from the upper left to lower right. Sew on the line. Trim. Press to U.
- Repeat Steps 3-6 in this section to make (2) more identical sections.
- Place (1) L on (1) T. Sew on the line. Trim. Press to T.
- Turn the HST right side down with L at the upper right corner. Draw a line from the lower left corner to the upper right corner.
- Place the HST on the upper left corner of (1) W. Sew on the line. Trim. Press to HST.
- Place (1) H on the lower right corner of W with the line from the lower left to upper right. Sew on the line. Trim. Press to H.

- Repeat Steps 8-11 in this section to make (2) more identical sections.
- Lay out (2) I, (2) G, the (3) U sections, and the (3) W sections as shown. Sew into a row. Press the seam at the center of each tulip to the right, inner seams to G, and outer seams to I to complete Unit 2.

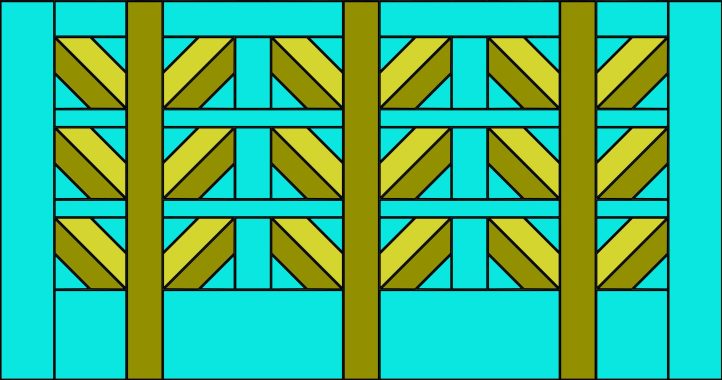
ASSEMBLY – UNIT 3:
- Gather (4) A, (4) C, (36) D, (8) E, (2) G, (2) J, (2) M, (2) N, (3) P, (18) Q, and (18) S.
- Draw a diagonal line on the WS of (36) D and (18) S.
- Place (1) S on (1) Q. Sew on the line. Trim. Press to Q.
- Lay the HST right side up, with the S in the upper right corner. Place (1) D on the upper right corner with the line from the upper left to lower right. Sew on the line. Trim. Press to D.
- Place (1) D on the lower left corner with the line from the upper left to lower right. Sew on the line. Trim. Press to D.

- Repeat Steps 3-5 in this section to make (17) more identical sections. Some of these will be turned in another direction in the following steps.
- Lay out a vertical row of (1) E, (1) QS section, (1) A, (1) QS section, (1) A, (1) QS section, and (1) M as shown. Sew together. Press away from QS sections.

- Repeat Step 7 in this section to create an identical row.
- Sew (1) E between (2) QS sections as shown. Press to E.

- Repeat Step 9 in this section to make (5) more identical sections.
- Lay out a vertical row of (1) G, (1) QSE section, (1) C, (1) QSE section, (1) C, (1) QSE section, and (1) N as shown. Sew together. Press away from QSE sections.
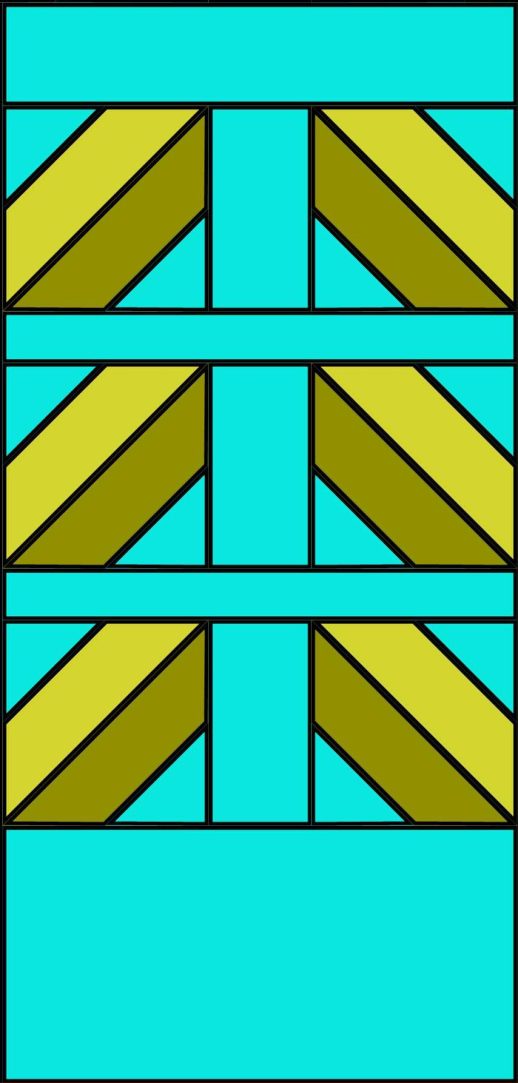
- Repeat Step 11 in this section to make (1) more identical section.
- Lay out a horizontal row of (1) J, (1) E/M section, (1) P, (1) G/N section, (1) P, (1) G/N section, (1) P, (1) E/M section, and (1) J as shown. Sew together. Press J and P.
ASSEMBLY – JOINING UNITS:
- Sew Unit 1 to the top of Unit 2. Press to Unit 2.
- Sew Unit 3 to the bottom of Unit 2. Press to Unit 3.
FINISHING THE QUILT:
- Layer the backing fabric with the right side down, batting, and the quilt top with the right side up. Pin or baste the layers together.
- Quilt using your preferred method and design. Trim the batting and backing to match the quilt top.
- Trim the selvages from the (3) binding strips. Sew the strips RST, end-to-end, with diagonal seams to make (1) continuous binding strip.
- Sew the binding around the edge using your preferred method.