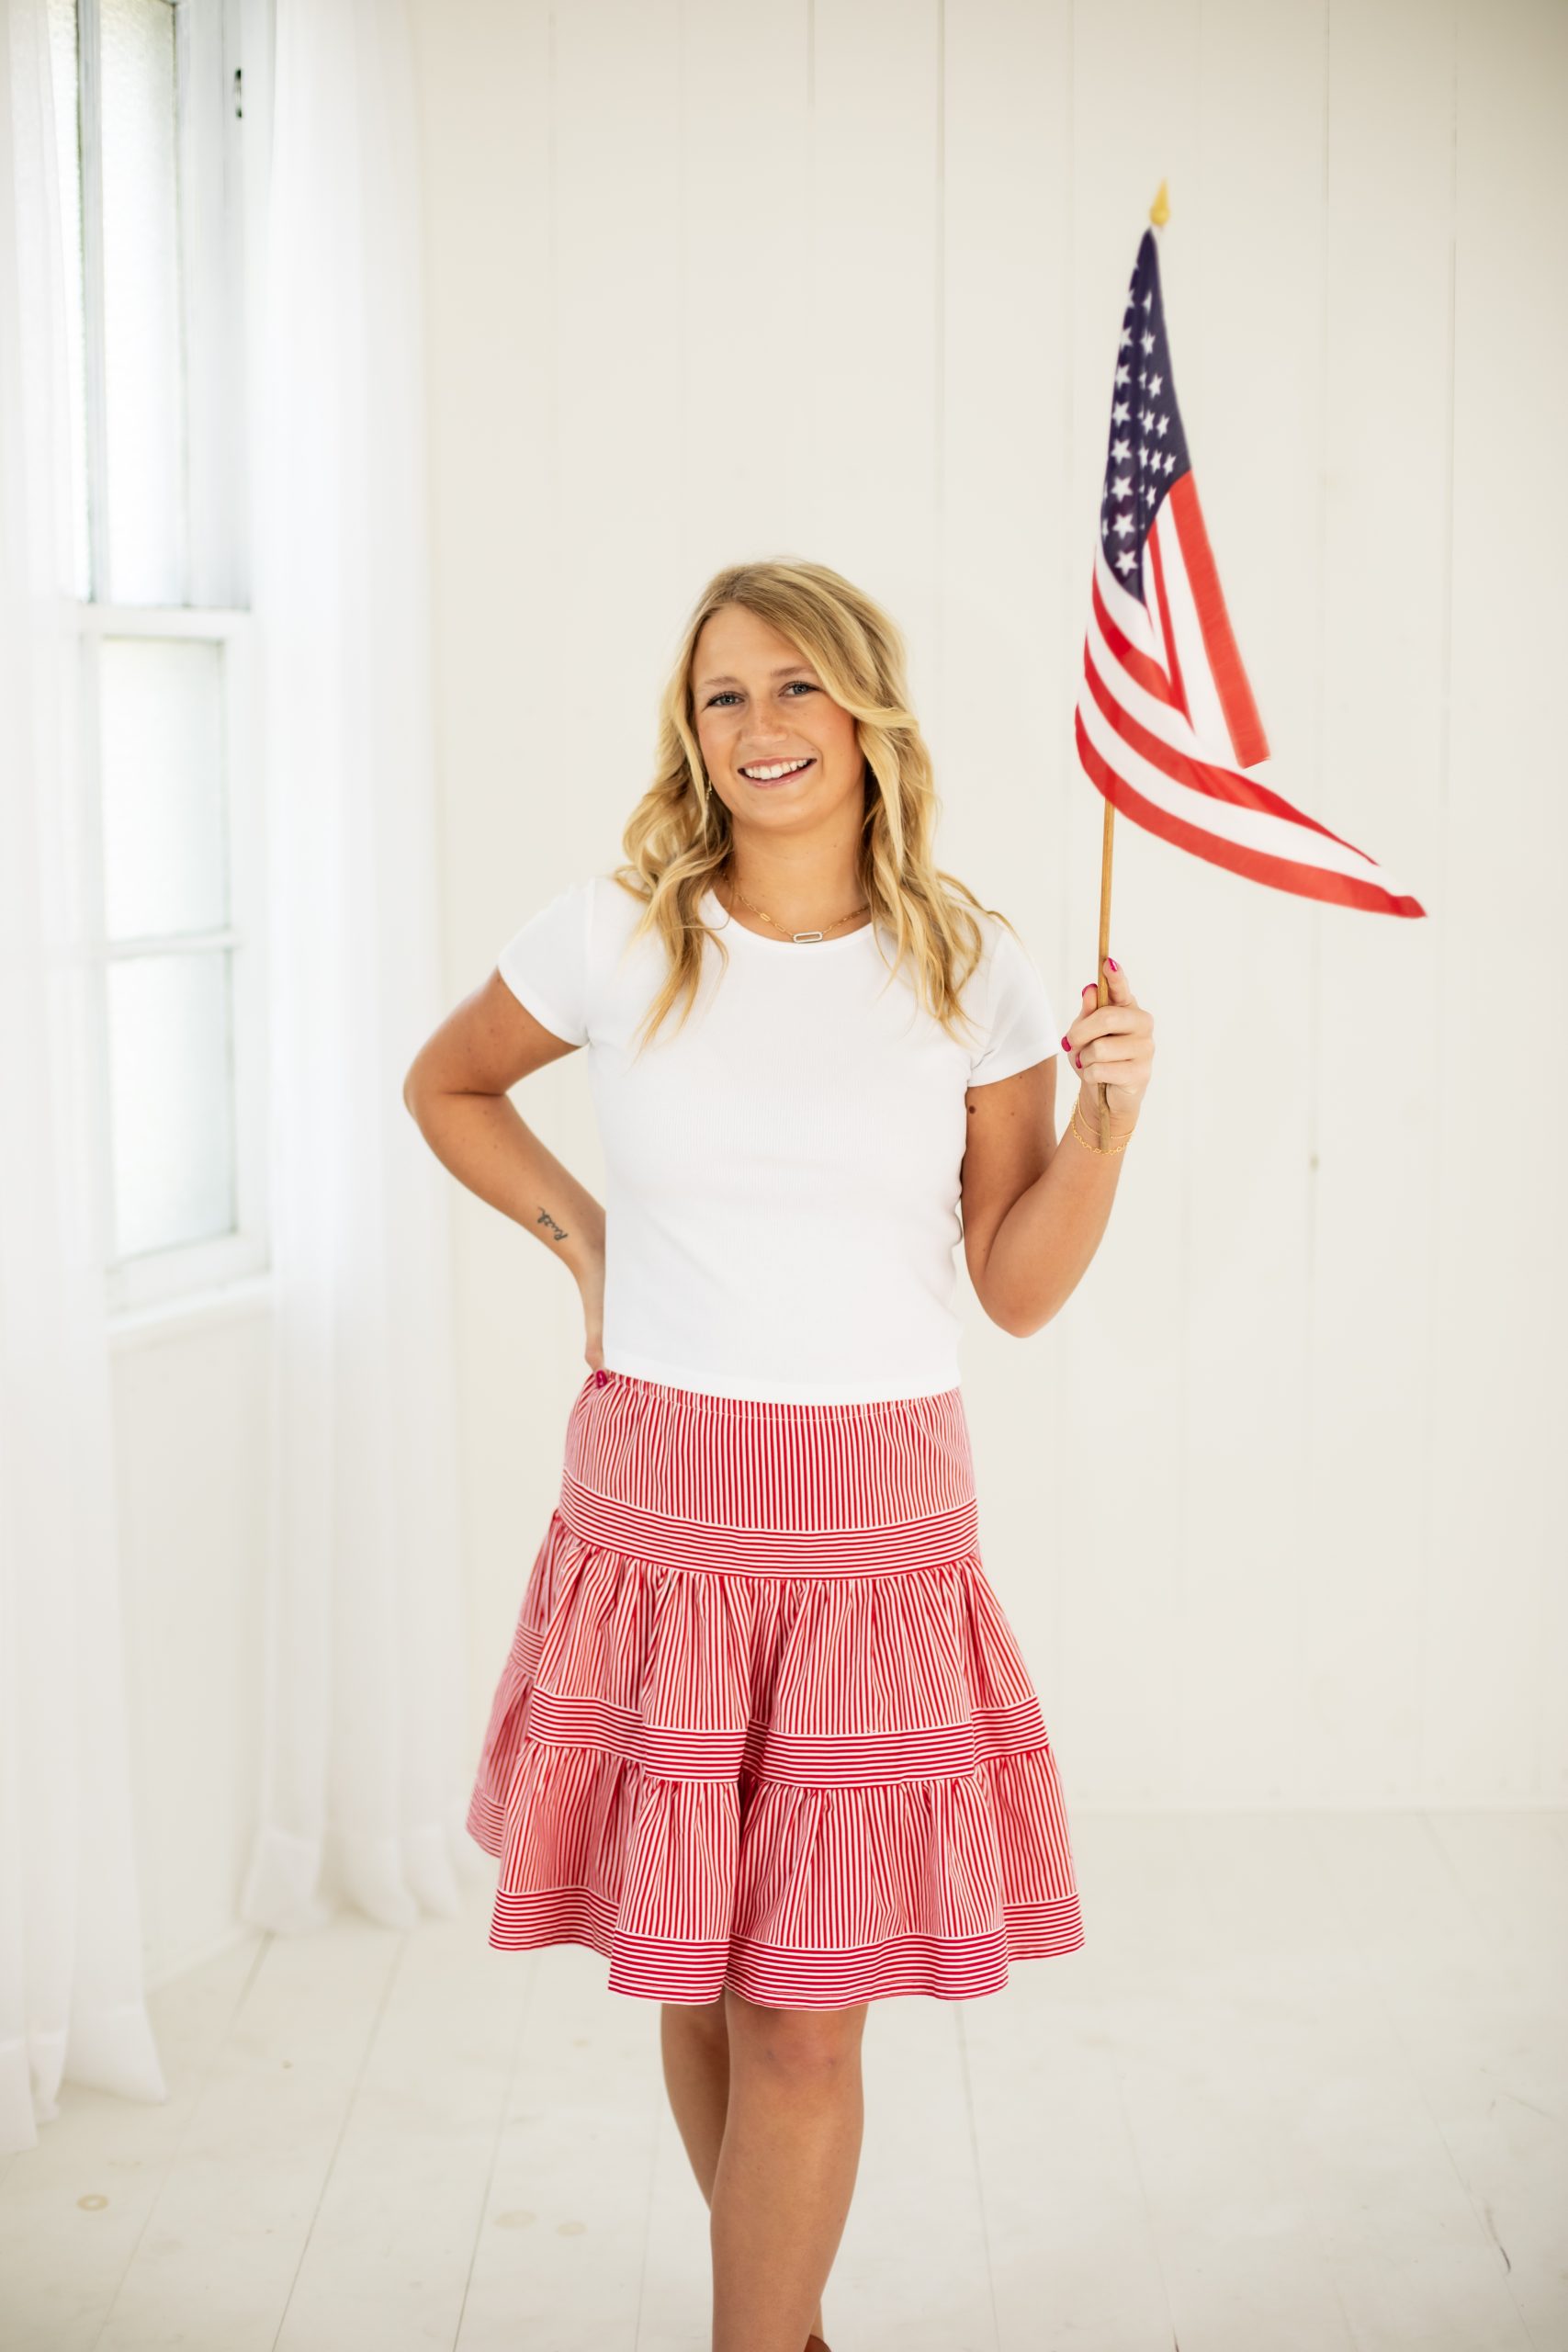
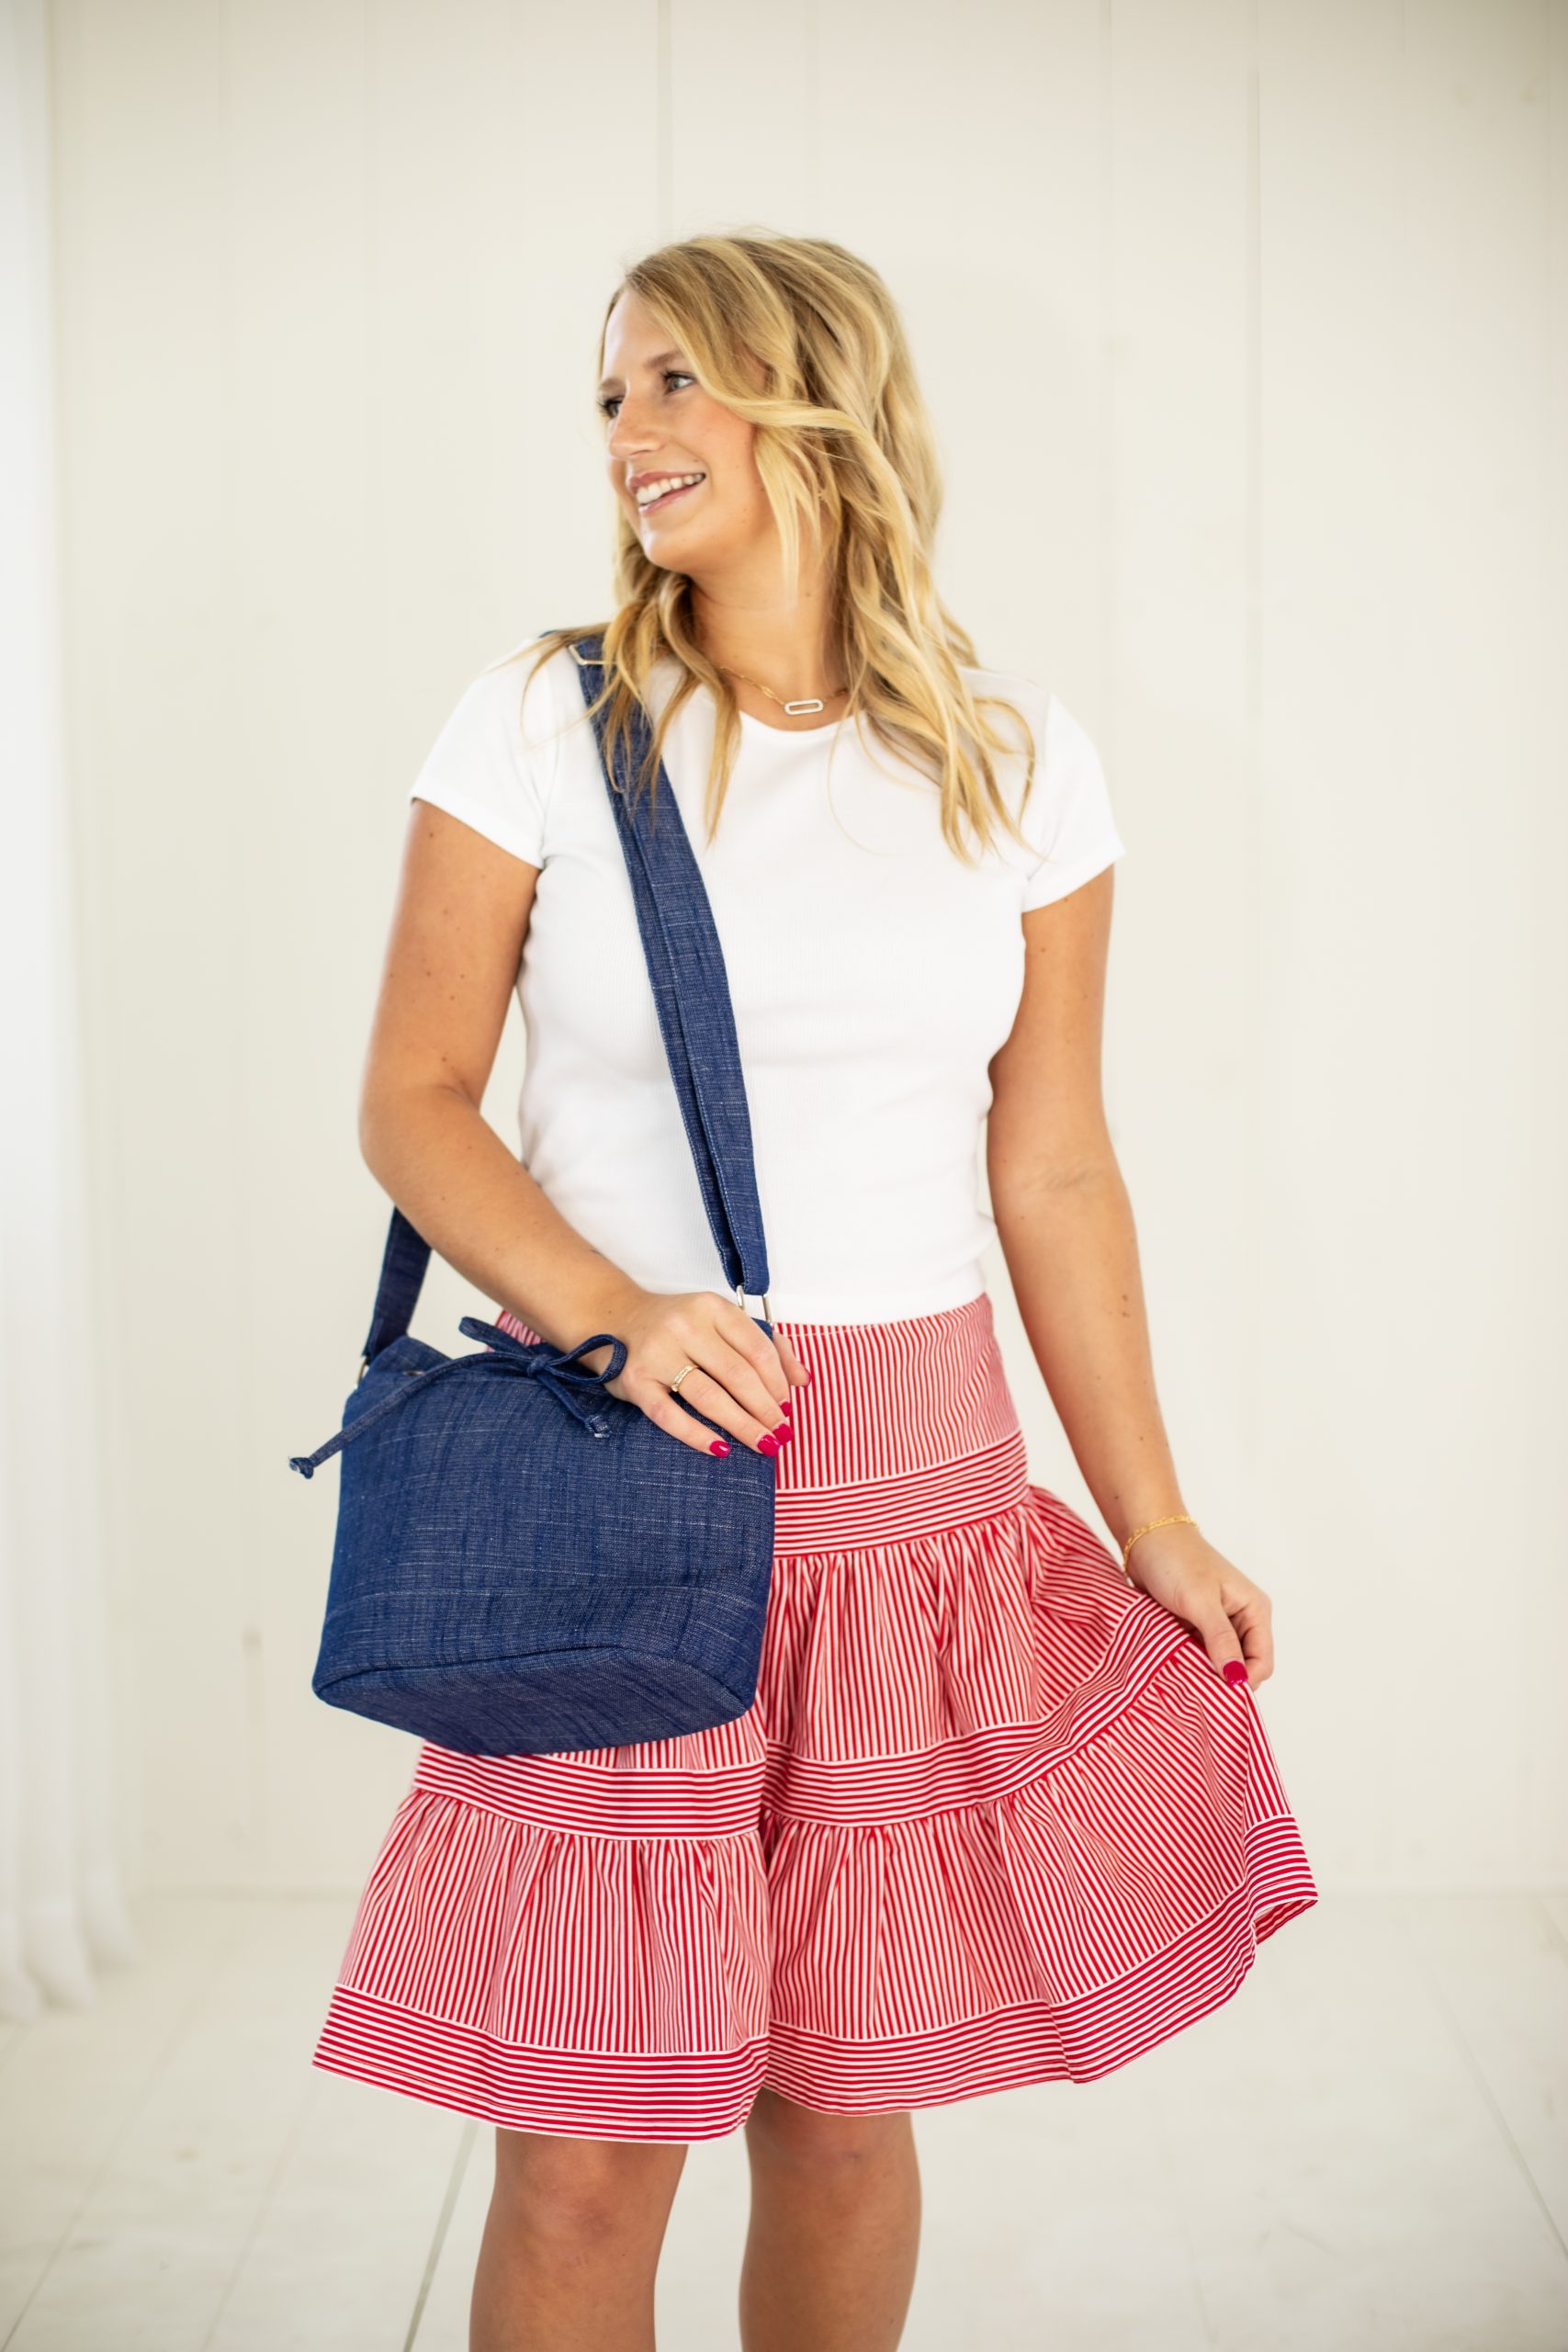
Sew a simple, stylish, lightweight skirt for hot summer days with this pattern from Don Morin. Made in airy, candy-striped poplin, this summer skirt pattern features multiple tiers and a comfortable elastic waist. This skirt sewing pattern is self-drafted to your body’s measurements, guaranteeing a perfect fit. Pair this timeless skirt with a white tee and sneakers or sandals for an effortless summer look or style with a peasant blouse or denim jacket to elevate your ensemble.
Hugs and kisses all-round for this candy-stripe summer skirt that is quick to make and customized for your body shape, all without a pattern. The key design feature is created through the clever use of the ‘longitudinal stripe’ found on a summer-weight fabric. Here, the designer has placed the stripe running vertically, from top to bottom, with each skirt tier having a horizontal striped border along its bottom edge. Any lightweight summer fabric for this skirt project will allow air to flow freely through the weave, keeping you cool and dry on hot summer days and offering a comfortable feel against the skin, letting you look and feel your best all summer long, without sacrificing your personal style or breaking the bank.
Materials:
- Summer-weight fashion fabric with a longitudinal stripe pattern, 60” wide (152cm)* (approximately 2 – 2 1/2yards * see notes on Gathers and Borders)
- 1 spool of mercerized all-purpose thread
- 1 spool of heavy-duty or upholstery thread (optional)
- 1” wide (25mm) braided elastic (equal to waist measurement)
- 1” wide (25mm) twill tape (equal to hip measurement + 2”)
- Universal machine needle, size 70-80
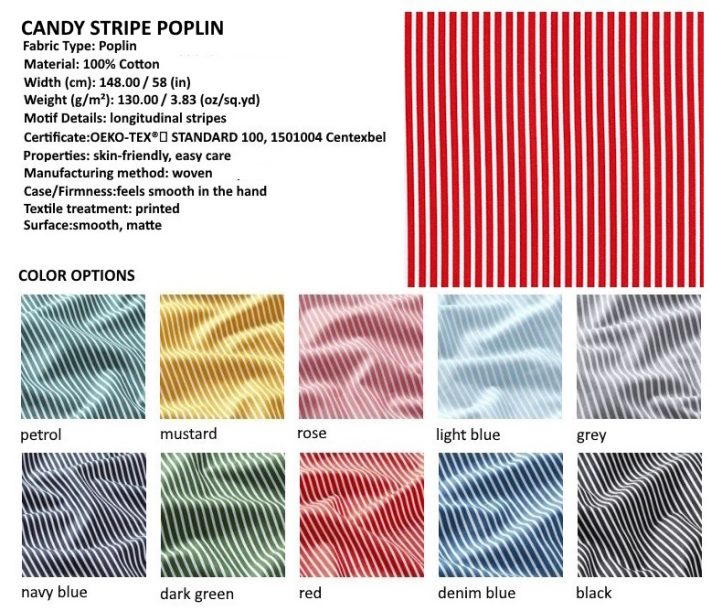
Note: For the model sample, Don used Stripe Poppy™ light-weight poplin (100% cotton) with longitudinal stripes in red-on-white; YKK™ white braid elastic (1” wide); Selfmade™ cotton twill tape (1” wide); Gütermann™ white mercerized cotton thread; and, Coats™ upholstery thread.
FABRICATION: IT’S ALL ABOUT THE STRIPE
A classic and versatile choice, linear candy stripes can be used in a range of different design schemes by using them vertically, horizontally, or in a chevron pattern, and this is the principle element used for this ‘no-pattern-used’ clothing design.
Cotton poplin lends itself to countless creative possibilities, from the most classic of summer colors to the boldest modern prints, and wouldn’t you know it, it comes available with candy stripes. Just what’s called for, as the key element of this customized skirt is created through its longitudinal stripe, a distinctive linear candy stripe pattern that features bands of color, running parallel along the fabric’s selvage as it rolls off the bolt.
Choosing a candy striped poplin for this summer project means guaranteeing accuracy and precision when plotting the rectangular shapes on the cloth. The vertical stripe acts as a cutting guide, so be sure that the fabric has been squared and on straight grain before proceeding, and check the distance each rectangle is from the selvage so that your garment pieces are parallel and aligned correctly.
Cotton poplin is the perfect summer fabric for creating light and comfortable summer garments, loved by designers and makers for its exceptional properties. While regularly reading fiber content labels on bolt-ends and selecting your fashion fabrics accordingly is a good place to start, if you really want to stay cool in higher temps, here’s another helpful hint: dark colors absorb heat. So no matter which fabric type you choose, you’re always better off selecting lighter colors that reflect the sunlight. The smooth and compact texture of cotton poplin makes it ideal for summer that feel fresh and is delicate on the skin, keeping you cool and comfortable even on the hottest days.
This material manages to combine breathability and durability, allowing makers to create garments that not only offer optimal comfort but also maintain their shape and quality, wear after wear. It is definitely easy to care for, but it’s recommended pre-shrinking the fabric once before cutting and sewing, as fabrics made of natural fibers or with a proportion of natural fibers can shrink during the first time it’s laundered. Washing cotton in hot water is principle, possible, but may affect the color intensity. Cold-water wash to reduce the fading of colors and skip the dryer if you want to avoid shrinkage; hang them to dry in the sunshine keeps it in tiptop shape.
Thanks to these characteristics, poplin continues to be an essential fabric for makers who want to combine comfort, quality, and versatility in their summer garments, letting you look and feel your best all summer long. The unique aspect of this light-weight fabric for summer lies in its classic and versatile candy stripe pattern, which has an uncanny ability to be both, bold and understated yet modern and timeless.
STYLING AND CUSTOMIZING THE FIT
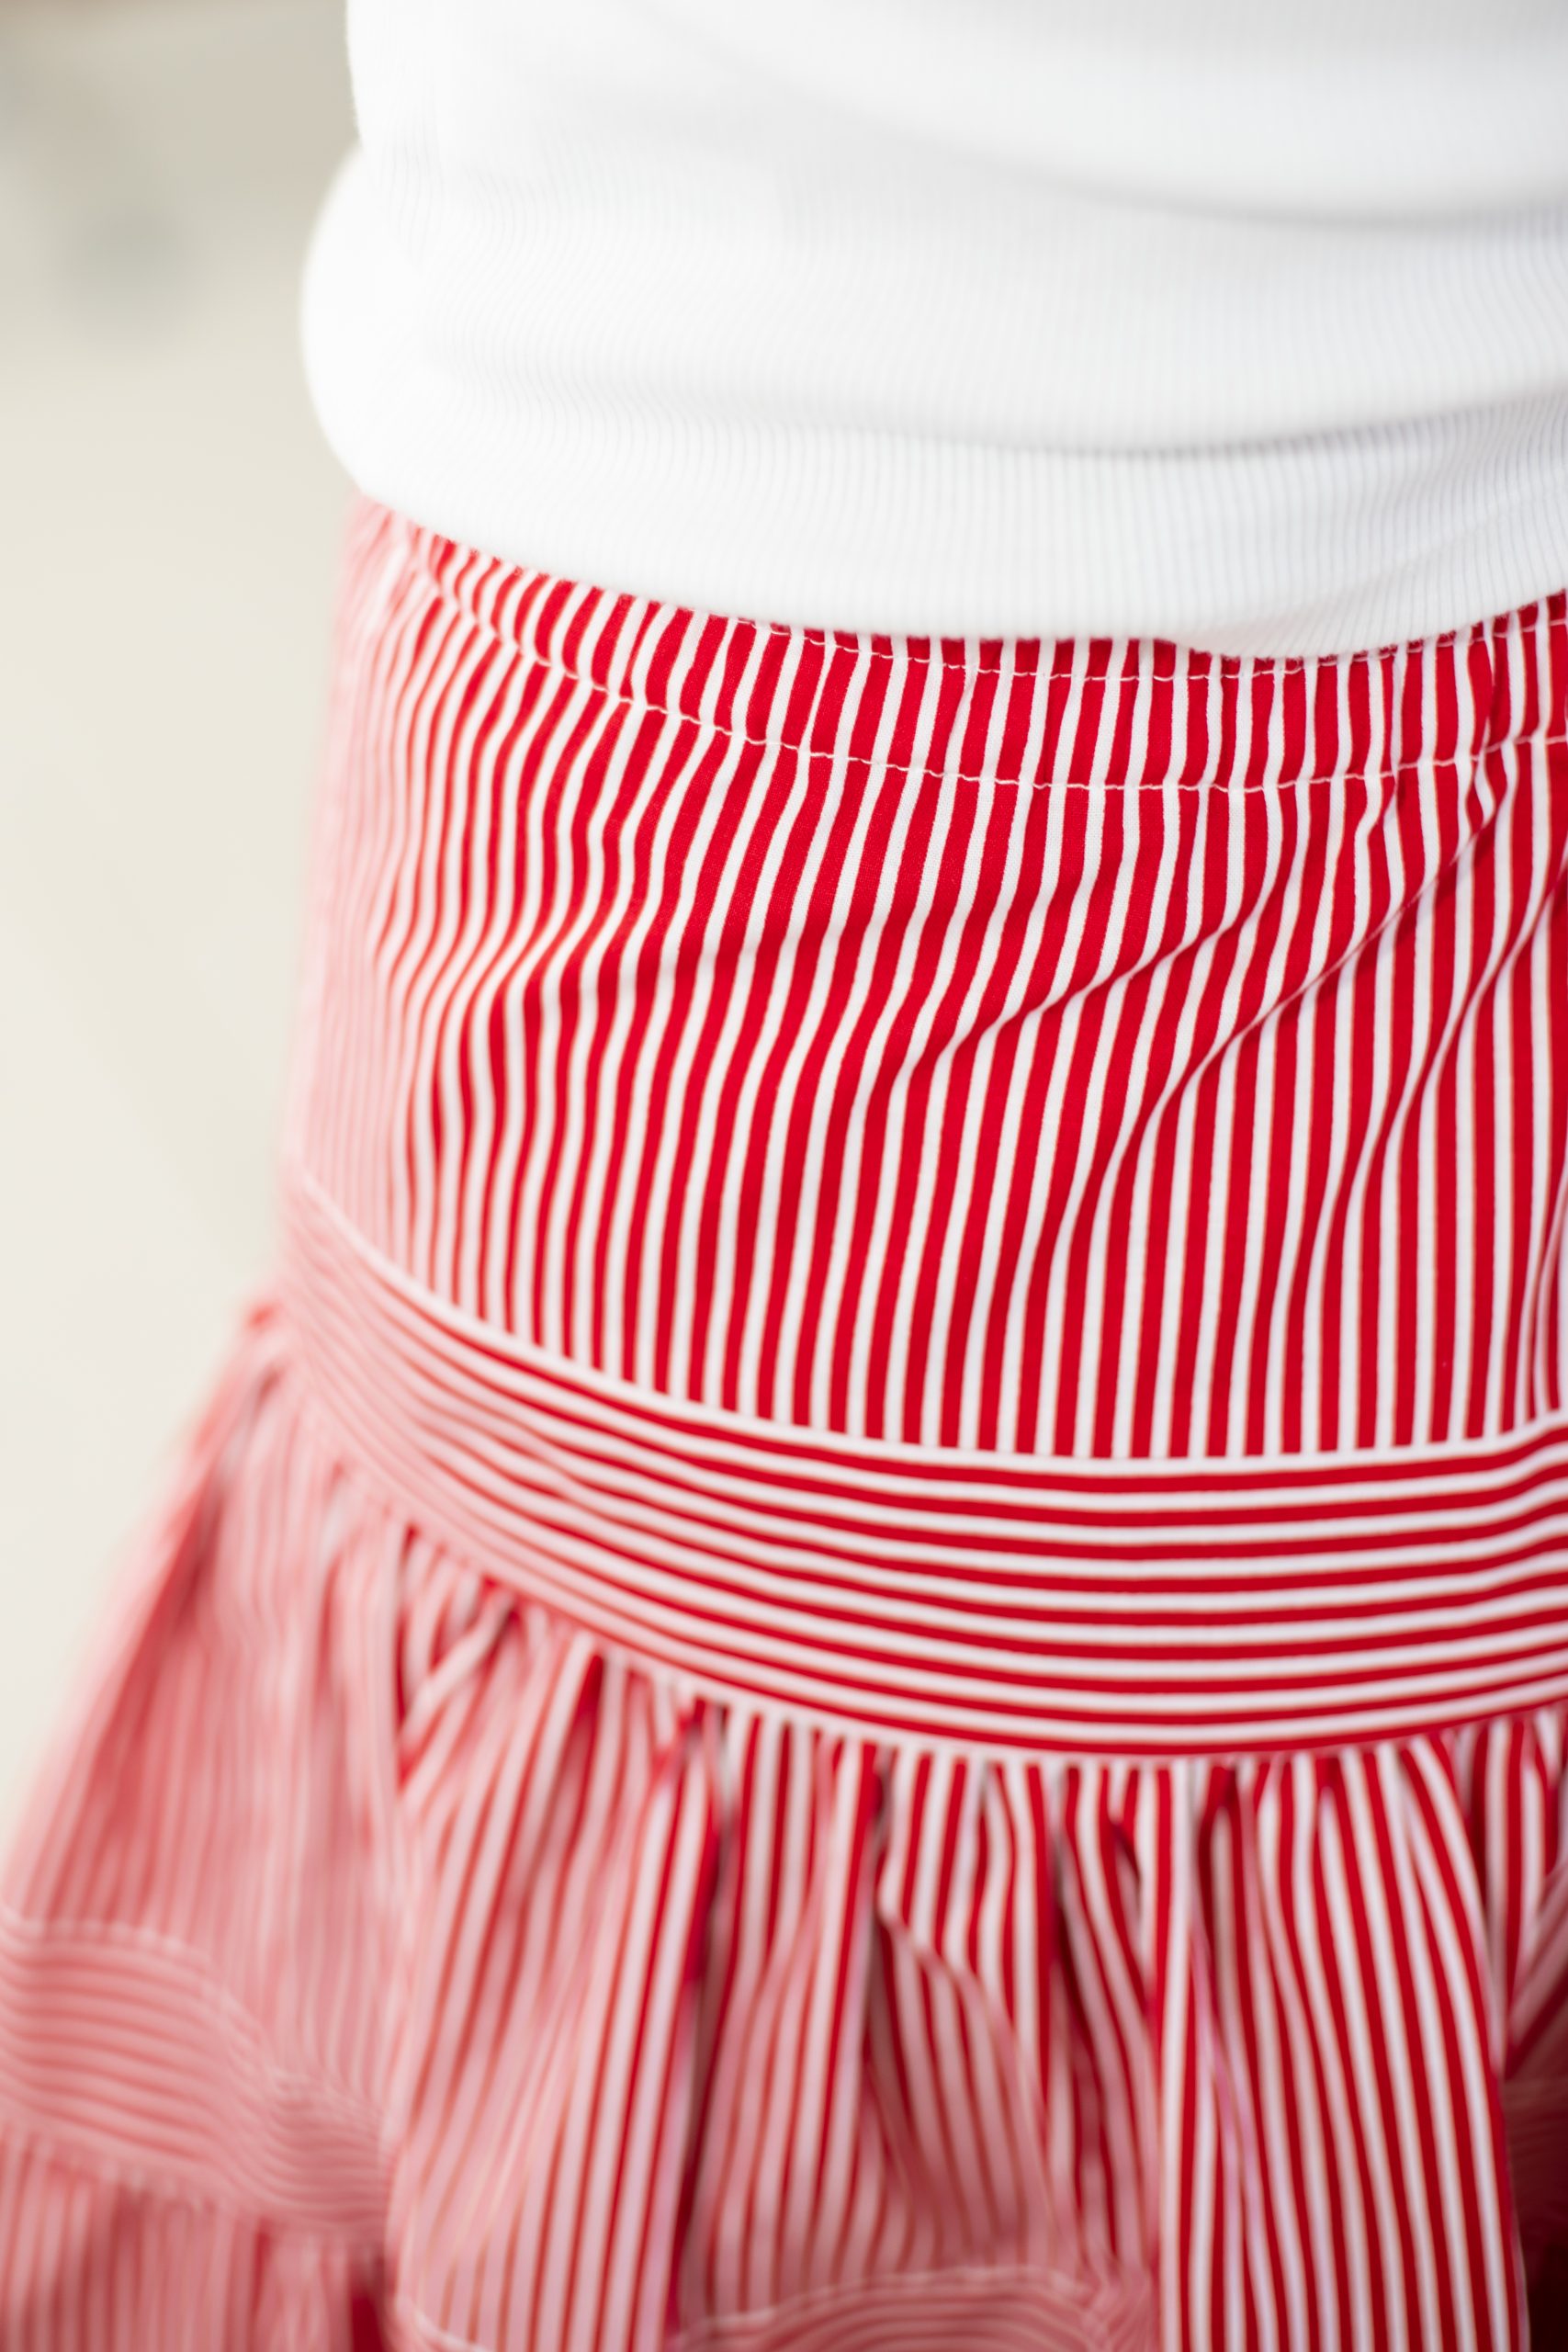
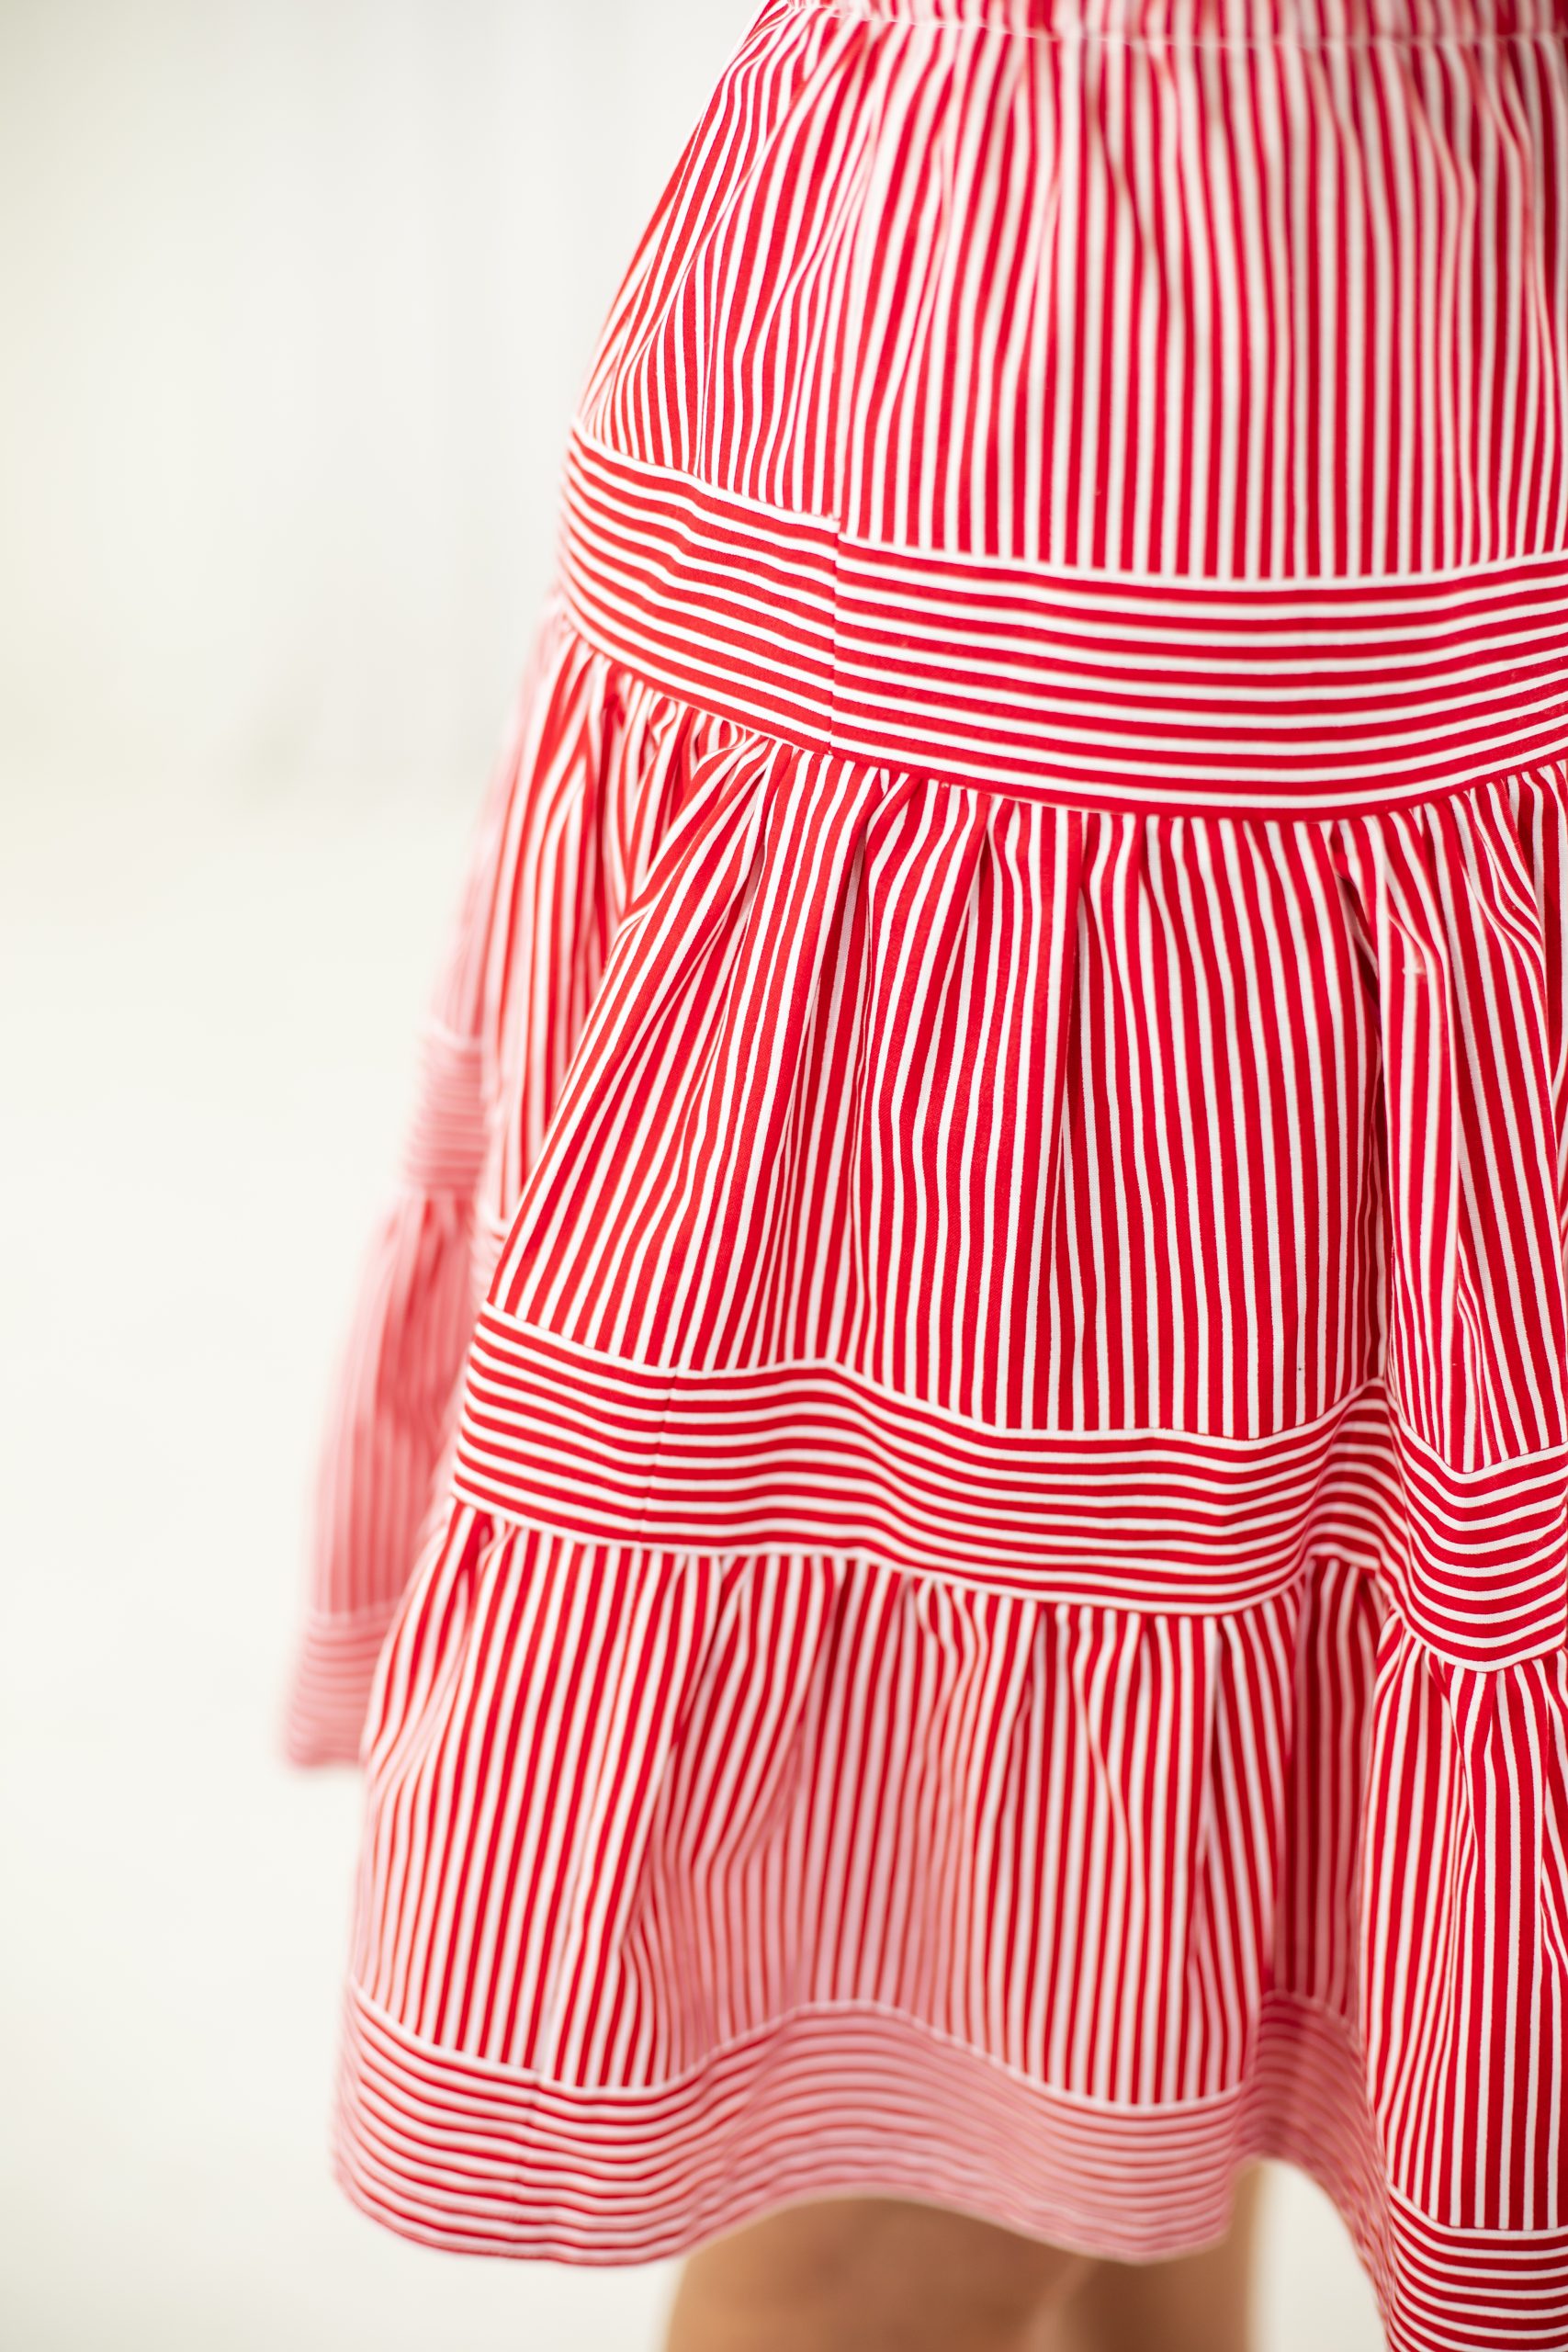
This attractive summer skirt is made up of three sections, where each section stacks up on the other and increases in width to produce a sweeping A-line shape, which is a flattering silhouette for all figure types. The top tier finishes off with an easy slip-on elasticized waistband, automatically cinching the fullness at the waist into soft gathers. The border detail is created by “railroading” the fabric horizontally. The sweep of the skirt is approximately triple the hip measurement.
A simple combination of widening rectangles lets you personalize the skirt to fit your body shape. You plot out each rectangle directly onto your fashion fabric without a pattern, but you will need to determine the dimensions of the fabric panels you are going to cut. Also, this will determine how much fabric yardage is needed based on your personal measurements.
When plotting the rectangular shapes on the cloth, the stripe acts as a cutting guide, so be sure that the fabric has been squared and on straight grain before proceeding, and check the distance each rectangle is from the selvage so that your garment pieces are parallel and aligned correctly.

MEASUREMENTS NEEDED
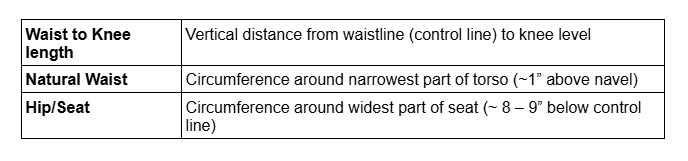
The basis of this tutorial is designing for the shape of the body rather than body size, so there is no real pattern to use, but a few body measurements are still needed. Ideally, measure wearing one thin layer of clothing. Position a length of elastic braid around your natural waist (narrowest part of torso) and hold ends together with a safety pin. The elastic band should sit neatly against your skin, but not so tightly that it causes an indent or digs in. Keep the elastic band level, parallel to the floor; it should be the same distance from the floor, front and back. This will be your “control”.
Note: If the measurement is a fraction, you may round up to the nearest 1/2-inch.
For waist and hip measurements, stand up straight with shoulders relaxed, position tape measure as directed (see below in chart), inhale then fully exhale, fully relax abdomen, then take measurement and record it.
THE X FACTOR: DETERMINING THE WIDTH
The X factor of each rectangle is based on the hip circumference, plus additional fit ease. Simply put, fit ease is the amount of ease included in the styling which makes the garment wearable and allows you to be comfortable. Without fit ease, the garment would fit like a sausage casing: skin-tight and difficult to move when wearing. You are the best person to judge what feels comfortable and what doesn’t for your body shape and your style. The chart outlines the various degrees of fit ease.
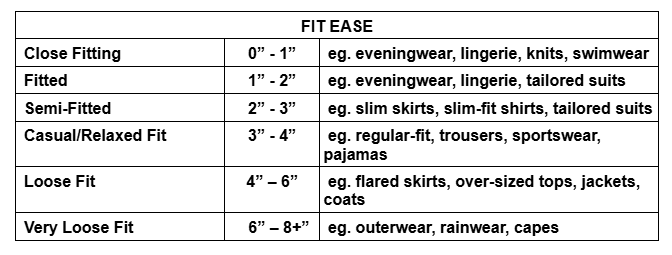
To customize the fullness of the girth to your body shape, measure the full hip area which includes the buttock, and add 2” of ease for a semi-fitted look. Divide this number in half equally to establish the front and back of the skirt and add 2 seam allowances.

SEAM ALLOWANCE:
Seam allowance is the width of the fabric between the stitching line and the cut edge of the fabric. The width of the seam allowance is frequently an indicator of garment quality. It is determined by many factors, including the type of fabric used and how it handles; the overall design, care, cost, and end use; the location of the seam and intricacy of the seamline; the amount of stress; the ability and need for alterations; the type of seam finish used; and your own personal sewing standards.
Keep in mind, that wider seam allowances not only require more skill and time to sew accurately, but they also require more fabric than narrow ones. They are used generally on major seams (most often a vertical seam) that are straight or very slightly curved, on fabrics that fray easily or slip, on clean-finished seams, and seamlines that might be altered.
Generally, the following details are considered when deciding upon what size seam allowance to use on this project, but feel free to select whatever is appropriate for your fabric’s characteristics.
For example, for the model sample:
- the selected fabric is a cotton poplin, 60” wide; usable surface, 58” wide
- 3.83 oz/yd² in weight; crisp plain weave
- print motif: longitudinal stripe
“Poplin” indicates that the fabric is a plain weave cloth with very fine horizontal rib that results in a strong, crisp fabric with a silky, lustrous surface. “Cotton” is a tip-off to pre-shrink the fabric once before cutting, as fabrics made of natural fibers or with a proportion of natural fibers can shrink during the first laundering! The weight tells me that the fabric is light-weight and suggests light fraying could occur, so I should use a pinked finish or clean-finish for the raw edges, if not over-locking (serging) the raw edges by machine. The usable width of the fabric (58”) indicates to me that any dimensions greater than 45 inches in my layout will require to be realized in 2 pieces or more and joined together. The simple rectangular shape requires single-needle stitched seams which can be produced with plain seams and busted open. The gathering detail requires a generous allowance in the seam for shirring. The stripe runs the length of the cloth and allows for railroading the border pieces.
After considering all the above, Don chose to add 1/2-inch seam allowance to all edges except for the hem edge of the skirt. This will allow for a finished width of 3/8” to the stitching line and 1/8” for an appropriate seam finish. No consideration needs to be made for alterations, as all measurements are customized and should fit well. Choose a seam allowance appropriate for your fabric selection.
THE O FACTOR: DETERMING THE HEIGHT
Let’s begin by customizing the finished length of the skirt. The ‘rule of thirds’ suggests that style is more appealing if it is divided into one-third and two-thirds (odd numbers) than if divided in half (even numbers). In art, design, and architecture, the rule of thirds can be applied horizontally as well as vertically, but, for garment construction, only the vertical concerns us.
The proportions are different on everyone as we are all different heights and shapes, but as a rule, one-third of the way down your body is somewhere around the top of a pair of high-waisted jeans, a little closer to the bottom of your ribs than to your hipbones. Two-thirds of the way down is going to be somewhere around your knees. The rule of thirds gives this outfit energy. Without it, the same skirt would look less dynamic and less interesting.
The most flattering hemline is based upon the vertical distance taken from the nape of the neck down to the floor (including heels if you plan to wear them). Divide that number by the Golden Ratio (1.618). The difference between these two vertical measurements is your ideal hemline, from the floor, for your height. Compare this amount to your actual waist-to-knee length and select the length you prefer.
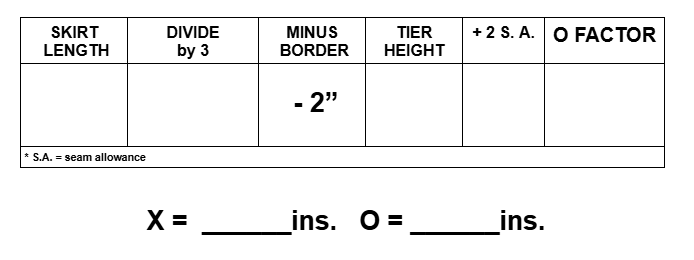
The O factor determines the vertical dimension of the rectangle. The skirt length is made up of three sections; divide the skirt length by 3, minus its fixed border. The border strip is finished at 2” wide. To this amount, add 2 seam allowances to calculate the O factor.
GATHERS AND BORDERS
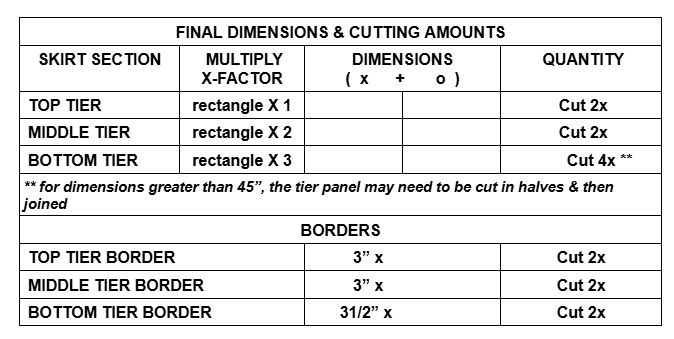
Now that the basic rectangle is established, the three tiers making up the finished length of the skirt and the length of the border strips may be realized. A pair of each is required: one for the skirt front, and another for the skirt back.
For the tier widths, expand as follows:
- Top skirt tier is one rectangle (as is).
- Middle skirt tier is double (2 rectangles side by side).
- Bottom skirt tier is triple (3 rectangles side by side).
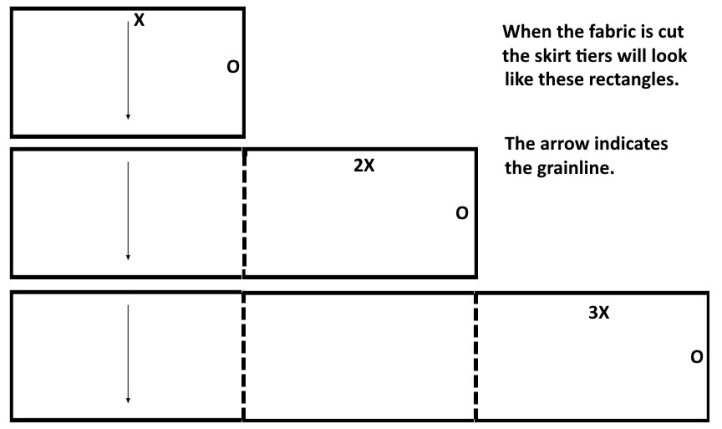
As mentioned earlier, each rectangle has a dedicated border along its lower edge. The border is “railroaded”, so that the longitudinal stripe of the cloth runs horizontally along the bottom edge of each tier. Each border strip is 3” wide (finishes at 2” + seam allowance) and matches the width of the tiers in length, except for at the hemline, where it is 3 1/2” wide to accommodate a double-turned hem.
Design Note: The 3X measurement of the bottom skirt tier is the amount of fabric yardage (based on 60” wide) required to make up the skirt. Round up the amount needed to the nearest 1/4-yard to allow for shrinkage or check the manufacturer’s percentage of shrinkage on the bolt label.
MARKING AND CUTTING
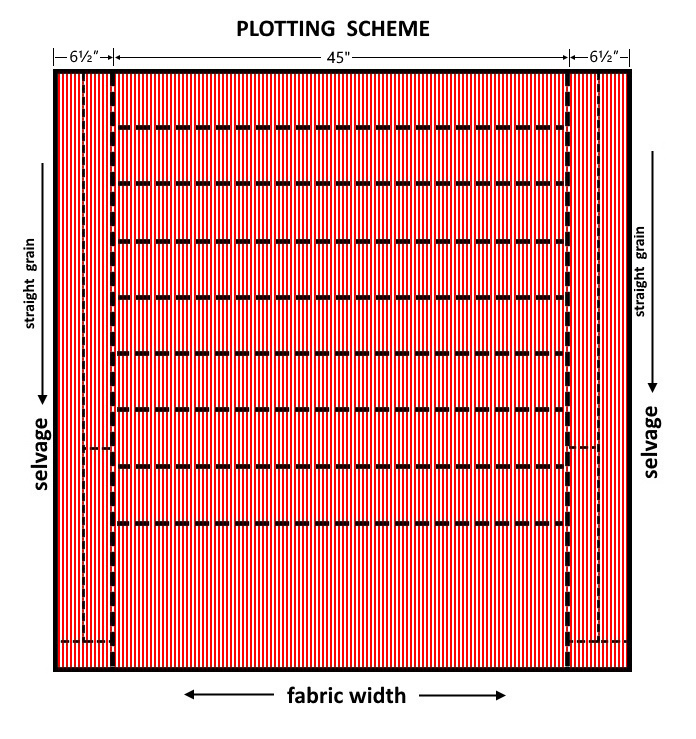
Before plotting the rectangular shapes on the cloth, be sure that the fabric has been squared and is on straight grain before proceeding. Work with the fabric face side up so that the stripe is visible. The orientation of the longitudinal stripe lets you use the stripe as a cutting guide and ensures that each cut is on straight grain and aligned correctly.
Plot out each rectangle directly onto your fashion fabric. Begin by removing the amounts needed for the borders from each selvage. As always, heed the old proverb: “measure twice, cut once”.
- Measure in from the first stripe along the selvage and mark the 6 1/2” point. Cut along the stripe at that location for the whole length of the cloth. Repeat the same for the other selvage.
- For the borders strips (including seam allowance), mark 3” on one of the short ends of the border strip and follow the stripe at that location for the length of the fabric.
- Then, cut the borders to length (X and 2X) from the 3” wide piece.
- With the remaining 3 1/2” strip, cut it to length (3X).
- Repeat these steps for the remaining selvage and use the previous cuts as a cutting guide.
Each selvage will provide a set of borders for the front and back of the skirt. (see diagram below)
- With the remaining fabric, square a chalked line across the width of the fabric. From this line, measure the height of the rectangle (O) and mark out 7 to 8 parallel lines on the fabric along the length of the fabric, following the quantities needed from the cutting chart.
- Cut across the fabric on these lines. A long safety ruler, rotary cutter and cutting mat make quick work of this while keeping the fabric flat and straight.
SEWING TECHINQUES USED
Gathering Cloth
Gathering is the process of drawing fullness into a much smaller area by creating soft, even folds. This sewing technique is one of many ways of controlling fullness in a garment. It is most often used at waistline, yokes, sleeves, cuffs, or when adding ruffles.
This basic sewing technique is used in all sorts of home décor projects and clothing construction, from full dresses and skirts to tops and pants. Gathering can be done manually or by machine with running stitches; with a specialized machine foot attachment (gathering foot); and automatically with elastic or draw-cord threaded through a channel (aka shirring).
Generally, ‘gathering’ is done after construction seams have been assembled, stitched, finished and pressed.
Method #1: Machine Basting
- To start, set your sewing machine to the longest straight stitch it can make. You can lower the tension, one notch, on your sewing machine as well to loosen the bobbin thread, if you prefer.
- Design Note: Suitable stitch length for gathering vary from 1/8” to 1/4” (3 to 6 mm), shorter for sheer or light-weight fabrics and 1/4” to 3/8” (6mm to 10mm) or longer for heavier fabrics. The shorter the stitch length, the more control you have over the gathers but it can sometimes be difficult to draw. We recommend using high quality all-purpose or extra-strong thread that won’t break when pulled.
- Place the presser foot about 1/4” (6 mm) from the edge of the fabric and stitch your first row of loose basting stitches. Do not back-tack at the beginning of the seam (as you normally would) and allow to have two long tails of thread. Your row of stitching should be parallel to the edge of your fabric.
- Design Note: Sew from the right side of the cloth (face side). The bobbin thread is always easier to pull and since you’ll be attaching panels right sides together, having the bobbin gathering thread on the wrong side of the cloth (back side) will give you more flexibility to easily adjust your gathers if needed.
- If seams intersect gathered area, begin and end gathering stitches at seamlines.
- Design Note: The designer always bases the width of his seam allowance upon his selection of fashion fabric and how it handles. Don’s standard seam allowance for gathered seams is 1/2” (12 mm). So that’s the amount that we’ll assume for this demonstration. However, if your pattern has a different seam allowance, you can adapt the spacing of your running stitches accordingly.
- Run a second row of stitching 1/4” (6 mm) away from the first row staying within the dedicated seam allowance. Do not back-tack and leave long tails of thread.
- Now that you have two rows of basting lines, you are ready to gather fabric. Draw up bobbin thread, distributing fullness evenly along the gathered edge. Start on one end, holding both bobbin thread tails and slide the fabric towards the center. Repeat for the other side until the fabric is gathered to match the length of the joining fabric.
- Pro Tip: For more precise distribution of fullness, you can measure each fabric piece and divide into equal halves/quarters. Then pin the pieces together at the midpoints and distribute the fullness evenly.
- Tie thread tails with knots to secure gathers.
- Pin and stitch seam gathered side up at your standard seam allowance and regular stitch length.
- Remove basting stitches with a seam ripper.
- Finish the seam using your preferred seam finish method based upon your selected fashion fabric (eg. serge or zigzag).
- Press the seam to one side as it should go in the finished garment. Press the gathers by working the point of the iron. Try not to press across the gathers too much, as it will flatten them. Alternatively, use a clothes steamer to smooth out the gathered fabric.
Method #2: Zig-Zag Method
This method works well when you have long lengths of fabric to gather. Similar to the previous method, the gathering can be controlled more easily than machine-basting. Set your machine to a wide zig-zag. Using some heavy-duty upholstery thread (The designer has used unflavored dental floss and string, as well), center the upholstery thread by lining up with the opening of your presser foot. You will sew over this heavy-duty thread with the zig-zag stitch, being very careful so that the upholstery thread is not caught by any stitches. Then, pull the thread until you get the gathered effect you want. Once the gathered edge is sewn to the flat edge, remove the upholstery thread.
Method #3: Using a Gathering Foot
The gathering foot allows the creation of a permanently gathered ruffle, no more slipping or sliding up and down the stitch line with the added bonus of being able to sew the gathered edge to a second layer of fabric in a single pass!
The gathering foot has two plates. If you are simply gathering a piece of fabric, you will simply place the fabric under the presser foot, and gather away. If the gathered piece has to be attached to another layer of fabric, you will feed the flat piece between the two places—the bottom layer gathers at the same time that it is sewn to the top later. The gathering ratio is generally 2:1. You will have to experiment with the stitch length to figure out the ratio of flat-to-gathered fabric.
- To form gathering on a single layer of fabric, pass the fabric beneath the bottom of the foot and simply sew. You will notice that the longer the stitch length, the fuller the gathers becomes. Play with some scrap fabric to find the perfect stitch length for your gathers.
- To gather a ruffle and attach it to a second piece of fabric, increase your stitch length. The higher the stitch length, the more gathers. Place the fabric that you want ruffled underneath your foot, and lower the foot down. Place the fabric that you want to remain unruffled, in the middle slot of your gathering foot, right side facing down. Sew, making sure you hold onto the flat material as you are sewing and pulling it slightly to the right as you do to keep it from slipping out from the specialized foot attachment.
- The fabric comes out with nice even gathers attached automatically to your non-gathered side of the fabric. Simply trim off any excess gathered fabric from the sides, and you are finished!
You can add the gather to either the right or wrong side of the flat piece of fabric as your project needs.
SINGLE SEAM ELASTIC WAISTBAND
A simple easy-access way of dressing, the single seam waistband is a closed band. It is generally elasticized and applied to pull-on garments. Unlike the casing, which is a type of extended facing, the waistband is cut separately or a woven tape is applied to the garment. It is cut long enough to pull over the hips easily. The band is elasticized by encasing a single band of elastic or by multiple rows of narrow elastic. The elasticized band can be joined to the top of the garment while the garment is still flat, or it can be joined in the round after all vertical seams are sewn.
The elasticized waistband is comfortable to wear and fits many figure types. The labor and material costs are minimal because it does not require any special sewing skill.
The insertion of an elastic band through a hollow channel or fold in the fabric is the most common elastic waistband technique that you’ll find in every sewing book. It automatically cinches the fullness of the fabric in the applied area creating gathers.
Application Method
- To start, choose the width and type of elastic you’d like to add. For example, for a plain 1” wide waistband, use a 1”-wide braided elastic that is cut a few inches smaller than the waist measurement plus added 1” for seam allowances. Braided elastic is a good choice for casings because it narrows when stretched.
- Next, you need to create a hollow channel that can accommodate your elastic. Following the example of using a 1”-wide elastic, you’ll need to add 1″ (the width of the elastic), plus 1/4” (6mm) of ease plus your selected seam allowance (3/8” /10mm for a minor seam).
- Stitch around the lower edge of the channel, 1/8” (3mm) from the edge, leaving a small (about 2”/ 5 cm wide) opening for the elastic to be inserted. Remember to back-tack at both ends.
- Attach a bodkin to the elastic and pull it through the channel. Lap the elastic ends over one another and anchor together with several rows of stitching through all layers.
- Pull gently on the fabric so that the joined elastic ends slip inside the channel. Distribute the gathers evenly. Then sew the opening closed with the same seam allowance used before.
- To secure the encased elastic and prevent it from twisting in the casing, stitch through all layers in the side seams.
Alternatively, a shirred waistband can be produced with the same gathered effect. As its name suggests, it is a waistband with several channels and rows of top-stitching. This technique is very similar to creating a basic fold-down casing, but instead of making just one casing, you make several and individually insert several pieces of narrower elastic into each casing. It gives a more sophisticated look to a simple pull-on garment.
MACHINE SET-UP:
Machine Needle – Size 70-80 universal needle
Stitch Length – Regular stitch length (2.5 of a possible 5)
Stitch Tension – Regular tension (4 of a possible 9)
Stitch Tension – Regular tension (4 of a possible 9)
Foot Attachments – Single-stitch or zigzag foot
Pressing – Moderate heat temperature (steam iron — 2-dots)
Seam Allowance: 1/2” (see note about seam allowance)
Hem Allowance: 1”; finished hem = 1/2”.
Waistband Finish: 1” elasticized with twill tape casing; elastic braid, 1” (25mm) wide.
Seam Finish: Pinked
Hem Finish: Double-turned; top-stitch by machine; or slip-stitch manually with needle and thread.
Sewing Skill: Beginner—simple novice level sewing, but having good knowledge of clothing construction in your repertoire will help.
Sewing Instructions:
Abbreviations:
- Right side together (RST) = front face of fabric
- Wrong side together (WST) = back of fabric
- Square = at a 90° (right angle)
For light-weight woven fabrics, a universal machine needle, size 70-80, is recommended.
SEAM FINISH CUT EDGES:
- While all the fabric pieces are flat, seam finish the edge of cut seams to prevent the fabric from fraying during use and cleaning, to improve the appearance and comfort of the garment, and to strengthen the seam itself. The finish should not add bulk to the seam and it should not be noticeable from the face side of the garment after the garment is pressed or when it is worn.
- Only exposed seams need to be finished. For light to medium weight fabric, you may apply an over-locked edge finish by machine, if available. Otherwise, opt for a pinked finish, using pinking shears. Pinking leaves a flat, inconspicuous bias-cut “zig-zagged” finish (bias does not fray) and is suitable for fabrics that do not ravel excessively in a variety of weights.
JOIN PANELS TO COMPLETE WIDTHS NEEDED:
- Most likely it is necessary to join two panels of fabric to make up the bottom skirt tier. Should this be the case, divide the 3X amount in half equally and add one seam allowance. Use the stripe to hide the seam by matching the spacing of the stripe. For larger bodies, this step may include middle or top tiers as well.
- With right sides together (RST), sew the short end of the panels together and press the seam allowance open. Repeat this step for the back of the skirt.
ATTACH THE BORDER STRIP TO THE PANELS:
For each tier, the length of the border strip acts as a ‘ruler’.
- Beginning with the bottom tier border (3X), fold it in half and align the two short ends. Mark the midpoint at the fold. With RST, match the midpoint of the lower border piece to the seam line in the center of the bottom tier section. Pin/baste the two layers of fabric together smoothly. Sew the border to the panel. Square up, following the stripe as it is on straight grain, at each end of the border and cut away the excess from the fabric that projects beyond the end of the border piece. Press the seam allowance open. Repeat this step for the back of the skirt.
- For the middle tier border (2X), match the middle border piece to the middle tier section. Pin/baste the two layers of fabric together smoothly. Sew the border to the panel. Square up following the stripe and cut the excess from the fabric that projects beyond the end of the border piece. Press the seam allowance open. Repeat this step for the back of the skirt.
- For the top tier border (1X), match the top border piece to the top tier section. Pin/baste the two layers of fabric together smoothly. Sew the border to the panel. Square up following the stripe and cut the excess from the fabric that projects beyond the end of the border piece. Press the seam allowance open. Repeat this step for the back of the skirt.
ATTACH FRONT AND BACK SECTIONS:
For each skirt tier section, attach the skirt front piece to the skirt back piece at the side seams.
- With RST, align the front and back sections of the skirt tier at both side seams and match up the border seams. Pin/baste the two layers of fabric together smoothly along the short ends.
- Sew the side seams to form a tube shape. Press the seam allowance open.
- Repeat this step for each tier of the skirt.
GATHERING TIERS:
- Now that construction seams have been assembled, stitched, finished, and pressed, apply the preferred method of gathering (see notes on Sewing Techniques) and draw in the fullness into a much smaller area of the adjacent tier by creating soft, even folds.
- Apply gathering stitches (parallel running stitches) only to the top edge of the middle and bottom skirt tiers. If seams intersect the gathered area, begin and end gathering stitches at each seamline. If applying running stitches manually, use the spacing of the stripe as a guide.
ATTACH GATHERED EDGES TO BORDERS:
- With RST, align the side seams together of each tube shape and mark the mid points, top and bottom, at the fold of the fabric creating 4 evenly-spaced quadrants.
- With RST, pin one gathered edge to one border edge at each quarter point. Draw up bobbin thread of basting stitches to produce soft shirring until both edges are the same length between each notch point. Distribute the gathers evenly. Tie thread tails with knots to secure gathers.
- With RST, pin and stitch seam gathered side up at your standard seam allowance and regular stitch length. Remove basting stitches with a seam ripper. Press the seam to one side as it should go towards the border of the garment.
- Press the gathers by working the point of the iron. Try not to press across the gathers too much as it will flatten them. Alternatively, use a steamer to smooth out the gathered fabric.
INSERTION OF ELASTIC BAND:
- Turn under seam allowance along top edge of the top tier of the skirt and press the edge flat.
- Cut a length of twill tape equal to the top edge of the skirt plus 1” for seam allowance.
- Fold the twill tape in half and sew across the short ends. Press seam open.
- With face side up, lay the fabric flat and align the finished edge of the twill tape on top edge of the skirt and the seam allowance approximately 1/8-inch away from the foldline.
- Edge-stitch along the long edge of the tape to the top of the skirt.
- Fold the taped seam to the inside of the garment and baste in place. From the face side of the skirt, top-stitch 1” from the top edge to form a channel for a casing.
- Cut a length of elastic equal to your waist measurement. Braided elastic is a good choice for casing applications.
- Attach a bodkin to the elastic and draw it through the opening at the waist. Lap the elastic ends over one another and anchor together with several rows of stitching through all layers.
- Pull gently on the fabric so that the joined elastic ends slip inside the casing. Distribute the gathers evenly. Then sew the opening of the twill tape closed.
- To secure the encased elastic and prevent it from twisting in the casing, ‘stitch-in-the-ditch’ through all layers at the side seams, or top-stitch down the center of the elastic casing while stretching the elastic to its fullest expanse.
HEM THE SKIRT:
The double-turn hem is applied to the lower edge of the bottom skirt tier. For this application, the hem is folded manually. The finished hem is 1/2-inch wide and the hem allowance is 1”.
- Turn the skirt face side down. Place the bottom section on the machine with the wrong side up and the bulk of the garment towards the left. Open the seams with your fingers and fold 1/2” to the wrong side. Fold 1/2” again in the same direction to enclose the raw edge of the fabric.
- Slide the hem under the foot and sink the needle into the edge of the first fold. Arrange the hem and stitch, using the inside edge of the foot as a sight line. Press the hem.