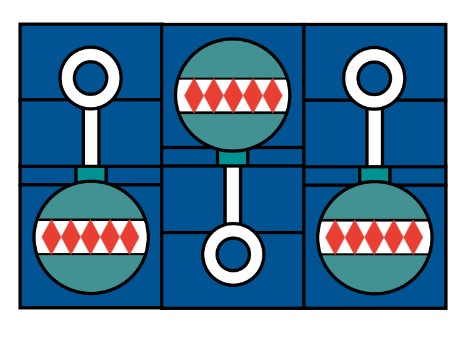
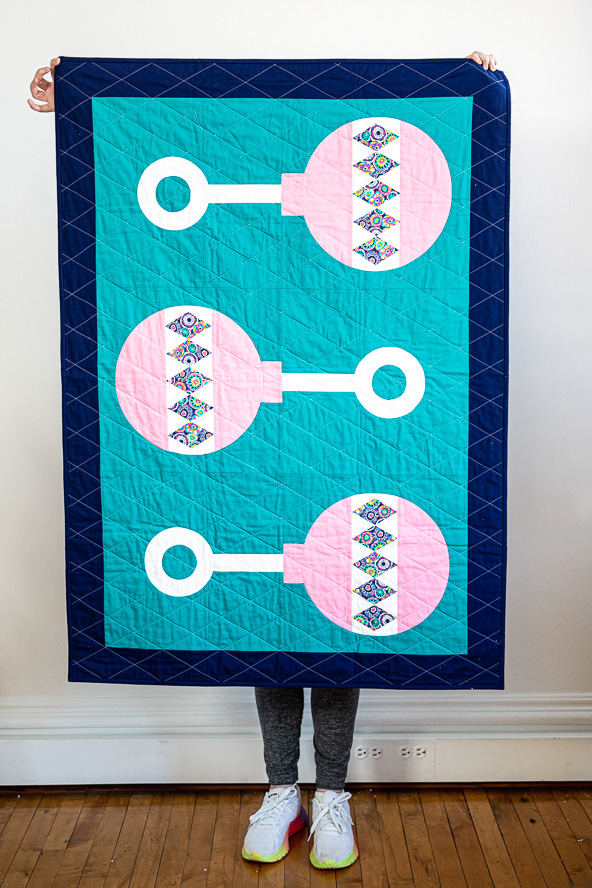
Give your newest grandbaby the gift of a handmade quilt that will be cherished for years to come. This modern baby quilt pattern features bold and colorful rattles made in pretty rosebud pink against a striking turquoise background. Make your circles using two different freezer paper methods, focusing on positive and negative space. New moms everywhere will love receiving this charmingly sweet homemade baby quilt.
Editor Note: Before we begin the baby quilt pattern, let’s take a deep dive into the two methods for making precision circles using freezer paper. These instructions are key to making your baby quilt, so you won’t want to miss Kathy’s insights into creating perfect circles!
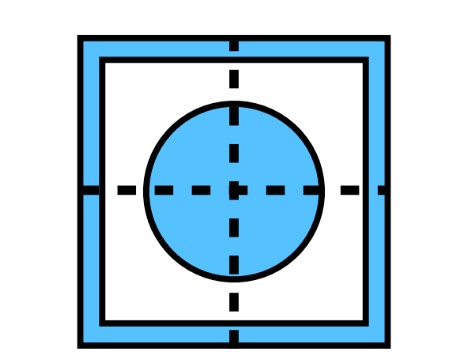
2 Methods for Precision Circles Using Freezer Paper
Materials:
- Pencil
- Compass
- Freezer paper
- Fabric safe marker
- Zipper foot (optional)
Fabric Requirements:
- Background fabric: 2 -18 inch squares of fabric

- Foreground (circle) fabric: 2 – 14 inch squares of fabric
Method 1: Using the Negative Space of the Freezer Paper Template
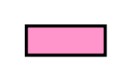
- Cut 2 16” X 16” freezer paper squares. Iron one 16” X 16” square of freezer paper on top of the other with waxy side of the top square facing the non-waxy side of the other.
- Locate the center of the freezer paper by folding the freezer paper in half vertically and horizontally.
- With the compass set at 6 inches, center the compass at the intersection of the fold lines and draw a circle with a diameter of 12 inches.
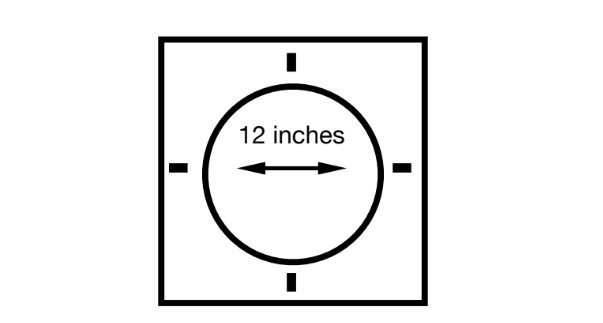
- Carefully cut out the 12 inch circle. The negative space of the freezer paper will be used as your 12 inch circle template for Method 1. The positive space 12 inch circle will be used as your 12 inch circle template for Method 2.
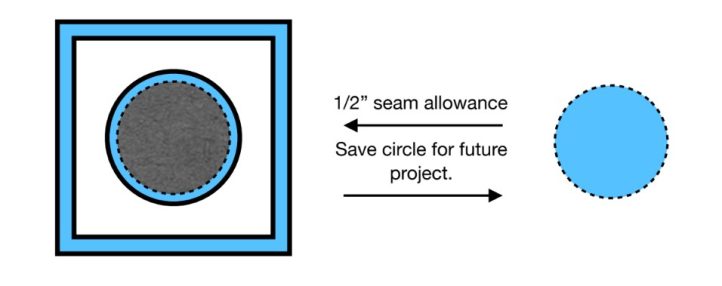
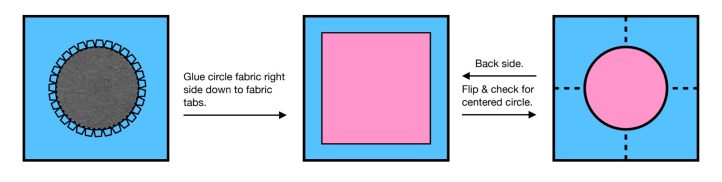
- Locate the center of your background fabric by folding the fabric in half vertically and horizontally. Center the negative space freezer paper circle template from Step 4 onto the wrong side of the background fabric. Iron the freezer paper template (waxy side down) onto the wrong side of your background fabric.
- Preserving a 1/2 inch seam allowance, cut a circle out of the center and save it for a later project.
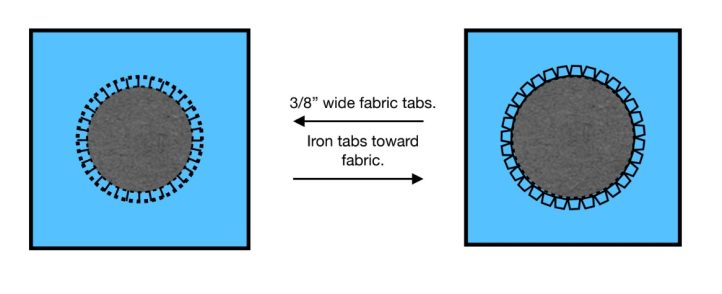
- Make snips in the 1/2” seam allowance perpendicular to the edge of the freezer paper circle to create fabric tabs. The snips should be a scant 1/4” from the edge of the freezer paper and the tabs should be approximately 3/8” wide . Iron the fabric tabs toward freezer paper and lightly glue the fabric tabs to freezer paper with a glue stick.
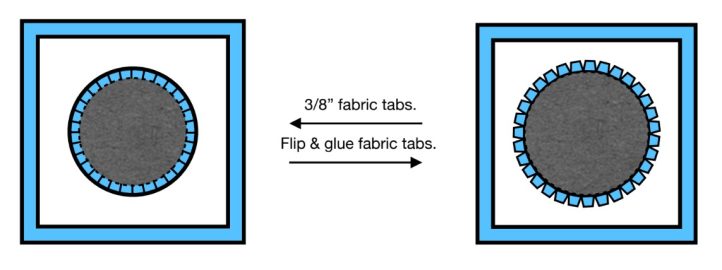
- Using a glue stick, apply glue to the top of the flipped fabric tabs and place the 14” X 14” square of circle fabric right side down over the fabric tabs. Finger press and allow the glue to set for a minute.

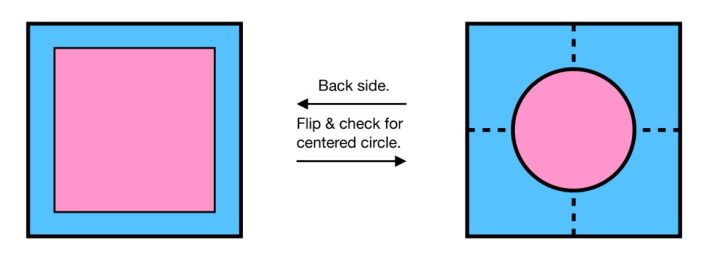
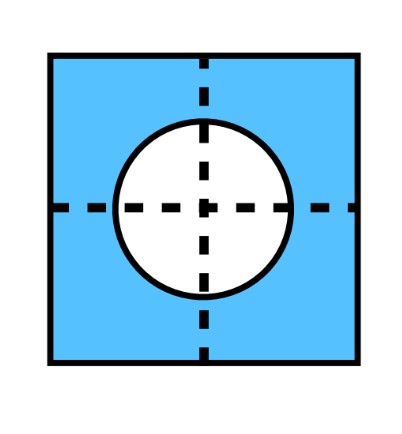
- Gently remove the freezer paper and save the template for another circle as it can be reused. Be careful to keep the background fabric tabs glued to the circle fabric. Should the tabs dislodge, finger press to reset glue. Turn the circle unit right side up to ensure the circle is centered on background fabric square.
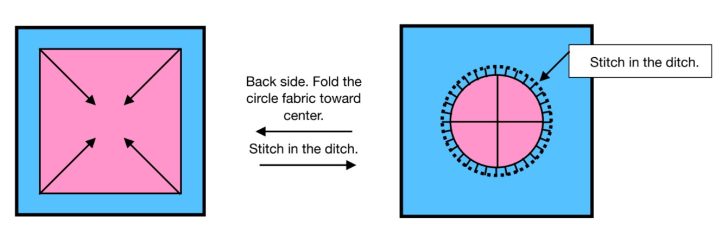
- Turn the circle unit over (back side up) and gather the circle fabric toward center by folding the circle fabric corners and edges toward the center. The background fabric tabs should be folding toward the center also as they are glued to the front of the circle fabric. Using a short stitch length, slowly stitch in the ditch around the perimeter of the circle. A zipper foot works best but any machine foot will due.
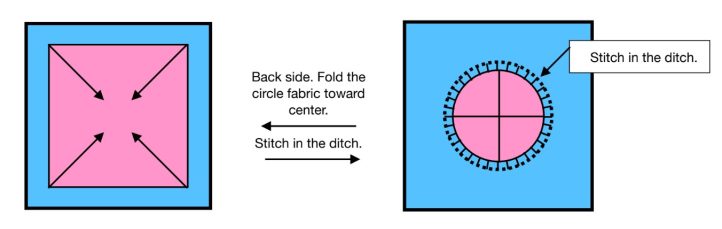
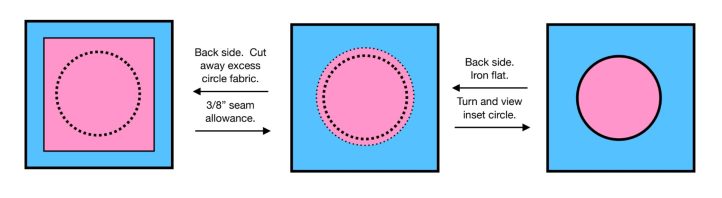
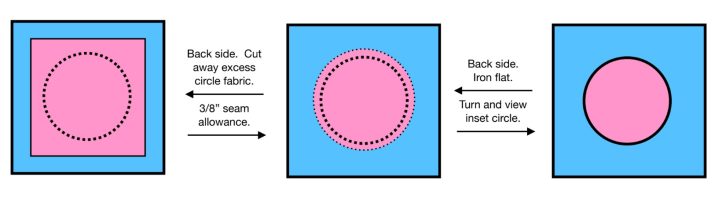
- After stitching in the ditch for the perimeter of the circle, keep the fabric unit back side up and smooth out the circle fabric. Cut away the excess circle fabric leaving a 3/8” seam allowance outside of the sewing line and iron flat. Turn the fabric unit right side up to view inset circle.
Method 2: Using the Positive Space of the Freezer Paper Template
- Locate the center of your background fabric by folding the fabric in half vertically and horizontally. Center your positive space freezer paper circle template from Step 4 onto the wrong side of the background fabric. Iron the freezer paper template (waxy side down) onto the wrong side of your background fabric.
- Using your fabric safe marking tool, trace around the 12” freezer paper template. Remove the template.

- Preserving a 1/2 inch seam allowance, cut a circle out of the center and save it for a later project.

- Make snips in the 1/2” seam allowance perpendicular to the edge of the fabric marker line to create fabric tabs. The snips should be a scant 1/4” from the marker line and the tabs should be approximately 3/8” wide. Iron the fabric tabs toward the fabric using the marker line as the fold line.
- Using a glue stick, apply glue to the top of the flipped fabric tabs and place the 14” X 14” square of circle fabric right side down over the fabric tabs. Finger press and allow the glue to set for a minute. Turn the circle unit right side up to ensure the circle is centered on background fabric square.
- Turn the circle unit over (back side up) and gather the circle fabric toward center by folding the circle fabric corners and edges toward the center. The background fabric tabs should be folding toward the center also as they are glued to the front of the circle fabric. Using a short stitch length, slowly stitch on the fabric marker line around the perimeter of the circle. A zipper foot works best but any machine foot will due.
- After stitching the perimeter in the ditch for the perimeter, keep the fabric unit back side up and smooth out the circle fabric. Cut away the excess circle fabric leaving a 3/8” seam allowance outside of the sewing line and iron flat. Turn the fabric unit right side up to view inset circle.
Rosy Rattles Modern Baby Quilt Pattern
Finished Size: 37 1/2” x 53 1/2”
Finished Block Size: 16” x 31 1/2”
Designer Notes:
-
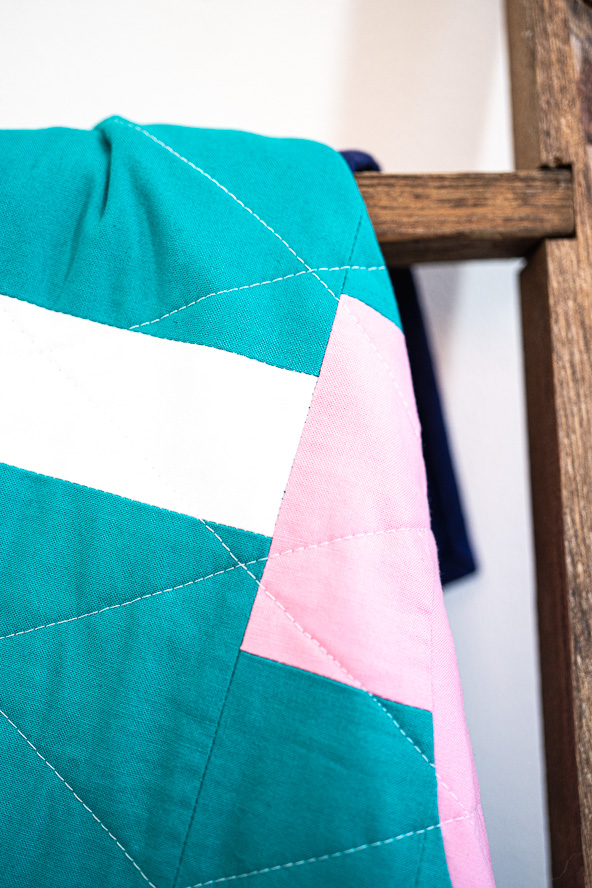
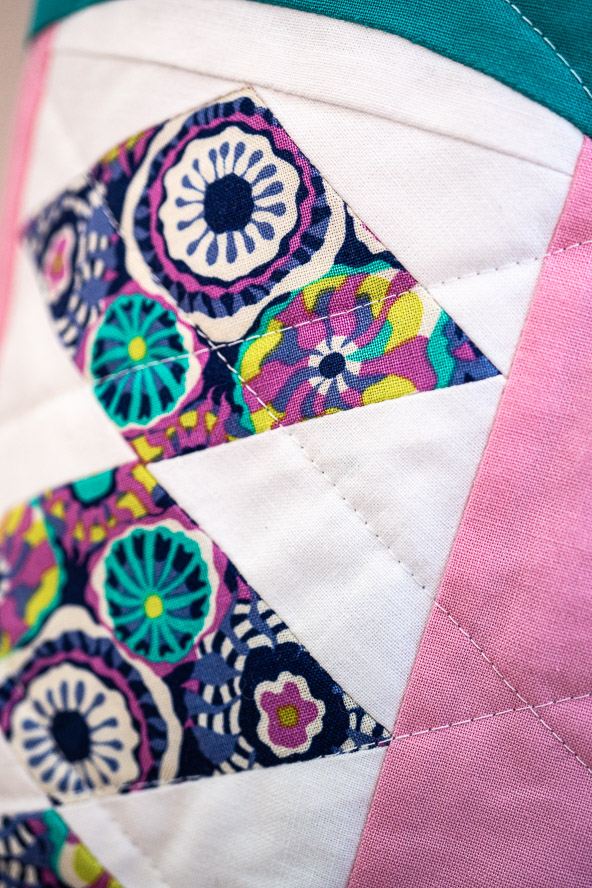
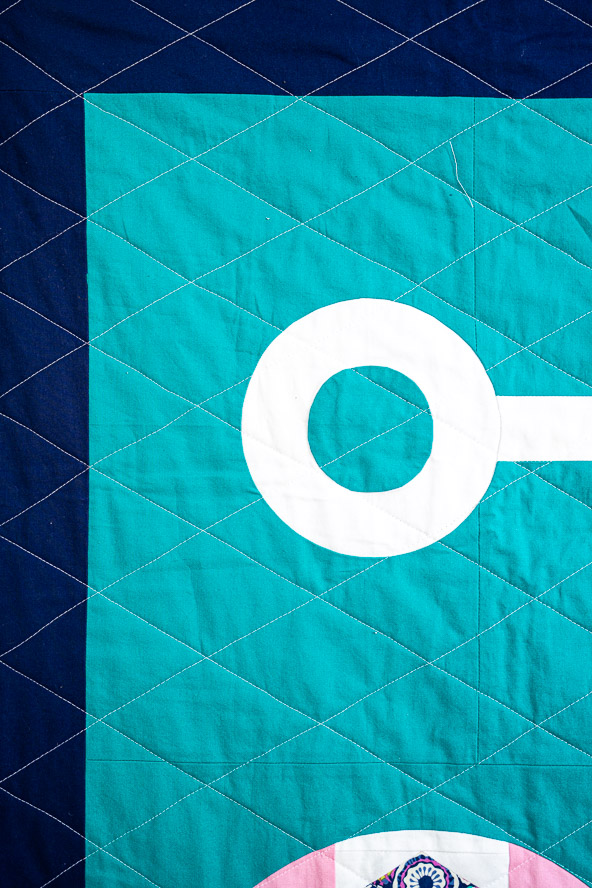
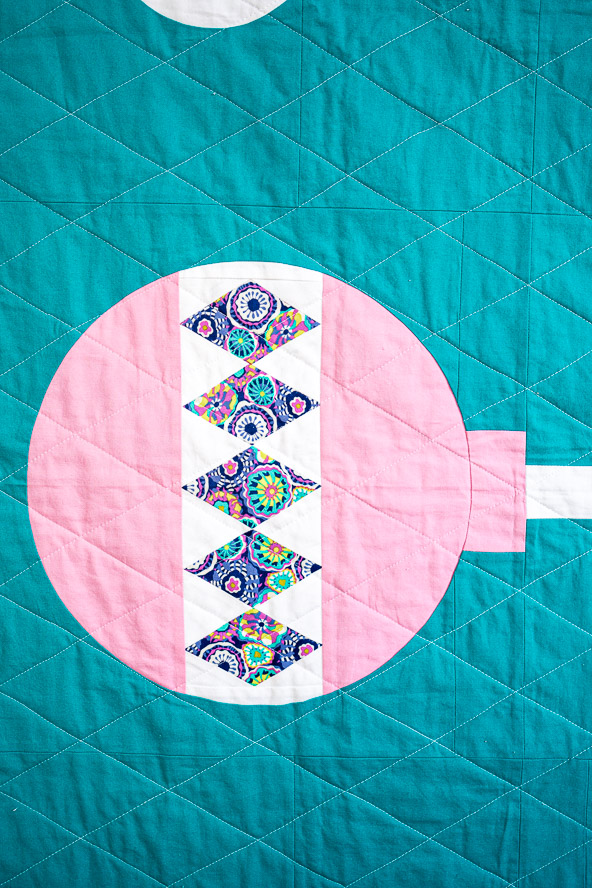
The solid fabrics in the quilt are all Kona Cottons (Nightfall, Carnation, White and Jade Green) and the print is Anemones by Sally Kelly for Windham Fabrics.
-
The walking foot quilting is done with a 50wt Aurifil #2024 thread.
Total Yardage:
NOTE: The above measurements assume fabric is at least 40” wide.
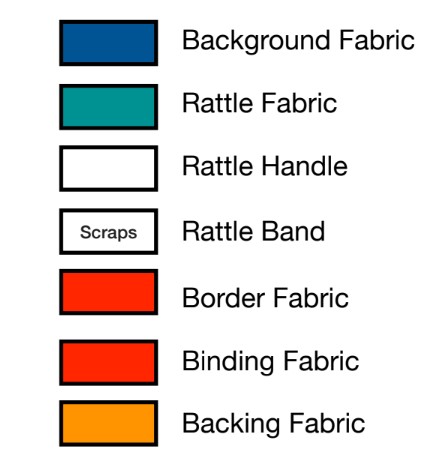
- Background fabric: 1 1/2 yards
- Rattle fabric: 1/2 yard
- Rattle handle: 1/4 yard
- Rattle band: Scraps = 18” X 22” fat quarter
- Border fabric: 2/3 yard
- Binding fabric: 3/8 yard
- Backing fabric: 1 2/3 yards
Color Key:
Materials:
- General quilting supplies
- Acrylic circle template for 3”, 6” and 12 1/2” circles OR freezer paper and glue stick
Cutting Instructions:
Background fabric: 1 1/2 yards


Rattle fabric: 1/2 yard

Rattle handle: 1/4 yard

Rattle band: Scraps = 18” x 22” fat quarter

Border fabric: 2/3 yard

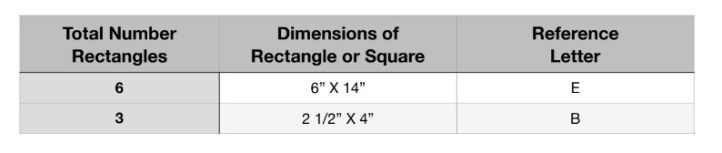
- Cut 5 – 3 1/2” X WOF
Binding fabric: 3/8 yard

- Cut 5 – 2 1/2” X WOF
Backing fabric: 1 2/3 yards

Sewing Instructions:
Designer Notes:
- 1/4” seam allowance.
- Use one of the 2 methods for precision circles using freezer paper (i.e. positive space or negative space).
RATTLE TOP:
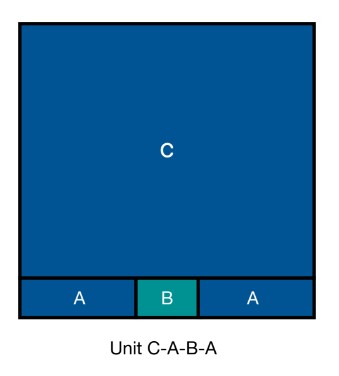
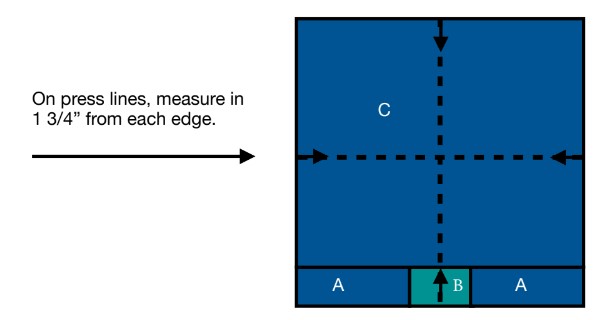
- Sew 2 Rectangle A pieces to Rectangle B to construct Unit A-B-A for a 2 1/2” X 16” rectangle. Press seams open. Repeat 3 times.

- Sew Unit A-B-A to Rectangle C for a 16” X 16” square to construct Unit C-A-B-A. Press seam open. Repeat 3 times.
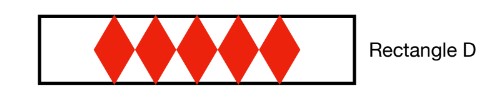
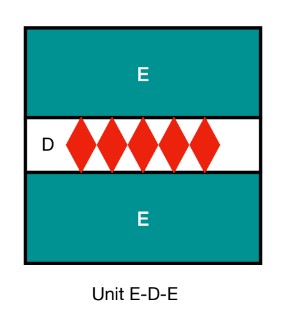
- Sew scraps for the Rattle Band to make a 4 1/2” X 14” Rectangle D. Press seams open. Repeat 3 times.
- Sew 2 Rectangle E pieces to Rectangle D (Rattle Band) to construct Unit E-D-E for a 14” X 14 1/2” rectangle. Press seams open. Repeat 3 times.
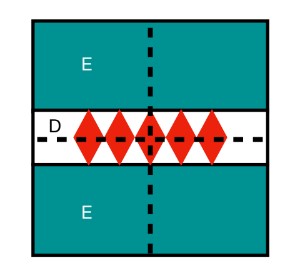
- Fold Unit E-D-E in half vertically and iron the fold line. Repeat for the horizontal direction. Repeat 3 times.
- Fold the Unit C-A-B-A square in half vertically and press. Repeat for the horizontal direction. Repeat 3 times. On the reverse side of Unit C-A-B-A, measure in and mark 1 3/4” from each edge of the vertical and horizontal press lines. Repeat 3 times.
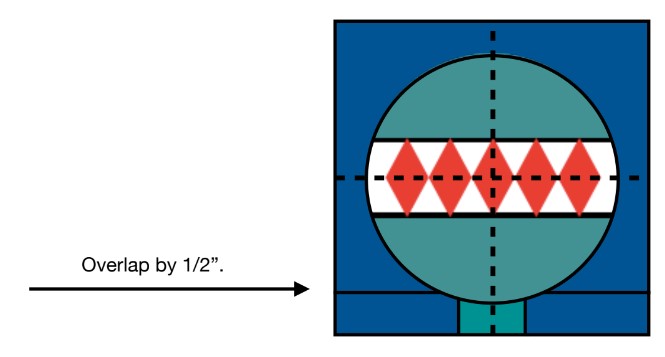
- Using the Inset Circle Technique of your choice (See notes section.) and your 12 1/2” freezer paper template, inset the Unit E-D-E circle into the Unit C-A-B-A square being sure to align the horizontal and vertical lines on Unit E-D-E with the horizontal and vertical lines on Unit C-A-B-A and overlap the bottom of the circle with piece B by 1/2”. Press the seams away from the circle. Repeat 3 times.
The Rattle Top square will measure of 16” X 16”.
RATTLE HANDLE:
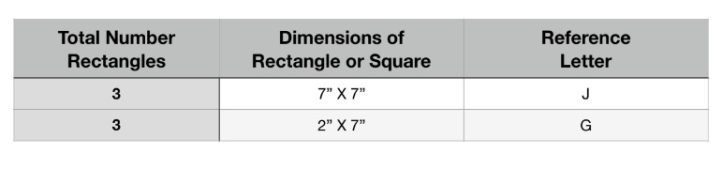
- Sew 2 Rectangle F pieces to Rectangle G to construct Unit F-G-F for a 7” X 16” rectangle. Press seams open. Repeat 3 times.
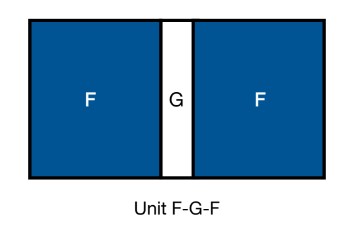
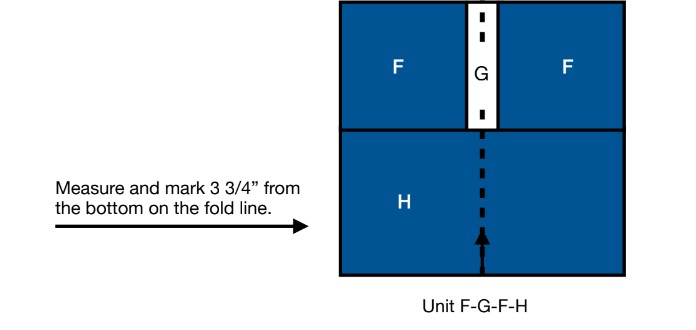
- Sew Unit F-G-F to rectangle H for a 16”X16” square Unit F-G-F-H. Press seams open. Repeat 3 times.
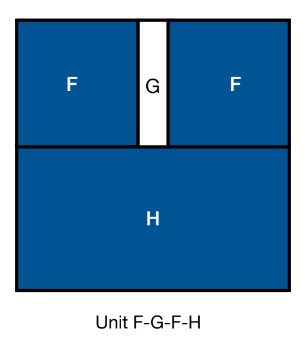
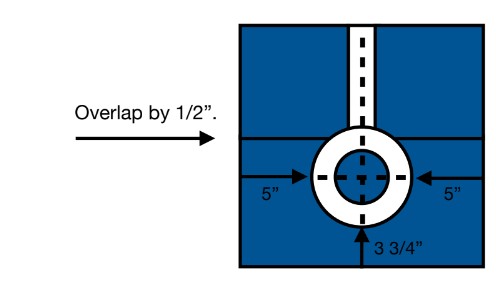
- Fold Unit F-G-F-H in half vertically and iron. On the reverse side of Unit F-G-F-H, measure and mark 3 3/4” from the bottom on the fold line.
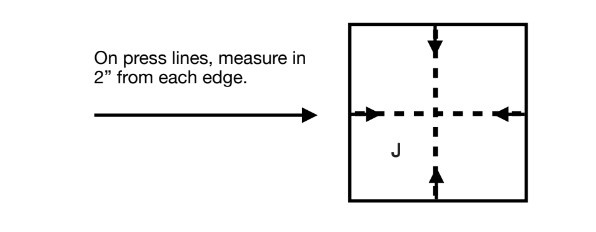
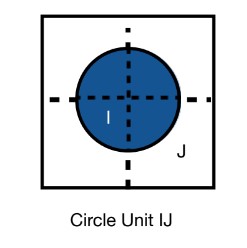
- Fold Square J in half vertically and iron the fold line. Repeat for the horizontal direction. Repeat 3 times. On the reverse side of Square J, measure in and mark 2” from each edge of the vertical and horizontal press lines. Repeat 3 times.
- Using the Inset Circle Technique of your choice (See notes section.) and your 3” freezer paper template, inset Circle I into Square J. Press seams toward circle. Repeat 3 times.
- Using the Inset Circle Technique of your choice (See notes section.) and your 6” freezer paper template, inset the Circle Unit IJ into the Unit F-G-F-H square being sure to align the vertical line on Unit F-G-F-H with the vertical line on Circle Unit IJ and overlap the top of Circle Unit IJ with piece G by 1/2” and the bottom with the 3 3/4” mark. The center line of Circle Unit IJ should be 5” from each sides of Unit F-G-F-H. Press seams away from circle. Repeat 3 times. The Rattle Handle square will measure 16” X 16”.
- Sew the Rattle Top square to the Rattle Handle square. Repeat 3 times. The final block will measure 16” X 31 1/2”.

COMPLETING THE QUILT:
- Sew the 3 rattle blocks in alternating directions to measure 31 1/2” X 47”.
- From border fabric, cut the following borders.

- Sew the lengthwise borders (3 1/2” X 47”) on the rattle top. Sew the width borders (3 1/2” X 37 1/2”) on the rattle top. The quilt top dimensions will be 37 1/2” X 53.

- Layer quilt top, batting and backing and quilt as desired. Bind using preferred method.
I love the concept of Rosy’s rattle baby quilt!You take that concept ,and make it into Christmas ornaments ! it’s definitely adorable.
That’s such a fun idea, Cynthia! Thanks so much for sharing 🙂 – Ashley, We Like Sewing
Thought I would give this a try. Trying to teach myself how to make quilts. Thank you for this.
Why can’t you have this pattern in a printable format so I can take it to my sewing machine? 23 pages is a lot to copy. I don’t have my computer near my sewing machine. I have not said this before.
Why can’t you have this pattern in a printable format so I can take it to my sewing machine? 23 pages is a lot to copy. I don’t have my computer near my sewing machine.