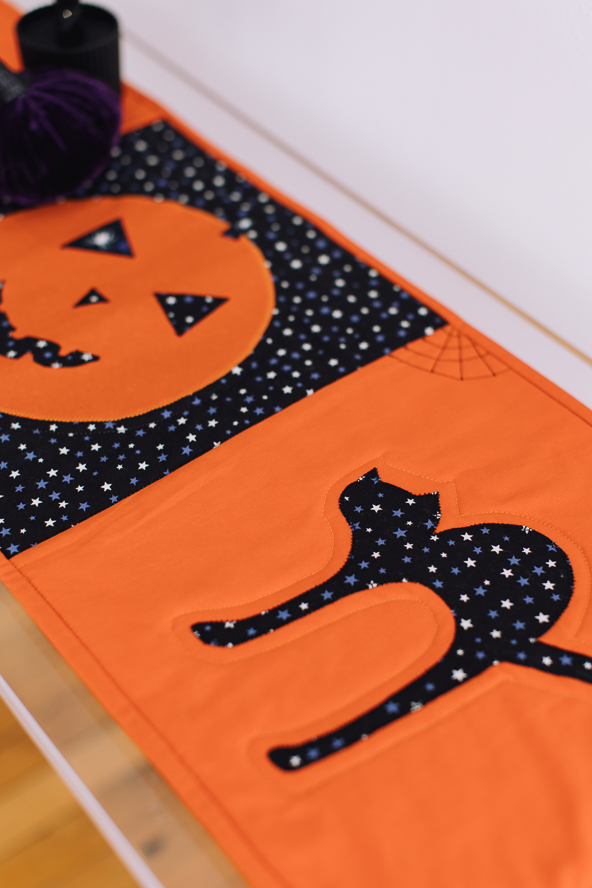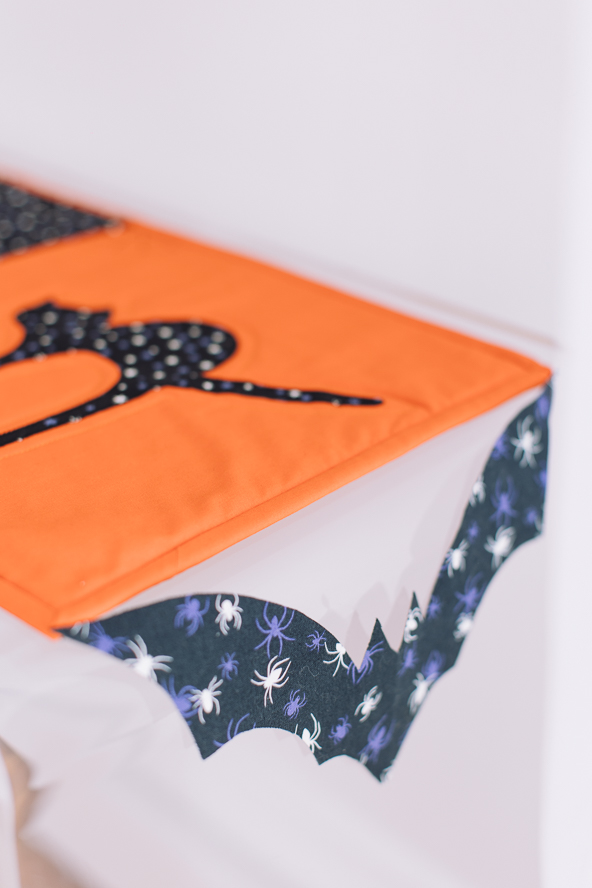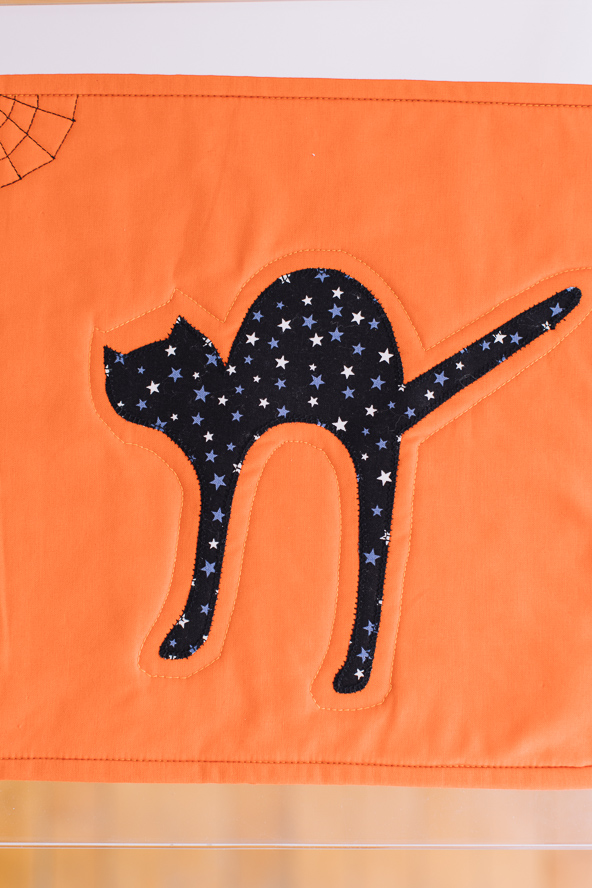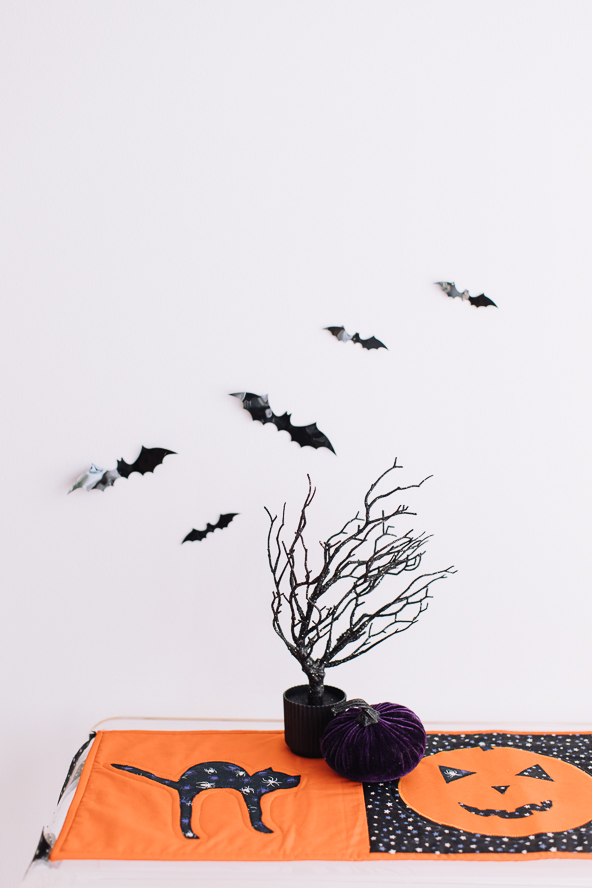
Start early on your Halloween sewing and quilting with this spooky fun table runner. This holiday table runner pattern is recommended for confident beginners and features classic Halloween motifs like black cats and jack-o’-lanterns. You can adjust the length of your runner to better fit your dining room table or entryway console, so that this table runner is the perfect size for your home. Our favorite detail: the adorable bats at each end of the design!
Skill Level: Confident beginner
Approximate Size: ~12” x 44”
Materials:
- Black patterned fabric 1: 0.5 yards
- Black patterned fabric 2: 0.5 yards
- Orange fabric: 1 yard
- Fusible adhesive (Heat N Bond lite): 2 yards
- Stitch and Tear/fusible interfacing (Vlieseline/Pellon): 1 yard
- Batting: 15” x 40”
- PDF Templates – These are located at the bottom of this page. Please see printing instructions below.
PRINTING INSTRUCTIONS:
Note: To download the templates, click on the pattern download button at the bottom of the page. We recommend opening your pattern download using Adobe Acrobat.
Cutting and Appliqué Instructions:
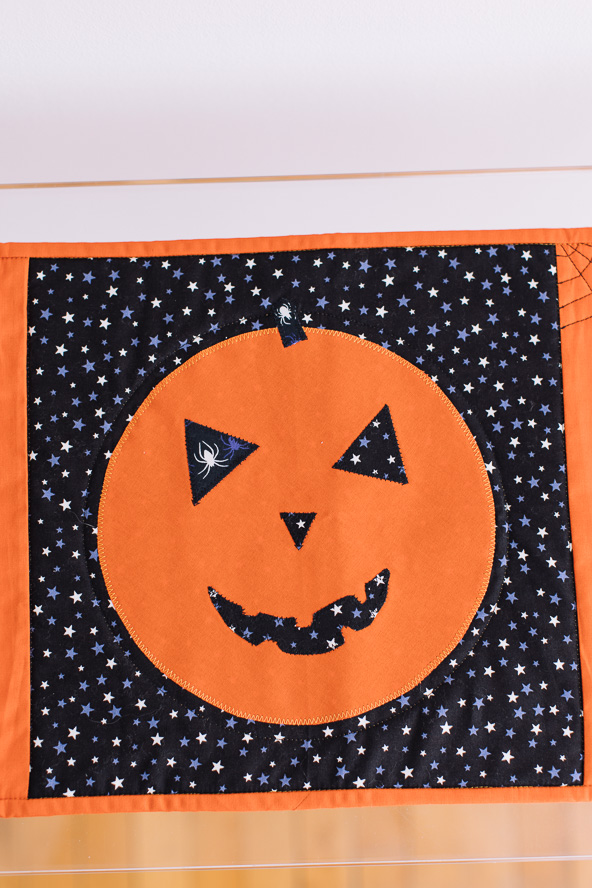
PUMPKIN:
- Orange fabric – Adhere a 9” square to the back of a 9 1/2” square of fabric with a warm iron (check the instructions for different brands of fusible adhesive). Fold the fabric in half and pin the pumpkin template so the straight edge lines up with the fold. Cut one circle.
- Using the templates, trace each element onto the paper side of the fusible adhesive. Cut the elements out roughly and adhere to the back of the fabric. Cut the elements out accurately.
- Black pattern fabrics 1 and 2 – Use the pumpkin eye template to cut two eyes.
- Black pattern fabric 1 – Use the pumpkin nose template to cut one nose.
- Black pattern fabric 1 – Use the pumpkin mouth template to cut one mouth.
- Black pattern fabric 2 (or a scrap of green) – Use the pumpkin stalk template to cut one stalk.
- Cut one 12 1/2” square of Black pattern fabric 1. Remove the paper from the back of the pumpkin circle and place it right side up in the center of the Black pattern fabric 1 square. Remove the paper from the back of the pumpkin elements and arrange them right side up on the pumpkin circle. Use a warm iron to adhere the fabrics to the Black pattern fabric 1 square and pumpkin circle.
- Press the fusible interfacing to the wrong side of the Black pattern fabric 1 square so it covers the area where the pumpkin will be appliquéd. Use a zig-zag/satin or blanket stitch to secure all the elements to the pumpkin and Black pattern fabric 1 square.
CATS:
- Using the templates, trace one of each cat onto the paper side of the fusible adhesive. Cut the cats out roughly and adhere to the back of the black fabric. Cut the cats out accurately.
- Cut two 12 1/2” squares of orange fabric. Remove the paper from the back of the cats. Place each cat right side up in the center of the orange square. Use a warm iron to adhere the cats to the orange squares.
- Press the fusible interfacing to the wrong side of an orange square so it covers the area where the cat will be appliquéd. Use a zig-zag/satin or blanket stitch to secure the cat to the orange square. Repeat for the second cat.
BATS:
- Cut two 12 1/2” x 7” rectangles of Black pattern fabric 1. Adhere a slightly smaller piece of fabric adhesive to the wrong side of one of the rectangles. Remove the paper backing and adhere the wrong side of the other rectangle to the first.
- Fold the rectangle in half, pin the bat template so the straight edge lines up with the fold and cut out the bat shape.
- Repeat to make a second bat from Black pattern fabric 2.
- If you are worried about the bat coming apart, use a straight stitch to secure the fabrics together about 1/4” inside the raw edge and zig-zag edges all around bat to prevent edges from fraying.
BINDING:
- Cut three 2.5” x WOF strips of orange fabric.
BACKING:
- Cut one 13 1/2” x 39” strip of orange fabric.
Sewing Instructions:
MAKING THE RUNNER:
- Stitch one of the cat blocks to the left of the pumpkin block.
- Stitch the other cat block to the right of the pumpkin block.
- Press the seams in one direction.
- Layer the backing, batting and runner top and quilt as desired. The designer echo quilted around the cats and pumpkin, stitched in the ditch between the blocks and added a cobweb.
- Use a long stitch to baste the runner around the edge, about 1/8″ away from the raw edge. Trim back to the top of the runner and double bind.
- Hand stitch the bats in place one on each short edge at the wing tips.
TO MAKE THE RUNNER LONGER:
- To make the runner longer, more blocks (for a long table) or sashing between the blocks can be added.
- To add sashing, measure you table length and take off 36” (the size of the three main blocks). Divide the remaining length by two and add 1/2” to each measurement. Cut two strips of fabric to this measurement by 12 1/2”.
- E.g. Table length 42” – 36”
- = 6”/2
- = 3” + 1/2”
- = 3 1/2”
- Cut two strips 3 1/2” x 12 1/2”.
- Stitch a sashing strip to the left and right sides of the pumpkin block before stitching the cat blocks to it.

- If you need to add very wide sashing, think about adding the strips between the blocks and to the opposite sides of the cat blocks.