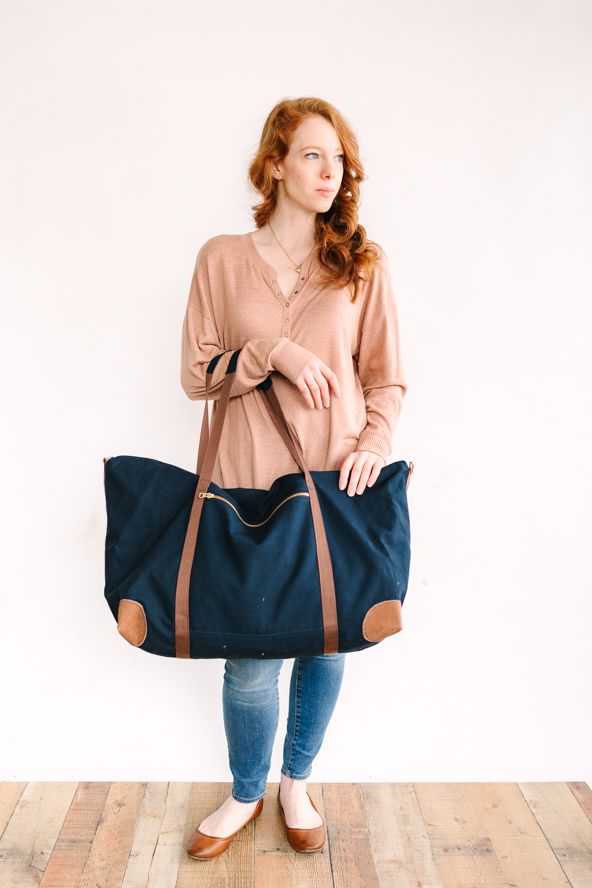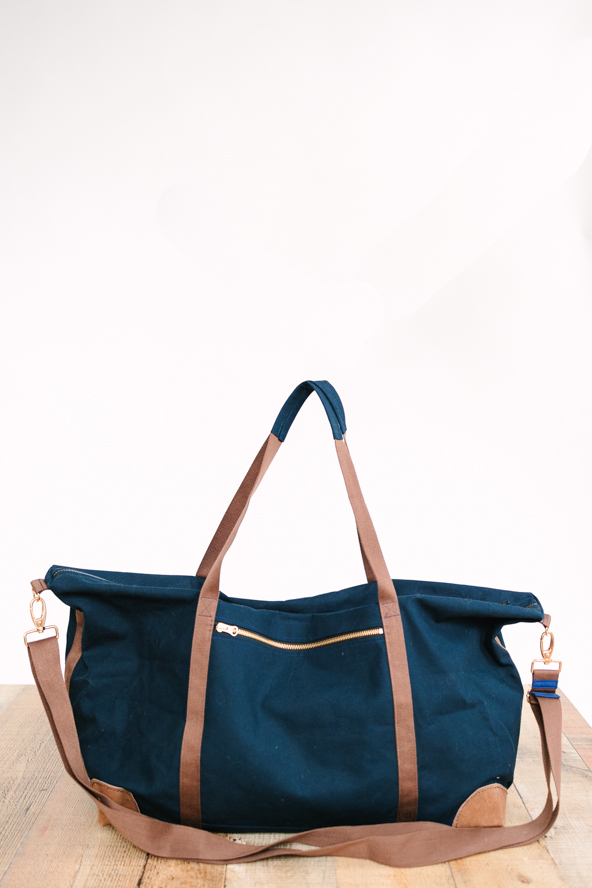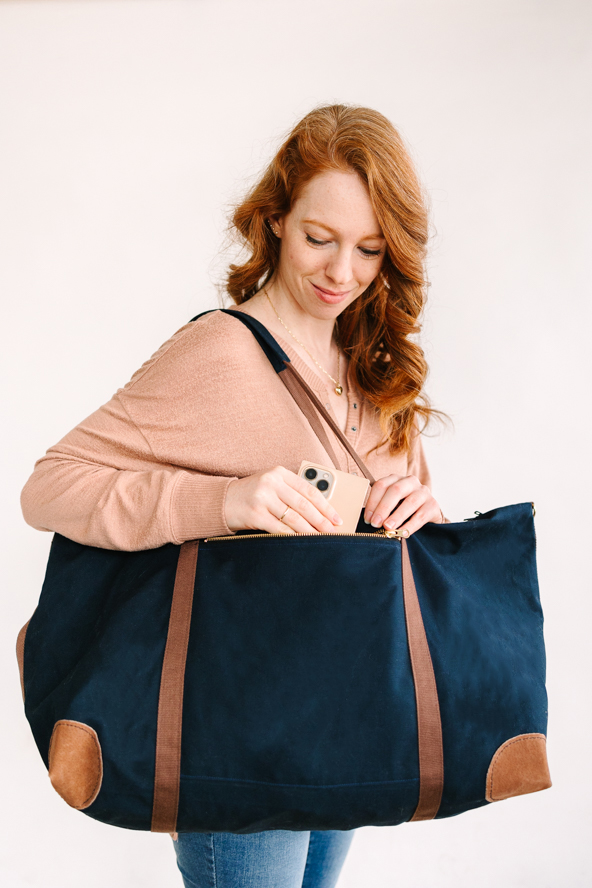
Summer is almost here, which means it’s almost vacation season! If you’re already prepping for your next weekend away, then you don’t want to miss this sleek and sophisticated weekend bag. This duffle bag pattern is made using soft, water-repellent canvas and features leather corner guards to give your necessities some extra protection. We love this travel bag pattern for its detachable, adjustable shoulder strap, mesh interior pockets and exterior pockets for your passport, tablet and more.
Skill Level: Easy but lots of prep work / Intermediate
Seam Allowances: Single seam allowance = 3/8” wide; Zipper turning = 1/2” wide
Finished Dimensions:
- Travel bag dimensions: 21″ x 15″ x 9″ (53*38*23cm) (W*H*D)
- Weight: 1 lb. 10 oz. (455g)
- Capacity: 45 linear inches for soft side (40L)
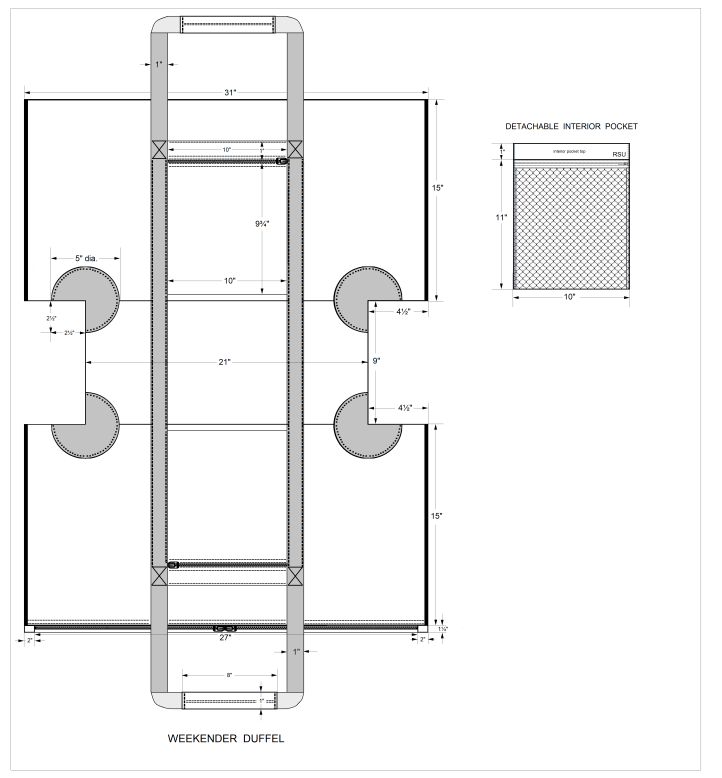
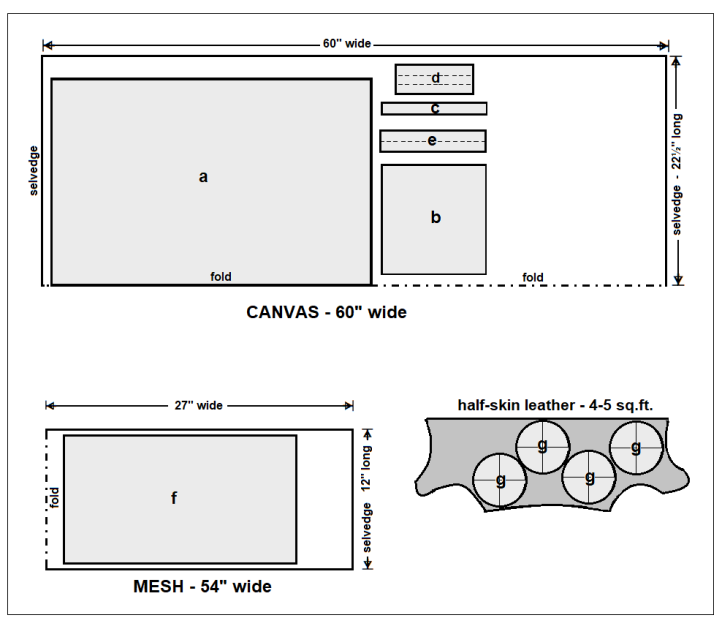
Pattern Layout:
Machine Set Up:
- Stitching – single-needle straight stitch
- Needle Type – Denim needle, size 14 -16 for canvas (Universal, size 14 for mesh pockets)
- Stitch Length – medium (3 of possible 5 setting)
- Tension – medium (4 of possible 8 setting)
- Topstitching – 3/8” from edge and 1/8” from edge, parallel to one another
- Zig-zag satin stitch (length – 1 of a possible 5 setting; width – 7 of a possible 7 setting; tension – loosen down one notch)
Materials:
- 1 1/4 yard outdoor or furniture canvas, 60” wide, about 200 – 300 g/m².
- 1/2 skin of soft leather or 1/4 yard of imitation leather
- 2 1/4 yards webbing for shoulder strap, 1 1/2” (38mm) width to fit hardware diameter
- 4 1/4 yard webbing for bag straps, 1” (25mm) width to fit hardware diameter
- 3 yards of double-fold bias tape, 3/4” (20mm) wide
- 2 closed-end bag zippers, 10” long
- 1 head-to-head closed zipper, 27 1/2″ long
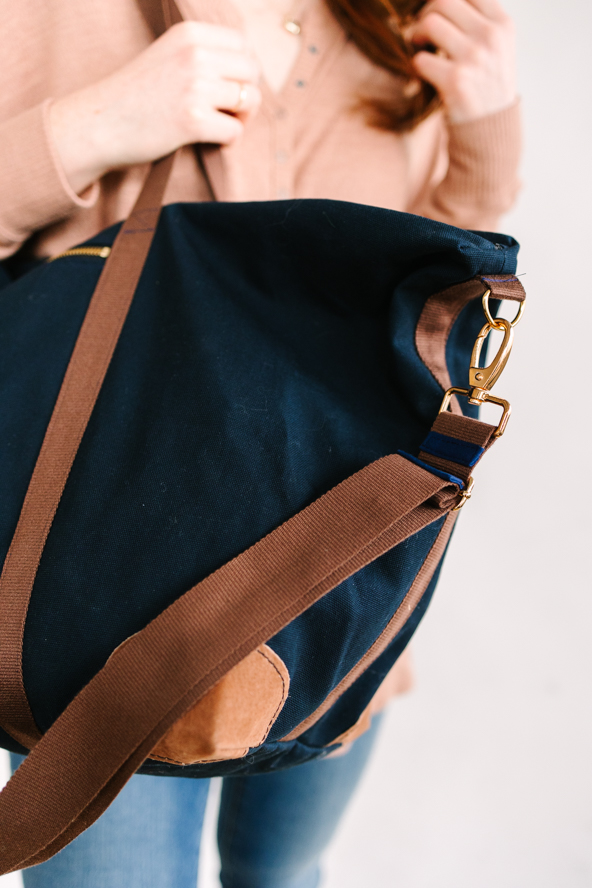
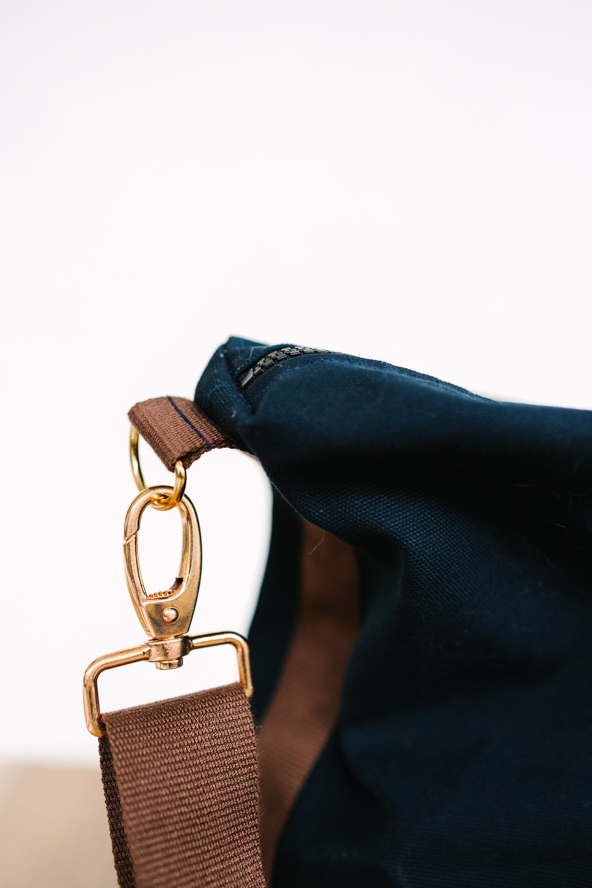
- 2 swivel carabiners, 1 1/2” (38mm) diameter
- 2 D-rings, 1” (25mm) diameter
- 1 slider buckle, 1 1/2” (38mm) diameter
- 1 spool heavy-duty or upholstery thread
- 1 spool buttonhole twist or waxed linen thread
- 1 roll of pattern paper or kraft paper (optional)
- PDF Layouts – These are located at the bottom of this page. Please see printing instructions below.
For detachable pockets:
- 1/3 yard of mesh simplex, 54” (140 cm) wide
- 1/2 yard of hook & loop fastener, 3/4” (20mm) wide
- 2 closed-end coil zippers, 10” (25cm) long
Tools:
- Pinking shears
- Awl or leather punch
- Quilter’s clips or low-tact masking tape
PRINTING INSTRUCTIONS:
Note: To download these layouts, click on the pattern download button at the bottom of the page. We recommend opening your pattern download using Adobe Acrobat.
FABRIC SUGGESTIONS:
Look for good quality bag fabrics for your next sewing project in the home decor section of your favorite fabric retailer. There you will likely find a large selection of robust, water-repellent and durable fabrics. Many offer a large selection of goods by the meter in many different colors and styles. You will find classics such as upholstery leather, in different colors and looks, but also upholstery fabrics such as denim, jacquard, gabardine, cotton twill, tapestry, canvas and half panama that will give your travel bag a very special feel.
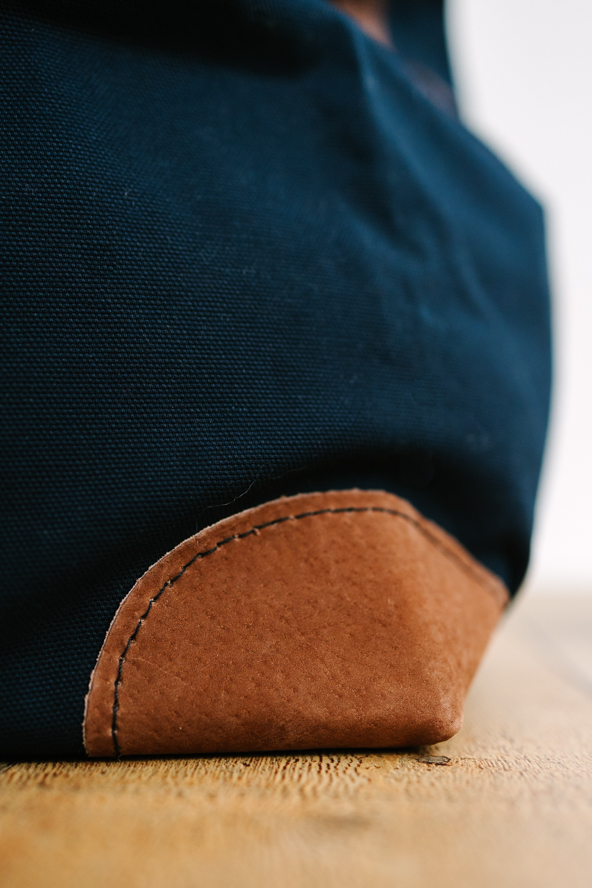
For the corner guard trim, select a textile that does not fray as it is an appliqué that is applied to each corner of the travel bag. Genuine leather can be purchased by full or half-skins and often small pieces are sold as cast-offs. Alternatively, you can use high-quality, lifelike faux leather with a bonded felt or woven backing, a perfect imitation of real leather and looks almost indistinguishable from genuine animal skin. You can buy the vegan-friendly option if you prefer.
When selecting hardware for the bag, take your cues from the type of metal used for the bag zippers. Match up the hardware to the same color and metal finish as the zipper teeth to give a harmonious professional look to your travel bag. Pay attention to the hardware’s inner diameters so that it fits your strapping perfectly.
Note: For the sample model, the designer chose an Oeko-Tex 100 certified, water-repellant cotton canvas, 60” wide, 344g/m², in navy blue.
MARKING AND CUTTING:
The duffel pattern is simply a collection of squares and rectangles. You can either download the layouts that are supplied or use the cutting list, which includes seam allowances and chalk directly on the fabric once it has been squared. The pattern pieces are cut using a dressmaker’s lay (fabric is folded in half on the crossgrain – face to face) and the pattern pieces are cut on straight grain.

FABRIC PREPARATION:
- Apply double-fold bias tape to vertical edges of the bag body piece with a Hong Kong seam finish.
- Pink top and bottom horizontal edges of the bag body piece to prevent fraying.
- Pink around perimeter of exterior pocket pieces and bag handles to prevent fraying.
- Pre-punch stitching holes along outer edge of leather circles with awl or leather punch.
Instructions:
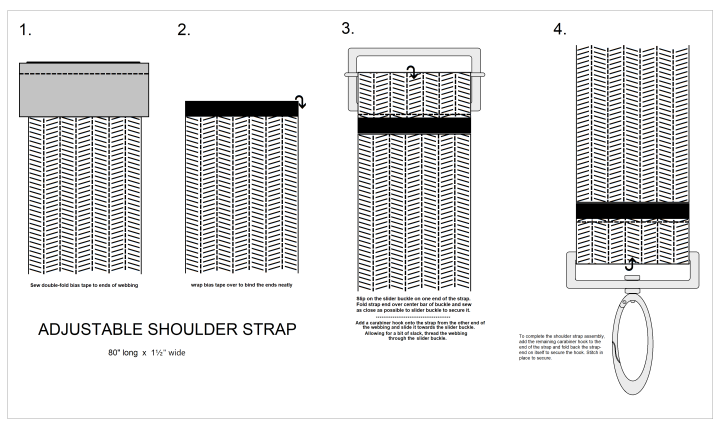
MAKE ADJUSTABLE SHOULDER STRAP:
- Gather together bag hardware (slider & carabiner), 1 1/2″ webbing, and bias tape.
- Cut 2 pieces of bias tape, 2” long. On each end of the webbing strapping, sew a piece of bias tape across the webbing and wrap it over the raw edge while tucking in the ends of the bias tape to neaten. Stitch-in-the ditch to enclose the webbing ends without adding bulk.
- Slip on the slider buckle on one end of the strap. Fold the strap end over the center-bar of the buckle and stitch as close as possible to the slider buckle to secure in place.
- Slide on a carabiner hook onto the webbing from the opposite end towards the slider buckle. Allowing for a bit of slack, thread the webbing through the slide buckle.
- Add the remaining carabiner hook to the end of the strap and fold the strap end back on itself to secure the hook. Stitch in place to secure. Set aside.
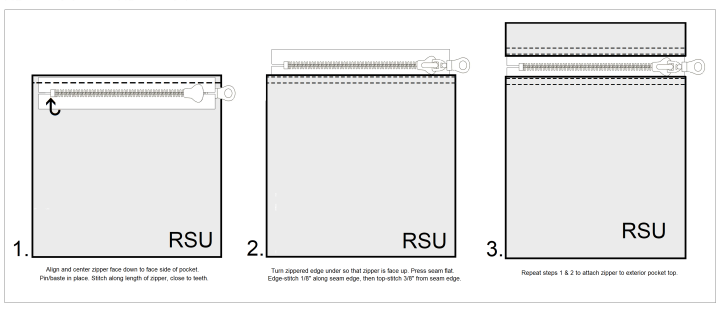
MAKE THE EXTERIOR POCKETS:
- Gather together exterior pocket pieces and 10” zippers.
- Align and center zipper face down to face side of pocket square. Pin/baste in place. Stitch along length of zipper close to teeth.
- Turn zippered edge under so that zipper is face up. Press seam flat. Edgestitch 1/8” along seam edge, then topstitch 3/8” from seam edge.
- Repeat Steps 2 and 3 for attaching zipper to face side of exterior pocket top.
- Repeat Steps 2 – 4 for remaining exterior pocket and set aside.
APPLY THE CORNER GUARDS:
- Gather together the bag body piece, leather circles (4), and the corner cutting template, if you used the cutting list to cut out the pattern pieces.
- With right sides together (RST), fold the body piece in half, aligning the finished sides and pinked tops together. Place the corner cutting template on each bottom corner (at the fold) with one arm on the foldline and another arm on the bound side edges. Trace around the template.
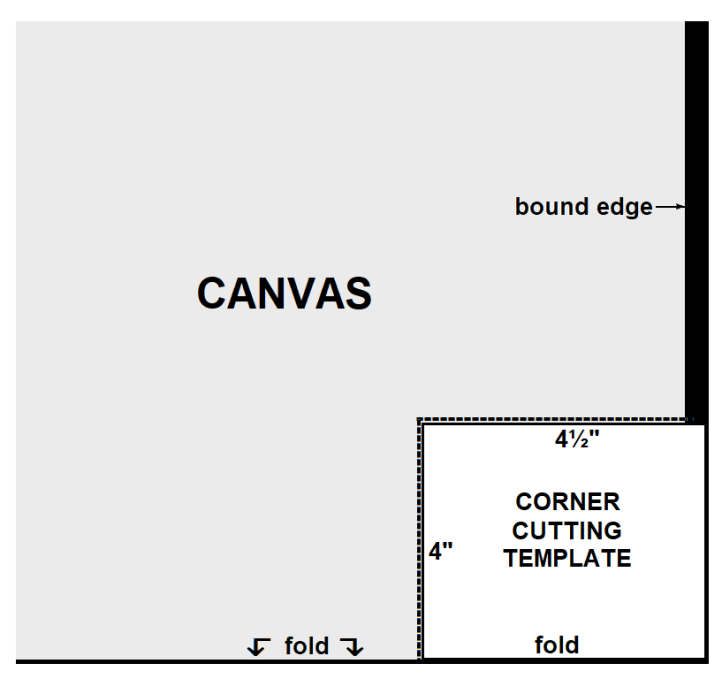
- Cut the “notch” out from each corner at the foldline and open the bag face up. Reserve discards for making bag handles.
- Chalk out the 2 intersecting seam allowances (3/8” wide) at the notch. There are 2 intersection points on each side of the base of the bag.
- Super-impose a pre-punched leather circle on the face-side of each corner of the bag, with the center of the circle aligning with the intersecting point of the seam allowances. Hold together with quilter’s clips or low-tact tape.
- Appliqué the leather patch to the canvas using waxed /buttonhole twist thread and saddle-stitch. Hand-stitch following the pattern of the pre-punched holes.
- Flip the body piece with wrong side up and trim off the excess leather following the edges of the canvas. Set aside.

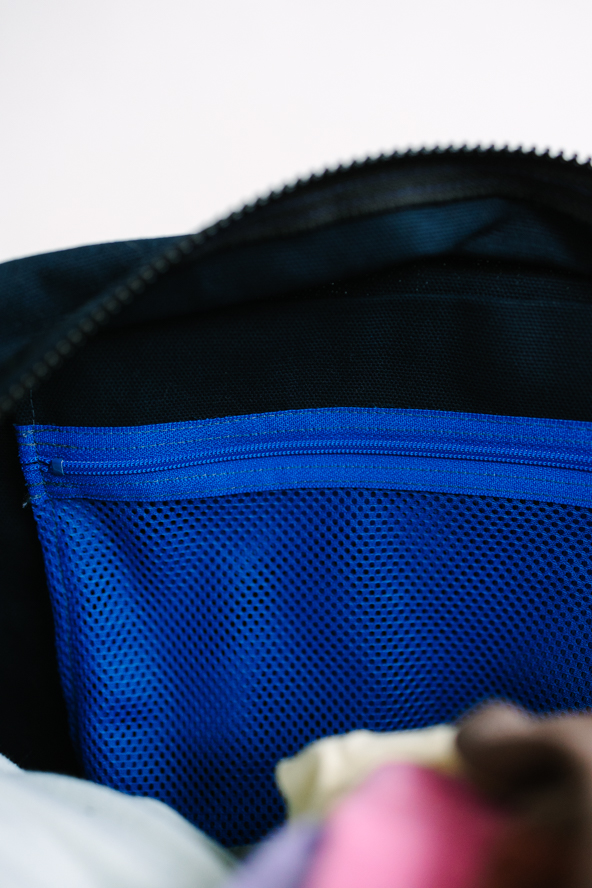
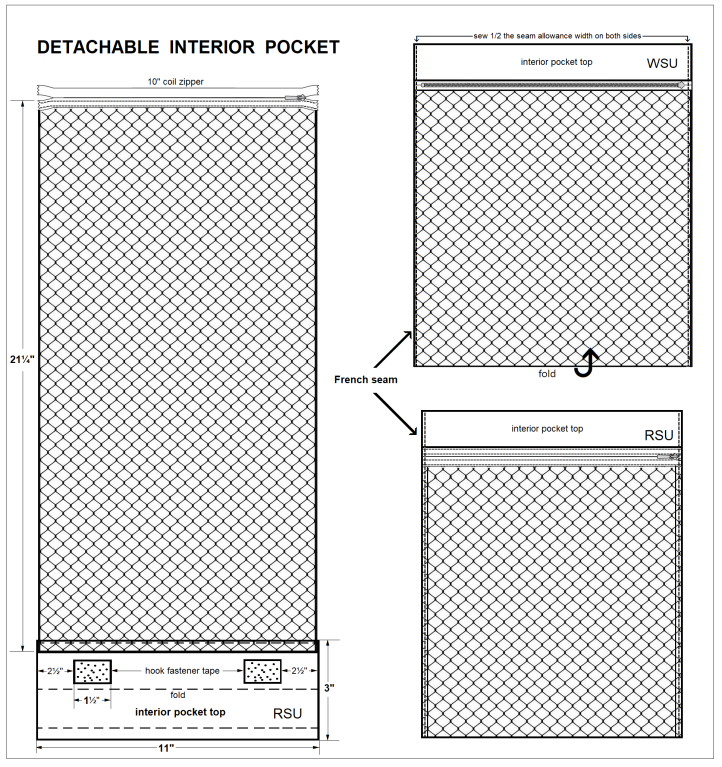
MAKE DETACHABLE INTERIOR POCKETS:
- Gather together the mesh pocket pieces, the pocket top pieces, two coil zippers, and the hook & loop fastener tape.
- With wrong sides together (WST), align and center the zipper to the mesh panel. Pin/baste together and stitch along the length of the zipper close to the zipper teeth.
- Fold zipper tape towards the right side of the mesh panel and press seam flat. Trim back any fabric exposed beyond the zipper tape, if necessary. With the zipper and the mesh panel face up, edgestitch along the zipper tape to secure to mesh.
- On the opposite end of the mesh panel, align and center the interior pocket top piece to the mesh panel, with WST. Pin/baste together and stitch along the length of the pocket top piece.
- Wrap the mesh over the seam allowance of the canvas to encase it and press flat. Stitch-in-the-ditch the seam between the canvas and the mesh. Press the wrapped edge towards the mesh side of the pocket and edgestitch along the wrapped edge to flatten the seam.
- Cut 2 pieces of the hook portion of the hook & loop fastener tape (1 1/2” long). Snip off the pointy corners from the tape.
- Place the hook fasteners approximately 2 1/2” from the outer edges of the canvas, just above the mesh/canvas seam and sew around the perimeter of the fasteners onto the canvas pocket top.
- With wrong sides together (WST), align and center the zipper to the pocket top piece. Pin/baste together and stitch along the length of the zipper close to the zipper teeth.
- Fold zipper tape towards the right side of the pocket top piece and press seam flat. Trim away any canvas that may be exposed beyond the zipper tape, if necessary. With the zipper and the canvas pocket top piece face up, edgestitch along the zipper tape to secure to the canvas material.
- The pocket assembly is now a continuous loop. With RST, flatten the pocket assembly so that the pocket top piece folds in half evenly and the sides from top to bottom align and match up (zipper face and hook fasteners should be positioned inside the assembly). With the zipper closed, stitch half of the seam allowance along the slider side of the zipper. Press the seam flat and pink the edge to prevent fraying.
- With the zipper open, stitch half of the seam allowance along the opposite side of the pocket assembly. Press the seam flat and pink the edge to prevent fraying.
- Turn the pocket right side out through the zipper opening and press the pocket flat. Along the sides of the pocket, sew up the remaining half of the seam allowance as a French seam.
- Repeat the above procedure for the remaining interior pocket.
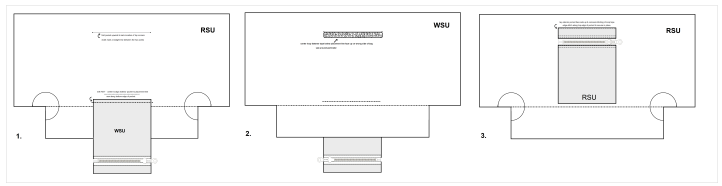
ATTACH THE EXTERIOR POCKET PIECE TO THE BODY:
- Gather together the bag body piece, the exterior pocket pieces, and the hook & loop fastener tape.
- Mark the pocket placement line with chalk or thread-baste, 1 inch above the base line on each side of the duffel bag. The placement lines should mirror one another and be parallel.
- With RST and the pocket upside down, align and center the pocket bottom edge along the placement line. Pin/baste together and sew in place across the width of the pocket.
- Flip up the pocket so that the front of the pocket is face up with the body. Make tailor’s tacks at the top corners of the pocket top piece on the body portion.
- Turn the body of the bag over so that the wrong side is face up. Chalk a straight line between the 2 tailor’s tacks.
- Cut a 9” length of the loop portion of the hook & loop fastener tape and snip off the pointy corners from the tape.
- Align and center the loop fastener below the chalk line, between the 2 tailor’s tacks. Stitch around the perimeter of the loop tape.
- With the bag body right side up on the work surface, pin/baste exterior pocket in the center of the bag. Ensure that the top of the pocket conceals the machine-stitching of the loop fastener. Adjust if necessary.
- Turn under the seam allowance along the top of the pocket top piece and press flat. Edgestitch the top edge of the pocket. Machine-baste the side seams of the pocket to the body.
- Repeat the above procedures for the remaining exterior pocket and loop fastener tape.
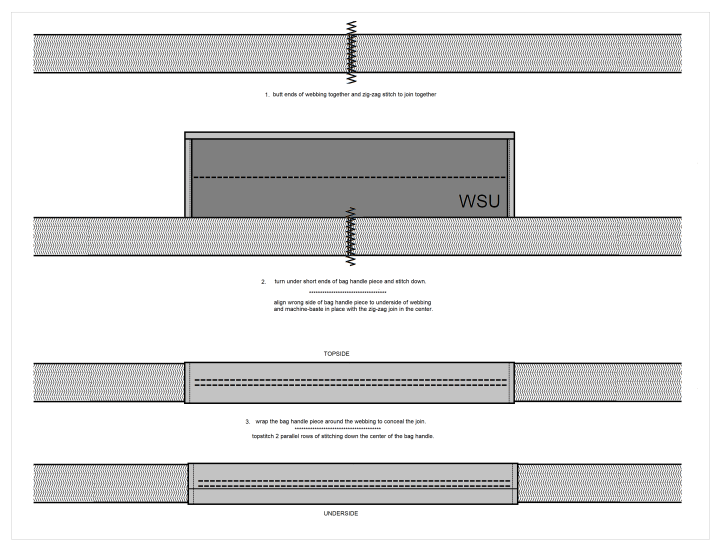
MAKING THE BAG HANDLES:
- Gather together the canvas bag handle pieces and the long length of 1-inch wide webbing.
- The bag handle pieces are 3” wide x 8 3/4” long. Fold under the short ends of the bag handle and topstitch along the fold at each end. Set aside.
- Make a continuous loop of webbing by butting the webbing ends together and zig-zag stitch across the joint. Ensure the webbing is not twisted before sewing.
- Center the handle piece on either side of the join. Stitch one long edge of the handle to the webbing to secure it in place. Next, wrap the handle piece around the webbing to hide the join and turn under the raw edge of the bag handle piece to finish neatly. Machine-stitch through all the layers of the bag handle to the webbing to complete.
- Double up the webbing to determine the center of the webbing on the opposite end of the join. Attach the remaining bag handle in the same manner. Set aside.
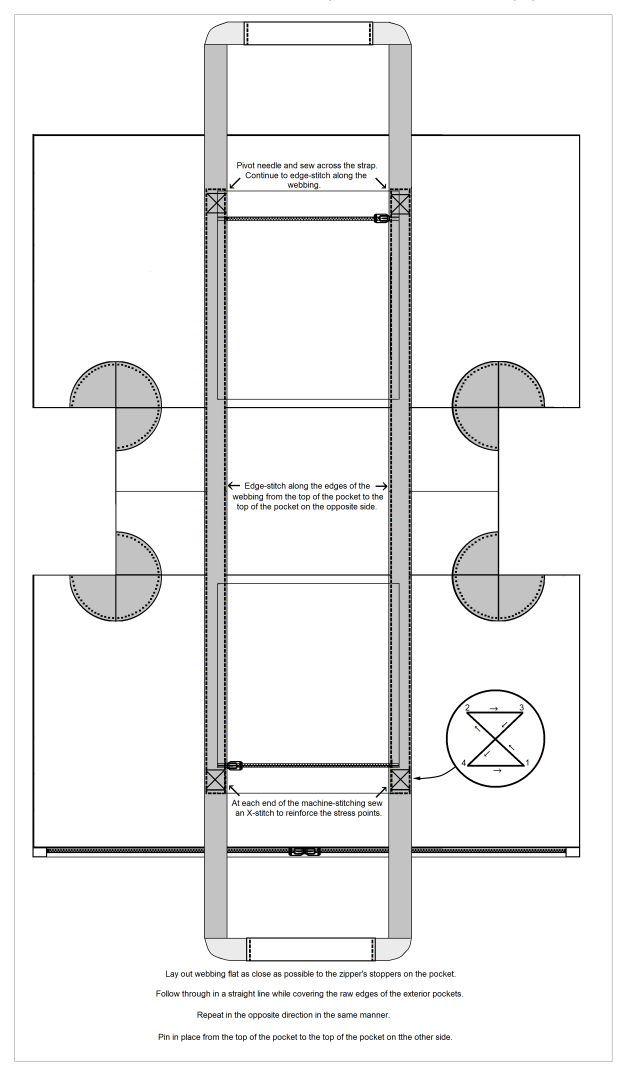
ATTACH BAG STRAPPING TO BODY:
- Gather together the bag body piece and the continuous loop of webbing.
- With the bag body flat and face up on the work surface, apply the webbing to the surface of the bag with the bag handle portions extending equally beyond the top edges of the bag.
- Begin by laying out the webbing flat as close as possible to the zipper’s stoppers on the pocket. Follow through in a straight line while covering the raw sides of the exterior pocket. Repeat in the opposite direction, in the same manner. Pin in place from the top of the pocket to the top of the pocket on the other side.
- Repeat Step 3 on the opposite side of the exterior pockets. Ensure the webbing is aligned over the pocket sides and centered evenly from side to side. The webbing straps should be parallel to one another. The length of the free end of the handle should be equal on both sides of the bag. Adjust strapping, if necessary.
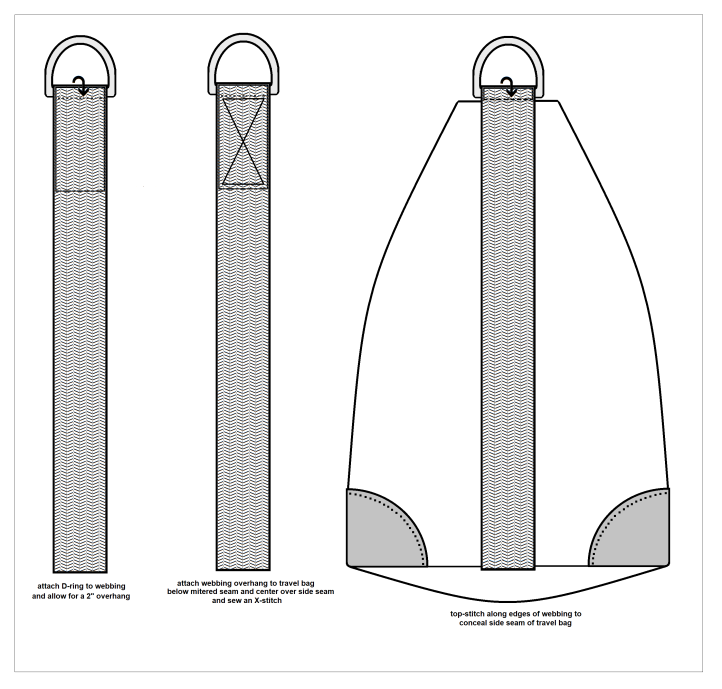
- Edgestitch along the edges of the webbing from the top of the pocket to the top of the pocket on the opposite side, pivot and sew across the webbing and pivot again, continuing to edgestitch along the webbing. At each end of the machine-stitching, sew an X-stitch to reinforce the stress points.
- Repeat Step 5 on the opposite side of the pockets and the webbing strap.
INSERT HEAD-TO-HEAD ZIPPER TO BAG OPENING:
- Gather up head-to-head bag zipper and a remnant piece of canvas.
- While the travel bag’s finished width is 21 inches, the bag’s top edge opening is 30 3/4 inches (width + depth). The length of the bag zipper is 27 1/2 inches long. To make up the missing length, sew a narrow piece of fabric to the ends of the zipper tape, known as a wedge tab. Cut 2 pieces of canvas remnant equal to the width of the zipper tape and 2 inches long. With RST, sew a tab to each end of the zipper tape, using a scant 1/4″ seam allowance. Fold tab outward and press seam allowance away from zipper stoppers.
- With RST and zipper face down, align and center bag zipper across the top of the bag. Pin/baste together and sew along the zipper tape close to the zipper teeth, from side to side.
- Turn the zipper seam to the wrong side of the cloth and press the seam flat. Edgestitch along the seam fold, then topstitch 3/8” from the seam fold.

CLOSING UP THE WEEKENDER DUFFEL:
- With right sides of the body together and zipper face down, align and center bag zipper across the top of the opposite side of the bag. Pin/baste together and sew along the zipper tape close to the zipper teeth, from side to side. This will form a “tube” of material.
- Open the bag zipper both ways with the double slider heads. Turn the bag right side out and press the zipper seam flat. Edgestitch along the seam fold, then topstitch 3/8” from the seam fold.
- Turn the bag inside out. With RST, align and match the side seams of the bag to form the gusset. Pin/baste together. Sew side seam and press seam open. Repeat for opposite side of bag.
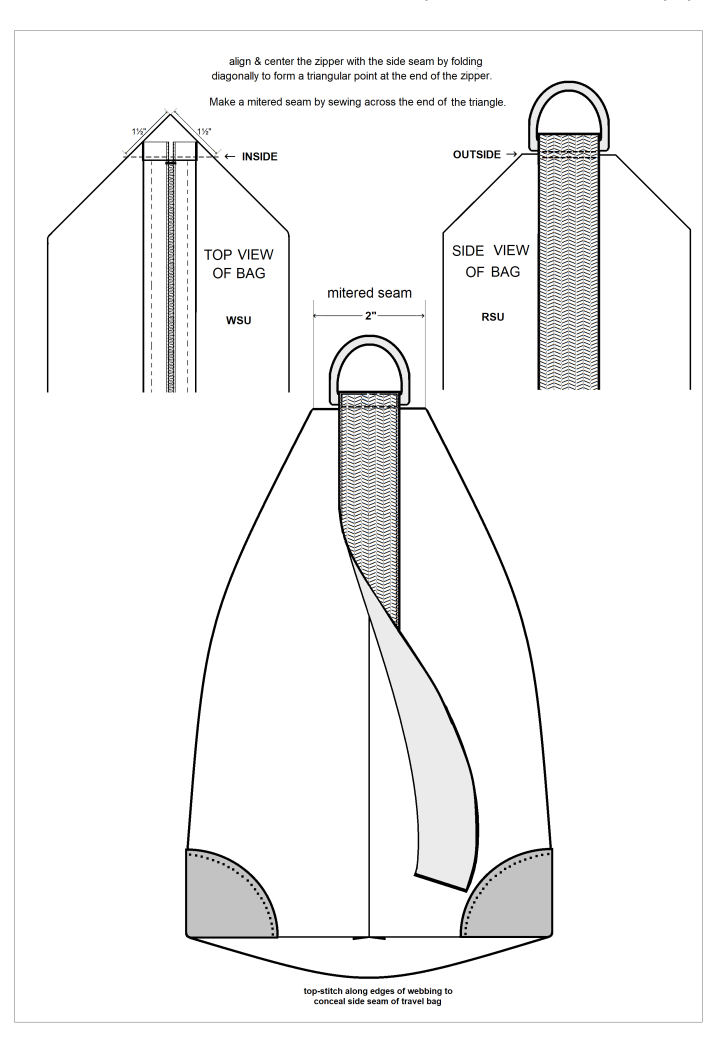
- Working through the bag opening, align and center the zipper over the side seam to form a triangular fold at the end of the zipper. Make a mitered seam by sewing across the end of the triangle. Mark a point, 1 1/2” from the end along the diagonal fold of cloth. Repeat on the opposite side of the triangle. Sew across the end from point to point. On the right side of the bag, check to see if the seam is straight and at right angle to the zipper. Adjust, if necessary.
- Once the mitered seam is made, trim away the excess material, allowing for a 3/8” seam allowance. Bind the seam allowance with bias binding to encase the raw edge and neaten the seam.
- Repeat Steps 4 & 5, for the opposite end of the bag opening.
ATTACH D-RING HARDWARE TO GUSSETS:
- Gather up D-rings and 1-inch wide webbing.
- Fold back 2 inches of webbing onto itself. Crease the fold, then slip on a D-ring and rest it on the cease of the fold. Sew across the webbing as close as possible to the D-ring to anchor it.
- Working through the bag opening, align and center the webbing over the side seam with the D-ring parallel to the mitered seam. Sew the short end of the folded webbing to the bag, just below the hardware and again across the bottom of the tail end to reinforce the stress point. Align the longer part of the webbing over the short end to conceal it and center the webbing over the side seam. Edgestitch the sides of the trim and across the top under the D-ring.
- Repeat the above procedure for the opposite gusset in the same manner.
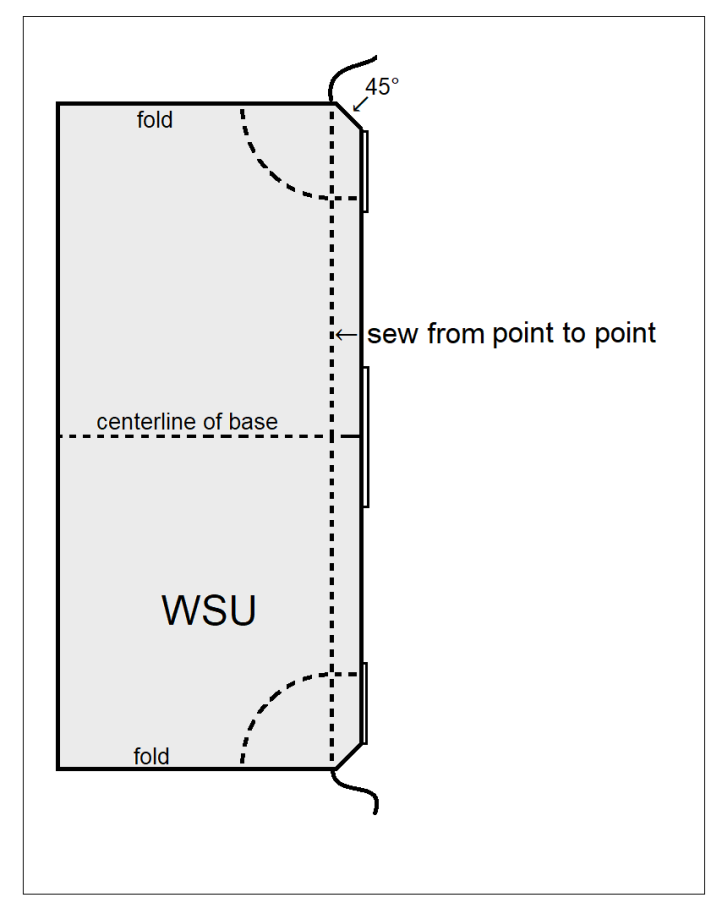
ATTACHING THE GUSSETS TO THE BASE OF THE BAG:
- Turn the bag inside out through the bag opening. Align and center the side seam to the center of the bag’s bottom (the base) and fold the corners at a 45° angle to match up the seam allowances. Use quilter’s clips to hold the seams together while sewing. Machine-stitch from corner to corner to produce a mitered seam and complete the corner guards. Grade the seam allowance to reduce any bulk, allowing for a 3/8” seam allowance. Bind the seam allowance with bias binding to encase the raw edge and neaten the seam.
- Repeat Step 1 for the opposite side of the bag’s bottom in the same manner.
FINISHING THE WEEKENDER DUFFLE:
- Attach the detachable interior pockets to the loop strip on the inside of the bag cavity.
- Clip on the carabiner hooks of the shoulder strap to the D-rings. Adjust the shoulder strap to fit your desired length either over the shoulder or cross the body for hands-free travel.