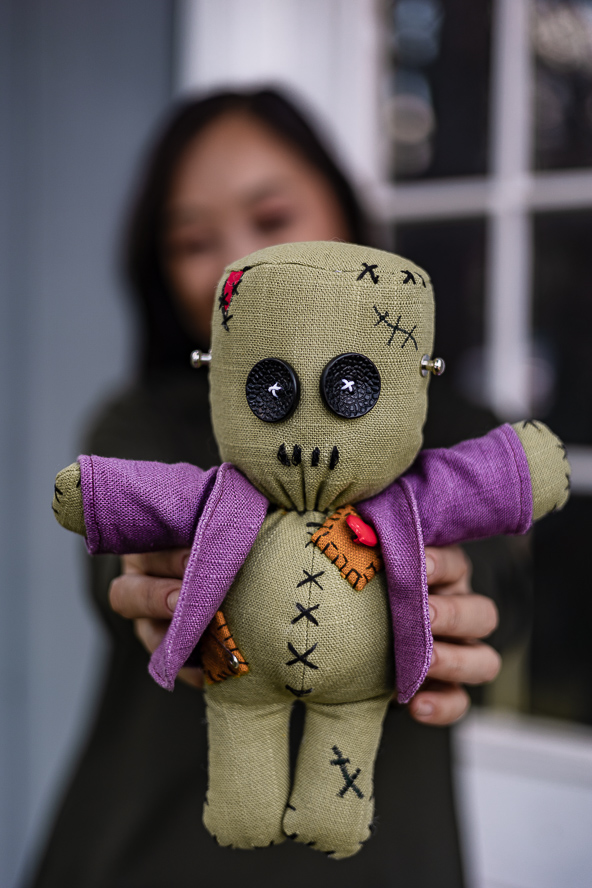
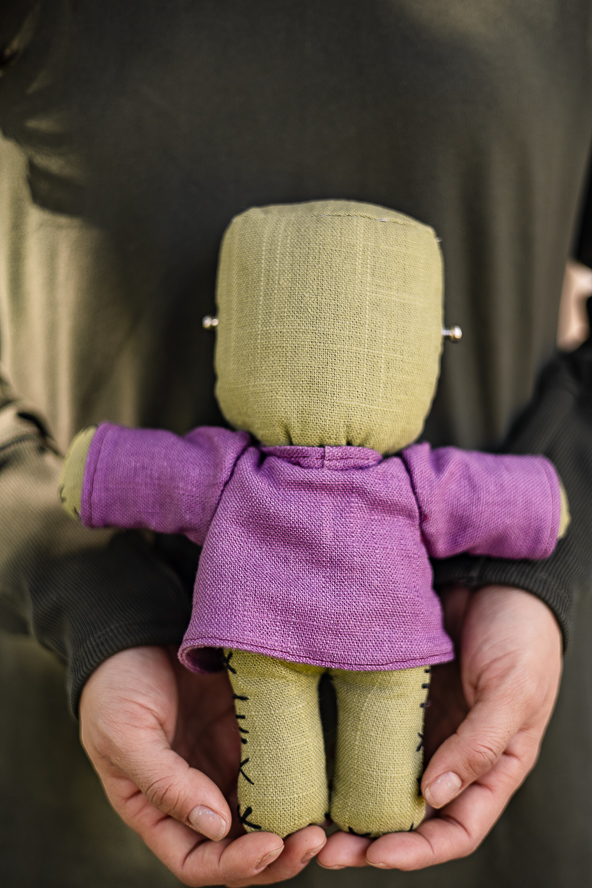
Halloween is almost here, which means that the time to decorate your home in fun and spooky décor is now. Create some monstrously cute décor for your living space with this Frankenstein fabric sculpture. A cross between a toy design and home décor, this hauntingly fun sewing project is an excellent way to use up scrap fabric and show off your creativity by adding tiny embellishments to your Frankie. This Halloween sewing project also shows you how to create two fabric pumpkins for Frankie’s pumpkin patch, so that you can add an adorably macabre scene to your mantel or dining room table.
Materials:
- Approximately 1/2 yard of fabric, new or remnant
- Quilter’s muslin or Knit-fuse™ interfacing
- Polyfill stuffing
- Thread, all-purpose and upholstery
- Buttons and other embellishments
- Embroidery floss
- Hobby felt for pumpkin leaves
- PDF Pattern – This is located at the bottom of the page. Please see printing instructions below.
PRINTING INSTRUCTIONS:
To download the PDF pattern, click on the download button at the bottom of the page. We recommend opening your download using Adobe Acrobat.
Pattern Information:
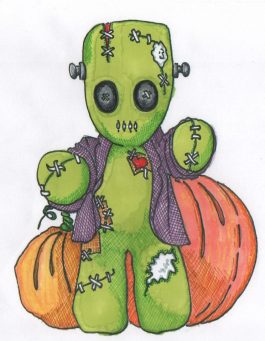
The pattern of “Frankie” is an exaggerated caricature of our favorite monster. Print the pattern pieces on a piece of paper and glue the sheet onto light card stock, cut out individual body pieces and quantities required, and check how it fits the figure’s shape. It’s easier to make adjustments when you see everything in one place.
The Frankie pattern consists of: a head (front, back & top); a rotund front body & flat back body; and an arm pattern which is cut 4 times to produce two out-stretched arms. When printing the pattern, be sure to measure the 1” x 1” square scales so that the reproductions are at 100% once printed or adjust your printer as required.
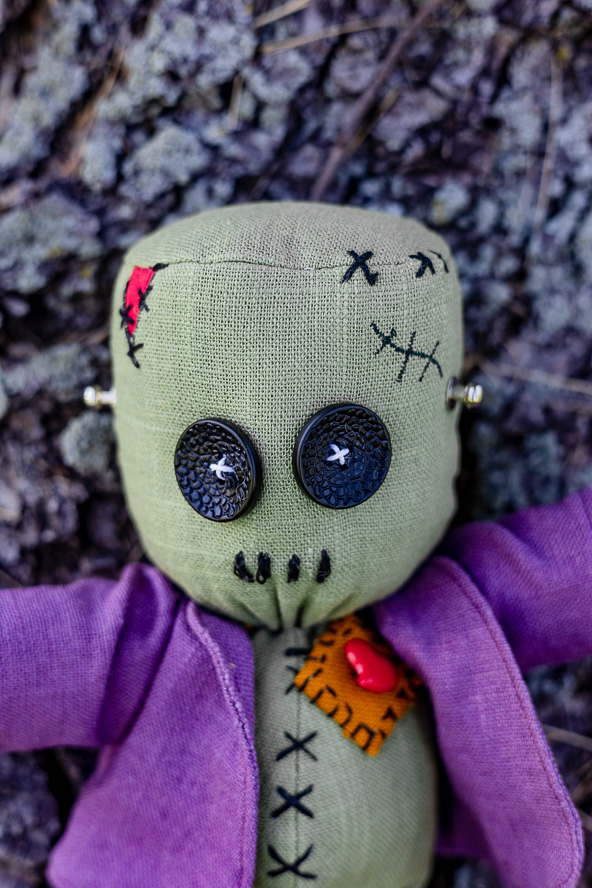
Before we make the body, let’s talk about the details. Buttons for eyes communicate emotions, and they are the first thing we view when connecting with a character. Slightly large eyes bring out warmth and appeal to your inner child. Other embellishments are his trademark electrodes at the temples, which are actually belt-making hardware and a heart-shape button on his chest. Embroidery floss X’s are randomly hand-stitched for sutures and crude stitchery. Use whatever you have on hand for embellishments. For instance, the heart-shape button could be replaced by a glued-on felt heart or a metal heart charm in its place. Maybe add some copper jeweler’s wire or broken watch parts to create a steampunk vibe that incorporates retro-futuristic technology and aesthetics inspired by 19th-century industrial steam-powered machinery. You get the idea. You are only limited by your imagination. The features are the ‘finishing touch’ and should complement the fabrics and character you have created, and bring it to life.
If you don’t mind another step in this process, you can even use some cheaper fabric and make a mock up of his jacket. This helps to see how the costume will drape, and lets you see what can be done differently before the final version. Teeny tiny seam allowances are quick to sew by hand.
Fabric Suggestions:
Any fabric will work, but if you are following a specific color palette, then purchasing new is the convenient way to go. 100% cotton quilting fabrics are preferred for my creations. The fabric is strong and comes in a variety of colors and designs, which enables you to choose a fabric which will complement the particular “doll” you are making. If you love working with fabric then you can’t help but accumulate fabric scraps – and sometimes they get a bit out of hand! I can’t bear to throw them away though so I’m always on the hunt for cute and creative fabric stash busting projects! Check your remnant bins & boxes, discards of hobby felt, hessian, broadcloth, linen, left-over fat quarters or jelly rolls, velveteen & velvet, leather scraps, cast-offs of polar fleece, minky and cuddle fleece, not to mention odd trims and ribbons, buttons & snaps are a treasure trove of finds and gives you the satisfaction that you are upcycling and re-purposing while keeping fabrics out of the landfills.
Line all fabric choices with an extra layer of fabric, usually unbleached ‘Quilters Muslin’. Cut it to exactly the same size as the fabric pieces and baste it on the reverse side of the fabric to add body and even-out the surfaces ready to be stuffed.
Or, when using a combination of different weights, unify the fabrics by applying iron-on Knit-fuse™ interfacing. This knit interfacing will give a little and not make the fabric stiff yet add support. Once the different fabrics are unified and the stretch has gone, you can use the fabric in any direction that suits you and acts as a great background for hand-stitching and embroidery.
And speaking of stuffing, use polyester Polyfil or fiberfill stuffing so the figure is very squishy and nice to the touch. If you want to go the more natural route, try stuffing it with rice or wood shavings. Cotton or wool fiber stuffing is also very commonly used in doll-making.
Don’t hurry this step. Get little bits of stuffing and poke them into your figure one at a time. Use a chopstick to push the stuffing in all the way until it meets the end of the fabric. Then get some more. Repeat until your figure is stuffed. If you have time, don’t close it up immediately. Put it away for 24 hours. When you return to it, the original stuffing will have settled a bit and you will now be able to get some more in. This second stuffing will help your figure stay firm and plump for longer.
A combo of good interfacing and good stuffing technique will make your completed display look so much more professional.
Instructions:
ASSEMBLY:
Designer Note: Use a small stitch and stitch twice.
When you are sewing on the sewing machine, machine-baste around your pattern pieces with a long stitch length to check the fit of the parts. Adjust seams as necessary. Then sew around the outline a second time but use a small stitch length on the sewing machine and follow your previous stitching. When it is stuffed firmly, the seams will not be weakened and will not be prone to ripping under pressure.
Cut out the fabric pieces and quantities needed. Flip the pattern if it requires 2 or more pieces (this pattern is located at the bottom of this page). Prep each piece by fusing or baste with a second layer of fabric.
SEW THE BODY:
- Add any machine-embroidered details to body parts while the pieces are flat.
- Layer the body fronts, right sides together and pin/baste the layers together. Stitch the CF seam up to the small dot, using a scant 1/4″ seam allowance. If you’re using a fabric that has no stretch, you’ll need to clip into all the concave curves.
- Layer the body front and body back pieces right sides together and pin/baste the layers in place. Sew around the edge using a scant 1/4″ seam allowance from the opposite side of CF through the crotch, matching small dots then back up to the other opposite side of the CF. Run the end of the chopstick all around the seams using very firm pressure. This helps smooth the curves and fill out the shape of the legs. Turn body right side out and massage the small curves with your fingers a little. Set aside.
SEW THE ARMS:
- Add any machine-embroidered details to body parts while the pieces are flat.
- Combine the arm parts in pairs and layer right sides together and pin/baste the layers together. Allow a long thread tail, and stitch from one small dot to the other small dot, leaving an opening in the seam to stuff the arm. Use a scant 1/4″ seam allowance. If you’re using a fabric that has no stretch, you’ll need to clip into all the concave curves.
- Turn the arms right side out and stuff the arms with Polyfil stuffing. Use a chopstick to push the stuffing in all the way until it meets the end of the fabric.
- Thread the long thread tail onto a needle and close the seam opening with a tiny hand-sewn ladder stitch. Knot off thread and sink thread end into the arm.
ATTACH ARMS TO BODY:
Designer Note: Use heavy-duty thread or upholstery thread to join and secure body parts.
- Attach the top of the arm to the “shoulder” area of the body with the arms out-stretched forward. If the fabric is not firm enough to secure the arm in place, use a small patch of hobby felt on the inside of the body to support the arm.
STUFF THE BODY:
- At the neck edge, turn under the raw edge a scant 1/4” and hand-sew a running stitch with heavy-duty thread. Leave long thread ends.
- Get little bits of stuffing and poke them into the legs one at a time. Use a chopstick to push the stuffing in all the way until it meets the end of the fabric. Then get some more and stuff the legs until they are solid.
- Continue stuffing the body and if possible, let it rest while you work on another part. When you return to it, the original stuffing will have settled a bit and you will now be able to get some more in. This second stuffing will help the body stay firm and plump for longer.
- To close up the body, draw up the long thread ends at the neck to cinch up the neckline. Set aside.
SEW THE HEAD:
- Add any machine-embroidered details to head parts while the pieces are flat.
- Layer the head front and back, right sides together and pin/baste the layers together. Stitch the side seams from top to bottom, using a scant 1/4″ seam allowance. If you’re using a fabric that has no stretch, you’ll need to clip into all the concave curves.
- Add the round ball screw hardware to the temples. To add support, cut a small patch of hobby felt and punch a small hole in the center of it. Place the patch on the inside of the head at the notch and thread the screw through the hole. Turn the head section right side out and fasten the round ball hardware onto the screw on each side of the head.
- With face sides together, align and match the top edge of the head to the head’s top. Pin/baste around the oval and ease in any fullness. Sew around the edge using a scant 1/4″ seam allowance. If you’re using a fabric that has no stretch, you’ll need to snip the curves. Pinking shears will make this WAY faster.
- Turn head right side out and massage the small curves with your fingers a little. Finger press seam open.
STUFFING THE HEAD:
- At the neck edge, turn under the raw edge a scant 1/4” and hand-sew a running stitch with heavy-duty thread. Leave long thread ends.
- Stuff the head as before with Polyfil stuffing. Use a chopstick to push the stuffing in all the way, then get some more and stuff the head until it’s solid.
- To close up the head, draw up the long thread ends at the neck to cinch up the neckline.
ATTACH THE HEAD TO THE BODY:
- Position the head on top of the body and secure with long straight pins. Work the pins in alternating directions so that the head stays fixed and does not topple off. Check the top of the head. The back of the head is ever so slightly rounder than the front. It is subtle, but it’s there.
- Once the head is positioned correctly, attach the head to the body using a heavy-duty thread to make a ladder stitch. Keep the stitches small and even. Knot off the thread and sink thread ends into the body. Remove straight pins from neckline.
ADD FACE AND BODY DETAILS:
- Begin by applying buttons for eyes. They’re the first thing we view when connecting with a character. Using a long upholstery needle and heavy-duty thread, secure the button in place as shown on pattern. Draw up the thread to create a slight indentation on the cloth to suggest eyeball sockets. Tie off thread ends and sink thread ends into head.
- Thread a needle with a full six strands of black embroidery floss and knot the end. Embroider the mouth in four simple vertical stitches as shown on the pattern. Sink the floss ends into the head.
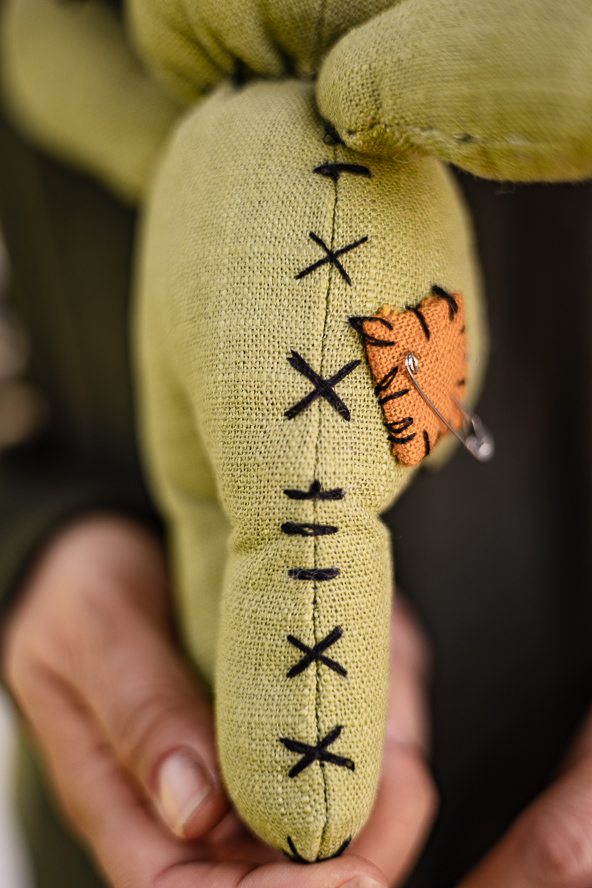
- Thread a needle with a full six strands of black embroidery floss and knot the end. Embroider large and small Xs along the body seams, leg seams, and arm seams to suggest sutures.
- Applique random patches to the front of the body. Hand-sew embellishments such as the heart shaped button or add brass safety pins, etc. to the patches.
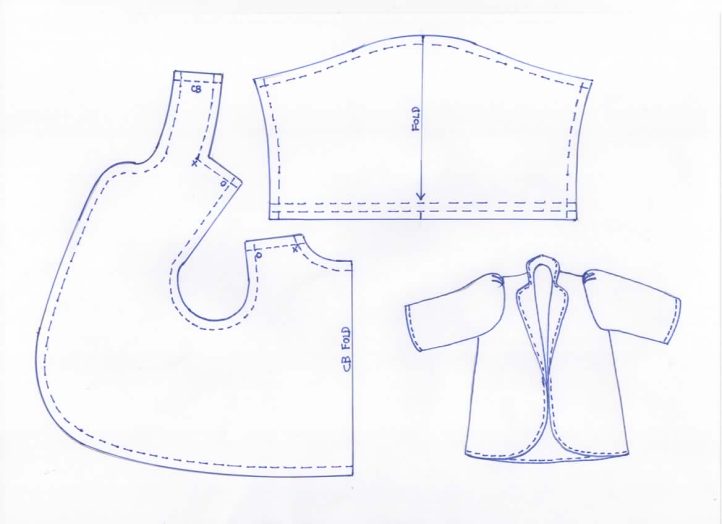
MAKE FRANKIE’S JACKET:
Decorating the costume really helps to highlight your concept of the doll. Personifying a creature by dressing them up in human clothing brings the whole idea together!
- Use stiff fabric or hobby felt. Minimize seaming if possible.
- The jacket is made up of one piece with two tubes of cloth for sleeves. To make the body section of the jacket, stay-stitch a scant seam allowance from the edge (about 1/8″) along the shoulder and the neckline on the collar, pivoting at point X. Clip diagonally into the seam allowance at point X. Repeat step for the opposite side of the jacket.
- Repeat Step 2 in this section for the “lining” of the jacket body (interior side).
- Place the two jacket body layers, with right sides together, to self-line the garment. The outer edge of the jacket and the top edge of the collar can be machine-stitched with the tiniest of seam allowances (1/8″).
- Turn the jacket right side out through the neck and shoulder area. Massage the small curves with your fingers a little. Press flat.
- With right sides together, match up the back seam of the collar section at center-back (CB) and sew together. Finger-press seam open.
- Turn under the front shoulder seams (from point O to point X) on the exterior and interior sections of the jacket. Insert the back shoulder seam between the two front shoulder seams (match X to X and O to O). Slip-stitch the shoulder from X to O. The tiny seams are quick to sew by hand and will create the armholes.
- Sew up each sleeve by machine and insert it into an armhole by hand. Any excess fabric may be gathered at the shoulder point. Hem opening of each sleeve. Trim the armholes with pinking shears or overcast raw edges together to prevent fraying.
- Hand-stitch neckline of the collar (single layer) to back neckline (double layer) same as shoulder seam. Repeat this step for the interior side of the jacket. Finger-press collar so it lies flat.
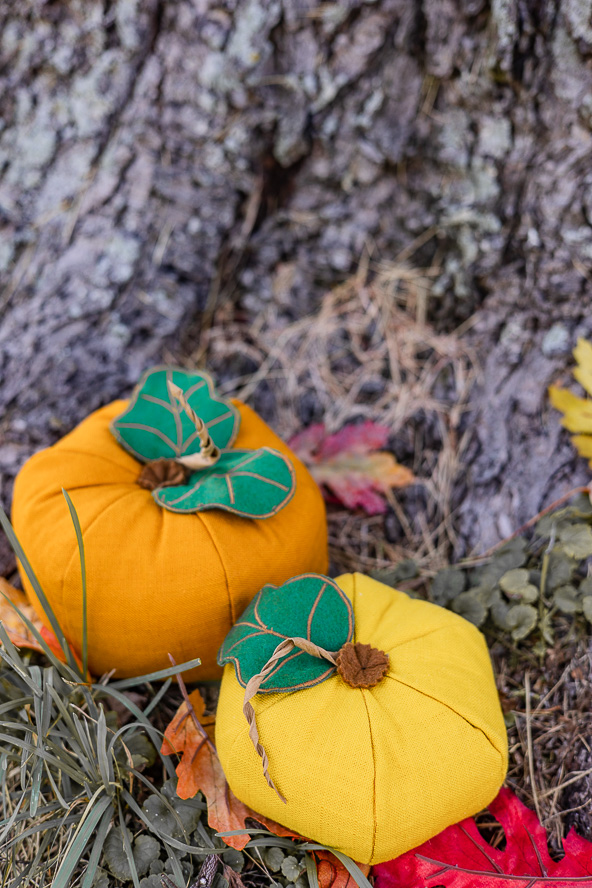
MAKE SOME STUFFED PUMPKINS:
To prop Frankie up on display, two stuffed pumpkins with weighted bean bags allow a background to perch on. Since they are cloth and stuffing, long hat pins can be used in a tripod pattern to keep the Frankie figure upright or placed side by side with Frankie in the middle.
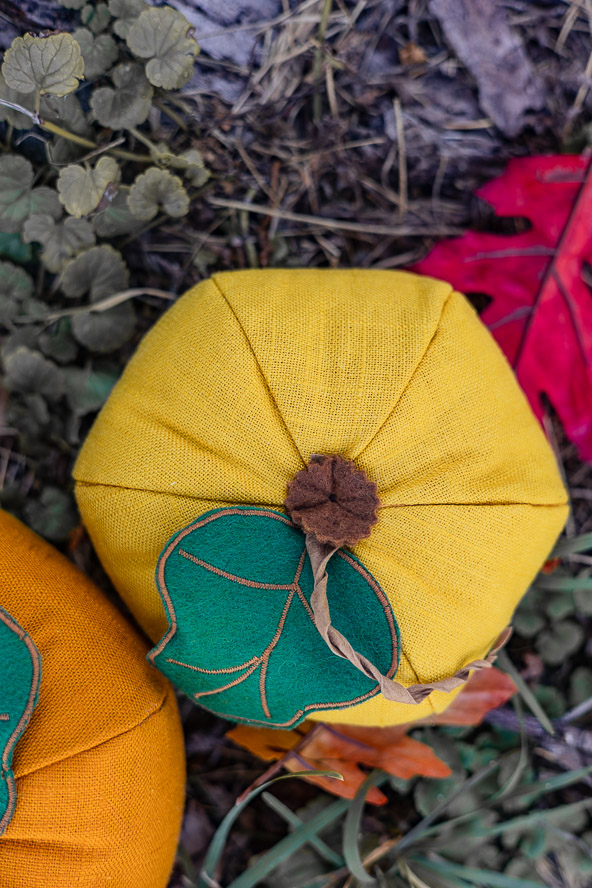
- Cut 6 pumpkin sections and baste interlining/fuse interfacing to each piece.
- Sew pumpkin section in pairs.
- Make small sachets/bean bags (4” x 4”) and fill with 1/4 cup (50g) dried beans or rice for weights.
- Sew the 3 pumpkin sections together to make pumpkin shell, leaving the last seam partially open for stuffing.
- Tack beanbag to base of pumpkin shell and stuff with Polyfil. Close up opening with a ladder-stitch.
- Embroider hobby felt leaves and attach them to top of pumpkin at stem end.
- Use a long upholsterer’s needle to tuft a felt button through the core and tie off to create a dimpled pumpkin look.


I am unable to download frankie from the site.
Hi Debra! This download is available to our Gold members. If you are a gold member and are having issues with the download, you may need to allow access to our site by adjusting your browser settings. If you continue to have issues with our downloads, please let us know. Have a great day! – Ashley, WeLikeSewing