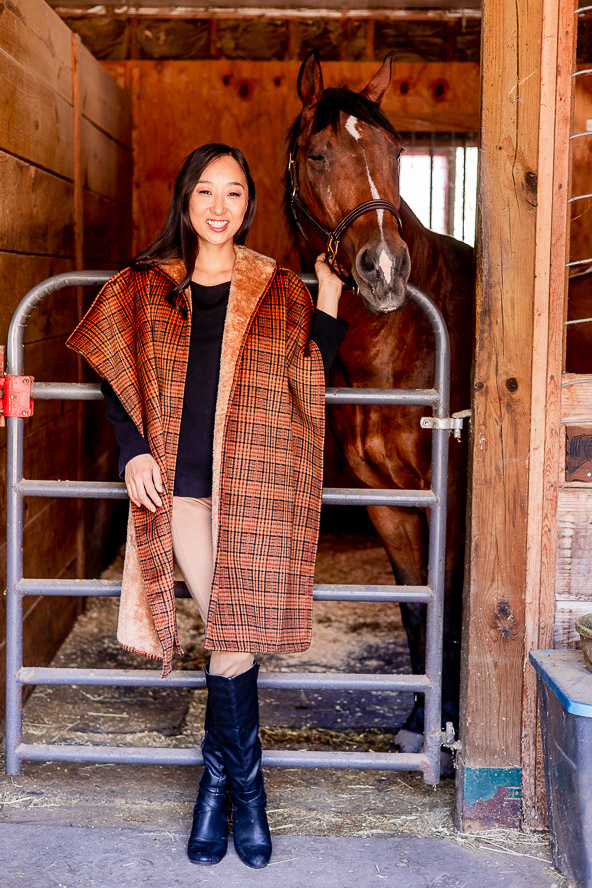
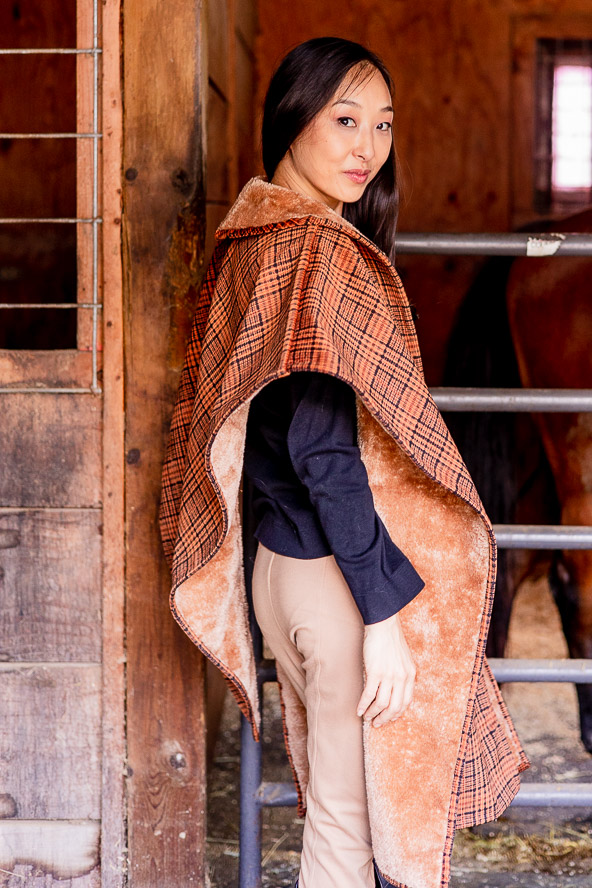
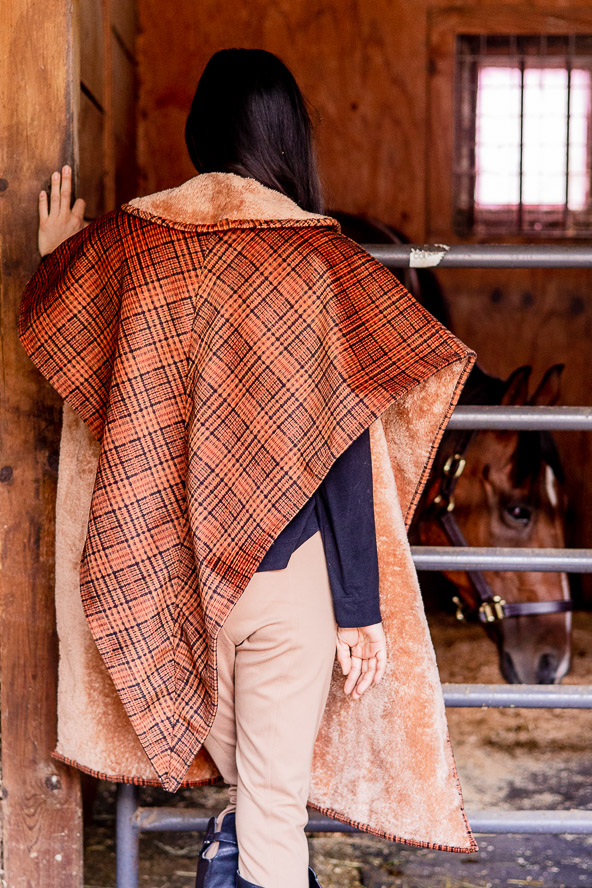
Combine fashion and function with this double-faced wrap that features a classic check design on one side and an ultra-cozy finish on the other. This cold weather sewing project is an excellent way to practice working with double-faced fabric and includes a quick guide to the different types of seams you can use with this project. Bundle up in style this season with this detailed sewing tutorial.
Seam Allowances: 3/4” wide
Finished Seams: 3/8” wide
Approximate Finished Measurements of Sample Shown:
- Center-front (from high shoulder point to hem) = 40″
- Center-back (from nape to point) = 40″
- Back width (across shoulder blades) = 18″ x 2 = 36″
- Front width (meets at CF) = 19″ x 2 = 38″
- Back side length (on diagonal) = 35.75″
- Front side length (vertical) = 39″
- Arm length (from high shoulder point to elbow) = 15″
- Back neckline = 3.5″ x 2 = 7″
- Collar depth at CB = 6″
Materials:
- Approx. 2 1/2 yards of double faced fabric
- Color-matched all-purpose thread
- Fray-check™ sealant
- PDF Layout – This is located at the bottom of the page. Please see printing instructions below.
PRINTING INSTRUCTIONS:
To download the PDF layout, click on the download button at the bottom of the page. We recommend opening your download using Adobe Acrobat.
SELECTING A FABRIC:
When sourcing material for a stole or wrap, think “blanket”. Fabrics that have the thickness and weight of a blanket will provide a single ply that will drape nicely over body contours, while keeping you comfortably warm at the same time. Double-faced fabrics are ideal choices to make a wrap where either side of the cloth can be used without adding on additional weight to the garment. These fabrics allow more options for creativity in designs when they have two sides of fabric to work from and it does not need a lining. Sewing double-faced garments requires special seaming and finishing techniques often as both sides of the cloth can be seen at the same time when worn.
The types of double-faced fabrics are endless and are found in the wool, silk, cotton and knit departments of textile retailers, and at all price points. More often than not, the weave of the cloth will produce a positive/negative effect or the dye lot is an identical color-match on both sides of the cloth, which in turn makes the cloth reversible. Other times, it is the texture of the face sides that differ, producing two-looks-in-one’; for instance, one side of the cloth may be a print or a check that reverses to a deep pile faux fur on the other.
Be aware that fuzzy, cozy, warm textures like faux fur, plush, velvet, corduroy, etc. belong to a special group of textiles referred to as “napped fabrics”. They have a one-way design feature that runs in one direction and are typically cut with the pile running towards the hem of the garment. However, sometimes a richer color with greater light reflection is gained by cutting the fabric with the nap running towards the neckline.
SEWING DOUBLE FACED FABRICS:
Though this wrap is single-ply in thickness, consideration of the two distinct faces of the fabric must be taken into account as well. If the face of one or both sides of the cloth has a directional napped surface, both face sides must be cut running in the same direction, front and back. This means there must be shoulder seams on either side of center to allow for this in its construction.
However, if the selected fabric has a two-way direction, there is no change in appearance when the fabric is turned 180 degrees in the same plane. In most cases, fabric symmetry is concerned with only the exterior side and the reverse face is of minimal concern, as it shall be inside the garment and out of view. Solid color plain weave fabrics are often symmetric.
In view of the fact that this garment is single-ply, no seam allowances should be visible on the garment on either side of the cloth; therefore, all construction seaming should be self-finished.
They are called self-finished seams because the raw edges of the cloth are finished during the construction process and do not require a seam finish to prevent raveling or fraying, as do conventional seaming. All are complex seams that require more than one run or pass under the presser foot.
Six possible self-finished seam applications to use for best results are:
- The French seam is used on very lightweight and sheer materials. It is frequently described as a seam within a seam, and is suitable for straight seams with a narrow seam finish. The French seam requires two passes under the presser foot and care must be taken to avoid thread whiskers at the seamline on the face of the garment. Seam allowances are cut the same width and sewn together. Once the first pass is complete, the seam allowances are graded by half its width. The seam is then folded so that the raw edges are encased and a second pass is made. The finished appearance of the French seam is a neat narrow enclosed seam.

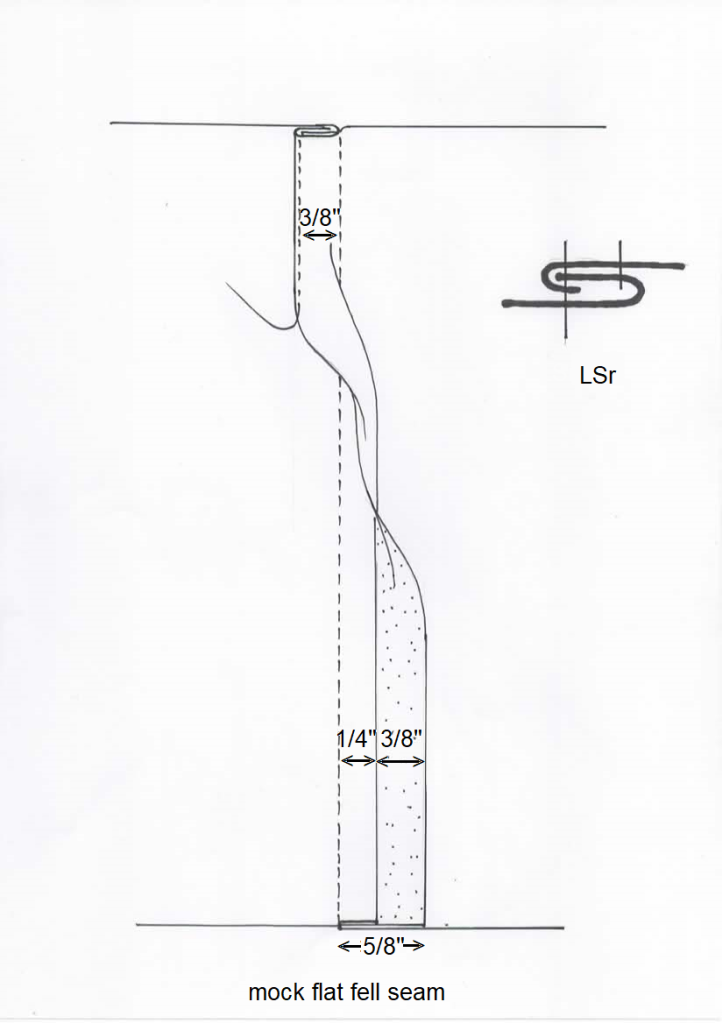
- The mock flat fell seam is sewn on a single-needle machine. It is durable, flat, and produces a self-finish with an encased seam allowance. This seam is stitched wrong side to wrong side to create an outside fell with two rows of stitching on the garment face. With the mock flat fell seam, the seam allowances are equal in width and after the first pass, one seam allowance is graded by half its width. The wider seam allowance is wrapped over the narrow one. What is produced is a turned-edge lap over which is parallel to the seamline on one side of the cloth and a clean flat seamline on reverse side of the cloth. This construction technique may be made as an inside fell if you sew right side to right side together, if desired.
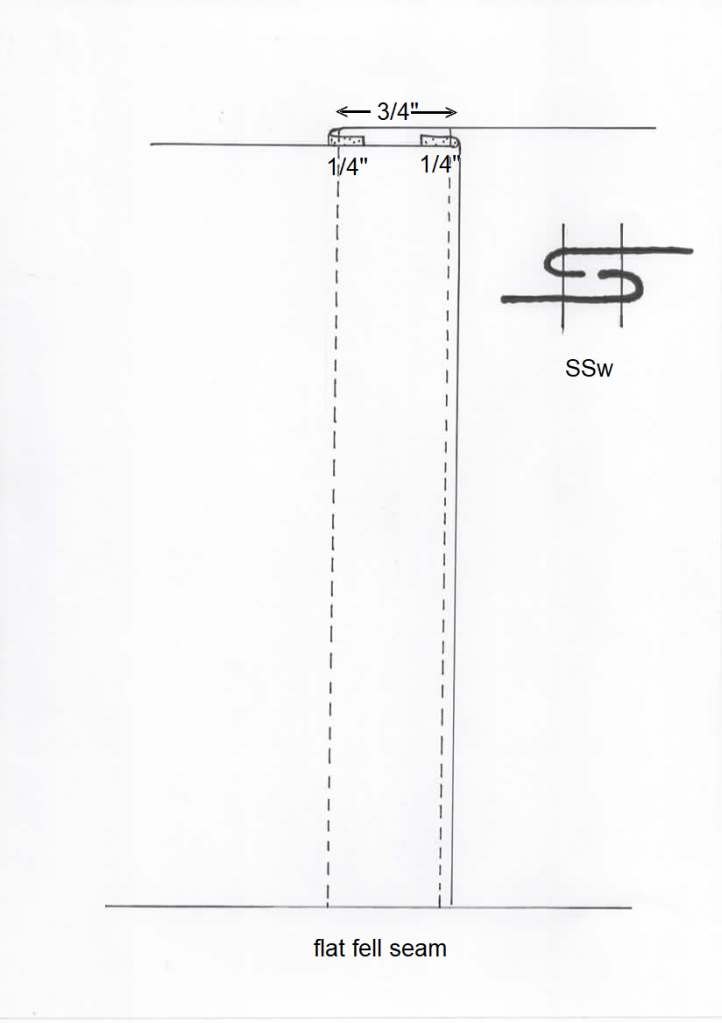
- The flat fell seam is a very strong decorative seam application that wears well and is easily laundered because of its flat finish. It is suitable for reversible and unlined garments. The lap is sewn with a special folder in a single pass on a double-needle lock-stitch machine, or by folding the seam allowances manually, then finishing the seam with two rows of stitching on both the face and wrong side of the garment. Generally, paired seams lap in the same direction, either front over back or back over front.
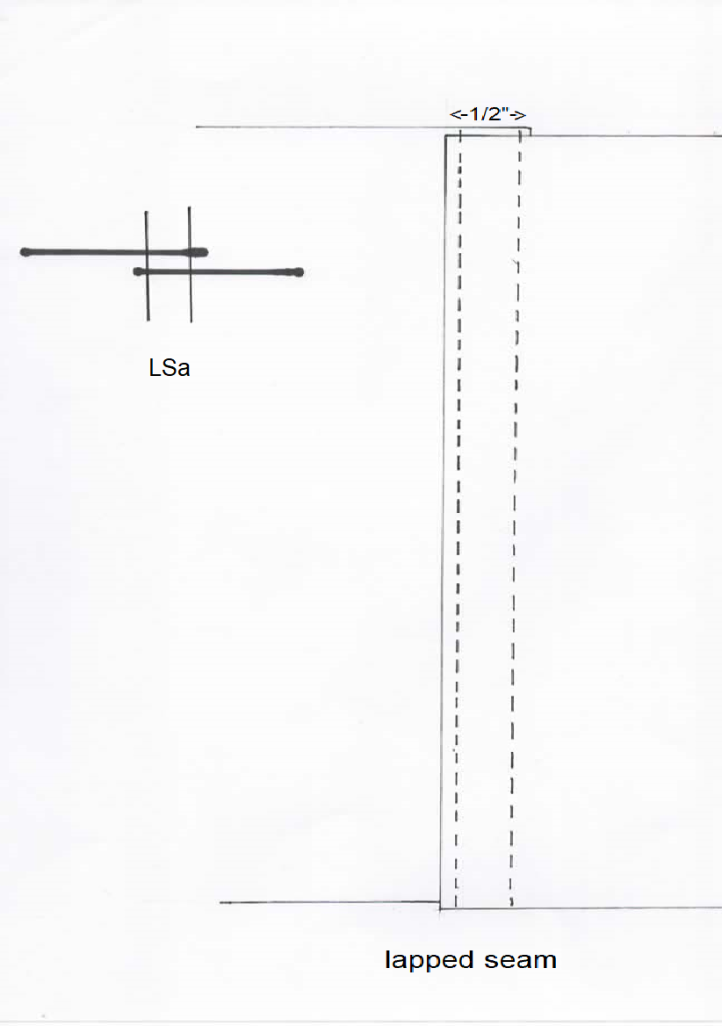
- The lapped seam is the simplest seam to make; however, its application is limited to fabrics that do not fray, ravel or curl, such as felt, synthetic vinyls, and knits. Its construction involves lapping one segment over the other, usually face sides up, and passing under the presser foot twice to secure the edges of each layer.
- The standing fell seam is a hemming seam suitable for enclosing raw edges of fabrics that fray or ravel. This self-bound seam is made in a single pass and forms a self-finish. The seam width can range from narrow to wide depending on the weight and thickness of the fabric, and the shape of the raw edges. Thicker and heavier than the French seam, the standing fell seam is used primarily on straight to moderate curves. The widths for the two turnings are not equal because one seam edge wraps around the other.

- The bound seam is an enclosed edge that is covered with a binding. A binding is a narrow strip of fabric, braid, ribbon, tape, animal skin, or other materials. It is folded to enclose, protect, and trim raw edges, but can also be used to encase thick edges as seam and hem finishes and as trim on decorative seams. Unlike facings, which are visible only on one side of the garment, bindings are visible on both sides of the cloth, making them decorative as well as functional. Bindings made of woven fabrics are cut on the bias-grain so they can be shaped to fit curves smoothly. When made of knits, leather or suede, most bindings are cut on the more flexible cross-grain. The bias strips are applied with two passes under the needle or with one pass and hand-finishing. It is an ideal seam finish for thick or bulky raw edges as the cloth is too thick to turn back on itself. Although bindings can range from 1/8” to several inches, most are approximately 1/4” wide because that is the easiest and least costly width to sew.

Once you are ready to put the garment together, use these techniques to create neat seams and edges.
MARKING AND CUTTING THE FABRIC:
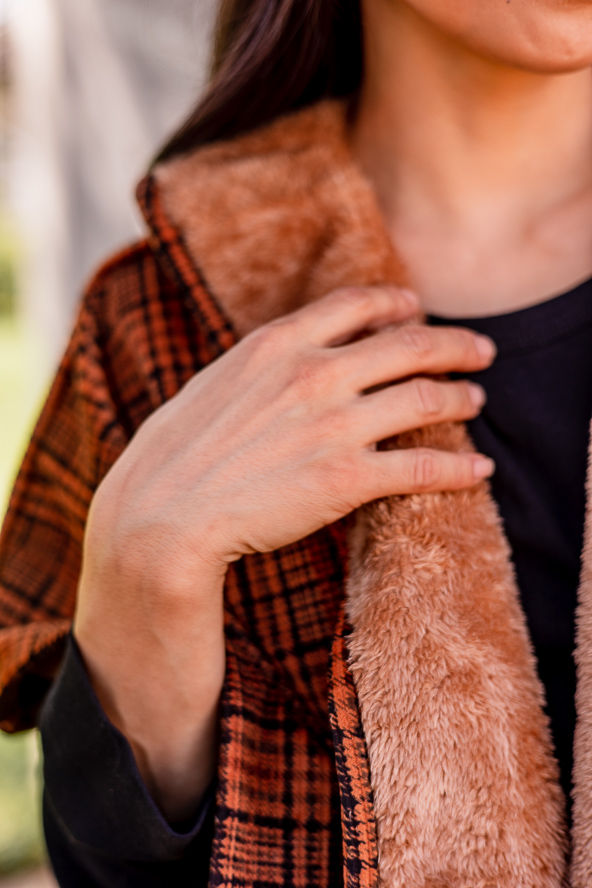
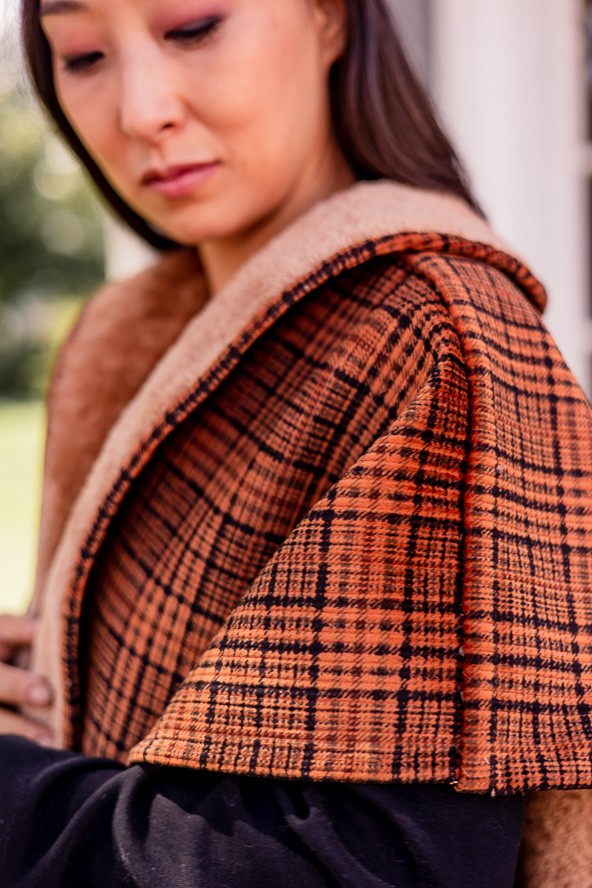
DESIGNER NOTE: For this sewing project, we selected a fashionable double-faced fabric consisting of fine-wale corduroy (also known as Manchester) with a Glen check print on one side and it reverses to a short pile faux fur on the other.
Notably, the corduroy face and the fur face are napped surfaces and must be cut in one direction on straight of grain. This fabric will be cut with the nap running towards the hem. Therefore, a seam at the shoulder will be needed to reverse the grain so that the nap runs in the same direction against the body, front and back.
Due to the intersecting lines of the Glen check, the surface print on the corduroy face must be matched at the shoulder seam for a smooth continuity in the design.
While favoring styles with minimal seaming, eliminating seams wherever possible will help to cut down on bulk between the two faces, and produce a smoother looking garment. If a seam is only there for design interest and you feel it can be eliminated without sacrificing the look of the fabric, tape your pattern pieces together at the seam line to create single piece from multiple ones.
However for this particular fabric choice, another seam must be added to the construction.
The combination of aforementioned directional nap and the bold pattern of the Glen check means flipping the back piece, then mirroring its shape, so that the lines of the Glen check can be aligned in a pleasing way since it cannot be matched, while the nap remains running in the correct direction.
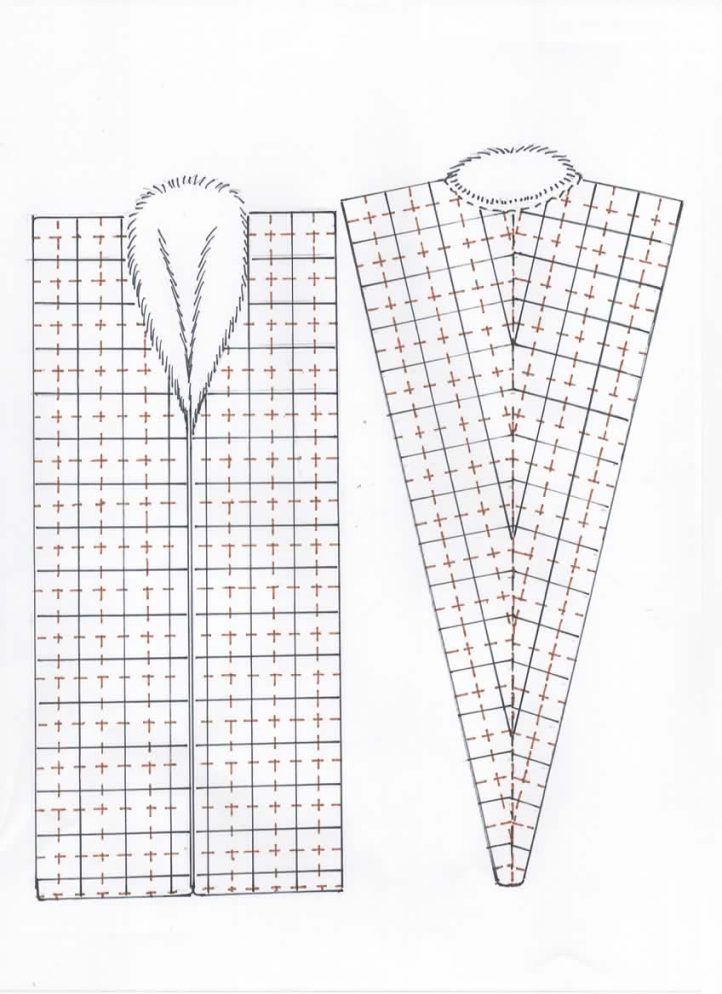
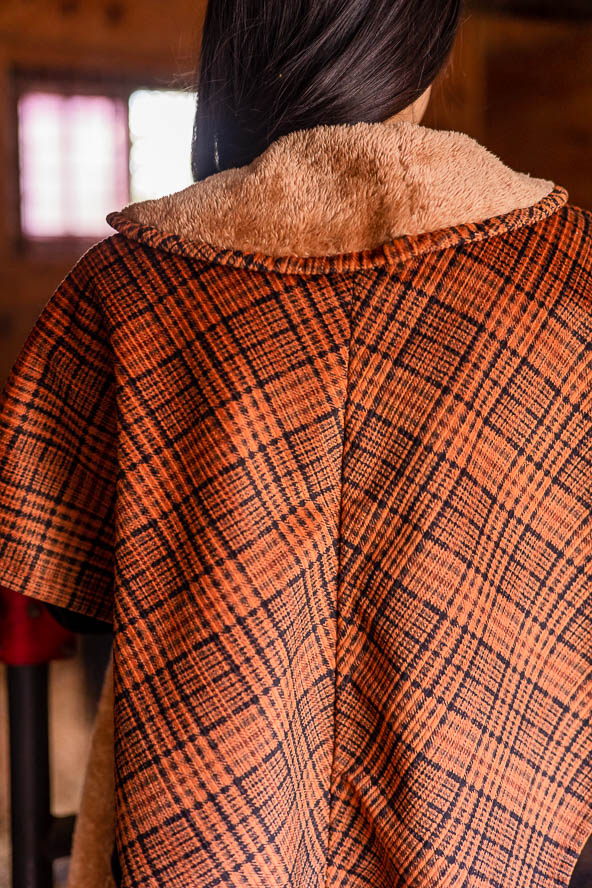
The wrap has a collar extension called an “all-in-one” roll collar. It extends from the top of the front panels and connects to the back panel at the neckline.
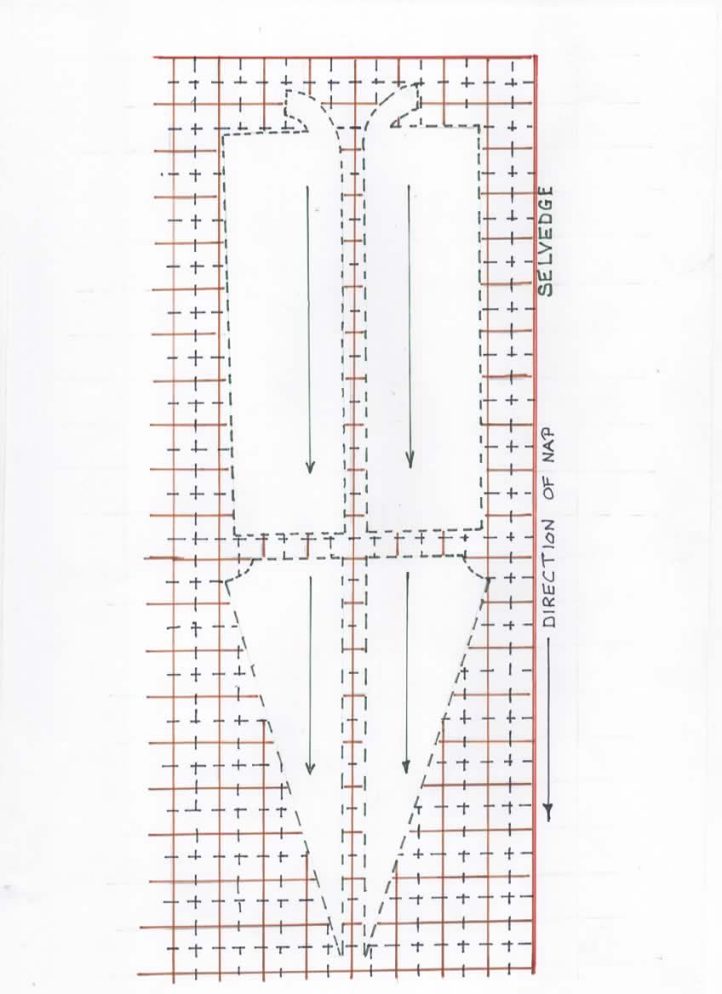
Lay the pattern pieces (see PDF layout at bottom of page) in a single layer of cloth with the corduroy side up. It allows better precision as these types of fabrics tend to be thick and can creep. Thread-mark the outline of the pattern pieces following the “with nap” layout and the surface design. Then flip the pattern pieces and repeat again. Use a contrast thread color for the thread-marking; it will be removed later.
With double-faced fabrics, allow for generous seam allowances depending upon your choice of seam application. Remember no seam allowances should be visible on either side of the fabric once completed. Wide seam allowances can be trimmed down after the seam has been sewn but cannot be added to if cut too narrow. For this fabric choice, seam allowances are 3/4” wide to be later reduced down to 3/8” wide for finished seams. The seam allowances may be marked out in chalk or marking pencil. Adjust these numbers if your fabric is very thick or frays a lot.
On the topic of fraying: Be aware that napped fabrics shed and flock a lot once they have been cut. Keep a lint roller or the vacuum cleaner nearby to clean up between steps as you sew. Maybe wear an apron.
Instructions:
DESIGNER NOTE: For the sake of clarity and understanding the sewing directions, the Glen check corduroy face will be the exterior side of the garment or known as the “right side” of the cloth; the short pile faux fur will be denoted as the interior side of the garment or known as the “wrong side” of the cloth.
STAY STITCH HIGH SHOULDER POINTS ON FRONT PANELS:
- Using a short stitch length, machine-stitch the seam line on either side of the pivot point of the collar and shoulder seams to reinforce that spot for later use. Stay stitch 1” on either side of pivot location at the high shoulder point with the fabric right side up.
- Repeat for remaining front panel.
JOIN FRONT AND BACK SHOULDERS:
- With wrong sides together, align and match up Glen check pattern at shoulder seams. Baste shoulder seam together and as you take a basting stitch, poke any unruly faux fur hairs back between the layers before taking the next stitch.
- Machine-stitch next to basting and back-tack each end of stitching.
- Remove basting and finger-press seam open. Trim away faux fur hairs from the seam allowances down to the backing of the fabric to reduce as much bulk as possible.
APPLY A MOCK FLAT FELL SEAM AT SHOULDERS:
- With the fabric right side up, grade the front shoulder seam allowance by half, then wrap the back seam allowance over the front seam allowance and fold it forward of the shoulder seam to create an exterior fell. Pin/baste in place.
- Stitch down by machine or finish by hand. Completed mock flat fell seam is 3/8” wide.
- On the wrong side of the cloth, brush the shoulder seam with a wide-toothed comb to fluff up the fur.
- Repeat steps for remaining shoulder.
JOIN BACK PANELS TOGETHER AT CENTER BACK (CB):
- With right sides together, align and match up Glen check pattern along the thread-markings to create a chevron pattern.
- Slip-baste center back seams together to minimize fabric creep and match up checked pattern.
- With wrong side up, measure center back seam allowance to check if they are equal. Adjust if necessary.
- Machine-stitch next to basting on the fur side in the same direction as the nap is running and back-tack each end of stitching.
- Remove basting and finger-press seam open.
APPLY A MOCK FLAT FELL SEAM ALONG CB SEAM:
- With the fabric wrong side up, grade one seam allowance by half and trim away any faux fur hairs on that seam allowance to reduce any bulk in the seam.
- Wrap the remaining seam allowance over the front seam allowance and fold it to the side to create an interior fell. Pin/baste in place.
- Stitch down by machine or finish by hand. Completed mock flat fell seam is 3/8” wide.
- Brush the back seam with a wide-toothed comb to fluff up the fur.
JOIN COLLAR HALVES TOGETHER:
- With wrong sides together, align and match up Glen check pattern at back seam of collar. Baste back seam together and as you take a basting stitch, poke any unruly faux fur hairs back between the layers before taking the next stitch.
- Machine-stitch next to basting and back-tack each end of stitching.
- Remove basting and finger-press seam open. Trim away faux fur hairs from the seam allowances of the fabric to reduce as much bulk as possible.
APPLY A MOCK FLAT FELL SEAM TO THE COLLAR’S BACK SEAM:
- With the fabric right side up, grade one of the seam allowances by half, then wrap the other seam allowance over the graded seam allowance and fold it to the side of the CB seam to create an exterior fell. Have the exterior fell lay opposite to that of the center back seam. Pin/baste in place.
- Stitch down by machine or finish by hand. Completed mock flat fell seam is 3/8” wide.
- On the wrong side of the cloth, brush the seam of the collar with a wide-toothed comb to fluff up the fur.
JOIN COLLAR TO BACK NECKLINE:
- Clip seam allowance diagonally at high shoulder point up to but not including the stay stitching at the pivot point to release the ease needed for the collar insertion. Add one drop of sealant (eg. Fray Check™) to the pivot point. Repeat on opposite side.
- With wrong sides together, align and match up the neckline of the collar to the neckline of the back panel. Pin/baste seam from the center seams and taper outward to the high shoulder point on each side of the back neckline. As you baste, poke any unruly faux fur hairs back between the layers before taking the next stitch.
- With right sides facing up, machine-stitch next to basting and taper seam as you reach each end of basting stitches.
- Remove basting and finger-press seam open. Trim away faux fur hairs from the seam allowances down to the backing of the fabric to reduce as much bulk as possible.
APPLY A MOCK FLAT FELL SEAM TO THE NECKLINE:
- With the fabric right side up, trim the neckline seam allowance close to the stitching, then wrap the collar’s seam allowance over the neckline and fold it below the neckline seam to create a narrow lap. Pin/baste in place.
- Stitch down by machine or finish by hand. Completed mock flat fell seam is 1/4” wide.
- On the wrong side of the cloth, brush the seam of the collar with a wide-toothed comb to fluff up the fur.
APPLY A STANDING FELL SEAM TO THE PERIMETER EDGE OF THE WRAP:
- Apply a standing fell seam to the outer edges of the wrap to enclose the raw edges to prevent fraying and to produce a neatly trimmed edge on the garment.
- Begin by trimming away the faux fur hairs from the raw edge on the wrong side. Make a channel about 3/4” wide to allow for a double folded turn under to form a self-bound finish.
- When ready and with wrong side up, enclose the raw edges by turning in the edges twice (3/8”+ 3/8”) so that one seam edge wraps around the other. This self-bound seam is made in a single pass under the machine foot or slip-stitched by hand-finishing.
FINISHING:
- Remove all the thread-marking and basting stitches from the garment.
- On the faux fur face side (interior), brush the pile with a wide-toothed comb to fluff up the fur.
- On the corduroy face side (exterior), roll a lint brush in the direction of the nap.

Would it be possible to make this without a double-faced fabric? I have some tartan fabric and would see if I can find a plush fabric to line it with. Do you think it could work?
Hi there! I think it could work but it will add some bulk to your wrap, as double-faced fabrics have only one layer of fabric (with a different print on each side). Please let us know if you have any other questions! – Ashley, We Like Sewing
there is a pattern layout for download – not pdf pattern to download= please help
thank you
carol
Hi Carol! The reason there is a pattern layout, instead of a printable pattern, is because unlike sized garments, this project is made to fit the wearer’s preferences/body. The designer walks readers through the process of creating a custom wrap in the pattern instructions. Let us know if you have any questions! – Ashley, We Like Sewing
Same here there’s a lay out but no pattern our measurements.
Hi Nancy! We’ve updated this pattern with measurements provided by the designer. Please let us know if you have any questions! – Ashley, WeLikeSewing
I do not see instructions on how to make the Highland Winter Wrap pattern (dimensions, etc.) nor a download for the pattern pieces. Could you supply the info /tell me where to purchase it/inform me what I may be doing wrong??? Thanks!
Hello there! There is a download at the very bottom of the page for a printable layout of this project for our Gold members (this layout can also be found in the project instructions). We’ll reach out to the designer about specific project measurements and will update the project as soon as we have more info. Thank you for your patience! – Ashley, WeLikeSewing
Looooove these can’t wait to make some for Xmas gifts