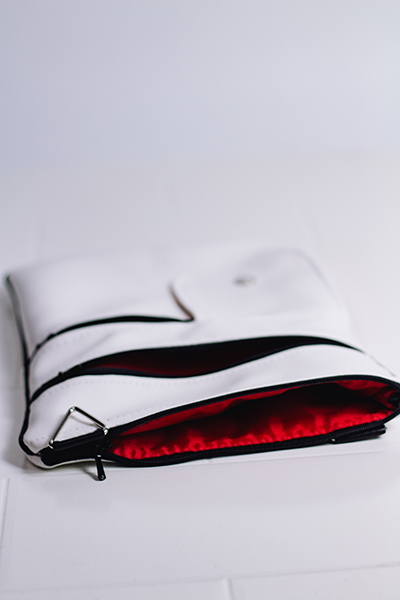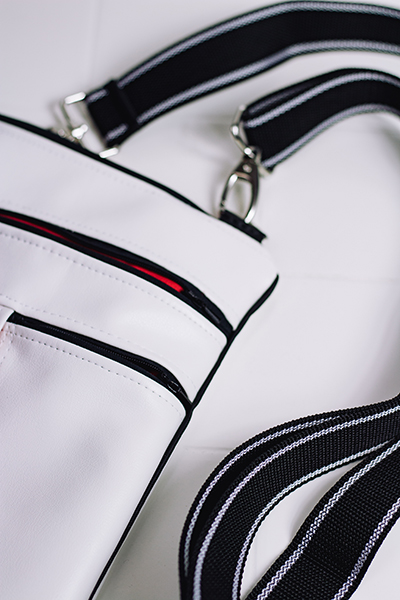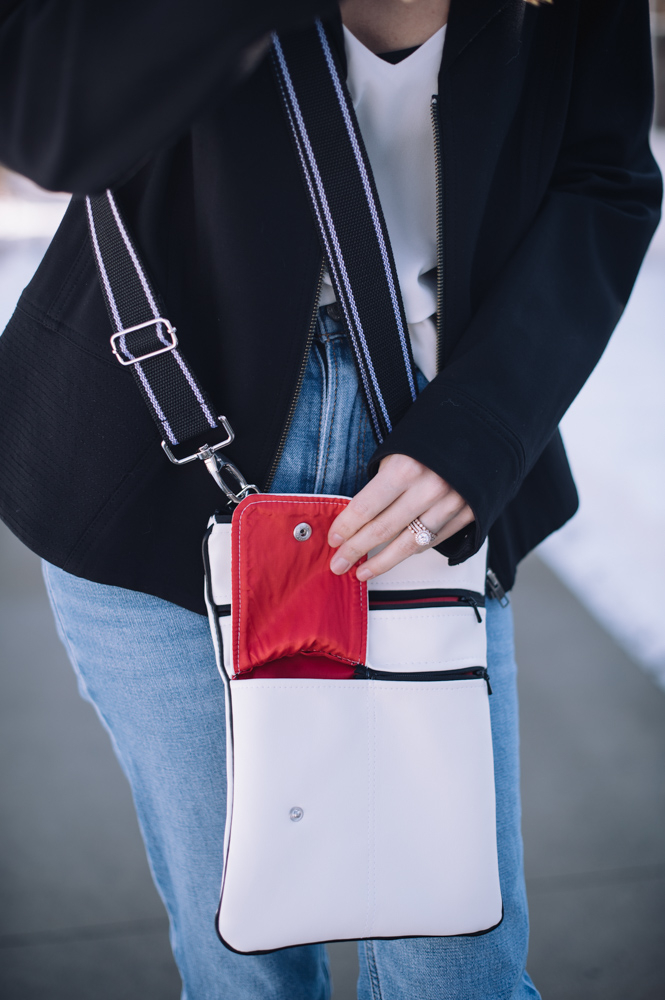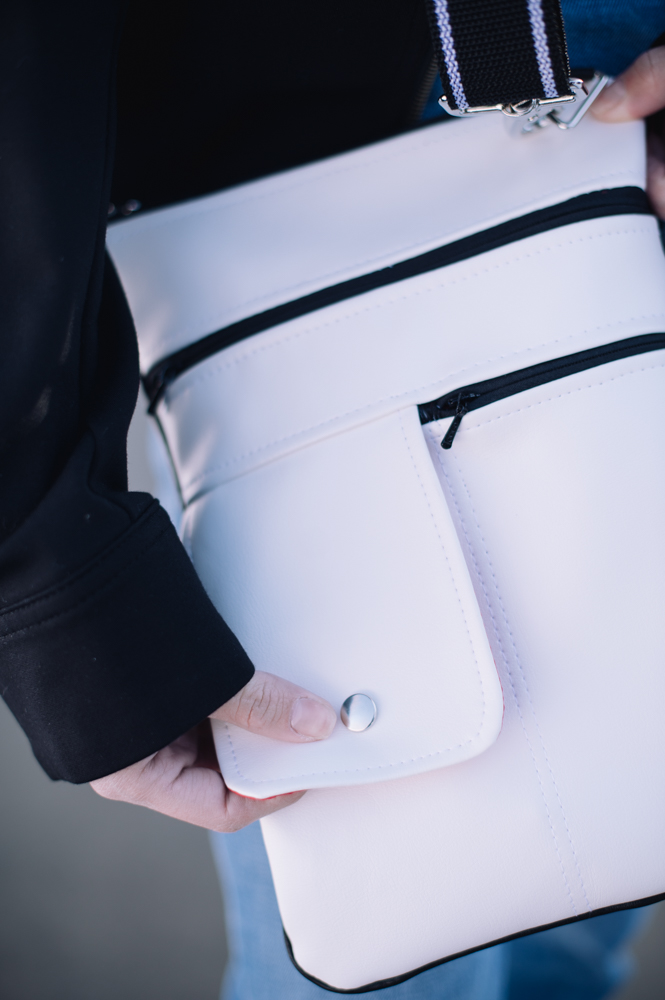
Combine the bold designs of ‘60s mod style with practicality and minimalism to make this sleek crossbody bag. Created with white faux leather, this bag sewing pattern also features an adjustable strap, front pocket detail, and chic black piping. This bag was designed for travel and is a fabulous and convenient way to carry your necessities. Keep your belongings close by in a purse that looks streamlined and fashion-forward with this sewing pattern.
DIMENSIONS: 9” x 11 1/4” w/ adjustable 80” long cross-body strap
Materials:
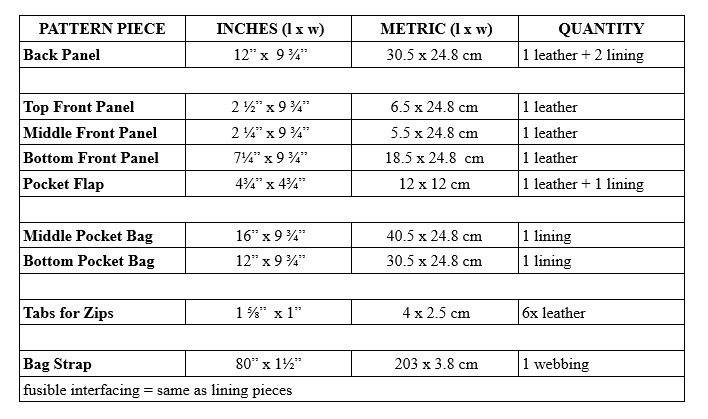
- 1/2 yard (0.5 m) imitation leather, 51 1/4” (130 cm) wide for the exterior
- 1/2 yard (0.5 m) acetate lining, 52” (132 cm) wide for interior
- 1/2 yard (0.5 m) Knit-Fuse interfacing, for lining
- 3 7/8 yds. (3m) imitation leather piping, 4mm wide for trim
- 1 spool color-matched thread
- 2 invisible coil zipper, 4mm x 20cm (8”) with teardrop slider
- 1 invisible coil zipper, 4 mm x 10cm (4”) with teardrop slider
- 2 1/4 yds. (2 m) webbing, 38mm (1 1/2”) wide for bag strap
- 1 slide buckle, 1 1/2” (38mm) diameter, metal for bag strap
- 2 triangular connector rings, 1 1/2” (38mm) diameter, metal for bag strap
- 2 snap hooks, 1 ½” (38mm) diameter, metal for bag strap
- 1 set press fastener, 1/2” (12mm) wide, metal for pocket flap
- PDF Diagrams – Located at the bottom of this page
Equipment:
- Sewing machine
- Steam iron
- Rotary cutter & mat
- Denim sewing machine needle (14/90 or 16/100)
- Dual-feed walking foot
- Basting tape or quilter’s clips
- Metal ruler
- Leather hole punch
PATTERN NOTES:
The draft and formation of this crossbody bag is based upon a simple flat grid, which fits into a rectangle, of which the size depends on the desired length of the zipper opening + ease. The length of the pattern (bag height) is whatever you desire as a finished length plus seam allowance. The zipper length used in the prototype sample is 8” (20 cm) long.
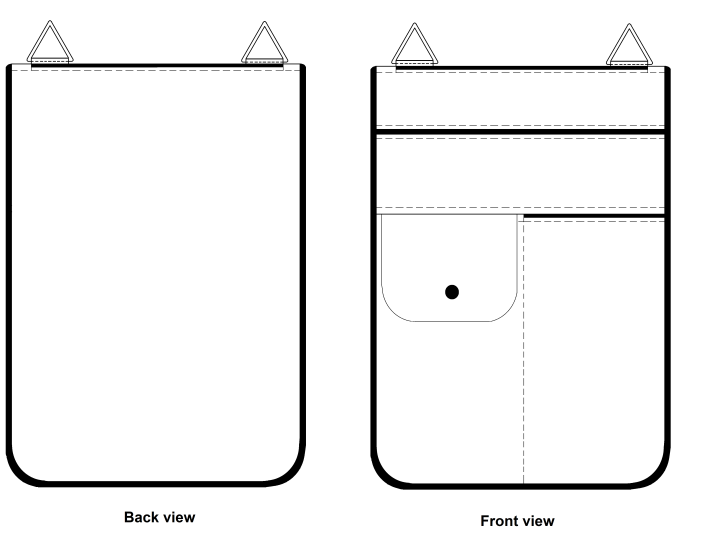
FINISHED DIMENSIONS: 9” x 11 1/4” with 1 1/2” wide adjustable strap, 80” long.
FUNCTION: Multi pockets/compartments, hands-free, slim & compact, more secure wearability.
ENVIRONMENT: For everyday use, ideal for travel.
FINISHES:
- Adjustable/detachable bag strap
- Faux leather piping accent
- Metal handbag hardware
Sewing with Imitation Leather:
Working with imitation leather is much the same as sewing any other textile fabric. Many of the same sewing techniques that you use in sewing cloth can be used when sewing faux leather, albeit with a few easy-to-do modifications.
- Always cut this no-fray material with a rotary cutter or box-cutter to get neat straight edges and use paper scissors to shape any curved edges. Do not use your good fabric scissors, as it will dull the blades quickly.
- Imitation leather and genuine leather have both similarities and crucial differences when it comes to sewing. One similarity is that machine-stitching and straight pins will create permanent holes in both materials. So instead of pinning your layers together before sewing, it’s better to use basting tape or quilter’s clips to hold the pieces together prior to stitching seams.
- To avoid perforating the material, use the longest stitch-length setting your sewing machine produces. Do not back-stitch at the start or end of seams; instead leave long thread-ends. Knot the thread-ends together and use a drop of Fray-check™ to seal the ends. Alternatively, thread the ends onto a hand-needle and back-track through a few existing hole punctures.
- As with sewing genuine leather, there are no redos and you might experience skipped stitches. If this happens, do not stop stitching, just keep sewing. What you want to do is when you have finished all the machine stitching, go back, and stitch over those skipped areas by hand. Start by anchoring the needle between the layers of the material and then bring it up through the first skipped hole. Pass the needle over the thread of the floating thread that was skipped and then pull the needle back through the hole. Be sure you pull the stitch tight and do this for each skipped stitch. This way, you keep the integrity of the machine stitching in tact while providing reinforcement.
- Use a denim needle, size 90/14 or 100/16, to sew. This machine needle has a deeper scarf, acute point, and modified shaft to sew without pushing fabric down into the needle-plate hole. It goes through fabric and meets the bobbin hook easily with less tendency of breakage. The large eye will accommodate thicker thread should you want to use upholstery thread but any sewing thread will work.
- Swap out the presser foot for more control and less friction. A dual even-feed foot (aka walking foot) or a roller foot will assist with keeping layers feeding at the same rate without shifting or puckering since the layers are gripped and fed by both upper and lower feed teeth. If you are a quilter, you know what I mean. When machine-stitching, go slowly when sewing seams and attempt to keep everything under the presser foot “flat” for as long as possible before closing up.
- Use a press cloth on both the right and the wrong side of imitation leather to prevent the iron from melting the fabric, sticking to the fabric, or scorching the fabric. It is best to test your iron setup with scraps of the fabric to ensure good results and not ruin your project. Do not use a heavy hand. Work slowly and allow the moderate heat to do the work, not the weight of the iron. Plowing through the fabric with the iron while the fabric is warm will cause the fabric to become distorted and misshaped.
Marking and Cutting Instructions:
Finished Dimensions: 9” x 11 1/4” (23 x 28.5 cm) with 1 1/2” (38mm) wide adjustable strap, 80” (203 cm) long.
Sewing Instructions:
Note: Fuse Knit-fuse® interfacing to wrong side of lining fabric pieces following manufacturer’s application directions.
SMALL PARTS PREPARATION
- Make bag strap. Gather together bag hardware, webbing, and piping trim. Cut 2 pieces of piping trim, 1 1/2” (38mm) long. Undo the stitching and remove the cord filler. On one end of the webbing, slip on the slider buckle. Machine-stitch the trim to the strap end, right sides together. Trim the seam allowance and wrap the trim over the raw edge of the webbing. Fold the strap end over the center-bar of the buckle and stitch-in-the-ditch along the trimmed edge of the webbing to secure in place.
Next, slide on a snap hook onto the webbing from the opposite end towards the slider buckle. Allowing for a bit of slack, thread the webbing through the buckle.
With the remaining raw end of the webbing, wrap it with the remaining trim piece and machine-stitch. Add a snap hook to the end of the webbing and fold its end back on itself to secure the hook. Stitch in place to secure. Set aside. - Add tabs to the connector rings. Gather together triangular connector ring and piping trim. Cut 2 pieces of piping trim, 1” (2.5mm) long. Undo the stitching and remove the cord filler. Wrap the trim around the inner diameter of the connector ring and stitch close to the metal to secure in place. Do the same for the remaining connector and piping trim. Set aside.
- Add leather tabs to zip ends. Gather together invisible coil zippers and imitation leather strips. To each of the zippers, extend its length by stitching tabs on each end of the zipper. With right sides together, stitch a leather strip at the end-stop of the zip and another at the top-stops of the zip. Fold the tabs back on themselves. Set aside.
- Make the pocket flap. Gather together leather flap piece and lining flap piece. With right sides together, align and match leather piece with lining piece. Hold layers together with quilter’s clips. Machine-stitch around outer edge of flap with 3/8” (10mm) seam allowance, leaving top edge open. Trim back seam allowance and snip small notches around the lower curved edges of the flap. Turn flap assembly right-side-out. From lining side, lightly press flap with a medium temperature iron and a press-cloth. With face side up, top-stitch through all layers along the outer edge of the flap since it cannot be pressed flat. Punch hole for press fastener in lower center of bottom edge. Set aside.
MAKE UP THE FRONT SECTION OF THE BAG
Note: Divide the front exterior section of the bag into 3 parts – the Top Front Panel, the Middle Front Panel, and the Bottom Front Panel by cutting through the zipper placement lines.
- Sew zip to top of Bottom Front panel. Gather together Bottom Front Panel and 4” (10cm) zip. Place zipper face-down on top-right corner of panel. Allow 3/8” (1 cm) gap from edge of panel. Zip slider direction faces inward. Trim zip tabs if needed. Hold in place with quilter’s clips. Place lining ( 9 3/4” x 12”) for Bottom Pocket bag on the Bottom Front Panel right sides together and stitch across top of panel (1/4” s.a.) and turn out. Fold the seam flat and top-stitch along seam line through all layers.
- Attach Middle Front Panel to Bottom Front Panel. Gather together Middle Front Panel and pocket flap. Align flap upside-down on Middle Front Panel along bottom left corner of panel with right sides facing together. Allow 3/8” (1 cm) gap from edge of panel. Place Middle Front Panel on Bottom Front Panel with right sides together and hold sections together with quilter’s clips. Flip the whole unit over. Fold up lining to top edge of zip to cover zipper and open edge of pocket flap. The flap and the zip tab should meet but not overlap. Adjust if necessary. Stitch across top of the panel (1/4” s.a.), through all layers to encase zip and pocket flap and turn out. Flatten and top-stitch along seam line through all layers. At the end of the zip, trim the leather tab so the material lines up with the side edges of the bag’s front. Repeat on opposite side with pocket flap.
- Separate the 2 lower compartments. Top-stitch a vertical row of stitching from top of Bottom Front Panel between the pocket flap and the zip, to the bottom edge of the panel, through all layers including the lining to create the pocket cavity. Repeat this step at end of zip by stitching through all layer within the seam allowance to complete the pocket bag.
- Attach press fastener to left side compartment. Gather together leather hole punch and press fastener kit. With the pocket flap closed (allow a little slack), mark the location of the fastener placement on the exterior of the Bottom Front Panel. Pre-punch a small hole at this location. Attach the press cap to the pocket flap and the stud portion through the location point on the front between the leather and the lining, following the manufacturer’s installation directions with the tools provided. Sew a vertical row of stitching from the pocket flap, through all layers including the lining, on the left side in the seam allowance to create another pocket.
You should now have a completed lower front half of the bag with a flapped pocket compartment and a zippered pocket compartment. - Sew zip to top of Middle Front Panel. Place 8” zip face-down on face-side of Middle Front Panel. Allow 3/8” (1 cm) gap from each edge of panel. Zip slider direction faces same direction as shorter zip. Place lining for Middle Pocket bag (9 3/4” x 16”) on top of zipper and stitch across top of panel (1/4” s.a.) and turn out. Fold flat and top-stitch along seam line through all layers.
- Attach Top Front Panel to Middle Front Panel. Center the Top Front Panel face-down along top of zipper tape (face up) on Middle Front Panel. Allow 3/8” (1 cm) gap from edges of the panel and hold pieces together with quilter’s clips. Flip the whole unit over. Fold up lining to cover top edge of zipper. Stitch across top of panel (1/4” s.a.), through all layers to encase zip and turn out. Fold flat and top-stitch along seam line through all layers.
- Make Middle Pocket Compartment. At each end of the zip, trim the leather tab so the material lines up with the side edges of the bag’s front. Sew a vertical row of stitching from top of the Middle Front Panel at end of zip through all layers including the lining within the seam allowance to create a pocket. Repeat on opposite side of bag.
The front of the bag is now complete.
ATTACH THE RING CONNECTORS ON BAG’S FRONT AND BACK SECTIONS
- Gather together the 2 completed connector rings and the front & back pieces of the bag. Place one upside-down at the right top corner of each of the front and back bag pieces. Allow 1” (2.5 cm) gap from edge of the panels. Machine-baste in place.
INSERT TOP ZIP
- Place 8” zip face-down on face-side of bag’s front section. Center the zipper and allow 3/8” (1 cm) gap from each edge of the front. Zip slider direction faces same direction as other zips. Place a lining piece (9 3/4” x 12”) over the zipper on the bag front with right sides together and stitch across top of material (1/4” s.a.) and the connector tab. On face side of leather only, flatten zipper seam and top-stitch to hold in place.
ATTACH FRONT AND BACK TOGETHER
- Place bag front onto bag back section with right sides together and center it on the zipper tape. Allow 3/8” (1 cm) gap from each edge of the bag back. Hold layers together with quilter’s clips. Flip whole unit over.
Place remaining lining piece (9 3/4” x 12”) on bag back with right sides together and stitch across top of material (1/4” s.a.) and the connector tab. On face side of leather only, flatten zipper seam and top-stitch to hold in place.
Trim the leather tabs on the zip ends to match up with the sides of the bag, if needed.
ADD PIPING TRIM
- Gather up a length of purchased piping trim and the still-flat bag. Apply the piping to the front section beginning at the middle of the leather zip tab, down the side, across the bottom, up the side, and ending at the middle of the opposite zip tab. To attach the piping cord to the straight edges of the bag, align and match the lip of the piping trim to the seam allowance of the bag with face-side up. Clip in place or use basting tape.
To attach piping trim to an outside curve at the bottom corners, place it onto the right side of the imitation leather matching the seam allowance. Baste it in place, notching the lip of the piping to ease it around the curve so that the fabric lays flat.
To begin or end the piping trim, allow a 1” (2.5 cm) tail on each end of the piping trim. With tweezers, coax out about 1” (2.5 cm) of the cord filler and cut it away so that the ends of the trim are hallow. Turn the trim ends outward towards the seam allowances.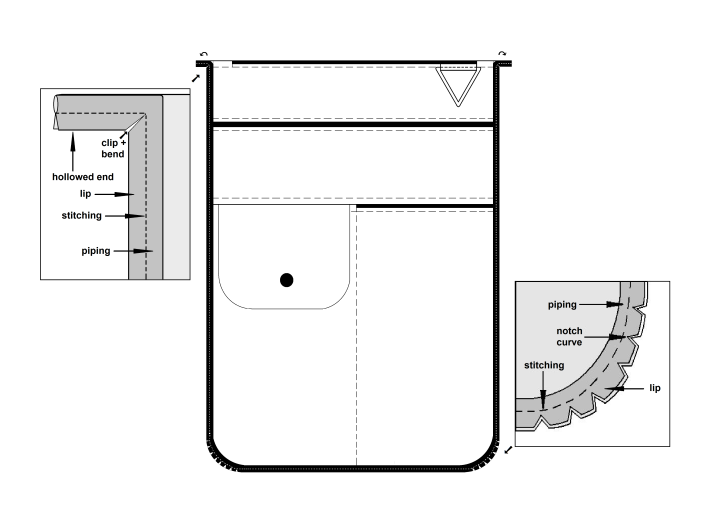
CLOSE UP THE BAG
- Open the top zipper. Align edges of exterior pieces and piping trim with right sides together. Do the same for lining pieces. Allow an opening on the bottom edge of the lining portion and stitch around perimeter of the bag. Stitch close to piped trim in seam allowance and fold/wrap the tabs of the top zip around the hollowed piping ends. Notch rounded corners. Reduce any bulk in seams.
- Turn bag right-side-out through zipper and opening in lining. Slip-stitch opening closed. Drop lining into bag cavity.
FINISH THE BAG
- Attach bag strap hooks to connector rings.
- Pick-stitch lining fabric to back of zipper tape along top bag opening.