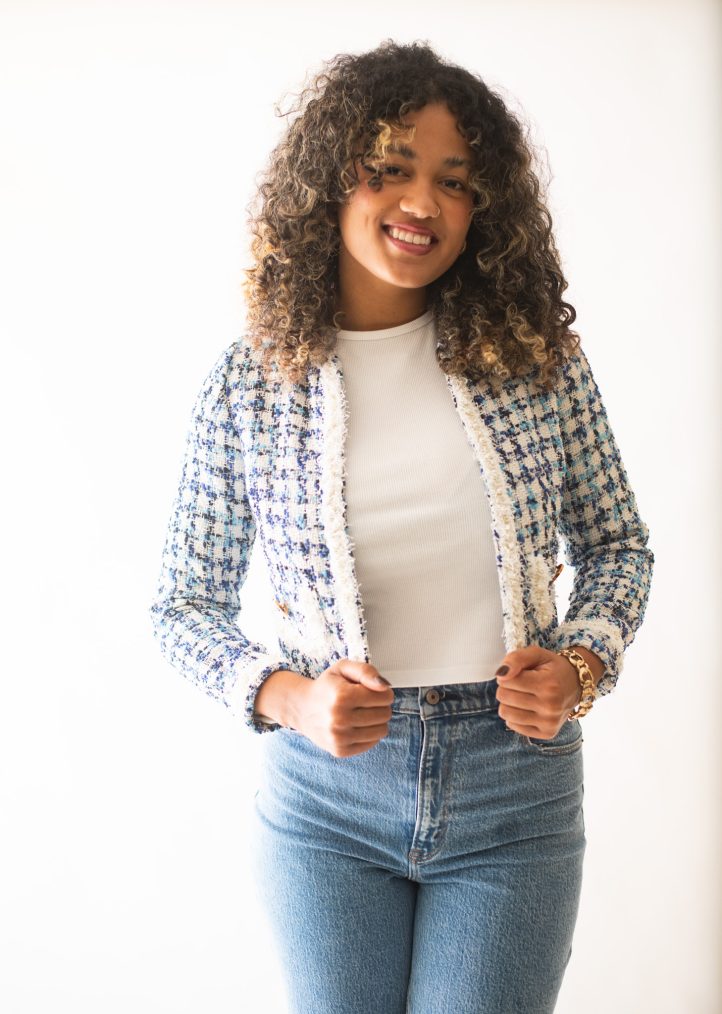
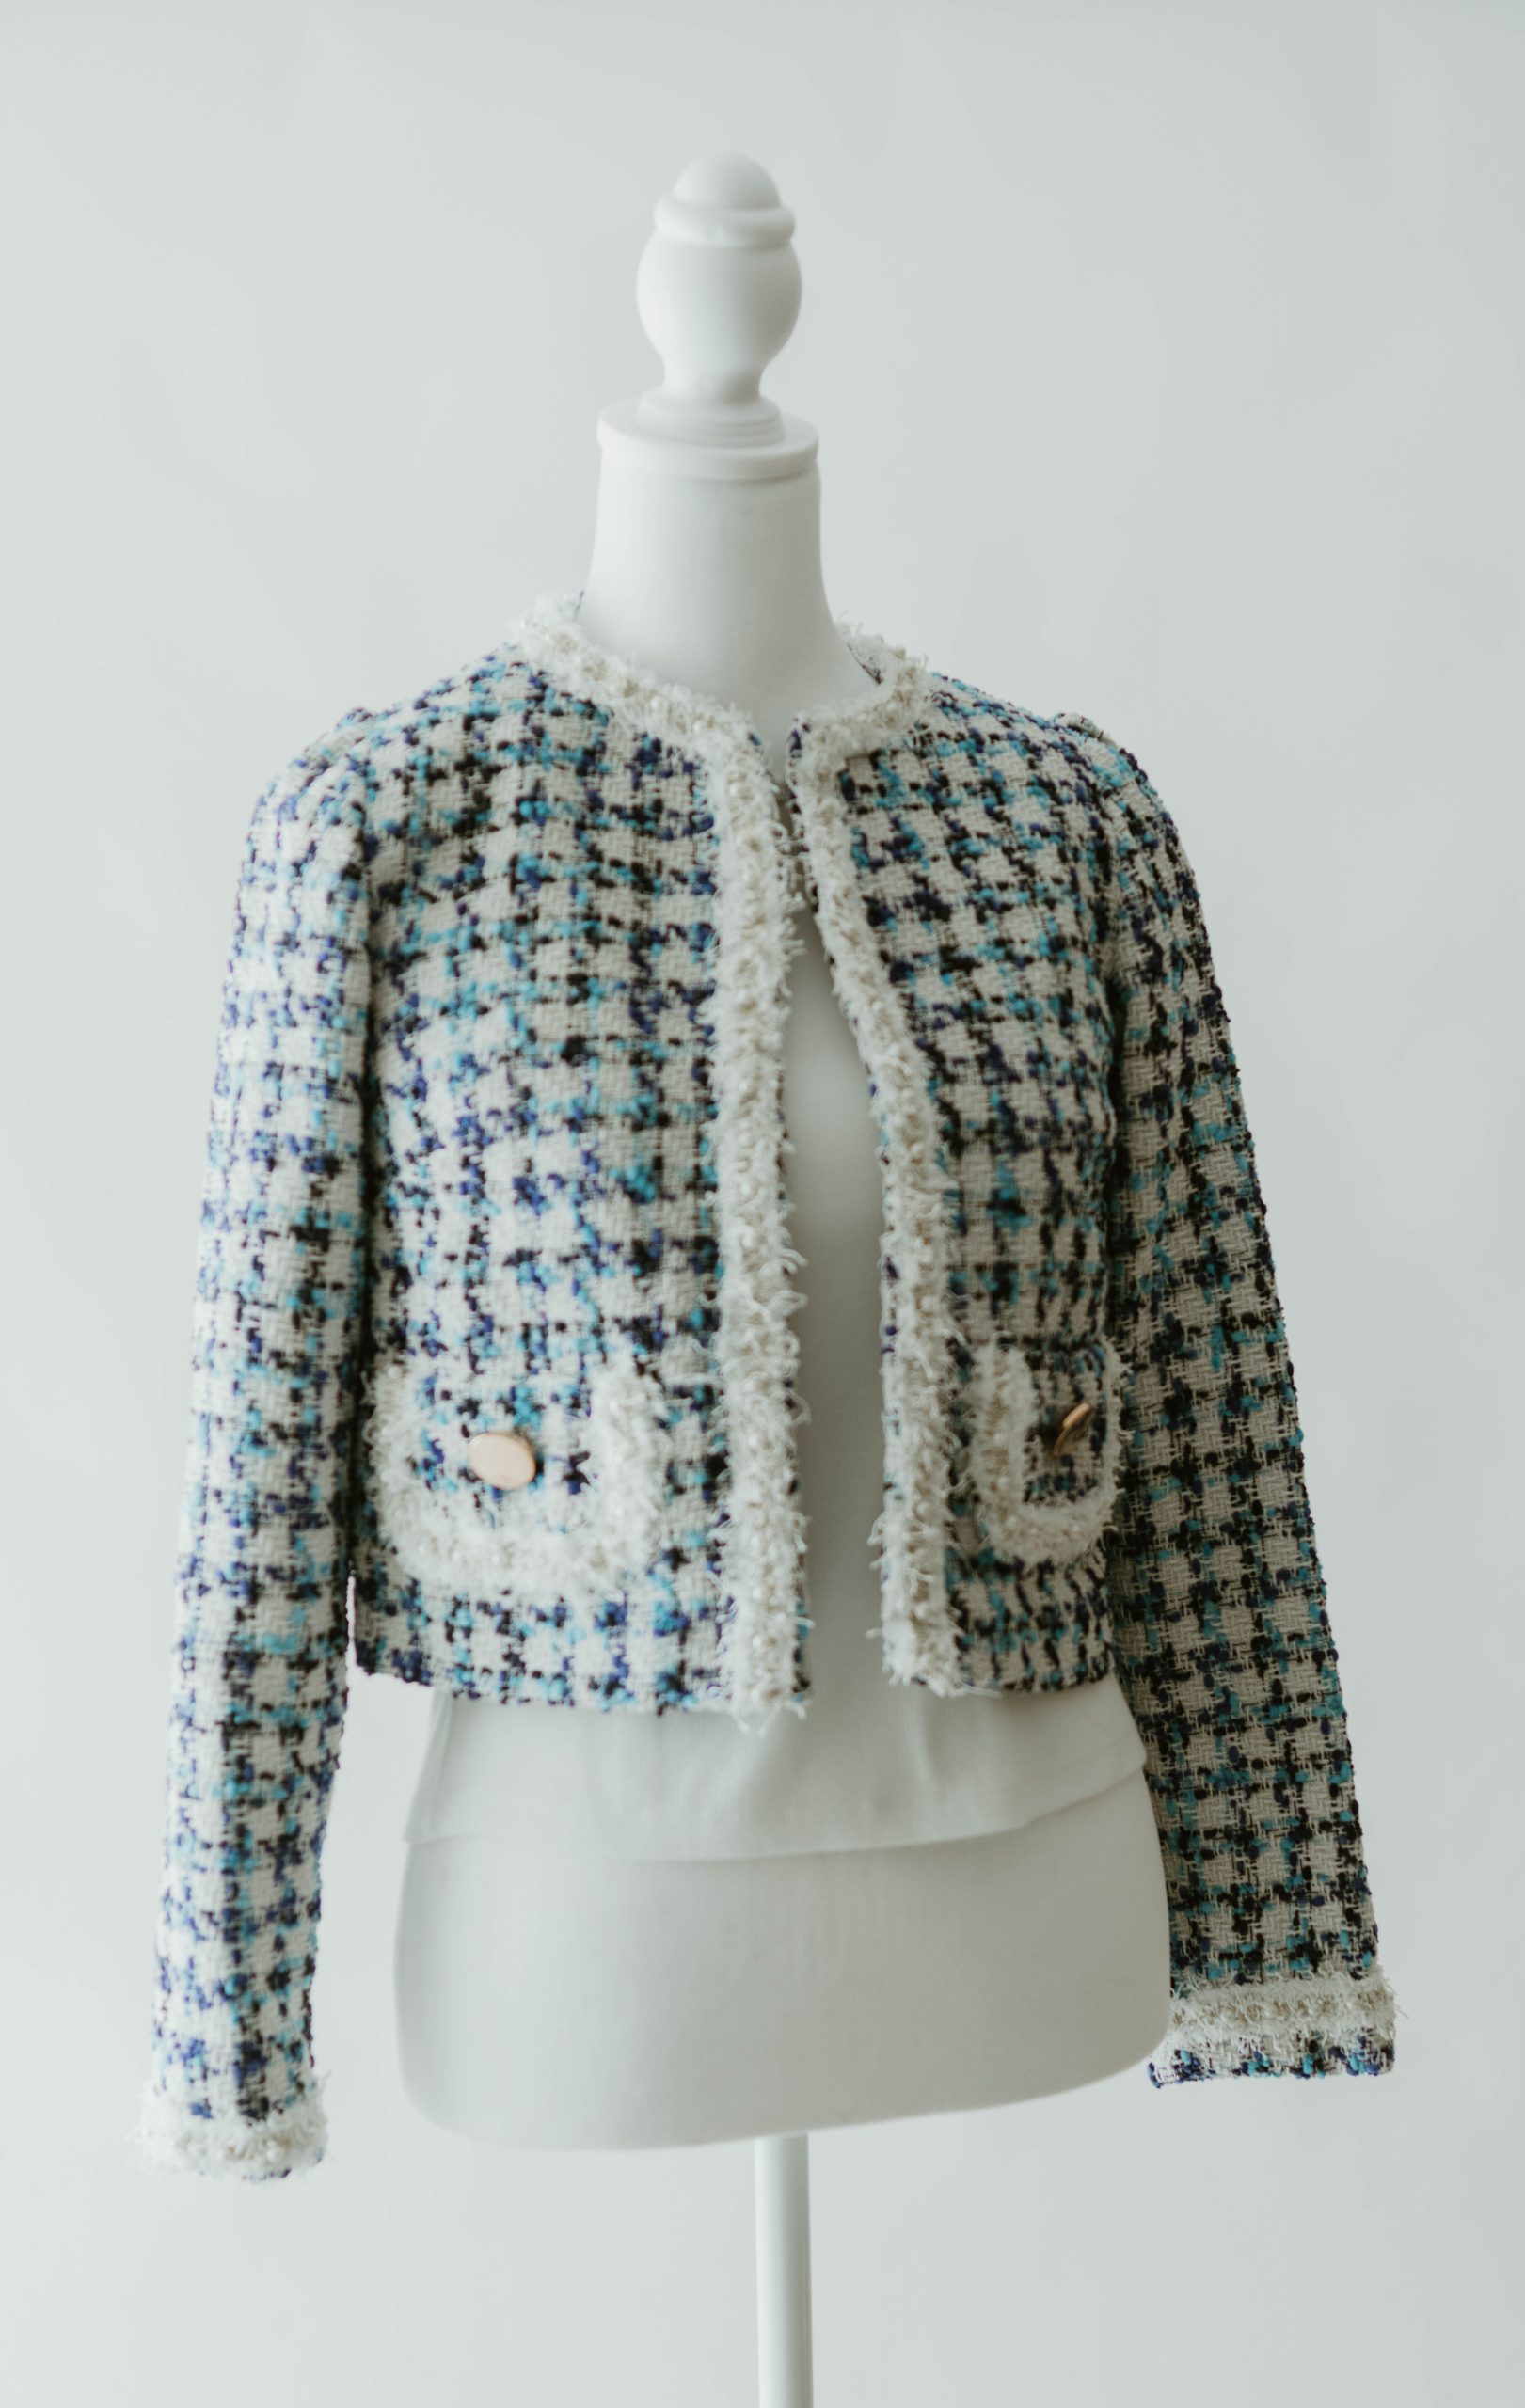
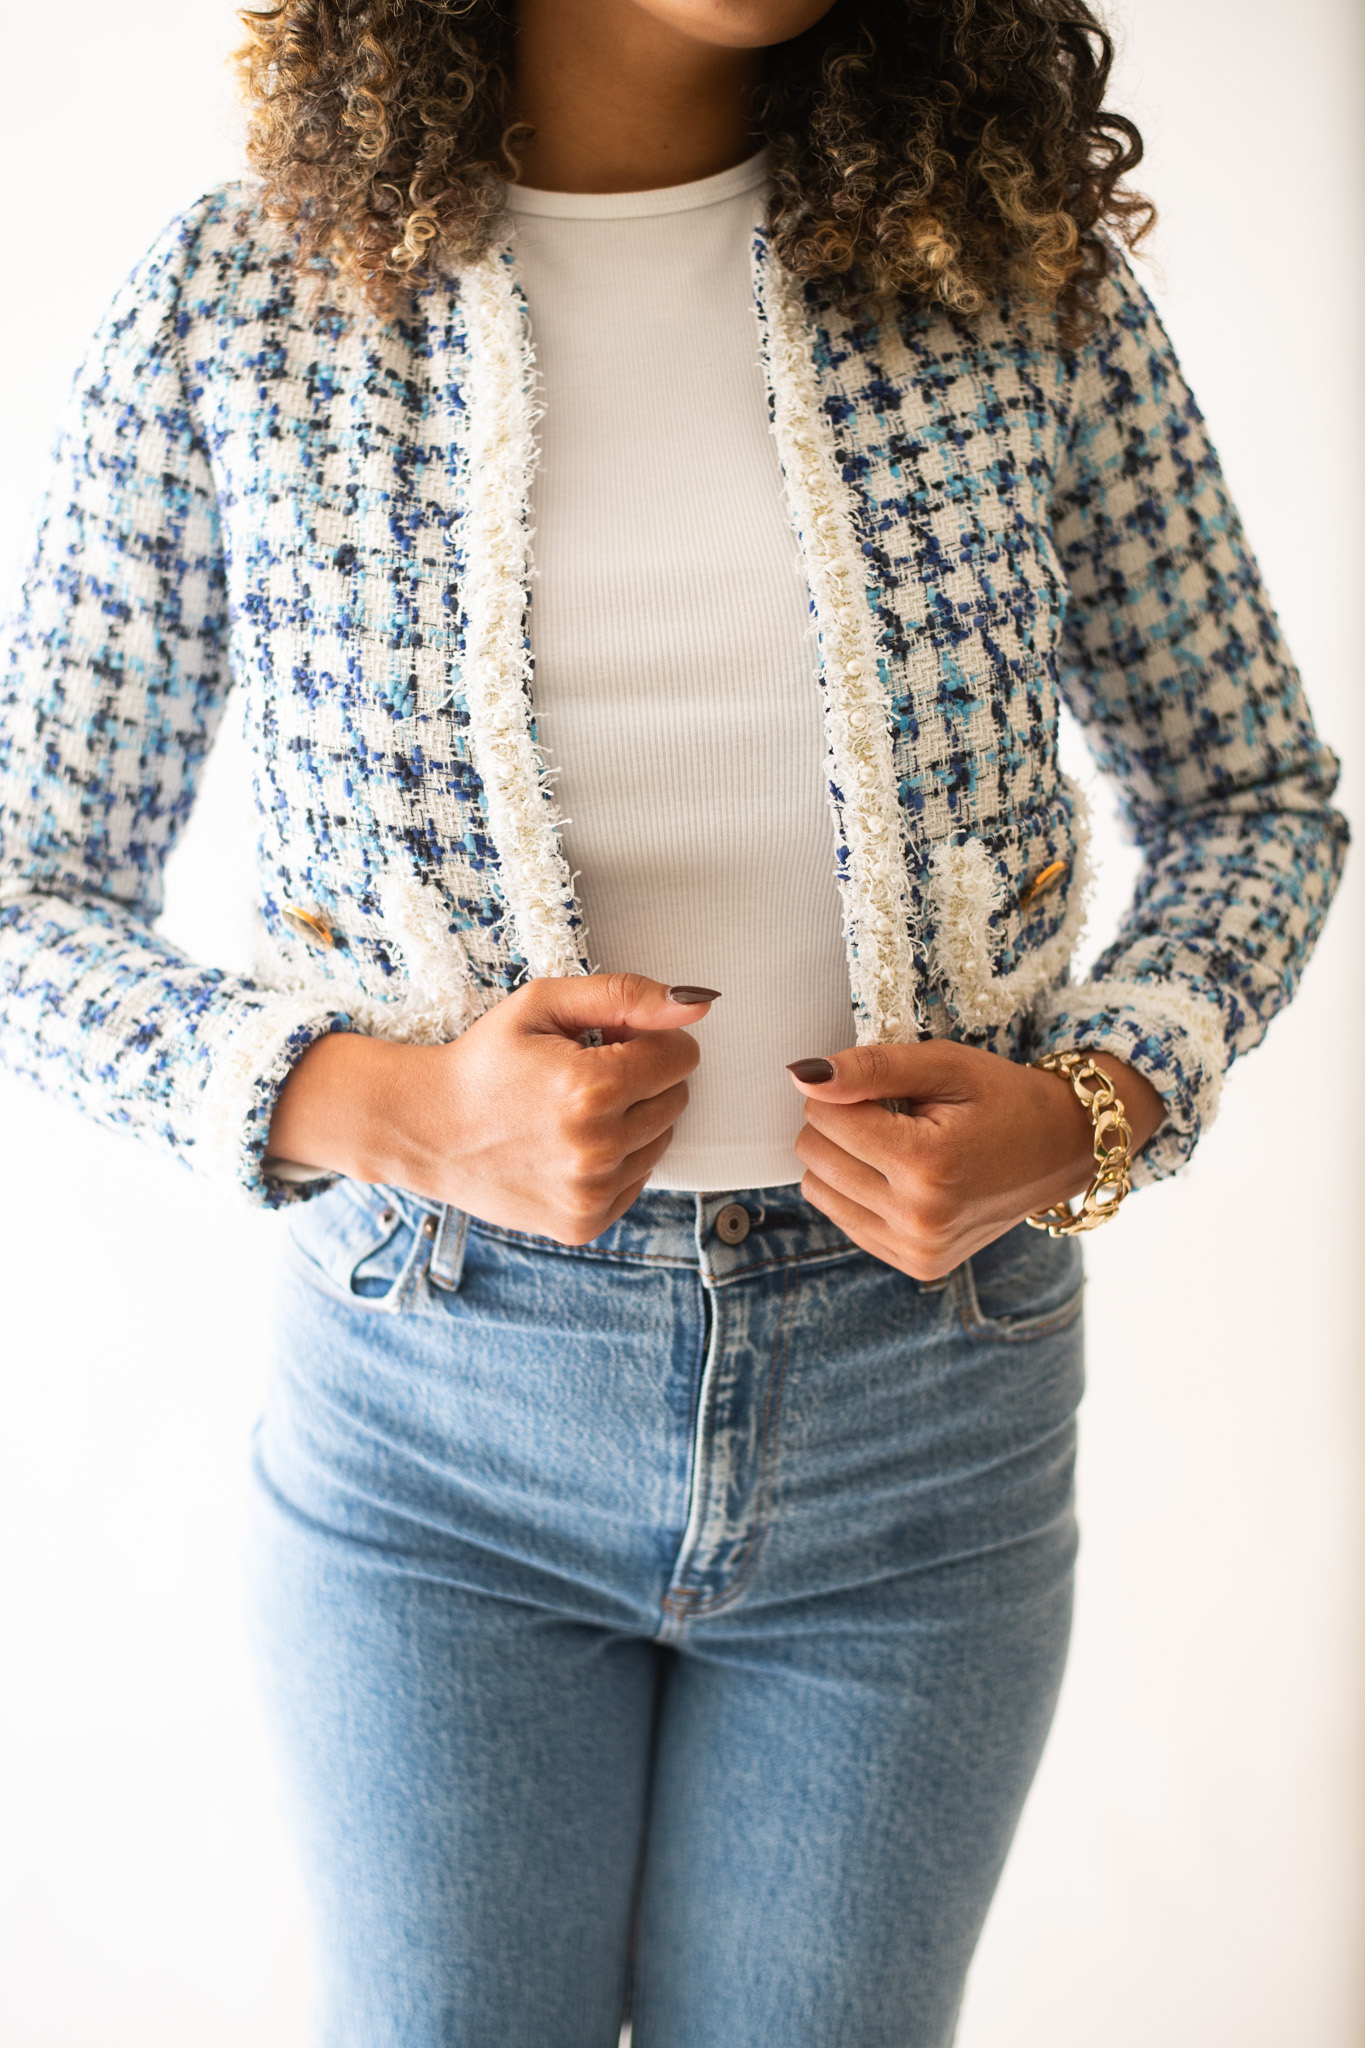
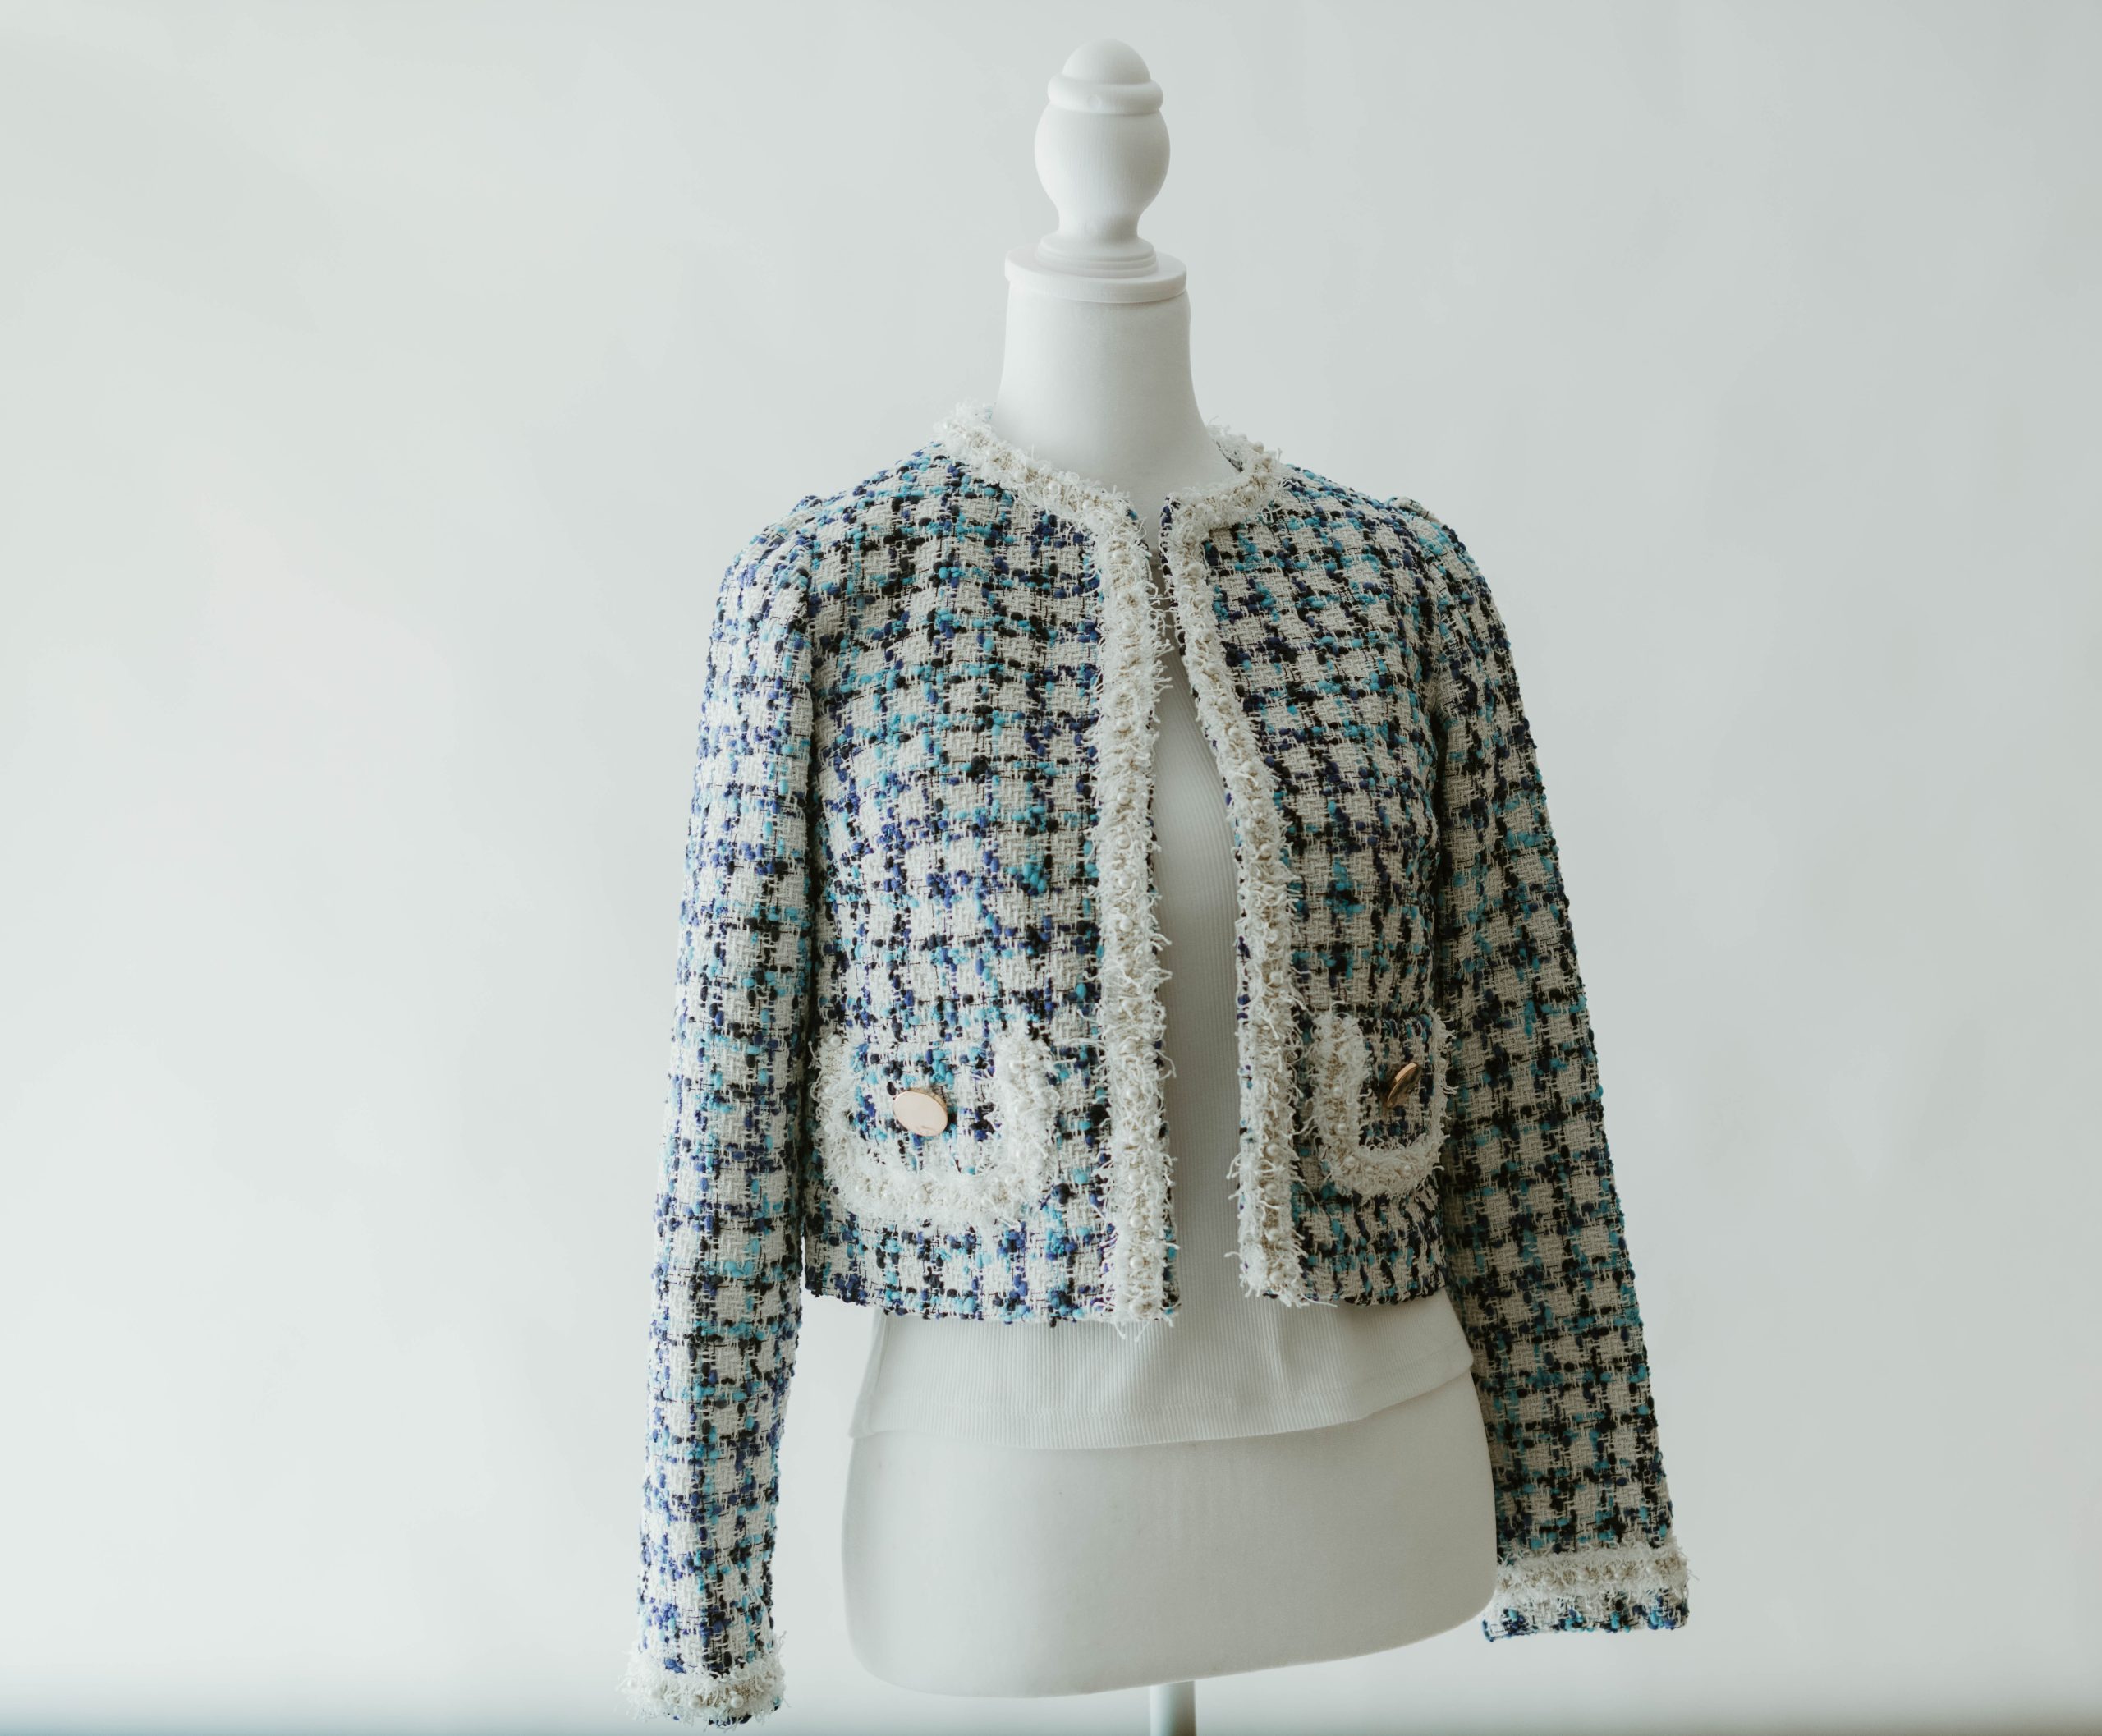
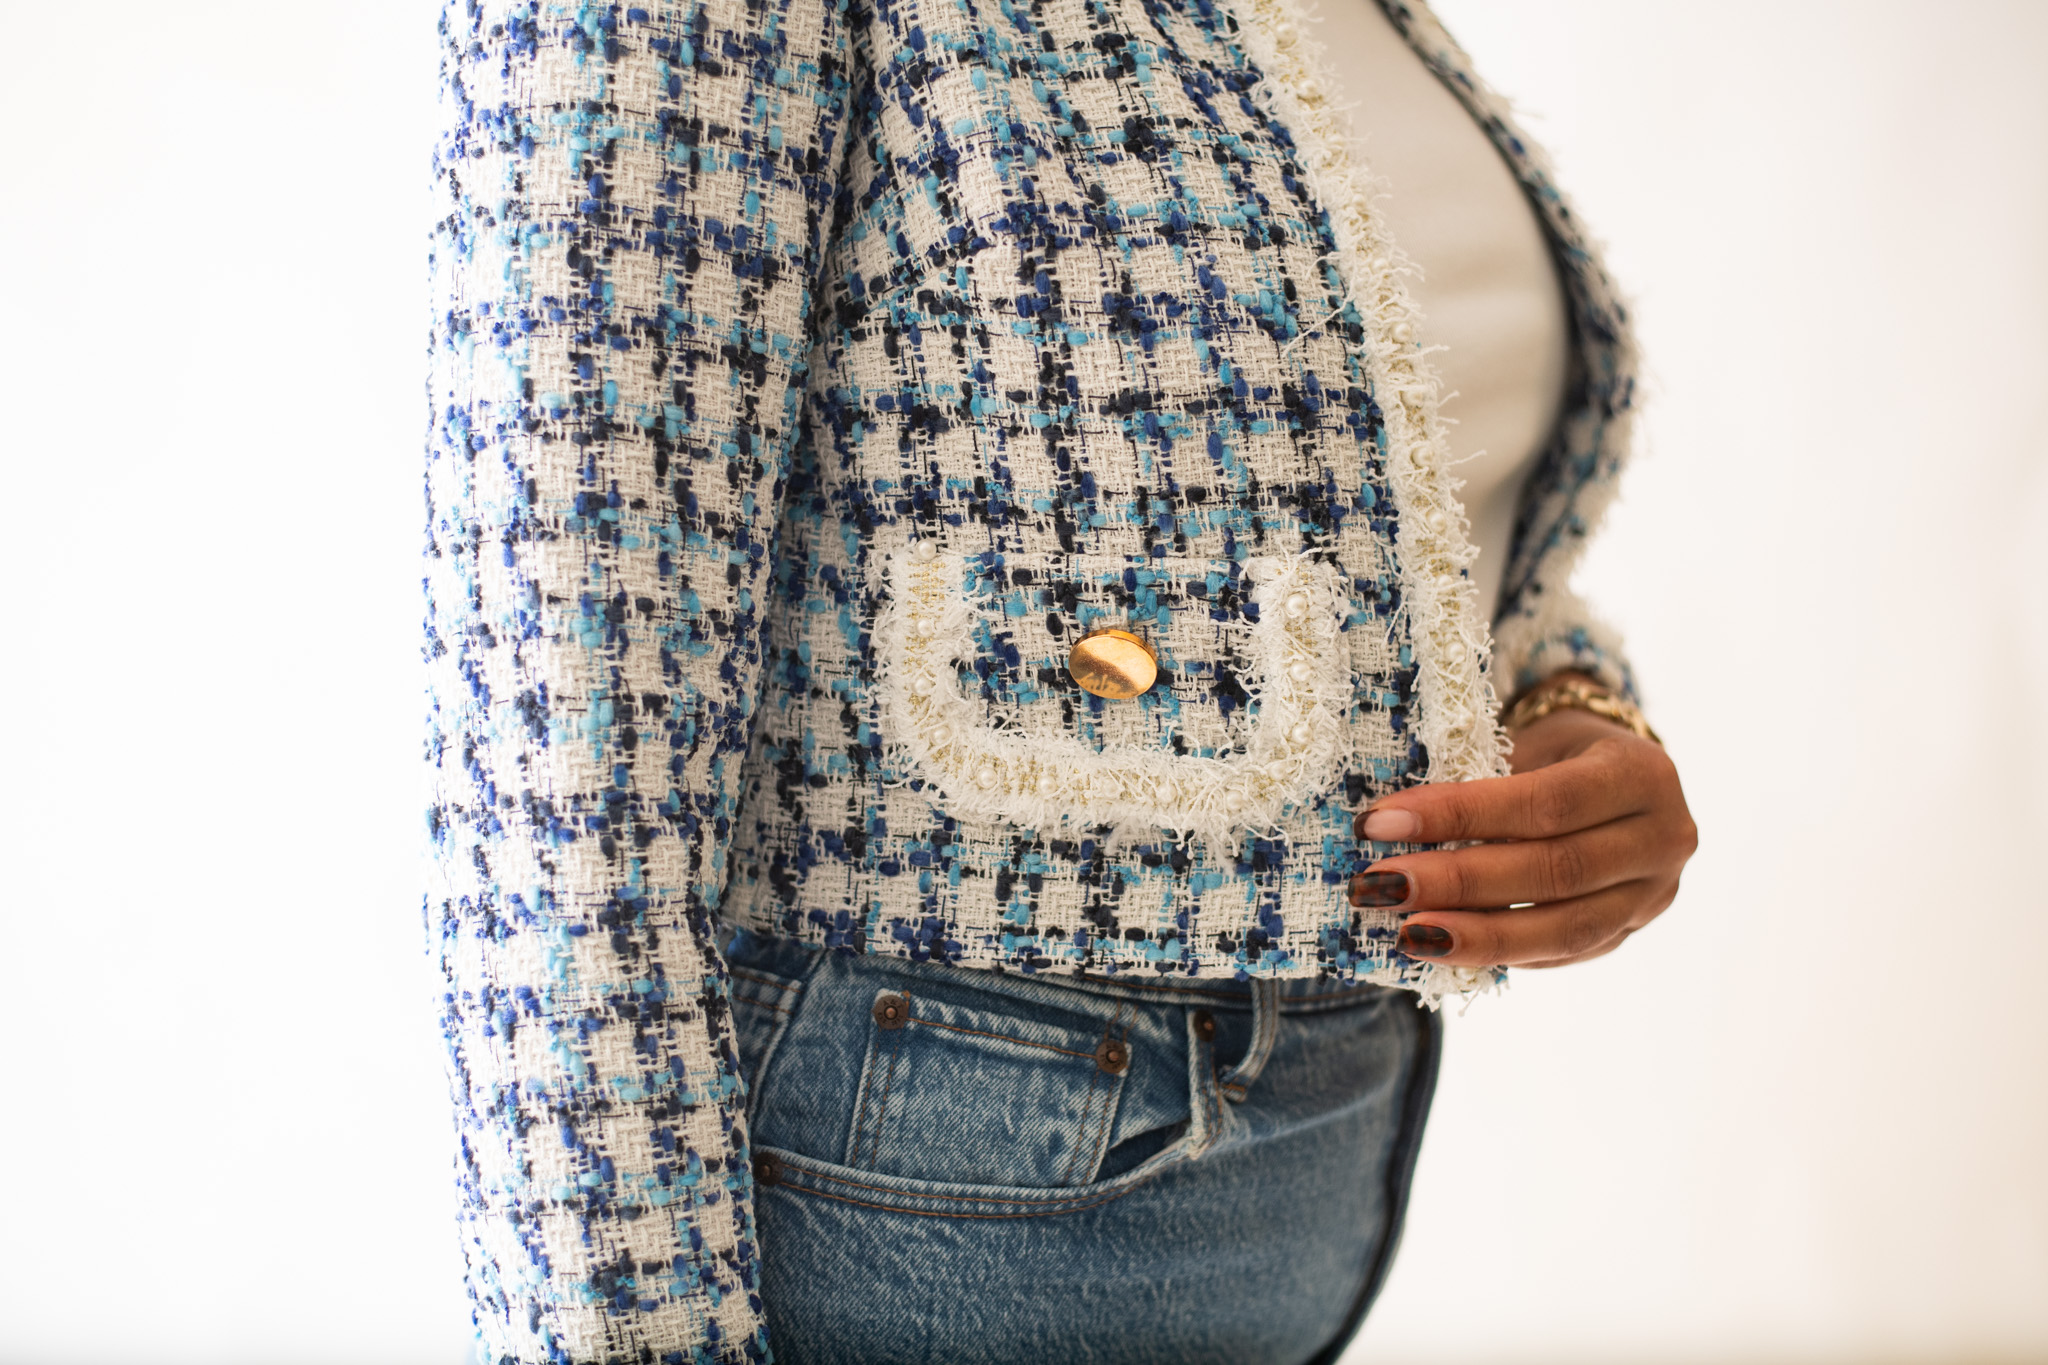
Dress yourself in icy shades of blue and white this winter with a chic cropped jacket pattern from Lauren Merciris. Made in luxe fabrics like bouclé and tweed, this stylish jacket sewing pattern features false pockets completed with beautiful buttons and can be lined with soft, dreamy fabrics such as satin or silk. Style your timeless jacket with a simple tee and jeans for an effortlessly fashionable look or glam it up by pairing it to your favorite fitted dress.
Designer Note: All the seam allowances are included: 1 cm/ 0.4 in.
Materials:
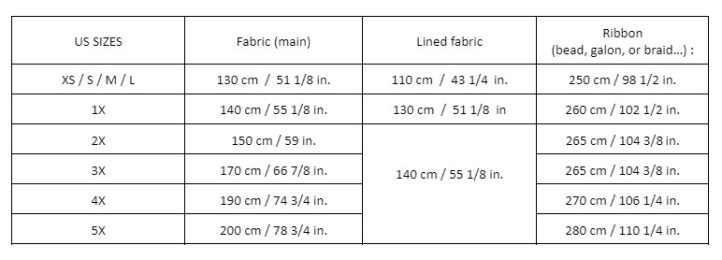
- Fabric and material requirements (fabric width 150 cm / 59 in.)
- Tweed, bouclé, jacquard, or wool (no stretch) for the main fabric
- Lining fabric (polyester, viscose, silk, or satin [no stretch]) for the lined fabric
- Button: 2 buttons of diameter from 15 mm to 20 mm/ (5/8 in. to 3/4 in.)
- PDF Pattern – This is located at the bottom of this page. Please see printing instructions below.
PRINTING INSTRUCTIONS:
Note: To download the pattern, click on the pattern download button at the bottom of the page. We recommend opening your pattern download using Adobe Acrobat.
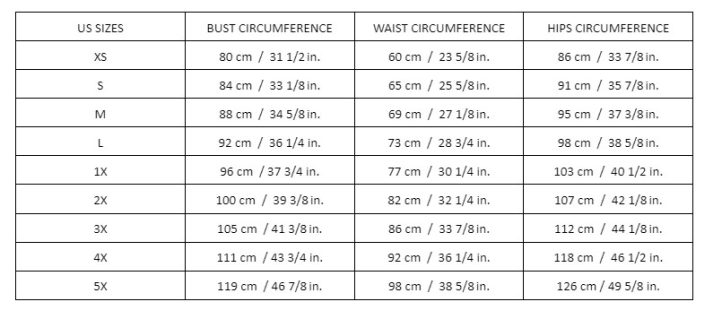
SIZE CHART (CMS/INCHES):
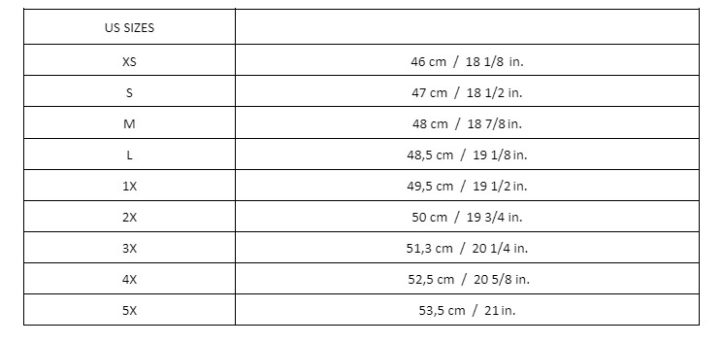
FINISHED GARMENT LENGTH (FROM SHOULDERS TO HEMLINE IN CM/INCHES):
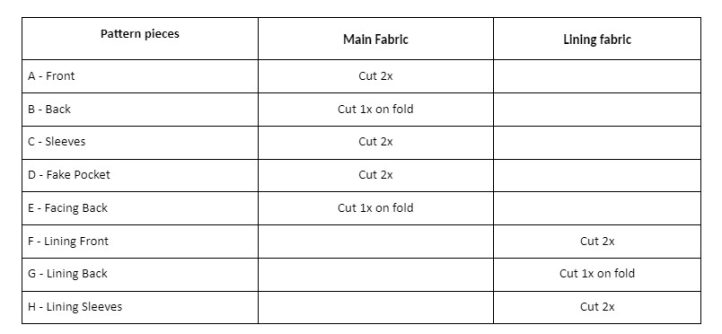
PATTERN PIECES:
Sewing Instructions:
CUTTING:
- Lay out the main fabric.
- For sizes XS and S:
- Fold the two selvage edges back to the middle of the fabric and adjust the width to obtain 1 fold on the left and 1 fold on the right (right sides together), one larger than the other.
- For sizes M to 5X:
- Fold the fabric along the selvage edges (right sides together).
- For sizes XS and S:
- Lay out the lining fabric.
- For all sizes:
- Fold the two selvage edges back to the middle of the fabric and adjust the width to obtain 1 fold on the left and 1 fold on the right (right sides together), one larger than the other.
- For all sizes:
- Lay out the pattern pieces on the fabric, respecting the grainline, and cut out each piece as many times as the pattern indicates.
- Mark the bust darts and other markers on the reverse side of the parts.
ASSEMBLING THE OUTSIDE OF THE JACKET:
Bust Darts:
- On the front (part A), match the two exteriors lines that form the bust darts, one on top of the other, right sides together.

- Pin the darts together.
- Sew each dart, starting from the side and ending at the stop mark (where the lines meet).
- To avoid marking the dart, close the dart by making a double hand knot with the remaining threads on the wrong side.
- Place the formed clip on the wrong side down and iron to flatten.
Fake Pockets:
- Form the fake pockets (part D) by carefully tucking the seam allowances inwards. You can use cardboard of the size of the template for the final pocket. Iron to flatten.

- Sew the braid around the pocket (bottom and sides).

- Position the fake pockets on the right side of the part A – Front, according to the marker.
- Lift the pocket up to access the top flap. Pin and sew in the fold.

- Fold the pocket down and pin all around (bottom and sides) from 2 to 5 mm / from 0.08 to 0.2 in. from the edge (depending on the fabric and the braid).

- Now hand-sew the button to the fake pocket marker (the 2 thicknesses together: fake pocket and front).
Joining Front and Back:
- Place the right side of the back jacket (part B – Back) in front of you.
- Place the wrong side of the 2 fronts (parts A) also in front of you.
- Join, pin and sew the shoulders at 1 cm / 0.4 in.
- Iron, spreading the seam allowances.
Sewing Braid:
- Turn the facing of parts A- Front inwards, following the mark, and iron to mark the fold.
- Leave the facing open.
- Position the ribbon or braid along this line on the right side about 1 to 2 cm / 0.4 to 0.8 in. from the edge of the marked fold of the facing (depending on the width of your braid), starting at the bottom.
- Once at the neckline, make a right angle or 90° rounding to extend the ribbon to the front neckline, then to the back neckline, and then back to the other front neckline. Repeat the 90° angle or rounding and work your way down to the bottom.

Sewing of Facing (Neckline):
- Now join the facing back (part E) with the shoulders of the 2 front facings right sides together.
- Pin and sew at 1 cm / 0.4 in.

- Iron, spreading the seam allowances.
- Turn over the facing and place facing right sides together on the front neckline and pin all around the neckline.
- Sew 1 cm / 0.4 in. apart, taking care not to sew over the edging braid.

- Edge and trim the seam. (If you’ve sewn a fringed braid, be sure to highlight any fringe caught in the seam on the right side before notching and trimming the seam allowance).
- Turn right side out, making sure the top front corners stand out, and iron to flatten.
Side Seams:
- Join, pin and sew the sides of the jackets together at 1 cm / 0.4 in.
- Iron, spreading the seam allowances.
Sleeves:
- Gather the top of the sleeves (part C) according to the markings.
- Place the braid right sides together, about 1 to 2 cm / 0.4 to 0.8 in. (depending on the width of your braid) above the hem marker on the bottom of the sleeves.
- Close the sleeves by sewing each sleeve right sides together.
- Iron, separating the seam allowances.
- Turn the sleeve right side out and the jacket inside out.
- Insert sleeves into their respective armholes (respecting the markings) and pin all the way around the armhole (aligning the seams and notches).

- Sew the entire armhole right sides together.
- Press carefully.
ASSEMBLING THE LINING:
Bust Darts:
- On the front lining jacket (part A), match the two exterior lines that form the darts, one on top of the other, right sides together.
- Pin the darts together.

- Sew each dart, starting from the side and ending at the stop mark (where the lines meet).
- To avoid marking the dart, close the dart by making a double hand knot with the remaining threads on the wrong side.
- Place the formed clip on the wrong side down and iron to flatten.
Ease Fold Back Lining:
- Fold the lining back (part G) wrong sides together.
- Form an ease fold by sewing the lining to the lines at the top and bottom of part G.

- Open the lining back and press the fold to the right side of the lining, centered over lines.

Assemble the Front and Back Lining:
- Place the right side of the back lining jacket (part G) in front of you.
- Place the wrong sides of the 2 fronts lining jacket (part F) also in front of you.
- Join, pin and sew the shoulders and the sides together at 1 cm / 0.4 in.
- Iron, spreading the seam allowances.
Lining Sleeves:
- Gather the top of the sleeves (part H) according to the markings.
- Close the sleeves by sewing each sleeve right sides together, leaving an opening of 20 cm / 8 in. (see circle marks between in the seam allowance).

- Iron, spreading the seam allowances (flatten the margins of openings as well).
- Turn the lining sleeves right side out and the lining jacket inside out.
- Insert the lining sleeves into their respective armholes (respecting the markings) and pin all the way around the armhole (aligning the seams and notches).
- Sew the entire armhole right sides together.
- Press carefully.
ASSEMBLING THE LINING AND THE JACKET:
Assembling the Bottom and Along the Facing:
- Tuck in 5 cm / 2 in. as shown by the Hem marker on the front and back of the outer jacket and tuck in 1 cm / 0.4 in. on the bottom of the facings.
- Iron to mark.
- Turn the front facing inside out and sew the right side of the lower front facing to the right side of the jacket at 1 cm / 0.4 in. (in the marked fold), leaving 1 cm / 0.4 in. unstitched towards the inside of the jacket.

- Make a scissor cut along the marker (from the corner to the bottom start of the facing fronts seams).

- Place the bottom of the lining right sides together over the entire bottom of the jacket (at the edge of the hem).
- Pin in place, making sure to match the side seams. Sew at 1 cm / 0.4 in.
- Make a 1 cm / 0.4 in. fill with the lining on the same margin on each side of the jacket and stitch to hold at 5 mm / 0.2 in. from the edge. (This operation prevents the lining from pulling on the bottom of the jacket).
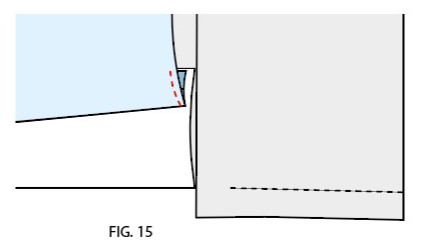
- Now turn the bottom fabric to align the front lining and front facing vertically and sew the two fronts together (stop at the shoulder seams).
- Do the same seam with the front of the other side.
Assembling the Back Together:
- Through the sleeve openings, grasp and pull the top of the lining and the facing back so that they are right sides together.
- Pin the entire back neckline and sew at 1 cm / 0.4 in.
- Trim bottom corners and/or seam allowances if necessary.
- Iron carefully the jacket.
Assembling the Sleeves Together:
- Insert each sleeve lining correctly (without twisting) into each jacket sleeve.
- Pass your hand through one of the sleeves and through the hole left in the lining, pick up the bottom of the lining and the bottom of the jacket sleeve.
- Gently slide them (while holding them pinched together) out of the opening to gain access. Position the lining and outer hems edges together, right sides together, respecting the seams, and pin all around the sleeve.
- Sew 1 cm / 0.4 in. from the edge.
- Repeat for the second sleeve.
- Trim seams if necessary.
- Make the sleeves stand out on the outside.
- Position sleeves and press to hold inner hem in place.
- From inside the jacket, gently pull each sleeve lining to close the opening left in each sleeve.
- Pin the openings edge to edge and sew 2 mm / 0.08 in. from the edge.
Finishing:
Optional: Sew a small invisible holding seam in the side seams to ensure that the hem stays together. This operation can also be performed on the sleeve hem seam.


I can’t wait to try some of these ideas! Audrey