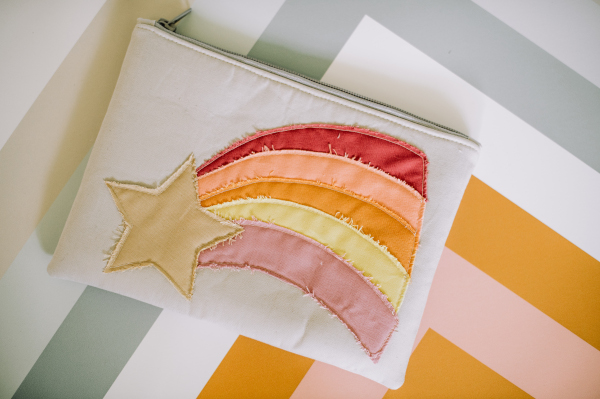
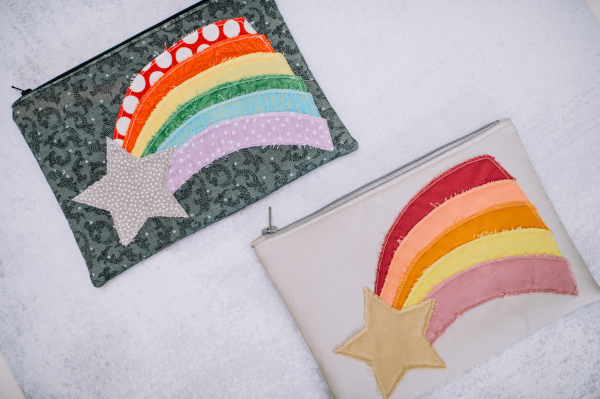
Make your little ones feel like a star student with this adorable zipper pouch! Perfect for holding pencils, erasers, and other school must-haves, this back-to-school sewing project uses raw edge applique to give your zipper pouch some fun texture. This small project fits perfectly into desks or backpacks and can be customized with your child’s favorite color. Get your kids excited for fall with their own personalized back-to-school gear.
Finished Size: Bag 10” wide x 7” tall
Skill Level: Beginner
Materials
- Fabric Requirements
- Scrap piece of fabric measuring at least 7” x 3” or 1/8 yd for each color of the rainbow stripes
- One scrap of fabric measuring at least 4” x 4” or 1/8 yd for the star
- 1/4 yd OR One fat quarter for the exterior
- 1/4 yd OR One fat quarter for the interior
- 1/2 yd medium weight fusible interfacing (Pellon SF-101)
- 1/2 yd fusible fleece interfacing (Pellon 987F)
- Supplies/Tools
- 9” zipper
- Sewing Machine with a zipper foot
- Iron/Ironing board
- One spool of coordinating all-purpose thread
Notes
- 1/4″ seam allowance unless otherwise noted
Fabric Used in Sample
- All Kona Cotton fabric from Robert Kaufman
- Exterior – Ash
- Interior – Deep Rose
- Star – Latte
- Stripes – Deep Rose, Creamsicle, Amber, Banana Pepper, Foxglove
Instructions
Cut Fabrics
- Cut one star from template
- Cut 5-6 stripes from chosen fabrics from template
- Cut 2 exterior panels 10.5” x 7.5”
- Cut 2 interior panels 10.5” x 7.5”
- Cut 2 zipper tabs from exterior fabric – 2” x 2” each
- Cut 4 medium weight fusible interfacing 10.5” x 7.5”
- Cut 2 fusible fleece interfacing 10.5” x 7.5”
Apply Interfacing
- Apply one piece of medium weight interfacing to the wrong side of the exterior and interior panels according to manufacturer’s instructions.
- Apply fusible fleece to exterior panels on the wrong side according to manufacturer’s instructions.
Assemble Front Raw Edge Applique
- Lay out rainbow stripe pieces on one exterior panel. The left side of the stripes should overlap 1/2” – 5/8”, the right side of the stripes should overlap between 1/8” – 1/4”. This will give a wider rainbow along the right side and a tighter rainbow along the left side. The right side of the rainbow should be about 1” – 1.5” from the right raw edge of the exterior panel. Temporarily place the star along the left side of the rainbow to make sure it covers up all sides of the rainbow, remove the star for now.
- Top stitch along the outside edge of each stripe 1/8” from the raw edge, backstitch at the beginning and end.
- Place the star on top of the left side of the rainbow, covering up all edges. Top stitch around the star pivoting at each corner. Backstitch at the beginning and end.
- The edges will naturally fray over time; you can gently rub your finger or nail along the edge to get them to fray quicker.
Prepare Zipper
- Fold zipper tabs in half WST (Wrong Sides Together), press.
- Open up the tabs and fold the raw edges inside to meet the crease from the first press. Fold again along the original crease to enclose the raw edges.
- Trim your zipper to 9”, slip the zipper tab over the short, raw edge of the zipper and topstitch along the edge closest to the zipper teeth. Repeat for other zipper tab.
Insert Zipper
- Lay the front exterior panel RS (Right Side) up on your work surface. Lay the zipper with tabs attached RS facing down, centered on top of the exterior panel. Lay one interior panel RS down on top of the zipper, match edges and pin or clip in place.
- Using your zipper foot sew along the top edge, close to the zipper. Move zipper pull as needed.
- Fold back both panels away from your zipper and press. Make sure all edges are out of the way of the zipper teeth.
- Top stitch 1/8” from the edge along the zipper
- Repeat step 5 for the other edge of the zipper and the back exterior and remaining interior panel.
- Unzip your zipper at least half way
Assemble Your Zipper Pouch
- Place your exterior panels RST (Right Sides Together) and your interior panels RST. Make sure seams and edges meet and zipper is folded towards the interior of the zipper pouch. Pin or clip around all four edges.
- Sew around the all four edges leaving a 4” – 6” gap along the bottom of the interior panels. Backstitch at both ends.
- Clip corners and turn pouch right side out through the hole along the interior panels. Gently push out corners.
- Sew the hole in the interior panel closed by hand or with a tight edge stitch.
- Push interior inside the exterior and push out corners and press as needed.

This pattern has only one page. Why don’t I see the other pages?
Hi Lina! Thank you for your comment. The PDF is only one page. Patterns on our site are not available to be downloaded in full. You can, however, print off the instructions by hitting the print icon or Ctrl+P. Please let us know if you have any questions. – Ashley, We Like Sewing
I would like to make the Shooting Stars Rainbow Zipper Pouch but cannot find the template for it anywhere. It says you have to be a gold member. According to my profile it looks like I am. I even put in the title with template in the search bar. No template! Please help as this would make great Christmas gifts for my niece.
Hi Teddie! Thank you for your comment. Your Gold Club membership to We Like Sewing expired in 2024. The PDF pattern is available for active Gold Club members only. Please let us know if we may further assist you. Have a great day! – Ashley, We Like Sewing