
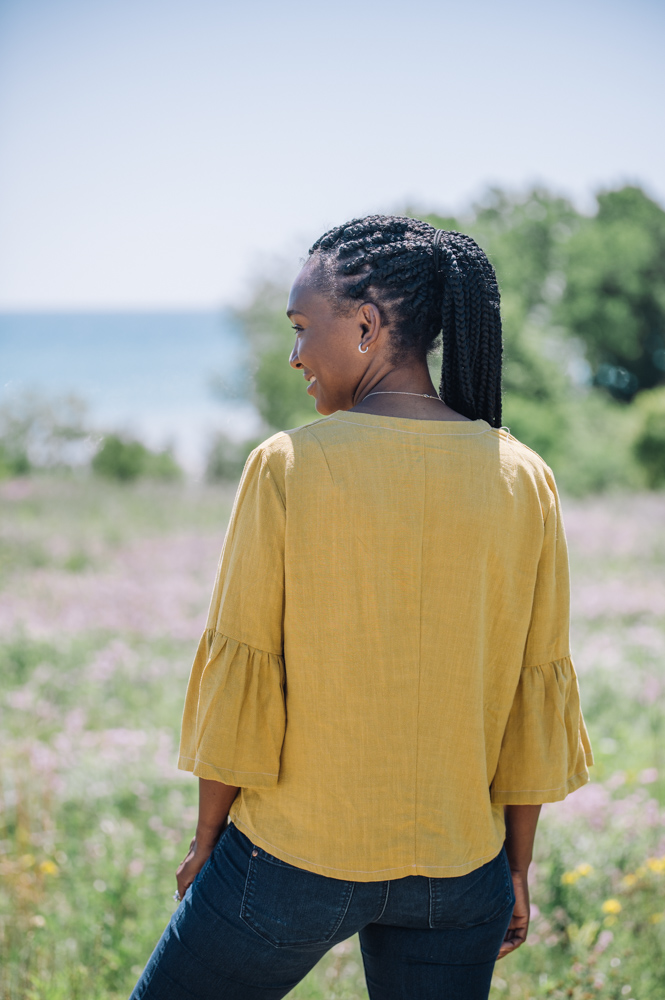
Vintage vibes meet modern design with this chic and comfy top pattern. This loose-fit top is incredibly figure-flattering and is a great transition piece for your wardrobe, so that you can go from summer to fall effortlessly. Design your top in light to medium weight woven fabrics, such as chambray for day wear or satin for a glam evening look. This sewing pattern is recommended for advanced beginners and can be customized with either short or longer sleeves, so that it perfectly fits your personal style.
Skill Level: Easy
Sizes: 4 to 30
Materials
- 1 1/2 to 1 3/4 yards of light to medium weight woven fabric
- Coordinating thread
- Regular needles
- 1/4 yard of fusible interfacing
Notes:
- Recommended fabrics: Light to medium weight woven fabric such as lawn, viole, chambray, satin, or challis.
- This top has a loose fit with a moderate v-neckline.
- The top features a high hip length.
- The pattern has a gathered peplum and gathered sleeves to create a boho style.
- The patterns have 4″ ease at bust point for the top.
Fabric Preparation
- Wash your fabrics before cutting to prevent shrinking.
- It is recommended to make a muslin or use a cheap fabric to check that the fitting and style of the pattern is exactly what you are looking for.
Before You Begin
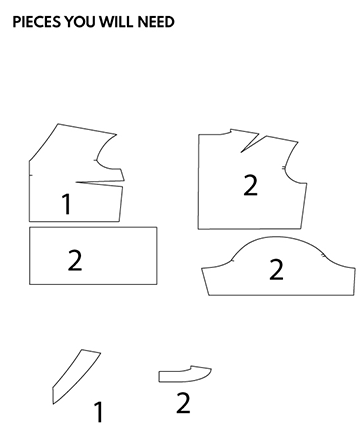
- Pieces you will need for this tutorial
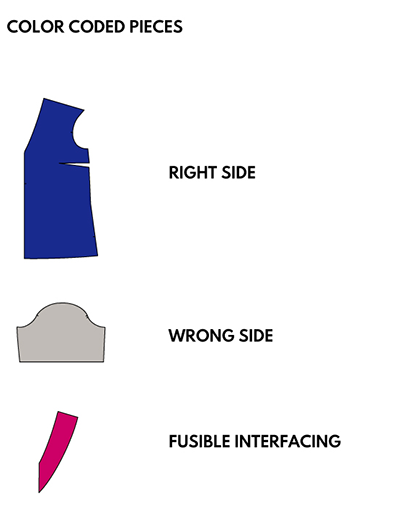
- Color coded pieces to read this tutorial. Throughout this tutorial, you will see two main colors on each pattern piece. This will help you easily identify the side of fabric or piece you are working with. Here is the legend:
Sewing Instructions
1. Fold the ends of each shoulder dart legs together and stitch towards the point. Change to a very short stitch length about 1/2” from the point and continue stitching to the point. Press the darts towards the center back.
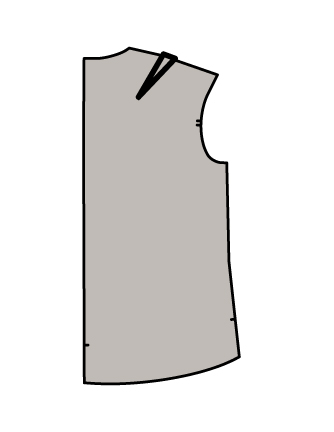
2. Gather the back bodice pieces and place them together from the center back, right sides facing. Pin the pieces together.
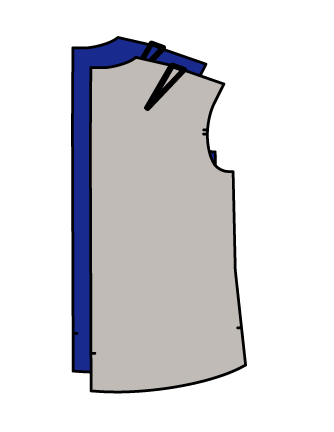
3. Now stitch the center back with a 3/8″ seam allowance. You can use a serger or an overlocking stitch for a clean seam finishing. Then press the seams open flat.
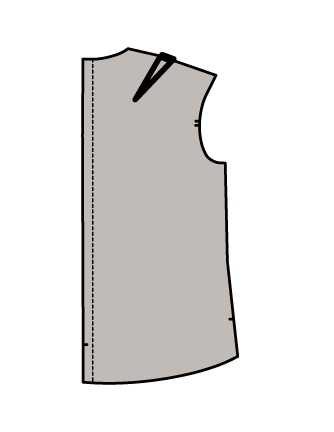
4. Open the back bodice and press the seams flat again.
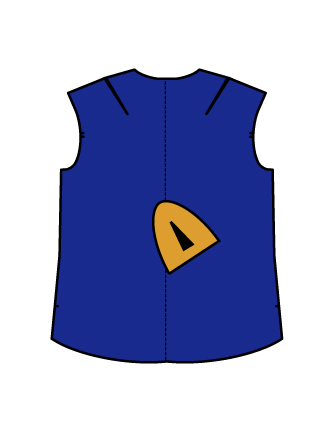
5. Fold the ends of the bust dart legs together and stitch towards the point. Change to a very short stitch length about 1/2” from the point and continue stitching to the point. Press the darts towards the bottom.
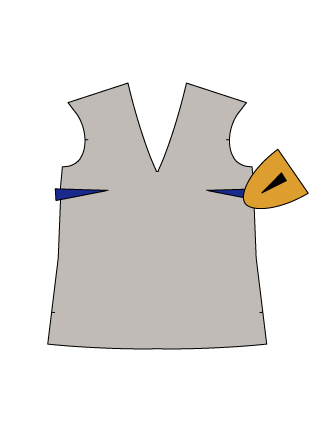
6. Place front and back bodices together, right sides facing. Match the shoulder and side seams and pin them with a 3/8″ seam allowance.
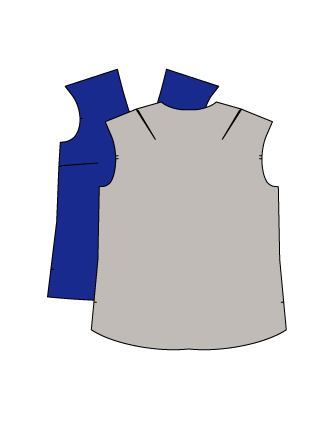
7. Now, stitch the shoulder seams and side seams with a 3/8″ seam allowance. Press seams flat.
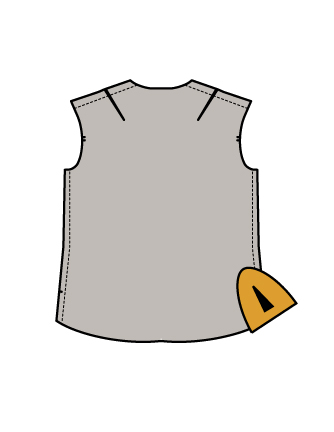
8. Fuse interfacing to the wrong side of the front and back facings.
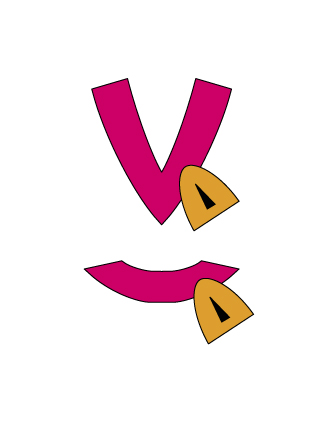
9. Stack the facings together, right sides facing, at the shoulders. Stitch the facing shoulder seams with a 3/8” seam allowance. Press the seams flat. Finish the raw bottom edge of the facing with a serger or an overlocking stitch.
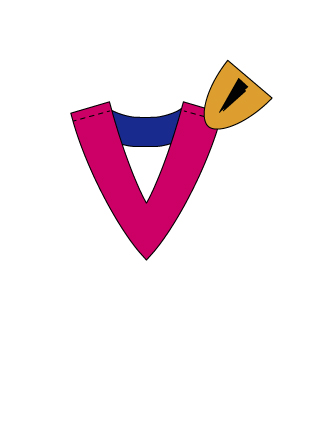
10. Pin facing and the top’s neckline together matching centers and shoulder seams. Stitch facing to neckline with a 3/8” seam allowance.
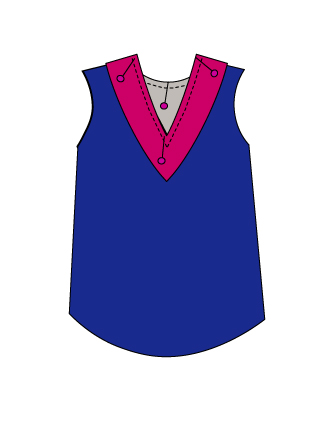
11. Trim away a small ‘V’ from the center front seam allowance. Make sure to not clip the stitching line. Trim facing seam allowance down to 1/4”, then press the facing to the inside of the top.
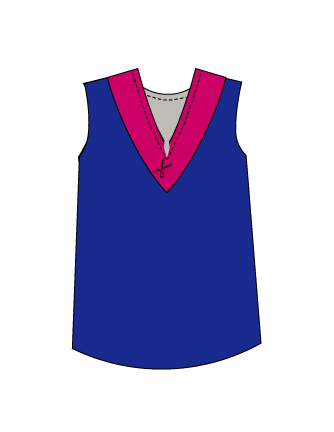
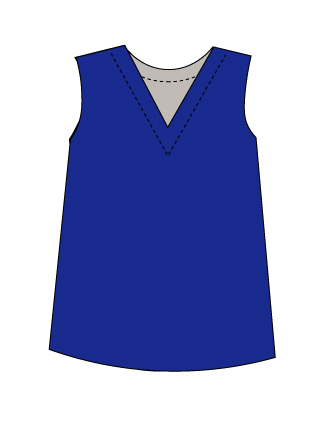
12. Stitching from the right side of the top, stitch the facing down using a straight stitch 1/8” from the finished edge of the facing.
13.
-
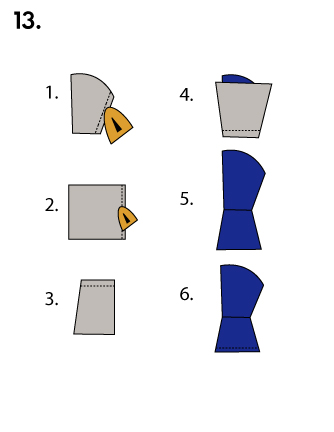
- Fold the sleeve in half. Then, stitch the seam with a 3/8″ seam allowance. Press seam flat.
- For the gathered bottom, fold the bottom part and stitch the side seam with a 3/8″ seam allowance.
- Hand stitch the top part and create some gathering. Adjust as needed.
- Insert the bottom of the sleeve into the main sleeve piece. Stitch the bottom with a 3/8″ seam allowance.
- Turn to the right side and press flat.
- Finally, stitch the hem with a 3/8″ seam allowance and press.
14. Turn the sleeves to the right side and insert them into the bodice. Match the armhole notches and armhole seam with the bodice side seams.
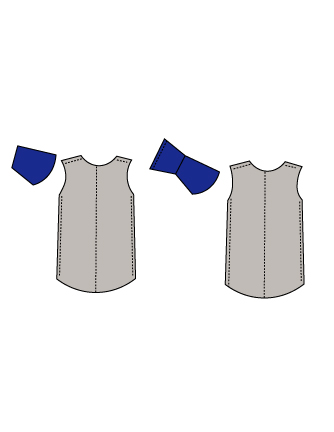
15. Then, stitch the sleeves to the bodice with a 3/8″ seam allowance. Press seams towards the sleeve.
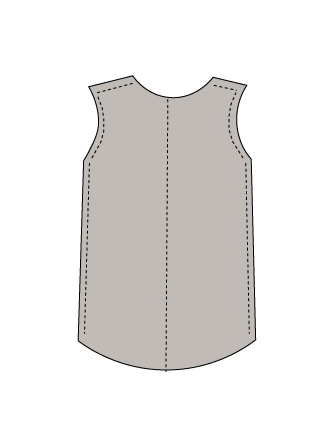
16. Turn the sleeves to the right side of fabric and press flat.
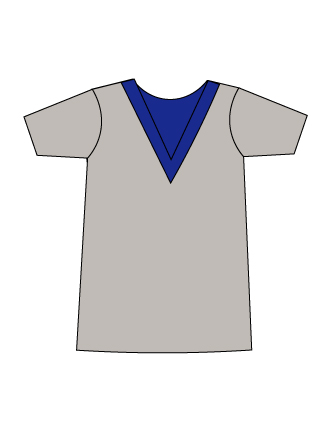
FOR THE SHORT SLEEVE VERSION
1. Double fold the cuffs 1/2″ towards the wrong side and press. Finish the cuffs with a straight stitch close to the pressed fold.
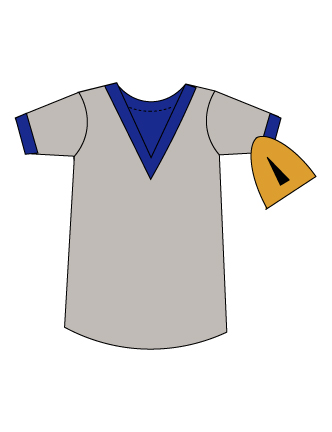
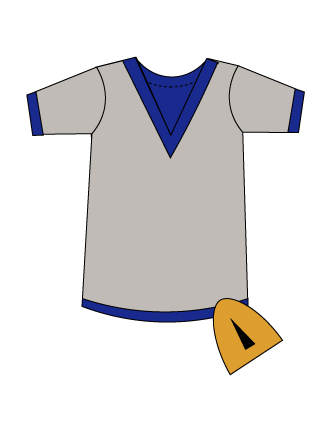
2. Double fold the hemline with a 1/4″ seam allowance first and a 1 inch seam allowance after. Press the hemline and stitch it with a straight stitch and 1/8″ from the pressed edge. After stitching the hemline, press flat again.




I have never tiled a pattern together. I was looking for directions on how to do it and I didn’t see any in the pattern directions. Where can I find them or can you tell me how to put the sections together?
Hi Valerie! If you look at the printable pattern, each page is numbered; this is the numerical order of the pages. Match up the triangles on the side of the pattern pieces. If you look at Daniela’s Savannah Button-Down Sundress Pattern (also on our site), she shows you how to piece the tiled pages together in a diagram titled Printed Pattern Layout. Let us know if you have any questions! – Ashley, We Like Sewing
Hi, I’m new to sewing clothing so bear with me. The pattern looked like I should cut out the shoulder and front darts along the line that I used everywhere else, so I did. To sew them, do I sew a 3/8″ seam allowance all along the dart line, not tapering to the point to close it? The instructions don’t explain how to go about it. I’m working with a muslin to figure it out. Thanks for any explanation.
Hi Dawn! Thanks so much for your question. We’ll reach out to the designer for an answer and will comment and update the instructions as soon as we have more info. Have a great day! – Ashley, WeLikeSewing
Hi Dawn! According to the designer, yes, you should apply a 3/8 inch seam allowance to stitch the dart. Please let us know if you have any questions! – Ashley, WeLikeSewing
Is there a place where I can find the size with added ease? Do these run larger or smaller?
I saved it as a download. The wording comes in as eastern europe. I have tried to change it to the USA choice but it does not come up. I always have trouble with things that come in as Eastern Europe. any suggestions.
Hi Connie! We’re so sorry about this. That definitely should not be happening, and I will pass it along to our team for insight. The pattern download opens for me in English. Is this something you have been experiencing with other patterns on the site? Please let us know. Thanks so much! – Ashley, WeLikeSewing
How can I download the pattern for this top?
Hi Susan! The pattern for this project is located at the bottom of the pattern page and is available for our Gold members. We recommend opening the PDF download using Adobe Acrobat and printing from there. Please let us know if you have any questions. – Ashley, WeLikeSewing
Is there a way to print the instructions in one area?
Hello there! If you want to print specific pages of the pattern, you should be able to do so. Download the pattern and open it using Adobe Acrobat. Click on “File”, and then “Print”. In the “Pages to Print” section, you can select the specific pages you’d like to print off. Hope this helps! – Ashley, WeLikeSewing
Hi folks! I paid $10.00 a number of months ago to join some part of this magazine. Due to many twists and turns my life has taken, I haven’t the foggiest idea of what I am supposed to receive from this $10.00 subscription. Perhaps with my name and email you can find me. If i must i can probably find the month i signed up.
Mary Ann Evanoff
Hi Mary Ann! With your subscription, you should receive access to our patterns and magazine issues, collections, videos, and more. Our customer service can help you set up an account with our site if you need it, and can answer any specific membership questions. You can contact customer service by clicking on the ‘Contact Us’ link at the bottom of our homepage. Please let us know if you have any questions! – Ashley, WeLikeSewing
Can you buy this pattern in the traditional pattern pkg via mail? TIA.
Hi Judy! Thank you so much for your question. Because we are a digital magazine, our patterns are made to be downloaded and printed at home, so we unfortunately do not offer traditional paper patterns at this time. Let us know if you have any other questions! – Ashley, WeLikeSewing
excellent
What do you suggest when printing pages in a typical true size pattern? Would that be special size paper ? And do I have to tape pages together ?
Hi Cindy! Patterns from this designer are available in A4 and Letter options (This will make it easier to assemble and reduce fitting issues.) And yes, to assemble the pattern, overlap the pages 1/2 inch, then match triangles together. You can tape this pattern together and then within the PDF download, the designer provides how to layout the pattern pieces. Hope this helps! – Ashley, WeLikeSewing
Was never given a chance to set a password.
Hi Linda! If you’re having issues with passwords, please contact our customer service team for additional help. If you scroll to the bottom of our homepage, you’ll find a “Contact Us” link; just shoot them an email and our team will help you set a password. Have a great day! – Ashley, WeLikeSewing
I just signed up for this and wasn’t give a password. Today I clicked on the Set a New password link and received an email that provided me a link where I could set a password. It’s the process you use when you’ve forgotten your password but it worked for me.
I signed up as a gold member. How do I download the patterns!
Hi Wendy! At the bottom of each project page (below the additional images), you should see a button to click to download the pattern. These should pop up in your browser with an option to save the PDF or download it. If you don’t have Adobe Acrobat, we recommend downloading the free version to your computer; it’s easy to print off the patterns from there. Hope this helps! – Ashley, WeLikeSewing