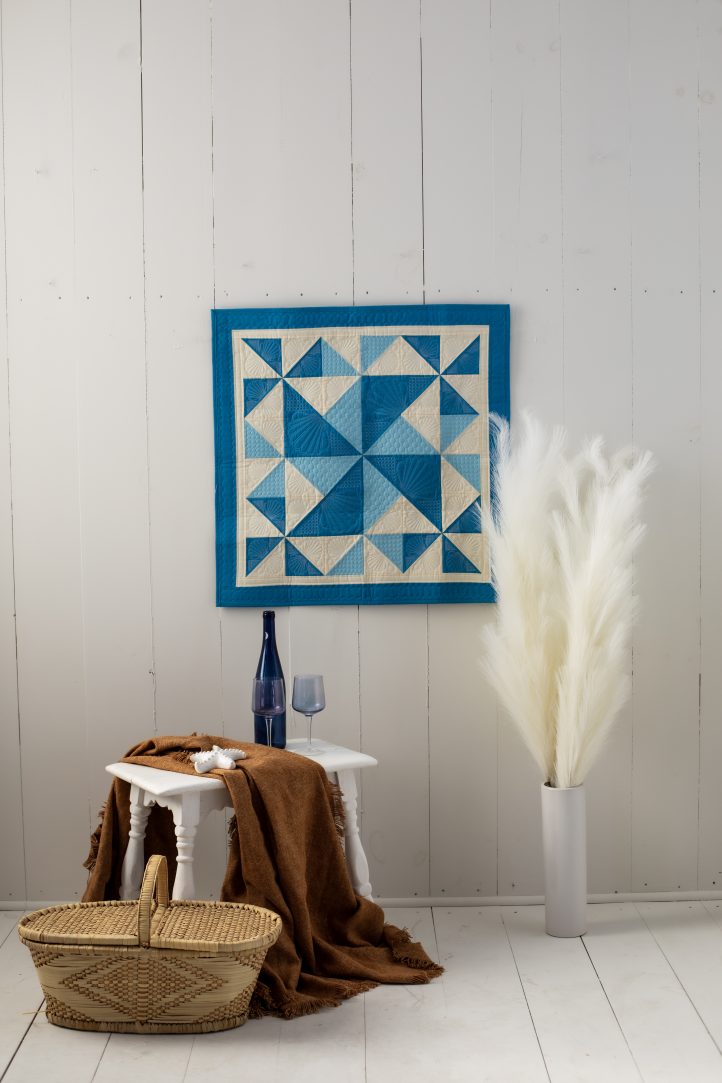
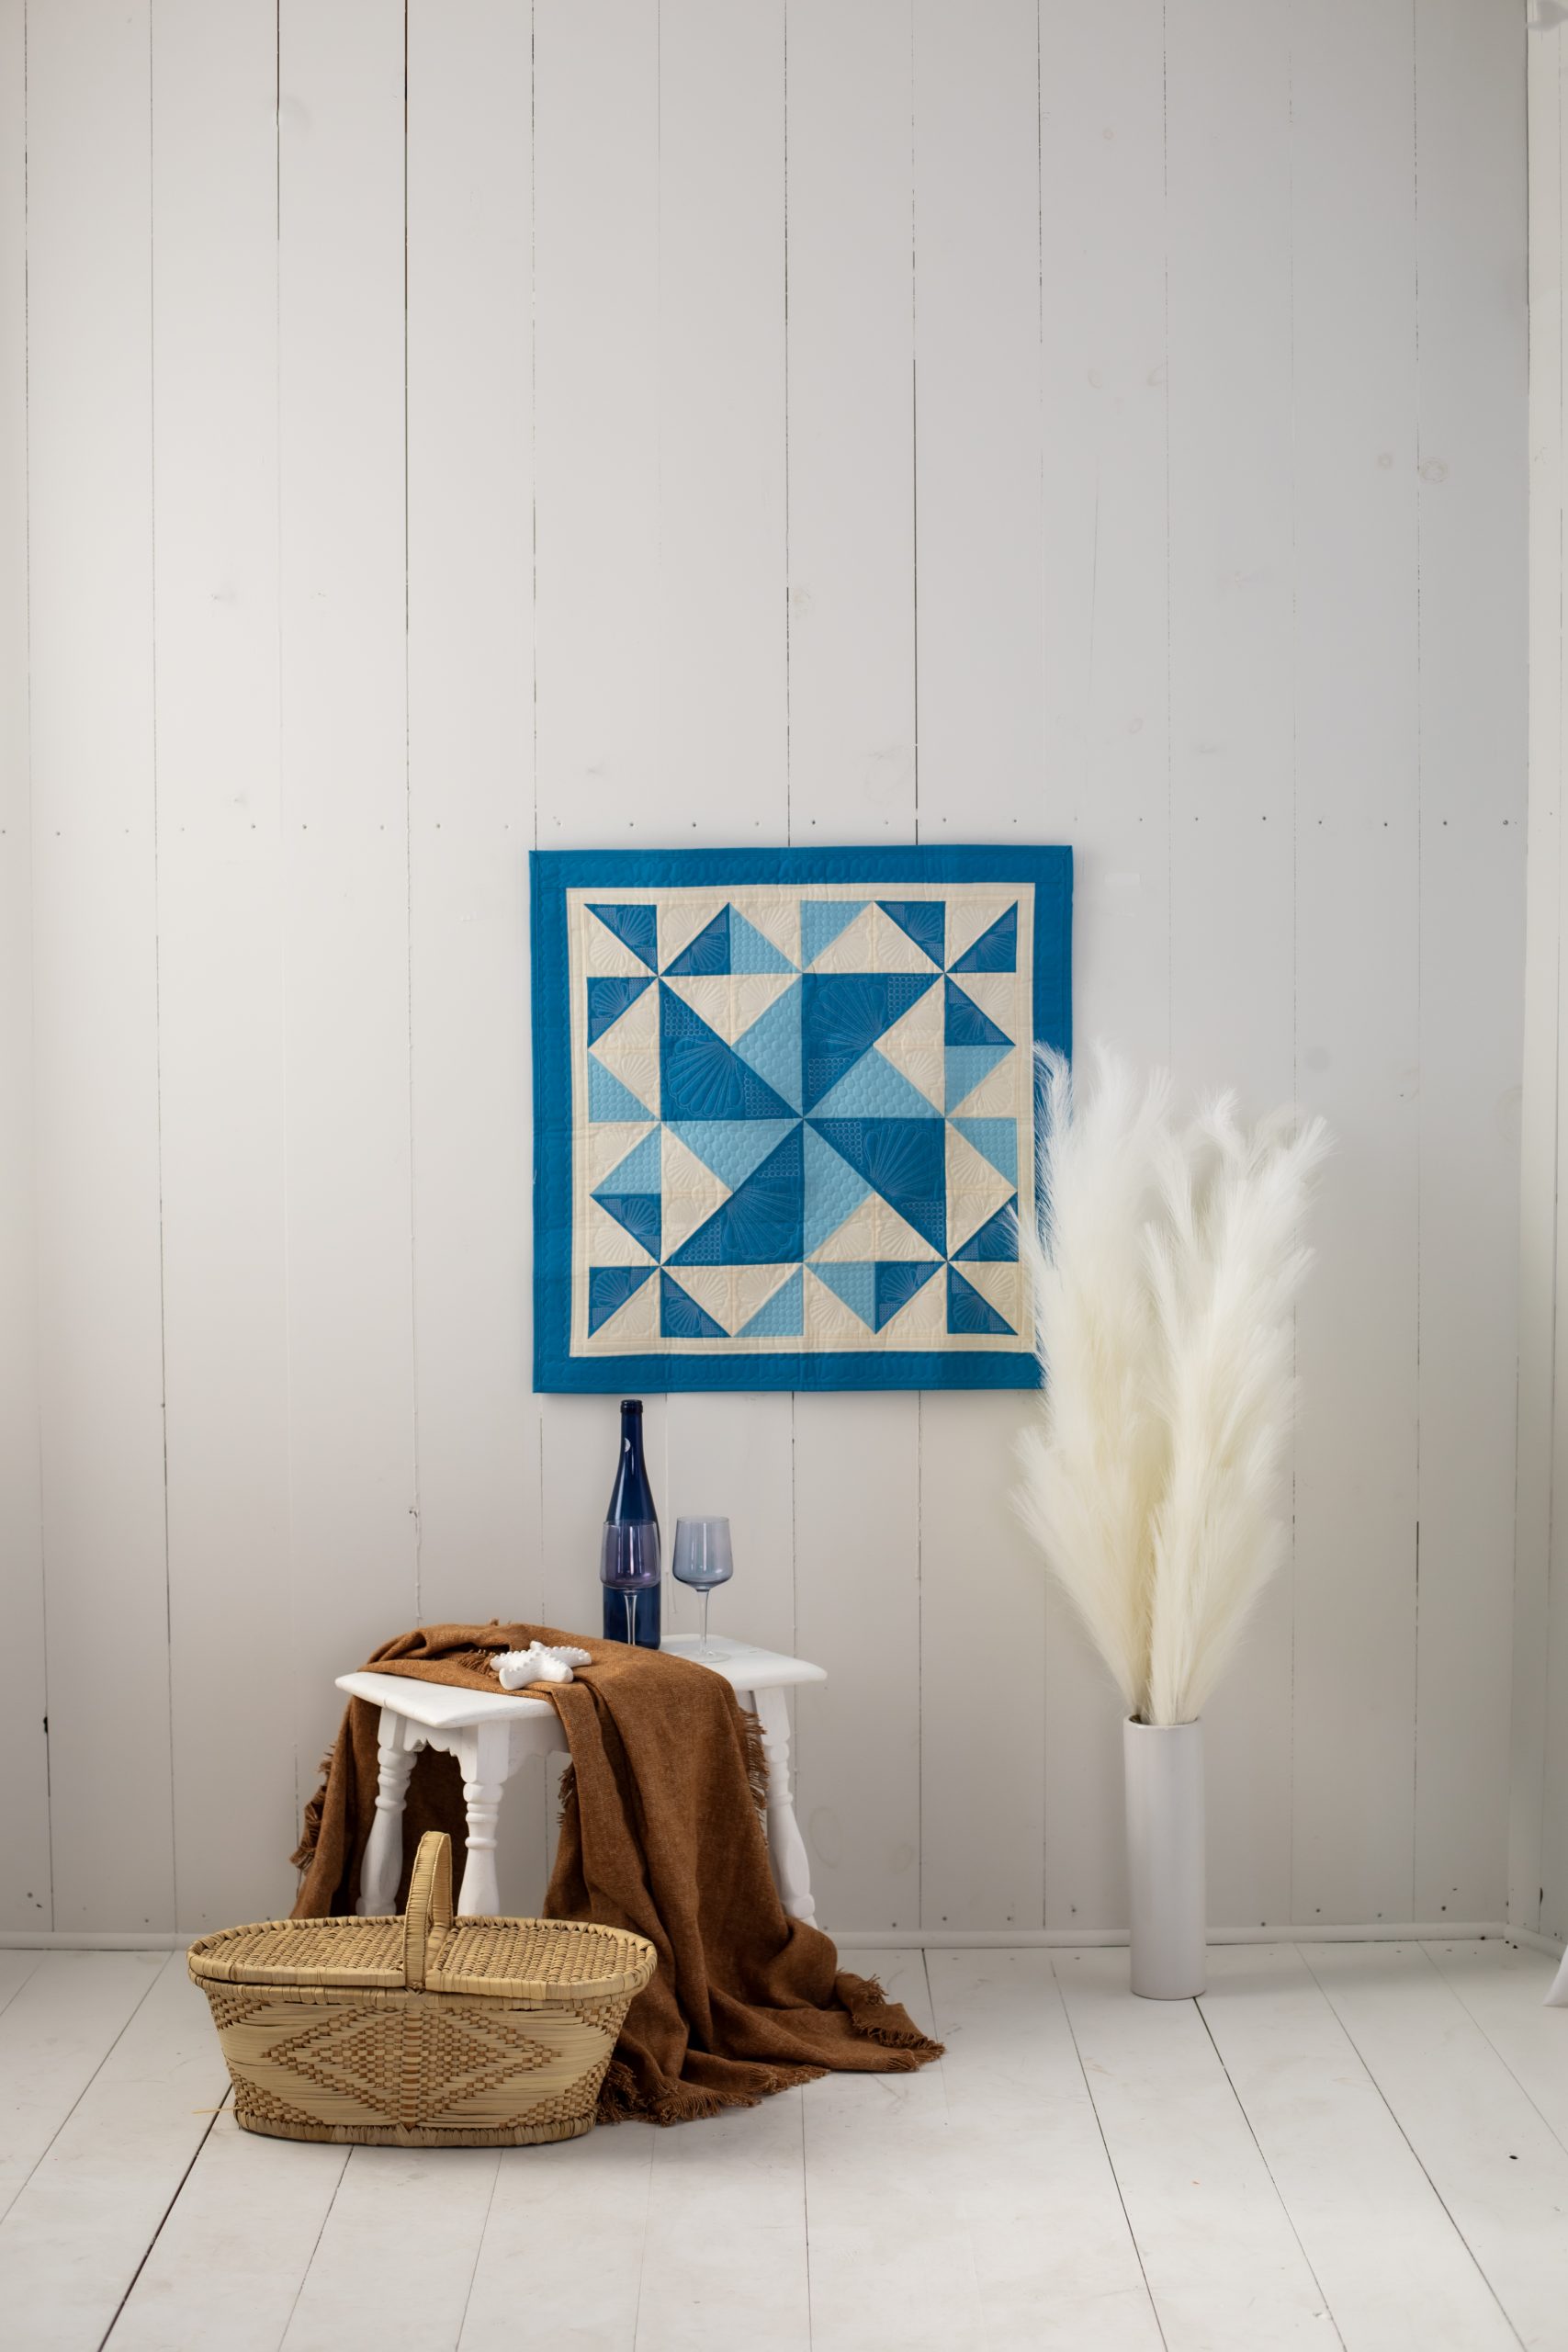
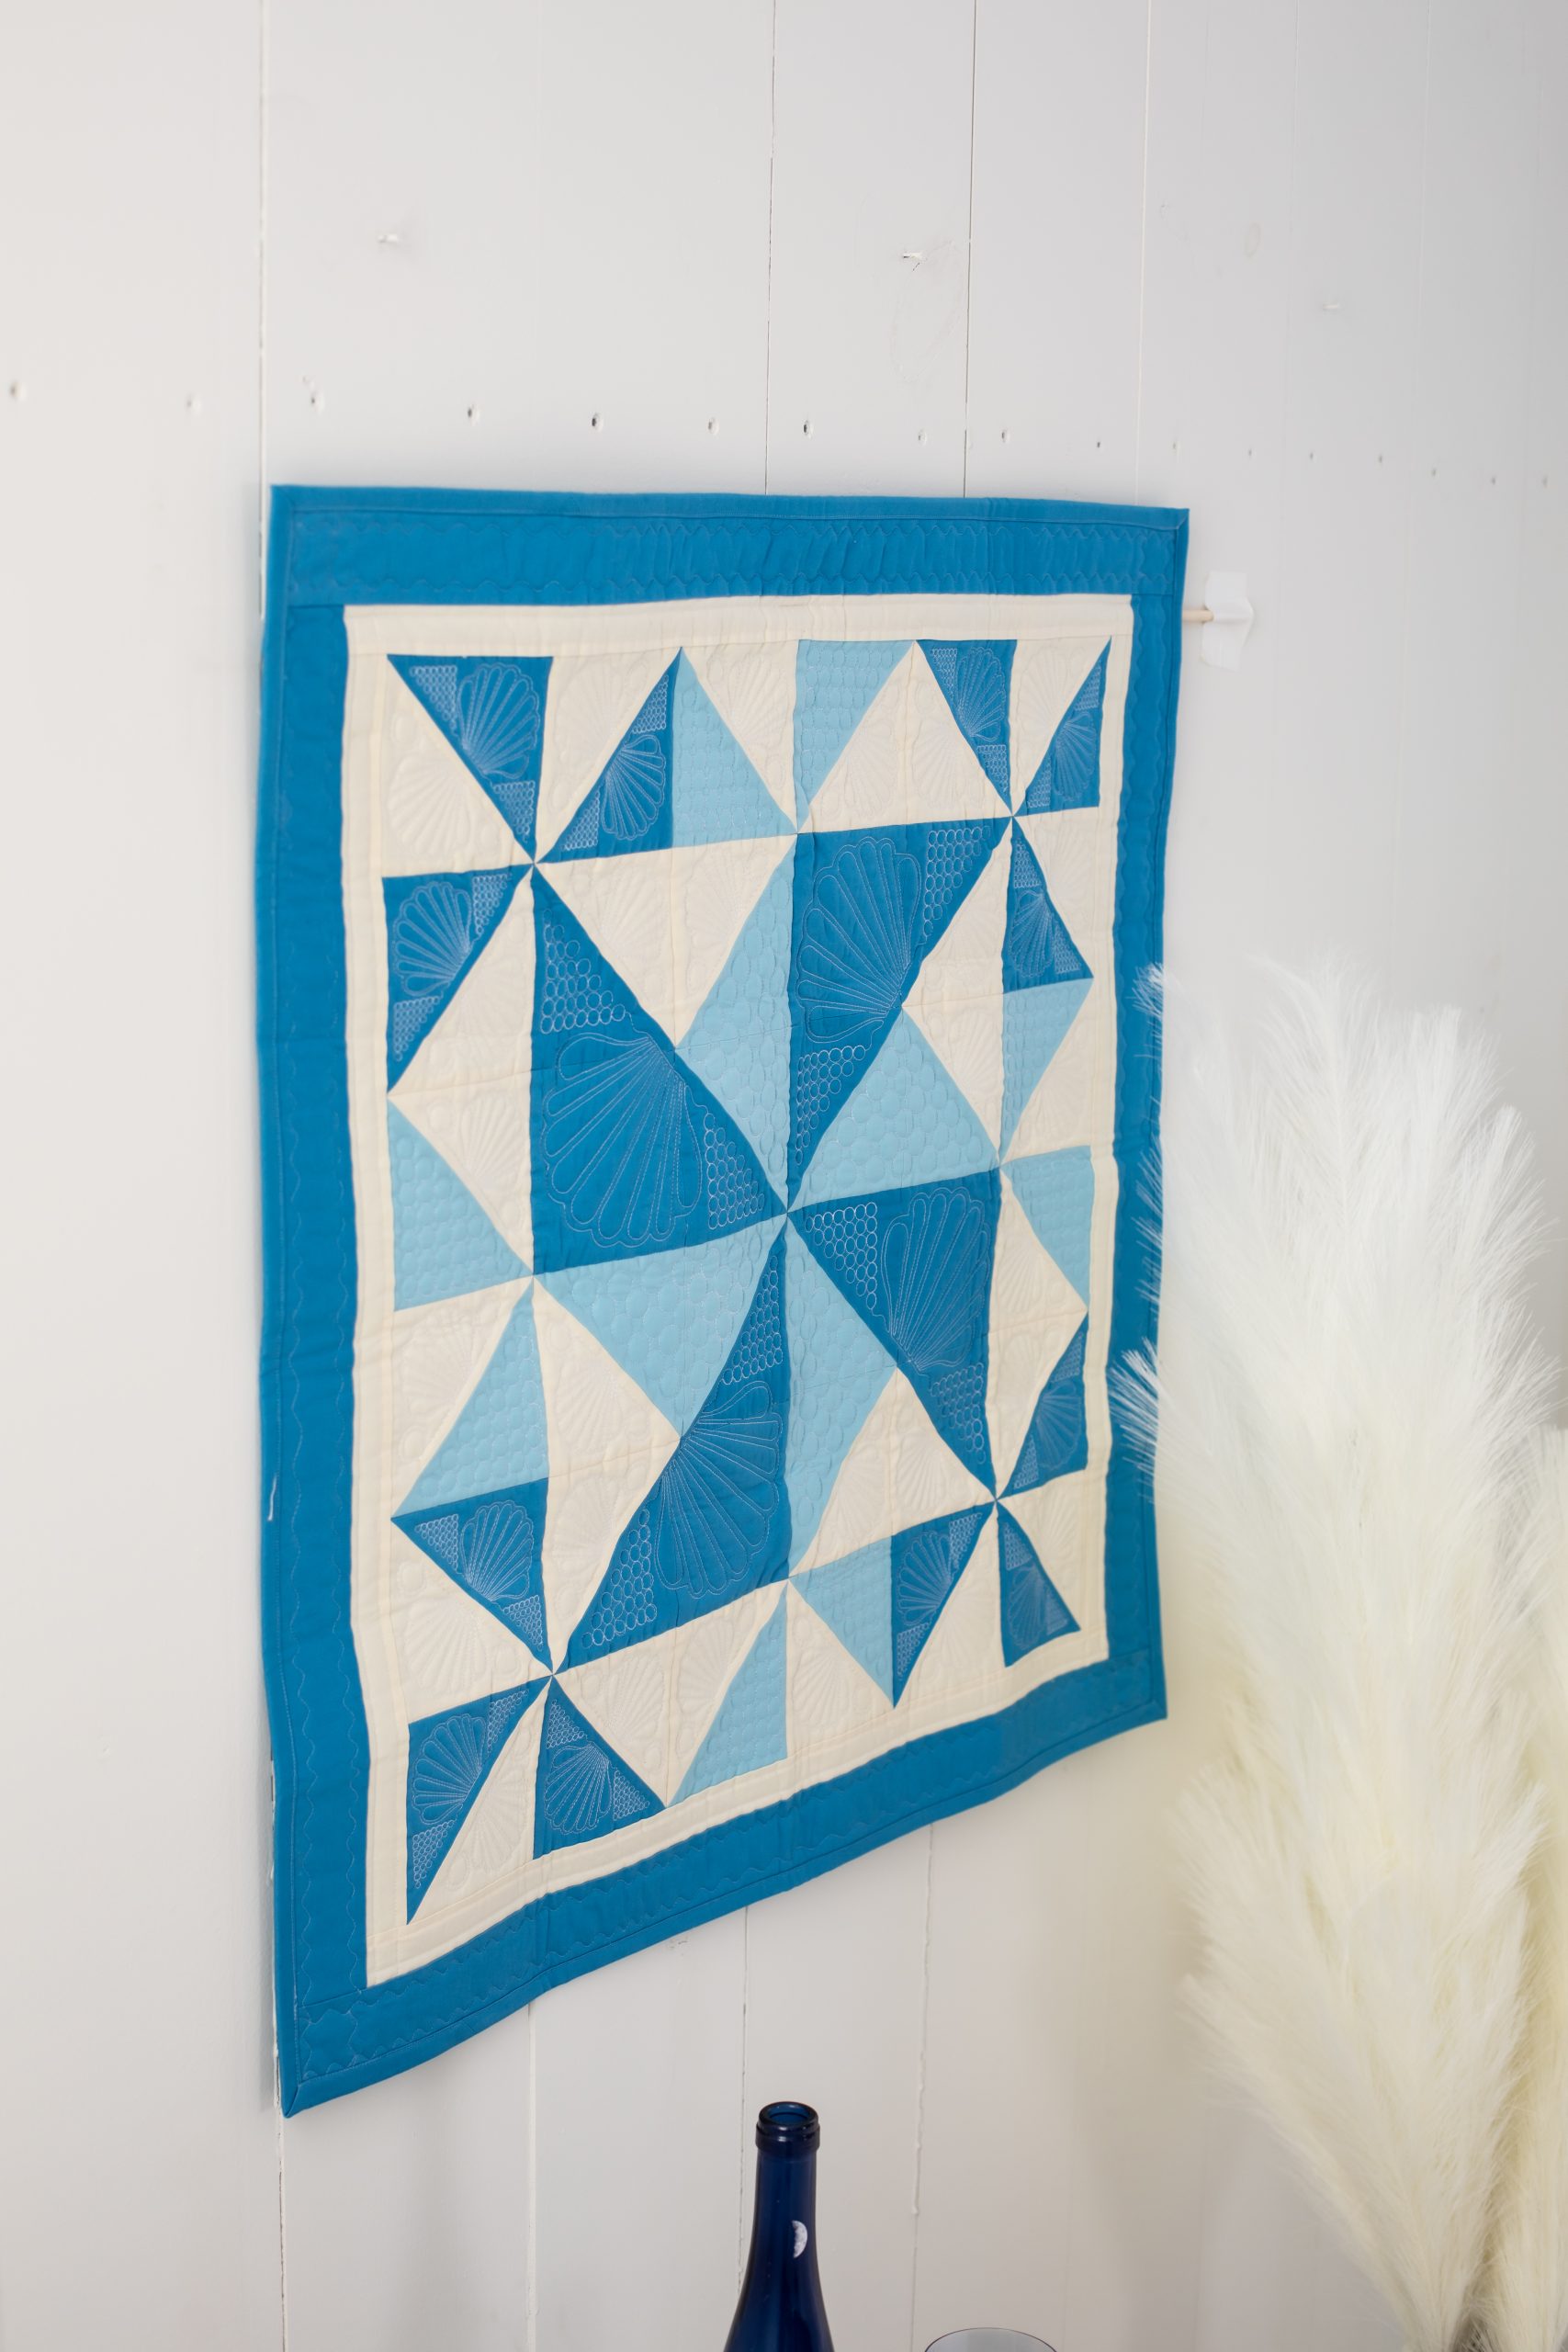
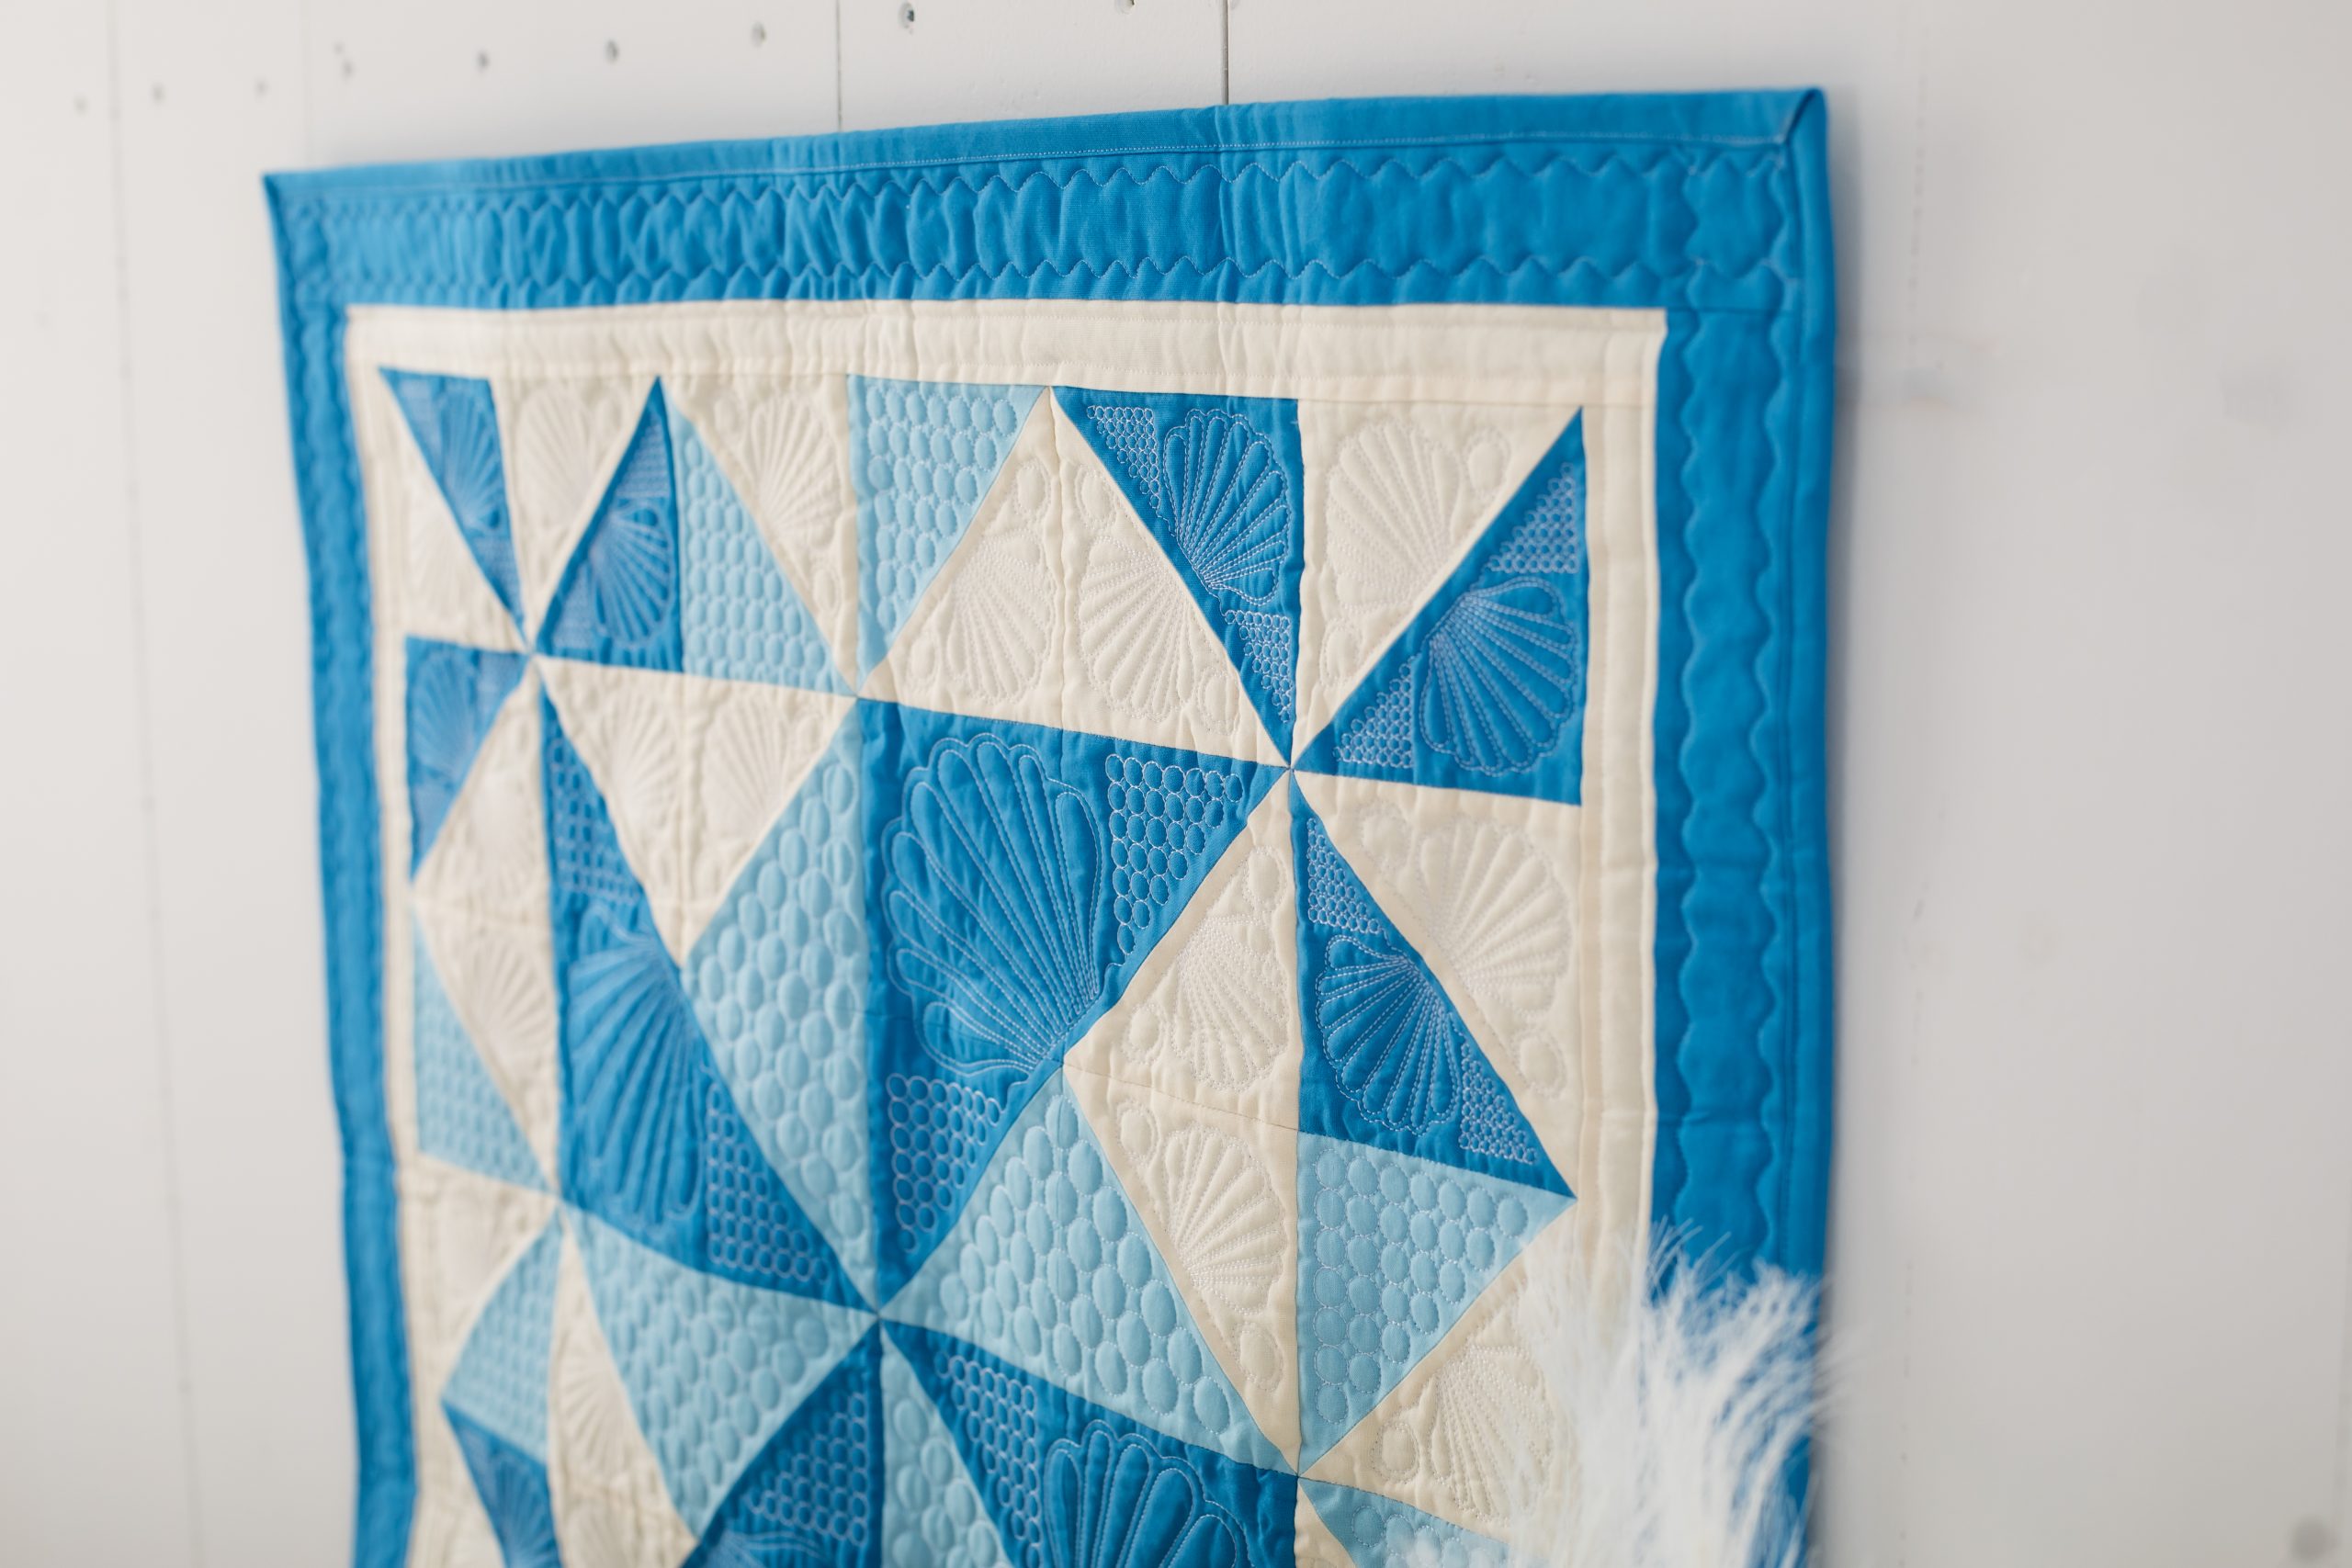
If you’re already dreaming about warm summer days spent at the seaside, then you’ll love this stunning wall hanging pattern from Teresa Stoller. Finishing at a 30-inch square, this pinwheel quilting project is made in calming creams and blues and is finished with beautiful seashell free-motion details. Complete your wall hanging with a fabric sleeve on the back, so that you can easily display your design.
Skill Level: Easy
Finished Size: 30” x 30”
Seam Allowances: 1/4”
Abbreviations:
- RST = Right Sides Together
- HST = Half Square Triangle
Materials:
- 1/4” presser foot for piecing
- Walking foot for quilting
- Rotary cutter, self-healing cutting mat, and safety cutting gloves
- Quilting rulers – Long quilting ruler for cutting fabrics and square quilting ruler for trimming blocks to 4 1/2″ square
- Iron and heat-safe pressing surface
- Applique pressing sheet or parchment paper to protect project when pressing
- Scissors
- Pins
- Fabric marking tool that does not show through to the other side of the fabric
- Seam ripper
- Spray starch (Optional)
- Dark blue cotton fabric (A), 1/2 yard
- Cream cotton fabric (B), 1/2 yard
- Light blue cotton fabric (C), 1/3 yard
- Cotton fabric for quilt back, 1 yard
- Cotton fabric for binding, 1/3 yard
- Batting 34” x 34”
Sewing Instructions:
CUT THE FABRIC:
- From the dark blue fabric (A), cut:
- Two strips, each 2 1/2″ x 26 1/2″
- Two strips, each 2 1/2″ x 30 1/2″
- Two 10 1/2” x 10 1/2” squares
- One 5 1/4” x 10 1/2” rectangle
- Four 4 1/2” x 4 1/2” squares

- From the cream fabric (B), cut:
- Two strips, each 1 1/2″ x 24 1/2″
- Two strips, each 1 1/2″ x 26 1/2″
- Three 10 1/2” x 10 1/2” squares
- One 5 1/4” x 10 1/2” rectangle
- From the light blue fabric (C), cut:
- One 10 1/2” x 10 1/2” square
- Two 5 1/4” x 10 1/2” rectangles
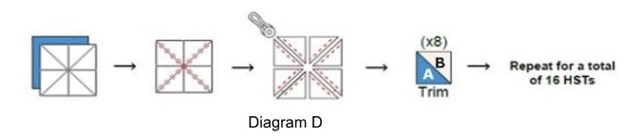
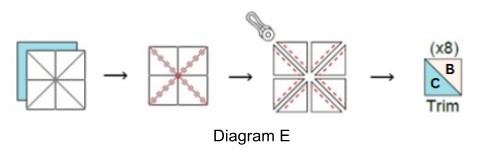
MAKE 8 HSTs AT A TIME:
- Place one dark blue (A) 10 1/2” square and one cream (B) 10 1/2” square RST and, using a fabric-marking tool, mark two diagonal lines and two perpendicular lines through the center of the square on top.
- Next, sew a 1/4” away from both sides of each diagonal line (diagonal lines only).
- Then, cut on each of the drawn lines.
- There should now be 8 HST units.
- Open the HSTs and, using the iron and pressing sheet, press each unit.
- Trim each HST to 4 1/2” square.
- Repeat Steps 1 through 6 in this section to create 8 additional dark blue and cream HSTs, for a total of sixteen.
- Place one light blue (C) 10 1/2” square and one cream (B) 10 1/2” square RST and repeat Steps 1 through 6 in this section to create 8 light blue and cream HSTs.
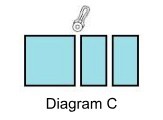
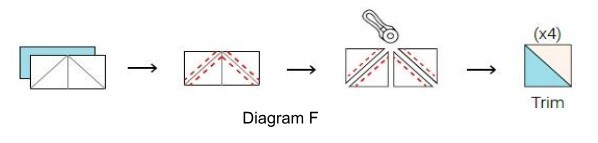
MAKE 4 HSTs AT ONE TIME:
- Place one light blue 5 1/4” x 10 1/2” rectangle and one cream 5 1/4” x 10 1/2” rectangle together, RST, and, using a fabric-marking tool, draw a vertical line to divide the unit into two 5 1/4” squares.
- Then, on the two squares created by the vertical line, mark a diagonal line from the bottom left corner to the top right corner of the square on the left and mark a diagonal line from the top left corner to the bottom right corner of the square on the right.
- Next, sew 1/4” away from both sides of each diagonal line (diagonal lines only).
- Then, cut on each of the drawn lines.
- There should now be 4 HST units.
- Open the HSTs and, using the iron and pressing sheet, press each unit.
- Trim the HSTs to 4 1/2” square.
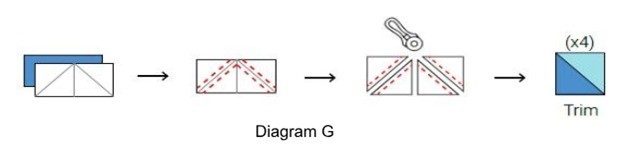
- Place one dark blue 5 1/4” x 10 1/2” rectangle and one light blue 5 1/4” x 10 1/2” rectangle together, RST, and repeat Steps 1 through 7 in this section to create four HSTs.
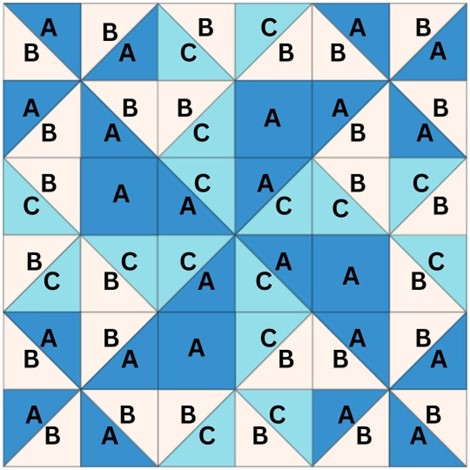
ASSEMBLE THE QUILT:
- Lay out the HST units and the four dark blue fabric squares as shown below, in diagram H.
- Using a 1/4” seam allowance, stitch the HST units together in rows.
- Using the iron and pressing sheet, press the seams of each row in alternate directions to help the rows nest as they are stitched together.
- Next, using a 1/4” seam allowance, stitch the rows together, aligning the seams as the rows are stitched.
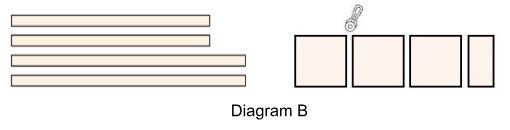
ADD BORDERS TO THE QUILT TOP:
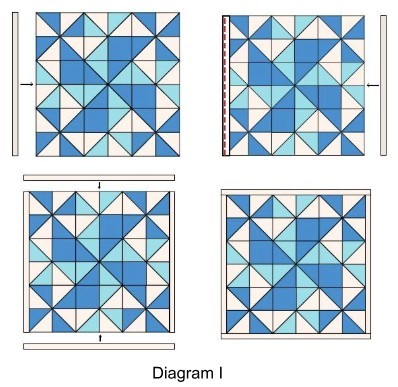
- To add the first strip of the inner border, position one 1 1/2” x 24 1/2” cream fabric strip on top of the left edge of the quilt top, RST, aligning the edges, as shown below, in diagram I.
- Using a 1/4” seam allowance, stitch along the aligned edge.
- Open the unit and press, using the iron and pressing sheet.
- Using the remaining 1 1/2” x 24 1/2” cream fabric strip, repeat Steps 1 through 3 in this section for the right edge of the quilt top.
- Then, use the 1 1/2” x 26 1/2” strips, repeat Steps 1 through 3 in this section, positioning the strips for the top and bottom inner border as shown below, in diagram I.
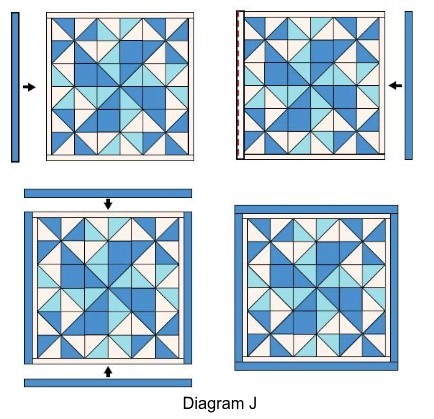
- Using the two 2 1/2” x 26 1/2” dark blue fabric strips and the two 2 1/2” x 30” dark blue fabric strips, repeat steps 1 through 5 to add the outer border, as shown below, in diagram J.
QUILT AND BIND:
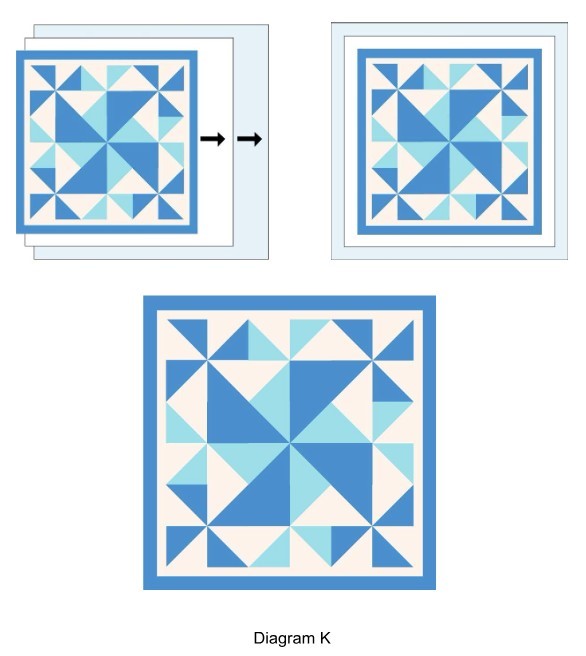
- As shown below, in diagram K, lay the backing fabric, wrong side (back side) facing up.
- Then, center the batting on top of the backing fabric.
- Next, center the quilt top, right side up, on top of the batting.
- Secure the layers and quilt the piece as desired.
- Trim and square the quilted wall-hanging to 30” x 30”.
- Bind the quilt.
I’ve never tried quilting before but I’m going to give this a try! I love the pinwheel pattern!