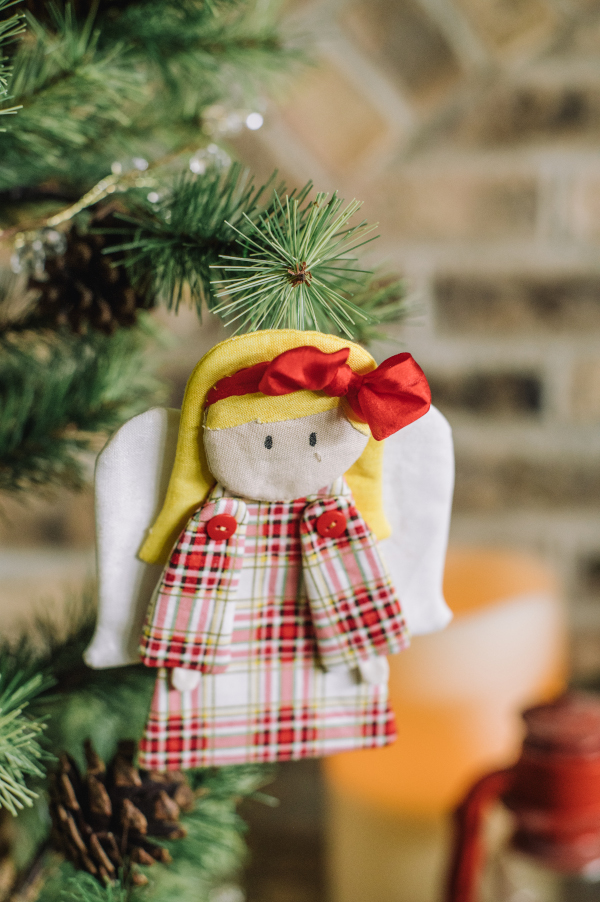
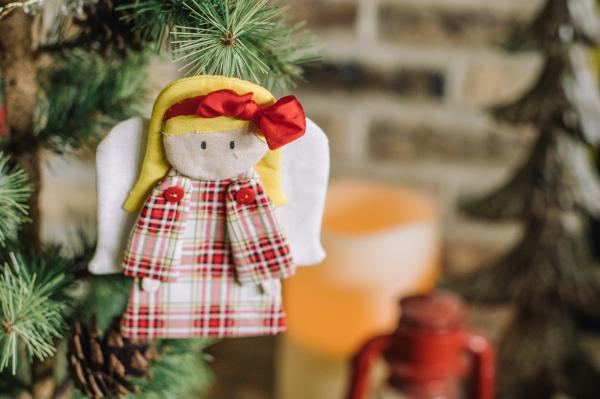
Add a sweet heavenly touch to your Christmas tree with this adorable Christmas angel! This Christmas ornament pattern is perfect for using up scrap fabric and spare sewing notions and is finished with buttons and shiny ribbon. We love the idea of customizing your angels for each of your grandchildren and including these ornaments as stocking stuffers to be enjoyed for generations to come. This project is recommended for sewists with a little experience under their belts, as it uses small fabric pieces and requires sewing tight curves. Heaven is a place on earth with these absolutely darling Christmas ornaments!
Skill Level: Easy
Materials:
Fabric:
- Hair – 6”x 10”
- Skin –4”x 6”
- Wings – 6” x 12”
- Dress – 6” x 8”
- Legs – 5” x 10”
- Shoes – 3” x 3”
Supplies:
- 1/4 yard ribbon
- 1/4 yard Heat n’ Bond Fusible Fleece
- 1/8 yard Heat n’ Bond Featherlite
- Permanent fabric pen (Pentel Arts Fabric Gel Roller)
- Fabric marking tool
- Pencil
- Light box (I love my Cutterpillar Glow but a window will work in a pinch)
- Thread
- PDF Template – This is located at the bottom of this page. See printing instructions below.
Tools:
- Turning tools: i.e. fast turn, purple thing, quick turn
- Scissors
- Pinking shears
- Iron
- Sewing Machine
PRINTING INSTRUCTIONS:
To download the PDF template, click on the download button at the bottom of the page. We recommend opening your download using Adobe Acrobat.
Instructions:
PREP WORK:
Maximize fabric usage when arranging the templates.
Hands:
- Trace 2 of hand template onto skin color fabric. Stitch two layers of fabric together along drawn lines, leaving short side open.
- Trim hands out with pinking shears, trimming close to stitched line. Press to set seams, turn right side out, and press flat.
Detail Prep:
- Trace shoe (from leg pattern piece) and hair pattern on paper side of Heat n’ Bond Featherlite. Trim about 1/4″ around traced shapes and press to wrong side of respective fabrics.
- Cut along traced lines.
Fabric Prep:
- Cut a piece of Heat n’ Bond Fusible Fleece to cover 1/2 of each remaining piece fabric for skin, wings, dress, and hair fabrics.
- Press fusible fleece to wrong side of each fabric (this should only cover half of the remaining of each fabric).
Arms:
- Place hands between layers of sleeve fabric.
- Trace arms onto wrong side of non-fleece affixed fabric with sewn hand side in towards center at sleeve, with raw edge sticking out past sleeve bottom. Pin in place.
- Sew around drawn line, through all layers.
- Trim arm out around seam, leaving scant seam allowance.
- Create small slit in non-fleece side of sleeve about 1/4″ from shoulder curve. Turn sleeve right side out through slit in fabric. Use purple thing or similar item to push all the edges out completely. Press.
Face:
- Press hair front piece to right side of skin tone fabric; this will be the same side fabric the fleece is affixed to.
- Fold fabric in half with right sides together. Trace face template on wrong side of fabric where hair was placed, positioning hair in desired position on face. A light source may be helpful in lining this up properly.
- Stitch around drawn line.
- Trim arm out around stitching, leaving scant seam allowance. Press to set seam.
- Create small slit in non-fleece side of head at center. Turn right side out through slit in fabric. Use purple thing or similar item to push all the edges out completely. Press.
Legs (optional):
- In same manner as face, press shoe in place on right side of leg fabric.
- Trace leg on wrong side of fabric, lining up with shoe.
- Stitch around leg, leaving short end open. Trim out and press to set seam.
- Turn right side out and press.
Body:
- Trace body/dress template on wrong side of non-fleece affixed fabric and fold fabric in half so right sides are facing.
- Place legs between layers with shoes towards center of body and shoes facing fleece affixed side.
- Sew along drawn line. Press.
- Create small slit in non-fleece side of body towards top. Turn right side out through slit and press.
Hair, Back, and Wings:
- Trace pattern on wrong side of non-fleece fabric. Note: You should have two of the hair back and two of the wings.
- Place them together with right sides facing each other.
- Sew along drawn line. Trim around stitched line with scant seam.
- Create small slit in non-fleece side towards top. Turn right side out through slit and press.
ASSEMBLY:
- Tie bow in center of ribbon and wrap around top of head and secure in back with hand stitches.
- Add hanger to wings. Fold ribbon in half and tie ends together in a knot. Hand stitch ribbon to back of dress.
- Position pieces back to front as follows: wings, hair, body, and face, hand stitching each layer to the last as you move forward.
- Hand stitch arms on with buttons.
TIP: Create a durable, easy-to-trace template from a dollar store flexible cutting mat or template plastic.
TIP: When sewing around tight curves and small pieces, use a smaller stitch length for a smooth curved seam.
Do I have to be a gold member to get the template for the Christmas Blessings Angel Ornament?
i cannot find a
download button at the bottom of the pattern
Thank you
Hi Diana! Yes, this angel ornament pattern is available for our gold club members. Please let us know if you have any questions! – Ashley, WeLikeSewing