
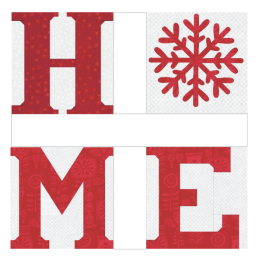
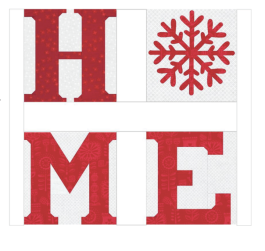
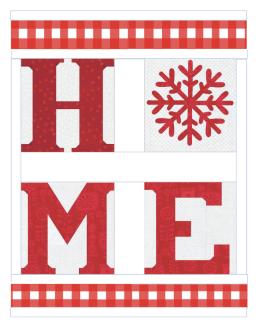
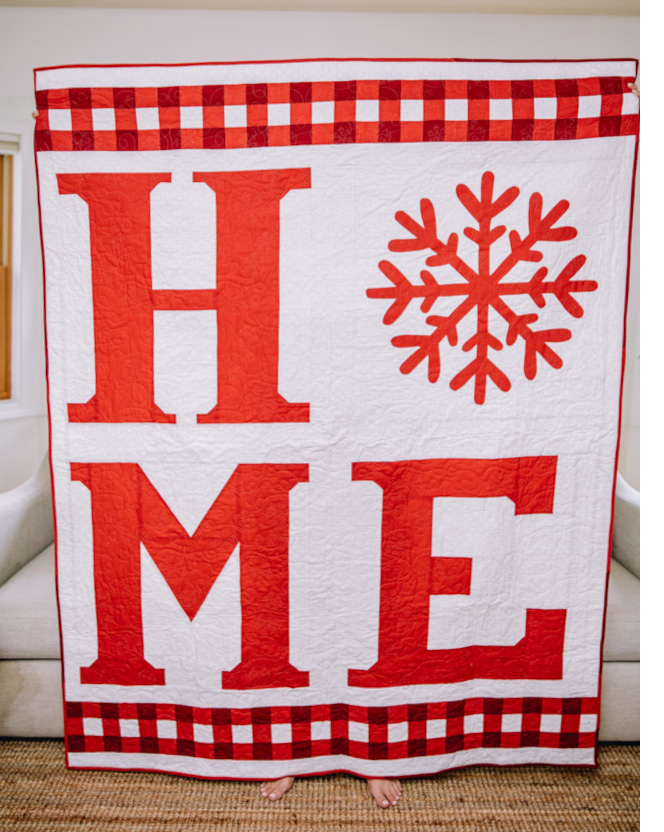
Bring the coziness of a Nordic mountain lodge into your home with this gorgeous winter quilt pattern. Channeling the spirit of all things “hygge” (the Norwegian word for feeling comfy and cozy), this quilt pattern combines quilting with applique to create a beautiful holiday design. This quilt finishes at roughly the same size as a full-size bed, so you can add it to your bedroom for some pretty winter décor or display it as a decorative throw for your living room at Christmastime. We’re completely obsessed with this pretty quilt design, from the festive gingham borders to the bold letter blocks!
Finished Size: 56” X 72”
Materials:
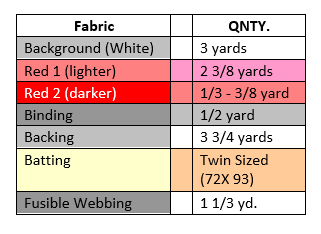
Fabric:
- Background (white) – 3 yards
- Red 1 (lighter) – 2 3/8 yards
- Red 3 (darker) – 1/3 – 3/8 yard
- Binding – 1/2 yard
- Backing – 3 3/4 yard
- Batting – Twin Sized (72 x 93)
- Fusible Webbing – 1 1/3 yard
Tools and Notions:
- Fabric scissors
- Iron
- Sewing machine
- Quarter inch foot for sewing machine
- White thread
- PDF Templates – These are located at the bottom of this page. See printing instructions below.
PRINTING INSTRUCTIONS:
To download the PDF templates, click on the download button at the bottom of the page. We recommend opening your download using Adobe Acrobat.
Abbreviations:
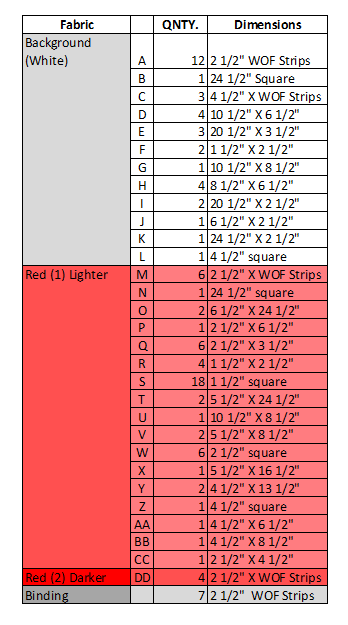
WOF = Width of Fabric
Cutting Instructions:
Sewing Instructions:
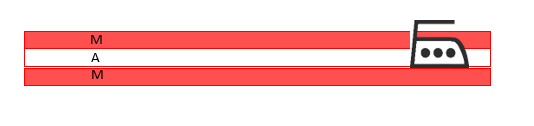
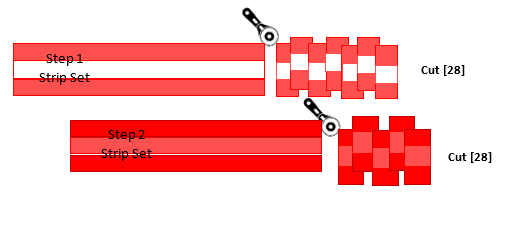
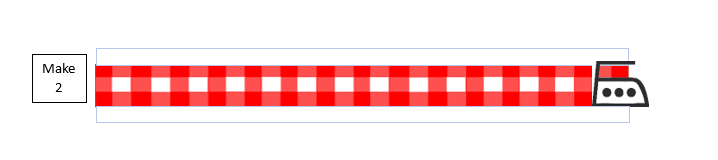
- Make strip sets for the top and bottom gingham borders. Sew 1 Fabric A Strip between 2 Fabric M Strips. Press the seams. It should measure 6 1/2” X WOF. Make 2 of these strip sets.
- Sew 1 Fabric M Strip between 2 Fabric DD Strips. Press the seams. It should measure 6 1/2” X WOF. Make 2 of these strip sets.

- Sub cut each of the 4 strips sets you created in Steps 1 and 2 into 2 1/2” X 6 1/2” rectangles. You will need 28 each from both color ways.
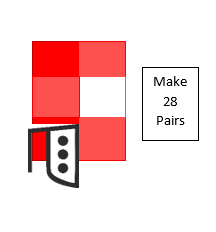
- Sew the Step 3 rectangles into pairs. Press the seam. Make 28 pairs.
- Sew the pairs into 2 long strip of 14 pairs each. Each strip should measure 6 1/2” X 56 1/2”. Make 2. Press the seams and set aside while you construct the sashing.

- Create the sashing for above and below these gingham rows. Using the remaining 6 Fabric A Strips, sew 2 sets of 3 strips each together to form two long strips ( 2 1/2” X approx. 120”). From each of these strips, cut two sashing strips 2 1/2” X 56 1/2”. [For a total of 4 strips].
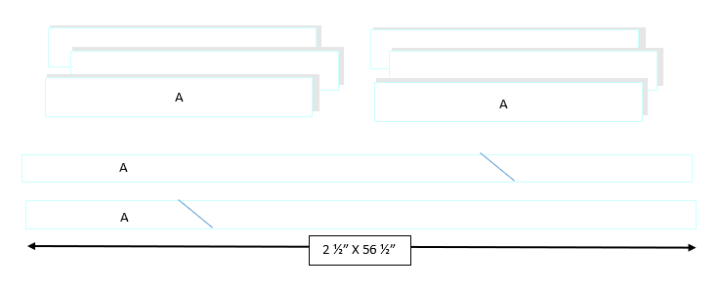
- Sew one of these strips to the top of each of the gingham rows you created in Step 5. Press the seams.

- Sew another of the Step 6 sashings to the bottom of each of the gingham rows you created in Step 5. Make 2. Press the seams. Set these aside while you construct the snowflake and the letters.
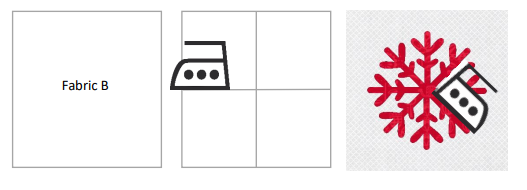
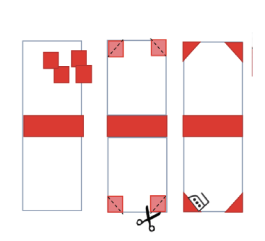
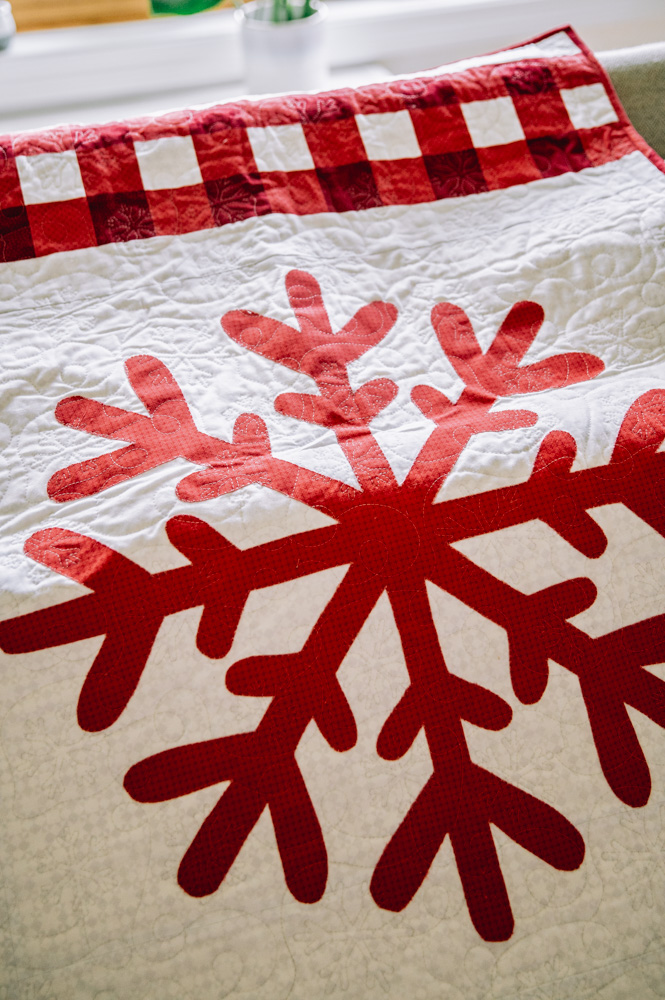
- To construct the snowflake: The applique method used for this is fusible raw-edge applique. Transfer/trace the snowflake template onto the paper side of your fusible webbing. You will need a 24” square. If your fusible webbing is not 24” wide, you will have to trace half on one section and half on another section. Once the snowflake pattern is traced onto the fusible webbing’s paper, iron the fusible webbing to the wrong side of the Fabric N square. Once the fusible webbing is adhered and cool, cut out the snowflake using scissors.

- Once you have cut the snowflake with fusible webbing on the back, you need to adhere it to the Fabric B square. To find the center, press the Fabric B square in half both ways. This will put a center mark both horizontally and vertically on your background. You will use these to center your snowflake applique. Once your snowflake is the proper position, iron it in place to secure it to the block. Once you have fused it to the background, stitch around the outside of the snowflake using a blanket, applique, satin, or straight stitch. This block should measure to a 24 1/2” square. Set it aside while you construct the letters.
- Construct the “H” Block:
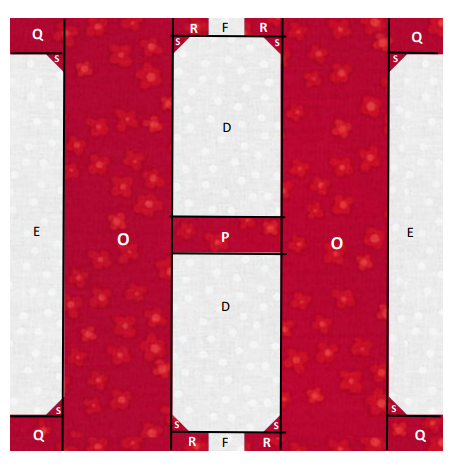
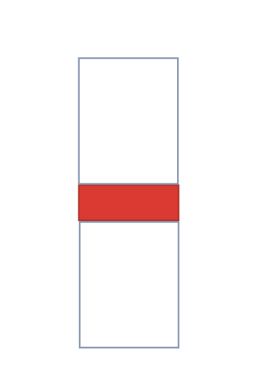
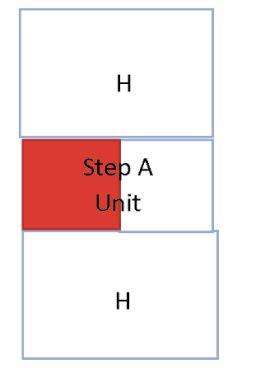
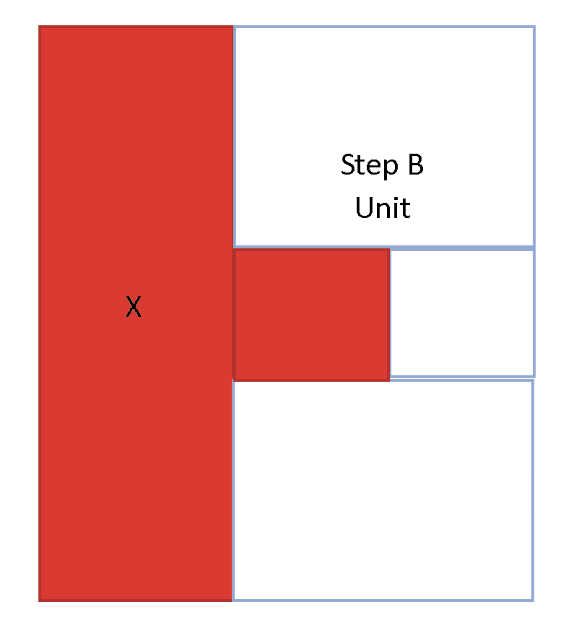
- (Step A) Sew Fabric P between the 2 Fabric D rectangles. Press seams.
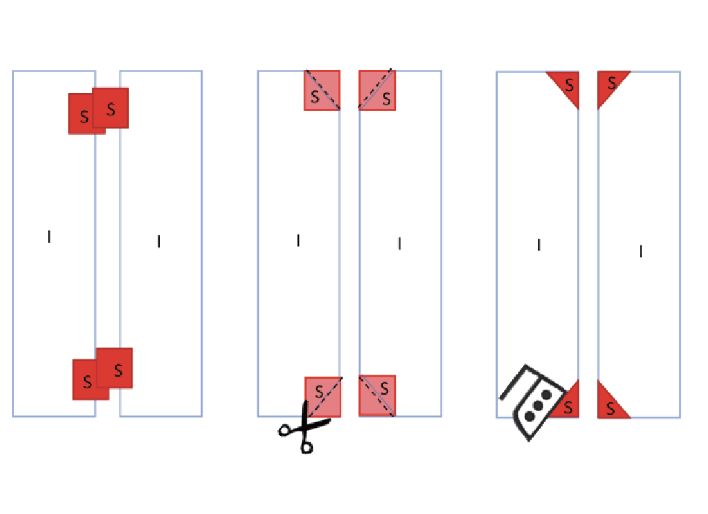
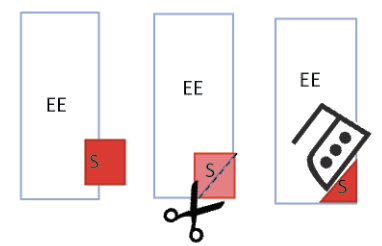
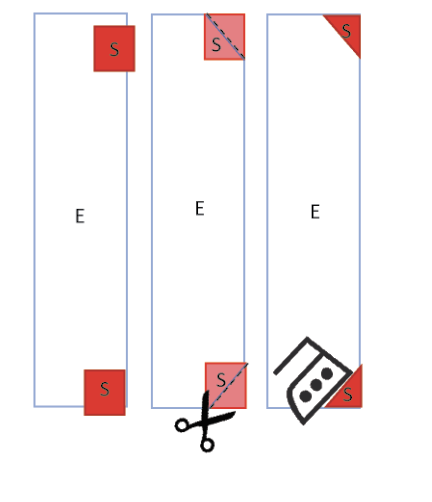
- (Step B) Mark the diagonal on the wrong side of all 8 Fabric S squares. Line up 4 of the S squares with the outside corners of the Fabric D rectangles. With right sides together, sew directly on the drawn line. Press the Fabric S back to form a corner triangle. Using scissors, cut away the two bottom layers, leaving a 1/4” seam allowance.
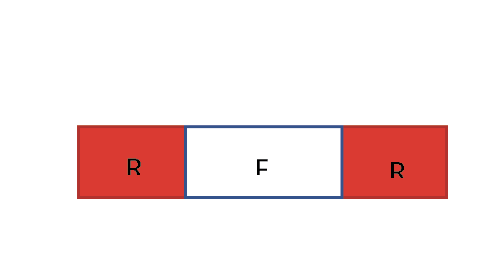
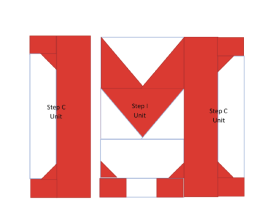
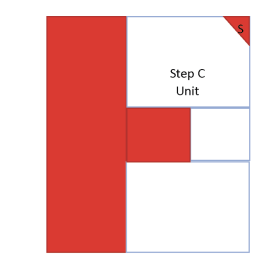
- (Step C) Sew Fabric F between 2 Fabric R rectangles. Press the seams. Make 2.
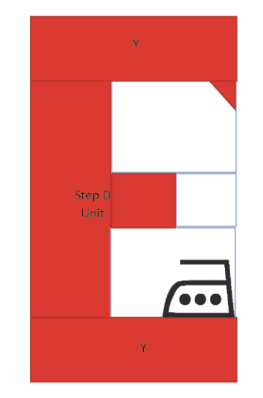
- (Step D) From Step C above, sew the Step C units to the top and bottom of the Step B Unit. Press the seams.
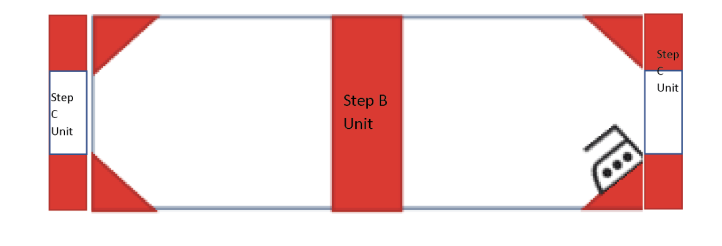
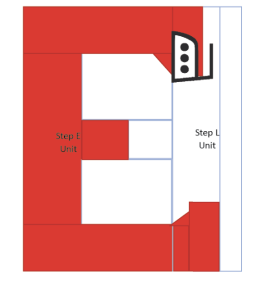
- (Step E) Sew the Step D Unit between the 2 Fabric O rectangles. Press the seams.
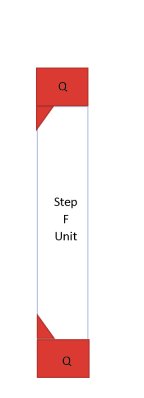
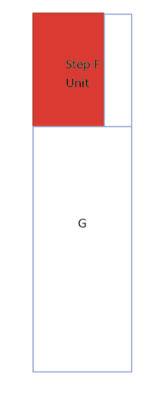
- (Step F) You have already marked the diagonal on the wrong side of the remaining 4 Fabric S squares. Line up these 4 S squares with the inside corners of the Fabric E rectangles. With right sides together, sew directly on the drawn line. Press the Fabric S back to form a corner triangle. Using scissors, cut away the two bottom layers leaving a 1/4” seam allowance.
- (Step G) Sew each of the Step F Units between 2 Fabric Q rectangles. Press the seams.
- (Step H) Sew the Step E Unit between the 2 Step G Units. Press the seams. Your “H” block is complete and it should measure 24 1/2” Square.
- (Step A) Sew Fabric P between the 2 Fabric D rectangles. Press seams.
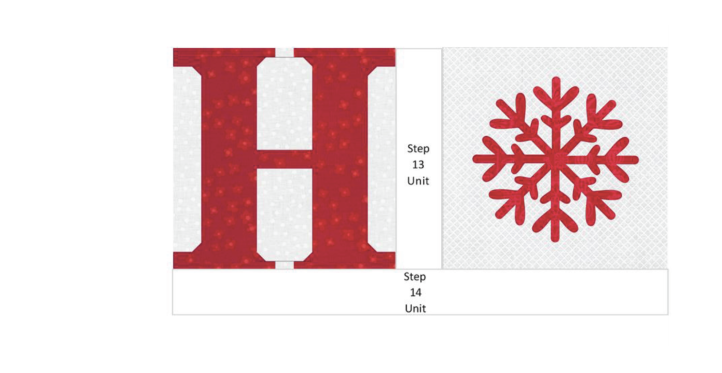
- Sew the “H” block to the Fabric C Sashing Strip. Cut one Fabric C strip to 4 1/2” X 24 1/2”. Sew the “H” Block from Step 11 to the Left of the Sashing Strip. Press the seam.

- Now sew the Snowflake Applique Block you completed in Step 10 to the right of the Sashing Strip. Press the seam. This half of the word should measure 24 1/2” H X 52 1/2”W.

- Join the remaining piece of the 4 1/2” X WOF Strip to another whole Fabric C Strip to make one long strip approximately 4 1/2” X 60”. Trim this strip to 4 1/2” X 52 1/2”.

- Sew the Sashing strip from Step 14 to the bottom of the Step 13 unit. Press the seam. This should measure 28 1/2” H X 52 1/2” W.
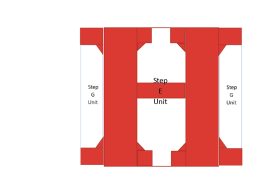
- Construct the “M” Block.
- (Step A) Mark the diagonal on the wrong side of the 6 Fabric S squares. You will use four of those six here. Line up these 4 S squares with the inside corners of the Fabric I rectangles. With right sides together, sew directly on the drawn line. Press the Fabric S back to form a corner triangle. Using scissors, cut away the two bottom layers, leaving a 1/4” seam allowance. You will have one right facing and one left facing unit.
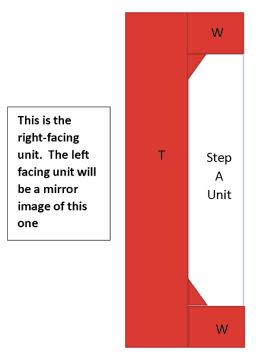
- (Step B) Sew each of the Step A Units between 2 Fabric W squares. Press the seams.
- (Step C) Sew a T Fabric Rectangle to the inside edge of the Step B Unit. Look at diagram for placement. You will have one left-facing and one right-facing unit. Press the seams and set aside while you construct the middle of the “M”.
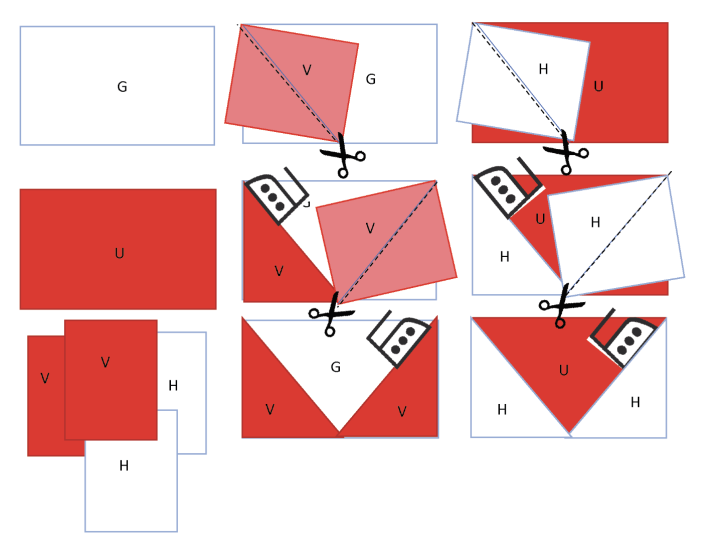
- (Step D) Mark the diagonal on the 2 H and 2 V fabric rectangles. Line up the Fabric V rectangles on the Fabric G rectangle. You will need to sew, cut, and press these one at a time. Also note the position in the diagram of the Fabric V rectangle. Line up the Fabric H rectangles on the Fabric U rectangle. Refer to information above. Do this one at a time and note the orientation of the Fabric H rectangle.
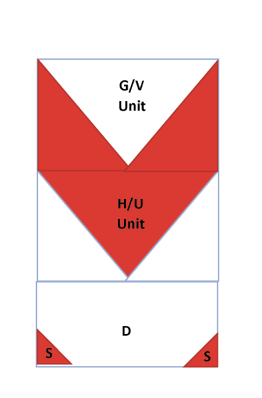
- (Step E) Sew the G/V Unit to the top of the U/H Unit. Press the seam.
- (Step F) Sew the D rectangle to the bottom of the U/H Unit. Press the seam.
- (Step G) You’ve already marked on the diagonal on the wrong side of the 6 Fabric S squares. You will use the remaining 2 of those six here. Line up these 2 S squares with the bottom corners of the Fabric D rectangle. With right sides together, sew directly on the drawn line. Press the Fabric S back to form a corner triangle. Using scissors, cut away the two bottom layers, leaving a 1/4” seam allowance.
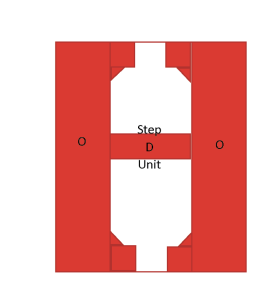
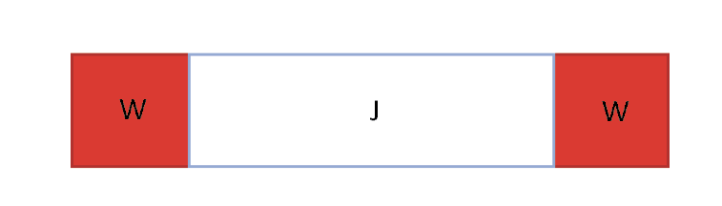
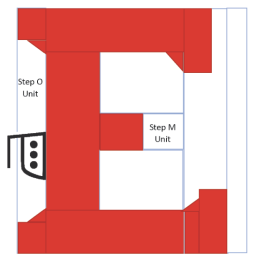
- (Step H) Sew the Fabric J rectangle between the remaining 2 Fabric W Squares. Press the seams.
- (Step I) Sew the Step H Unit to the bottom of the Step G Unit. Press the seam.
- (Step J) Sew the Step I Unit between the 2 Step C units. Press the seams. Your block is now complete and measures 24 1/2” square. See diagram here for proper placement.
- (Step A) Mark the diagonal on the wrong side of the 6 Fabric S squares. You will use four of those six here. Line up these 4 S squares with the inside corners of the Fabric I rectangles. With right sides together, sew directly on the drawn line. Press the Fabric S back to form a corner triangle. Using scissors, cut away the two bottom layers, leaving a 1/4” seam allowance. You will have one right facing and one left facing unit.
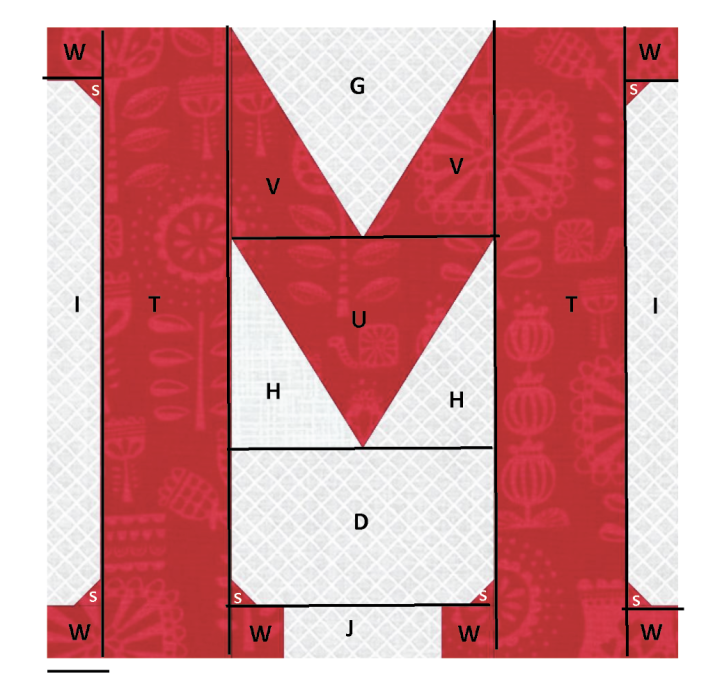
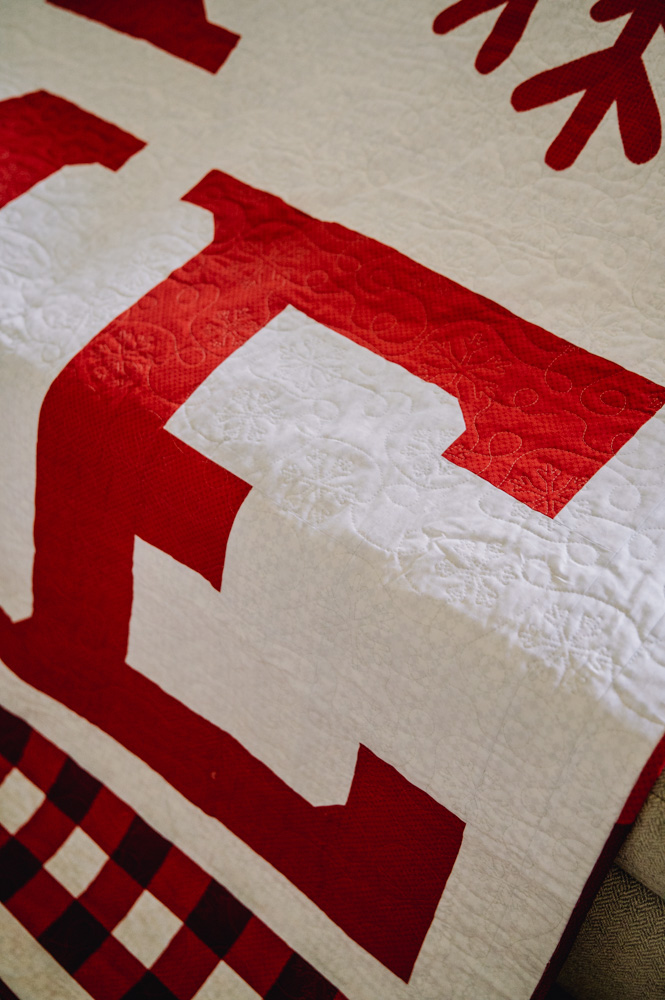
- Construct the “E” Block.
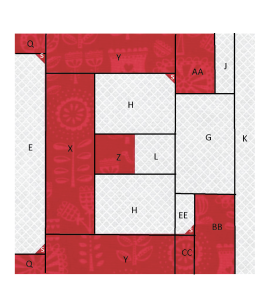
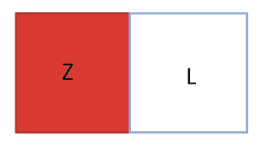
- (Step A) Sew the Fabric Z square to the Fabric L square. Press the seam.
- (Step B) Sew the 2 Fabric H rectangle to the top and bottom of Step A Unit.
- (Step C) Sew the Fabric X rectangle to the left of the Step B Unit.
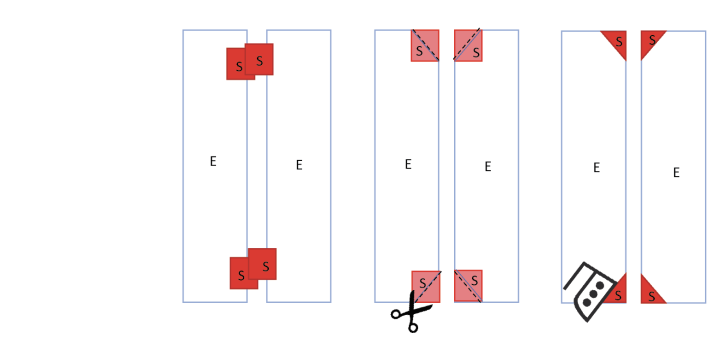
- (Step D) Mark the diagonal on the wrong side of the 4 Fabric S squares. Use one of the Fabric S squares in the upper right corner of the Step C Unit. Lay the S square on top of the Step C unit. Sew directly on the diagonally drawn line. Press the Fabric S piece back to form a corner triangle. Trim the two bottom layers away, leaving a 1/4” seam allowance.
- (Step E) Sew the 2 Fabric Y rectangles to the top and bottom of the Step D unit. Press the seams. Set this portion aside while you construct the rest of the “E”.
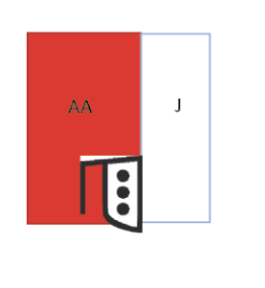
- (Step F) Sew the Fabric AA rectangle to the left of the Fabric J rectangle. Press the seam.
- (Step G) Sew the Fabric G Rectangle to the bottom of the Step F Unit. Press the seam.
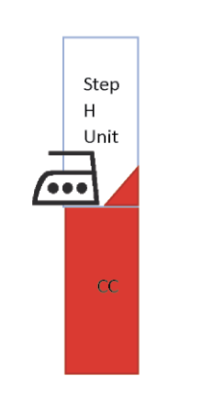
- (Step H) Sew one of the marked Fabric S square to the lower right corner of the Fabric EE rectangle. Sew directly on the diagonally marked line. Fold the Fabric S back into the lower right corner to form a corner triangle. Press the seam. Cut away the two lower layers, leaving a 1/4” seam allowance.
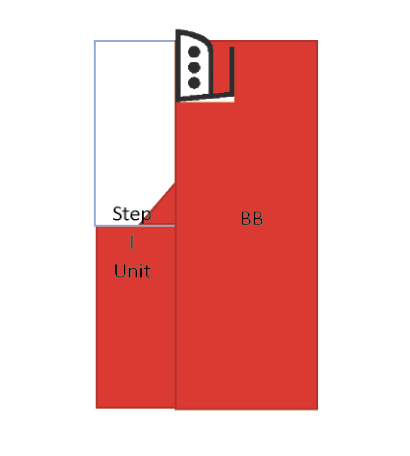
- (Step I) Sew the Step H Unit to the top of the Fabric CC rectangle. Press the seam.
- (Step J) Sew the Step I Unit to the left of the Fabric BB rectangle. Press the seam.
- (Step K) Sew the Step J Unit to the bottom of the Step G Unit. Press the seam.
- (Step L) Sew the Fabric K rectangle to the right side of the Step K Unit. Press the seam.

- (Step M) Sew the Step L Unit to the right of the Step E Unit. Press the seam.
- (Step N) Sew the two remaining Fabric S squares to the upper and lower right corners of the Fabric E rectangle. Sew directly on the diagonally marked line. Fold the Fabric S back into the upper and lower right corners to form a corner triangle. Press the seams. Cut away the two lower layers, leaving a 1/4” seam allowance.
- (Step O) Sew the 2 Fabric Q rectangles to the top and bottom of the Step N Unit. Press the seams.

- (Step P) Sew the Step O Unit to the left side of the Step M Unit. Press the seam. Your “E” block is now complete and should measure 24 1/2” square.
- (Step A) Sew the Fabric Z square to the Fabric L square. Press the seam.
- Sew the “M” block to the Fabric C Sashing Strip. Cut one Fabric C strip to 4 1/2” X 24 1/2” Sew the “M” Block from Step 16 to the Left of the Sashing Strip. Press the seam.

- Now sew the E Block you completed in Step 17 to the right of the Sashing Strip. Press the seam. This half of the word should measure 24 1/2” H X 52 1/2”W.

- Sew the Step 19 Unit to the bottom of the Step 15 Unit. Press the seam. This section should measure 52 1/2” Square.
- Take 3 of the Fabric A strips and seam them together to make one long strip 2 1/2” X approximately 120”. From this long strip, cut [2] vertical sashing strips that measure 2 1/2” X 52 1/2”.
- Sew these 2 vertical sashing strips down either side of the H-O-M-E center of the quilt. Press the seams. The center of the quilt should measure 52 1/2” H X 56 1/2” W.
- Attach the upper and lower gingham units you constructed in Step 8. Press the seams. Your quilt top is complete and should measure 56 1/2” W X 72 1/2” H.
- Quilt as desired. Trim excess backing and batting. Square up the quilt to 56” X 72”.
- Sew the binding strips together to form one long binding strip 2 1/2” X approximately 280”. Fold the binding strip in half with wrong sides facing. Press into a long strip 1 1/4” X approx.. 280”. Using your machine and a 1/4” foot, sew the binding to the edge of the quilt. Have the raw edges facing the outside of the quilt. Once the binding is secured by machine to the front, press it out from the sides and hand or machine stitch it down to the back.

I want to change colors and use something else for the snowflake. I thought of the sun. Any ideas?
Hi Elizabeth! What do you think about a 60s style daisy instead of the snowflake? A sun is a super fun idea for spring! – Ashley, We Like Sewing