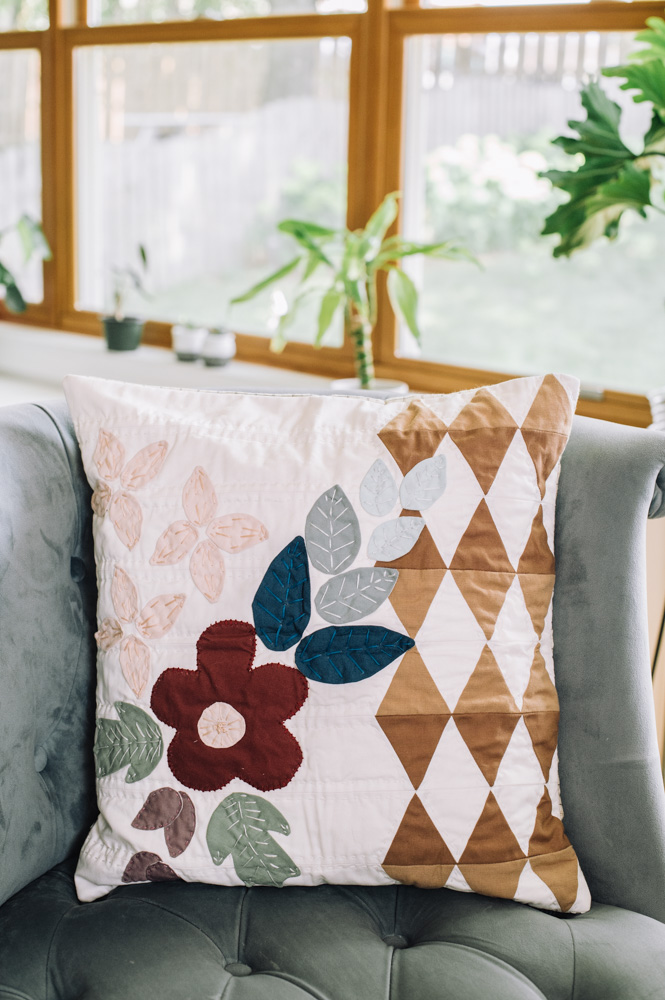
Create a one-of-a-kind pillow in fall hues like burgundy, sage, and bronze with this applique project. This quilted throw pillow combines the soft nature designs of fall florals with modern geometrical motifs in a diamond pattern. Made using fat quarters, this project uses both quilting and applique techniques, making it a wonderful project to expand your skill set. You can even give your pillow some extra texture with embroidery details! Add this charming throw pillow to your sofa or bed to give your home a delightfully quaint country cottage vibe.
Skill Level: Intermediate
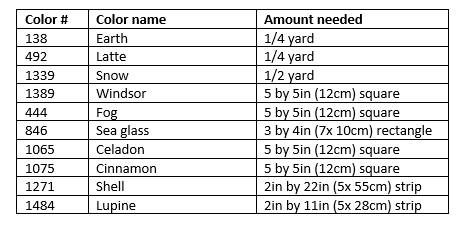
Materials:
- Fabric Requirements: Kona Cotton Solids in:
- White embroidery floss
- Hand needle
- One piece batting 22″ (55 cm) square
- Two pieces backing fabric 19 x 11″ (48 x 28cm)
- Grid ruler
- Cutting mat
- 1/4 yard feather weight interfacing (optional)
- EZ Quilt Ruler (optional)
Instructions:
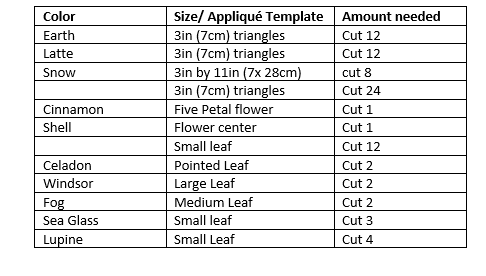
CUTTING INSTRUCTIONS:
ASSEMBLE THE BACKGROUND:
- Arrange the light and dark triangles alternating them with the background triangles as shown.
A triangle template is included or use a triangle ruler such as the EZ Quilt Ruler. - Piece the rows of triangles by placing the RST with the corners of the triangles slightly offset as shown in the figure below. Sew together all six triangles into a group, open and press seams either open or to one side. Repeat for triangle rows one through eight.
- Cut a diagonal edge to the background strips using the triangle template or ruler.
- Sew the long background strip to the colored triangle grouping using the same offset technique as above. Press all seams flat. Attach all eight triangle strip units, paying close attention to alternate light and dark triangle rows.
- Alternate sewing the dark and light triangle strips together, making sure to use a scant 1/4″ in seam allowance when connecting the tips of the triangles so the points are not lost in the seam.
- Sew all rows together and press flat to complete the pillow background.
QUILT THE BACKGROUND:
- Cut a simple muslin backing fabric and piece of batting at approximately a 22″ square.
- Create a quilt sandwich for the pillow by placing the muslin or backing fabric right side down, placing the batting on top, and pillow background right side up. Pin all three layers together and hand or machine quilt the layers together. The shown example was hand quilted using white embroidery floss for an extra layer of texture and detail.
- Trim the quilted pillow background to a 19″ square using an acrylic ruler and cutting mat.
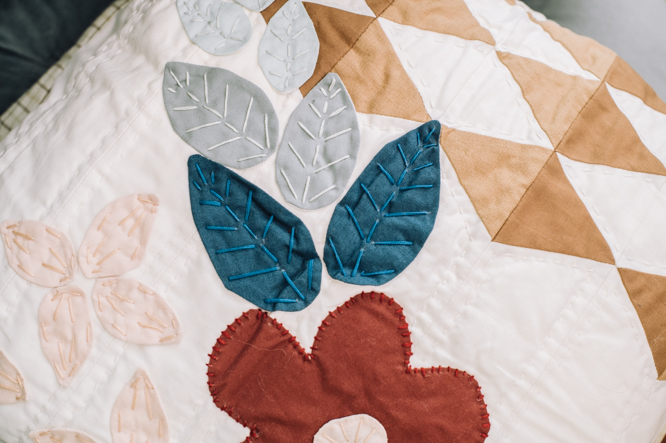
ADD FLORAL APPLIQUE:
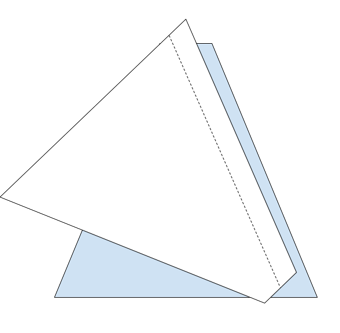
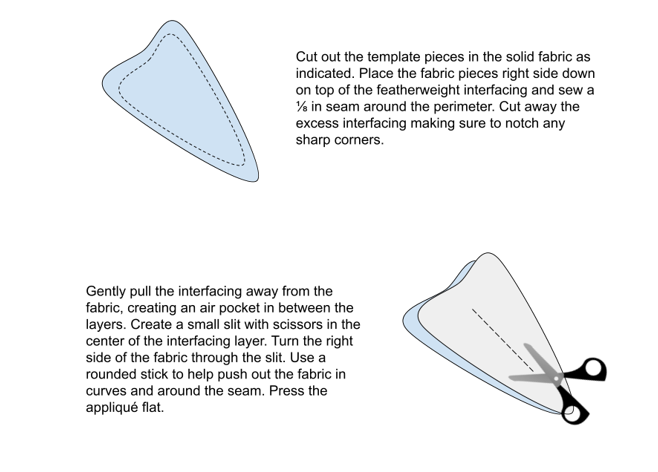
- Print and cut out the needed floral appliqué pieces as indicated in the cutting chart. Floral appliqué may either be applied with the raw edge technique or finished edge technique using fabric interfacing. For interfacing instructions, see figure below.
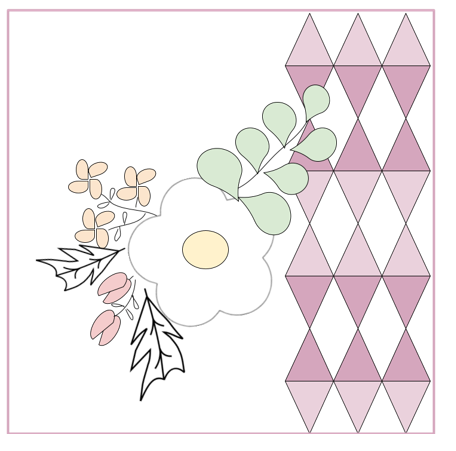
- Arrange appliqué on pillow background as shown in figure 1 and lightly pin or glue in place.
- Hand or machine stitch applique to the pillow background. Additional details, such as stems, can be added with hand stitching or embroidery. Example pillow was stitched in coordinating embroidery floss for additional texture and detail.
FINISH THE PILLOW
- Fold over and create a 1/4” finished edge on each piece of 19 x 11″ backing fabric pieces.
- Lay the quilted pillow top right side up and place the backing fabric piece face down with RST, overlapping the pieces across the center of the pillow.
- Sew a sturdy 1/2” seam around the perimeter of the pillow edge, leaving about a 3″ pocket opening centered between pillow edge corners. Make sure to backstitch over the seams where the backing fabric overlaps for additional reinforcement.
- Turn the pillow right side out through the pocket and gently poke out the corners.
- Stuff the pillow with your favorite 18″ pillow form and enjoy!
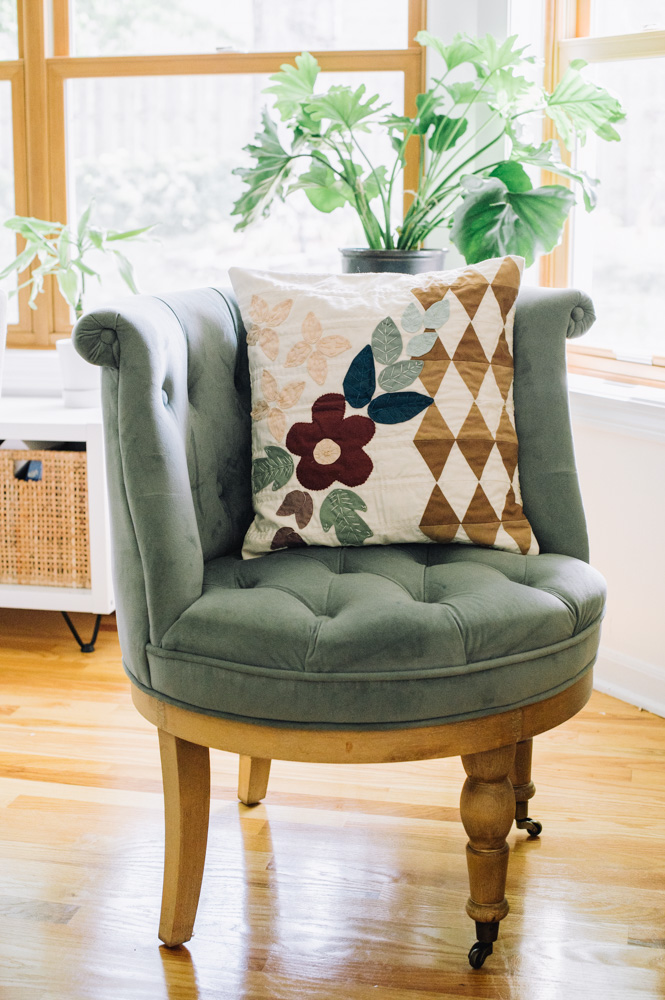
Floral Splendor Quilted Throw Pillow
Floral Splendor Quilted Throw Pillow
too bad the instruction etc weren’t a download.
All you need to do it go to the File menu at the top of the page and hit print, then you can print the instructions. I hope this helps.
I can not find a file menu
Hi Barb! This pattern is available for download to our Gold Club members. The download button is located at the bottom of the page. Please let us know if you have any questions! – Ashley, We Like Sewing