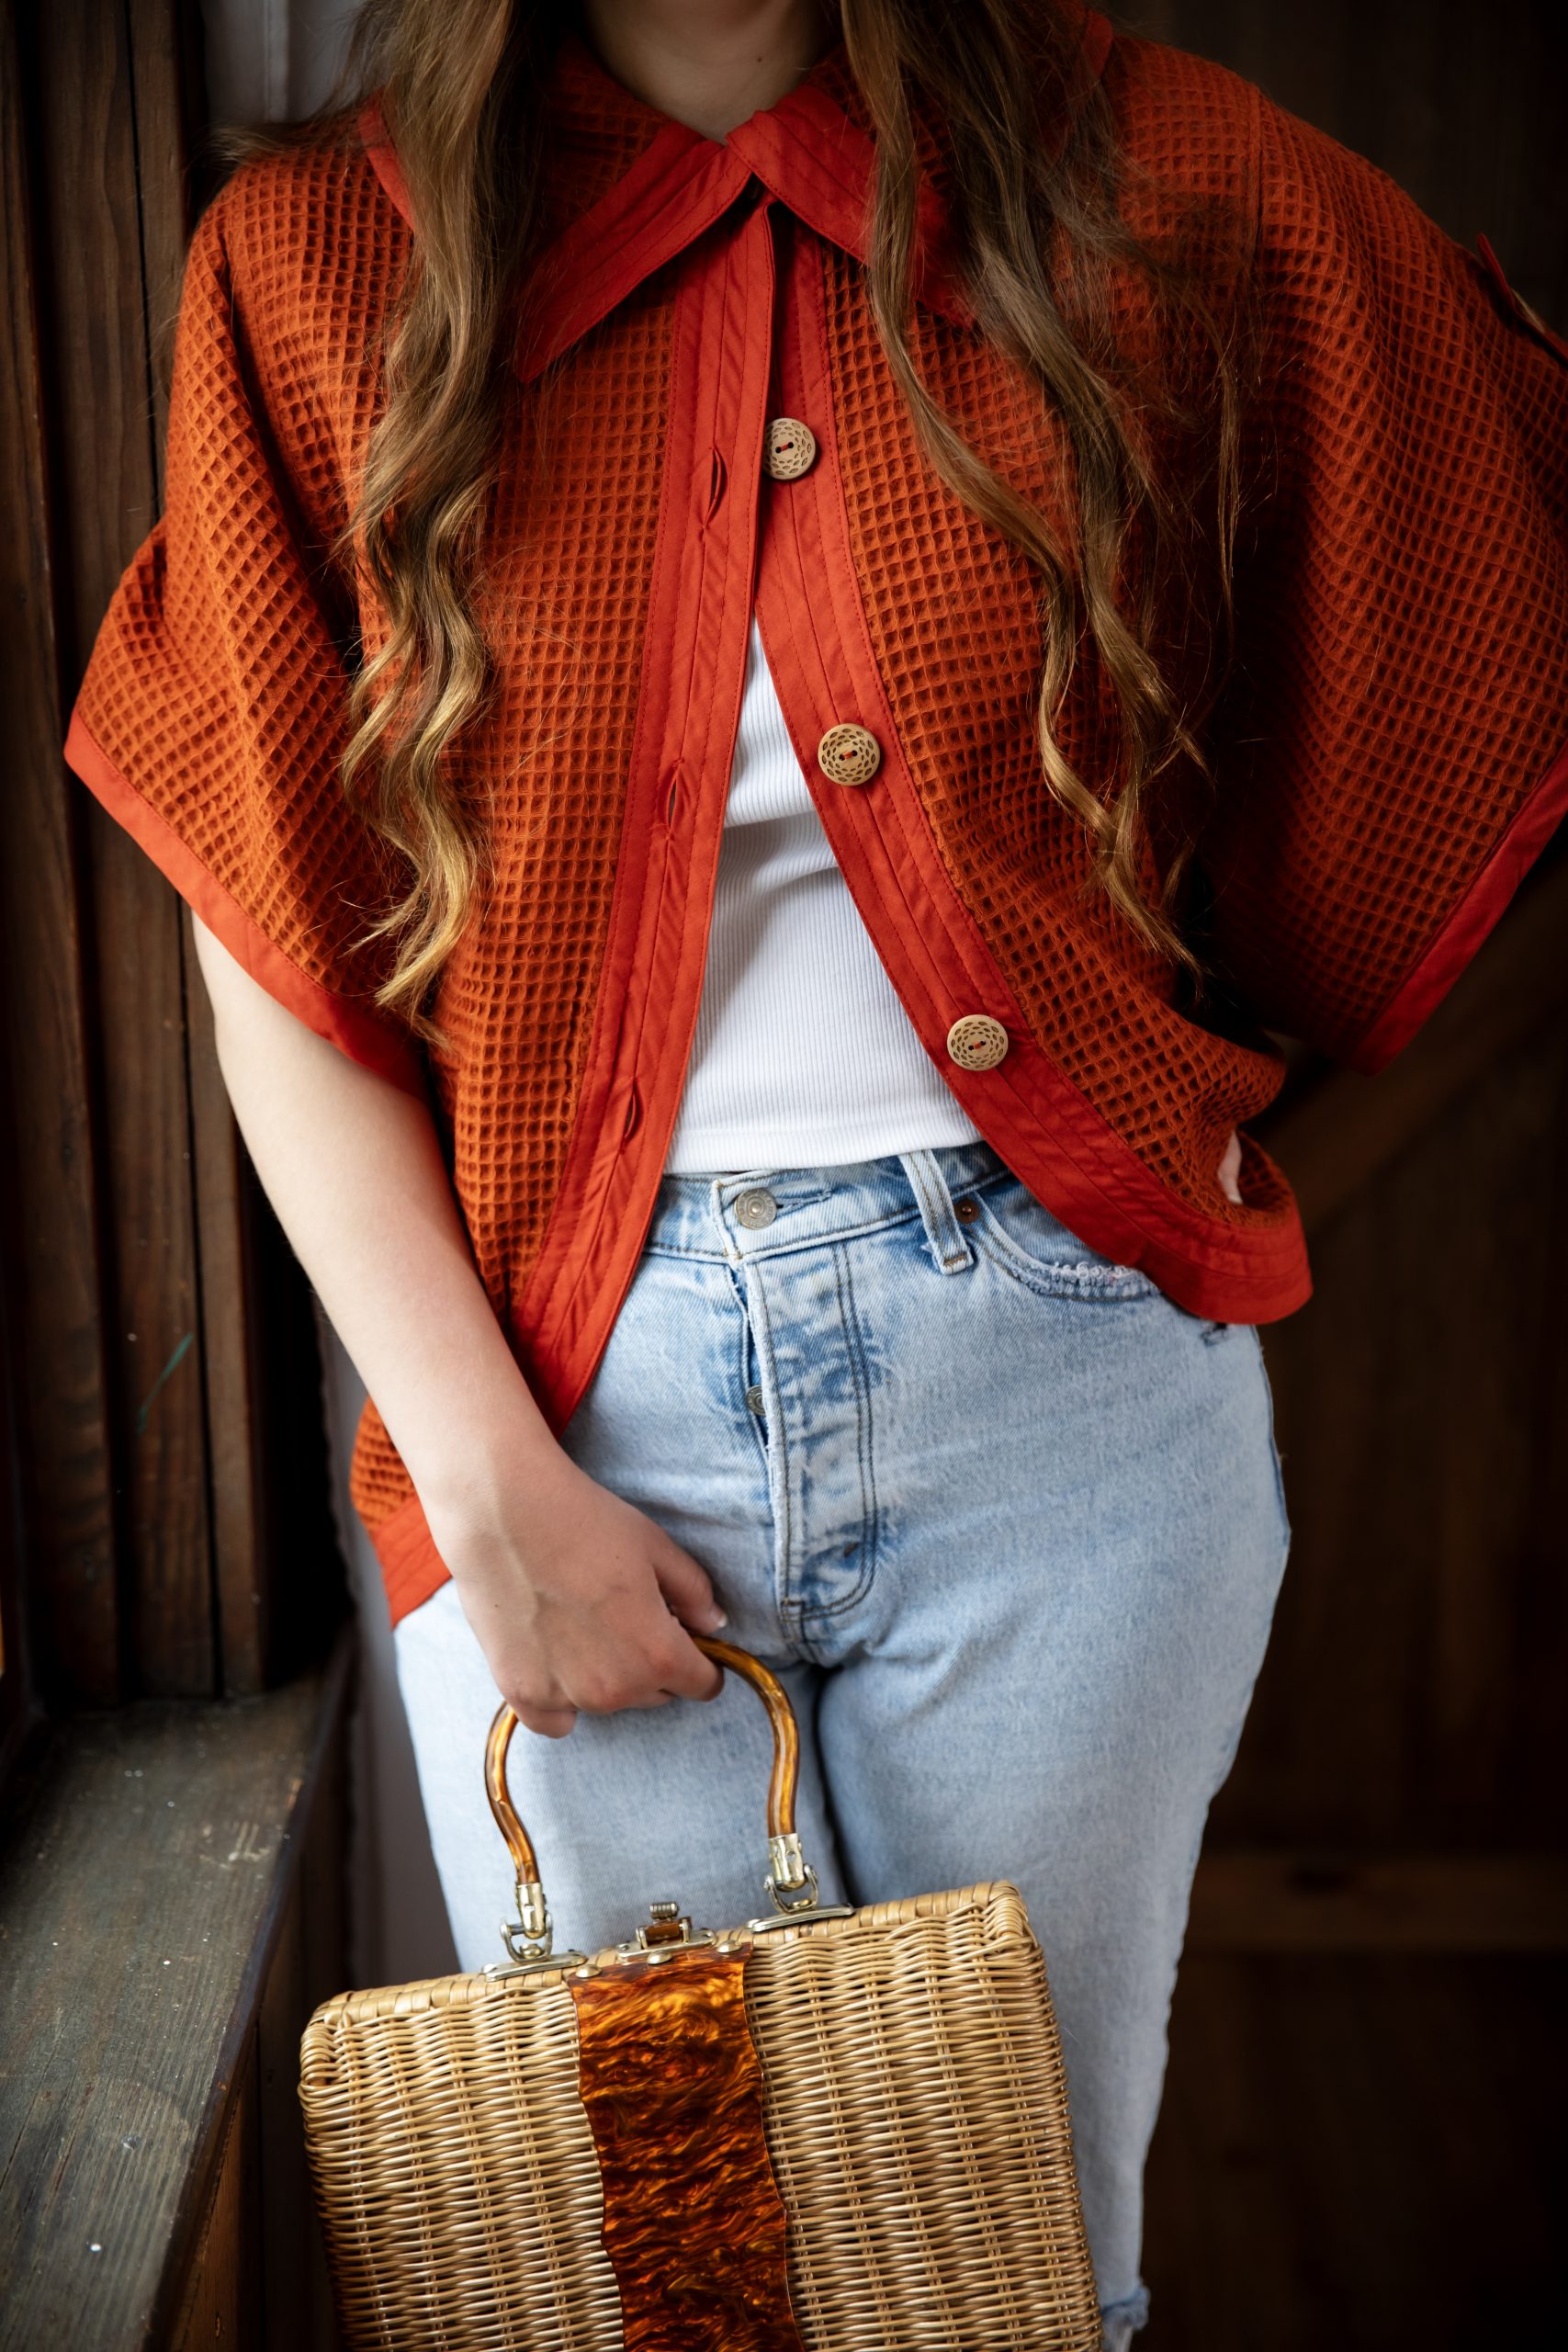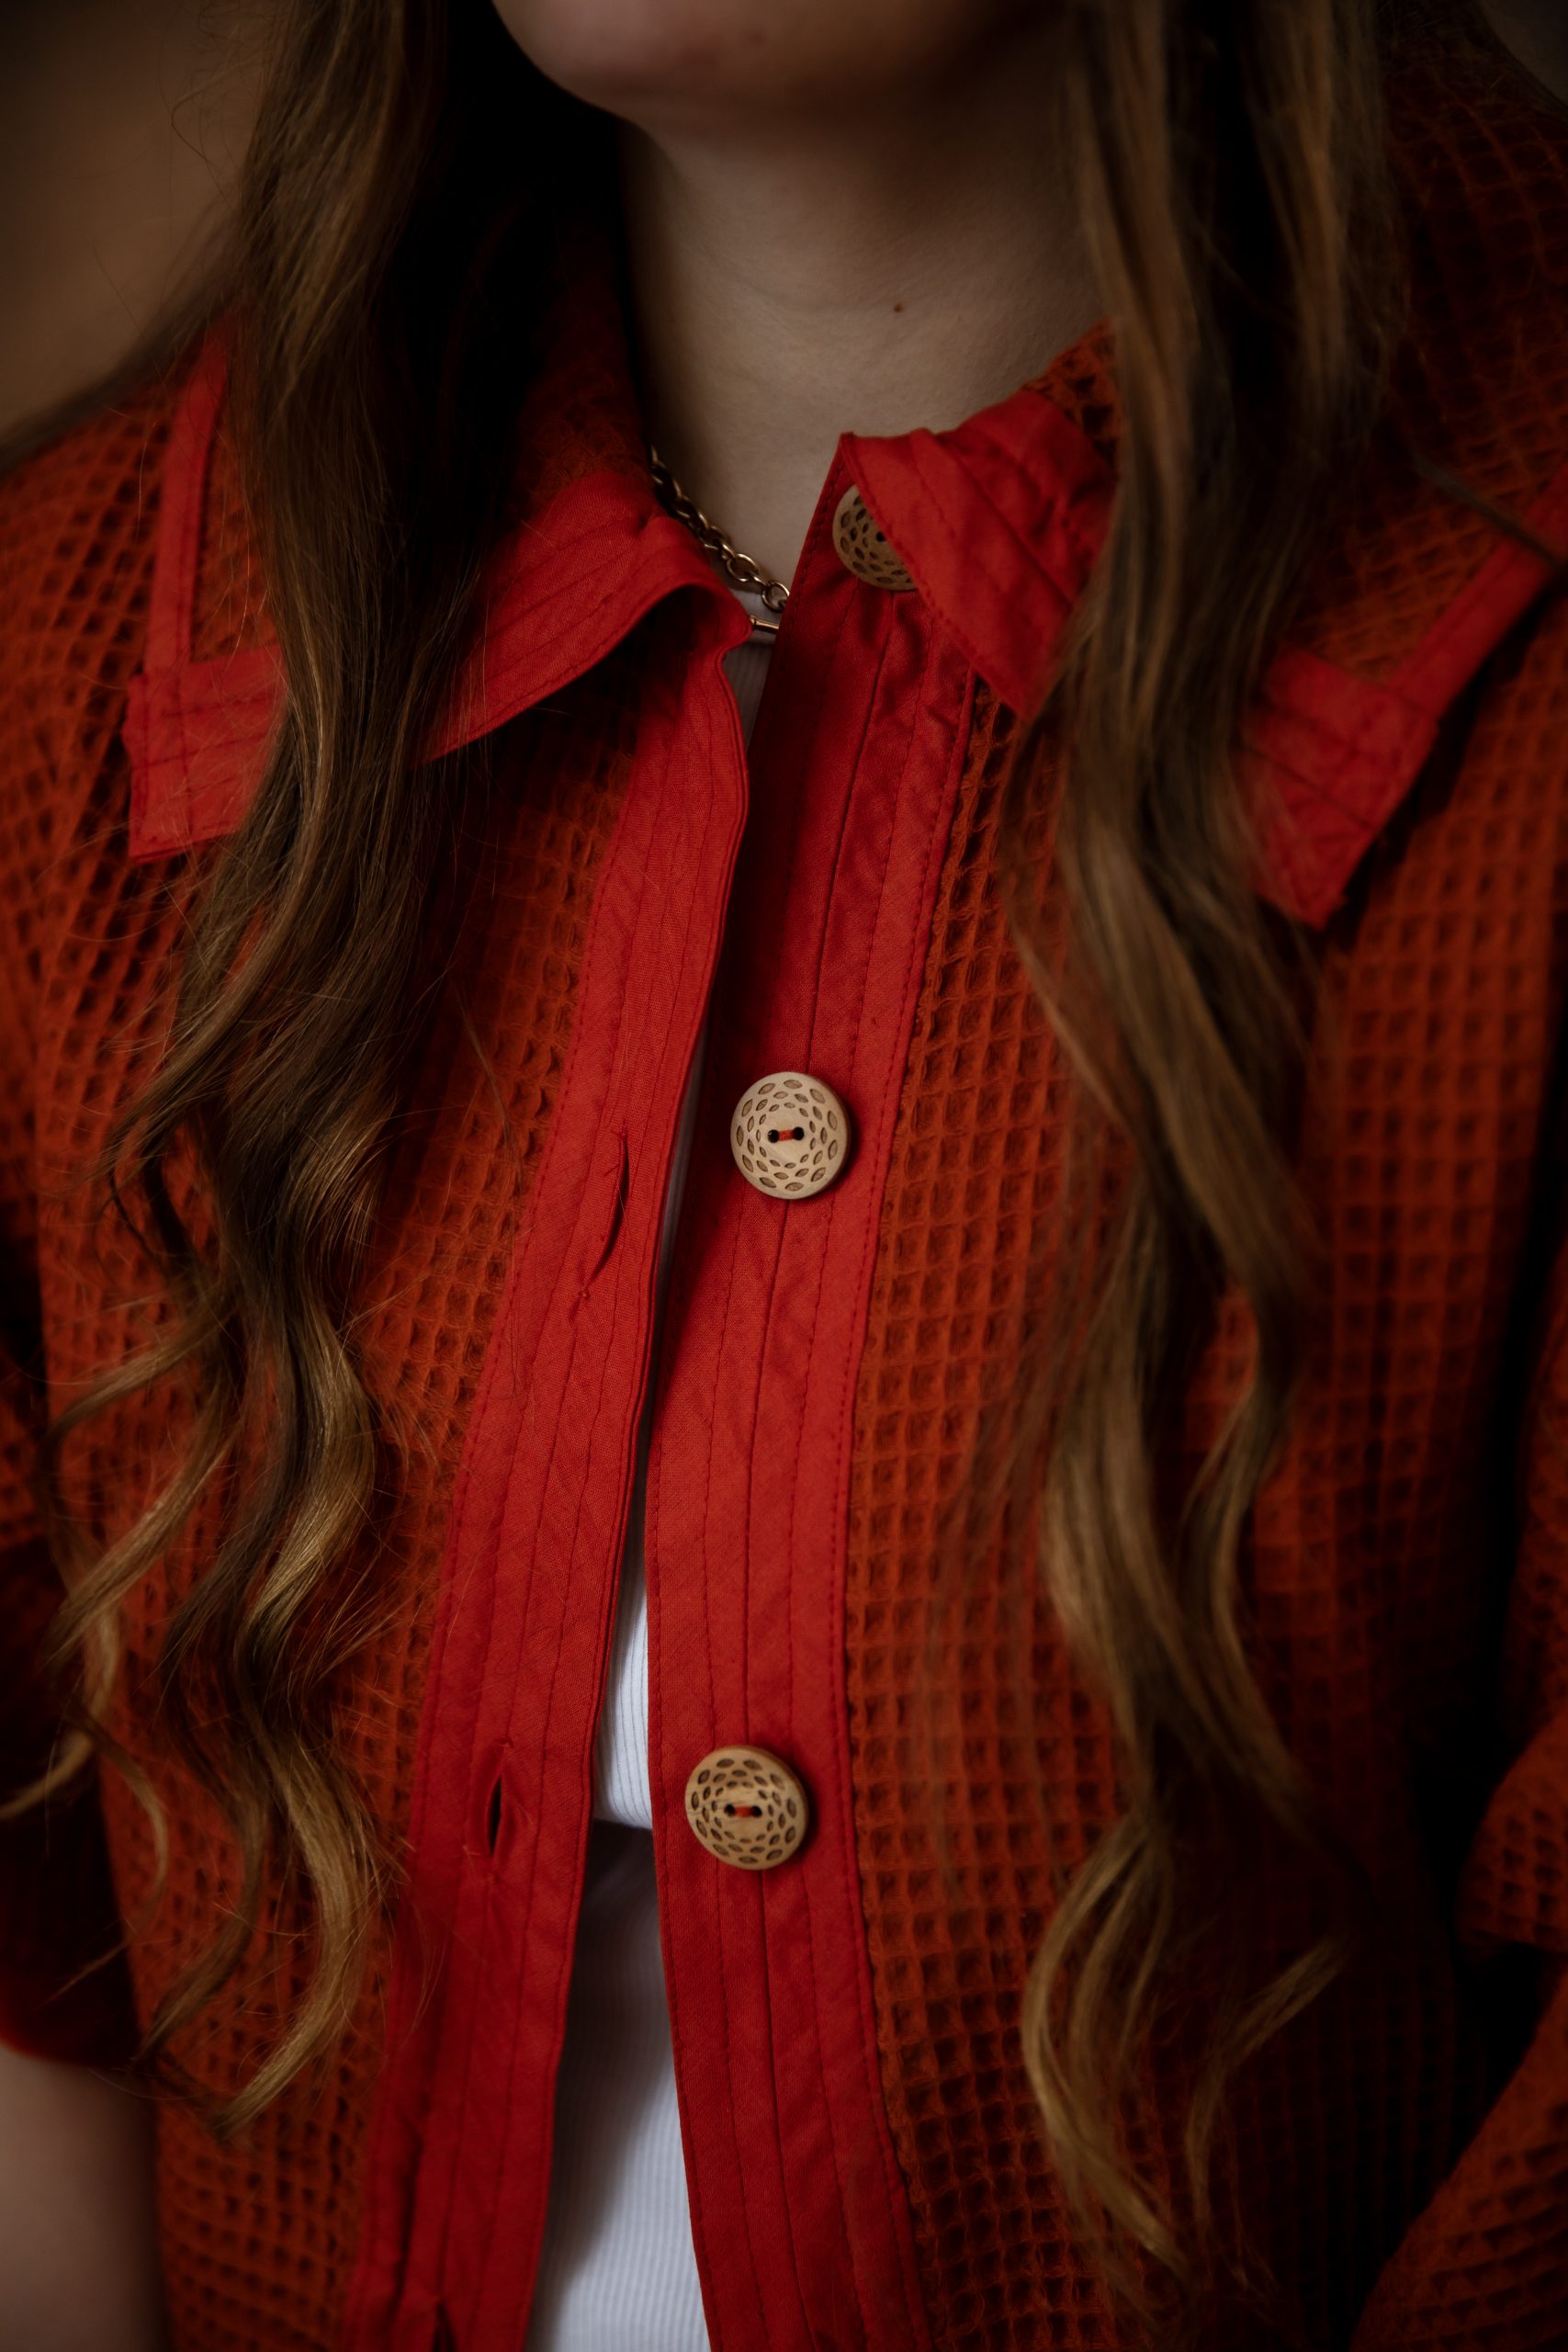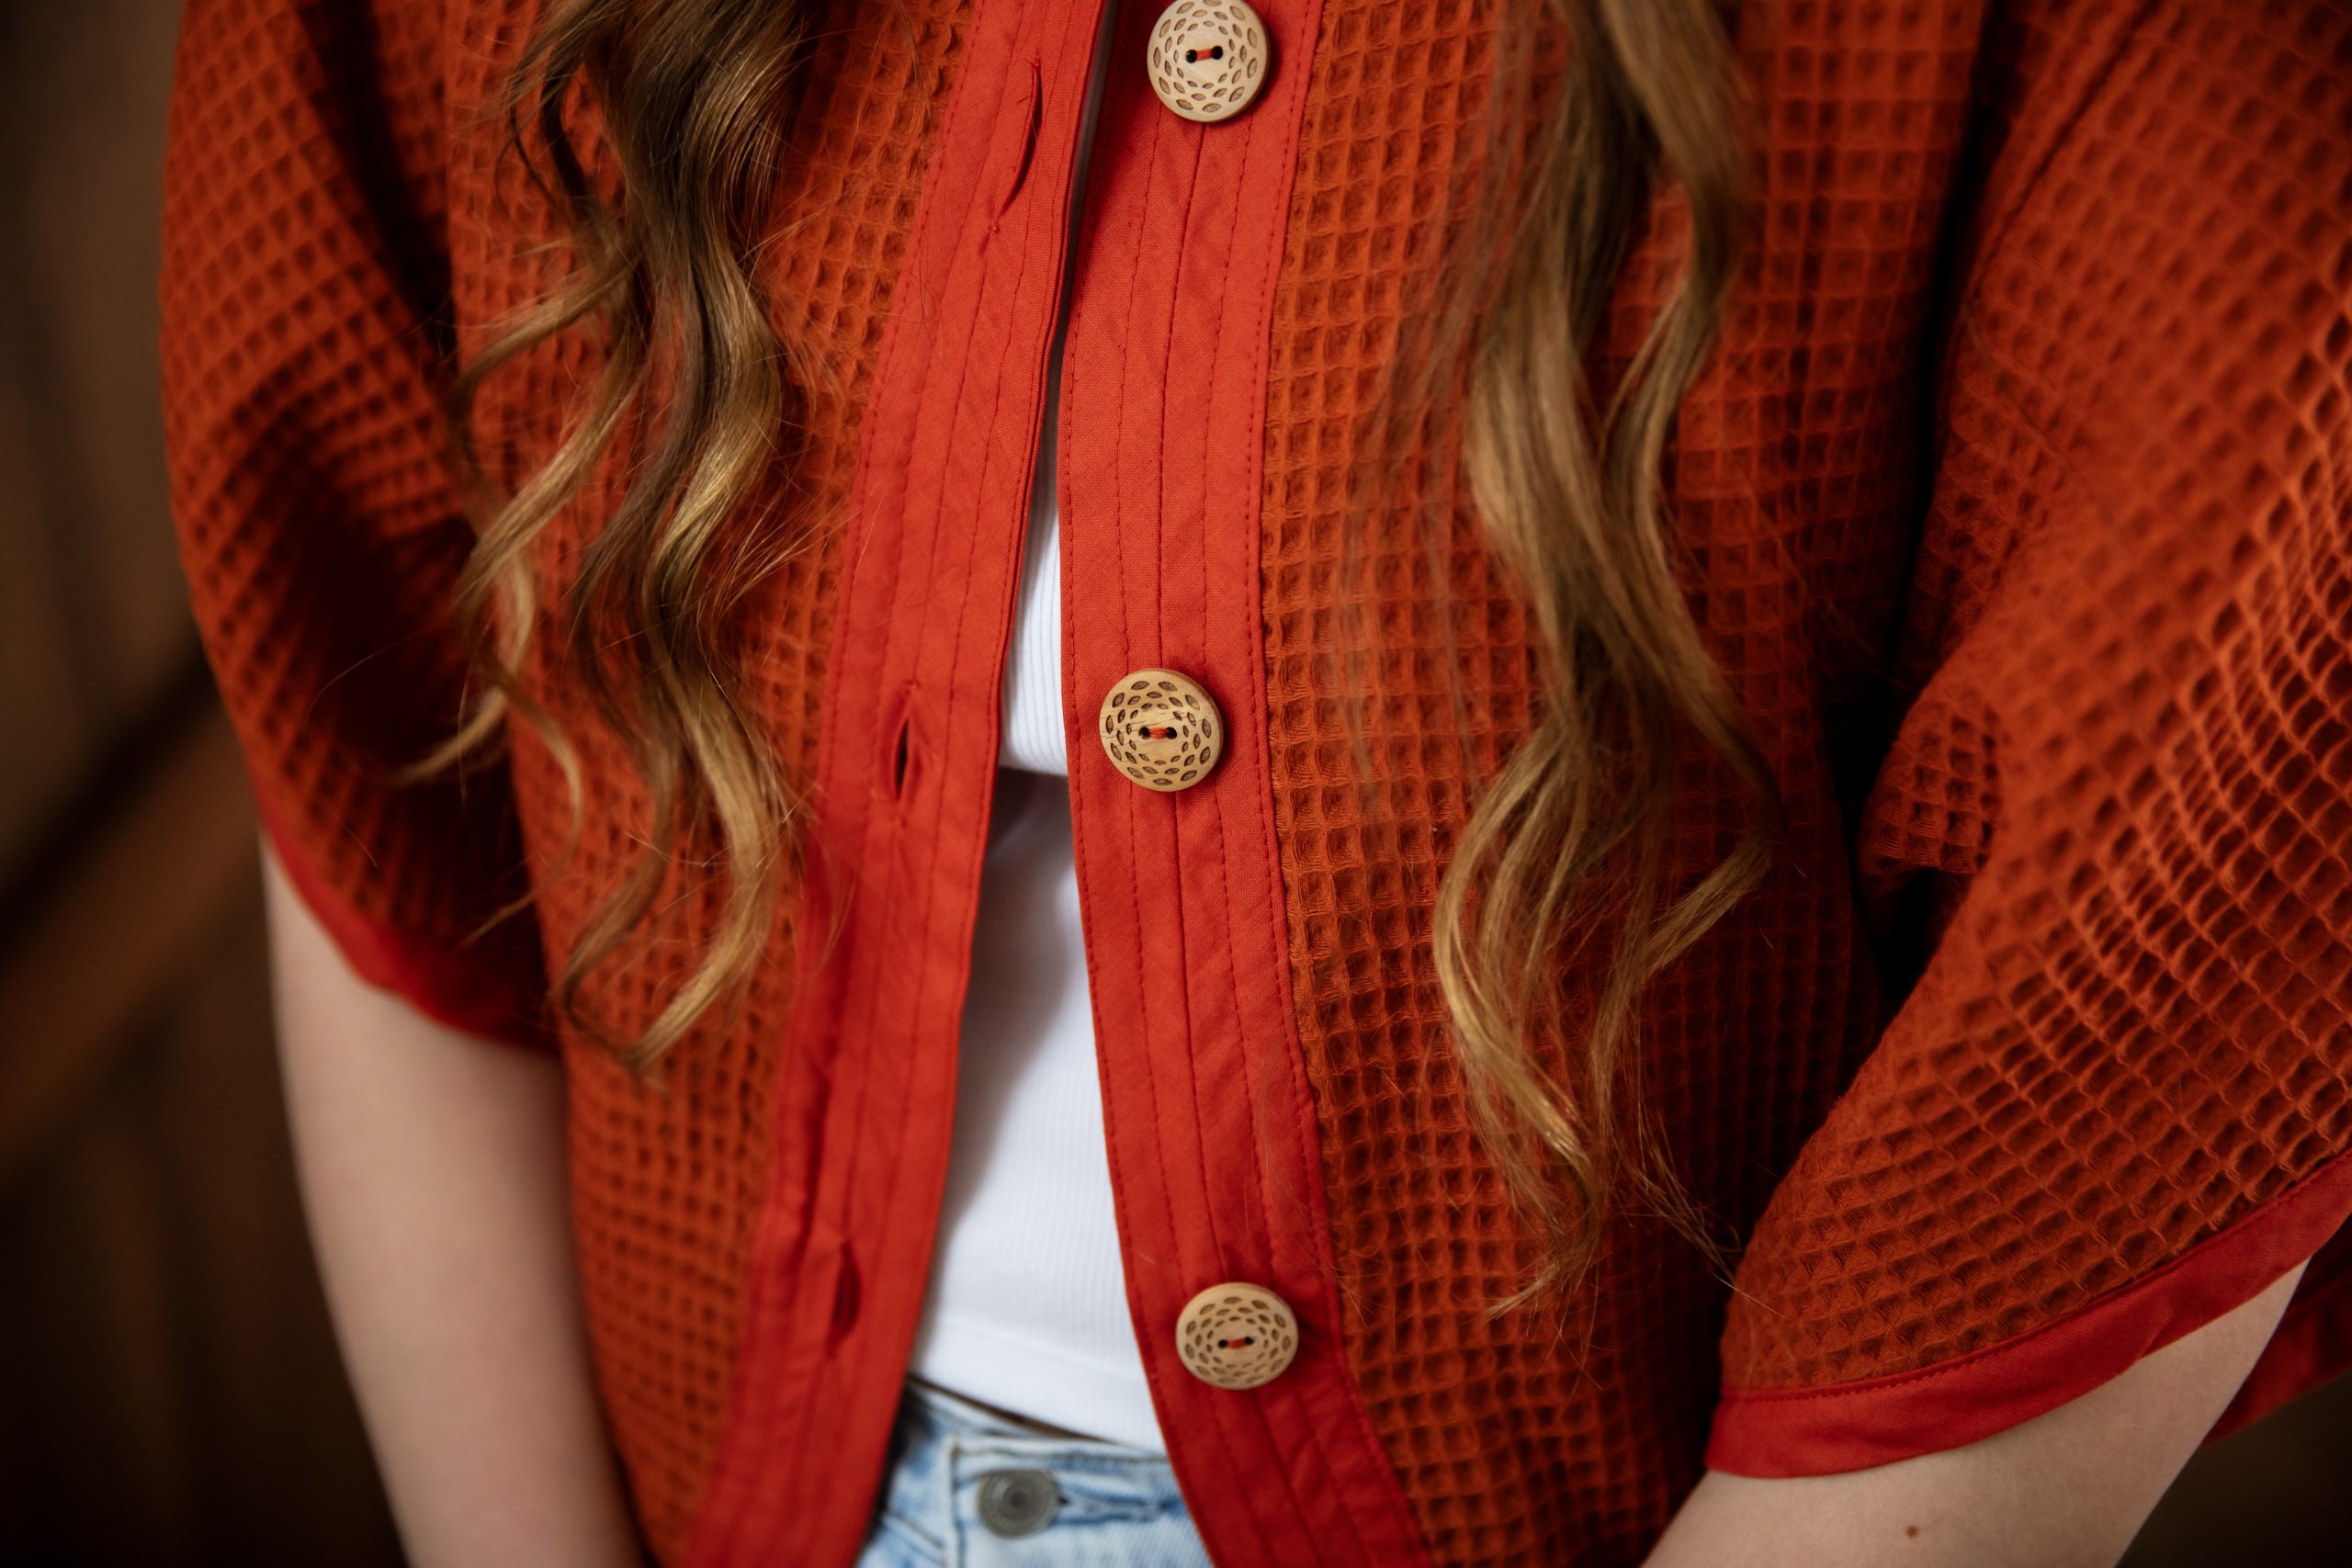
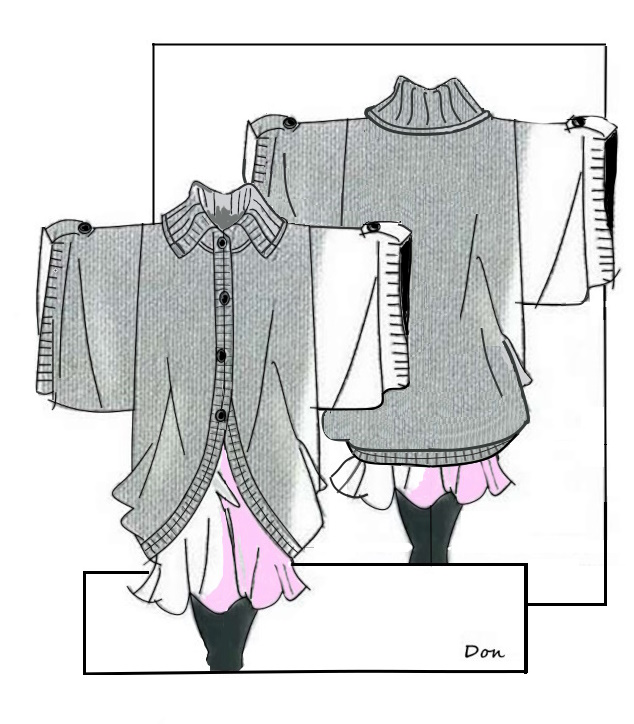
Update your fall wardrobe with a colorful statement sweater with this design from Don Morin. Made in textured waffle cloth in burnt orange, this polo sweater pattern has a bias-cut border and features roomy, kimono-style sleeves, making this pattern perfect for fall layering. Complete your sweater sewing pattern with large, stylish buttons and pair your top with your favorite pair of jeans and boots.
THE BIG WAFFLE POLO
This fun Big Waffle Polo sweater design offers more than a luxurious snuggle — it can add cozy texture and depth to your look this fall. The distinctive three-dimensional texture of waffle cloth makes it so great for transitioning and layering throughout the cooler months. The divots produced in the weaving process creates little pockets that hold in heat making it great for cooler weather. It provides warmth and insulation by trapping body heat and forming a warm comfortable soft layer next to the skin.
A combination of polo sweater and kimono robe, this garment’s styling is an eclectic mix. A bias-cut border frames its relax-fit shape from collar to hem, and completes the openings of the ample kimono-style sleeves.
Materials:
- Woven cotton waffle cloth piqué, 59” (150 cm) wide
- Cotton poplin, 57” (144 cm) wide, for bias trim
- Fusible stay tape, 3/8” (10mm) wide
- Spool of matching all-purpose thread
- 6 buttons, 3/4” (20 cm) diameter
- Roll of pattern paper, 31” (80cm) wide format
Note: For the model sample, Don used a cotton waffle cloth piqué and cotton poplin by Tula™ in terracotta; Vlieseline™ fusible stay tape; natural wooden buttons by Prym™ Gütermann™ Sew All sewing thread (terracotta).
Tools:
- Yardstick
- C-thru ruler
- French curve
- 45°/90° set square or triangle
- Tracing wheel
- Rotary cutter
- Card stock
- Quilter’s clips
FEATURED FABRIC: WAFFLE CLOTH:
If you’re looking for a versatile and cozy fabric that’s perfect for a variety of sewing projects, consider giving waffle cloth a try!
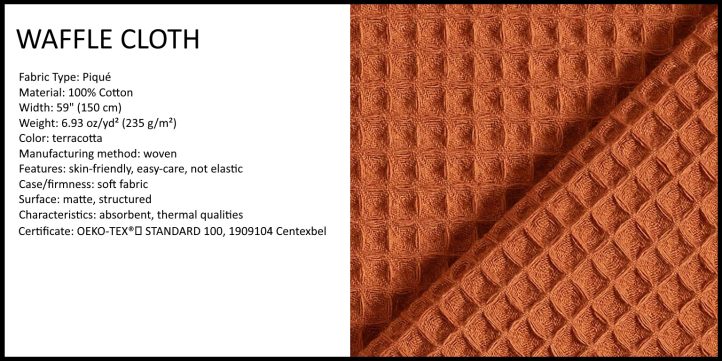
Most woven and knitted waffle fabrics are piqués, a type of dobby construction. Piqué weaving produces a unique divot/grid pattern effect resembling a waffle or honeycomb. These fabrics require the addition of extra yarns, called ‘stuffer’ yarns. These stuffer yarns are incorporated into the back of the fabric to give texture and added depth to the fabric design. Some piqués may also be made using the Jacquard attachment on the loom.
Waffle cloth is typically made of 100% cotton, which makes it cuddly soft and comfortable to use. Cotton-based fabrics are very popular as they are generally skin-friendly, breathable, durable and easy to care for. These material properties can keep you warm, which is why it’s a staple in many thermal/layered clothing styles. Its waffle pattern creates pockets of air, providing excellent insulation and breathability against the skin, making it ideal for clothing items, like this comfortable polo, as it keeps you warm without causing overheating.
SOURCING FABRIC:
When you are shopping for waffle cloth, look at how thick the material is and whether it will be a good weight for your project. The designer likes to think about the square/grid pattern of the fabric itself, and how it will improve or detract from the pattern they are making. The weave style will contribute to the aesthetic look and feel of your finished product. Think about where your seams will be, and additional coordinating fabrics and patterns as you plan out your items to sew.
Don also like to test its ‘give’ and see how the recovery on the fabric is before buying it for the project. Depending on the weight, waffle can be quite fine and threads could snag when sewing or seam ripping, but overall, the fabric is absolutely robust and durable. Its strength and longevity make it suitable for regular use and its waffle weave is easy to maintain and does not require special attention.
Taking proper care of waffle fabric helps retain its charming texture and utility over numerous laundering cycles. It is machine-washable in cold water, and air drying is recommended as some shrinkage is possible. Lightly press with a medium iron if needed, but don’t overly flatten the distinctive raised waffle peaks.
Here’s the easiest trick in the book: SCRUNCH IT. High-quality fabric bounces back smoothly, it holds its shape and resists wrinkles. This means it’s made with better fibers, a tighter weave, or a blend that stays polished longer. It’s important to consider the specific type of waffle fabric and its intended use when assessing its warmth, as it can range from light and breathable to thicker and cozier, catering to a variety of climates and preferences.
TECHNIQUES USED IN THIS TUTORIAL:
Making Bias Trim:
Bias Trim applied to any garment makes a very practical and attractive trimming. Uniformity of line, evenness in spacing, and fine machine and hand-stitching make bias trimmings a beautiful addition.
- Cutting On True Bias: Cloth strips and pieces cut on a true bias are frequently needed for finishes and trimming. Begin with a fashion fabric that has been squared and is on grain. To make a true bias, fold one corner of the cloth over so the length-wise threads of the goods exactly parallel the cross-wise threads. The 45 degree angle that is created in the true bias of the cloth. Then use a yardstick and chalk-wheel to mark the width of the strips you wish to cut parallel to the true bias, as shown in the diagram (1).
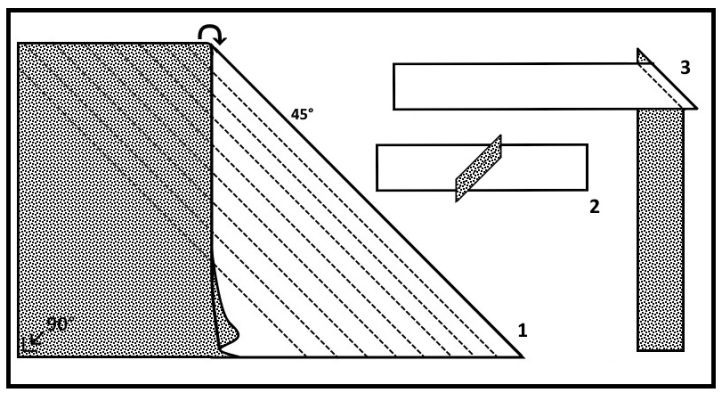
- Joining Ends of Bias Strips: Sew ends of bias strips together so that the grain of the material runs alike in both pieces (dia. 3). Connect as many strips as needed to obtain the desired length.
- Joining of Bias Strips Pressed Open: When joined bias strips are straightened out, press the seam open, and clip away the points that extend beyond the edges (dia. 2). The bias strip is now ready to be made into bias binding, bias edgings, and decorative contrasting trim.
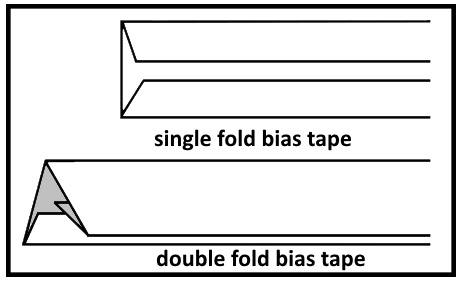
- Bias Binding: Commercially made bias binding is available in different widths ranging from about 1/4-inch (~ 6mm) to about 2-inch (50 mm) wide. Of course, if you make your own you can make any width you like. Bias binding comes in single fold bias tapes and double fold bias tapes. Single-fold means that the sides of the bias strip are folded towards the center and pressed to give it a clean edge on the bias strip. Double-fold means the bias strip is prepared like the single fold tape method, then the bias tape is folded over again in half so that turned edges meet and are pressed flat.
- Making Bias Fold Tape: It’s so easy to make your own with a bias tape maker. This tool is available in five ideal sizes: 1/4″, 1/2″, 3/4″, 1″ and 2″ finished widths. For all sizes, cut bias strips of fabric twice the width of the bias tape maker to make single fold bias tape. Another way is to make single fold bias tape that is much more customized without a special tool. Design a pressing template made from oaktag or heavy card stock. Draw the pressing template equal to the desire finished width of the trim required and in a manageable length (18” – 24” long). Use a sharp X-acto blade or art knife and a safety ruler to cut out the blanks for the template to get perfectly straight lines. Place the bias strip, face down, on the pressing surface and center the oaktag/ card stock strip on top. Secure the end of the oaktag with a pin on each ends to prevent slipping. Fold the excess material over the long edges of the oaktag towards the center of the strip, without twisting the fabric and press, in an up-and-down motion, along the folded edges. For longer lengths of bias trim, the fabric must be advanced on the pressing surface before proceeding and the method repeated for the new length and so on.
Hong Kong Seam Finish:
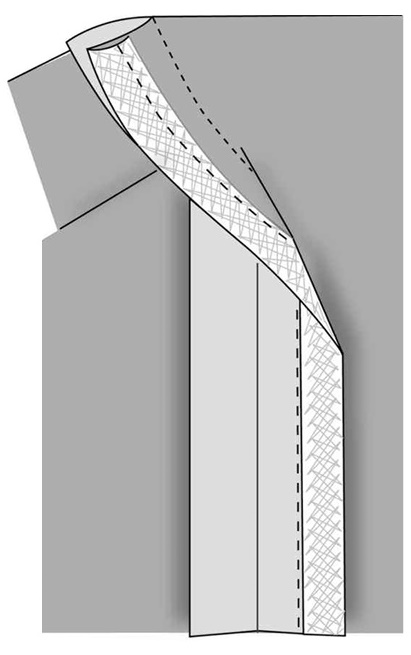
A Hong Kong seam finish, also known as a bias-bound seam, is a seam finishing technique that encloses the raw edges of a seam allowance with bias tape, resulting in a neat and professional look, especially for unlined garments. Unlike a standard bound seam, the bias binding is left unturned on the wrong side of the seam, which helps to reduce bulk.
Here’s a breakdown of the process:
- Prepare the fabric: Press your seam allowance open and cut bias strips of fabric (or use commercially-made bias tape).
- Attach the bias binding: Pin the bias binding to the seam allowance on the right side of the garment, aligning the raw edges, and sew with a 1/4″ seam allowance.
- Press and wrap: Press the bias binding away from the seam allowance, then wrap it around the raw edge to the wrong side and press again.
- “Stitch in the ditch”: From the right side, stitch in the ditch along the bias seam to secure the binding. On the wrong side, trim away excess bias tape close to the row of stitching.
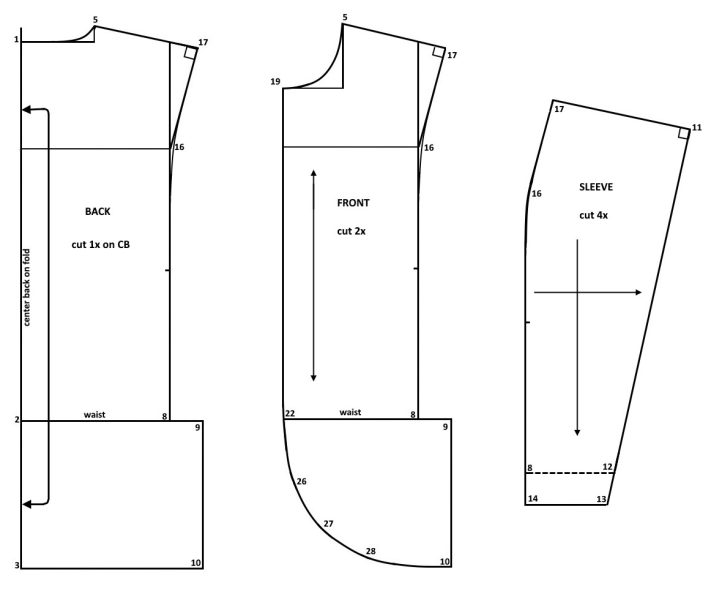
DRAFTING A CUTTING PATTERN:
The cutting pattern for this project is a simple pattern to draft. The median plane method, which divides the body or any of its parts into right and left halves, provides a balanced symmetry for the garment and superimposes its parts for the front and back planes of the body to customize a cutting pattern using your actual personal body measurements, for a relaxed fit. Along with some body measurements, you will need pattern/tracing paper, a set square, French curve, straight-edge rulers, and a tracing wheel.
Measurements Needed:
- Bust circumference: Measure around fullest part of torso over the bust.
- Hip circumference: Measure around fullest part of seat + 2” ease (about 8-9” below waist).
- Back Waist Length: Measure distance from nape of neck to waistline.
- Shoulder + Sleeve Length: Measure distance from high neck point on shoulder to top of arm and down to elbow joint.
- Neck Circumference: Measure around base of neck + 1/2” ease.
On a large sheet of pattern paper, draw a vertical “control” line along the left side of the paper.
On the control line, plot a point and label it “0”.

Back:
1 from 0 = 1” (2.5cm)
2 from 1 = back waist length. This is the waistline and the horizontal “control” line.
3 from 2 = 10” (25.4 cm)
Square all points on the control line across the paper. The term “square” means at a right angle (90°).
4 from 1 = 1/3 of half-neck circumference.
Square up from point 4 to locate point 5, as shown.
Extend a tangent line, 45 degrees from point 4.
6 from 4 = 3/4” (2 cm). Draw the back neck by connecting points 1-6-5 with a smooth curve.
7 from 1 = 1/4 bust circumference
8 from 2 = 1/4 bust circumference. Join points 7 and 8 with a straight line.
9 from 2 = 1/4 of the hip circumference + 1” (2.5 cm).
Point 10 is located at the intersection of lines squared from points 3 and 9.
Sleeve:
Extend a straight line from point 5, passing through point 7, and continue onward.
11 from 5 = high shoulder point (HSP) to elbow measurement less 3/4” (2cm).
Square a straight line from point 11 to locate point 12 on waistline.
13 from 12 = 8 – 9
Point 14 is located at intersection of lines squared from points 8 and 13.
Front:
15 from 1 = 1/4 back waist length (BWL). Square across to locate point 16 at intersection of lines.
From point 16, draw a straight line so that it is square to line 5-11. Label point 17, as shown.
At point 16, smooth the jagged connection with a gentle curve blending into the squared lines, as shown.
Point 18 = half-way between points 1 and 15. Square across to point 19; 19 from 18 = 3/4” (2 cm).
Point 20 is located at intersection of lines squared from points 18 and 5.
Extend a tangent line, 45 degrees from point 20.
21 from 20 = 1” (2.5 cm). Draw the front neck by connecting points 5-21-19 with a smooth curve.
22 from 2 = 3/4” (2 cm)
23 from 3 = 3/4” (2 cm)
24 from 23 = 5” (12.7 cm); square across.
25 from 23 = 5” (12.7 cm); square up.
26 from 24 = 1 1/4” (3.17 cm)
27 from 23 = 3 5/8” (9.3 cm), on 45° tangent line.
28 from 25 = 3/4” (2 cm)
Draw a smooth curve from waist (22) to side seam (10) passing through points 26-27-28, as shown.
Mark all grainlines parallel to vertical control line (0 – 3).
TRACE OFF PATTERN PIECES:
On a new sheet of pattern paper, trace off the back, front, and sleeve pattern pieces, as shown.
Sleeve: Connect the dots, 11-13-14-8-16-17-11. Add seam allowances*.
Front: Connect the dots, 19-22-26-27-28-10-9-8-16-17-5-21-19. Add seam allowances*.
Back: On folded paper, place CB (1-3) on fold and connect the dots. Trace 1-6-5-17-16-8-9-10-3-1. Add seam allowances*. Cut out on the fold as a full pattern piece.
* See notes on seam allowance
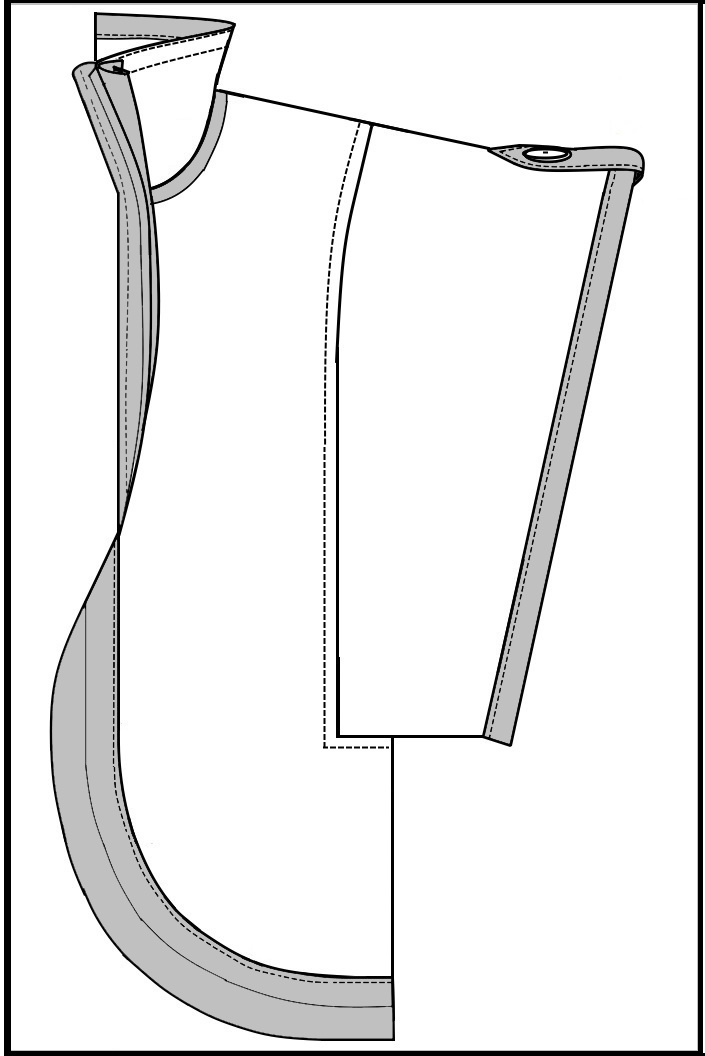
CONVERTIBLE COLLAR:
On a sheet of pattern paper, draw a vertical “control” line along the left side of the paper.
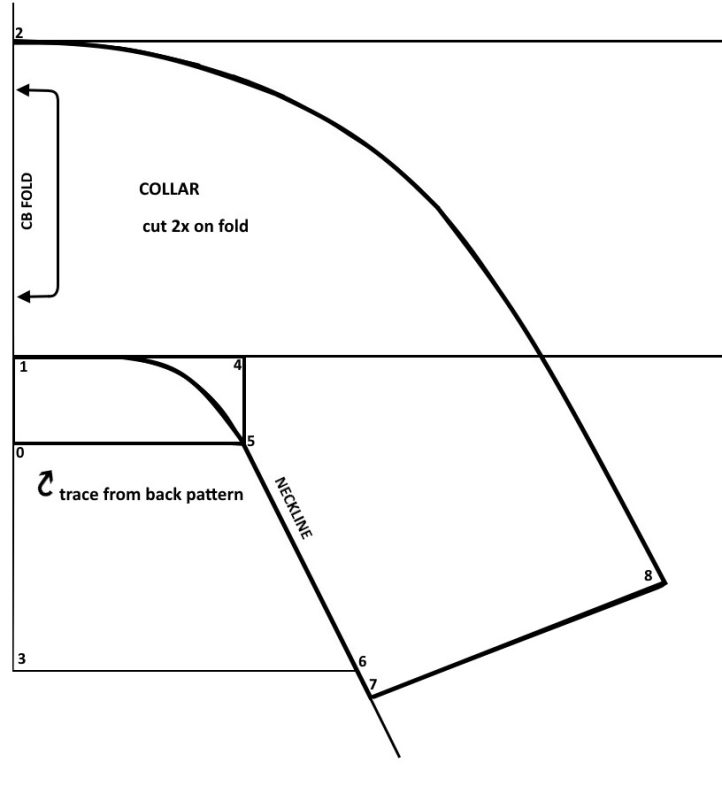
From the back pattern piece, flip upside-down and rest 0-1 on control line.
Trace off 0-1-4-5 and draw the back neck, 1-6-5 in the center of the paper.
Square a line up and down from point 1.
2 from 1 = 3.5 of neck circumference.
3 from 1 = same as 1 – 2
Square across from point 3.
6 from 3 = same as 1 -2.
Extend a straight line from 5 passing through 6.
On line 5-6, plot the length of the front neck measurement from the pattern draft. Label this point 7.
Draw outer edge of the collar parallel to the neckline.
8 from 7 = 1 – 2. Join points 7 and 8 with a straight line.
Label line 1-2 as ‘centerback on fold’ and add a grainline parallel to the control line, as shown.
On folded paper, place CB (1-2) on fold and trace out 1-5-6-7-8-2. Add seam allowances. Cut out on the fold as a full pattern piece.
SEAM ALLOWANCE:
Seam allowance is the width of the fabric between the stitching line and the cut edge of the fabric. The width of the seam allowance is frequently an indicator of garment quality. It is determined by many factors, including the type of fabric used and how it handles; the overall design, care, cost, and end use; the location of the seam and intricacy of the seamline; the amount of stress; the ability and need for alterations; the type of seam finish used; and your own personal sewing standards.
Keep in mind that wider seam allowances not only require more skill and time to sew accurately, but they also require more fabric than narrow ones. They are used generally on major seams (most often a vertical seam) that are straight or very slightly curved; on fabrics that fray easily or slip; on clean-finished seams; and seamlines that might be altered.
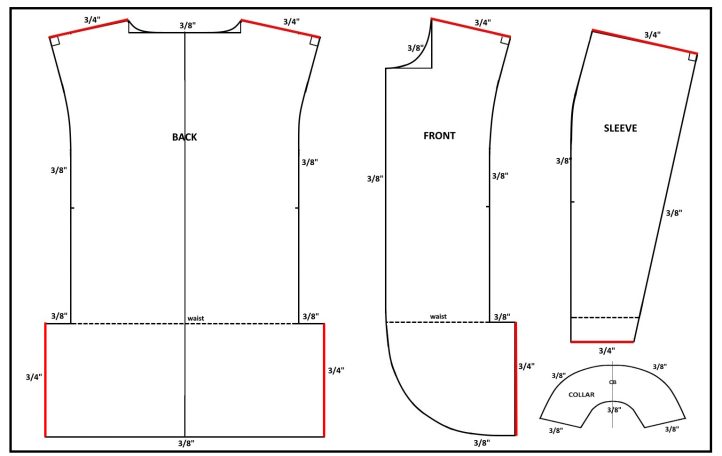
The clothing construction in this tutorial is an enclosed seam method which uses a minor seam allowance for convenience. The narrow seam width increases the control and accuracy of the maker while decreasing the time required to sew it. It also reduces the seam bulk, the number of clips, or the need to trim after stitching so that the seam lies flat.
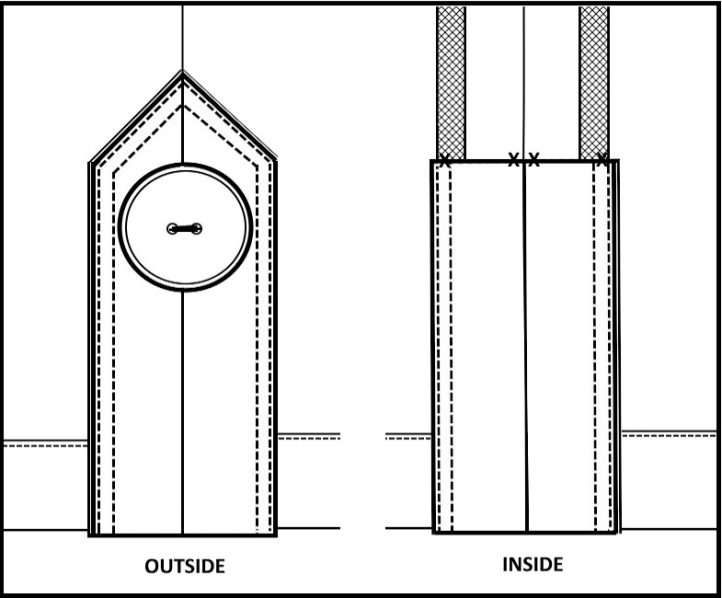
There are only two open seams in this garment: the shoulder and sleeve combination seam, and the side-seam and sleeve combination seam. Both require a major seam allowance to accommodate machine-stitching and seam finishes. Major seams (indicated in red) are typically double the width of the existing minor seam allowance, but feel free to select whatever is appropriate for your fabric’s characteristics.
- Begin by chalking out all major seam allowances. The shoulder and the side-seam of the back and front body pieces are exposed seams, so they need a 3/4” (20mm) seam allowance to be able to finish them properly.
- Continue with the same method as Step 1 and add a major seam allowance to each, the upper and lower edges of all the sleeve pieces, as these edges meet at the shoulder, and at the side-seam, respectively. The seam allowances must match in the assembly of the garment.
- Next, add minor seam allowance (3/8” / 10mm) to all the remaining edges of the layout. These narrow seam widths do not need finishing as they will be concealed. Also, it reduces the seam bulk and the need to trim after stitching so that the seam lies flat.
Marking and Cutting:
It is always recommended to pre-shrink any fabric made of natural fibers once before cutting and sewing, as fabrics made of cotton fibers or with a proportion of natural fibers can shrink during the first time it’s laundered. Washing cotton in hot water is possible, but it may affect the color intensity. Cold-water wash to reduce the fading of colors and skip the dryer if you want to avoid shrinkage; hang them to dry in the sunshine to keep them in tiptop shape.
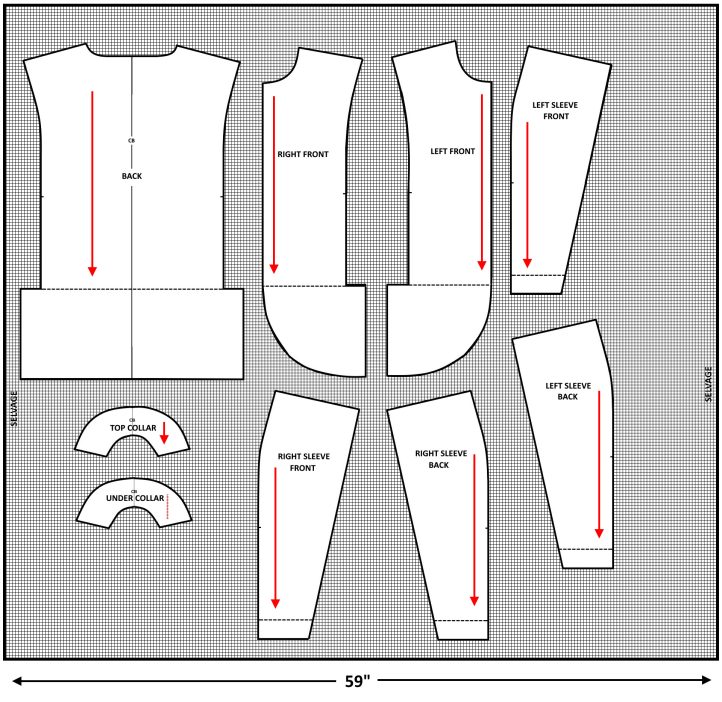
MARKING THE PATTERN LAYOUT:
It is best practice to mark out the pattern pieces on waffle cloth in a single ply instead of on a fold, to ensure you get beautiful, straight lines.
- Working with the wrong side of the fabric facing up on the work table, begin by laying out the largest pattern piece and progressively work down to the smallest pattern piece. Pro Tip: Use the surface “grid” pattern of the waffle cloth to aid in pattern piece placement to guarantee pleasing straight lines. Chalk or thread-baste around the perimeter of the pattern piece to mark out each piece.
- For pattern pieces requiring a pair or more cuts, flip over the pattern to mirror its orientation on the body and space it out next to the first one. Ensure that the grain-line is parallel to the selvage of the cloth.
CUTTING OUT THE FABRIC:
You can use a rotary cutter or shears just make sure you lay out your squared material on grain in your intended direction for the project, so that the fabric rests flat on your cutting table. Waffle cloth has poor recovery, which means when you stretch it, it does not snap back into place, so you may have to weigh down the fabric in open spaces around your chalked pattern shapes.
Another thing to keep in mind is that both sides of the waffle cloth look identical. To avoid confusion while assembling, put a safety pin on the wrong side of the cloth for each cut made to distinguish the right and wrong sides of the material.
STAYING THE RAW EDGES:
Once the fabric is cut, the waffle cloth begins to fray. Typically, this is prevented by applying a suitable seam finish before assembling the garment. However, that operation is redundant if the raw edges are to be enclosed.
To prevent fraying of cut edges while handling the material, secure the cloth’s edges with fusible stay tape. This is a mid-weight, bias-cut fusible webbing made from synthetic fibers and with a reinforcement stitch. The fusible stay tape is 3/8-inch (10mm) wide and sewn through with a chain stitch at one edge to prevent any stretching on many types of fabrics.
- Securing to stabilize all raw edges, following the pattern’s straight, curved, or diagonal cuts. Do not stretch the tape while applying.
- Iron slowly without steam with pressure, using only the tip of the iron in the allotted seam width, for about 8 seconds per point (or follow manufacturer’s directions). The tape is fused in place, so the 8 mm extends to the edge of the fabric and is sewn directly behind the chain stitch.
CUTTING THE BIAS TRIM:
For this garment, true bias trim is used to make the garment’s border that runs from collar to back hem; to finish the opening of the kimono sleeves; to trim the outer edge of the top collar; to trim the neckline; to make the sleeve tabs; and to use as a seam finish for open seams (Hong Kong method). The bias grain of woven fabric offers ease, malleability and a flowing drape. The negatives are that these characteristics also give instability to the fabric so it can be difficult to work with at times, resulting in much more wasted fabric than cutting on the straight grain.
Begin with a length of cotton poplin that is as long as it is wide and that has been squared and is on grain.
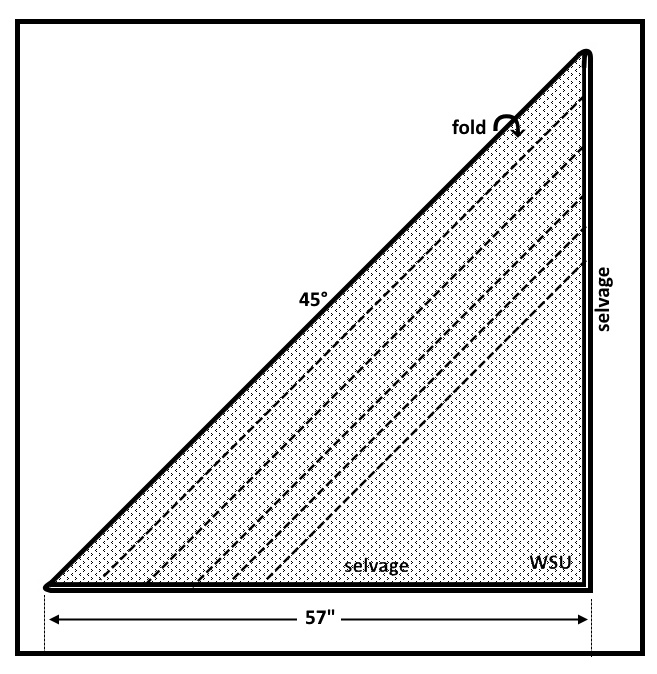
- With right sides together, fold one corner of the cloth over so the length-wise threads of the goods exactly parallel the cross-wise threads. The 45 degree angle that is created in the true bias of the cloth. Press the fold flat using an up and down motion so as not to stretch the bias grain. With the fabric remaining folded, use a yardstick and chalk-wheel to mark out 3 bias strips parallel to the folded edge. The width needed is 2 1/2” (6.4 cm) wide. Chalk ends of each pair of strips to distinguish the right and wrong sides of the material. These bias strips will be used for the border trim, sleeve openings, and sleeve tabs.
- Next, chalk 2 more pairs of bias strips for bias fold tape for the seam finishes and collar trim. The width needed is 1 1/2” (3.8 cm) wide. Chalk ends of each pair of strips to distinguish the right and wrong sides of the material. These bias strips will be used for a Hong Kong seam finish on open seams and for trimming the outer edge of the top collar and outlining the neckline of the garment.
- Use a long metal yardstick and rotary cutter to produce smooth, even cuts.
Machine Set-Up:
As no two sewing machines perform in the same manner, you should always test the thread tension and stitch quality on a scrap piece of fabric that matches the one you will use for your project. This way, you can avoid wasting time and materials on seams that are not satisfactory. Testing the thread tension and stitch quality will also help you prevent damage to your fabric, needle, or sewing machine.
Machine Needle – Recommend a universal ‘sharps’ needle with a gauge of 80–100.
Machine Foot – Narrow 1/4-inch single stitch foot.
Foot Pressure – Try lowering the pressure on your presser foot as the material is quite thick when layered together.
Machine Tension – Standard (4 out of a possible 9).
Stitch Length – A little longer than average length (3 out of a possible 5).
Top Stitch Length – Long stitch length (5 out of a possible 5).
Thread – High-quality cotton-wrapped polyester thread holds color and luster better when used on semi-synthetic fabrics and tends to be stronger and less likely to fray in your machine.
Pressing – Lightly press with tip of medium iron if needed, but don’t overly flatten the distinctive raised waffle peaks. Prone to shrinkage by high temperatures. A seam stick is an excellent tool for your pressing station. It is a half-round wooden dowel typically made from poplar, ash, or maple and ranges from 18” to 24” in length.
Sewing Instructions:
ASSEMBLY:
Bias trim, also known as bias binding or bias tape, is a versatile sewing notion that can be used for both functional and decorative purposes. In this tutorial, cotton poplin is used to make various bias bindings to finish raw edges, bind sleeve openings, and create sleeve tabs. It is also a great way to add a pop of color and border detail to a garment.
Making Border Trim and Sleeve Tabs (Poplin):
Care must be used to not stretch or twist the bias binding when applying it.
- Prepare the Bias Binding: Select a pair of bias strips that are 2 1/2” (6.4 cm) wide. With right sides together (RST), stitch across the short ends of a pair and cut away excess material to 1/4” seam allowance. Press seam open. Repeat the method for a second pair of bias bindings.
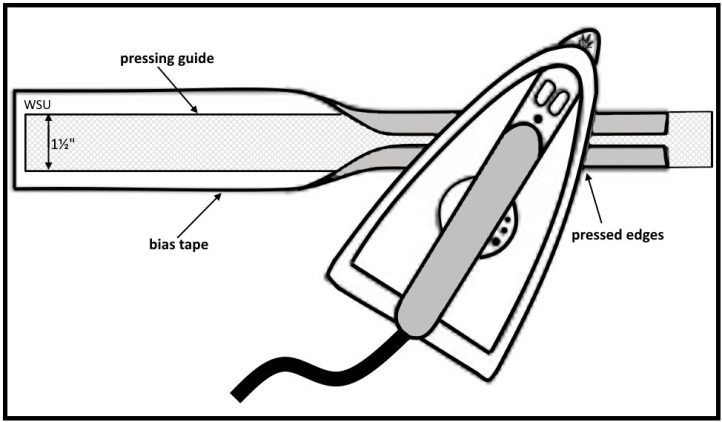
- Pressing the Edges: Place each long bias strip, right side down, on the pressing surface and center a 1 1/2” (3.8 cm) oak-tag pressing guide on top. Secure the ends of the oak-tag with a pin on each end to prevent slipping and fold the excess material over the long edges of the guide towards the center of the strip, without twisting the fabric. Press, with an up-and-down motion, along the folded edges. For longer lengths of bias trim, the fabric must be advanced on the pressing surface before proceeding and the method repeated for the new length and so on. Group bias strips in pairs and handle gently to not stretch the bias grain.
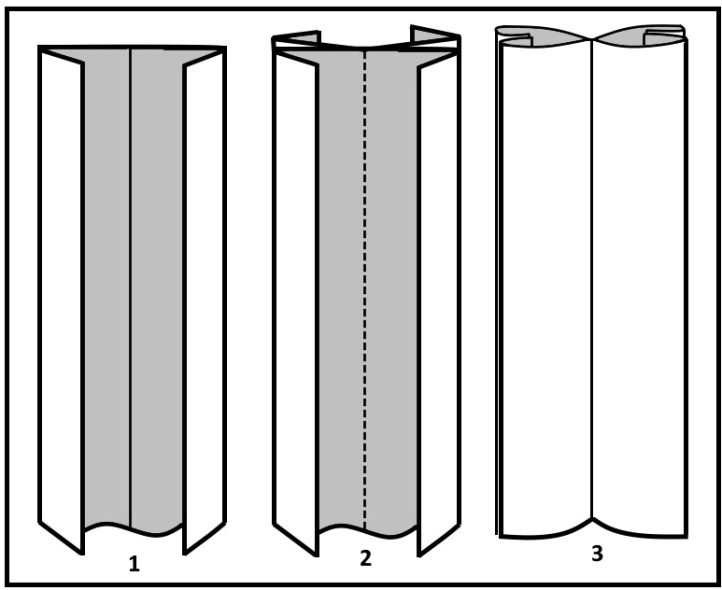
- Mark the Center Line: With wrong sides together (WST), fold strip in half length-wise and match up the sides of the bias strip to form a double fold bias tape. Lightly press with the tip of the iron to give it a clean edge on the bias strip, as shown in Diagram 1.
- Join Bias Tapes To Make Border: Open the bias tape flat and with RST, lay one double fold bias tape on top of the other. Align and match up their edges and pin together. Machine-stitch along the crease of the fold line in the center of the strip, as shown in Diagram 2. Next, with WST, align the folded edges and finger-press flat along fixed center of strip, as shown in Diagram 3. Set aside.
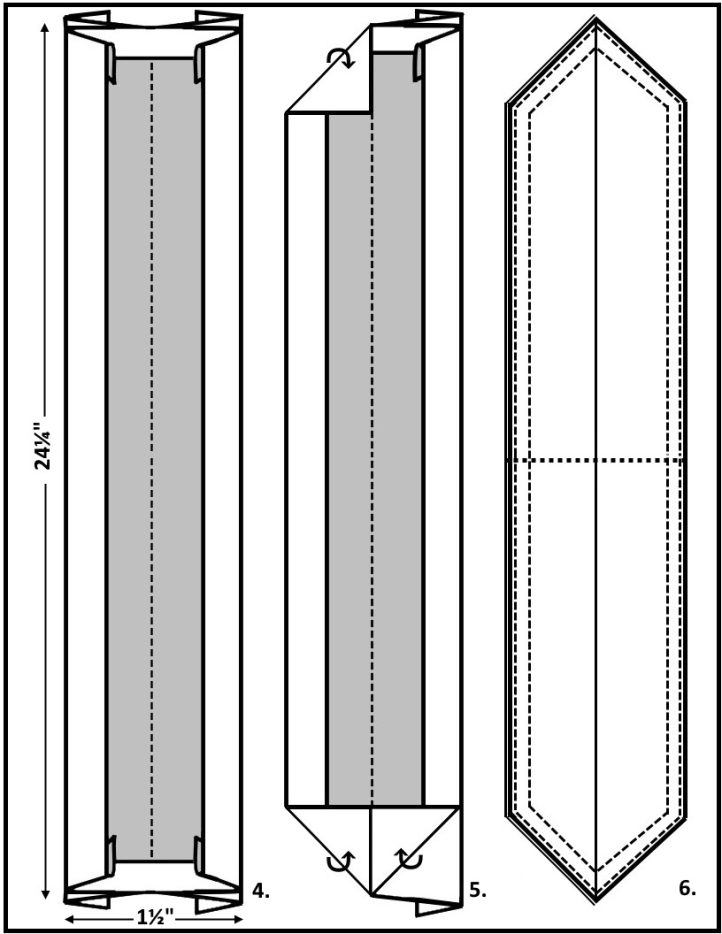
- Make Sleeve Tab: Select another pair of bias strips that are 2 1/2” (6.4 cm) wide. Cut a length of 25” (63 cm) long. Allowing for a 3/8” (10mm) at each short end, turn under seam allowances and press flat. Open the bias tape flat and with RST, lay one bias binding on top of the other. Align and match up their edges and pin together. Machine-stitch along the crease, back-tacking at each turned end (Diagram 4). With WSU (wrong sides up), fold the corners diagonally toward the center on both halves and press flat as shown in Diagram 5. Next, fold the ends WST to form half of an arrow. Repeat for the opposite side. Match up long edges and press flat. Double top-stitch along perimeter of sleeve tab, as shown in Diagram 6. Cut in half to make 2 sleeve tabs and set aside.
Constructing the Body (Waffle Cloth):
Be careful not to stretch your material when pinning/basting layers together. But if you do, waffle cloth presses beautifully so there is some forgiveness there.
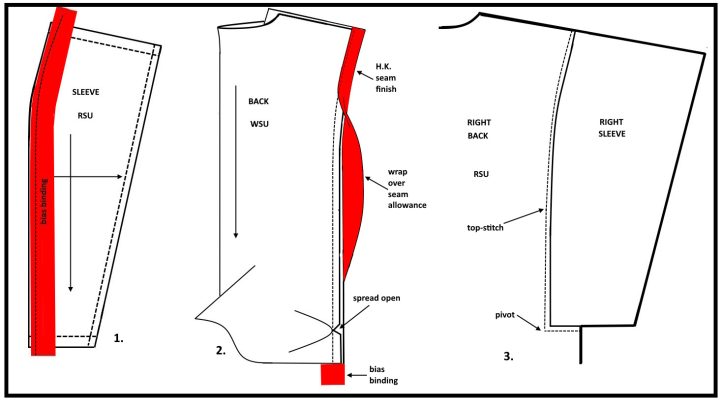
- Stay Stitch: With wrong side up (WSU), stay-stitch the inside corners of the armscye of front and back pieces. Sew on the stitching line and follow the edges of the fusible stay tape.
- Clip Corners: Clip diagonally into seam allowance at corner of all armscyes up to the stay-stitching to relieve tension at the pivot point.
- Attach Bias Tape: With right sides together (RST), pin/baste bias binding (1 1/2” wide) to armscye edge of sleeve. Do not stretch bias binding. Sew in place and press the bias binding away from the seam allowance. Repeat for all sleeve pieces.
- Attach Sleeves to Back Section: With RST, align back armscye to left back sleeve. Pin/baste back armscye to sleeve, spreading the seam allowance open at pivot point corner. Sew in place and press seam away from sleeve. Repeat method for right back sleeve.
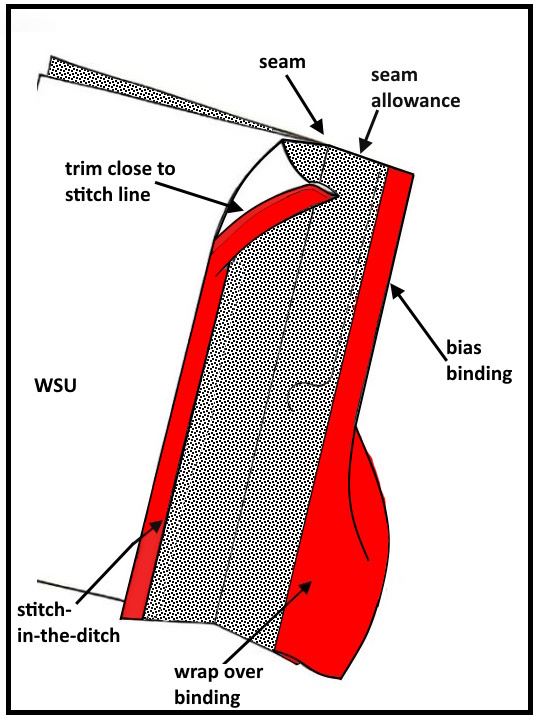
- Hong Kong Finish: Grade the seam allowances of the armscye, then wrap bias binding around the raw edge (about 3/8” in width) to the wrong side and press flat. From the right side, stitch-in-the-ditch along the bias seam to secure the binding. On the wrong side, trim away excess bias tape close to row of stitching. Press seam allowance to one side away from the sleeve.
- Top-Stitch Armscye Seam: With right sides up (RSU), top-stitch 1/4” from seam on back section to secure seam allowance in place. Repeat for opposite sleeve.
- Attach Sleeves to Front Sections: With RST, align left front armscye to left front sleeve. Pin/baste back armscye to sleeve, spreading the seam allowance open at pivot point corner. Sew in place and press seam away from sleeve. Repeat method for right sleeve to right front.
- Hong Kong Finish: Grade the seam allowances of the armscye, then wrap bias binding over the raw edge to the wrong side about 3/8” wide and press flat. From the right side, stitch-in- the-ditch along the bias seam to secure the binding. On the wrong side, trim away excess bias tape close to row of stitching to complete the seam finish. Press seam allowance to one side away from sleeve. Repeat method for other front section.
- Top-Stitch Armscye Seam: With RSU (right side under), top-stitch 1/4” from seam on front sections to secure seam allowances in place.
- Apply Hong Kong Finish to Major Seams: To the shoulder and upper sleeve seam, pin/baste the bias binding (1 1/2”) to the seam allowance on the back of the garment, aligning the raw edges, and sew with a 1/4″ seam allowance. Do not stretch bias binding. Repeat method for the side seam and under sleeve seam of the garment. Press the bias binding away from the seam allowance, then wrap it around the raw edge to the wrong side about 1/4” in width and press flat. From the right side, stitch-in-the-ditch along the bias seam to secure the binding. On the wrong side, trim away excess bias tape close to row of stitching. Repeat Hong Kong finish for front sections of the garment.
- Join Fronts to Back Section: With RST, match high shoulder point, armscye seam and end of sleeve. Pin/baste shoulder/sleeve seams of fronts to the back section together. Machine-stitch 3/4” seam allowance and press seam open.
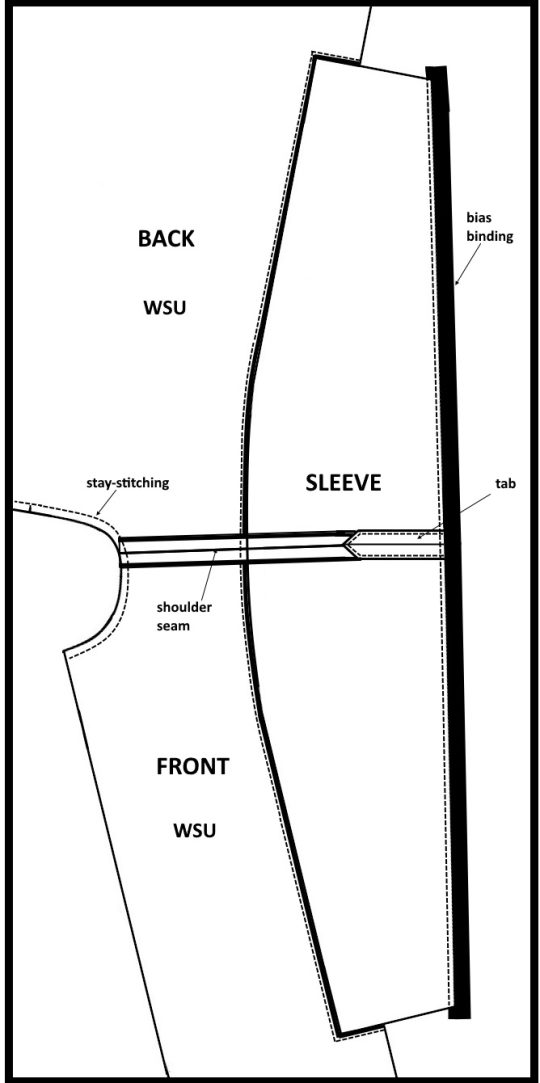
- Attach Sleeve Tabs to Sleeve Opening: With sleeve WSU, align sleeve tab, face side down onto seam allowance of sleeve with squared end of tab at sleeve opening. Machine-baste square end of tab to seam allowance. Repeat method for other sleeve.
- Attach Bias Binding to Sleeve Opening: With RST, align and match a single layer of bias trim (2 1/2” wide) to edge of sleeve opening. Pin/baste together and sew in place, easing the bias trim as you go. Press bias trim away from sleeve. With RSU, top-stitch along edge of bias binding.
- Stay Stitch Neckline: With WSU, stay-stitch the neckline of the front and back pieces. Sew along the stitching line and follow the edges of the fusible stay tape. Trim away bulk in seam allowances at high shoulder points.
- Add Bias Trim to Neckline: With RST, apply bias binding (1 1/2” wide) following the stay-stitching line on neckline. Do not stretch bias binding. Baste binding in place, then sew 3/8” from edge of binding. Fold the tape over so that it is face up and follows the shape of the neckline. Baste trim in place to lie flat. Press flat. With RSU, edge-stitch outer edge of trim.
- Add Bias Trim to Top Collar: With RST, lay binding (1 1/2” wide) 3/8” from stitch line, easing bias binding in place as you go. Do not stretch bias binding: Sew binding flat, then fold the tape over so that it is face up and follows the shape of the outer edge. Press flat and baste trim to collar’s seam allowance. Trim away any excess material if needed. With RSU, edge-stitch outer edge of trim.
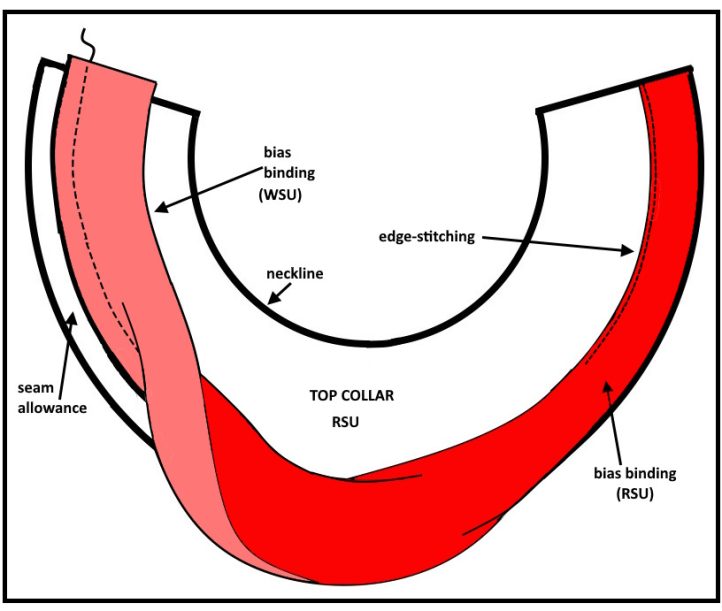
- Join Top Collar and Under Collar: With RST, match under collar to top collar and pin/baste together. Sew along outer edge of collars and grade seam allowances. With RSU, edge-stitch on under collar side next to seamline. With WST, press outer edge of collar flat. Stitch-in-the-ditch on top collar to fix trimmed edge.
- Attach Under Collar to Neckline: With RST, pin/baste under collar to neckline of garment. Sew on the stitching line (3/8”) and follow the edges of the fusible stay tape. Grade seam allowance and reduce any bulk in the seam.
- Attach Top Collar to Neckline: Turn under seam allowance of top collar along collar’s neck edge. With WST, align turned edge to machine-stitching along neckline. Pin/baste top collar to neckline while tucking in seam allowance of neckline. Slip-stitch collar’s neckline to garment’s neckline.
- Join Side Seams and Sleeve Seams: With RST, align and match front and back side seams plus the front and back of the under sleeves. Match up the ends of the bias trim. Pin/baste together, side seams and under sleeve of front section to the back section. Machine-stitch 3/4” seam allowance and press seam open. Repeat method for other side of garment.
- Finish Sleeve Opening: Turn under seam allowance of bias trim and press flat. Fold bias trim in half and align turned edge onto the visible row of machine-stitching on the wrong side of the sleeve. Slip-stitch edge of bias trim to inside of sleeve opening. Wrap sleeve tab over bias trim and align point of sleeve tab to sleeve’s top seam, 4 1/2” (11.5 cm) from the opening. Secure in place with a button, sewing through all layers. On the inside of the garment, flatten any slack in the placement of the sleeve tab and tack it down to the seam allowance of the sleeve’s seam. Repeat for other side of the garment.
- Apply Border Trim to Body: Collect prepared bias trim. Starting at the CB of the garment with RST, align the joining seam to the center of the back hem and apply the bias trim around the perimeter of the garment. Pin the bias trim to follow the cut edge of the body. Ease the bias trim around the front curve and straight up the front edge to the top of the collar. Allowing for a turned edge at the top, extend the bias trim about 3/8” (10mm) beyond the collar and cut away excess material. Tailor-baste the seam allowance of the bias trim to the edge of the garment and remove the pins. Stay clear of the stitching line. Starting from the centerback of the garment, machine-stitch 3/8” (10mm) from the edge of the tape. Repeat method for other side of the garment.
- Mark Buttonholes on Right Front: On the right-hand side of the garment, place a pin at the neckline and at the waistline on the crease line of the bias trim. This will be the buttonstand. At each pin, mark a 7/8” opening for the buttonhole. Between these two buttonholes, add two more buttonholes, equal distance from each other. Reinforce the crease line of the center of the bias binding by stitching on top of the original stitching and back-tacking at the start and end of each buttonhole. Unpick threads within the buttonhole to create an aperture for the button.
- Closing the Inside of the Border: Remove all the tailor-basting. With RSU, press the bias trim away from the body. Do not stretch bias binding. Top-stitch the border along the seam line all the way round the perimeter. With WSU, turn under the seam allowance of the bias trim and align it to the machine-stitch on the back of the top-stitching. Pin/baste the bias trim to cover and enclose the raw edge. At the top of the collar, turn under the seam allowance and tuck it into the seam neatly. Slip-stitch back of the border in place.
- Finishing the Border: With WST, align and match outer edge of border to each other. Tailor-baste layers together. Edge-stitch along outer edges of border and press edge flat. Add top-stitching on border to hold layers together, following the edge-stitching.
- Add buttons: On left front of garment with RSU, sew buttons on the centerline of the border to match the positions of the buttonholes.