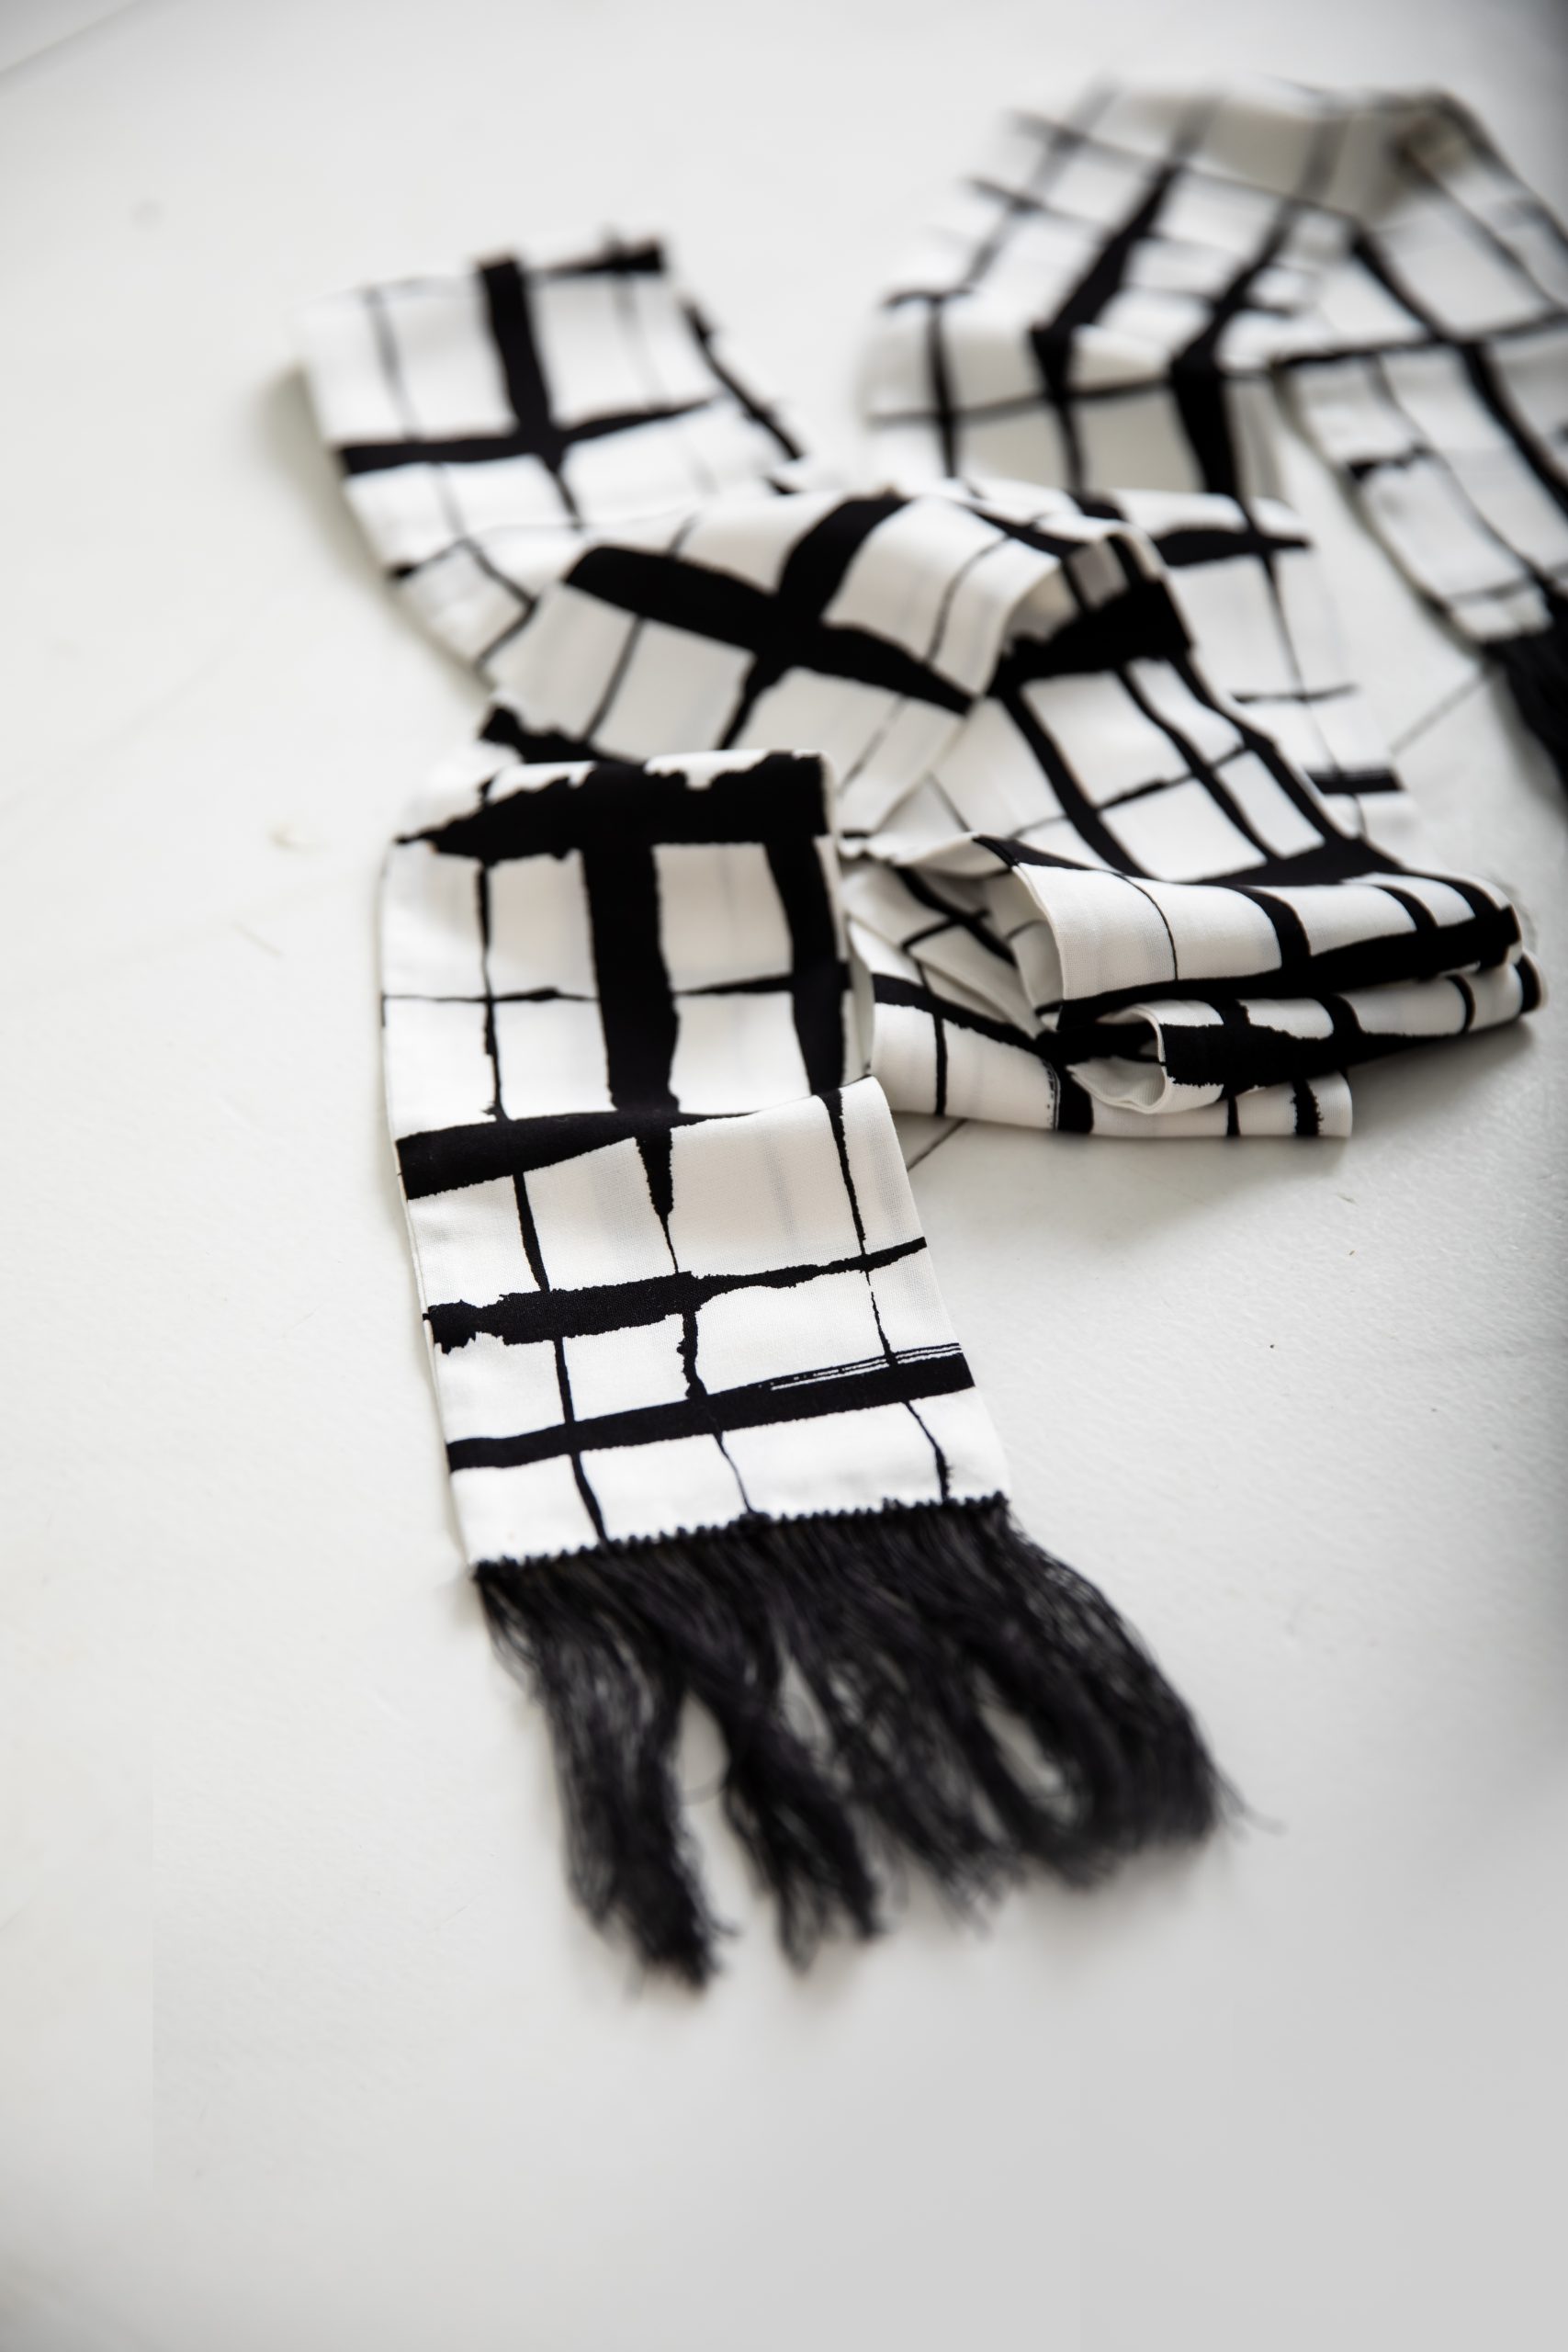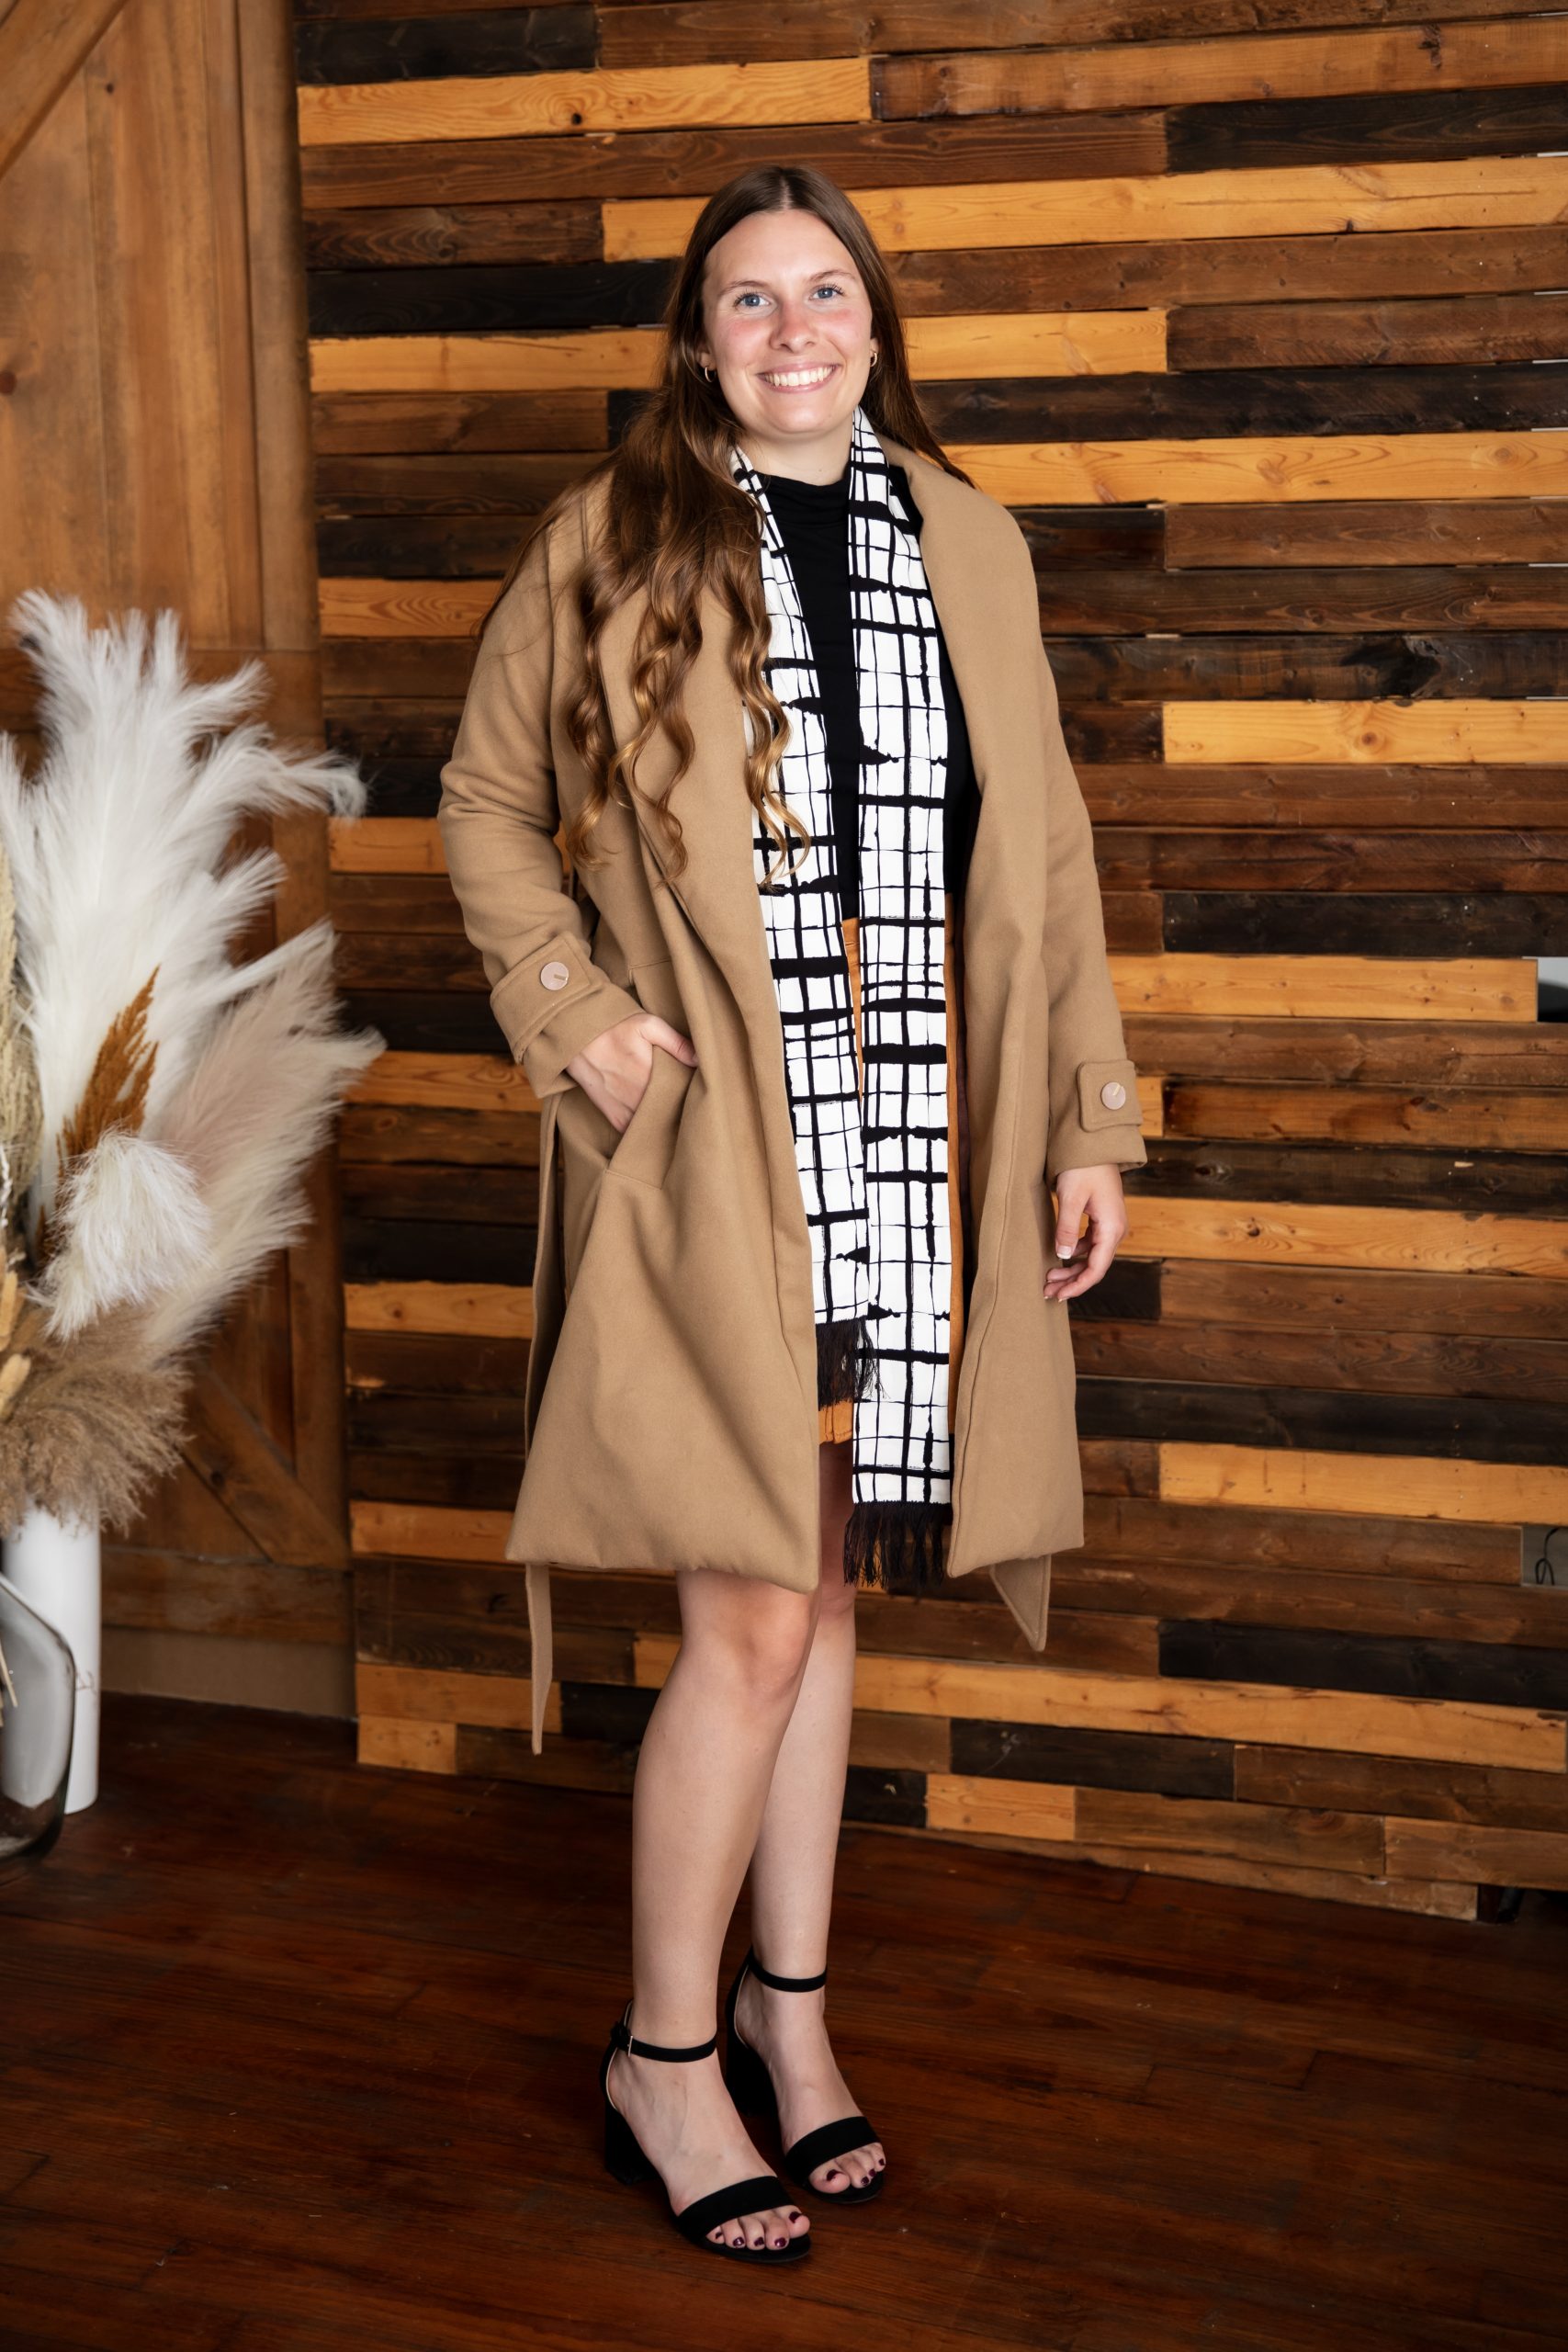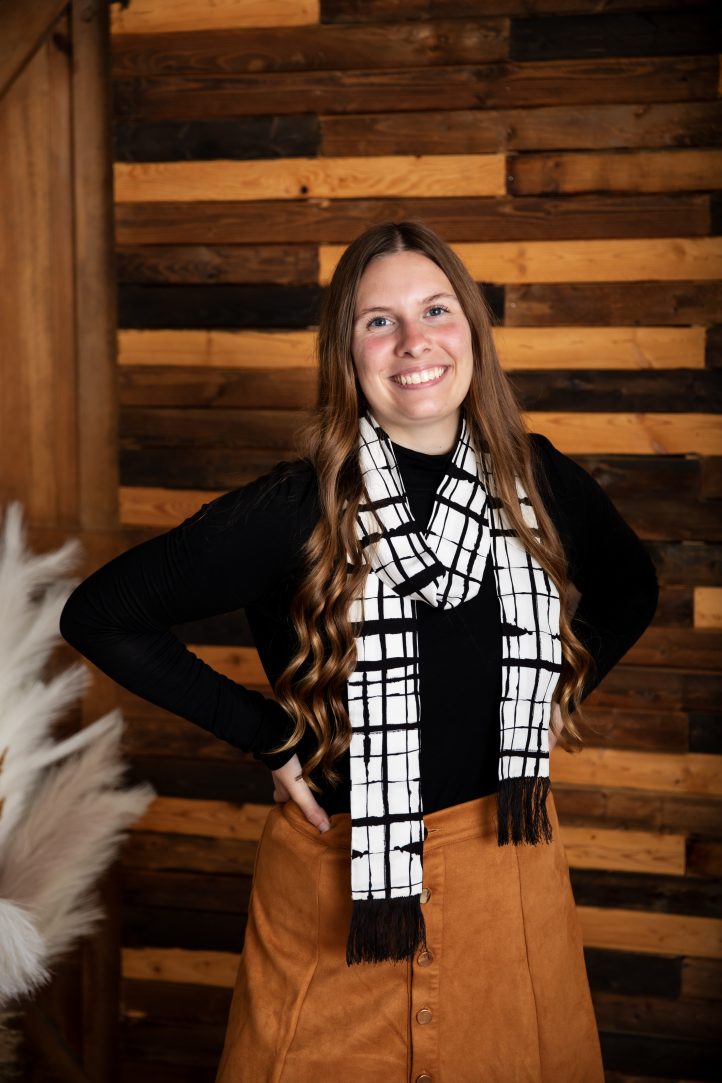
This year’s trending fall accessory: the skinny scarf! Part ‘60s mod, part ‘70s rockstar, this scarf sewing pattern from Don Morin can be worn multiple ways, such as a classic scarf as shown on our model, or as a tie, headband or belt. Finish this versatile fall accessory pattern with playful trim and explore all of the different ways you can style your skinny scarf with your cold-weather wardrobe.
Materials:
- 1/2 yard to 2 yards of EcoVero™ viscose satin, 54 inches (137 cm) wide, 6.19 oz/yd² (120 g/m²) in weight
- Spool of color-matched all-purpose thread (for needle size of 70-90 and an optimal thickness of 100)
- Embroidery floss, for the fringe trim (4 or 6 strands)
Tools:
- Microtex sewing machine needle in size 70.
- Embroidery needle (just large enough size to accommodate floss)
- Rotary cutter and mat
- Seam stick, ~18” to 24” long
- Lint-free press-cloth
- Dressmaker’s silk pins
Note: For the model sample, Don used Ecovero™ woven viscose (54” wide) with a check print on an off-white background by Lenzing™; Selfmade™ 100% cotton 4-strand embroidery floss in matte black; and Gütermann™ Sew All sewing thread (white).
THE GLAM SKINNY SCARF
Creating your own fashion accessory is about expressing oneself and every great design begins with inspiration. This fall, the skinny scarf craze is the must-have accessory of the season. It seems the return of the boho chic aesthetic has brought with it a renewed love for long thin scarves.
Adding a scarf to an outfit is not a new concept, but the perspective does tend to change over from season to season. Making your own from scratch allows you to truly make it your own – your choice of luxurious fabric, your favorite color, embellished with your personal sense of style, in a length that befits you. So if you want to add a chic and unexpected touch to a look right now, you’ll be ahead of the curve if you go for skinny scarves.
DESIGNING YOUR OWN GLAM SKINNY SCARF
Creating your own glam skinny scarf is an intricate choreography of self-expression, aesthetics, and functionality. Whether it’s art, travel, nature, or personal experiences, find something that speaks to you and reflects your tastes. Create a mood board with images, colors, and textures that resonate with your vision for the scarf. Think of its versatility as a fashion accessory and make it work in several ways – as a tie, a bow, perhaps a hairband, or even a belt, but its most important role is to convey your personality. It should always reflect your personal style and preferences, and that is where the “glam” comes in. Modernizing this retro-look by adding your own unique embellishment is the appeal of this long thin scarf style. Despite its simplicity, it can elevate an outfit and provide a touch of personal style.
CHOOSE THE RIGHT MATERIAL
The glam skinny scarf, with its long thin shape, is thoroughly a minimalist style so the easiest way to modernize this look is by choosing the right fabric and let its beauty be the star. The choice of fabric is crucial in determining the feel, drape, and overall aesthetic of the scarf.
While silk is the quintessential choice for fabrics when creating scarves, Don was eager to try out EcoVero™ viscose rayon, a new sustainable and ethical alternative to traditional silk. It has a smooth texture and a luxurious drape which gives the fabric a beautiful flowing quality, just as you would get using silk but with less fuzziness and high maintenance. This new cutting-edge viscose fiber is pleasant to wear against the skin and the body can easily breathe in it. It would be an excellent choice for this particular sewing tutorial.
Fabrics with EcoVero™ viscose, Lyocell™, and FSC-certified viscose (aka rayon) are all made from protected sustainable wood (cellulose) from certified and controlled forest areas. EcoVero™ viscose is free from harmful or toxic content and the closed-loop production cycle is optimized to significantly reduce the environmental impact compared to traditional viscose. Among other things, much less water is used and up to 50% less CO² is emitted during production than traditional viscose.
Today’s designers and makers are increasingly demanding more sustainable fabric options that will help improve the carbon footprint of their sewing community and allow us to create with care and sew with a purpose. This sounds like a very eco-conscious fashion material that blends comfort, style, and sustainability. Fabrics with the EcoVero™ label are available in the U.S.A. and globally.
DECIDE ON DIMENSIONS
Though you’ll want a long, flowing, skinny scarf, decide on its dimensions before selecting your fabric. Think about how you’d like it to be worn, what styles suit you, and what fabric limitations you may need to consider. The more lightweight the fabric, the wider the scarf can be. If the fabric has more bulk, you can cut it very narrow. The finished dimensions are generally in the range of 2 inches to 4 inches wide when finished and as long as you like, so the design is super simple to make.
Note: For the model sample, the scarf dimensions are 72” long and 3” wide.
ORIENTATION OF THE CUT
Orientation of the cut may affect the drape of your scarf design and will also indicate how much yardage is needed to produce the scarf.
Typically, to ensure that most scarves drape beautifully, they are cut on bias. The bias grain of woven fabric offers ease, malleability and a flowing drape. The negatives are that these characteristics also give instability to the fabric so it can be difficult to work with at times, resulting in much more wasted fabric than cutting on the straight grain.
Cutting on the straight grain presents much the same stumbling block – poor usage of fabric. The intentional slim profile of the scarf suggests it does not depend so much on the drape of the cloth but on its finished length. Unless you decide to make more than one of the same scarf (they’re a great item to make for craft fairs and bazaars; and they also make great gifts), the long narrow shape doesn’t utilize the fabric’s yardage well enough to be beneficially cost-effective. Better to plan making it in tandem with another sewing project to use your fabric productively, as it only calls for a narrow strip of material which can be cut along the selvage of the cloth.
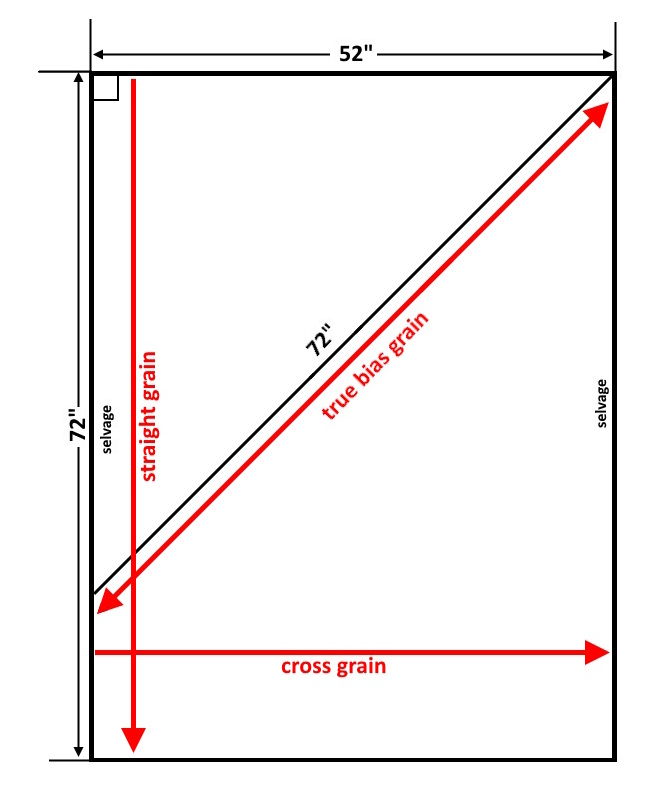
Cutting on the cross grain requires the least yardage of all and is the most economical. This approach allows you to purchase remnant pieces of luxurious fabrics at huge discounts or use up small amounts of end-cuts from your stash, letting you look and feel your best without sacrificing your personal style or breaking the bank. The cross grain runs perpendicular to the selvage and offers more flexibility and ‘give’ to fabric projects. This means the finished length of the scarf is limited only to the finished width of the fashion fabric. To obtain the same length as the bias and straight grain cuts, you’ll need to cut two long bands on the cross-grain and join them together for a length of 72 inches.
When creating with directional prints or requiring a distinct drape, strategically employing the cross grain’s characteristics enhances both the functionality and aesthetic appeal of your scarf.
AESTHETICS
The glam skinny scarf is a thin long shape. Consider the visual appeal of the scarf as both sides of the cloth are visible. Also, keep in mind that any large surface print will “disappear” once the narrow silhouette of the scarf is cut out of the cloth so you may want to select a small mini-print versus large scale motif. For a polished look, keep style lines balanced and straight, vertically and horizontally, for a sophisticated formal aesthetic; and for a more artisan vibe, shape short ends of the scarf with diagonal slants or curved tapers for a softer imaginative touch.
Let the beauty of your fabric be the emphasis of your design and embellish your creation with a bit of glam: trim with fringe or tassels, bedazzle with sequins and paillettes, embroider with silk or metallic threads, appliqué with lace and cut-outs, string on seed beads or tiny pearls, or personalize with your monogram. Bear in mind that “less is more” and the details are only limited by your imagination.
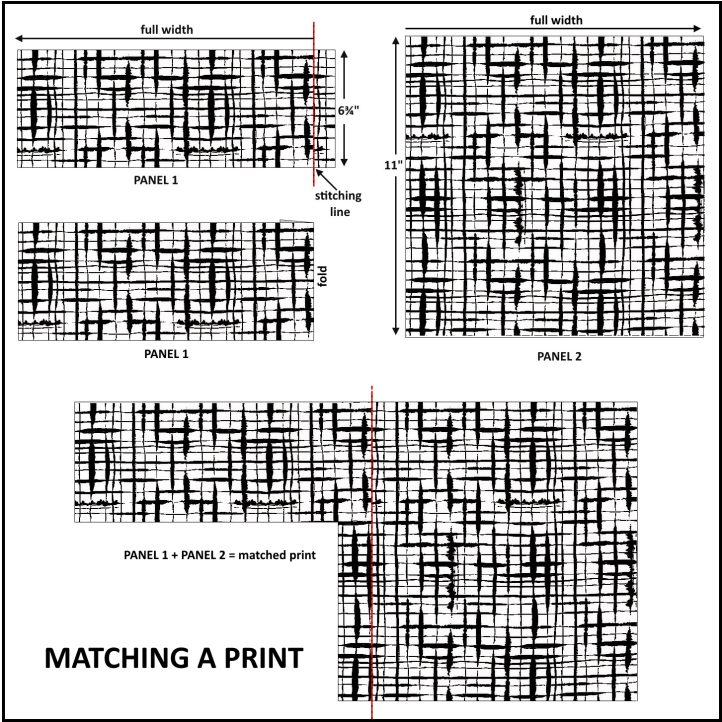
In consideration of the print being only on the face side of the fabric, the cloth will need to be folded lengthwise as both sides of the scarf are visible when worn. Furthermore, for the most economical and the least amount of fabric yardage required, the cross-grain cutting method is preferred. As the fashion fabric is not wide enough to make the length of the scarf all in one piece, two panels of fabric will be needed and joined together to allow for the desired length. Focus on key features in the fabric’s print and prioritize matching those across the seam to conceal the join if possible.
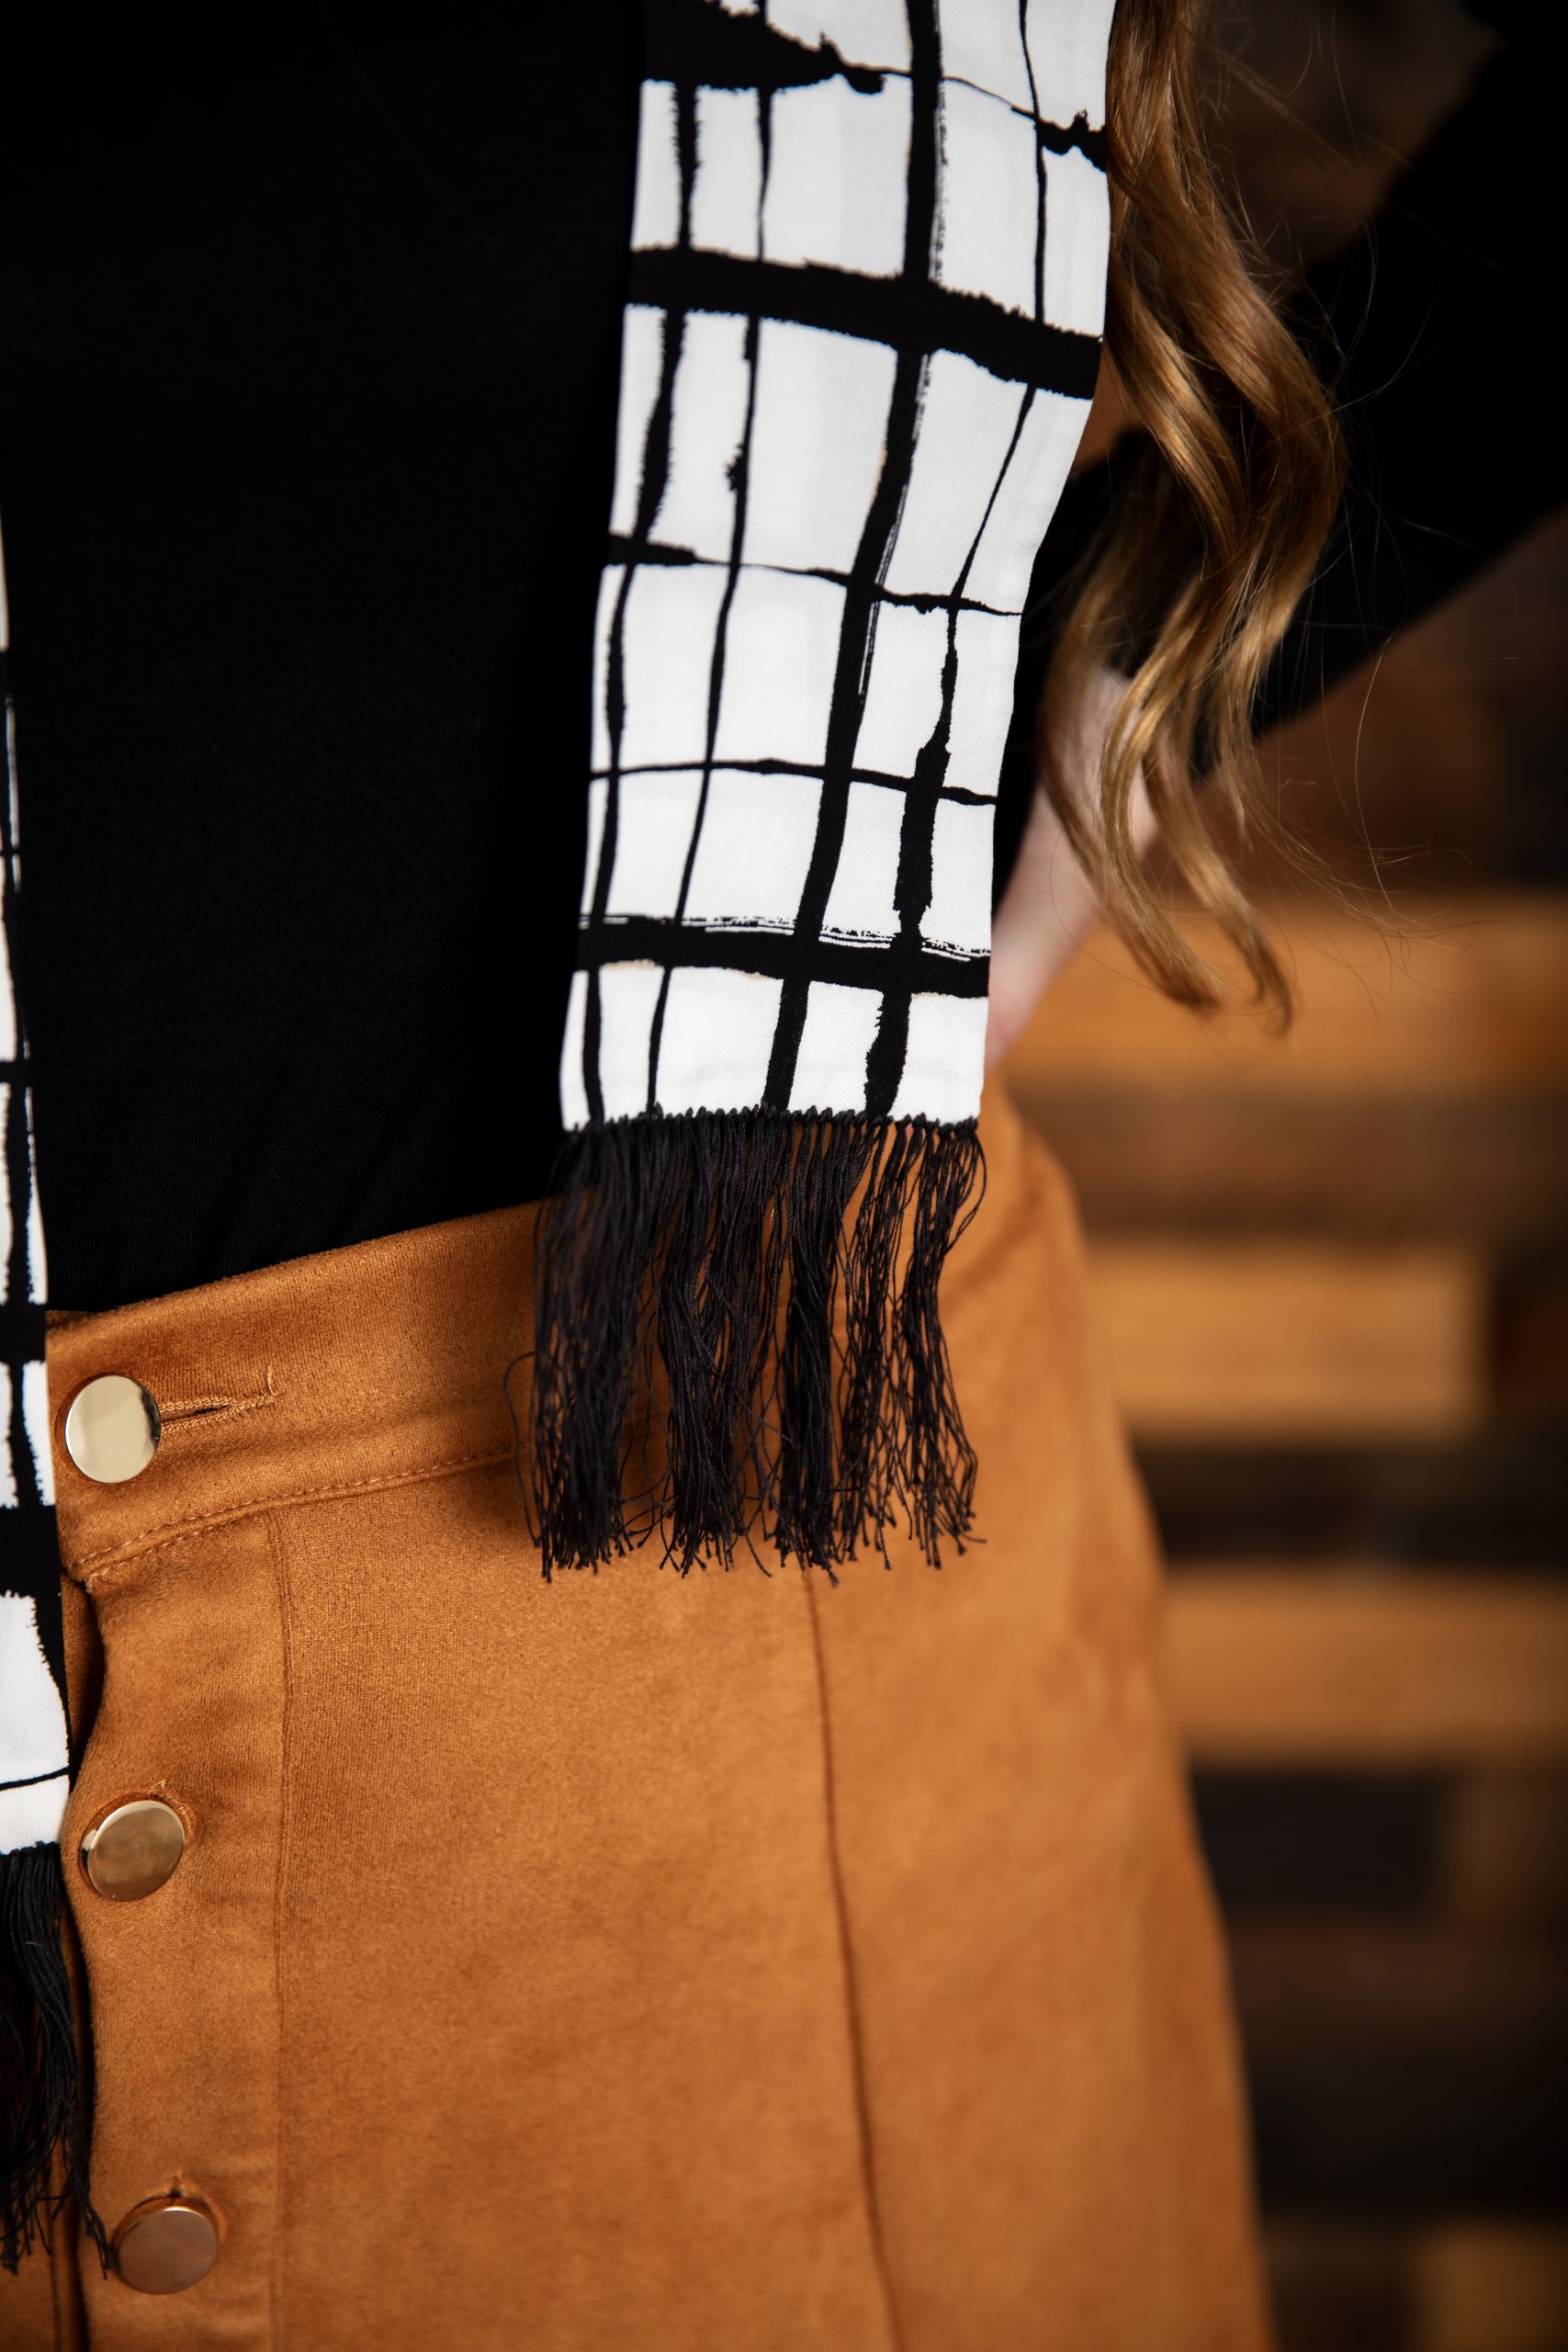
An ornamental fringe adds a modern touch of glam by creating movement and the long skinny scarf will become a wearable masterpiece. A lark’s head knotted fringe made up from strands of silken embroidery floss adds a polished and stylish finish.
Techniques Used in This Project:
- French Seam for Enclosed Seam Finish. For transparent or lightweight fashion fabrics, the French seam technique is recommended. Frequently described as a seam within a seam, it is suitable for straight seams with a narrow seam finish and creates a very neat, delicate seam. The width of the finished seam can vary from 1/8 inch to 3/8 inch, depending on the weight and texture of the fabric, but most are less than 1/4 inch wide. The French seam requires two passes under the machine foot and care must be taken to avoid fraying threads at the seamline on the face of the scarf.
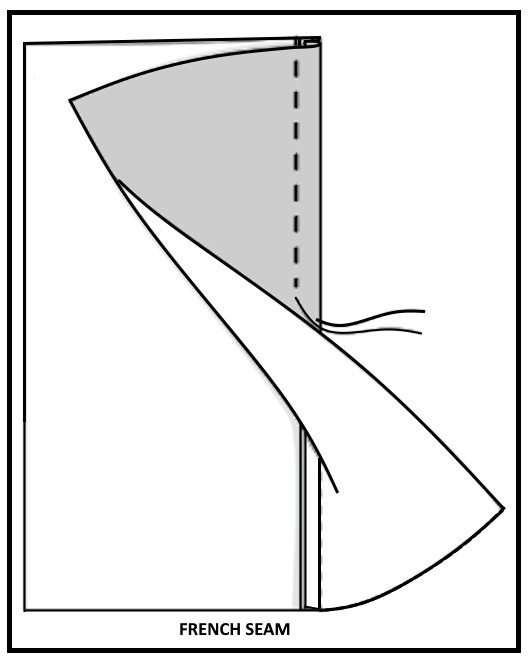
- With wrong sides together, pin the corresponding pieces together. Using a straight stitch, sew half the width of the seam allowance.
- Press the seam allowance open and then press flat to one side.
- Trim the seam allowance close to the row of stitching.
- Fold the fabric with right sides together directly on the seam. Press flat.
- Stitch again, this time using the remaining width of the seam allowance, encasing the raw edge.
- Press the seam to one side to finish.
- Lark’s Head Knotted Fringe. A lark’s head knotted fringe is a cut-fringe made of decorative yarns/threads. This type of fringe is easy to make by forming a row of consecutive lark’s head knots like those used in macramé with four to six strands of embroidery floss. Each knot makes a pair of tails on the fringe. Adding a fringe trim to your projects is a fun and easy way to give them a unique and stylish finish. When working on a scarf, the steps are simple and can be done with just a few materials. The key is to cut the yarns evenly and secure the fringe tightly to ensure it stays in place. With practice, you’ll be able to create beautiful fringes that add a special touch to all your handmade items. The knotted fringe is trimmed to length at the base of the fringe and is cut straight and even using a rotary cutter and ruler.
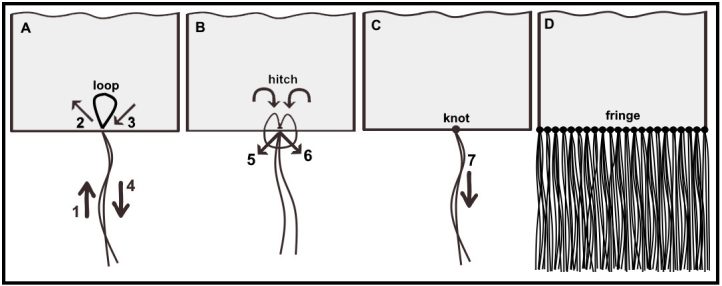
- Cut a 4- or 6-strand piece of embroidery floss to approximately 6 inches (15cm) long. Thread a darning needle with the floss. Using all of the strands will double the finished appearance and make for a fuller fringe.
- Turn under a narrow seam allowance to the backside of the cloth and press flat. For each insertion, use the tip of the embroidery needle to make a small pilot hole along the hem’s edge (about 1/16 inch from the edge).
- Bring the threaded needle up through the hole (1 – 2) from the face side of the hem. Draw the thread through about a third of the way and then take back the needle through the same hole (3 – 4) leaving a loop of thread on the opposite side of the cloth.
- Bring up the ends of the embroidery floss together as a pair and insert them through the loop (5 – 6). Gently draw up and pull the thread ends in unison (7) so that the loop closes flush to the cloth’s edge creating a lark’s head knot. This will anchor the thread tails across the top of the loop, holding the fringe in place.
- Continue in the same way and make the next pilot hole right next to the first loop. Repeat this method along the turned the edge of the hem until fringe is completed.
- Cut the fringe to an even length using a rotary cutter. Once finished, use the tip of the needle to separate the floss so that the fringe looks full and fluffy.
MACHINE SET-UP
As no two sewing machines perform in the same manner, you should always test the thread tension and stitch quality on a scrap piece of fabric that matches the one you will use for your project. This way, you can avoid wasting time and materials on seams that are not satisfactory. Testing the thread tension and stitch quality will also help you prevent damage to your fabric, needle, or sewing machine.
Needle – Microtex sewing machine needle is generically known as a “sharp” needle. The very slim acute point creates beautiful topstitching on fashion sewing and perfectly straight stitches for piecing and quilting. Use a microtex sewing machine needle when precision is paramount.
Machine Foot – Narrow 1/4-inch single stitch foot.
Machine Tension – Standard (4 out of a possible 9).
Stitch Length – Average length (2.5 out of a possible 5).
Thread – High-quality cotton-wrapped polyester thread holds color and luster better when used on semi-synthetic fabrics and tend to be stronger and less likely to fray in your machine.
Pressing – Iron with medium heat and a pressing cloth to prevent shrinkage with high temperatures. A seam stick is an excellent tool for your pressing station. It is a half-round wooden dowel typically made from poplar, ash, or maple and ranges from 18 inches to 24 inches in length. Pressing on a long, straight seam on a seam stick prevents imprints from your seam allowance from showing through to the face side of your garment.
MARKING AND CUTTING
For transparent or lightweight fabrics, a French seam technique will provide a cleaner and narrower seam construction. Plot out the cutting lines directly onto the prepared fashion fabric or you can draw a paper template that includes a minor seam allowance (3/8”) to trace as the assembly requires an enclosed seam construction.
- Pre-Treatment: Viscose fibers are semi-synthetic and may shrink when laundered, especially if you use hot water and heavy machine cycles. It is highly recommended to pre-wash viscose fabrics with cold water to avoid major shrinkage and support the cloth’s longevity. Use a very delicate hand-washing specific detergent in a wash basin filled with cold water. Evenly distribute the soap, and submerge the item in the water. Soak for up to 30 minutes, then rinse well with cold water. Hang to dry only and press out any wrinkles using a medium heat temperature and a press-cloth. Iron from the back side of the fabric. However, if you choose to use a washing machine instead, put the item in a mesh wash bag if possible, and choose a cold gentle cycle with a slow spin speed. Do not use a tumble dryer and hang to dry. Gently iron the wrong side of the cloth to remove any wrinkles using a steam iron with a medium heat temperature setting and with the aid of a press-cloth.
- Square Fabric: Make sure that the lengthwise and crosswise yarns of the fashion fabric are at right angles, and that the fabric is on the straight-of-grain. To do this, it’s necessary to straighten one of the cut ends. If there is a prominent design line, such as a woven stripe or plaid, cut along the design line. Do not use printed lines as a reference; the print may not have been matched up with the grain.
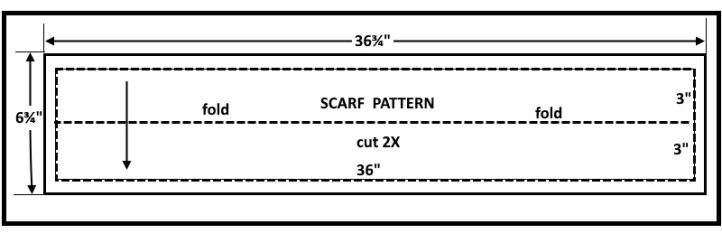
- Lay Out: For this skinny scarf design, the designer has chosen to cut the fabric on the cross grain. However, the fashion fabric is not wide enough to make the length of the scarf all in one piece, so two panels of fabric will be needed and joined together to allow for the desired length. Before marking and cutting the cloth, decide what elements of the print you wish to use for the scarf. Focus on key features by identifying distinct features in the fabric’s print and prioritize matching those across the seam to conceal the join if possible. From a 1/2 yard of fabric, cut from selvage to selvage, a panel equal to twice the scarf’s width plus 2 seam allowances and half the length of the scarf plus 2 seam allowances. For example, a scarf that is 72” long and 3” wide requires a panel that is 36 3/4” x 6 3/4”. This will result in the second panel having approximately 11 inches of fabric remaining to match the print on the fabric.
- Match the Seam: To match seams on prints, focus on aligning the repeating pattern elements across the seam. You can achieve this by folding back the seam allowance on the first panel and pressing it flat, and then carefully aligning the folded edge of the fabric with the second panel to match the print. Tailor-baste along the seam with contrasting thread to help ensure a perfect match. For instance for the model sample, Don chose a 100% viscose satin with a black irregular check print on an off-white background.
- From a half yard of fabric, he prepared the first panel of fabric by cutting across the width of the fabric a panel twice the scarf width plus 2 seam allowances, and focusing on one of the bolder, thicker lines of the check and marked the stitching line parallel to the selvage (on straight grain).
- Next, Don turned under the stitching line by folding back the seam allowance along the marked line and pressed it flat.
- Then he matched the print by carefully aligning the folded edge of the seam with the remaining cut of fabric, ensuring the print elements match up at a similar bold and thick checkline. There is some leeway in the alignment as it is rarely equal or the same.
- Lastly, he pinned and basted the seam using silk pins to secure the seams and then tailor-basting along the aligned edge.
- Sew the Seam: With right sides together, machine-stitch along the basted stitching line and join both pieces together. Trim away any excess fabric leaving a minor seam allowance next to the row of stitching and press the seam allowance open and flat.
- Cutting Out: Fold the long panel of fabric in half width-wise, with wrong sides together.
- For the scarf length: From the seam on the panel, measure 36 3/8” along the foldline in both directions, for a total cutting length of 72 3/4”.
- For the scarf width: Measure perpendicular from the foldline, 3 3/8” at each end and connect point locations with a straight line parallel to the foldline.
- Cut the oblong shape out on the fold.
Sewing Instructions:
ASSEMBLY:
Enclosed seams are used in the construction of this scarf so that the face of the fabric is visible on both sides of the skinny scarf. The narrow seam width increases the control and accuracy of the maker while decreasing the time required to sew it. It also reduces the seam bulk, the number of clips or the need to trim after stitching so that the seam lies flat. It may also allow for a more economical layout and reduce the amount of material needed.
* The working seam allowance is 3/8-inch (10 mm) wide. You may choose a seam allowance more appropriate for your fabric selection and grade/trim the seam allowances after sewing the seam.
- Working from the wrong side of the fabric, at each short end of the fabric, turn under 3/8” and press flat to neaten.
- With wrong sides together, align and match the corners and center seam of the open edge of the cloth and pin together.
- Machine-stitch along the long edge of the fabric using the French seam method (first pass – 1/2 the seam allowance).
- Slip a seam stick into the channel created and with the tip of iron, press the seam allowance open following the seam line. Then press the seam allowances to one side.
- Trim away half of the seam allowance close to the row of stitching.
- Turn the channel of fabric inside-out and press the edge of the seam (double layer) flat.
- With right sides together, machine-stitch parallel to the seam of the fabric and sew the remaining seam allowance to encase the raw edge (second pass – 1/2 the seam allowance). Press the seam flat.
- Turn the channel of fabric right side out and press the scarf flat.
- Embellish the scarf with a hand-stitched knotted fringe along the tail ends of the scarf to complete.