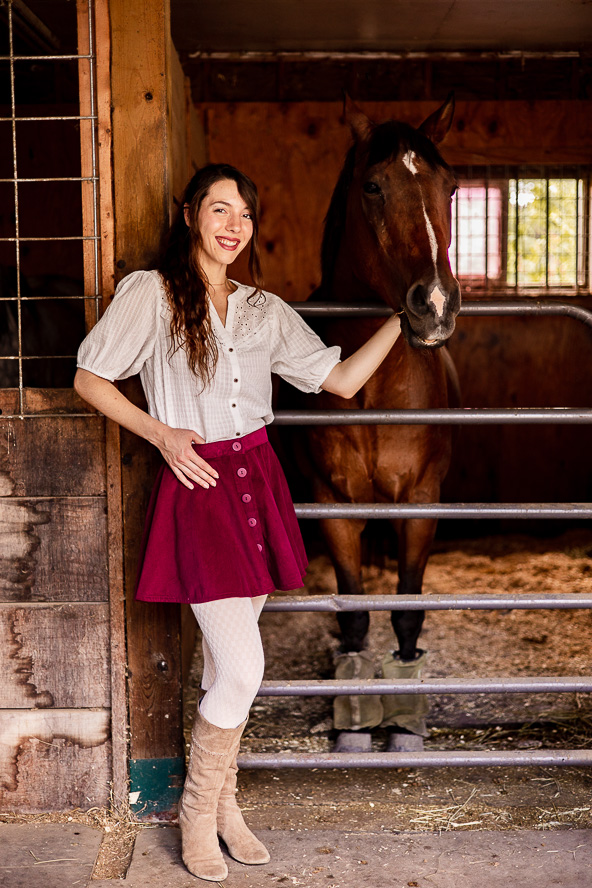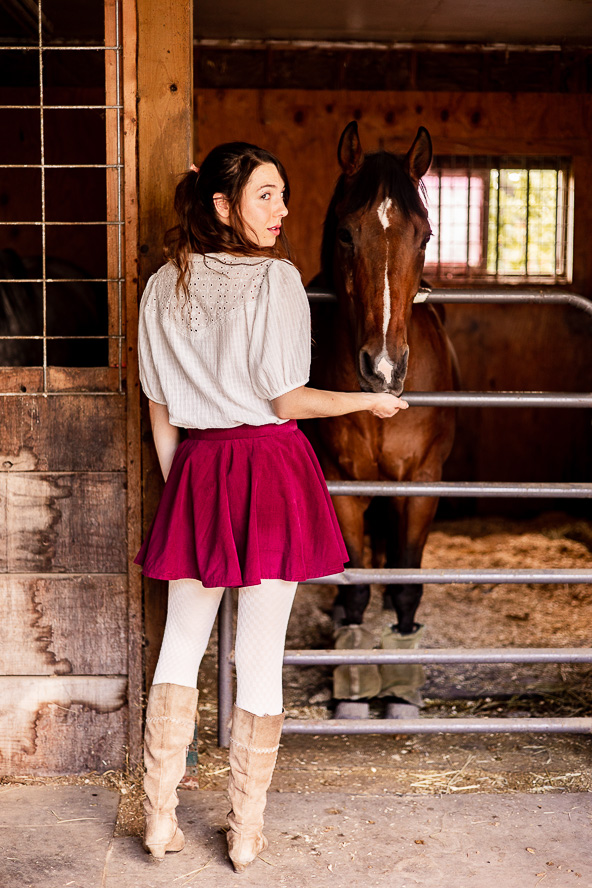
‘70s chic makes a major comeback with this flirty fall mini skirt! Made in a beautiful mulberry corduroy, this mini skirt features front button details and a hidden zipper. This project is designed to perfectly fit your measurements, so if you’re ready to explore the world of pattern drafting, this is the project for you. Pair this flared quarter-circle skirt with tights and boots for fall and winter to create a fun and eye-catching look.
Materials:
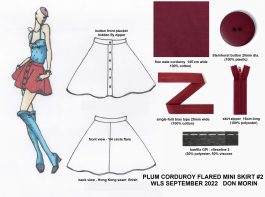
- Approx. 1 1/3 yards (1.3 m) of corduroy, 60” wide
- 1 spool of color-matched all-purpose thread
- 1-2 packets of vlieseline pre-cut waistband interfacing, set-in type
- Approx. 5 1/2 yards (5 m) of color-matched bias-fold tape, 13mm wide
- Approx. 5 yards (4.5 m) of stay tape, 13 mm wide
- 6 plastic buttons, 23 mm diameter
- 1 skirt zipper, 6” long (15 cm)
SELECTING FABRIC & NOTIONS:
Whenever possible, choose a quality fabric and opt for an all-cotton corduroy rather than a polyester blend. The blended fibers don’t tend to hold up well in repeated washings, and the nap (that’s the fuzzy bits) is more easily crushed and misshapen. Cotton also steams evenly and takes well to finger-pressing, which is an important feature since typical pressing methods would damage corduroy. If you’re not sure whether the fabric you’re looking at is high quality, try scratching at its surface with a fingernail. If this causes discoloration or raises a powdery substance to the fabric’s surface, you’re likely looking at an inferior product that’s been filled with a sizing treatment to try to disguise the fact.
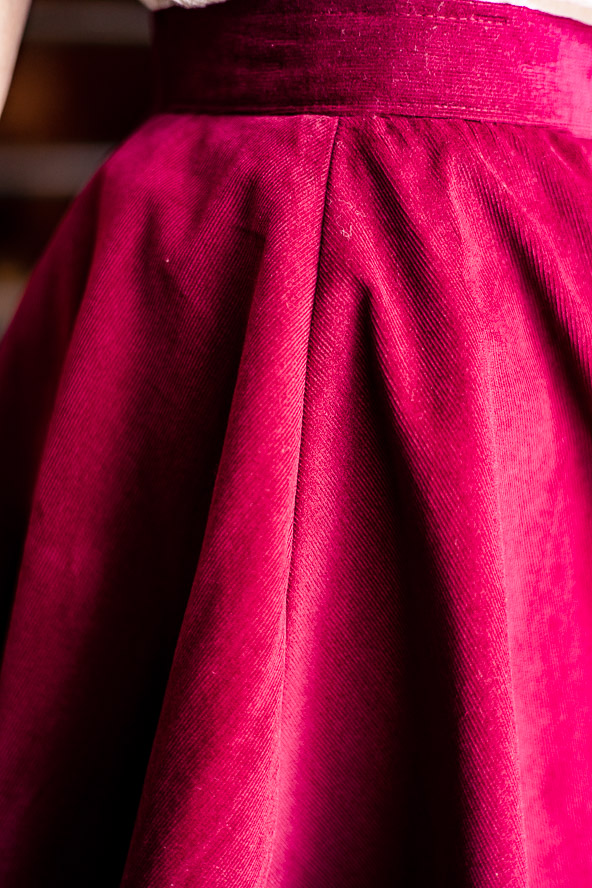
Corduroy’s most prominent feature is its raised lines of pile, known as wales. These can be tiny ridges, often known as pin wales, to quite wide. There are even some types of corduroy that have alternating thick and thin wales. With all that texture going on, it’s best to opt for garments with simple shapes rather than complex, highly tailored lines, like this skirt sew-along project. Not only does this make it easier to match the wales in each pattern piece, it also keeps the finished project from looking overly busy.
With this sewing project, adding a bit of stability to your corduroy with interfacing, especially in elements like the waistband and front placket, is actually a great idea. It gives a nice crisp finish and a touch of structure, but always opt for the stitch-in variety. This may seem a bit obvious if you have used napped fabrics in past projects, but pressing crushes the wales and leaves a shiny, flattened texture that is unfortunately, permanent, so ironing is probably not the best idea, but for many of us sewists, fusible is an automatic choice, so it bears repeating: avoid fusible interfacing.
Be careful not to go over-the-top with embellishments. Unlike denim, which easily stands up to studs, rhinestones, lacy overlays, embroidery, and more, corduroy already has a lot of eye-catching style built in thanks to its texture. Embellishments on corduroy can very quickly look excessive, so instead opt for something understated, like contrasting top-stitching, unique buttons, or even the placement of darts (since they’ll interrupt the regular wales), that can become a design feature. Feel free to get creative!
MARKING & CUTTING:
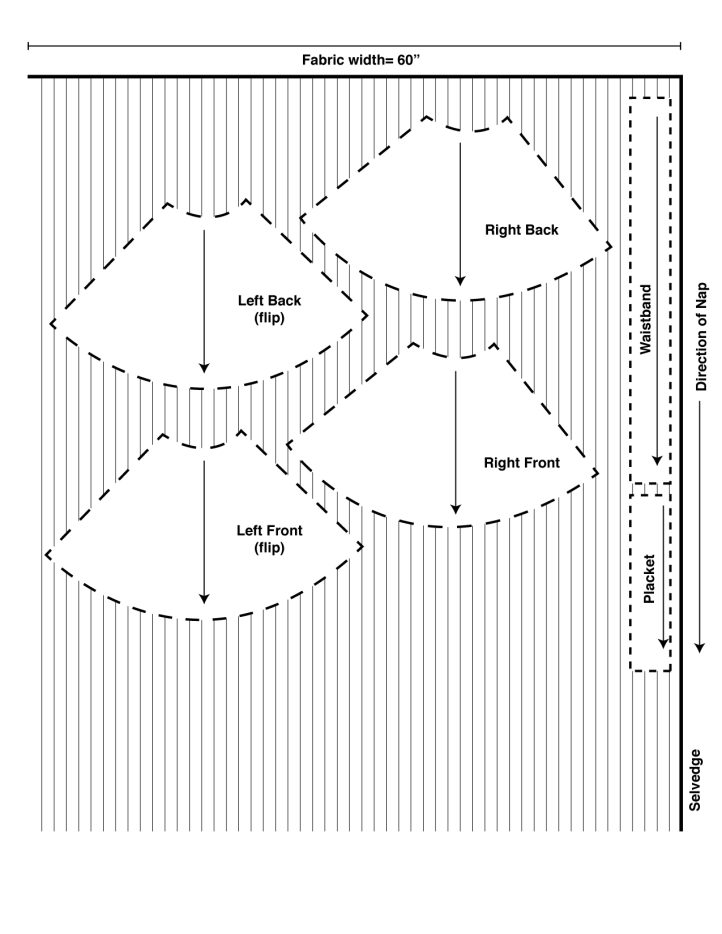
Corduroy has what is known as nap, meaning the fabric looks different from different directions. This is easy to see with piece of fabric with a deep pile, like velvet or corduroy, but you can even see it on fabrics like terry cloth or even carpeting. The fibers of the pile aren’t standing straight up, but have a sort of direction to them. If you brush the fibers backwards, you can see the change in color and texture immediately. The goal is to avoid accidentally assembling your project with the nap running all different directions. Thankfully, there is a “with nap” layout (see below), which ensures that all your pieces will be correctly oriented. Double check the fabric requirements before making your purchase as “with nap” layouts typically require a little extra. Remember, you’re using a fabric that’s either mostly or entirely cotton, so you’ll also want to take into account any possible shrinkage in your fabric.
Prep the Fabric:
Preshrink all washable fabric and notions following directions on the care label. Some of these fabrics will shrink quite a lot, depending on the fiber content, when laundered.
Square Up the Fabric:
Before cutting the pattern, check the straight of grain of the fabric by pulling a cross-grain thread and cutting along the line created. Place the fabric on a large table or cutting mat. If the crosswise and lengthwise grains aren’t at right angles, pin the selvage and the cut edge square, then steam the fabric with a hot iron held just above it, gently urging the wrinkles in the fabric to flatten. This works quickly to straighten most corduroys.
Matching of Wales:
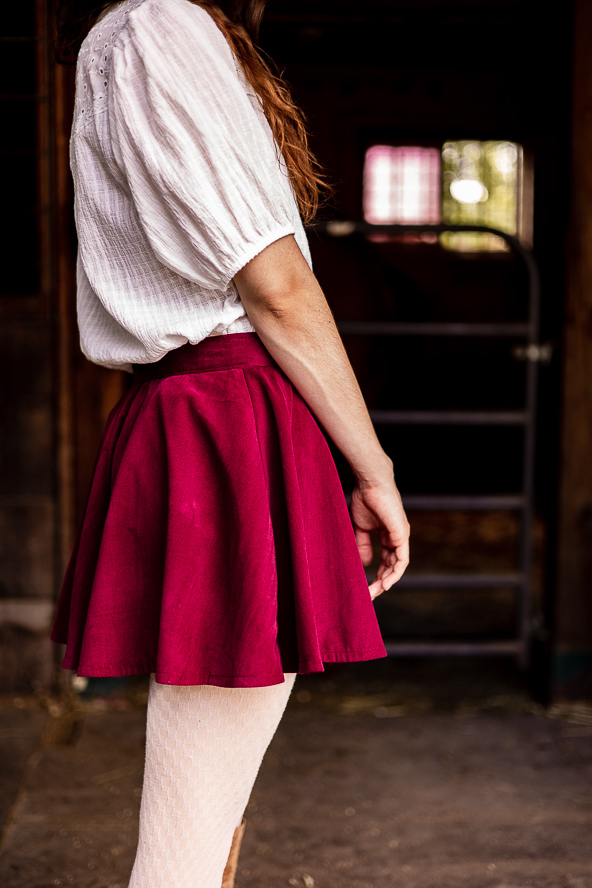
Most corduroys look best when handled like a striped design and the wales are matched. However, this skirt is made up of quarter circles. This silhouette provides for a flattering fit without the use of waist-shaping darts and an optimal flared sweep at the hemline. For most quarter-circle styles, the seam lines are stable, as they follow the direction of the straight of grain and the cross grain of the fabric.
However, with corduroy and its one-way texture, the wales will not match up and will run in opposite directions. To remedy this situation, the pattern’s grainline is moved to a 45 degree angle and the skirt panels are bias-cut, allowing for a better drape of the fabric over the body. When joined, the seams will take on an attractive chevron pattern when aligned together and all sides will be balanced. Also, keep in mind that the seam lines are no longer stable and must be stabilized with stay-tape.
Instructions:
PATTERN DRAFTING:
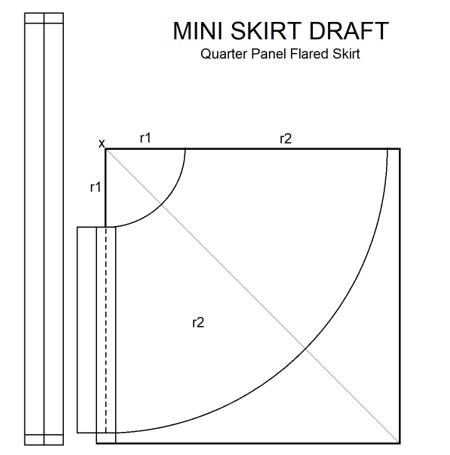
- Draw a square. Measure diagonally to opposite corners. Both distances should be equal.
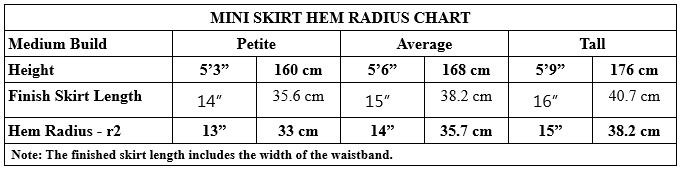
- Select your waist circumference from the chart and add 1” for turns.
- Extend a radius (r1) from X and draw an arc to create the waistline of the skirt.
- Extend a second radius (r2) from X and draw an arc to produce the sweep of the skirt.
- Draw a diagonal line from X to the opposite corner. This is the grainline.
- Draw a rectangle, extending from the skirt panel, 3/4” on either side of the vertical line of the square. Draw a second rectangle parallel to it, 2 1/2” wide. Trace off the double-rectangle. This is the skirt front placket.
- Draw a rectangle equal to your waist measurement + 3” for lap-over, and 3 3/4” wide. This is the skirt’s waistband. *Note: All seam allowances are included in chart below.

MARKING OUT LAYOUT:
To avoid fabric shifting when marking corduroy, place it in a single ply, wrong side up. Mark the direction of the nap and follow the grainline rule, using a “with nap” layout.
Check your fabric to see if pins leave marks; if so, pin only in the seam allowance or use weights to anchor during cutting. Avoid marking corduroy with a tracing wheel, which can leave a permanent imprint. Instead, mark with chalk, temporary marking pens, tailors’ tacks, or thread tracing.
Trace out the skirt draft following the lines squared out from X for the back sections.
Mark out 2 skirt backs with fabric face up. Remember to flip the pattern to get a mirrored image.
Trace out the skirt draft, including the extension of the rectangle (all one piece) for the front sections.
Mark out right skirt front with fabric face up. Mark the centerline (dotted line) of the placket on this front panel to be trimmed later.
Mark out left skirt front with fabric face up. Remember to flip the pattern to get a mirrored image.
Waistband & Front Placket:
For the waistband, cut a continuous strip of cloth parallel to the selvedge and follow the direction of the nap. It is equal to the waist circumference + 2x the width of the finished placket + 2 seam allowances. The self-lined waistband is cut 3 3/4” wide (9.5 cm), or 1 1/2” (3.75 cm) wide finished when folded.
For the front placket, cut a continuous strip of cloth parallel to the selvedge and follow the direction of the nap (towards the hemline). It is equal to the length of the right front skirt panel + 2 seam allowances. Its width is 2x the width of the waistband + 2 seam allowances (cut 3 3/4” wide (9.5 cm), or 1 1/2” (3.75 cm) wide finished when folded).
Follow the “with nap” layout below:
ASSEMBLY:
*Note: Use a walking foot. Because the texture of corduroy is very different from one side to the other, it’s quite easy for the fabric to “creep” as it’s being sewn. This means that the bottom layer is pulled along by the feed dogs, while the top has a tendency to lag behind, making your seams out of place and uneven. One way to help with this issue is to raise your presser foot slightly, provided your sewing machine allows for this kind of adjustment. An even better solution, however, is to use a walking foot, which provides the same kind of feeding motion to the top layer of fabric as the bottom and creating in even feed. In fact, walking foot attachments are also sometimes called “even feed” feet!
- Stabilize all vertical seams from stretching on skirt panels by basting with pre-shrunk stay tape.
- Sew stay tape to face side of cloth along outer edge.
- Finger-press seam open and understitch seam to stay tape on face side of cloth.
- Wrap tape over seam’s edge to wrong side of cloth and baste stay tape to cloth.
- With face sides together, align and match vertical edges of the skirt panels. Baste/pin together to create a chevron pattern and prevent fabric from creeping.
- Stitch vertical seam along inner edge of stay tape (3/8” from edge) in the direction of the nap. Finger-press seam open.
- Insert skirt zipper to left skirt front along the seam edge so that the zipper tape aligns with the seam allowance of the skirt panel.
- With face sides together, stitch the zipper and left skirt front to the right skirt front. Finger press seam open.
- With face sides together, align and match bias-fold tape to the sweep of the skirt’s hemline. Baste/pin the bias-fold tape in place and machine-stitch along the crease of the first fold in the tape.
- Finger-press hemline open and understitch seam on bias-fold tape with cloth face side up. Trim seam allowances where the bias-fold tape crosses the vertical seams.
- Wrap bias-fold tape over hem’s edge to wrong side of cloth and baste bias-fold tape to cloth.
- Sew bias-fold tape by machine or by hand along sweep of hemline.
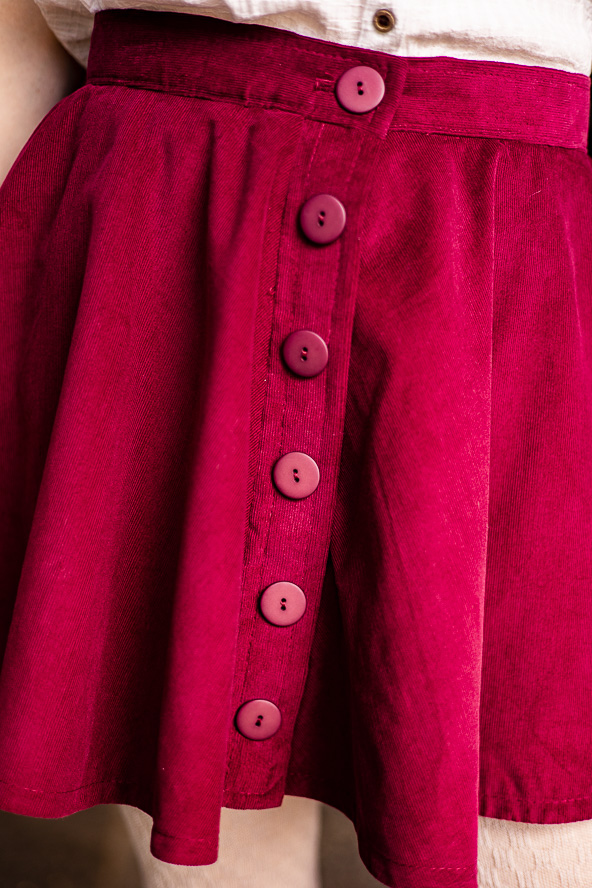
- Make up the front placket. (*Note: The skirt front placket is a faux placket to hide the zipper.)
- Baste vlieseline pre-cut interfacing (set-in type) to back of cloth strip for placket.
- Turn in seam allowances on long edges and baste to hold in place.
- With face sides together, fold the placket in half length-wise and match up turned edges. Stitch across one short end and turn placket right side out.
- Top-stitch around perimeter of placket.
- Lay placket to the right of the skirt front seam, aligning it from the hem up to the waistline. Hand-stitch in place on the left side of the placket to the front of the skirt and on top of the zipper. Trim any excess material if necessary.
- Attach waistband to waist of skirt, allowing for seam allowances at each short end.
- Baste vlieseline pre-cut interfacing (set-in type) to back of waistband strip.
- Open zipper and ease any fullness in the skirt panels equally into the waistband.
- With face sides together, stitch waistband to skirt’s waistline. Fold waistband in half length-wise and sew short ends.
- Turn waistband right-side-out and align inner edge with row of machine-stitching. Slip-stitch by hand.
- Thread-mark the center front alignment on the front placket and make a machine-made horizontal buttonhole on the waistband (right front) to fit buttons selected.
- Hand-sew buttons to waistband and placket on CF line and to skirt portion below the zipper to produce a false front.