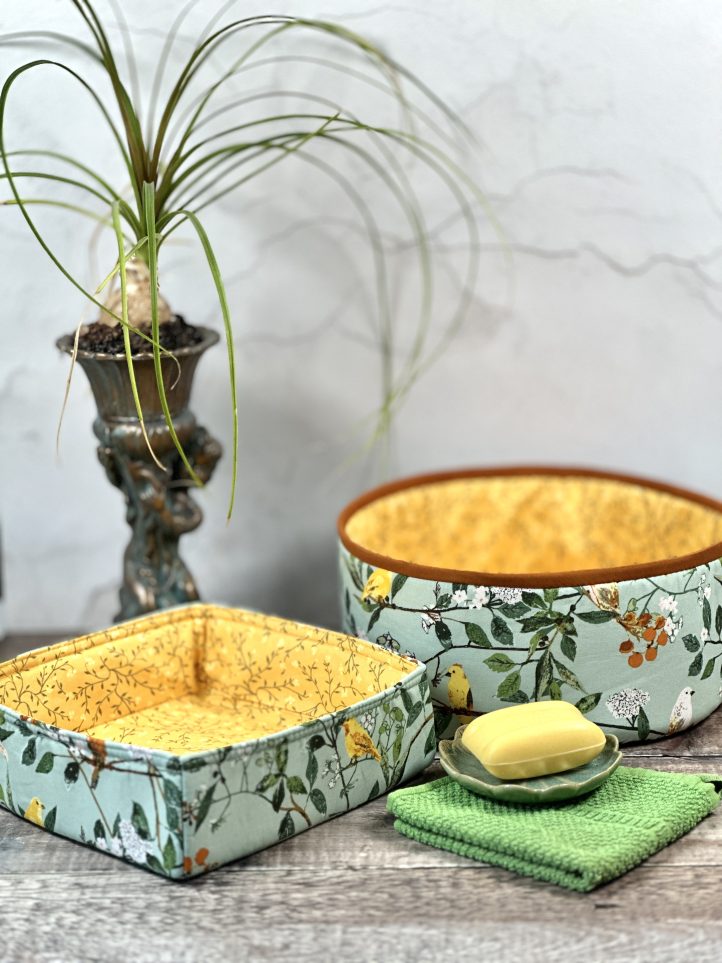
Organize your bathroom necessities with a pretty, homemade storage set. These sewn organizer patterns from Debbie von Grabler-Crozier are a set of two storage bins, one round and one square, made in whimsical, richly colored fabrics. Don’t settle for cheap plastic organizers from the dollar store and create custom organization that perfectly matches your décor aesthetic with these DIY fabric organizers.
ROUND STORAGE BIN:
Designer Note: Seam allowances are all 1/4” and have already been added.
Materials:
- Fabric: (Note: All fabrics are by Art Gallery Fabrics.)
- 17” strip print fabric for the external panel. Debbie loves Melodic Plumage Day from the Plentiful collection by Katarina Roccella for AGF.
- 17” strip coordinating print for lining. The designer’s choice is Dancing Florets Solar from the Plentiful collection by Katarina Roccella for AGF.
- FQ solid fabric for the binding. The designer is using Gingerbread from the pure Elements collection by AGF.
- Interfacing:
- 1 yd. Style-Vil foam interfacing (Vlieseline)
- 3/4 yd. G740 fusible interfacing (Vlieseline)
- Coordinating threads for all fabrics and trims
- Scissors
- Fabric marking tools
- PDF Template – This is located at the bottom of this page. See printing instructions below.
PRINTING INSTRUCTIONS:
To download the PDF template, click on the download button at the bottom of the page. We recommend opening your download using Adobe Acrobat.
Cutting Instructions:
From the main fabric:
- 1 piece for the base external panel (PDF template)
- 1 piece 34 1/2” wide x 5 1/4” tall for the external side panel
From the lining:
- 1 piece for the base panel lining (PDF template)
- 1 piece 34” wide x 5” tall for the side panel lining
From the solid fabric:
- Bias tape 1 1/2” wide and joined to make a continuous 35” strip
From the G740 interfacing:
- 2 pieces for the base exterior and lining panels (PDF template)
- 2 pieces 34 1/2” wide x 5 1/4” tall for the external and lining side panels* (*Note: The lining interfacing has to be slightly smaller [1/2” on the length and 1/4” on the height] to match the lining panels. Trim accordingly.)
TIP: There are no cutting notes for the Style-Vil foam interfacing. Instructions will be given as we go along, but the basic idea is to press the piece to be interfaced and then pin to a slightly larger piece of foam interfacing. Use a machine basting stitch to attach the panel to the foam, gently keeping a taut tension on it. Then trim the excess foam away.
Sewing Instructions:
PREPARATION:
Make the Bias Tape:
- Join the bias cut strips if needed and then fold the strip in half lengthways, wrong sides together and iron a long central crease.
- Unfold and re-fold the two long raw side edges to the center crease and press again.

- Fold so that the raw edges are enclosed.
Prepare the Panels:
- Interface the exterior and lining panels with G740 interfacing.
- Lay the exterior panels only, wrong sides together, onto a piece of slightly larger Style-Vil foam interfacing and attach the panel to the foam with a machine basting stitch.

- Trim the foam all around back to the fabric edge.
Build the Exterior:
- With the right sides together, sew the short seam on the exterior panel to form a loop.

- Make tiny (no more than 1/8”) snips all along the bottom edge of the exterior side panel.

- TIP: This will help the slightly thicker straight edge negotiate the base curve.
- With the right sides together, sew the side panel to the base. Notch the edge all the way around to help the curve sit smoothly when the exterior is turned the right way out.

Construct the Lining:
- TIP: Increase the seam allowances to 1/2” when sewing the lining.
- Sew the short seam on the lining and press the seam open. Check that it fits inside the basket and adjust as needed. Make the same snips along the bottom edge and attach to the lining base circle.
- TIP: There is no need to notch this time because the lining is drop-in and will not be turned.
MAKING:
- Drop the lining into the exterior and match up the seams. Sew together on the top edge.

- Bind the top edge with the bias tape using your preferred method.

SQUARE STORAGE BIN:
Designer Note: Seam allowances are all 1/4” and have already been added.
Materials:
- Fabric: (Note: All fabrics are by Art Gallery Fabrics.)
- 11” strip print fabric for the external panels. The designer loves Melodic Plumage Day from the Plentiful collection by Katarina Roccella for AGF.
- 11” strip coordinating print for lining. Debbie’s choice is Dancing Florets Solar from the Plentiful collection by Katarina Roccella for AGF.
- Interfacing:
- 11 “ strip Style-Vil foam interfacing (Vlieseline)
- 11” strip G740 fusible interfacing (Vlieseline)
- Coordinating threads for all fabrics and trims
- Scissors
- Fabric marking tools
Cutting Instructions:
From the external fabric:
- 1 piece 9” sq. for the tray base
- 4 pieces 9” wide x 3 1/2” tall for the tray sides
From the lining fabric:
- 1 piece 8 1/2” sq. for the tray base
- 4 pieces 8 1/2” wide x 3” tall for the tray sides
From the G740 interfacing:
- 2 pieces 9” sq. for the tray base, exterior and lining*
- 8 pieces 9” wide x 4 1/2” tall for the tray sides, exterior and lining* (*Note: *The interfacing for the lining will be slightly smaller, trim as needed.)
TIP: There are no cutting notes for the Style-Vil foam interfacing. Instructions will be given as we go along, but the basic idea is to press the piece to be interfaced and then pin to a slightly larger piece of foam interfacing. Use a machine basting stitch to attach the panel to the foam, gently keeping a taut tension on it. Then trim the excess foam away.
Sewing Instructions:
PREPARATION:
- Interface the wrong sides of all of the fabric panels (external and lining) with G740 interfacing.
- TIP: This interfacing is a whisper thin cheesecloth weight interfacing and it gives the fabrics a light canvas weight which is perfect for a basket. You can omit if you are using a heavier fabric.
- Place the external panels only onto a piece of foam interfacing that is a little larger (about 3/4” all around) than the panel and attach with a long machine basting stitch.

- Trim the foam interfacing back to the fabric edge.

- TIP: This project uses Y seams so that the bottom corners of the tray are nice and sharp. This means that you will make a measurement 1/4” up from the bottom of the sides on the wrong side of the side panels and 1/4” in from all sides on the base panel on the right side.

MAKING:
- Pin or clip the first two sides together, right sides facing. Sew from the top edge to the mark that you made and then backstitch.

- Repeat this on all four sides to make a square ‘loop’.

- Attach this loop to the base, working on each side singularly.
- TIP: This means to sew one side from mark to mark, backstitching at the beginning and end. The corners will naturally splay slightly to fit.

- Repeat this for the lining pieces. Leave a turning gap of around 3- 4” on one side of the lining when you attach it to the base square.

- Turn the foam interfaced external section the right way out and use something pointed to gently push the corners out.
- Pull the lining on over the external section and pin or clip, matching the corners and edges.

- TIP: The lining will be quite a snug fit over the interfaced exterior- you want that, so just scrunch everything into the middle so that you can get the edges perfect. The foam will bounce back beautifully when you turn the tray the right way out and you will have a lovely smooth lining.
- Sew right around the top edge. Turn the tray out through the turning gap and close the gap.
- Push the lining down into the tray and clip the top edge. Topstitch right around.

- TIP: The designer likes to topstitch twice- the first pass at 1/8” and the second about 1/4” under that. This makes the top edge neater and holds those thick layers.
- Finish off by clamping the corners for a while.

- This gives it a better shape. A ‘while’ will depend on the thickness of the foam (usually about 1/4”) and the brand that you are using. The designer tends to leave it about an hour or two but overnight is best.


