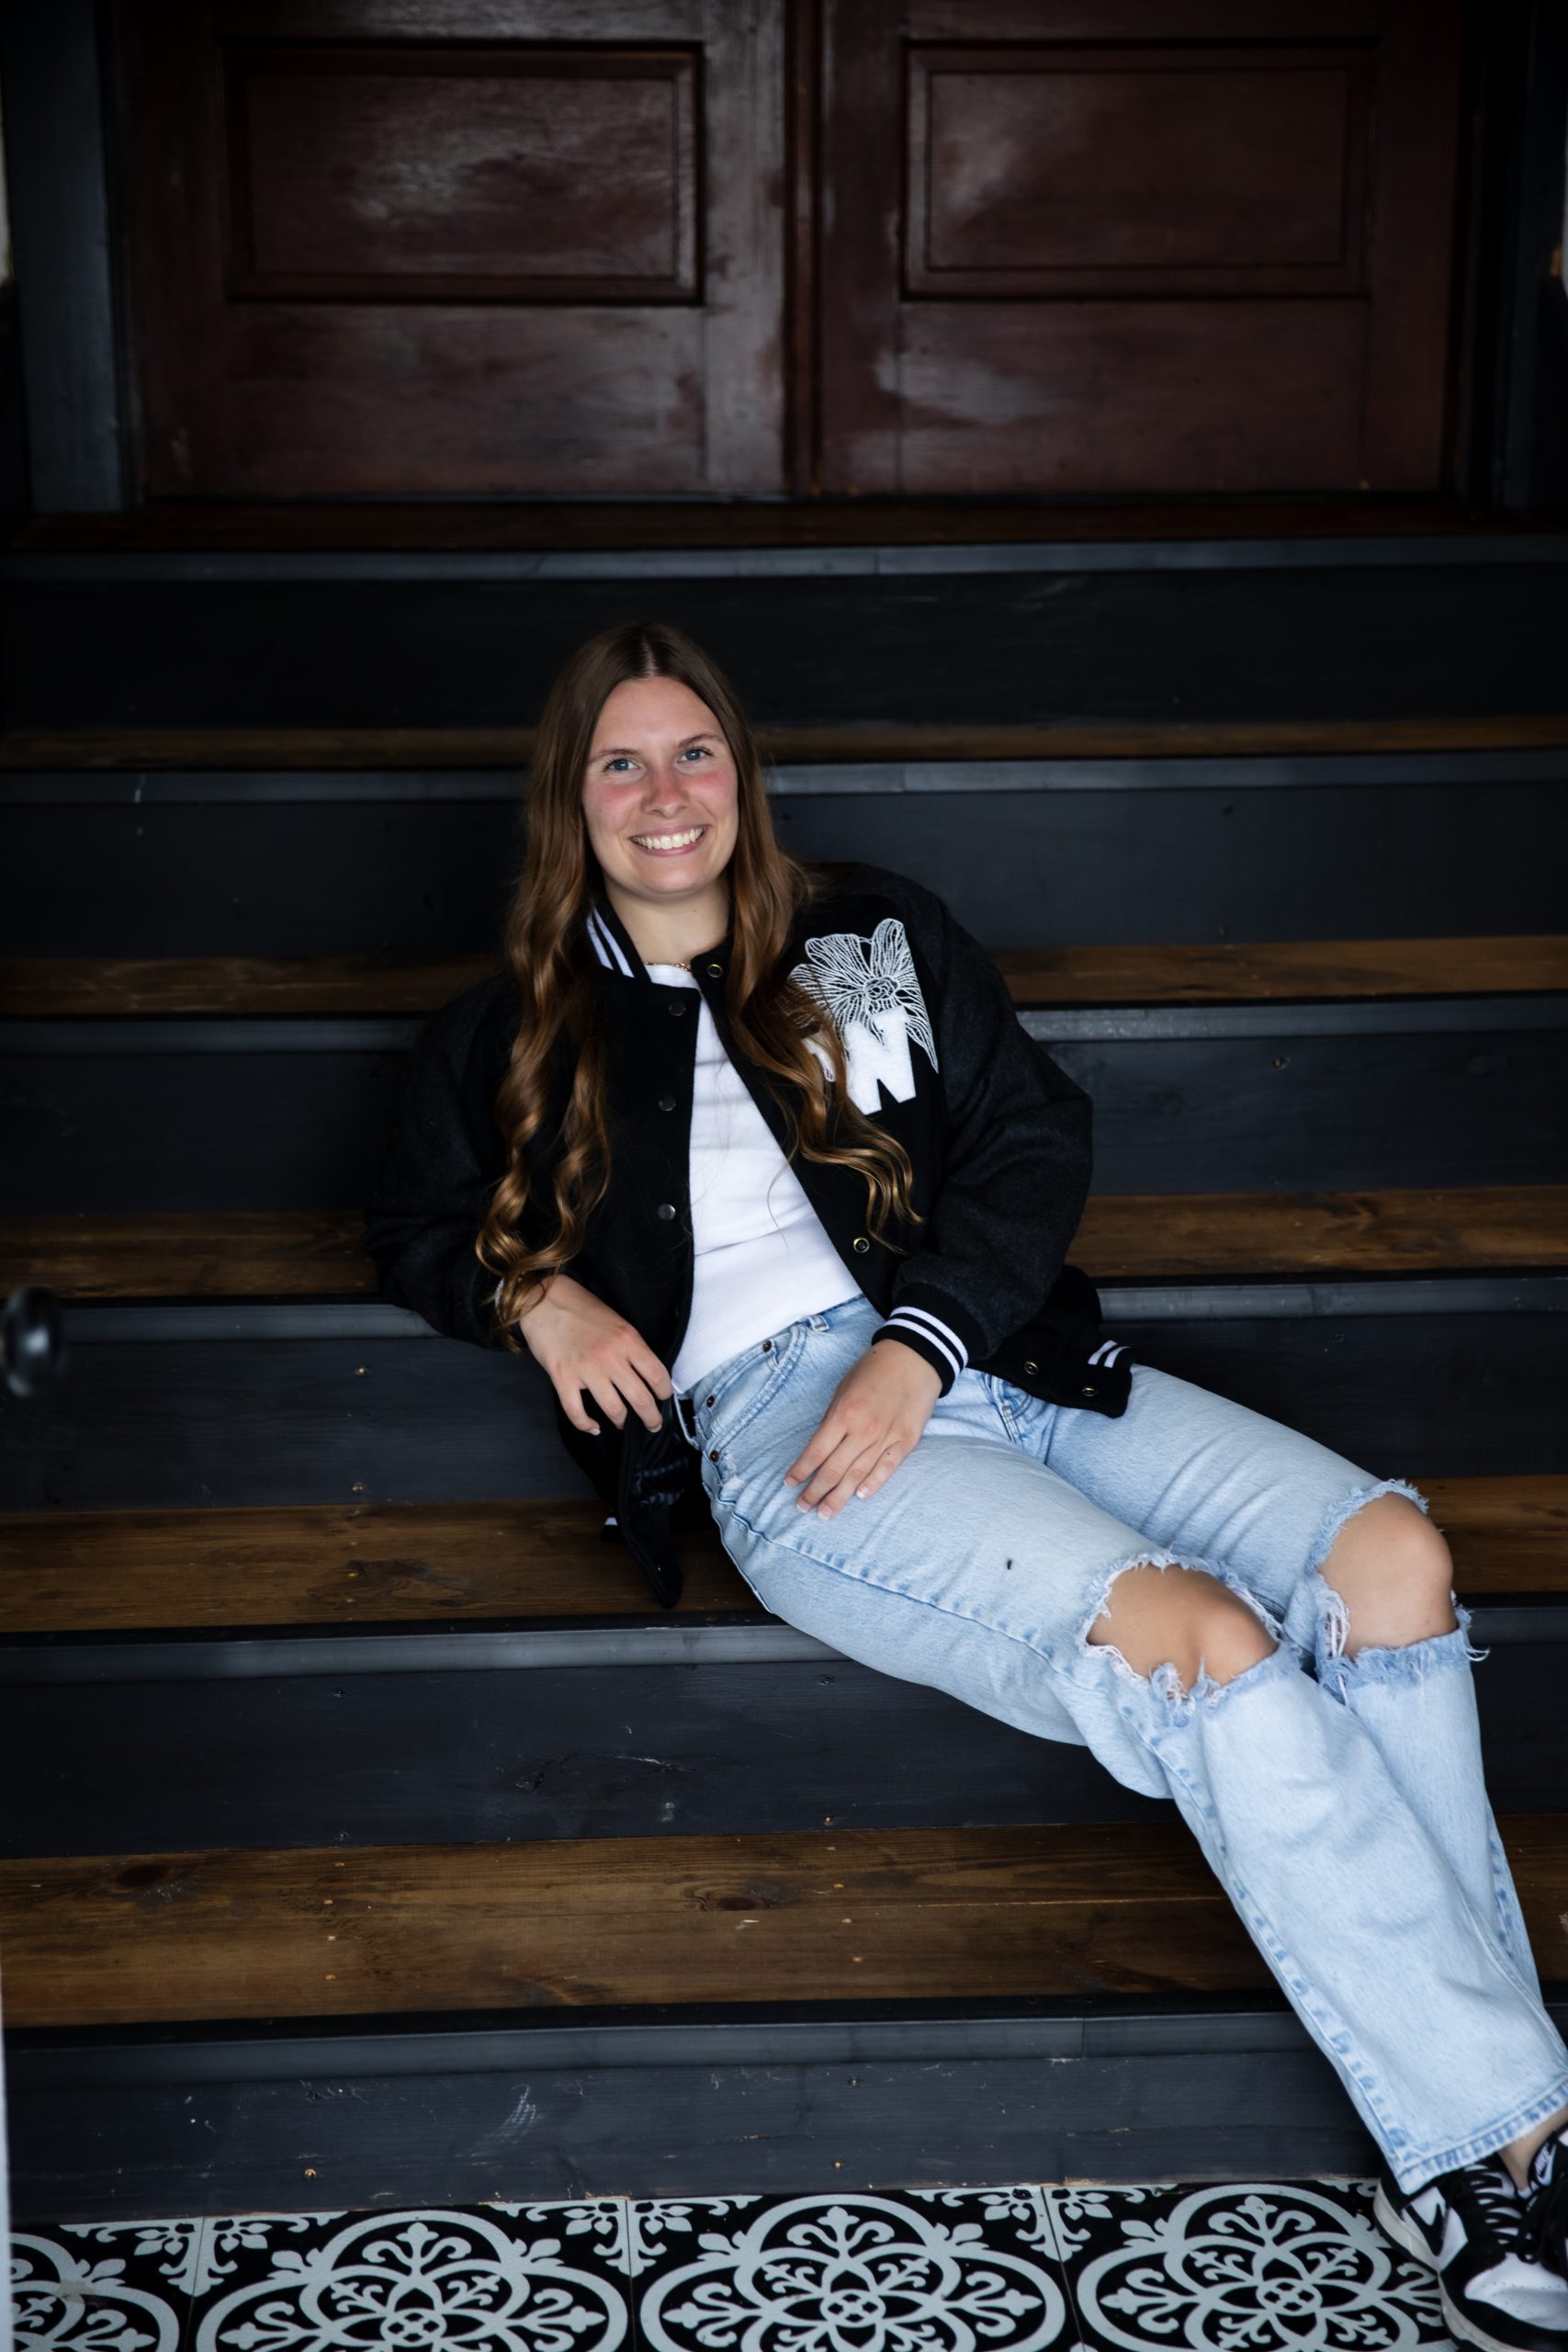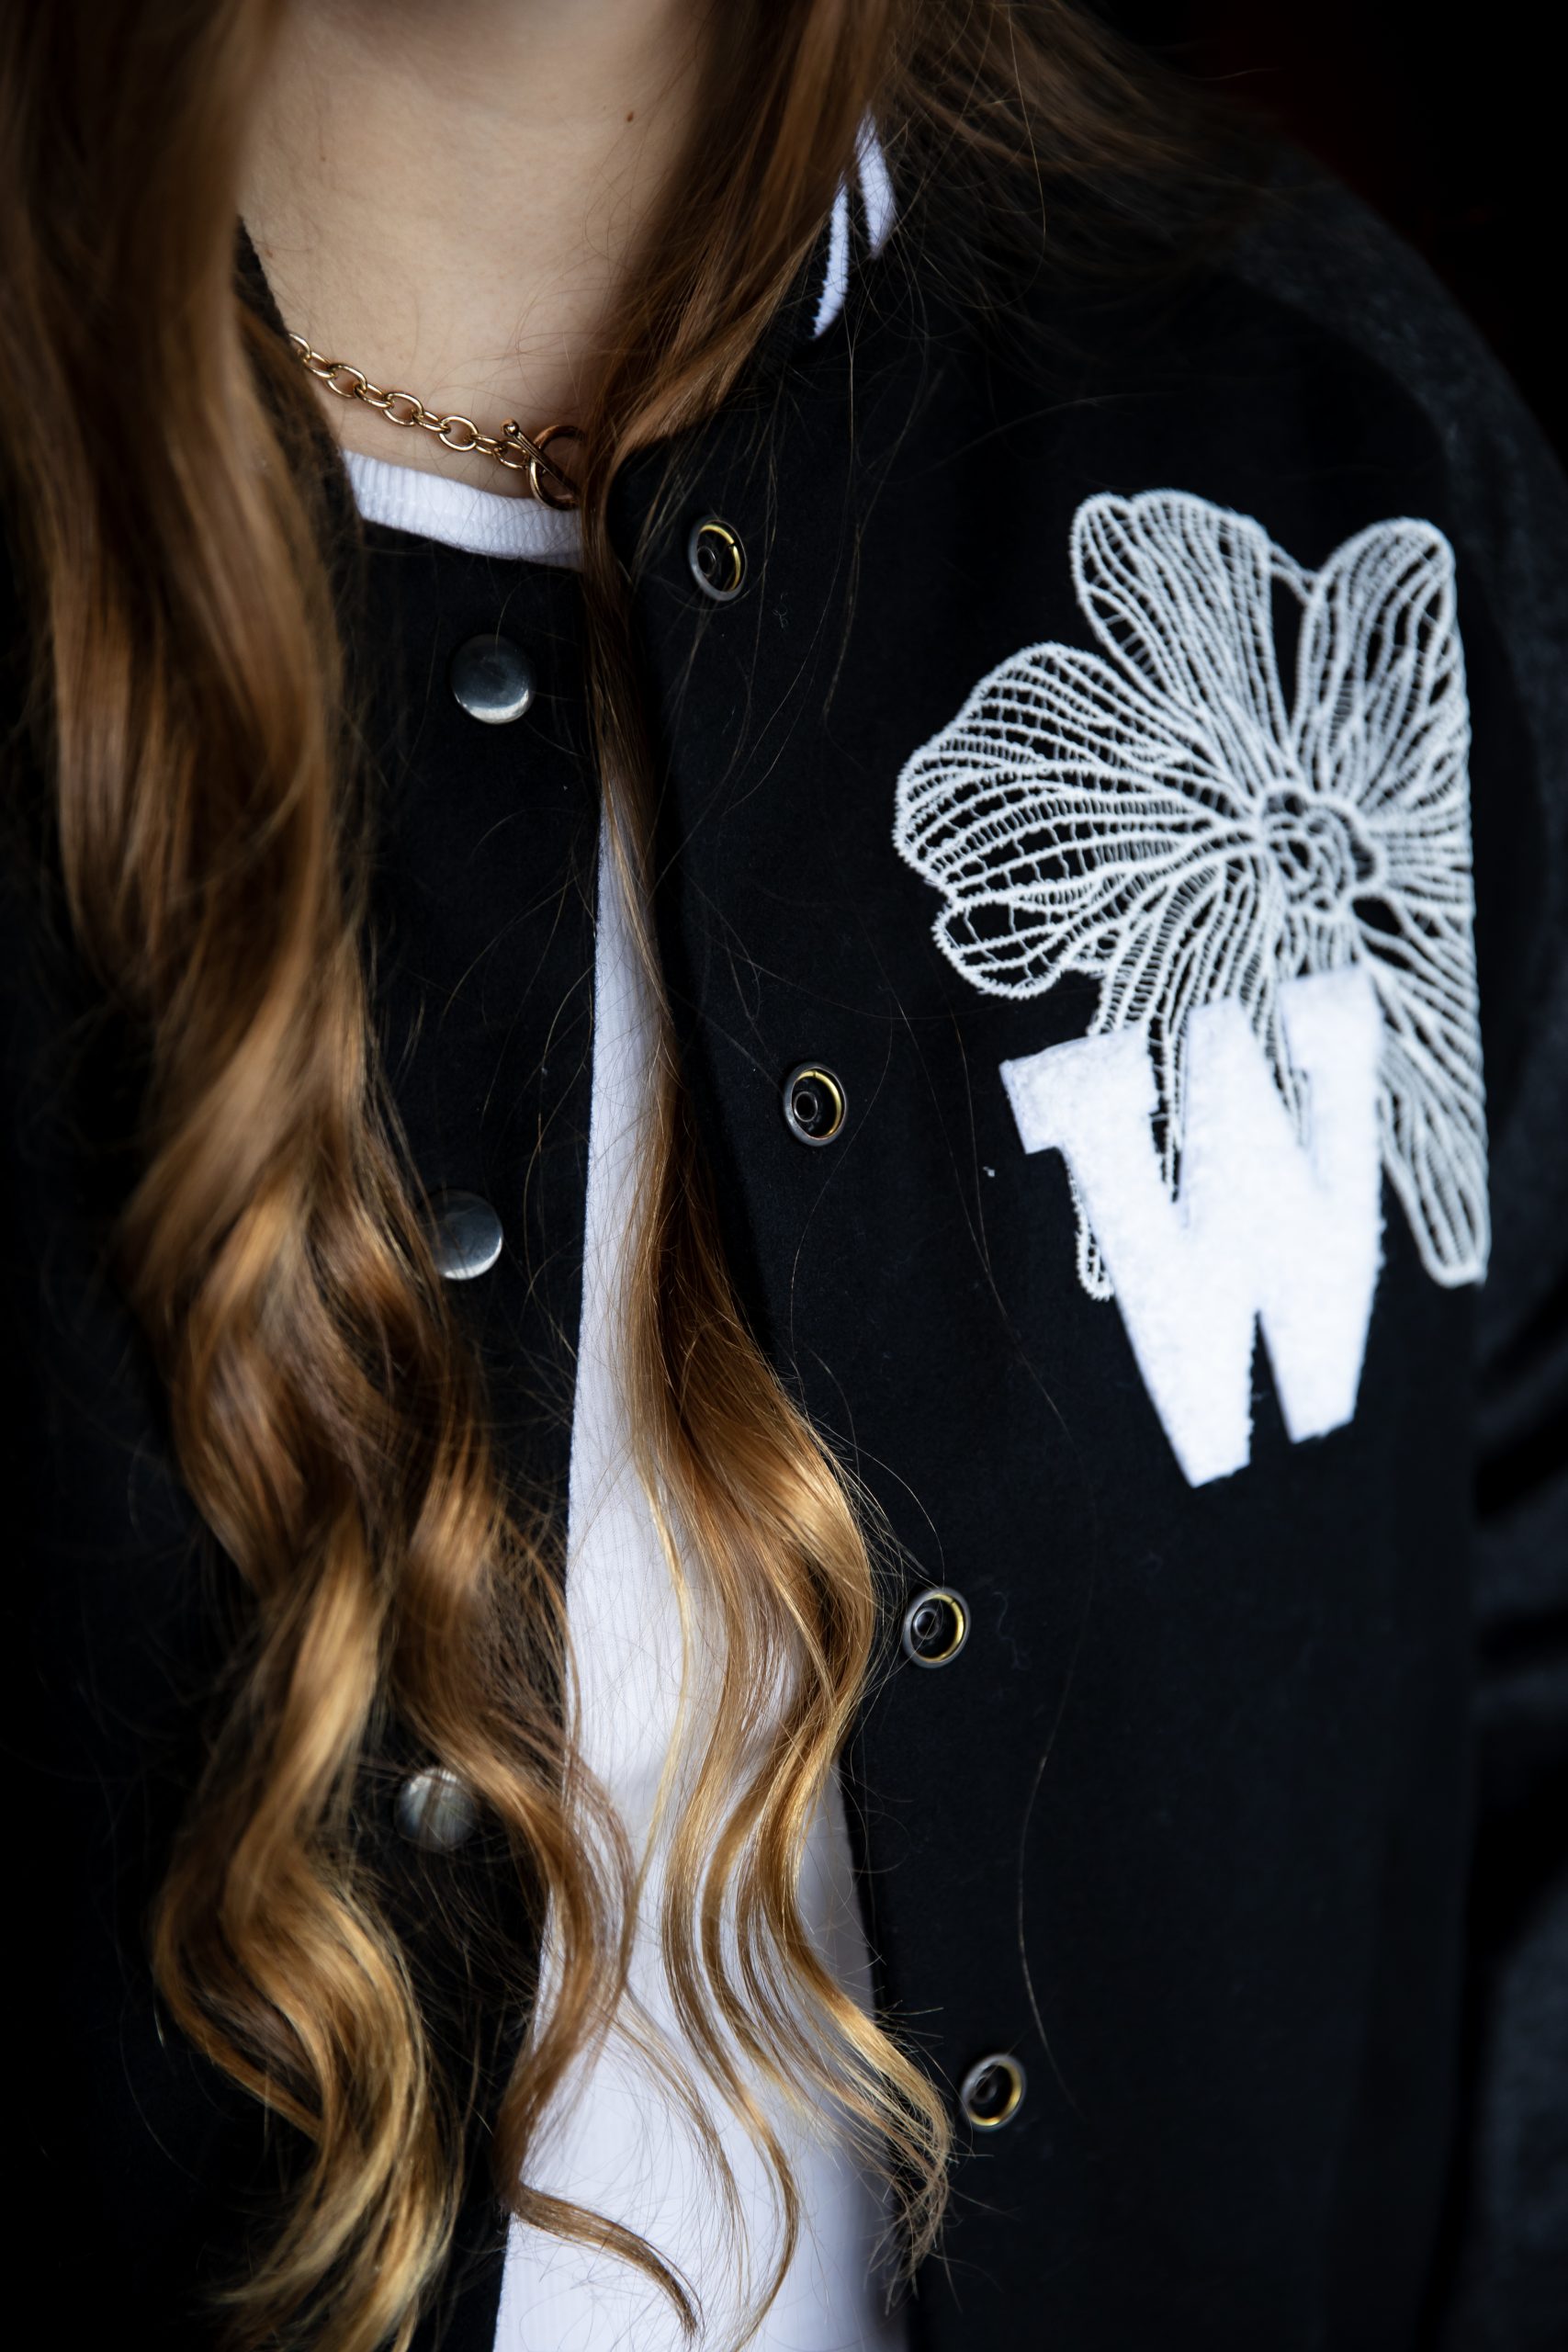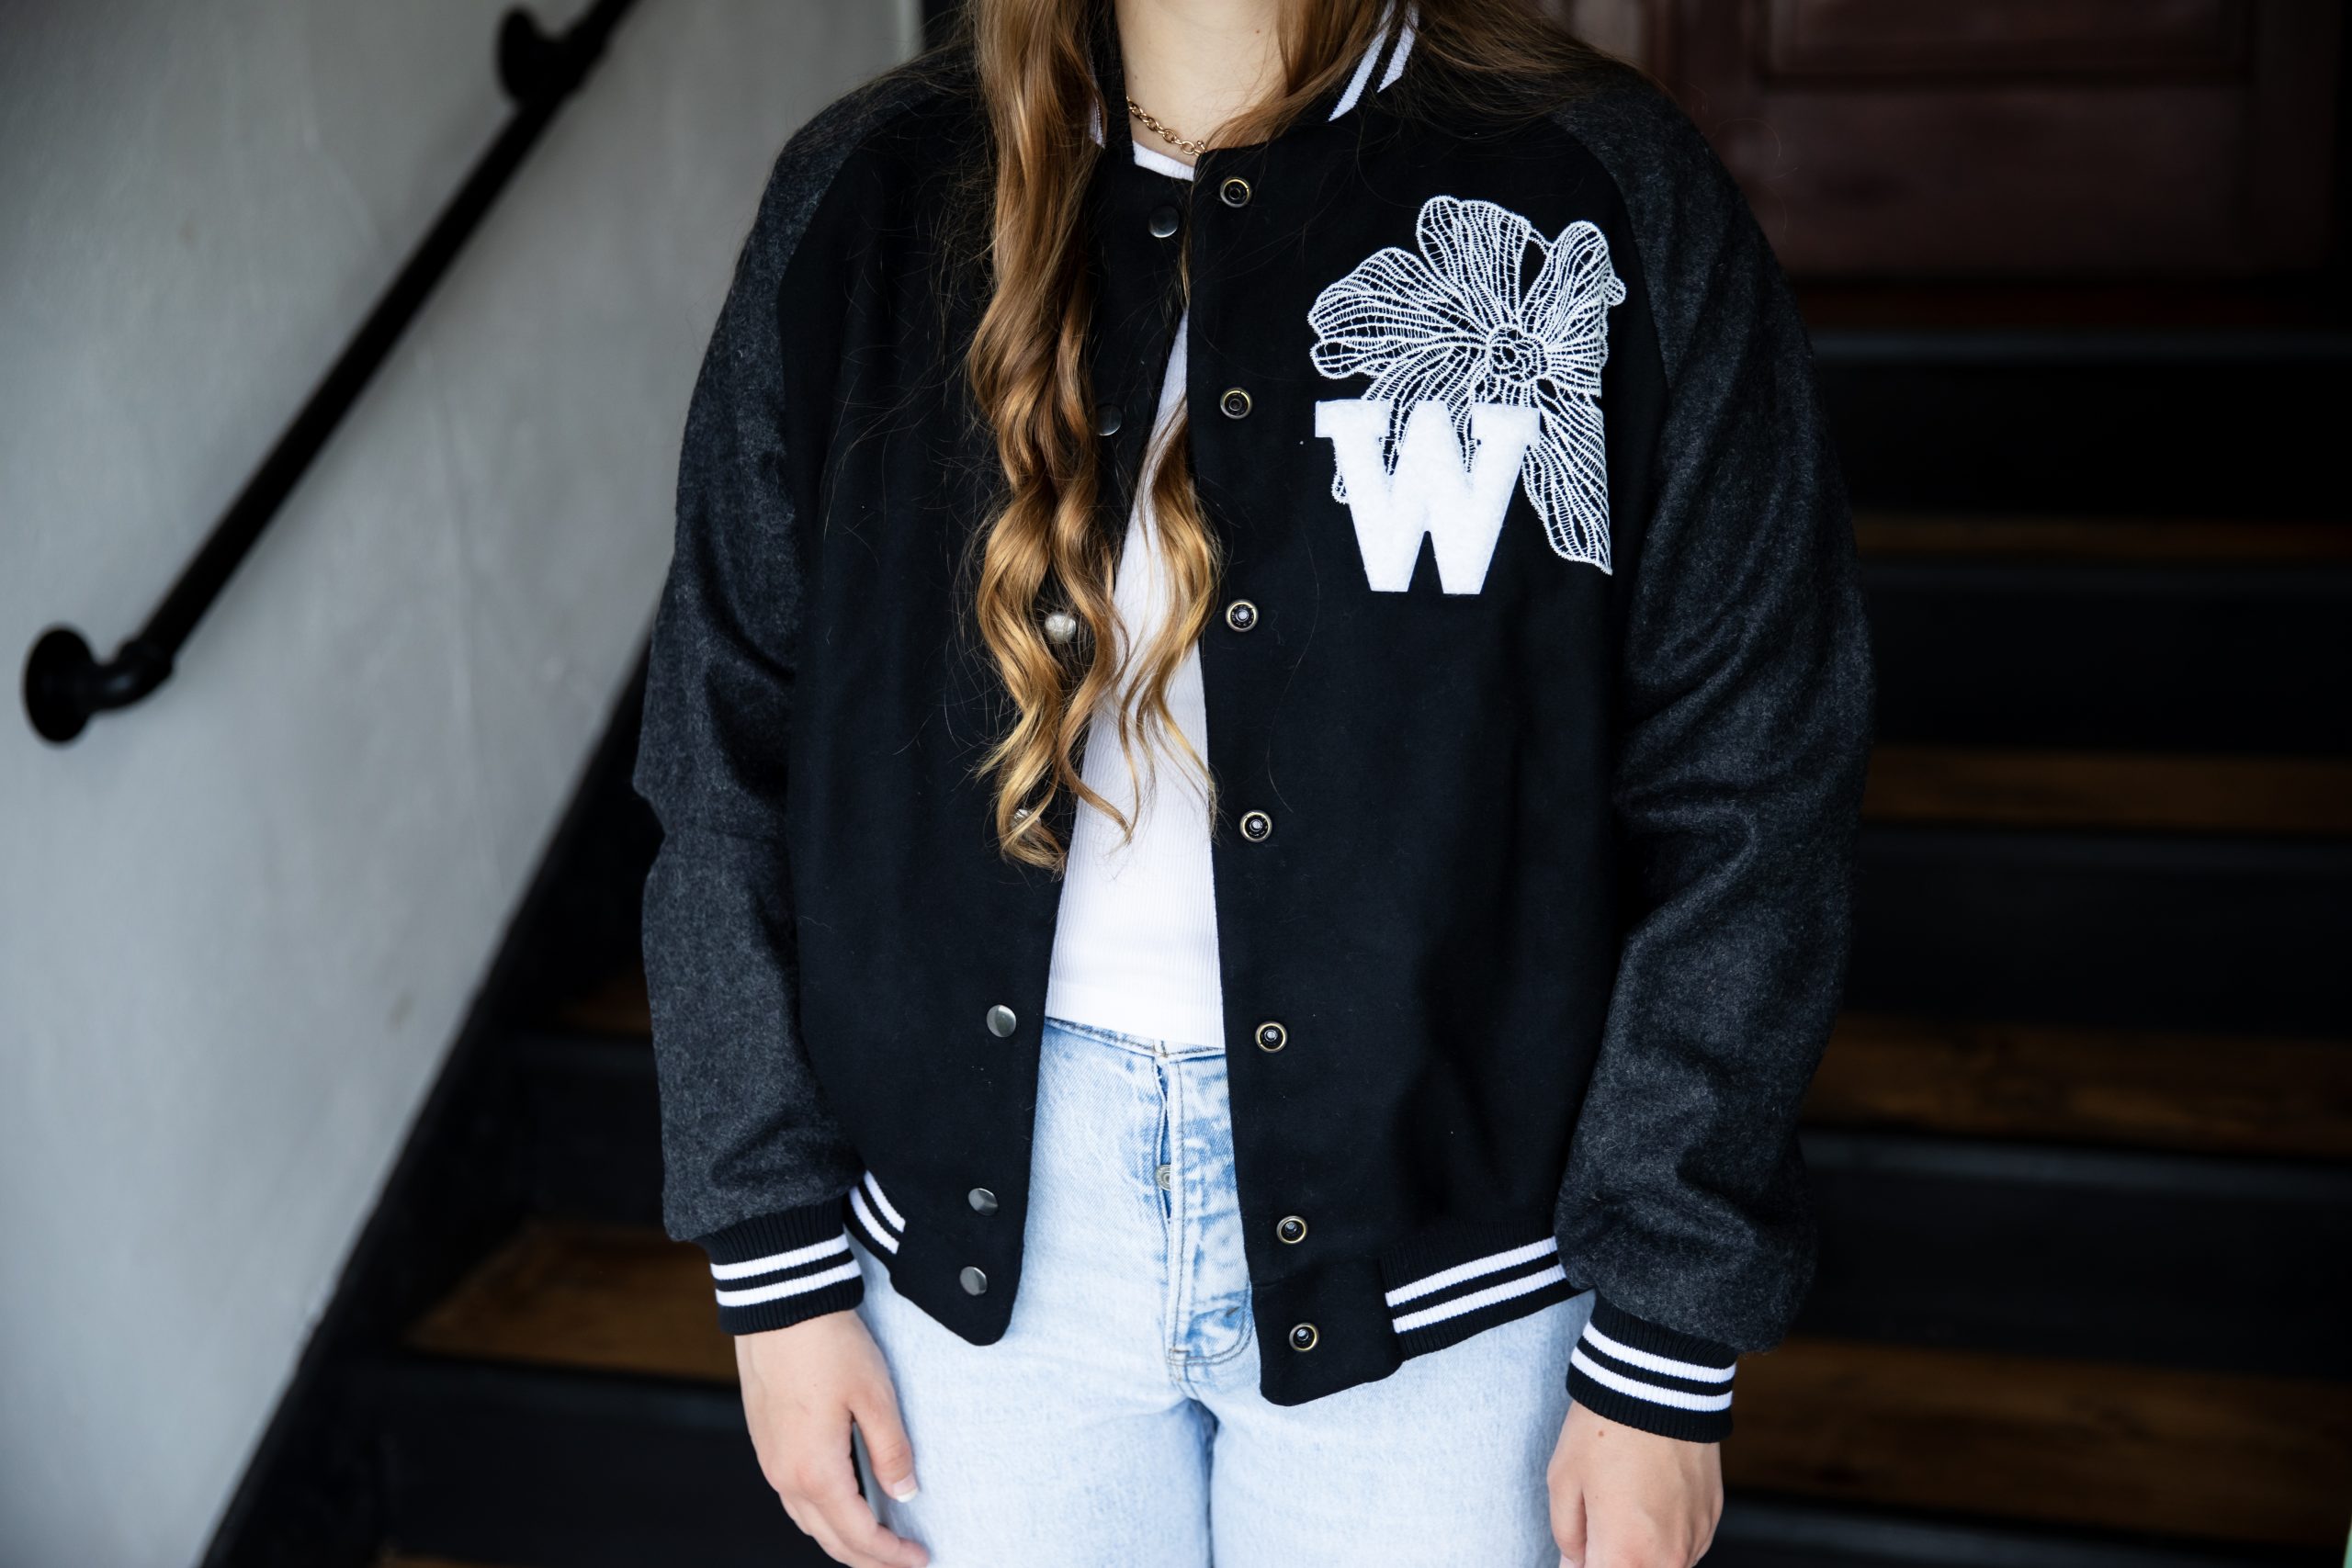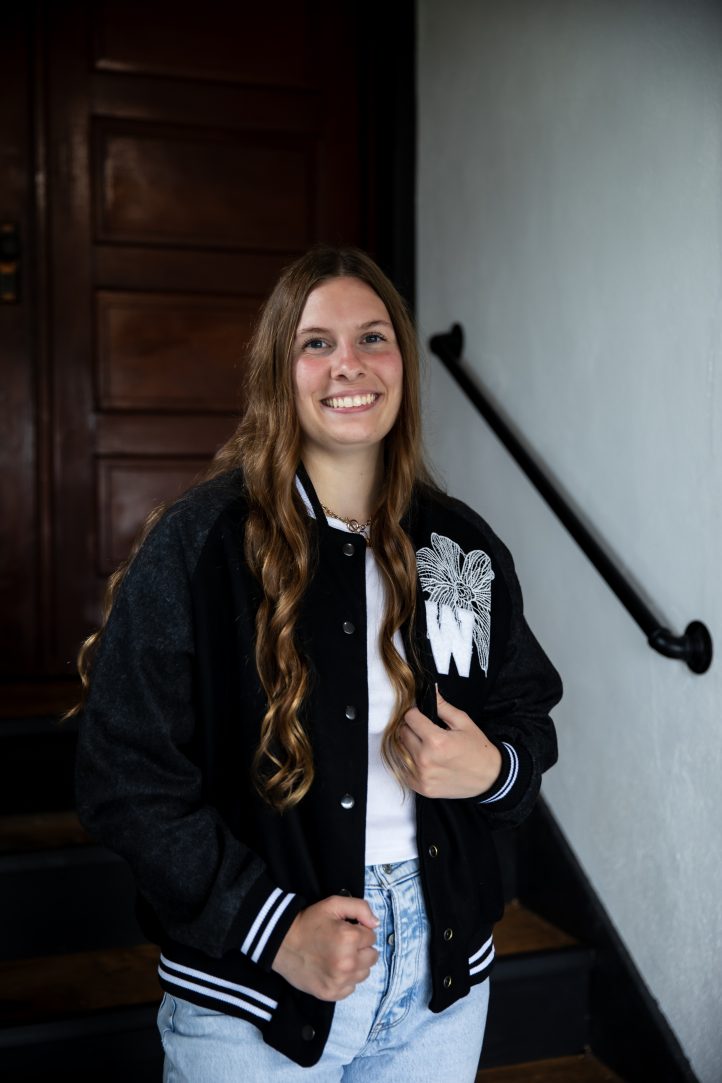
We can’t get enough of classic fall style, and this chic black-and-white bomber jacket from Lauren Merciris will be a staple in your fall wardrobe. Featuring a varsity-style letter and delicate embroidered floral patch, this bomber jacket pattern is perfect for heavy-duty fabrics like wool and tweed. Elevate your everyday style with this sporty chic fall jacket design.
Designer Note: All the seam allowances are included: 1 cm / 0.4 in (3/8’’).
Materials:
- Fabric and material requirements (fabric width 150 cm / 59 in.)
- Fabric 1 and 2: wool, tweed, bouclé, jacquard, light quilt – no stretch
- Lining fabric: polyester, viscose, silk, satin – no stretch
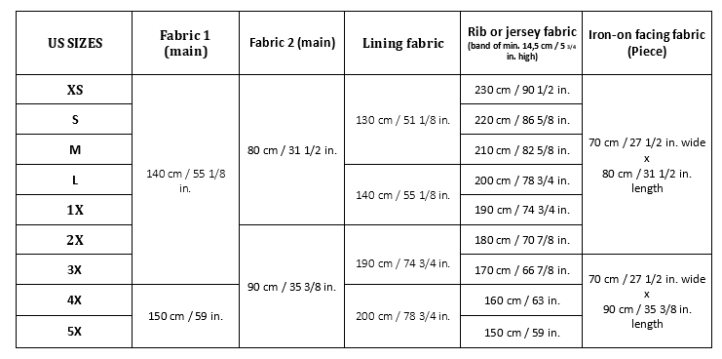
- Rib or jersey fabric bands: Stretchy ribs for the neckband, the waistband, and the wristband (14.5 cm / 5 3/4 in. wide)
- Iron-on facing fabric: To reinforce front and back facings, the hem band tabs, as well as the welt pocket.
- 7 metallic snap buttons (diameter 15 mm / 0.6 in.) + snap press or snap tools
- One iron-on letter patch and a decorative embroidery flower patch
- PDF Pattern – This is located at the bottom of this page. Please see printing instructions below.
PRINTING INSTRUCTIONS:
Note: To download the pattern, click on the pattern download button at the bottom of the page. We recommend opening your pattern download using Adobe Acrobat.
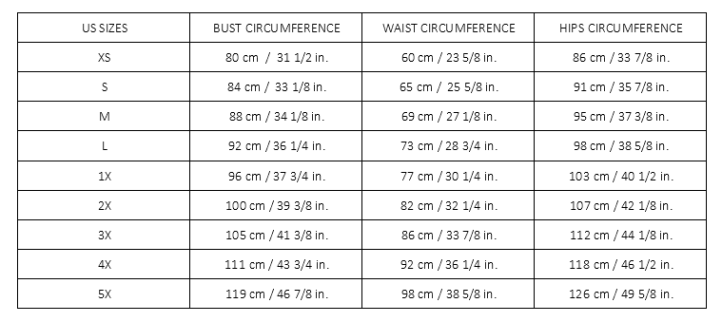
SIZE CHART (CMS/INCHES):
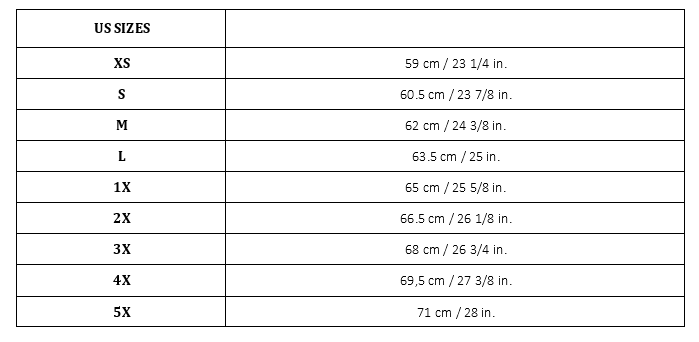
FINISHED GARMENT LENGTH (FROM SHOULDERS TO HEMLINE IN CM/INCHES):
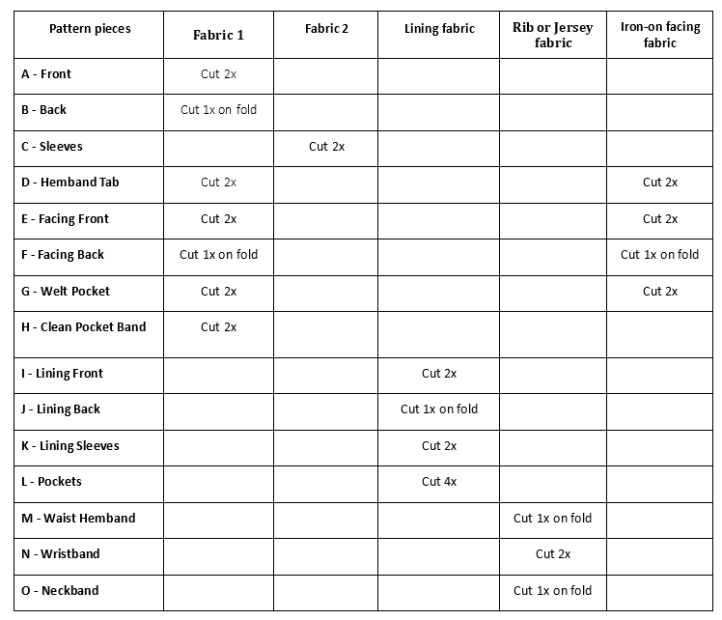
PATTERN PIECES:
Cutting Instructions:
- Lay the Fabric 1.
- For sizes XS and S:
- Fold the two selvage edges back to the middle of the fabric, and adjust the width to obtain 1 fold on the left and 1 fold on the right (right sides together).
- For sizes M and 5X:
- Fold the fabric along the selvage edges (right sides together).
- For sizes XS and S:
- Lay the Fabric 2.
- For all sizes:
- Fold the fabric along the selvage edges (right sides together).
- For all sizes:
- Lay the lining fabric.
- For all sizes:
- Fold the fabric along the selvage edges (right sides together).
- For all sizes:
- Lay out the pattern pieces on the different fabrics, respecting the grainline, and cut out each piece as many times as the pattern indicates.
- Mark all the markers on the reverse side of the parts, except for the Pocket and Button marks on the Front Jacket (A – Front).
Sewing Instructions:
ASSEMBLING THE OUTSIDE JACKET:
Front, Back, and Sleeves:
- Join each side of the sleeve (C – Sleeves) right sides together at the Front (A – Front) and Back (B – Back) respectively.
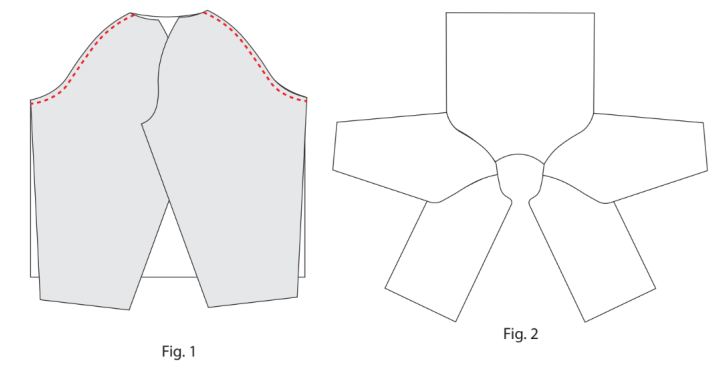
- Pin and sew at 1 cm / 0.4 in (3/8’’).
- Iron by spreading seam margins to flatten them.
- To close the outside jacket, place the front and back right sides together. Pin and sew the entire sides and also along the sleeves at 1 cm / 0.4 in (3/8’’). Make sure that the seams are aligned where the sleeves meet the front and the back.
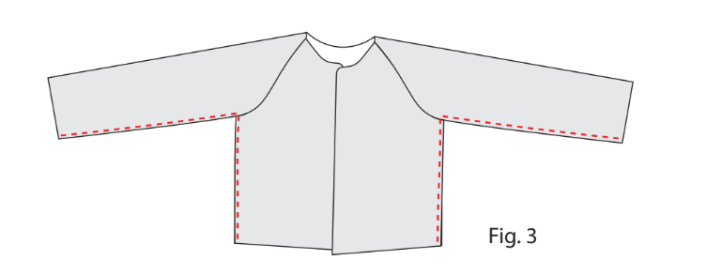
- Iron by spreading seam margins to flatten them.
Patch and Flower:
- Position the flower according to the mark, on the Front.
- Pin and iron softly.
- To prevent it from coming unstuck, machine or hand sew to hold it in place with small holding stitches. It should remain firmly attached to the fabric.
- Now place the patch letter on top.
- Pin and iron.
- To prevent it from coming unstuck, follow the same procedure as for the flower.
Pockets:
- Place the right side of one of the Pockets (L – Pocket) on the right side of the Clean pocket bands (H-Clean Pocket Band).

- Sew at 1 cm / 0.4 in (3/8’’) along the pocket opening.
- Press spreading the seam allowances. The clean pocket band prevents the bottom of the pocket from showing when the pocket is opened, giving it a nice finish.
- Fold the Welt pocket (G – Welt Pocket) according to the fold mark, right side out. Iron. The welt pocket will be the visible strip at top of pocket.

- Position the folded welt pocket on the right side of the second pocket section (L – Pocket). Sew at 1 cm / 0.4 in (3/8’’).

- Now position and center the two prepared pocket parts right sides together, along the pocket markings on the Fronts (A – Front). Be sure to match the seam lines with the reference lines. Sew as shown, leaving 1 cm / 0.4 in (3/8’’) on each side.

- Now cut into the front fabric following the mark in the middle of the rectangle on the front.

- Turn over the two pocket parts sewn to the wrong side of the front.

- Tuck in the welt pocket and position carefully.
- On the wrong side of the front, turn up the triangles and sew at 1 cm / 0.4 in (3/8’’) intervals to hold everything together (the sides of the clean pocket band + the welt pockets + the triangle), and keep on the seam along the pockets bottoms, and come back on the other side of the pocket.

- Press carefully.
- Do the same for the other pocket, respecting the symmetry.
Neckband:
- Fold the Neckband (O – Neckband) lengthwise, wrong sides together, and position the open sides along the neckline.

- To do this, first pin the middle of the neckband to the middle of the back to match.
- Then stretch the neckband so that the ends are positioned over the neckband mark on the front.
- Pin and sew 0.5 cm / 0.2 in (3/16’’) from edge to maintain.

Facings:
- Apply the Iron-on facing on the wrong side of the Facing front (E – Facing Front) and Facing back (F – Facing Back).
- Now join the facing back with the 2 front facings right sides together.
- Pin and sew at 1 cm / 0.4 in (3/8’’).
- Iron, spreading the seam allowances.
- Turn over the facing and place facing right sides together on the front neckline and pin all around the neckline (sandwiching the neck band), and all along the opening of the fronts.
- Sew 1 cm / 0.4 in (3/8’’) from the edge.
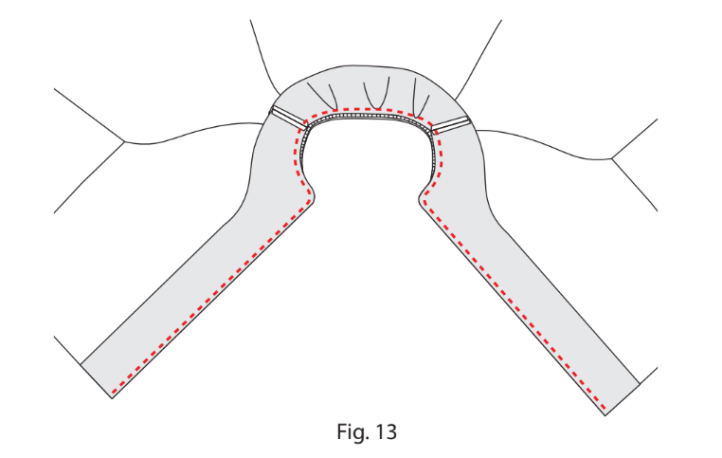
- Edge and trim the seam, especially in the curves.
- Turn right side out, making sure the front rounded corners stand out.
- Iron to flatten.
ASSEMBLING THE LINING:
Ease Fold Back Lining:
- Fold the Lining Back (J – Lining Back) wrong sides together.
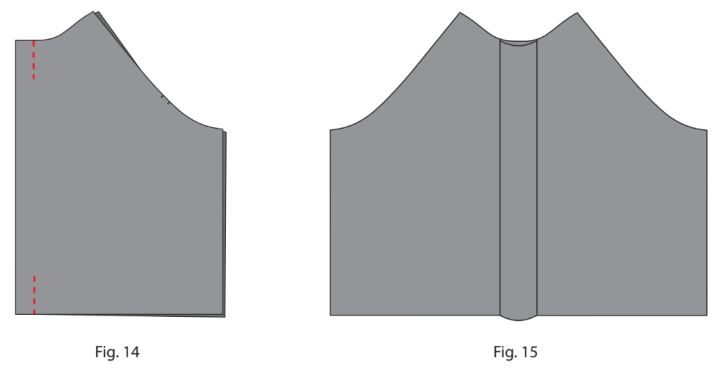
- Form an ease fold by sewing the lining along the line at the top and bottom of the Lining Back.
- Open the Lining Back and press the fold centered over stitching on the right side of the lining.
Assemble the Front and Back Lining:
- Place the right side of the Back Lining jacket in front of you.
- Place the wrong sides of the 2 Front Lining jacket (I – Lining Front) also in front of you.
- Join, pin and sew the sleeves and the sides together at 1 cm / 0.4 in (3/8’’).
- Let 20 cm / 8 in. opened in one of the sleeves lining (between the marks).
- Iron, spreading the seam allowances.
- Sew the front pieces along the facing front. Leave the top of the lining unsewn, at the Facing Back area.
Waist Hemband:
- Cut the Iron-on Facing part to obtain 2 halves.
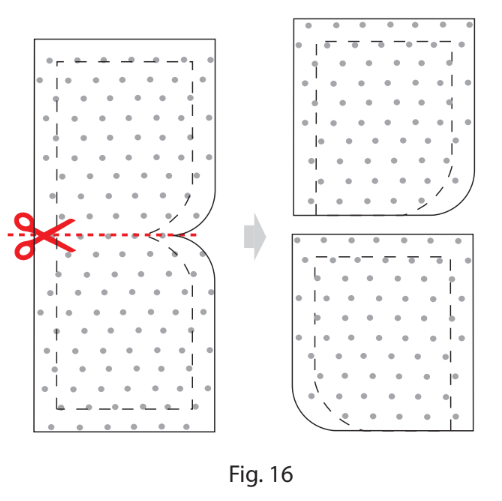
- Apply each of it on the 2 Hemband Tabs (D – Hemband Tab).
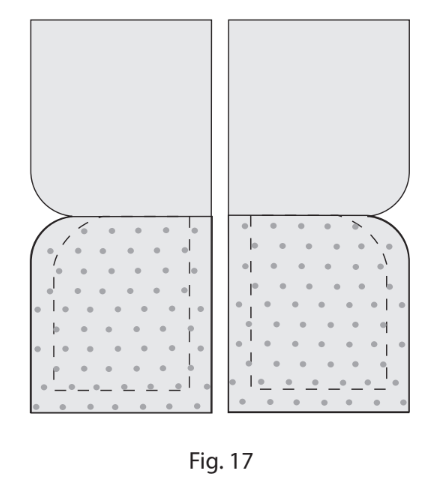
- Place the Hemband Tabs over the edges of the rib Waistband (M – Waist Hemband), right sides together. The length of the Hemband tabs must be the same as the length of the rib edge.
- Pin and sew at 1 cm / 0.4 in (3/8’’).
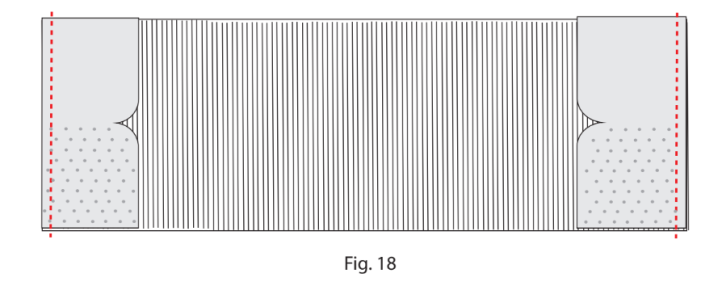
- Press to flatten. Now fold the rib lengthwise, right sides together and sew the curves of the Hemband Tab.
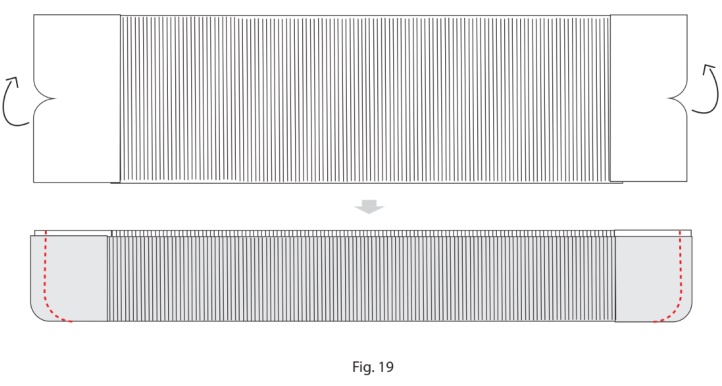
- Turn the Waist Hemband right sides out and iron to flatten.
Assemble the Waist Hemband to the Jacket:
- Mark the middle of the Back outside jacket (B – Back).
- Mark the middle of the Waist Hemband on the back (M – Waist Hemband).
- Now place accordingly the center mark of the Waist Hemband on the center mark of the Back bottom of the outside jacket, right sides together.
- Pin.
- Stretch the rib to each side of the jacket.
- Pin and distribute the waistband along the jacket.

- Add the right-side facing and lining on top, matching the back fold seam of the lining with the back markings on the waistband and jacket.

- Pin in place and sew 1 cm / 0.4 in (3/8’’) from the edge along the bottom of the jacket and lining.
- Turn the jacket right side out and press to flatten seam allowances.
- Reach through the unsewn sleeve to catch the lining and back facing. Gently pull them through the opening and sew them together, right sides together at 1 cm / 0.4 in (3/8’’) to close the back lining.
- Iron to flatten.
Wristband:
- Unfold the wristband pieces (N – Wristbands) and close each, right sides together.
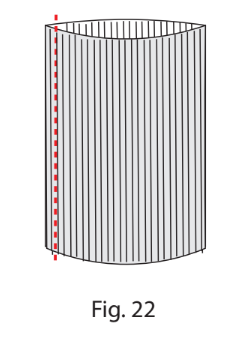
- Pin and sew at 1 cm / 0.4 in (3/8’’).
- Fold them lengthwise, wrong sides together.
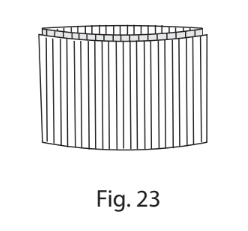
- Insert the lining sleeves into their respective armholes.
- Come inside and pull slowly the bottom of one of the sleeves (outside and lining together). Pay attention to not twist the lining inside.
- Between the lining of the sleeves bottom and the outside jacket sleeve, place the open side wristband, matching the seams together and stretching in all around the sleeve.
- Pin together all along the sleeve bottom the outside jacket, the wristband and the lining.
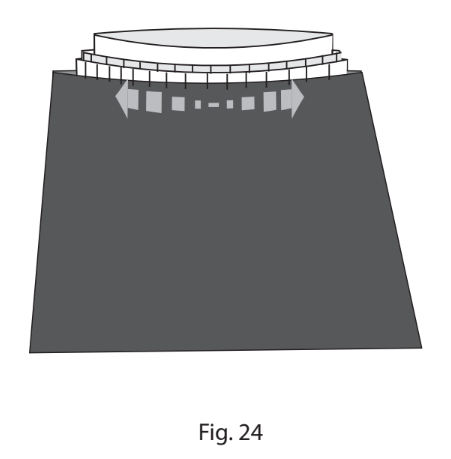
- Turn the sleeve right out by the opening left in the sleeve.
- Do the same for the other wristband.
SNAP BUTTONS:
- Put the snaps on the jacket (6 along the front, and 1 on the Hemband Tab), following the markings. (A lot of different tools is possible as a press machine, or a hand press machine. Follow the instructions from the tool you’ll use).
- For women, the right side snaps over the left. For men, the left side snaps over the right.
- Accordingly, position the parts of each snap respectively on each side.
FINISHING OPTIONS:
- Topstitching the seams of each piece before assembling the lining.
- Endless possibilities in terms of embroidery or lettering on the front parts, but also on the back or sleeves.
- Adding piping between the sleeves and the body of the jacket, especially if the fabric chosen for the sleeves is the same as for the front and back of the jacket.
- Choice of a lot of color for metal snaps (matte gold, shiny gold, matte or shiny silver, matte or shiny black, bronze).

