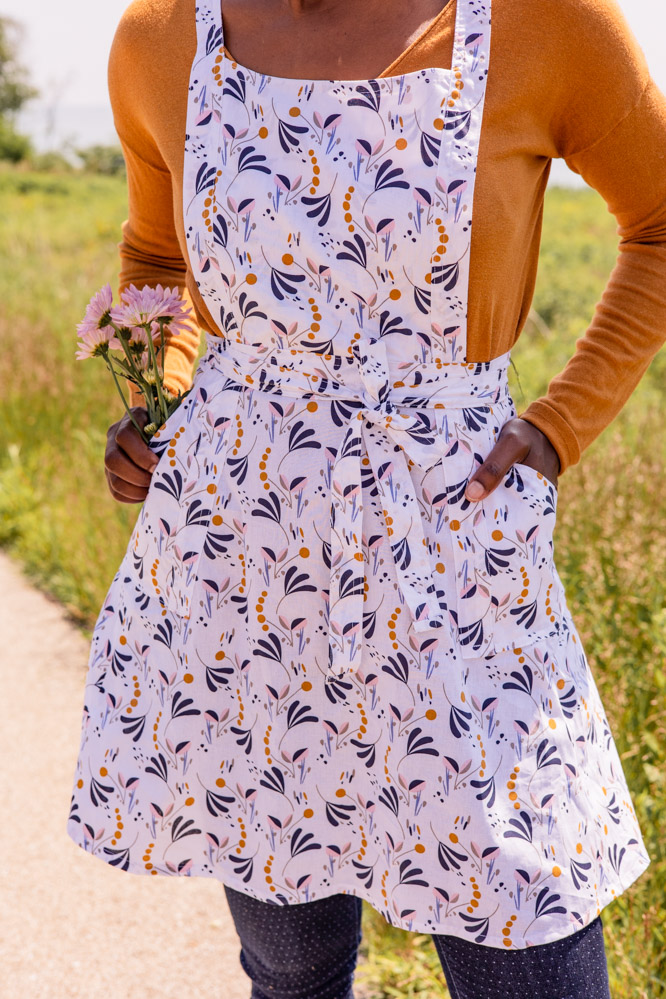
Style and function never looked so good! This classic apron has a wonderful vintage feel yet is made in a thoroughly modern print. Its wrap-round styling allows for a custom and comfortable fit and its design features adjustable shoulder straps and two handy front pockets. Make this vintage-inspired apron for yourself in a fun and colorful print or whip up a batch of these aprons as make-ahead gifts for the holidays. If you’ve been searching for a simple project to take your skills from beginner to easy-level sewing, look no further than this kitchen sewing project.
Skill Level: Easy
Materials:
- Sewing machine (with universal 80/90 needle)
- Rolled hemming foot attachment
- Steam iron and ironing-board
- Lint-free press-cloth
- Basic sewing kit
Seam Allowance: 3/8” (1 cm) wide, then graded or trimmed by half.
Top-Stitching: 1/16” from finished edge, 1/4” from finished edge.
Selecting Fabric for This Project:
Look for durable summer-weight fabrics with a beautiful print. Choose your favorite color in mini prints, geometric shapes, and abstract designs as cutting does not affect the finished appearance of these printed fabrics. Obvious diagonal prints are not suitable. No yardage allowance has been made for matching of fabric prints.
In keeping with the functionality of this garment, it is recommended to select fabrics with a natural fiber content, as synthetic fibers absorb oil & grease easily. Choose a material with a smooth hand that is durable and is relatively easy-to-care for best results.
For instance, the project sample is made in an Oeko-Tex®100- certified all-cotton Cretonne broadcloth by Domotexä (France). The fabric print is abstract leaves on a white background.
Color palette is navy, powder blue, taupe, gold, and pink.
Pattern repeat equals 25” (63.5 cm).
Construction Techniques Used in This Project:
The majority of the assembly of this apron utilizes enclosed seam construction. Enclosed seams are made by sewing two fabric plies with face sides together, then turning them face sides out so the back sides of the cloth are together on the finished garment. No machine-stitching is visible on the surface of the cloth therefore providing a neat, clean finish inside and out; plus, there is no need to finish any raw edges.
These enclosed seams are stitched with narrow seam allowances ranging from 1/8-inch for lightweight, non-fray fabrics to 1/2-inch for loosely woven fabrics that fray. The narrow seam width increases the control and accuracy when machine-stitching and reduces excess bulk. If in doubt about how stable the weave of the fabric that is selected, it is recommended to use a seam allowance that you are comfortable using and “grade” them once the joining seam is sewn by cutting away the layers of the seam allowance width into graduated tiers. This will encourage the fabric to lay flat with limited bulk. It is always easier to trim away any excess, than try to add it back on if you need it.
Pressing, an up-and-down motion, with a steam iron is a key step in creating enclosed seams. Press the work as you go and do not skip this step for best results.
As mentioned, no seam finishes are required throughout most of this project. However, the side seams of the skirt portion of the apron are raw and should be finished as they are visible. They may be finished by serging the raw edges with an over-lock machine or given an appropriate seam finish on a conventional sewing machine based upon the fabric selection. Light to medium-weight fabrics such as voile or broadcloth, may employ a “booked seam finish” or a “turned-and-stitched seam finish” as these finishes will not add bulk to the fabric’s thickness. With heavy-weight fabrics such as cotton twill or denim, bound seam finishes like a Hong Kong finish or bias-cut binding are recommended to enclose raw edges from fraying and keep seam allowances as a single-ply.
For instance, the fabric used for the project sample is a tightly woven plain weave and frays a little.
Overall seam allowance width is 3/8-inch, which is later graded down by half the width. Exceptions are the side seams of the apron’s skirt, which have a 3/4-inch width to allow for a proper seam finish of the raw edge, and the waistband & bib straps, which have a 1/4-inch seam allowance width as there is no access to the seam allowances after machine-stitching.
The Personalized Pattern:
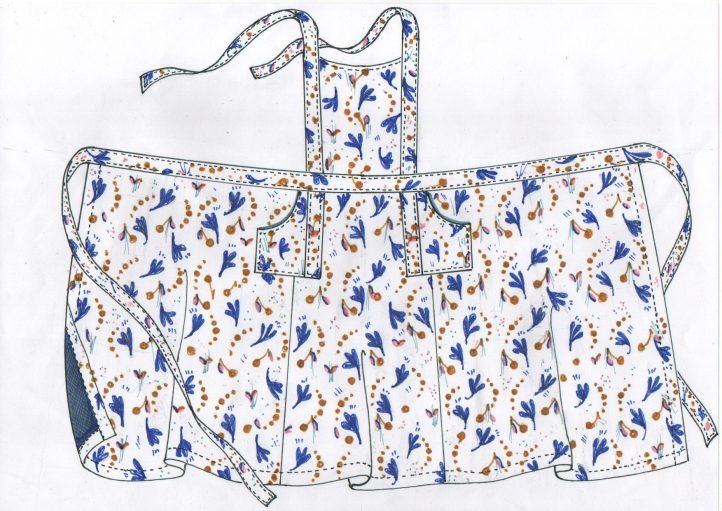
The template for this apron can be drafted on paper by using your own actual body measurements for a customized fit. The construction is very simple: two full backs added on each side of the front A-line skirt; a self-lined front bib, along with two self-lined patch pockets on either side beneath the bib. Then, two long shoulder straps that criss-cross in back and fasten with buttons and button-loops. The waist is well marked by a top-stitched waistband & extending sash ties.
Body measurements are plotted onto a basic grid to make the pattern, then you simply connect the dots.
For a perfect fit, it is imperative that you take exact measurements. Measure directly on your body when wearing underwear. Have someone assist you. Place a length of firm tape or ribbon around your natural waist and pin the ends together. Stand with a straight, relaxed posture. For this apron, the finished hem is based on body height from the High Shoulder Point (level with the nape of the neck) to the floor plus heel height of shoes divided by the Golden Ratio (1.618). Bib straps are adjustable with a button placement. Measurements may be taken in either imperial (inches) or metric (centimeters).
You will need the following body measurements to draft this bib apron pattern:
- Waist circumference – Horizontal circumference around the narrowest part of the torso (ribbon – tape).
- Back waist length – Plumb back distance from High Shoulder Point to tape at waistline.
- Front waist length – Plumb front distance from High Shoulder Point to tape at waistline.
- Apex to Apex – Horizontal distance between bust points.
- Waist to Hip length – Plumb distance from tape at waistline to crotch level.
- Waist to Knee Length – Plumb distance from tape at waistline to top of kneecap.
- Bib strap length equals front waist length + back waist length + ease.
- Waistband ties equal 1.5 x waist measurement + 2 tie lengths.
- Hem length based on height equals (vertical height from nape of neck to floor + shoe heel height) divided by 1.618.
For the project sample, standard US measurements for a small build and height of 5’6” were used.
Equipment Needed: Wide tracing paper, pencil, straight ruler, eraser, French curve, 45º/90º set square.
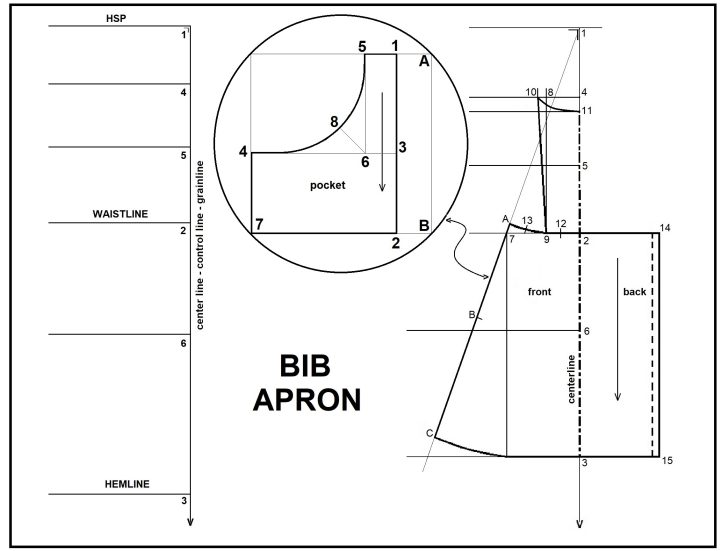
THE GRID:
- Begin by folding a sheet of pattern paper in half lengthways.
- Open the fold and lay the paper flat with the fold-line running top to bottom or vertically.
- Draw a straight line along this fold-line. This will be the vertical control line of the pattern.
- Choose a spot at the top of this line and label it, 1.
- Point 2 from 1 = back waist length.
- Point 3 from 1 = desired hem length + 3/4” (20mm) hem allowance.
- Divide the back waist length (1-2) equally into thirds to locate points 4 and 5 on the control line.
- Point 6 from 2 = waist to hip length; 8” (20.2 cm).
- Square 90º across from all points using a set square. This is the drafting grid.
THE FRONT BIB:
- Point 7 from 2 = 1/4 waist measurement. This is the horizontal control line as well.
- Point 8 from 4 = 1/2 apex to apex measurement.
- Square down from 8 to locate point 9 on the waistline (line 2).
- Point 10 from 8 = 5/8” (16 mm).
- Point 11 from 4 = 3/4” (20 mm).
- Join points 10 and 11 with a smooth curve, as shown using a French curve.
- Join points 9 and 10 with a straight line.
- The grain-line runs parallel to the control line (centerfront line).
THE FRONT APRON SKIRT:
- Extend a continuous tangent line from point 1 to the hemline (line 3) passing through point 7.
- Point A from 1 = length of 1 to 2 (back waist length).
- Point B from 1 = length of 1 to 6 (side-seam notch).
- Point C from 1 = length of 1 to 3 (hem length + 3/4”hem allowance).
- Point 12 from 2 = 2” (5 cm).
- Point 13 is squared 1” (2.5 cm) from A, using a set square.
- Join points 12 and 13 with a smooth curve, as shown using a French curve.
- Square across from point C and join onto line 3 with a smooth curve, as shown using a French curve.
- The grain-line runs parallel to the control line (centerfront line).
THE BACK APRON SKIRTS:
- The back apron skirt panels take on the same silhouette of the front skirt at the side seams.
- From the center line, square a line across the paper from points 2 and 3. Point B is the side seam notch.
- Point 14 from 2 = 1/4 waist measurement + 1” (2.5 cm) facing.
- Point 15 from 3 = 1/4 waist measurement + 1” (2.5 cm) facing.
- Join points 14 and 15 with a straight line.
- The grain-line runs parallel to the control line (center back line).
THE PATCH POCKET:
- Draw a square with all sides equal to A – B on skirt piece of apron.
- Point 1 from A = 1 1/4” (3.25 cm).
- Square down from point 1 to locate point 2, using a set square.
- Point 3 from 1 = 5” (12.75 cm).
- Square across from 3 to locate point 4, using a set square.
- Point 5 from 1 = 1 1/4” (3.25 cm).
- Square down from 5 to locate point 6 on line 3 -4, using a set square.
- Point 7 is located at intersection of lines squared from points 2 and 4.
- Draw a line at a 45 degrees angle from point 6 to locate point 8 = 2 1/2” ( 6.25 cm) long.
- Connect points 4, 8, and 5 with a smooth curve, as shown using a French curve.
- The grainline runs parallel to line A – B.
TRACE OFF PATTERN PIECES AND ADD SEAM ALLOWANCES:
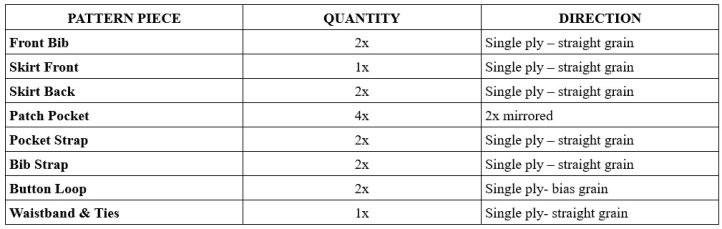
Once the pattern is completed, trace off each pattern piece on new sheets of paper. The bib and front skirt pieces should be traced on folded paper to make a complete mirrored image. Add seam allowances to all pattern pieces based upon your fabric selection and cut out, then label each pattern piece with a directional grainline, cutting quantities, and piece name.
No hem allowance is needed as it is included in the draft.
- Trace out front bib (2 – 9 – 10 – 11 – 2) on the fold; add seam allowances.
- Trace out front apron skirt (2 – 3 – C – B – A – 13 – 9 – 12 – 2) on the fold; add seam allowances.
- Trace out back apron skirt (2 – 14 – 15 – 3 – C – B – A – 13 – 9 – 12 – 2); add seam allowances.
- Trace out patch pocket (1 – 2 – 7 – 4 – 8 – 5 – 1); add seam allowances.
- Note: There are no templates for waistband & ties and bib straps as they are simply long strips of cloth.
Materials:
- 2 1/4 yards (2 m) of durable fabric**, 60” (150cm) wide, preferably in natural fibers
- Note: 2 3/4 yds. (2.5 m) for a medium build; and 3 1/4 yds. (3 m) for a large build
- 1 spool of color-matched all-purpose thread
- 2 plastic buttons, 3/4” (19 mm) diameter, ligne 30
- 1 roll of tracing paper or kraft paper, 40” wide
MARKING AND CUTTING THE FABRIC:
- Preshrink the fabric and press flat to remove wrinkles.
- True up the cloth so that the grain of the fabric runs parallel with its selvedges and that corners are at 90º (right angles) to its selvedges.
- For waistband and bib straps, reserve 2 oblong strips of cloth 3” wide (7.6 cm) X total yardage used or length of fabric. Cut these strips of cloth parallel to the selvedge of the fabric before laying out pattern on fabric.
- For pocket detail, reserve an additional oblong strip of cloth 3” wide by 20” long (7.6 cm X 51 cm).
- Once strips are removed and set aside, use the apron template to cut out the remaining apron pieces.

FABRIC WIDTH LAY-OUTS:
Key: B = bib, SF = skirt front, LSB = left skirt back, RSB = right skirt back, P = pocket, PS = pocket strap, BS = bib strap, WB = waistband ties, and L = button loops.
This apron uses button loops for fastening the shoulder straps to the apron. Decorative as well as functional, button loops are placed at the waistband edge and allow for the shoulder straps to pivot and be adjustable. A machine-made buttonhole is located on the left-hand side on the waistband and allows the right-hand sash tie to be drawn through the opening and wrap-round the waist of the apron. Save remnants of fabric to make bias-cut button loops.
Remember to add seam allowances to pattern pieces before marking and cutting fabric.
Instructions:
Note: Right sides = face side or exterior side of the cloth
Wrong sides = back side or interior side of the cloth
- Prepare button loops. For button loops, fold a bias-cut strip of cloth (L) in half lengthwise with wrong side together (WST) and press foldline. Open fold flat and turn in long edges to the center with WST. Press foldlines. Re-fold cloth to create a narrow strip with turned edges. Edge-stitch along fold of open edge, then stitch along fold of fixed edge. Cut the finished strip into 2 equal lengths to create the button loops. For each loop, fold the length of the strip in half diagonally across its width so that both short ends butt up next to each other, forming an arrow shape. Bar-tack across the base of the triangle at the pointed end. Measure a distance equal to the diameter of the button + 1/8” from the base of the triangle towards the strip ends to make the loop opening. Zig-zag-stitch the butting edges together. Allowing for seam allowance, trim any excess from each button loop. Set aside.
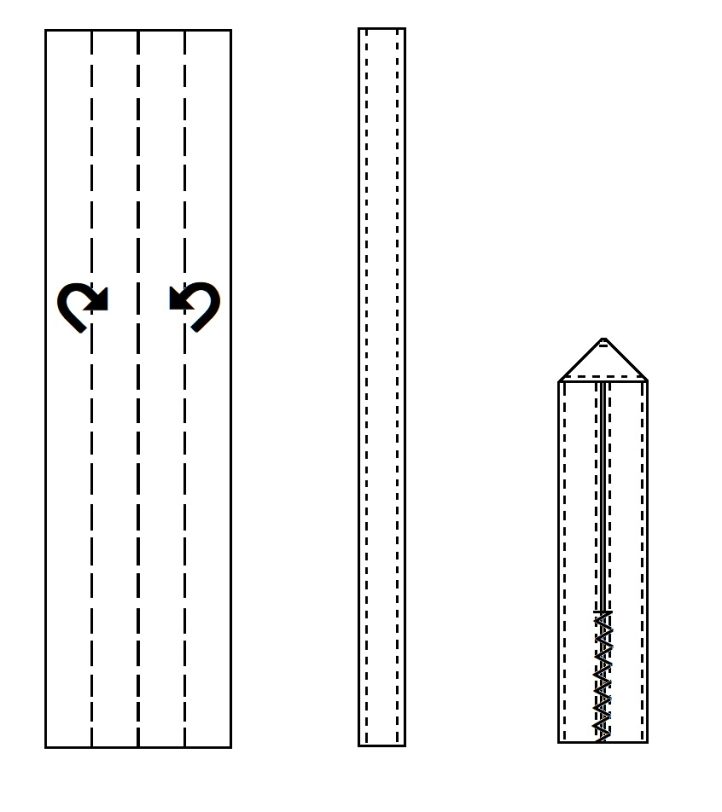
- Prepare bib straps. For bib’s shoulder straps, use one of the narrow strips of cloth that was cut on straight-grain and parallel with the selvedge of the fabric. Fold the strip of cloth in half lengthwise with wrong side together (WST) and press foldline. Cut cloth’s length into 2 equal pieces (BS) to make two shoulder straps. Place one shoulder strap length with wrong sides up on the work surface and turn a 1/4” seam allowance along one long edge. Press turned edge flat. Set aside. Repeat this step on the second shoulder strap to create a pair of shoulder straps that mirror one another. Set aside.
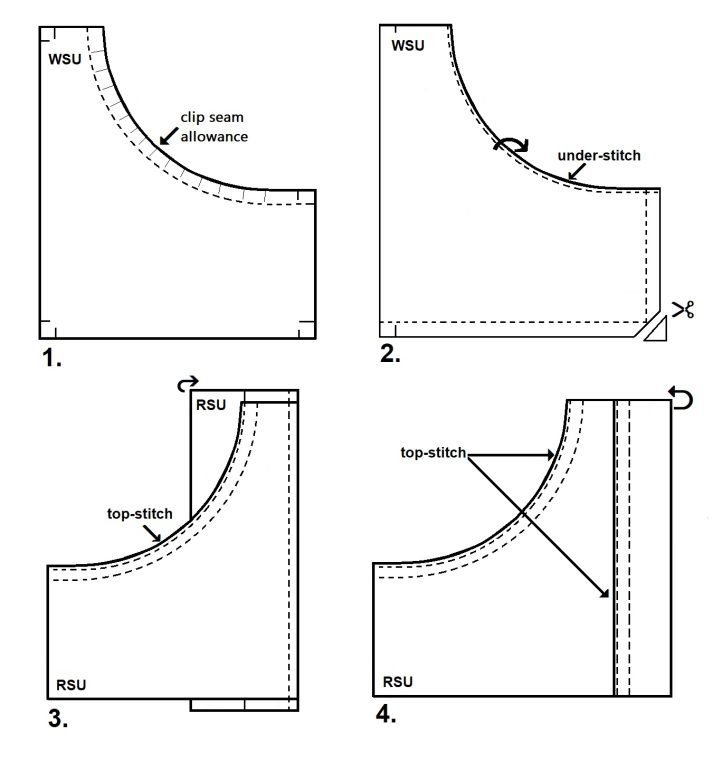
- Prepare bib. For the self-lined bib, match and align the two bib pieces (B) with right sides together (RST). Machine-stitch the curved top edge of the bib. Cut small snips into the seam allowance following the curve of the seam to reduce stress on the seam. Press seam allowance to one side of the seam. With right sides up, under-stitch 1/16” from seam line on the bib piece with the seam allowance beneath it. Trim away the excess in the seam allowance. Match and align the bib pieces with WST, folding along the curved edge to create the bib. Press seam flat. Double top-stitch the curved seam on the portion without the under-stitching. This will be the front of the bib. Pin/baste the sides of the bib together and reduce the seam allowance to 1/4” wide. Set aside.
- Attach bib straps to bib. To attach the shoulder straps to the bib, match and align one of the bib strap (BS) pieces to the back of the bib with RST. Start at the waist and work up the side of the bib, matching raw edge to raw edge. Machine-stitch in place using 1/4” seam allowance. Repeat this step on the second shoulder strap to mirror each side of the bib to the other.
- Making the shoulder straps. To make the shoulder straps, fold and align the free ends of the strap’s length with RST. Machine-stitch along the open edges and across the short ends of the strap to the fold, using a 1/4” seam allowance. At the corners of the short ends, cut diagonally across the corners to remove excess fabric. Turn shoulder straps right side out and press strap width flat. Fold bib strapping portion with turned seam allowance on top of bib’s front, aligning the turned edge to the previous row of stitching and pin/baste in place. Complete the bib and shoulder straps by double top-stitching along the perimeter of the bib strapping. Repeat on remaining shoulder strap. Set aside.

- Seam finish apron’s side seam. The side seams of the skirt portion (SF & SB) of the apron are raw and should be finished as they are visible. Choose a seam finish appropriate for the weight and weave of the fabric selected for this apron. The designer chose a “turned and stitched” seam finish, also known as a “clean-finish” and allowed double the overall seam allowance width on the side seams as they are on bias-grain. To make, turn raw edge under 1/4” and press flat. With right sides up, edge-stitch along fold for length of seam. Press turned edge to set stitches. Set aside.
- Make patch pockets. To make self-lined patch pockets, match and align pocket pieces (P) in pairs, with right sides together. Machine-stitch curved edge to join together. Cut small snips into the seam allowance following the shape of the curved seam. With wrong sides up, press seam allowance to one side of the seam. With right sides up, under-stitch 1/16” from seam line on the pocket piece with the seam allowance beneath it. Trim away the excess in the seam allowance. Fold over curved seam and align the pocket pieces with right sides together (RST). Pin/baste short side and bottom edge of pocket together. Machine-stitch layers together, pivoting at corner. Diagonally cut across the corner in the seam allowance and press seams open. Turn pocket right side out. Press finished edges flat. Double top-stitch along the pocket opening (side without the under-stitching). This will be the front of the patch pocket. Repeat above steps for remaining pocket but in the opposite direction. Apply under-stitching to second pocket to mirror the first one. Attach strap detail (PS) to open side of pocket to complete the patch pocket. For each pocket, treat the two layers as 1-ply and baste together. Reduce the seam allowance to 1/4” wide along the open side of the pocket. Turn and press flat 1/4” seam allowance on one long edge of a pocket strap piece. Match and align the strap piece to the interior of the pocket with RST. Start at the bottom corner, allow for seam allowance and work up the side of the pocket, matching raw edge to raw edge. Machine-stitch in place using 1/4” seam allowance. Press seam flat. Wrap the pocket strapping with WST on top of pocket front. Align the turned edge of the strap to the previous row of stitching and pin/baste in place. Complete the pocket by double top-stitching along the inner seam line. Set aside. Repeat steps for second pocket to mirror the first one.
- Attach apron skirt back panels to apron skirt front. With right side together, match and align left skirt back (LSB) to left side of skirt front (SF) at its side seam. Be mindful to not stretch out the side seam when pinning or sewing. Machine-stitch side seam (A to C) using a 1/2” seam allowance and press seam open and flatten. Repeat this step with right skirt back (RSB) pinned to right side of skirt front (SF), with RST. Use a roll-hem foot attachment to stitch a 3/8-inch rolled hem along the sweep of the apron skirt. The facing of the apron skirt’s back panels is made by folding under its length twice. With wrong side up on the work surface, fold raw edge 1” with WST and press foldline flat. Open flat and fold raw edge to previous foldline (1/2”) and press new foldline. Edge-stitch along edge of facing. With right side up, top-stitch along apron skirt edge. Repeat this step for remaining back facing on opposite side.
- Attach bib to apron skirt. Along the waistline, locate the center of the bib and center of the skirt front and mark position. With the bib up-side down, match and align the back of the bib to the back of the skirt front at the centerfronts on the waistline. Working either side of center, pin/baste raw edges together working out to the sides until bib straps are reached.
- Applying pockets to apron skirt. Position patch pockets on either side of apron skirt front and align pocket strap detail with shoulder strap detail on bib so that it appears to be one continuous long strap. Allow pocket to lay flat on skirt surface approximately 4 – 5 inches from side seam at notch B. Pin down front bottom corner and lower edge of pocket. At side seam, gently swing and pivot lower edge of pocket to cross the side seam at a perpendicular angle. Pin/baste in place. Continue swinging up across the skirt back following the curvature of the hemline. The short side of the pocket should be approximately 5” from the waistline to the pocket opening. Pin/baste in place. This subtle shaping will cause the pocket opening to bellow outward. To set the pocket in place, double top-stitch along the front edge, bottom edge, and back edge of the pocket. Repeat procedure for remaining pocket.
- Prepare waistband and ties. For waistband and sash ties, use remaining long narrow strip of fabric (WB) that was cut on straight-grain of the fabric. Fold the strip of cloth in half lengthwise with wrong side together (WST) and press foldline. Place fabric with wrong sides up on the work surface and turn a 1/4” seam allowance along one long edge. Press turned edge flat. Set aside.
- Attach waistband to apron. To attach the waistband to the apron, match and align the right side of the waistband piece to the wrong side of the apron skirt and upside-down bib. Pin/baste waist together at the centerfront and work outward to the ends of the skirt backs, matching raw edge to raw edge. Ensure that bib and pockets are enclosed securely between the layers. Insert button loops facing downward on waistline of left skirt back equal distance from centerback location. The distance between the button loops should be approximately the same as the width of the bib. Machine-stitch from one side of the apron to the other. Grade the seam allowance width and press the seam allowance upward towards the waistband to enclose.

- Complete ties and waistband. The sash ties and waistband for the bib apron are constructed from one continuous length of fabric. The waistband will be attached to the apron using an enclosed seam application.
- If you have not already done so, turn a 1/4-inch seam allowance along the long sides of the fabric strip and press flat to the wrong side of the cloth. Find the mid-point by folding the strip in half and match up the short ends of the strip. Mark the center of the strip.
- Starting at the mid-point, pin/baste the face side of the waistband and ties to the wrong side of the apron skirt with the bib hanging up-side-down. Work outward at the waist from the center of the bib to the end of the skirt, on either side of center. Remember that there are 2 different seam allowances in play, 1/4” and 3/8”, so there will be a slight off-set grade to the seam allowance. The remainder of the fabric strip will be the ties. They should be equal in length.
- Machine-stitch a 3/8” seam across the waistline of the apron.
- With right sides together, fold each loose end of the fabric strip lengthwise and align long raw edges together and short ends together. Pin/baste from point where waistband is attached to apron to short ends of ties. Repeat this step on opposite side of apron.
- Machine-stitch a 1/4” seam along length and end of each tie. Trim corners.
- Turn sash ties inside out and press flat.
- With the bib section face up and right side up, the waistband is now lying on top and above the waistline of the apron skirt section. Align and match the turned edge of the waistband to the previous row of stitching on the waistline of the skirt. Pin/baste graded seam allowance up into the waistband to enclose the seam allowance and press flat.
- Starting at the edge of a skirt back panel, top-stitch from the face side, the bottom edge of the waistband onto the apron skirt and onward across the bib section to the opposite side of the second skirt back panel. Continue top-stitching along the tie and tie-ends, pivoting at each corner, then along the top edge of the ties and waistband, repeating the step until you reach the starting point. Do a second row of top-stitching parallel to the first row of stitching. Top-stitching equal 1/16” from finished edge, 1/4” from finished edge.
- Add a machine-made buttonhole to the left-hand side of the waistband at the side seam. The length of the buttonhole equals the finished width of the sash ties (1 1/4” wide) and is positioned horizontally between the top-stitching.
- Add buttons to shoulder straps. To complete the apron, the shoulder straps of the bib criss-cross in back and fasten with buttons and button-loops. Hand-sew a button to each end of the shoulder straps where the straps meets the waistband of the apron.
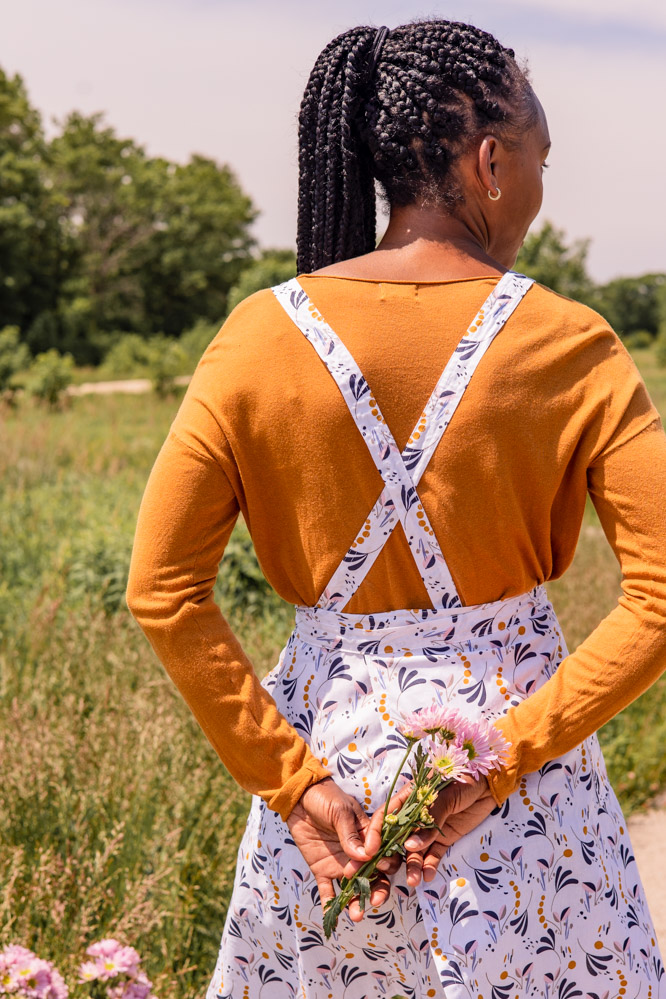


You say the apron neck straps criss-cross in the back. You have no pictures that show how that works. I am not visualizing it at all, especially as you have a photo of the neck straps tied at the back of the neck.
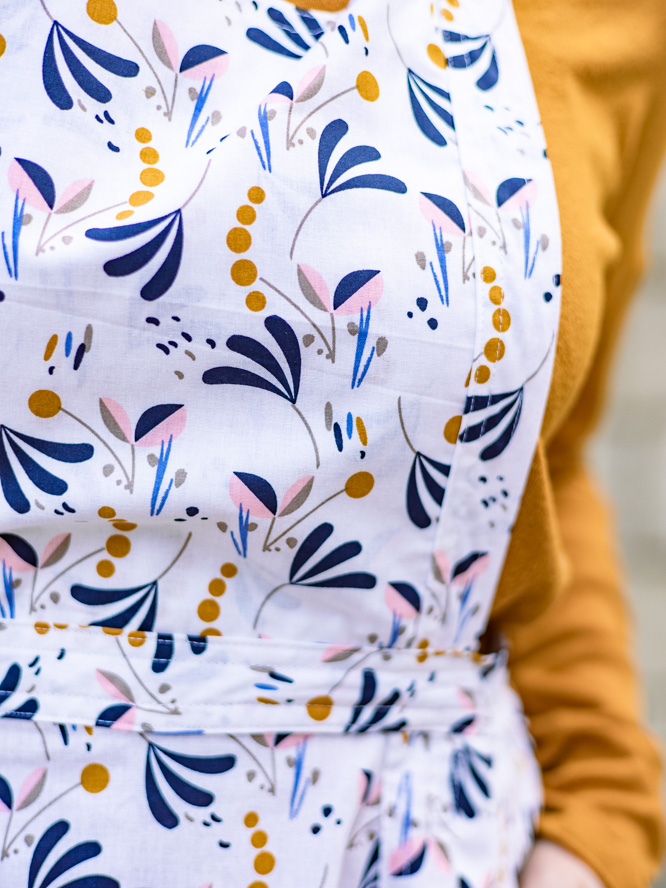
Hi Evelyn! The instructions for this project (which include the criss-cross in the back) are correct. We made an error with the photos. Each strap has a button, which attaches to buttonhole loops on the inside of the waistband (see Photo 3 at the bottom of the page). We’ve made a note to re-photograph this project with the straps displayed correctly and will update the pattern to let the reader know. Thanks so much for catching this error! – Ashley, WeLikeSewing
Hi Evelyn! We’ve updated this project with new photos to correctly display the criss-cross straps in the back. We apologize again for this error and thank you for catching it. Let us know if you have any questions. Have a great day! – Ashley, WeLikeSewing
I would love to have a simple bib apron pattern in sizes like small, medium, large and extra large to make for gifts.
Hi Mona! For this project, we asked the designer to create a tutorial that would let sewists make the apron to their own body measurements. However, you make a good point, that for gifts, standard sizes might work better. This is something we will keep in mind for future issues and project calls. Have a great day! – Ashley, WeLikeSewing