Working with leathers is much the same as sewing textile fabrics. Many of the same sewing techniques that you use in sewing cloth can be used when sewing leather, albeit with a few easy-to-do modifications.
Real Leather vs. Faux Leather
When selecting leathers, you have a choice of genuine leather and faux leather. The fundamental difference between the two is that genuine leather’s origins are from animal hides (a by-product of the food chain) and each hide is different in thickness, appearance, and in size. Faux leather is made from a vinyl base (plastic) and is then treated with wax, dye, or polyurethane to create the appearance and texture of leather. This is processed on a woven or knitted background in uniform sheets.
Is real leather more difficult to sew than faux leather? Faux and real leather have both similarities and crucial differences when it comes to sewing. It really comes down to the type and thickness of the leather being used. Real leather can be thick and dense, but so can faux leather. Some crafters have industrial sewing machines with powerful motors but most of us possess conventional home sewing machines. Your home sewing machine just isn’t powerful enough to handle thick hides, yet with a few modifications made to your sewing machine, you can sew fairly light-weight animal skins (think 1½ to 2 ounces per square foot, 1/16 inch thick), such as goatskin or pigskin. On the other hand, faux leathers come off a roll in sheets with a uniform thickness and width just like most yard goods, making it more cloth-like when it comes to sewability but it can be tricky at times. When working with leather and vinyl or any other thick fabric, you need to make sure you prepare well because you cannot undo the seams; once they are made, they are there to stay. Pay close attention and be sure to measure twice and cut once. Cutting corners when measuring will only result in you cutting the material incorrectly and losing your investment in your leather purchase.
How to Sew Leather
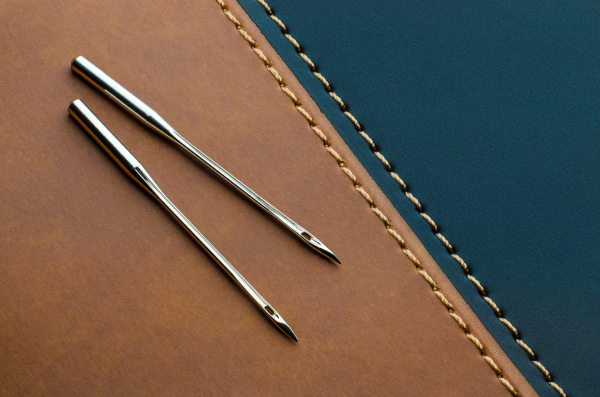
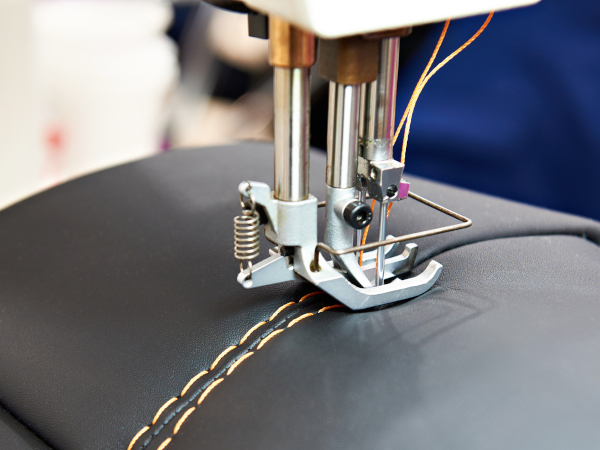
Changing the sewing machine needle is the first step to prepare for sewing most leathers. Ideal for sewing natural leather, use a leather sewing machine needle (Wedge Point 14/90 or 16/100), which has a slight cutting point (almost like an arrowhead), and a larger eye to accommodate thick heavy-duty thread. Use a longer stitch length to prevent perforation of the hide and slightly “looser” tension for using heavy-duty synthetic thread when sewing leather. Real leather will wear out your needles very quickly but faux leather not so much, so it’s good practice to change the needle before every leather sewing application. For faux leather including vinyl, use a denim needle, size 90/14 or 80/12, to sew. This machine needle has a deeper scarf, acute point, and modified shaft to sew without pushing fabric down into needle-plate hole. It goes through fabric and meets the bobbin hook easily with less tendency of breakage.
Next, swap out the presser foot. Both faux and real leather “stick & drag” on the work surface. I prefer a dual even-feed foot (aka walking foot) that “walks” over the leather to assist with keeping layers feeding at the same rate. With this foot attachment, leather can be sewn without shifting or puckering since the leather is gripped and fed by both upper and lower feed teeth. If you are a quilter, you know what I mean.
Or you may use a roller foot (aka roller guide) for leather and vinyl for more control and less friction. This is perfect for all sewers and DIY-ers when you need to feed the fabric or layers perfectly. The metal roller will not imprint the leather.
The last option can be a Teflon® foot (aka non-stick foot). The Teflon® foot is designed to prevent fabrics such as leather, vinyl and plastic, suedes, and Ultrasuede® from sticking to the bottom of the foot and to the foot plate of the sewing machine. It is made of or coated with Teflon®, a material well-known for its non-stick properties, and allows leather to glide right under the foot. The foot, unlike other sewing machine feet, has a distinctive look, like that of a white plastic material which prevents drag. Another method to prevent drag or friction when sewing leathers is to lightly spray the foot plate of your machine with a silicone spray. A light coat will aid the leather not to stick to your working surface.
Another similarity is that straight pins will create permanent holes in both materials. So instead of pinning your layers together before sewing, it’s better to use basting tape or Wonder clips™ to hold the pieces together prior to stitching seams.
How to Press Leather
You cannot use a high-temperature steam iron to press out the wrinkles or flatten seam allowances on either material. Prevent folds and creases by storing the leather on cardboard rolls. To open or to flatten seams, use a seam brayer (wallpaper roller) and roll it over the seam to flatten. A rawhide mallet or a wooden clapper can be used to flatten leather seams, along with a skiving tool to pare down any thick seam allowances.
Use a press cloth on both the right and the wrong side of faux leather to prevent the iron from melting the fabric, sticking to the fabric, or scorching the fabric. It is best to test your iron setup with scraps of the fabric to ensure good results and not ruin your project. Do not use a heavy hand. Work slowly and allow the heat to do the work, not the weight of the iron. Plowing through the fabric with the iron while the fabric is warm will cause the fabric to become distorted and misshaped.
7 Simple Tips for Sewing Leather

- Finishing the edges. The raw edges of real leather will not fray, but most leather-crafters burnish and dye the edges so they look nice. Faux leather also does not fray but the raw edges should be finished in some manner.
- Choose the right cutter. Scissors are a nightmare to try and use to get a straight line, so always cut leather and faux leather with a rotary cutter and safety ruler to get neat straight edges and use an art knife to shape any curves edges. Do not use your good fabric scissors.
- Reduce bulk in your seams. Bulk in seams can be reduced if you plan your project to take advantage of the non-fray properties and allow your sewing machine motor not to struggle while you sew. Use a lapped seam application where one piece of fabric is laid upon another piece of fabric with an overlap. The fabrics are both right sides up, and by overlapping the fabric, you end up with two layers of fabric instead of up to four when using other conventional seams.
- Change up your seams with faux leather. For faux leathers, consider using an enclosed seam, such as the run-and-fell or the flat-felled seam. These construction seams will encase raw non-fraying edges and flatten seams that cannot be pressed with an iron. Flat-felled seams have two rows of stitching and the seam allowances are encased. This is the version which is sewn with wrong sides together. The run-and-fell seam has only one visible line of stitching and is sewn as normal with right sides together. One seam allowance is graded, and the other is turned and encased.
- Considering hand sewing. While sewing machines can do a wonderful job when sewing leather, you may want to sew leather by hand. This is more common in leather-crafting as the leathers used are thick large animal hides. Most often, construction is the cut-edge method where the edges are not skived or turned over but sewn wrong sides together; the full thickness of the material used is retained and its edges are usually stained and polished. Keep the styling simple in the design as all the construction is done by hand. You will need to add to your sewing kit a stitching awl to pre-punch holes into the leather, waxed linen thread, harness or glover’s needles (3-sided point leather needle), and a leather thimble to push the needle along. Common hand stitches for leather are: saddle-stitch, whip-stitch, Z-stitch, butt-stitch, box-stitch, and the cross-stitch to name a few.
- Add a seam groover. For thick leather hides (such as cowhide) where the thickness is 3 oz. or greater per square foot, add a seam groover to cut a shallow groove in the surface of the leather to recess your stitching slightly into the leather, either for practical or decorative reasons, and a leather punch to punch holes for lacing and hand stitching quickly and evenly. You may even want to get a leather stitching pony. It can hold leather securely and the vise section can be positioned, so you can sit on the long base section to hold the pony steady while using both hands to sew.
- Sew a mock-up. Mock-ups ensure that the finished product will meet your vision and are used as a benchmark to gauge the quality of the workmanship and materials once the pattern-making is completed. All too often on design-it-yourself projects, this “check and balance” system is overlooked or considered to be an unnecessary option. Creating mock-ups for projects can be pretty painless though, and with the products, tools, and techniques available today, you can produce samples quickly and affordably. If you have a limited quantity of leather available or your leather skins are costly to experiment with, making up a sample in a cheaper fabrication is acceptable. A good example would be using thick hobby felt. A 2-3 mm thick felt is similar in weight and texture as leather yet inexpensive to purchase. Felt has similar characteristics as leather, such as it does not fray when cut and there is no directional grain to the material. The hobby felt is marked and cut the same way the leather is worked. It will also provide you with an operational sequence of assembly. Use the same notions and stitching methods to be used on the actual project. This step will test your pattern before cutting into your expensive material. Don’t be disappointed if it does not ‘turn out ‘on the first attempt as planned, as that is what sample mock-ups are for. Make as many attempts as needed to achieve your desired goal. These mock-ups allow you to modify the end result, correct the pattern, and work out the sewing/assembly process, making the actual project effortless to sew.
With the help of our sewing tips, you’ll be able to design your genuine leather and faux leather projects with ease and confidence.
Great details, many suggestions that I never thought about. Love the hobby felt mock-up idea. Thank you for writing a concise article.
We’re so glad you enjoyed this article, Cindy! Thank you for the kind comment 🙂 – Ashley, We Like Sewing
I have never machine sewn anything before. Nice to see good tips that don’t cost a bundle!
Hi Mona! We’re so glad you enjoyed this article! You might enjoy our article on how to sew velvet, which is located in our February 2022 issue. Have a great day! – Ashley, WeLikeSewing
Thank you, glad to see you active here. I have taken your training 2-3 years ago. You helped me a lot.
This was very helpful with good learning of things I didn’t know. Thank you