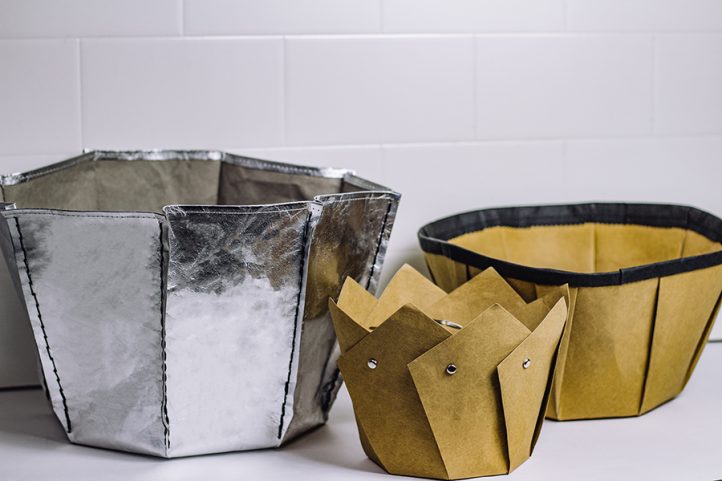
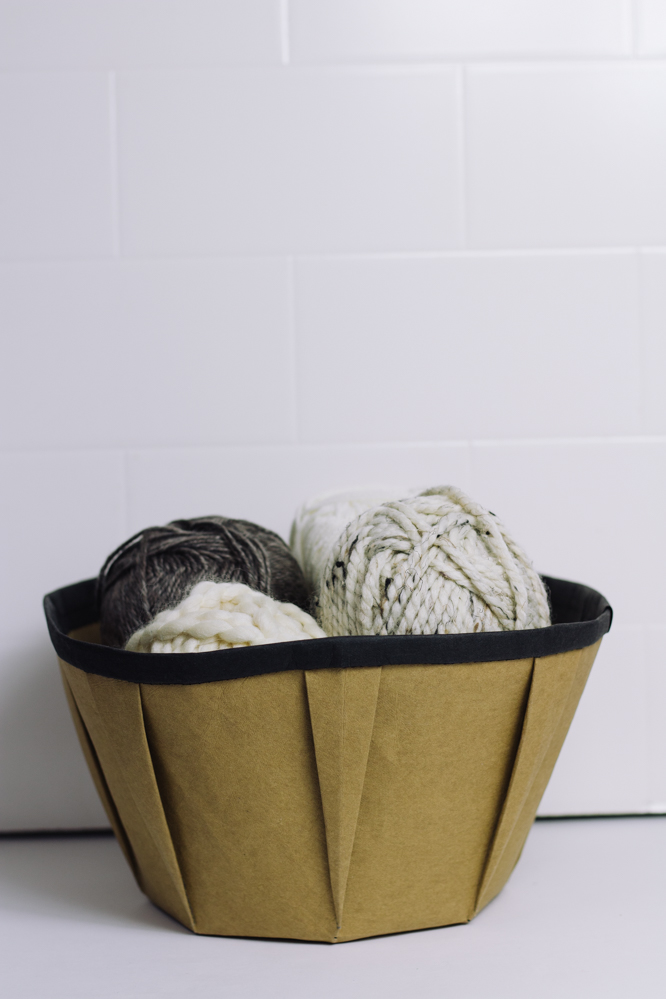
If your home is in desperate need of serious organization, then you’ll love these sewn storage baskets. Conquer the clutter in your house by creating some simple and stylish baskets to store clothing, toys, linens, and more! These storage baskets can be made in multiple styles using different methods, meaning this project is filled with endless possibilities. In our January 2022 issue, we’ll be sharing how to create the bucket style of this project. Design pretty and practical custom storage with this organizational sewing project.
Materials:
- Pattern paper
- Pencil
- Ruler
Instructions:
CUT-OUT DART METHOD TEMPLATE FOR BUCKET-STYLE BASKET
Note: Pattern Paper – 80cm wide (31 1/2”)
- Select a sheet of pattern paper, 31 1/2” wide x 31 1/2” long.
- Fold the sheet in half width-wise, then fold again length-wise, aligning all the edges.
- Place the folded paper on the work surface so that the folded corner is nearest you to your left.
- Label the corner, X. This is the radius point of the template.
- Draw a square from X.
- 1 from X = 15”
- 2 from X = 15”
- Square across the paper from point 2 and square up from point 1 to locate 3 at the intersection of the lines.
- Connect X and point 3 with a diagonal straight line.
- Measure the length of the diagonal lines. They should be equal or the grid is not square (90°).
- Draw the base of the basket.
-
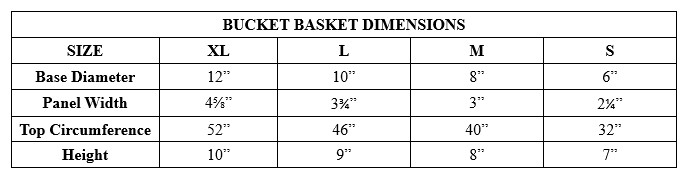
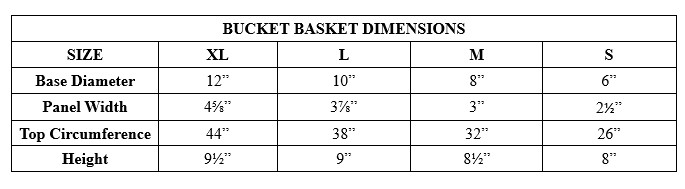
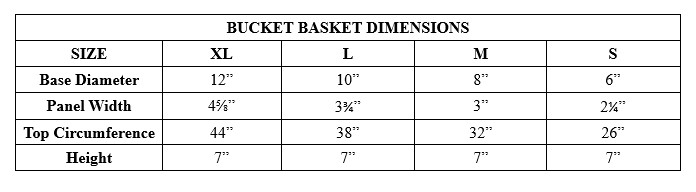
- 4 from X = 1/2 the diameter of the base. Note: Refer to Bucket Basket Dimensions chart below for base measurements.
- 5 from X = 4 from X
- 6 from X = 4 from X
- Connect point 4 to point 5 with a straight line.
- Connect point 5 to point 6 with a straight line.
- On line X – 3, point 7 from 5 = line 4 – 1.
- Connect points 1 and 7 with a straight line.
- Connect points 2 and 7 with a straight line.
-
- Draw the height (side) of the basket, or to the height you desire.
- Divide the line 4 – 5 in half and label the mid-point, 8.
- Divide the line 5 – 6 in half and label the mid-point, 9.
- Draw a straight line from point X passing through point 8 to establish the height on line 1-7.
- Label this point, 10 where the 2 lines intersect one another.
- Draw a straight line from point X passing through point 9 to establish the height on line 2-7.
- Label the intersecting point, 11.
- Square out a straight line on either side of point 10.
- 12 from 10 = length of line 4 – 5.
- 13 from 10 = length of line 4 – 5.
- Connect points 4 and 12 with a straight line.
- Connect points 5 and 13 with a straight line.
- Draw a facing 1 cm wide (0.4” inches approx.) above and parallel to line 12 – 10 – 13, as shown.
- Draw a seam allowance of 1 cm wide (0.4” inches approx.) parallel to the dart length, as shown.
- Repeat above set of drafting steps for second side panel at line 2 – 7.
- Staple through all layers of the folded paper and cut out the outline of the pattern.
- Cut out the dart wedges between the side panels. Punch a small hole at points 4, 5, and 6 with an awl or hole punch to indicate the crease lines of the base of the basket.
- Unfold the paper to produce the whole template.
FOLD & TUCK METHOD TEMPLATE FOR BUCKET-STYLE BASKET
Note: Pattern Paper – 80cm wide (31½”)
- Select a sheet of pattern paper, 31 1/2” wide x 31 1/2″ long.
- Fold the sheet in half width-wise, then fold again length-wise, aligning all the edges.
- Place the folded paper on the work surface so that the folded corner is nearest you to your left.
- Label the corner, X. This is the radius point of the template.
- Draw a square from X.
- 1 from X = 15”
- 2 from X = 15”
- Square across the paper from point 2 and square up from point 1 to locate 3 at the intersection of the lines.
- Connect X and point 3 with a diagonal straight line.
- Measure the length of the diagonal lines. They should be equal or the grid is not square (90°).
- Draw the base of the basket.
-
- 4 from X = 1/2 the diameter of the basket. Note: Refer to chart below for basket measurements.
- 5 from X = 4 from X
- 6 from X = 4 from X
- Connect point 4 to point 5 with a straight line.
- Connect point 5 to point 6 with a straight line.
-
- Draw the height of the basket, or to the height you desire.
- Divide the line 4 – 5 in half and label the mid-point, 7.
- Divide the line 5 – 6 in half and label the mid-point, 8.
- Draw a straight line from X, passing through point 7 to the outer edge of the square. Label point 9.
- Draw a straight line from X, passing through point 8 to the outer edge of the square. Label point 10.
- On line 7 – 9, measure 3 times the distance from line X – 4. Label this point 11.
- Square out a straight line on either side of point 11.
- 12 from 11 = 4 – 5
- 13 from 11 = 4 – 5
- Connect points 4 and 12 with a straight line.
- Connect points 5 and 13 with a straight line.
- Connect point 9 to points 12 and 13 with a straight line.
- On line 8 – 10, measure 3 times the distance from line X – 6. Label this point 14.
- Square out a straight line on either side of point 14.
- 15 from 14 = 5 – 6
- 16 from 14 = 5 – 6
- Connect points 5 and 15 with a straight line.
- Connect points 6 and 16 with a straight line.
- Connect point 10 to points 15 and 16 with a straight line.
- Draw placement points for fasteners.
- Hole punches are located at mid-point on line 11 -12; line 11 – 13; line 14 – 15; and line 14 – 16.
- Staple through all layers of the folded paper and cut through all layers following these points: 4, 12, 9, 13, 5, 15, 10, 16,and 6. Punch a hole through all layers for the fastener placements with an awl.
- Unfold paper to produce entire basket pattern.
FOLDED DART METHOD TEMPLATE FOR BUCKET- STYLE BASKET
Note: Pattern Paper – 80cm wide (31 1/2”)
- Select a sheet of pattern paper, 31 1/2” wide x 31 1/2” long.
- Fold the sheet in half width-wise, then fold again length-wise, aligning all the edges.
- Place the folded paper on the work surface so that the folded corner is nearest you to your left.
- Label the corner, X. This is the radius point of the template.
- Draw a square from X.
- 1 from X = 15”
- 2 from X = 15”
- Square across the paper from point 2 and square up from point 1 to locate 3 at the intersection of the lines.
- Connect X and point 3 with a diagonal straight line.
- Measure the length of the diagonal lines. They should be equal or the grid is not square (90°).
- Draw the base of the basket.
-
- 4 from X = 1/2 the diameter of the basket. Note: Refer to chart below for diameter of basket measurements.
- 5 from X = 4 from X
- 6 from X = 4 from X
- Connect point 4 to point 5 with a straight line.
- Connect point 5 to point 6 with a straight line.
- On line X – 3, point 7 from 5 = line 4 – 1.
- Connect points 1 and 7 with a straight line.
- Connect points 2 and 7 with a straight line.
-
- Draw the height of the basket, or to the height you desire.
- Divide the line 4 – 5 in half and label the mid-point, 8.
- Divide the line 5 – 6 in half and label the mid-point, 9.
- Draw a straight line from point X passing through point 8 to establish the height on line 1-7.
- Label this point 10, where there 2 lines intersect one another.
- Draw a straight line from point X passing through point 9 to establish the height on line 2-7.
- Label the intersecting point, 11.
- Square out a straight line on either side of point 10.
-
- 12 from 10 = length of line 4 – 5.
- 13 from 10 = length of line 4 – 5.
- Connect points 4 and 12 with a straight line.
- Connect points 5 and 13 with a straight line.
- Draw a facing line 1 cm wide (approx. 0.4” inches) above and parallel to line 12 – 10 – 13, as shown.
-
- Square out a straight line on either side of point 11.
-
- 14 from 11 = length of line 5 – 6.
- 15 from 11 = length of line 5 – 6.
- Connect points 5 and 14 with a straight line.
- Connect points 6 and 15 with a straight line.
- Draw a facing line 1 cm wide (approx. 0.4” inches) above and parallel to line 14 – 11 – 15, as shown.
- Staple through all layers of the folded paper and cut out the outline from points 1 – 7 – 2.
-
It’s algebra, right?
Thanks for the cool patterns. I really look forward to using them,
You’re welcome! We hope you enjoy them. – Ashley, WeLikeSewing