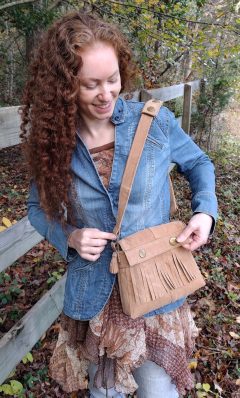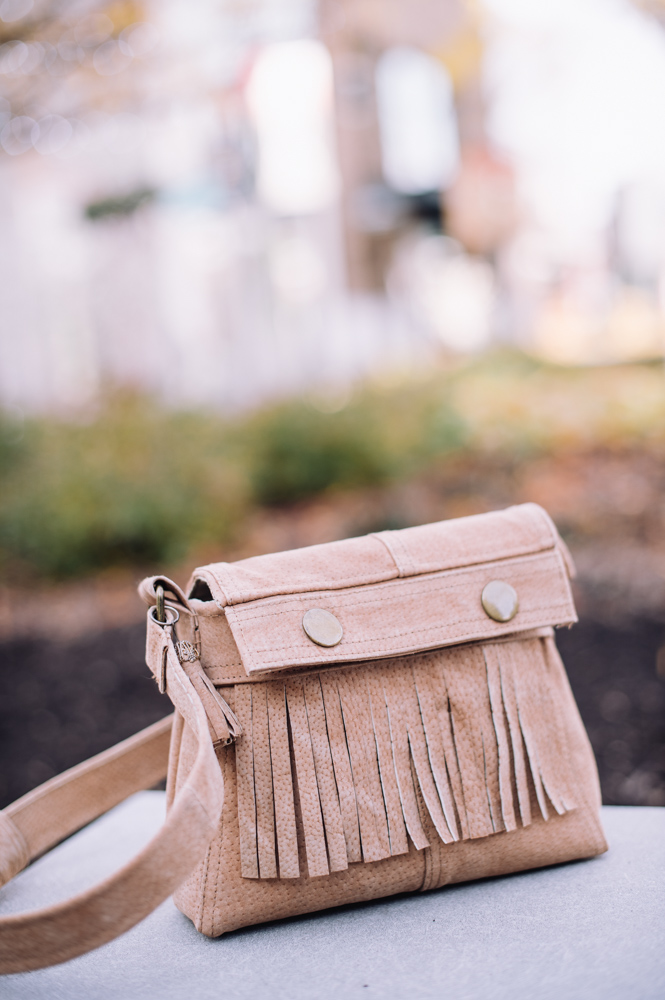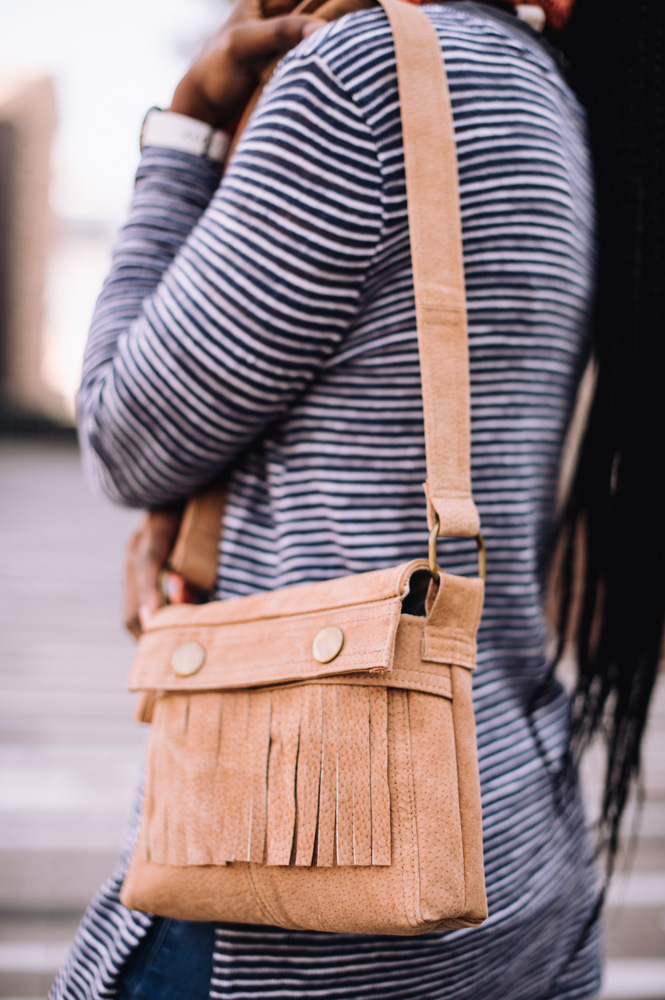
Add a beautiful leather bag to your wardrobe without spending a fortune! With this fun refashioning project, you’ll learn how to give a thrifted leather coat a second lease on life by transforming it into a new purse. This upcycled sewing tutorial walks you through every step of the sewing process, from selecting the ideal coat to use as your fabric to making the straps and adding fringe. Explore your local thrift store and design a gorgeous retro-inspired bag without spending money on expensive leather.
Materials
- Leather coat
- Fusible stabilizer (optional but highly recommended, especially if the leather of your coat is thinner or has less body than you’d like)
- Tightly-woven fabric for the bag lining, such as cotton sateen
- Leather sewing machine needle
- Size 11 sharp sewing machine needle (or other needle appropriate for your chosen lining fabric)
- All-purpose thread in colors that match your coat and lining
- PDF pattern
Designer Notes:
- For this coat, the designer created a bag with a shape that played off of the angled flat-felled seams on the back of the coat. Since every coat is different, the pattern she made for her coat may not be the best option for yours.
- Be sure to read through all the designer hints carefully to determine the best way to work around different elements that you might run into with the coat you have chosen. You should be able to take these tips, and then use (or even make!) a different pattern that will work well with your coat.
- As you cut out your pattern pieces, remember not to throw away any of the leather yet. Even small scraps can be used for stitching and fusing tests, and it’s very important to test out your thread tension and stabilizing technique before you jump into sewing and fusing your main bag pieces.
- You will most likely need to use a stabilizer in order to provide shape and durability to your bag. Leather stretches over time, and if your bag was made purely of leather with no lining or stabilizer, you would end up with portions of the bag distended by the weight of the items you are carrying. Look for a stabilizer that is advertised as being able to bond to leather.
Instructions
Selecting a Coat
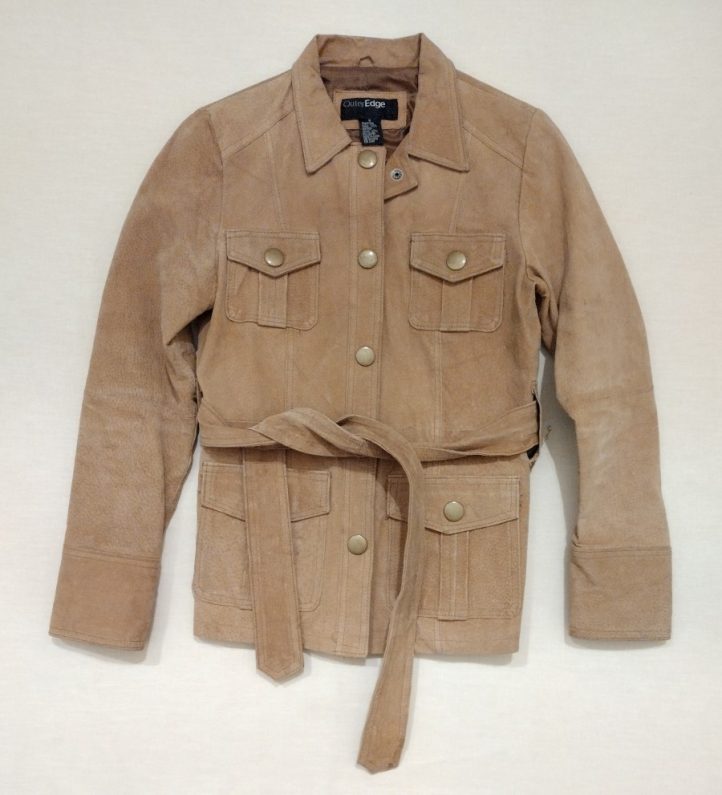
The first thing you need to do is choose a coat to use as your material. Secondhand coats can be wonderful sources of inexpensive yet high-quality leather, and with a little effort, you can transform them into something that fits your style. Here are a few tips for coat selection:
- When you are selecting your coat, check the item over for any tears, holes, or stains prior to purchasing. The coat that the designer found had a few issues with wear, so she needed to avoid any stained or scuffed places when cutting out the pieces for her bag.
- Take a pass on coats with any disagreeable odors, as this can be difficult to get rid of.
- Don’t forget to check the men’s section, too! A boxy style of coat will be easier to work with and give you more options than a fitted coat will. Larger coats will give you more material to work with, which is helpful if you want to end up with a bag that’s on the larger side, and when you’re looking for long pieces of leather to make the strap.
Once you’ve selected the perfect coat, just have it cleaned and you’re ready to transform it! But first, you need to decide on the shape for your bag.
Choosing a Shape for Your Bag
Time to start prepping your coat for its transformation!
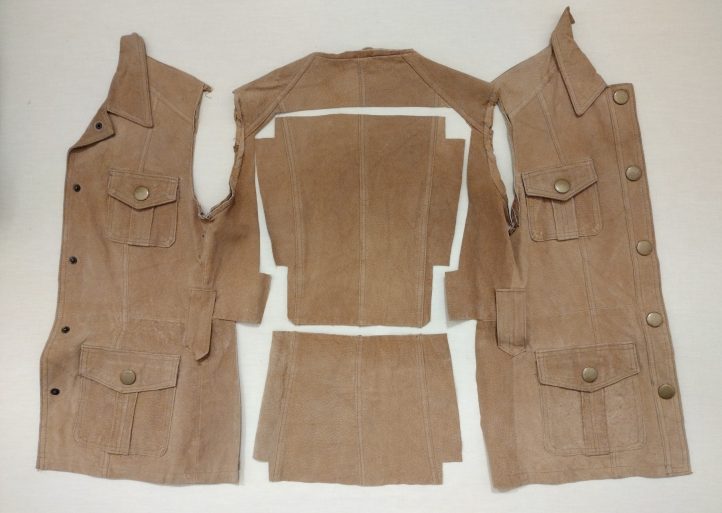
- Cut the sleeves off your coat, or use a seam ripper to remove them. (Set them aside for later!) Cut along the shoulder seams as well, so that the coat material lays more or less flat on your table.
- Remove the coat lining so that you can see both sides of the leather.
- Look for areas of the coat that are symmetrical. Take note of and avoid areas where the coat was shaped, such as bust darts or princess seams.
- Pockets
- Let’s talk about the pockets for a minute. They take up a lot of room, but in this example, the designer couldn’t just use a seam ripper to remove them. If she did, the square pattern of holes from the original stitching would be visible, and stitching holes are impossible to remove from leather. The leather underneath the pockets is also very likely a darker color, and the silhouettes from the pockets would remain.
- One option would have been to keep the two pockets by making her bag out of the bottom half of the coat and sewing the front opening closed. She could have also incorporated the pockets into her design, removing them with a seam ripper, and reattaching them onto a different area of the coat by sewing through the original stitching holes.
- In the end, the designer decided not to use the pockets for her bag sample, but there are multiple ways to create your own bag based on your unique tastes. In this example, even though she did not keep the pockets from the coat, she still used the material from the areas around them to make fringe and various design details.
- The side seams of your coat are most likely going to be curved, but if you want to use the sides of the coat to make your bag, you can straighten the side seams out to make the material lie flat. Use a ruler to mark a straight line on the wrong side of the leather, sew a new seam, and trim the seam allowances.
- Print out the pattern pieces the designer used for her bag, or grab another favorite handbag pattern. Place the pieces on different areas of the coat, and visually audition different shapes and placements for your bag pieces. If you’re having trouble fitting the pattern pieces on your coat, you can reduce the size of the bag by printing the pattern with scaling (for example, try printing at 90% of the original size).
- Take a look at the front opening of the coat (the placket). The placket can usually become the top edge of your bag, allowing you to leave the original coat zipper or snaps in place to use as a bag closure. If the designer’s coat didn’t have patch pockets, she would have straightened the side seams, and included the original snaps at the top edges of the bag to use as closures. Obviously with this particular coat, the pockets would have ended up sideways if she used this technique. However, if your coat has vertical slash pockets (or no pockets at all), then using the placket as the top edge of your bag is a great option.
- The designer’s coat included a belt, which would be very simple to use as a strap. So simple, in fact, that it’s almost like cheating! Since your coat may not come with a belt, the designer shows you how to make a strap out of the sleeves. The sleeves are often the longest usable pieces of leather, and if a belt is not available, the sleeves will likely be your best option for creating straps or handles. But what if you don’t have a belt OR sleeves? If you are using a leather vest or a coat with damaged sleeves, then creating a braided strap might be your next best option. You can cut the scraps of leather into strips, and join in new strips when you need to by tucking the ends in between the other strips, to make the joints less noticeable. A braided strap looks incredibly chic, and nobody needs to know that you braided it because you were running out of material!
- The fringe and tassel will come from the smaller unused pieces of leather, such as the inner edges of the sleeves, and the areas on the front and sides of the coat that are not covered by pockets. The collar is almost always the first thing to get stained, so it tends to be difficult to reuse.
Cutting the Leather
- The pattern the designer made for her bag can be used two different ways: you can use both pattern pieces to make a bag with a flap closure, or you can use the front pattern piece for the front and the back, which will give you a bag with an open top and no flap. Align the top edge of the pattern piece with an existing coat zipper, and you have a ready-made closure for your bag!
- To make a bag just like the example, you will need a front and back cut out of leather. The tassel piece is 2” by 6.5”, and the fringe is 4” by 7”. The strap length is up to you; the designer wanted a leather piece that was 3.75” by 36”, which she folded and stitched so that it was 1.25” wide. You will probably have to piece the strap together (or braid one out of thinner strips of leather), and a pattern piece for it is not included. Use your best judgment to create the strap after the front and back bag pieces are taken care of. If it suits your bag style, you can make two shorter handles instead of one long strap.
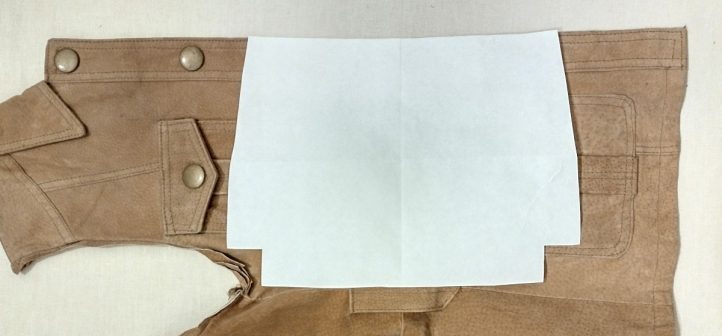
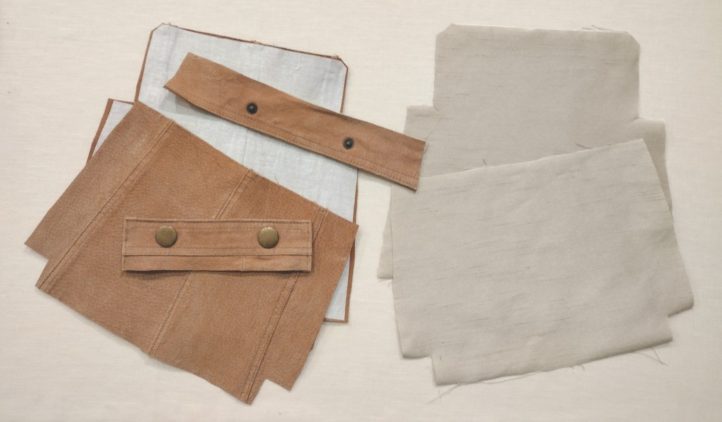
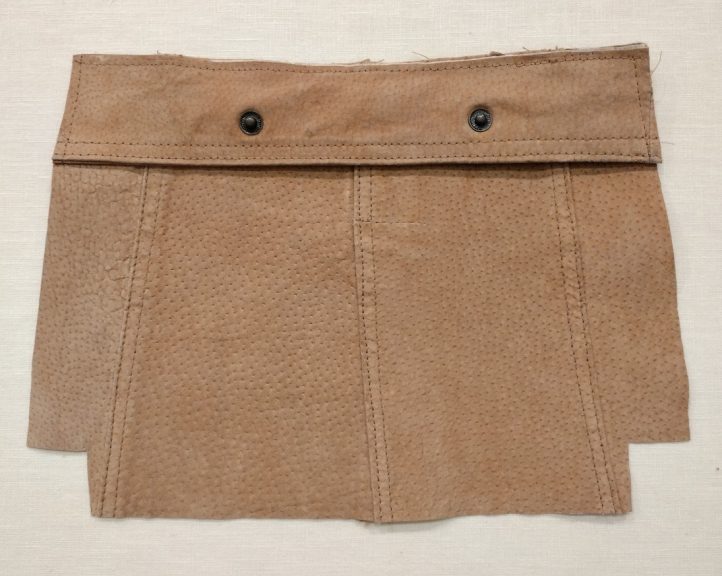
- You will notice that the designer cut separate small pieces of leather that have snaps on them, due to the pockets on the coat being in the way. If you need to cut separate pieces that have the coat closures on them, just cut a piece that is as wide as the bag flap, with snaps centered on it. The small piece should be as tall as the placket section, plus 1/2” for a seam allowance. Now remove a strip from the bag flap pattern piece that is as tall as your placket, minus 1/2” for the seam allowance. The two leather pieces placed end-to-end (the back piece for the bag and the separate piece with the snaps on it) should be as long as the original pattern piece for the back of the bag, plus 1″ (because each piece now has a half inch seam allowance included).
- The designer also used a separate snap piece on the front of the bag, but did not need to add any seam allowances because this snap section was layered over the bag front and stitched down. Center the top of the bag front pattern piece over the coat snaps, and cut a section of placket that includes the snaps that will match the ones on the bag flap.
Stabilizing the Leather
- The designer fused a medium-weight stabilizer directly to the wrong side of the leather, which is the option that is best for most leather coats-turned-bags. In certain rare cases, the designer has fused a stabilizer to the bag lining instead, and stitched through the outer shell and lining along seam lines to support the outer material (although this is really not a standard technique, and it’s better suited to fashion runway and show pieces than a durable, practical everyday bag). If your leather is very thick and stable, you can skip the stabilizer entirely. However, most leather that is used for making garments is too thin and has too much drape to hold up well if it’s used to make a handbag without a stabilizer.
- When you fuse a stabilizer to leather, it’s very important to test it out on a scrap in order to avoid burning the leather that you are planning to use for your bag. It also helps to use a reliable, high-quality iron that can hold an even temperature. Place a small piece of stabilizer on top of your leather scrap, with the shiny or textured side of the stabilizer facing on the wrong side of the leather. You may need to use a press cloth (such as a white cotton towel) or a piece of kraft paper on top.
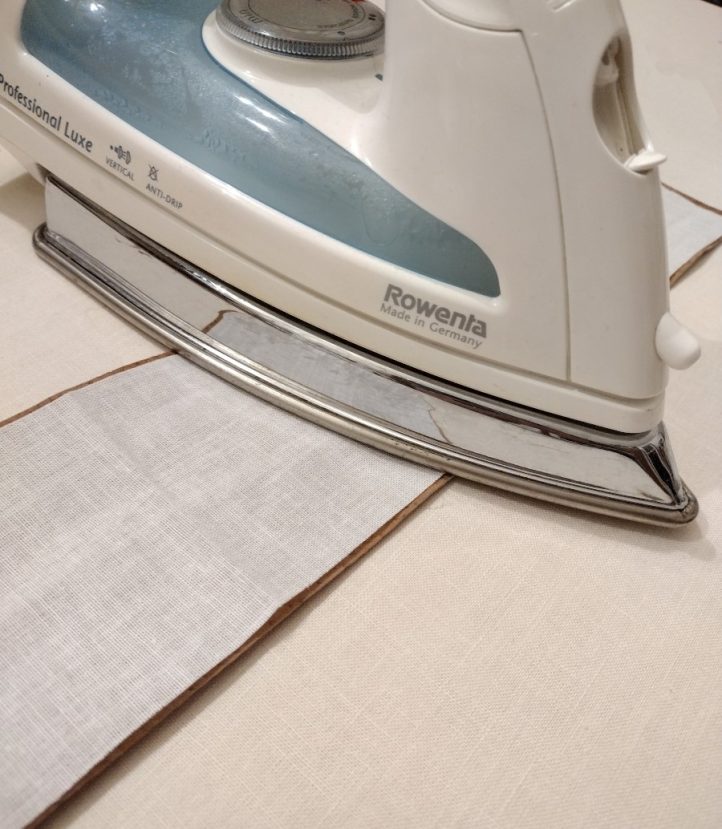
- If the directions for fusing your stabilizer state to use dry heat with no steam, make sure that the water tank on your iron is completely empty to avoid accidental drips, which may result in water spots on your leather.
- Fuse the stabilizer to the leather according to the package directions, and then let the scrap cool. Test the bond of the stabilizer and leather by working at the edges with your fingernail. Check the flexibility of the bonded material to be certain that you’re happy with the drape and texture. Fold the scrap in half and stitch through it to make sure that you aren’t going to have any problems assembling your bag. If the bonded material does not suit you, you can try out a different stabilizing option.
- When you are satisfied that you have found the right stabilizer for your leather, use the pattern pieces to cut out the stabilizer. Trim the stabilizer by about 1/8” all the way around, so that it’s just a tiny bit smaller than the leather pieces. (Any excess stabilizer that’s hanging off the edges of your material will end up fused to your ironing surface!) Center the stabilizer pieces on the wrong side of the leather, with the shiny or textured side of the stabilizer facing the leather, and fuse them together.
Lining Fabric
- A lining will finish off the inside of your bag nicely and enclose all of the seam allowances, but it will also protect the leather from soil and abrasion over time.
- The lining should be made of a woven fabric that does not stretch, and it ought to be durable and tightly-woven, so that it can stand up to sharper and more abrasive items, such as a set of car keys. The designer chose a medium-weight synthetic with a slight sheen and a slub texture. Other good choices would be cotton sateen, broadcloth, poplin, silk, or even quilting cotton.
Assembling the Bag
Now that you have your lining pieces cut, and your leather pieces cut out and stabilized, you’re almost ready to put your bag together! There are just a few more things you need to know:
- Leather can be a fairly easy material to sew. However, pins will leave permanent holes, so you will need to use binder clips or clothespins to hold your pieces together. For the same reason, you won’t always be able to fix mistakes if you sew incorrectly and try to undo it with a seam ripper. It’s a good idea to be certain of how your pieces are going to fit together before you take them over to the sewing machine by doing a dry-fit: assemble your bag first using binder clips, in order to make sure that everything was cut correctly and will match up properly before you start sewing any of the seams.
- The instructions show how the example bag was sewn, but you may have to go off-script a bit depending on how your coat was constructed. For example, if the snaps were cut in one piece with the bag front or back, you won’t have the extra small pieces of leather to deal with.
- Set up your machine with the needle and thread that you chose for your lining fabric, and a medium-length straight stitch (the designer suggests 2.5 mm). Match up the two pieces of lining fabric, right sides together.
- Sew the two side seams and the bottom seam with a half-inch seam allowance, stopping when you reach the square-shaped cutouts at the corners.
- Press the seam allowances open. It helps to press them over a wooden dowel that’s inserted through the square cutouts along the seam line.
- Align the side seams with the bottom seam, flattening the square cutouts so that they turn into short, diagonal seams. Keep the existing seam allowances in the center of each side.
- Sew this new diagonal seam with a half-inch seam allowance, then trim the seam allowances down to one quarter inch. Press the seam allowance towards the bottom of the bag.
- Now you can switch your machine to the thread and needle that you will use for your leather. Increase the stitch length slightly (to roughly 3.5 mm).
- The designer has layered the inner snap piece on top of the bag front, and stitched 1/4” away from the top and side edges to hold it in place. The bottom edge will remain free, and the designer will treat these two pieces as one piece of leather from here on out. If you were able to cut out your bag front so that the top edge already had the snaps attached, you can skip this sewing step because the snaps will already be attached to the bag front, and you will not need the small extra piece of leather.
- Place the front and back of the bag right sides together, and sew them the same way you sewed the lining. Carefully press the seam allowances open, using the iron setting that gave you success when you tested it on a scrap earlier. Then flatten the two square cutouts into diagonal seams, the same way you did when you sewed the lining, and sew those seams as well. Trim the diagonal seam to 1/4”, and press it towards the bottom of the bag.
- At this point, take a minute to determine how you are going to attach your strap and fringe. Depending on how your coat was constructed, you might want to add these pieces now, instead of adding them later on.
- If you like, you can put the bag strap in between the bag and lining, and line up the edges of the strap with the raw edges of the bag. That way, when you sew the bag and lining together, the strap will be sewn into the seam line, providing a very clean finish. If you attach the strap this way, it’s a good idea to sew some additional lines of stitching in the seam allowance to attach the strap more securely, since the strap will bear the weight of the bag. After you have sewn the bag and lining together with a 1/2” seam allowance, then you would sew over the strap area with a 3/8” and 1/4” seam allowance for extra security.
- The designer chose to use the coat’s belt loops and some metal rings to attach the straps, and she did this after having sewn in the lining. By adding them later, she did not have to worry about catching them in the stitching or having them get in the way while attaching the lining.
- You also may find that you’d rather insert the fringe in one of the coat’s seam lines this way. There are many ways to add the fringe, and since it won’t fray, you can even topstitch it directly to the outer shell of the bag at this point. This is a style decision, and there’s really no wrong way to do it. If it looks good to you, go with it! The designer added fringe on near the end, but do whatever works for your coat.
- If your coat closures were cut in one piece with the bag front and back, you might find that the best way to attach the lining is to fold the edge of the lining under and stitch it just below the coat closure. Here’s how the designer worked with separate snap pieces:
- Keep the leather inside-out, but turn the lining right side-out. Insert the lining into the bag, and match up the edges. The designer turned in 1/2” on the sides of the outer snap piece and stitched them down already, and then added it in between the leather and the lining. It goes at the top edge of the bag, raw edge lined up with the bag’s raw edge. The pretty side of the snaps should be facing the leather, with the business side towards the lining. But remember, if your bag pieces were cut with the snaps already attached (or if your coat had a zipper), then you will not have a separate piece here like the example.
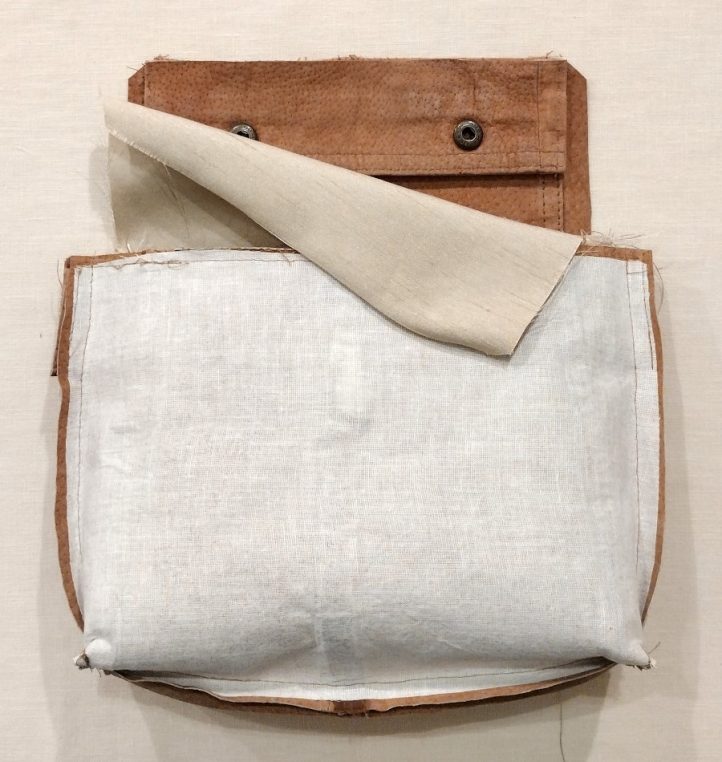
- Keep the leather inside-out, but turn the lining right side-out. Insert the lining into the bag, and match up the edges. The designer turned in 1/2” on the sides of the outer snap piece and stitched them down already, and then added it in between the leather and the lining. It goes at the top edge of the bag, raw edge lined up with the bag’s raw edge. The pretty side of the snaps should be facing the leather, with the business side towards the lining. But remember, if your bag pieces were cut with the snaps already attached (or if your coat had a zipper), then you will not have a separate piece here like the example.
- Once you have everything layered to your satisfaction, sew around the entire top edge with a half inch seam allowance. You will be sewing the front edge, sides, and around the perimeter of the flap. Keep the edges lined up, and always put your needle down if you need to stop and readjust anything. Turning the corners can be tricky, and if you are sewing over thick existing seams, you might need to take your foot off the pedal and use the hand wheel as you cross them. When in doubt, slow down and use the hand wheel!
- Trim the seam allowances at the outside corners, and snip right up to the stitching line on the inside corners. Trim down any excess leather seam allowances from thick crossing seams around the top edge and bag flap. Press all seam allowances towards the leather.
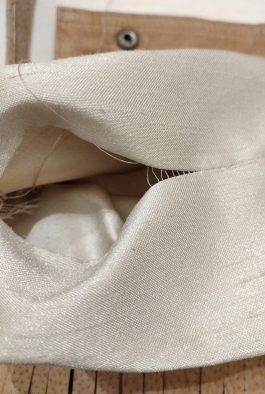
- So now you have a really great bag, but it’s all inside-out. Take a seam ripper, and slice an opening in the bottom seam of the lining. About 5″ wide is all you should need. Now, reach in there and turn your bag right side-out. Doesn’t it look great?
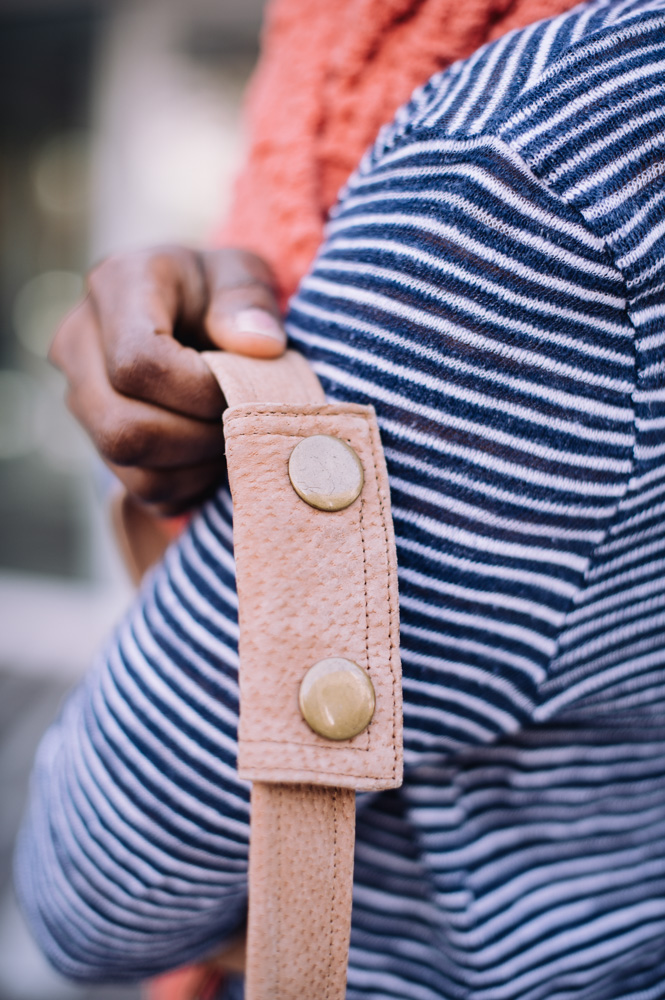
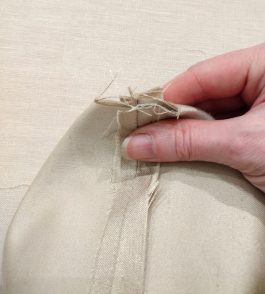
You might be wondering why the designer chose to sew the entire lining seam and then cut it, instead of leaving an opening for turning. The main reason is because this way, the lining seam allowances are nicely pressed already, and it was super easy to press because there was a seam there when the seam allowances were ironed open. So, later on, when sewing the opening closed, the press lines give a sewing guide and cause the seam allowances to lie down smoothly. (The other reason is because sometimes the designed didn’t leave a large enough opening, so she waited and then sliced it as large as it needed to be.) - Next, you will attach the strap. (If you have already attached your strap between the bag and lining, you can skip this step.) The coat’s belt loops were 1.5” wide, and the designer trimmed them to 3.5” long. She then folded them to form large loops around a couple of metal D-rings. If your coat doesn’t have belt loops, you can stabilize some extra leather scraps, and fold them to form tabs of this size.
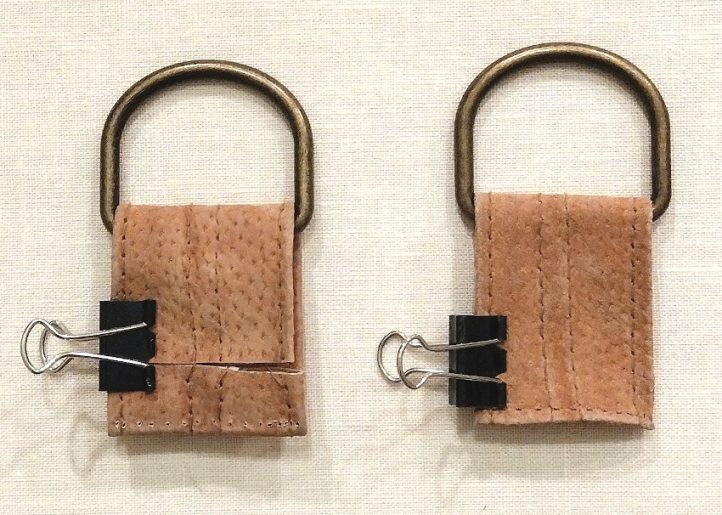
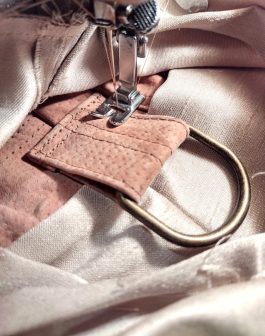
The designer folded the bottom edge under to meet the raw edge on the other end, which will give a clean finish with less bulk instead of folding both ends under. The loop on the left shows the wrong side, and the one on the right is demonstrating the finished side. - Next, the designer sewed the belt loop tabs to the sides of the bag near the top, so that the weight of the bag is balanced. She had the bag inside out, the lining pulled out, and the presser foot through the hole in the bag lining. She sewed the belt loops only to the stabilized shell, which means that no stitches will show on the lining. Again, you can choose to do this before you attach the bag’s lining, but then you will need to keep the tabs out of the way of your needle when you sew the lining and bag together. Since she wanted to attach the tabs so close to the top of the bag, she decided that it would be easier to do it this way. However, you should do what makes sense for your materials and design vision.
- Once the tabs and rings were attached, the designer was ready to topstitch the upper edge and bag flap. This step is important because the stiff leather seam allowances will want to stand straight up, which causes the bag’s lining to peek out awkwardly from the top of the bag.
- The seam allowances on the top edge of your bag should already be pressed towards the leather, but take a minute to press the top edge of the bag again (using your pre-tested iron settings) so that the seam that joins the lining and the leather is at the very top. The lining should all be inside the bag, not peeking out over the top edge. If you notice any thick leather seam allowances still around the bag flap or top edge, this is your final chance to trim them!
- The designer topstitched all the way around the seam that joins the lining and the leather, 1/4” away from the seam, with the lining against the feed dogs and the leather towards the needle. She had the leather facing up so that she could follow the original stitching lines whenever it made sense to do so (on the edges of the bag flap, for example). Try to keep your stitch length consistent, and use the hand wheel when you come to a crossing seam or other thick area of the leather.
- The next step is to construct a strap out of the coat’s sleeves. The designer cut the sleeves apart on a seam, and removed the lining. She then cut a strip out of each sleeve that was 3.75” wide, and as long as was possible. She needed to avoid a stain on one of the sleeves, so one strip is shorter, but that’s okay. She also had a horizontal seam on each strip, because the sleeves were made from several pieces of leather, but that’s okay too. She sewed the two short sides of the strips together, so that she had one long 3.75” wide strip. She then pressed the joining seam open, and stabilized the leather to keep the strap neat and sturdy.
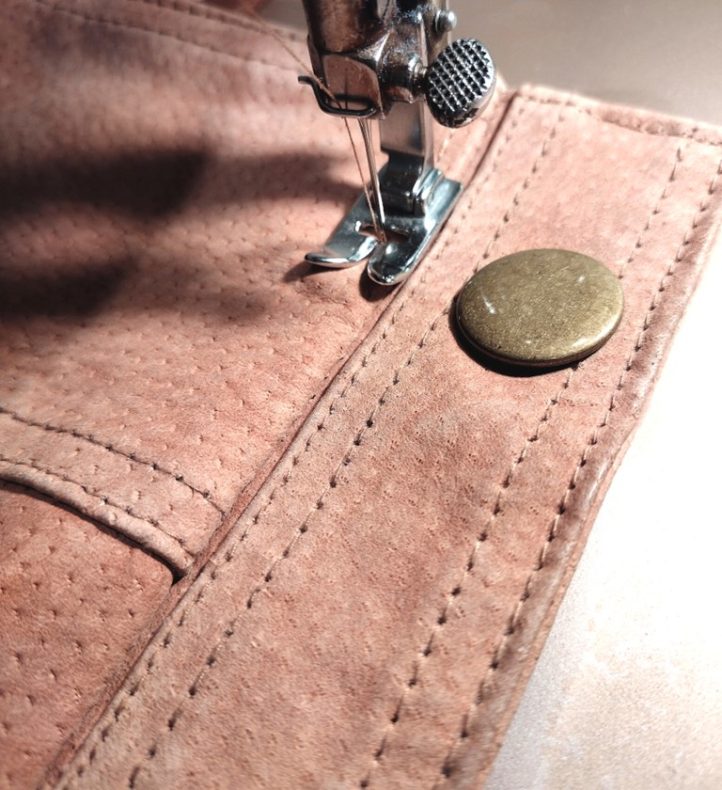
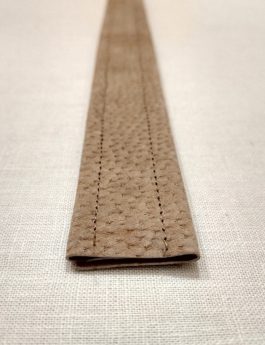
- Next, the designer pressed the strap lengthwise into thirds. This gives a finished width of 1 1/4”, which is proportional to the bag. She topstitched on both sides of the strap, being sure to catch the free edge of the leather in the stitching. This would be a great place to use the decorative stitch options that are built into your sewing machine! A nice line of scalloped stitching along each edge of the strap would add an eye-catching detail without adding any extra work.
Usually, making a strap means stitching a tube and then turning it right side-out. But with a thick, stiff material such as leather, turning a tube is incredibly difficult, and may even scuff the leather. If you would rather have both raw edges of the leather enclosed, you can cut a wider strip (four times the width of your desired finished strap), fold the edges of the strip to the middle, and then fold the strap in half. This encloses both cut edges of the leather, and provides a very clean finish.
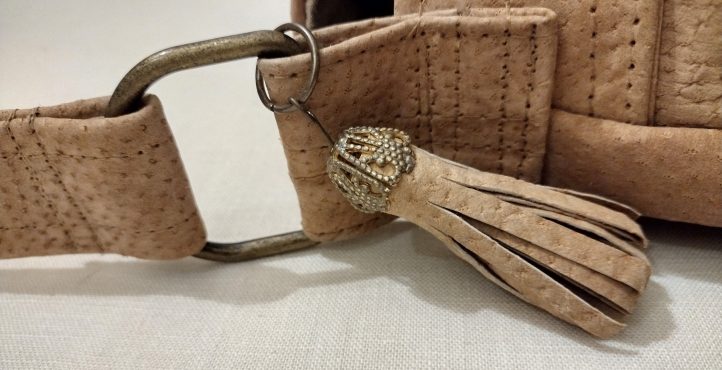
- The designer wanted to bring in a few more elements from the coat’s hardware, so she used the snap section from one of the sleeve cuffs to make a hand grip at the top of the strap. It’s basically a small decorative tube that slides onto the strap to cover the center seam. It isn’t a necessary detail, but remember how one sleeve of the coat was stained, which made the seam in the middle of the strap a little off-center? She used leather-safe fabric glue to form the end of one of the cuffs into a small tube. You can also sew one strap section just inside each end of the hand grip, and use the hand grip to make your strap a little bit longer.
- After sliding on the hand grip, the strap was placed through the rings, with the wrong side of the strap facing towards the bag. She folded under about 1” of the strap back on itself, and stitched it down to hold the strap in place through ring.
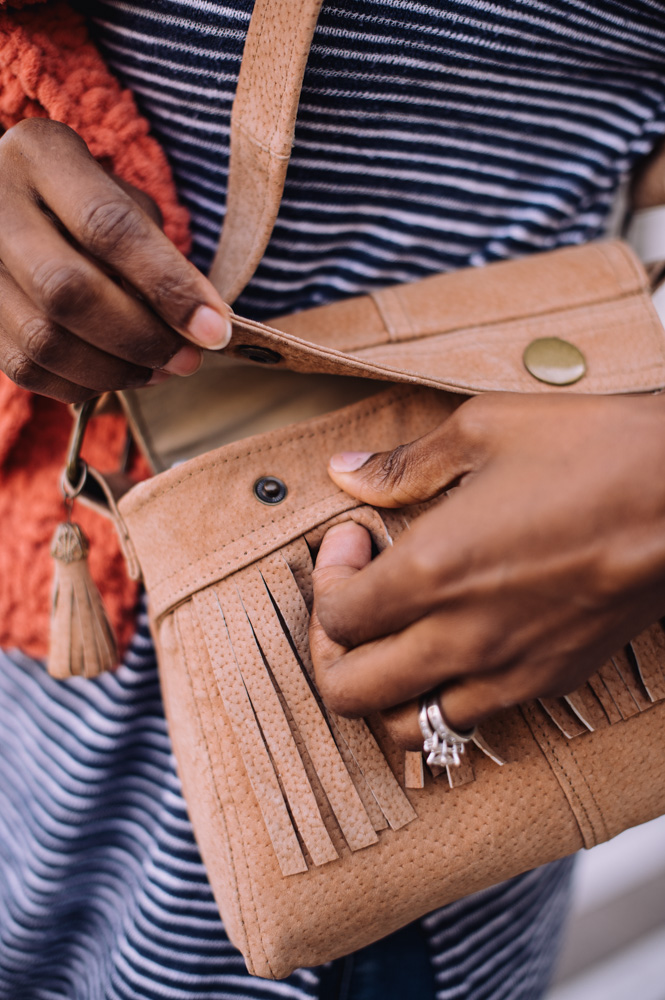
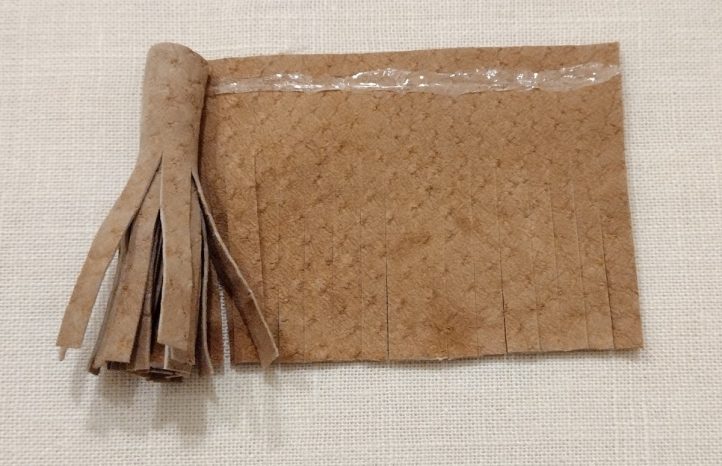
- The fringe and tassel are each made from a single layer of unstabilized leather. Since leather does not fray, the raw edges on the fringe and tassel are going to hold up fine. The designer wanted the fringe to be 4” by 7”, but didn’t have any scraps left that were large enough to make the fringe out of one piece. However, you can put several pieces side by side until you have a piece that is equal to 4” by 7”, because the fringe is sliced into strips anyway, and it won’t matter if a few of the cuts go all the way to the edge. She cut her fringe every 1/4”, and stopped about a half inch from the edge.
- The leather for the fringe was inserted into the seam along the edge of the inner snap piece. The designer cut the original stitches, inserted the fringe, and then used a line of leather-safe fabric glue on each side of the fringe to close up the edge and hold the fringe in place.

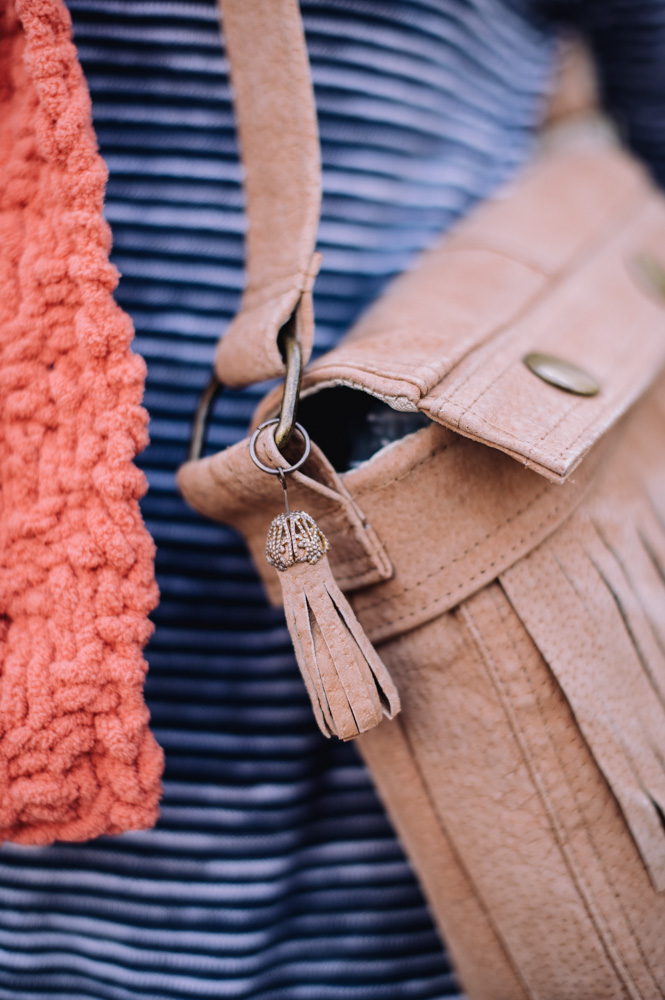
- The leather to make the tassel is 2” by 6.5”, and because it is such a tiny piece, it was slashed every 1/8” to make smaller fringe. Then the designer placed it right side-down on her tabletop, added a line of leather-safe fabric glue along the top edge, and rolled it up tightly. She inserted the rolled end of the tassel into a large jewelry bead cap, and crimped it with a pair of pliers. She then used an eye pin and a small bronze ring to attach the tassel to the D-ring on the bag’s strap. Note: The bead cap and other tassel hardware is optional; you can roll the tassel around a loop of leather instead, and use the leather loop to attach the tassel to the bag handle.
- There is one last quick task, and that is to hand-sew the opening in the lining closed using a ladder stitch. Using a hand needle and matching thread, take stitches through the creases you created when you initially ironed the lining seam allowances flat. Sew small stitches on alternating sides of the opening, with each stitch going into the fabric directly across the opening from where the previous stitch came out. Pull the thread tight every 8 stitches or so, and keep going until the lining seam is completely closed.
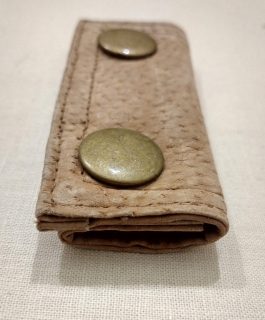
That’s it! The finished bag adorable. Now you can use the same pattern and methods to revamp a leather coat of your own!