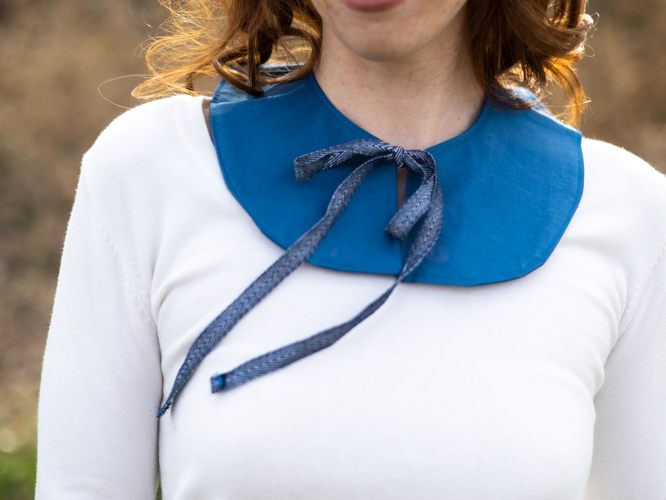
Oversized collars are one trend that is here to stay. Take this trend from the late 80s and early 90s into 2022 by learning how to design your own custom statement collars at home. The beauty of this easy sewing pattern is the endless options for customization with fabric, trim, or even embroidery details! Complete with a printable template, this sewn accessory is perfect for layering over your favorite tee, dress or sweater.
Skill Level: Easy
Finished Dimensions: 13″ long by 12″ wide
Seam Allowances: 1/4”
Materials:
- Fabrics:
- Cut 4 – solid cotton fabric (Cut 2 Collar Front – solid cotton fabric. Cut 2 Collar Back – solid cotton fabric.)
- Cut 2 – fusible interfacing (Cut 1 Collar Front – fusible interfacing. Cut 1 Collar Back – fusible interfacing.)
- Cut 36″ – twill ribbon
- Cut 45″ – vintage trim (optional)
Special Notions and Templates:
- Ribbon/ twill ribbon
- Vintage trim (optional)
- Small button
- Light to medium weight fusible interfacing
- Printable PDF Collar Template – This is located at the bottom of this page. See printing instructions below.
PRINTING INSTRUCTIONS:
To download the PDF template, click on the download button at the bottom of the page. We recommend opening your download using Adobe Acrobat.
Instructions:
CUTTING AND PREPARATION:
- Cut out Collar Template A and Collar Template B (found in the PDF at the bottom of this page) and join together at the dotted line to create the Collar Template.
- Fold and press your cotton fabric RST (right sides together) and use the collar template to cut two collar template pieces out on the fold of your fabric. Flip pattern and cut two pieces in the mirror image, creating a right and left side of your collar template, which will give you four pieces in total.
- Fuse the light to medium weight fusible interfacing to one of your collar pieces. Cut away any excess interfacing and set aside.
- Attach the right collar side to the left collar side with RST. Sew 1/4″ seam up the back seam. See Fig 1.

- Repeat for the duplicated collar pieces with interfacing attached. Press open the back seam.
ADDING THE TRIMS (OPTIONAL):
- If adding a trim, measure approximately 45″ in length and fold over edges to finish as desired.
- Set sewing machine stitch length to a basting stitch length and sew 1/8″ along the raw edge of the trim.
- Using the thread ends, locate the bobbin thread end and gently gather the trim to a loose ruffle.
- Starting 1/4″ from the interior neck opening, gently ease the ruffled trim around the collar exterior perimeter RST lining up the raw edges, pinning and adjusting as necessary to hold in place. Refer back to Fig.1.
- Sew trim in place with 1/8″ seam and remove basting string.
- If closing collar with a button and loop, attach a 1/2″ loop of thin ribbon or twill at the base of one end of the trim or 1/4″ from the end of the collar neck opening on one side.
- If closing the collar with a ribbon tie, attach 18″ lengths of ends of twill ribbon at opposite sides of the base of the collar neck opening. Refer back to Fig.1.
- Tack in place with a 1/8″ seam.
ASSEMBLE THE COLLAR:
- Place RST of the collar and collar with interfacing attached, then align pieces along center back seam. Pin in place and sew 1/4″ seam along the entire perimeter of the collar, leaving an approximate 2″ opening for turning.
- Trim corners slightly to ease bulk when turning, being careful not to cut through stitching of seam allowance.
- Turn the collar right sides out and use a dull stick to press out the edges and the corners of the collar. Press flat.
- Top stitch around the entire perimeter of the collar to enclose the opening.
- Add a small button (optional) opposite the ribbon loop and secure in place with hand stitching to close the collar.