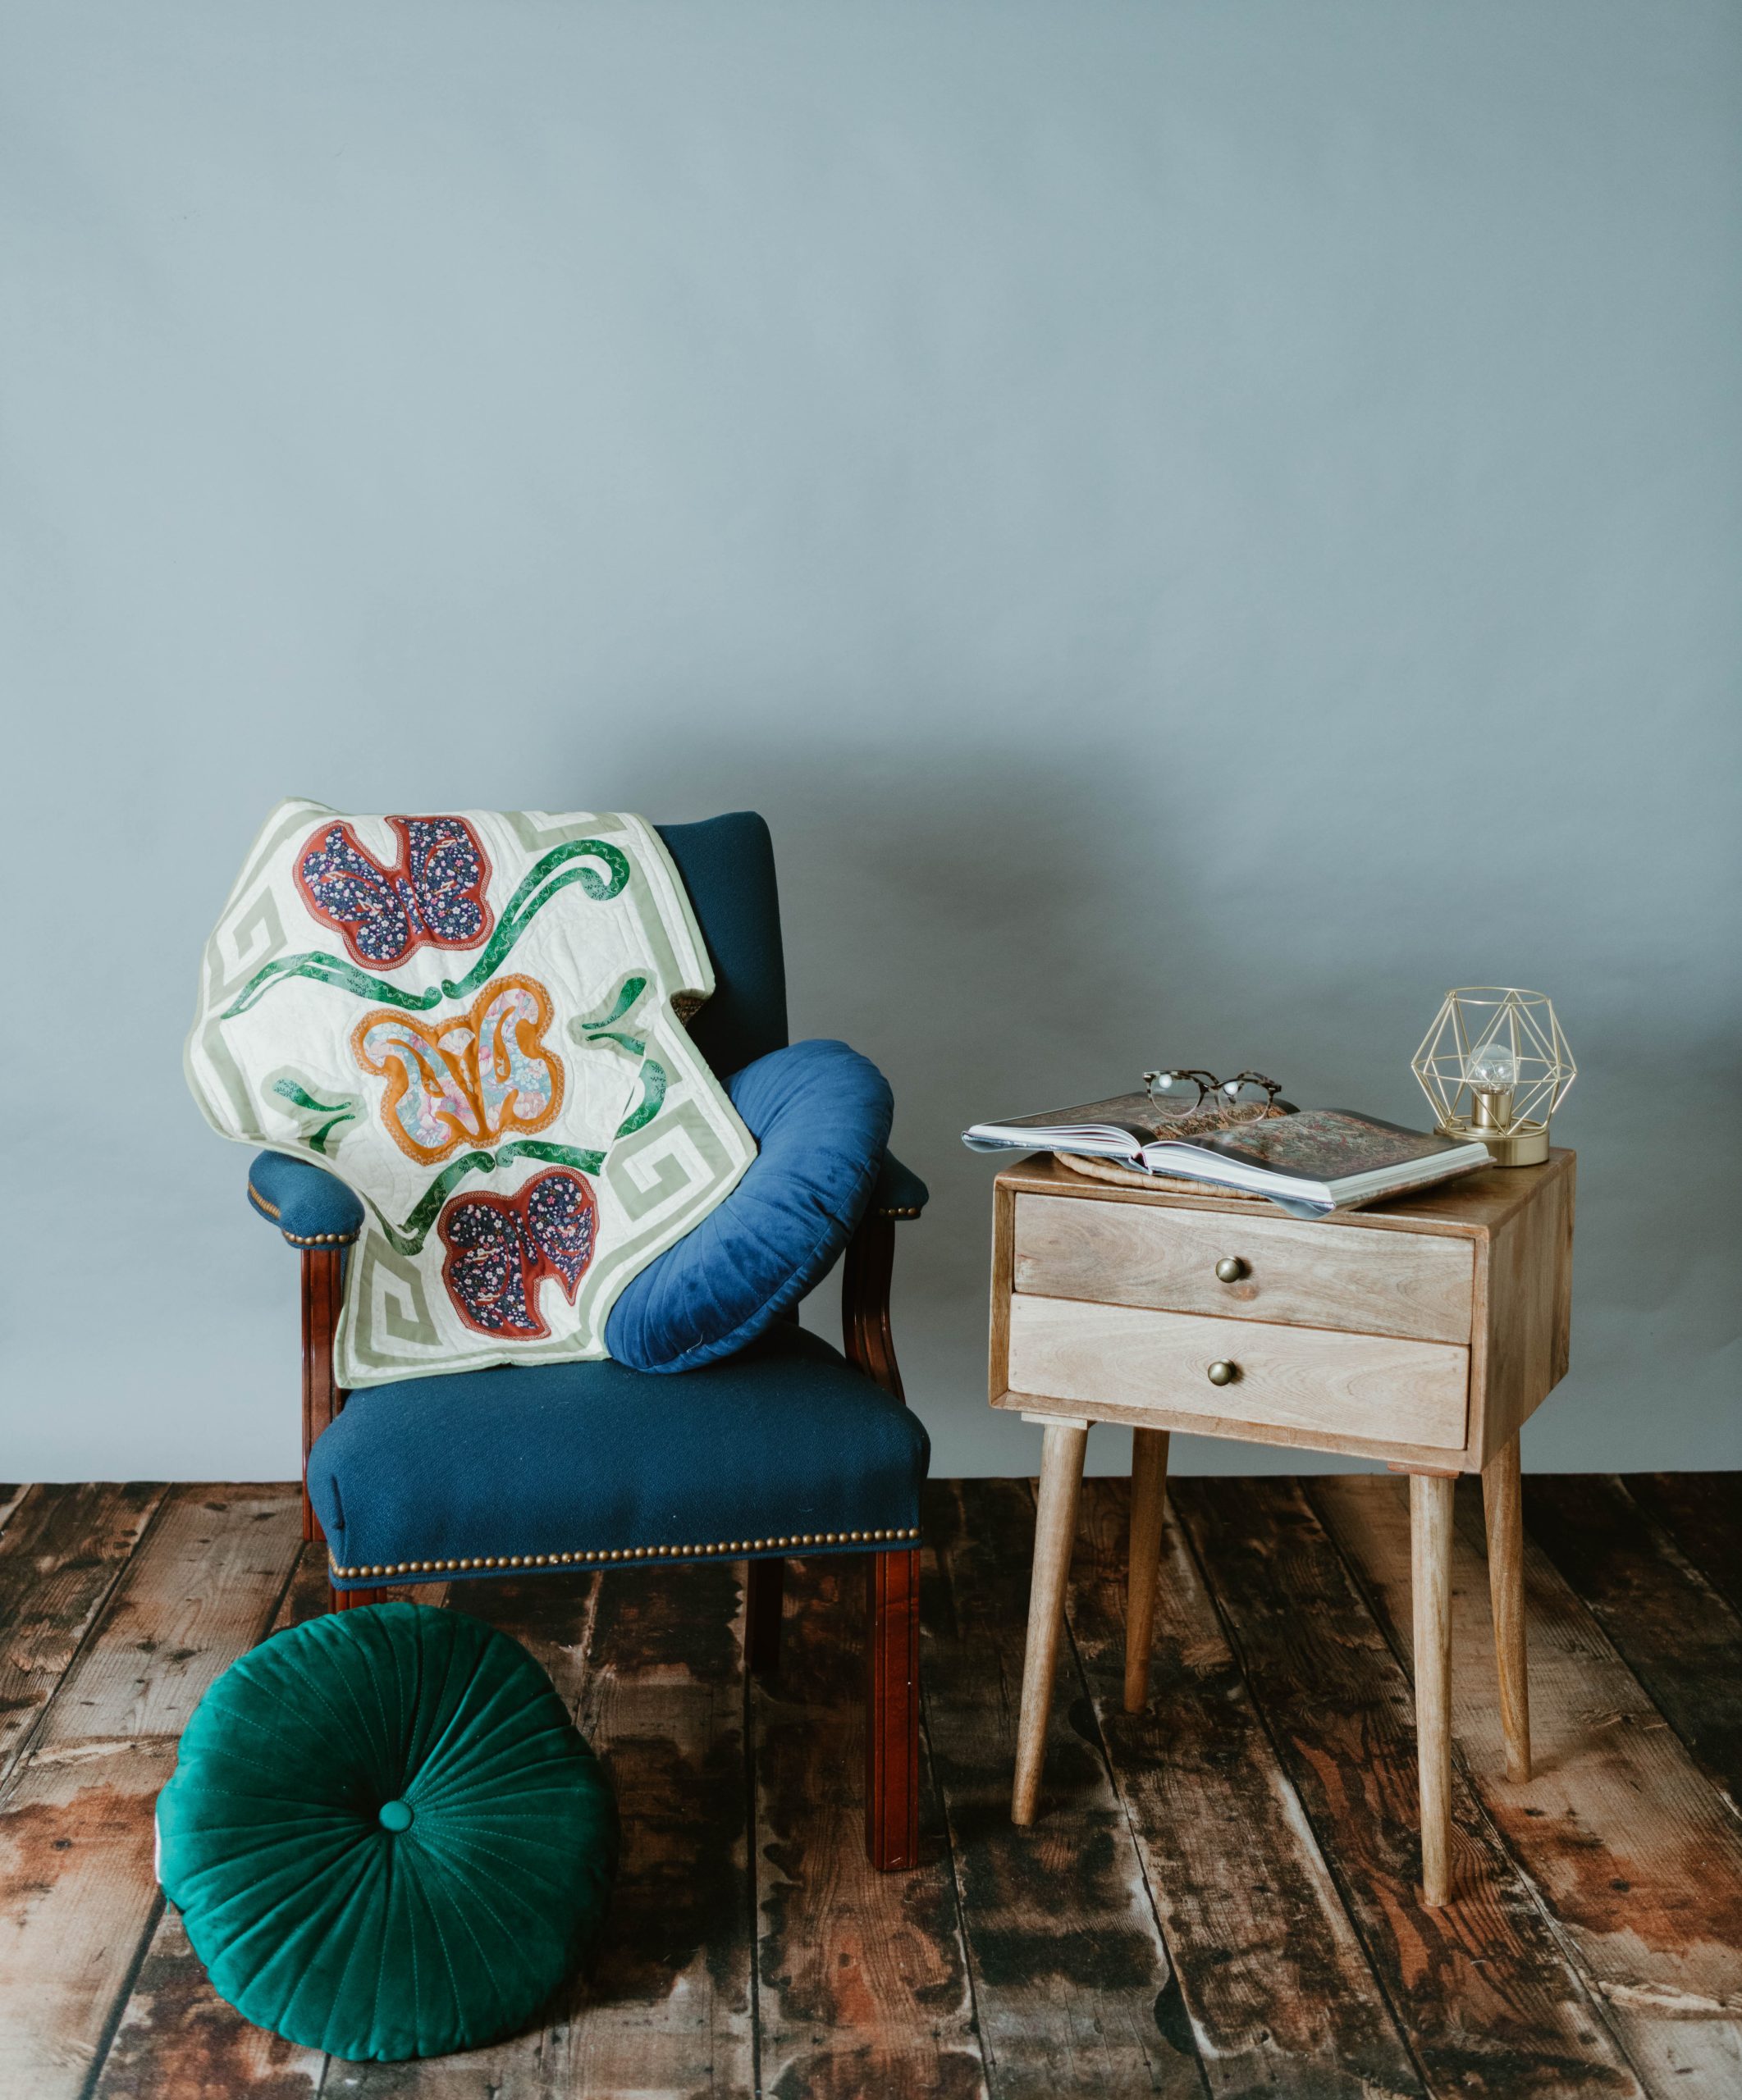
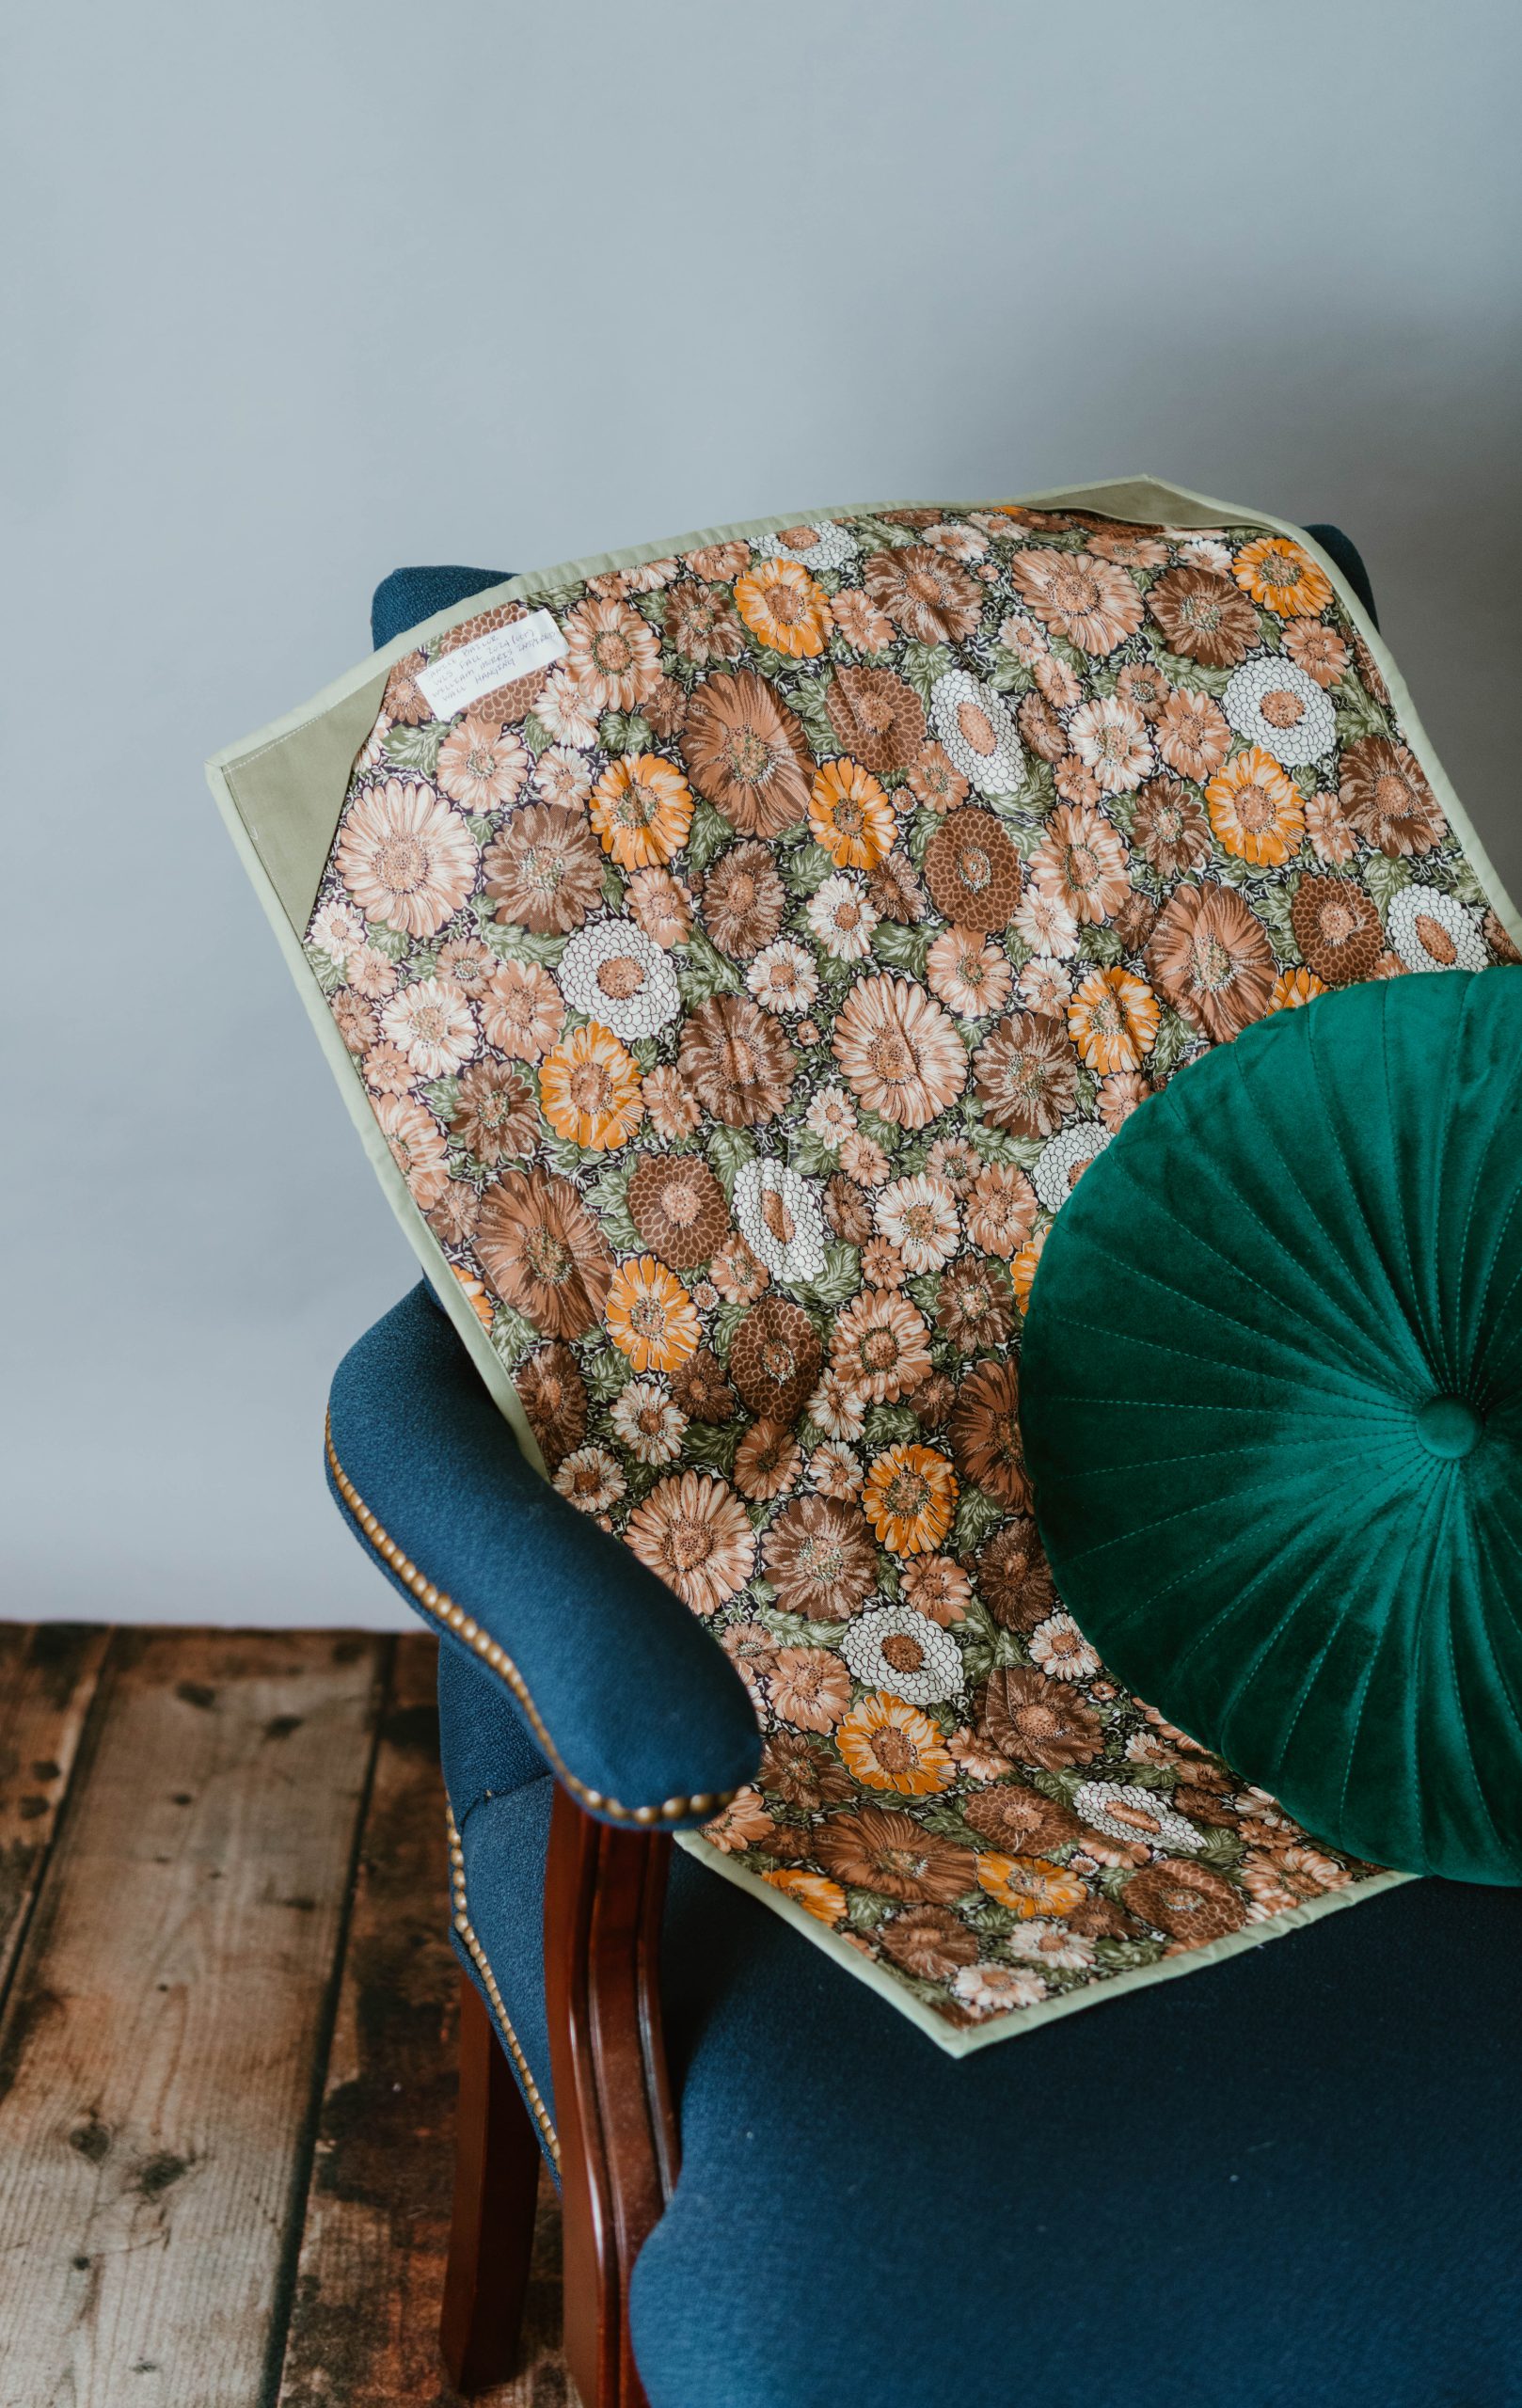
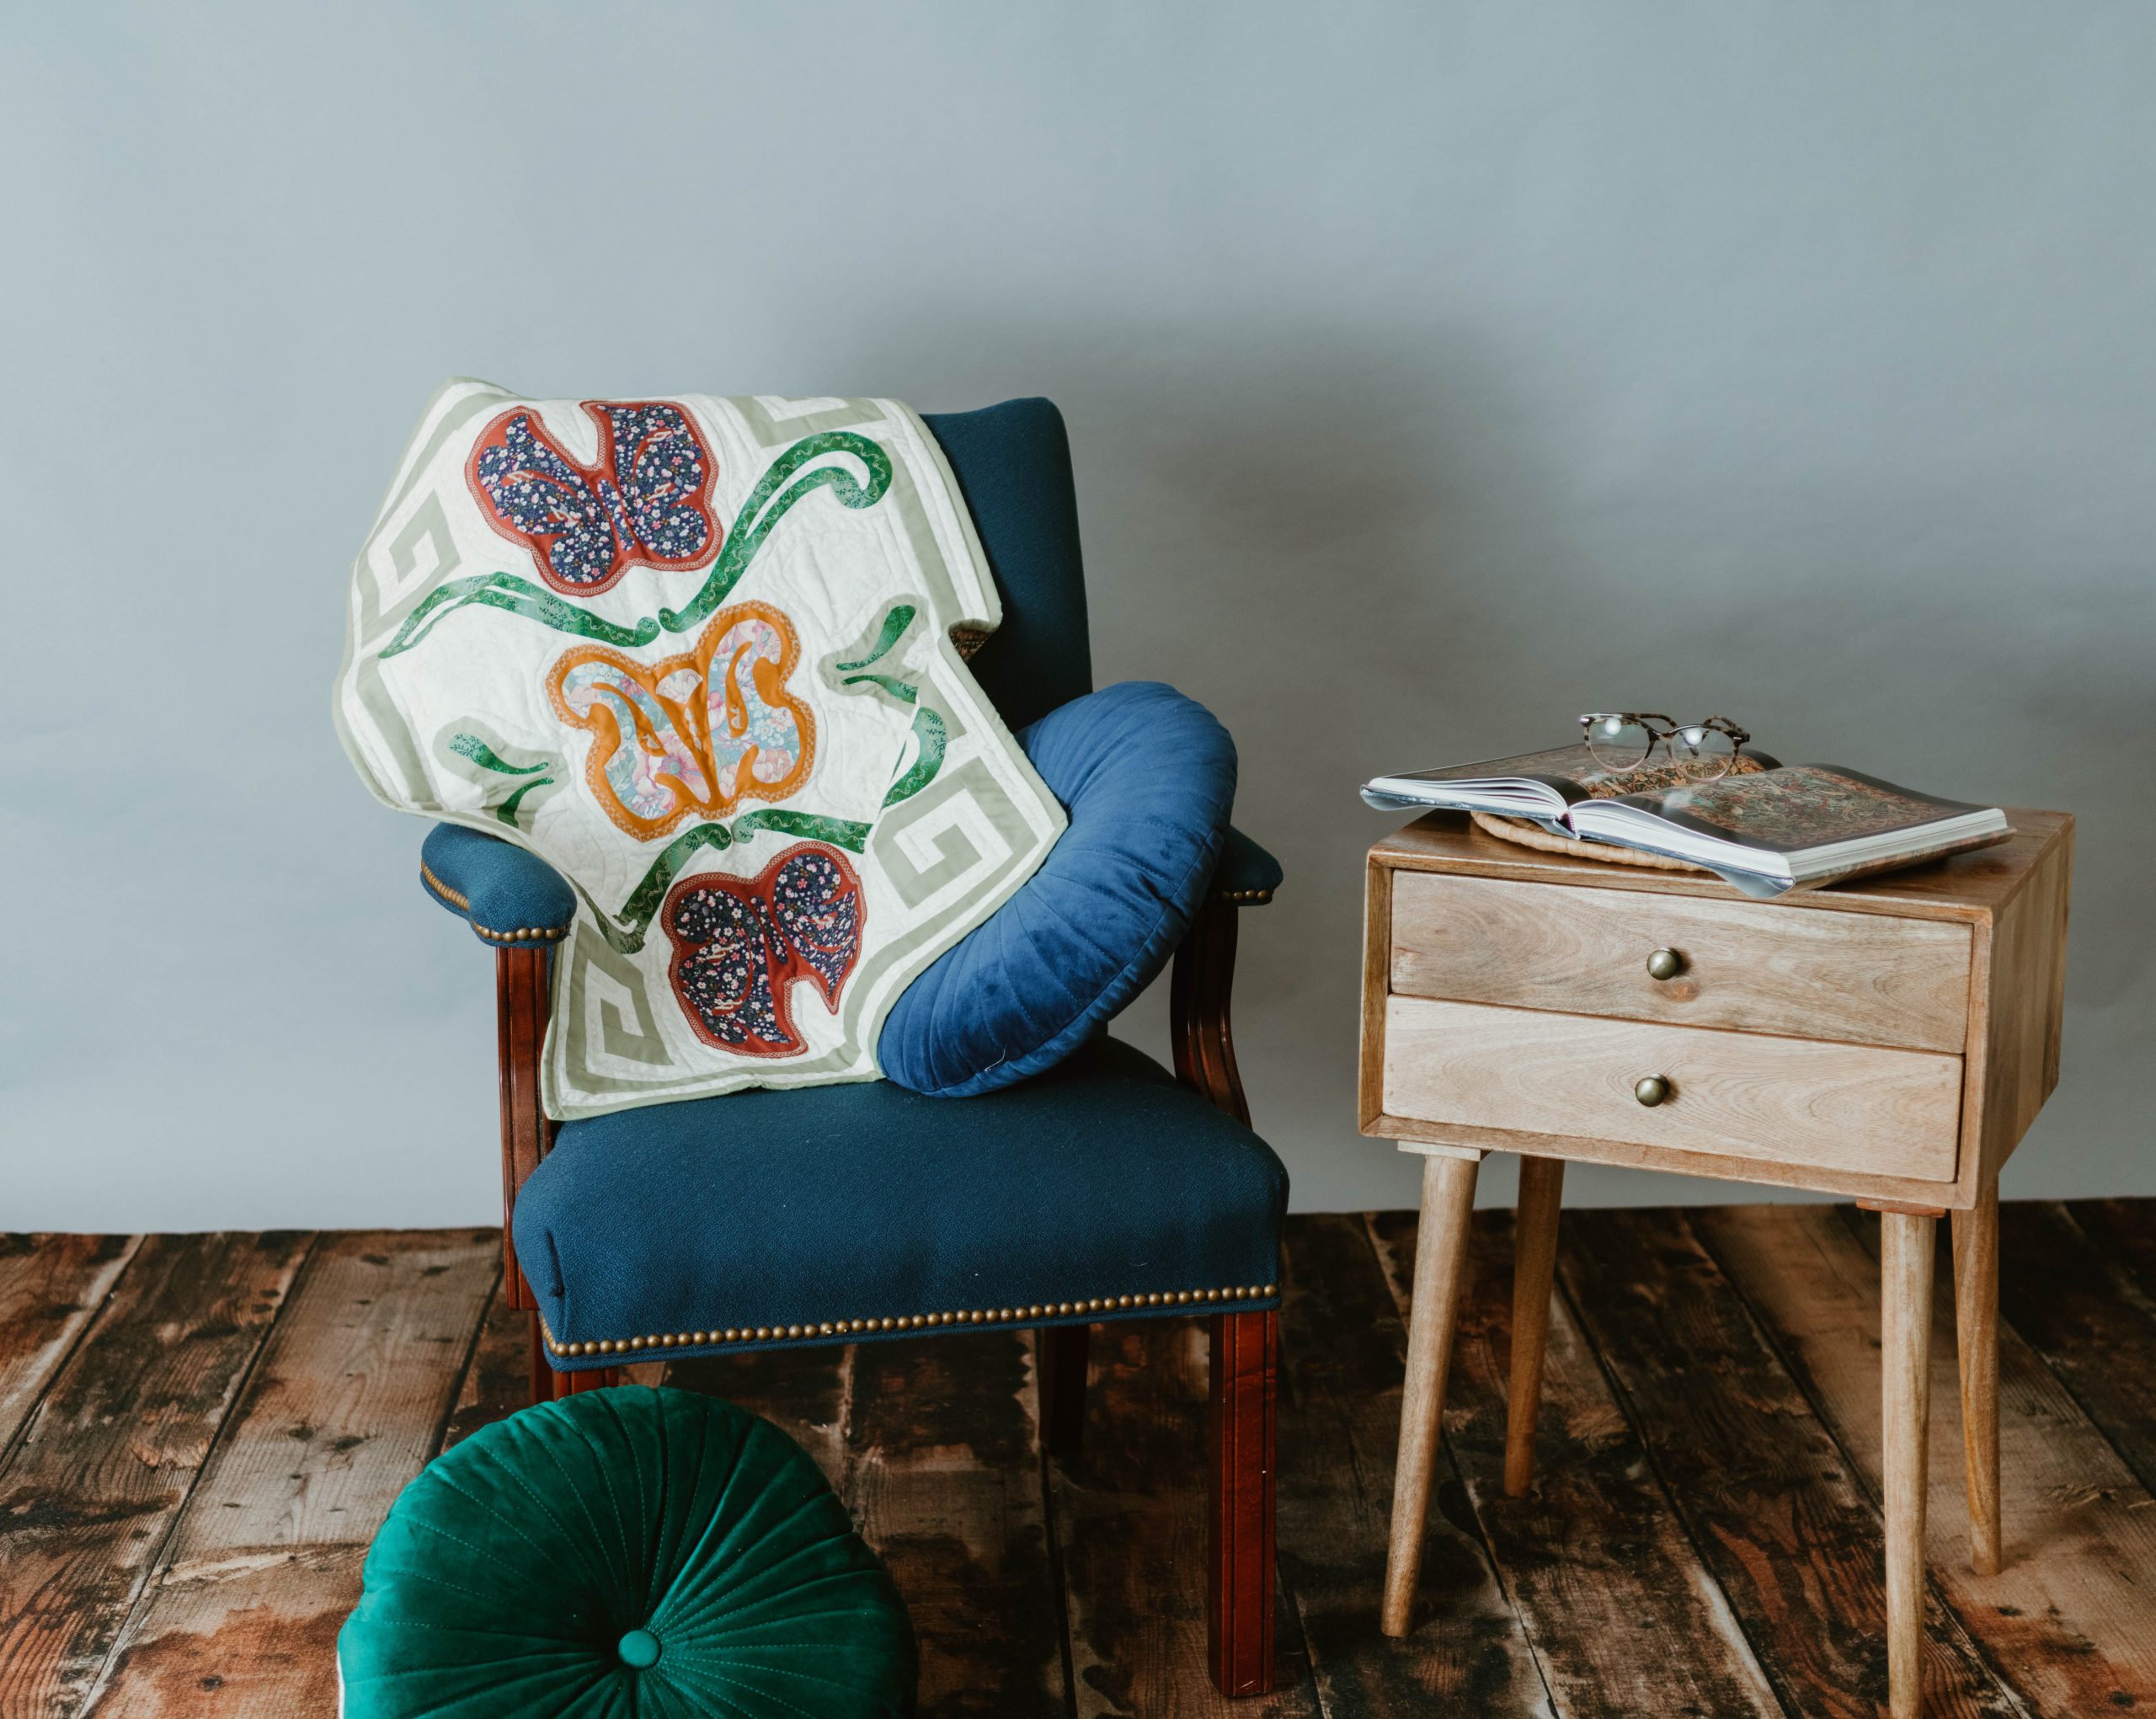
Take a trip back in time with us to the Pre-Raphaelite art movement of the 1800s and find inspiration in rich colors and nature with this pattern from Janice Bailor. Inspired by the work of William Morris, this fall wall hanging pattern features floral designs in deep jewel tones against a cream background. Display this large wall hanging (measuring 24” x 32”) in the foyer of your home or in your dining room to elevate your décor.
Skill Level: Confident beginner
Finished Dimensions: 24 in. wide by 32 in. long wall hanging
Seam Allowances: 1/4 in patchwork
Designer Notes: “RST” means Right Sides of fabric Together.
Materials:
- Fabrics for wall hanging:
- Blue Butterfly – 1 fat quarter each floral print and coordinating solid
- Green Leaves – 1 fat quarter each floral print and coordinating solid
- Orange Floral – 1 fat quarter each floral print and coordinating solid
- Green Greek Key Inset- 1/4 yard
- Background – 1/2 yard
- Backing – 1 yard
- Binding – 1/3 yard
- Walking foot for quilting
- Rotary cutter, mat and acrylic ruler
- Heat ‘n Bond fabric adhesive
- PDF Templates – These are located at the bottom of this page. Please see printing instructions below.
PRINTING INSTRUCTIONS:
Note: To download the templates, click on the pattern download button at the bottom of the page. We recommend opening your pattern download using Adobe Acrobat.
Cutting Instructions:
- Line up selvages and press all fabrics to remove any creasing or wrinkles.
- Neaten and trim up the cut edges along the WOF (Width of Fabric) with a rotary cutter, ruler, and cutting mat as required to create an even edge.
- From the newly trimmed edge, use the cutting mat grid and acrylic ruler to cut:
- Green Greek Key pieces: 6- 1 1/2 in. by 8 1/4 in. rectangles, 4- 1 1/2 in. squares, 4- 1 1/2 in. by 2 1/2 in. rectangles, 4- 1 1/2 in. by 3 1/2 in. rectangles, 4- 1 1/2 in. by 4 1/2 in. rectangles, 4-1 1/2 in. by 5 1/2 in. rectangles, 4- 1 1/2 in. by 7 1/2 in. rectangles
- Background fabric: 6- 6 1/4 in. by 8 1/4 in. rectangles, 6- 1 1/2 in. by 8 1/4 in. rectangles, 4- 1 1/2 in. squares, 4- 1 1/2 in. by 2 1/2 in. rectangles, 4- 1 1/2 in. by 3 1/2 in. rectangles, 4- 1 1/2 in. by 4 1/2 in. rectangles, 8-1 1/2 in. by 5 1/2 in. rectangles, 12- 1 1/2 in. by 7 1/2 in. rectangles, 1- 8 1/4 in. by 16 in. rectangle
Sewing Instructions:
PIECING THE GREEK KEY INSET BLOCKS:
- Begin by sewing the 1 1/2 in. green and background squares RST with a 1/4 in. seam, then press the seam open.
- Working in a clockwise rotation, turn the pieced 1 1/2 in. blocks so the green block is on the bottom and sew a 1 1/2 in. by 3 1/2 in. background strip to the right overlapping seam. Press seams open.
- Place a green 1 1/2 in. by 3 1/2 in. strip RST across the 1 and 3 blocks (refer to piecing diagram, Figure 1a and 1b), and sew. Press seams open. Continue to join green blocks and background strips as shown in the diagram.
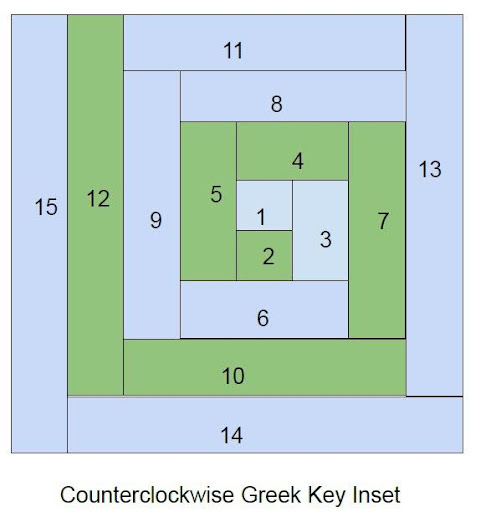
Figure 1A
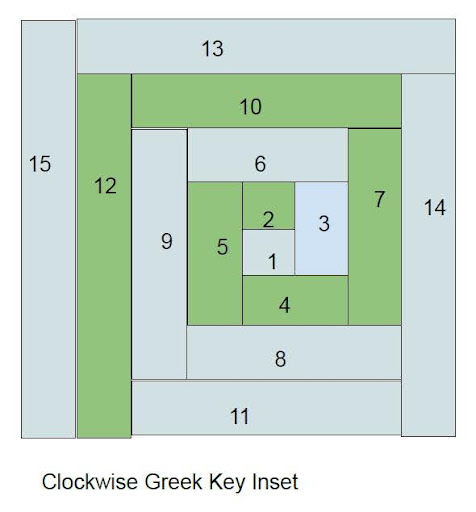
Figure 1B
- Refer to the piecing diagram and work from the center outward in a clockwise direction for two blocks and a counterclockwise direction for the remaining two blocks.
- Make 2 clockwise blocks and 2 counterclockwise blocks. Trim the finished Greek Key Blocks to measure 8 1/4 in. square.
PIECING THE GREEK KEY BORDER BLOCKS:
- Begin by placing the green and background 1 1/2 in. by 8 1/4 in. strips RST and sew 1/4 in. seam. Press the seam open. See Figure 2.
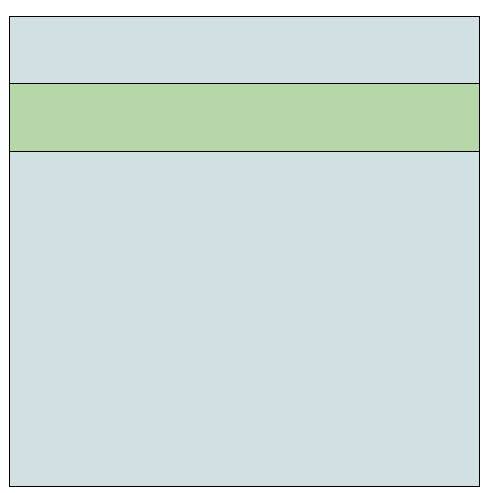
Figure 2
- Place the pieced strips RST with the green strip at the top of the 6 1/4 in. by 8 1/4 in. rectangle and sew. Press the seam open and trim the block to 8 1/4 in. square.
- Repeat to make 6 border blocks.
PIECING THE GREEK KEY BACKGROUND:
- Begin by laying out the Greek Key Inset and Green Key Border Blocks as shown in the Background Diagram. See Figure 3.
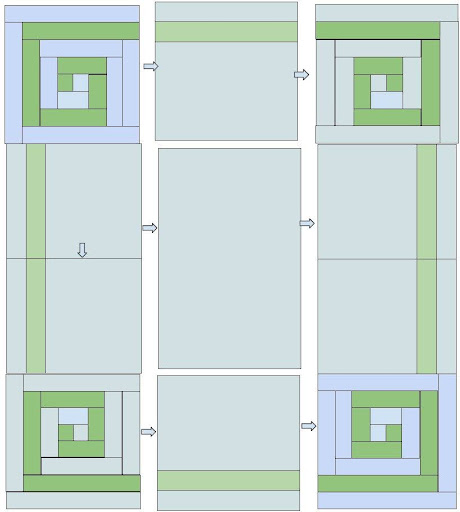
Figure 3
- Working from the edges inward, sew the Greek Key Inset and Greek Key Border top and bottom rows RST and press all seams open.
- Next, sew the two side sets of Greek Key Border Blocks RST and press the seams open.
- Attach both the right and left side of the Greek Key Border Block strips to the central 8 1/4 in. by 16 in. panel and press all seams open.
- Finally, sew the top and bottom Greek Key Inset strips to the central panel to complete the wall-hanging background. See Figure 3.
- Trim the completed panel to 24 in. wide by 32 in. long and set aside.
CREATING THE PIECED APPLIQUE:
- Use the included templates to create two layers to the William Morris-inspired appliqué. Print and cut out included (Leaf, Floral, Butterfly) Templates.
- Begin by adhering Heat ‘n Bond to the back of all print and coordinating solid layers following the manufacturer’s instructions.
- Trace and cut two each of the front of the Butterfly Wing Template.
- Flip the Butterfly Wing Template to the reverse side and trace two wings facing the opposite orientation.
- Trace and cut two of both sides of the Butterfly Wing Template.
- Peel the Heat ‘n Bond backing from the printed fabric and arrange on the coordinating solid background fabric allowing enough background around all edges to cut a 1/2 in. border. See Figure 4.
Figure 4
- Adhere the Butterfly Template of the printed and solid fabrics to the background fabric following the manufacturer’s instructions and cut out around the shapes leaving an approximate 1/2 in. border of solid fabric around the entire circumference. See Figure 4.
- Repeat Steps 1-7 for the Small Leaf Templates. Set aside.
- Trace and cut two each of the front Large Leaf Template.
- Flip the Large Leaf Template to the reverse side and trace two leaves facing the opposite orientation. Repeat Steps 6-7 to apply the Heat ‘n Bond and attach to background fabric.
- Using the Arrangement Diagram, Figure 5, begin by centering the Floral appliqué element in the wall hanging background. See Figure 5.
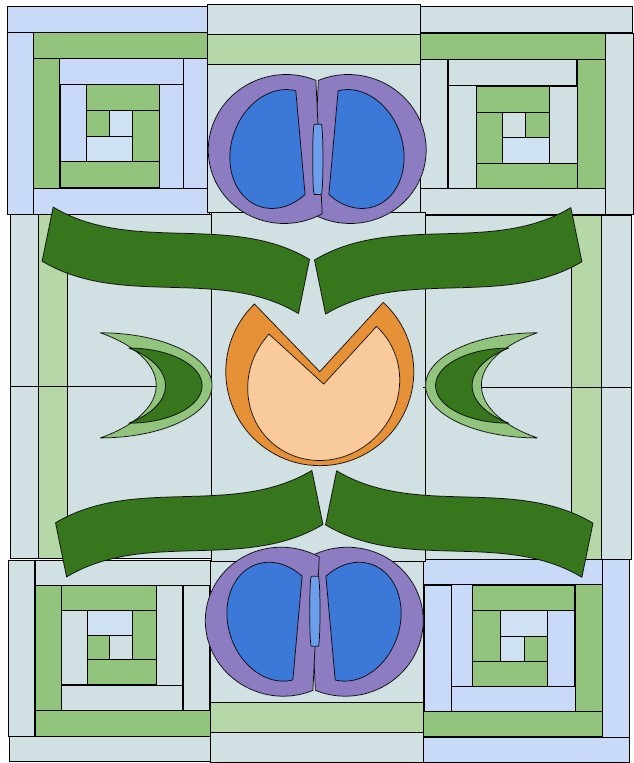
Figure 5
- Arrange the remaining appliqué elements symmetrically using the Arrangement Diagram as shown. See Figure 5.
- Following the manufacturer’s instructions, use a hot iron to adhere all appliqué elements in place and top sew using straight or decorative stitches as desired.
QUILTING AND FINISHING:
- Cut a strip of batting and backing approximately 2-3 in. wider and longer on all sides than your finished quilt top.
- Assemble the quilt sandwich for the quilt by laying out the backing (right side down), batting in the center and quilt on top, right side up. Baste and quilt as desired and trim edges. The sample quilt has been quilted in an echo pattern following the seam lines of the piecing.
- Prepare the binding by cutting 2 1/2 in. by WOF strips of fabric and attaching all strips together on the diagonal. Press strips wrong sides together in half lengthwise along the entire length of the binding to complete.
- For the Wall Hanging, insert a loop of fabric across the top length of the block or two pockets of fabric in each corner for hanging.
- Attach binding to the quilt sandwich by lining up all raw edges, mitering the corners as you go.
- To miter corners, sew into the corner stopping a 1/4 in. from the end, backstitch, and remove the quilt from the sewing machine.
- With the quilt lying flat, fold the binding up and away from the quilt, making the binding straight with the unsewn side. (Fig. 6)
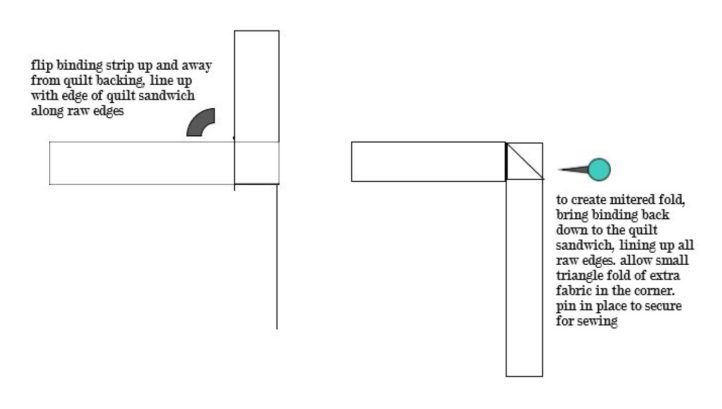
Figure 6
- Fold the binding down to the sewn side, leaving a diagonal fold on the underside of the binding and pin fold in place. (Fig. 6)
- Place the quilt back into the sewing machine and sew down the fold and continue on sewing binding.
- Make a miter at each corner, adjusting the amount of fold as necessary.
- Join the ends of the binding together where they meet and attach to the quilt sandwich.
- Press and fold the binding over to the opposite side of the quilt to finish. Tuck the mitered corner flat, pinning into place as necessary.
- Finish the binding with your preferred method, either by hand stitching in place or machine stitching.