If you shy away from adding inset circles to your projects because they look complicated, the two easy-to-sew techniques presented here will have you running circles around inset circles in no time – yes, it’s really that easy! Whether you use the Pinning Method or the Freezer Paper Method, just secure the inset circle to its background and then stitch slowly for a beautiful result every time.

Materials:
- Cotton fabric: Four pieces of contrasting colors, each 10.5” square (Note: In the examples, these are labeled Fabric A and Fabric B.)
- Starch
- Freezer paper, 10” square
- Pencil, for marking the paper side of the freezer paper
- Fabric-marking pencil (Note: Choose a marking tool that will not show through or bleed onto the front of the fabric.)
- Ruler
- Compass for drawing circles (Note: Alternatively, use your favorite circle making template that can be used with fabric to cut a 6” and a 7” circle.)
- Scissors
- Straight pins
- Water-soluble glue stick
- Applique pressing sheet
- Iron and a heat-safe pressing surface
The Pinning Method:
In this process, a circle of fabric is cut away from the center of a fabric square to create a frame for the inset circle, which is cut from a second piece of fabric and then pinned and stitched to the frame.
To begin, apply starch to Fabric A and Fabric B, then place the fabrics on the heat-safe pressing surface, and press flat with the iron until dry.
In the completed inset circle block, Fabric A, (yellow), will become the fabric frame, (i.e., the background fabric), and Fabric B, (blue), will become the inset circle. (Figure 1)
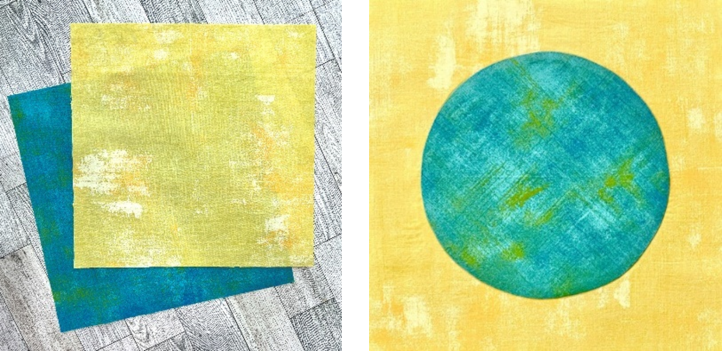
Figure 1
Use the ruler and the fabric marking pencil to draw two diagonal lines on the back of Fabric B, (the inset circle fabric). (Figure 2)

Figure 2
Measure 3.5” away from the center of the marked X on the back of Fabric B and use the fabric marking pencil to mark that measurement on each of the lines that run from the center to the corners. (Figure 3A)
Using the compass, and the marked measurements as a guide for the compass, draw a circle with a 7” diameter on the back of Fabric B. (Figure 3B)
Then, cut out the circle along the drawn line. (Figure 3C)
Handle the circle cutout gently to help lessen the chance of stretching its bias edges.
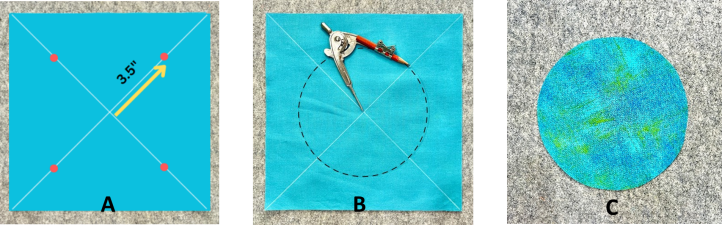
Figure 3 A, B, and C
Then, fold the Fabric B circle into eighths, by first folding it in half, then in half again, and then in half once more. The fabric will look like a triangle when folded into 8 sections. (Figure 4A, 4B, and 4C)
Use the heat-safe pressing surface and the iron and press on the folds to mark the 8 sections, and then unfold the pressed circle, and place it right side up on your workstation. (Figure 4D)
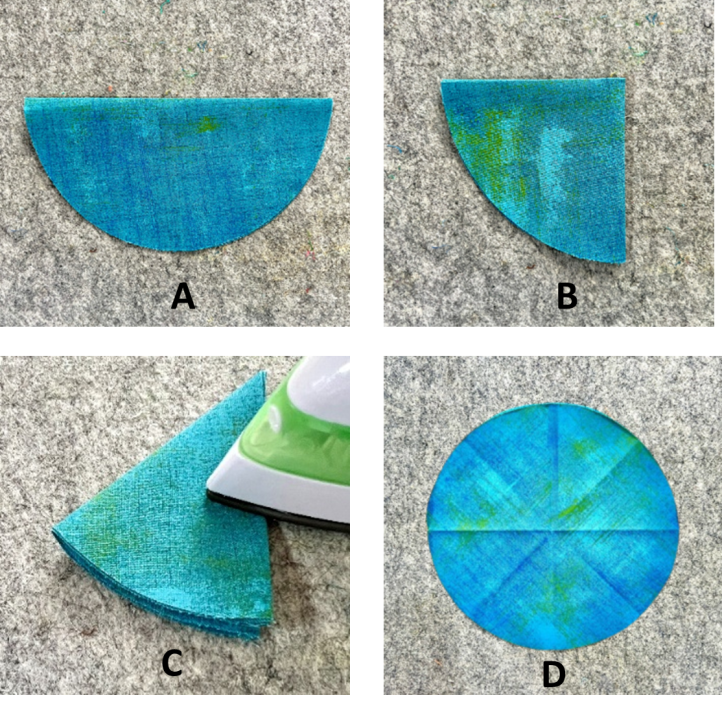
Figure 4 A, B, C, and D
Next, working with Fabric A, (the frame fabric), fold it into eighths, by first folding it in half, then in half again, and then in half once more. The fabric will look like a triangle when folded into 8 sections. Using the heat-safe pressing surface and the iron, press on the folds to mark the 8 sections. (Figure 5A, 5B, and 5C)
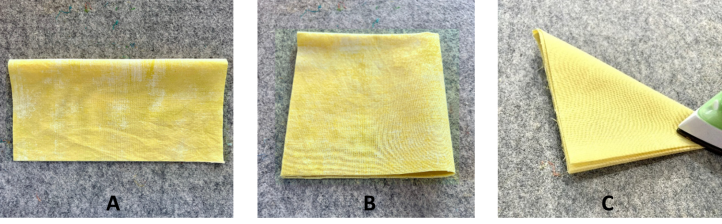
Figure 5 A, B, and C
Then, unfold the pressed fabric square and place it right side facing down on your workstation.
Using a ruler, measure 3” away from the center of the creased lines and use the fabric marking pencil to mark that measurement on the back of the fabric on each of the creased lines that run from the center to the edges of the fabric. (Figure 6A)
Using the marked measurements as a guide for the compass, draw a circle with a 6” diameter on the back of Fabric A. (Figure 6B)
Cut out the circle along the drawn line. The circle will not be used in this project, so set it aside. Handle the fabric frame gently to lessen the chance of stretching the bias edges along the interior cutout section. (Figure 6C)
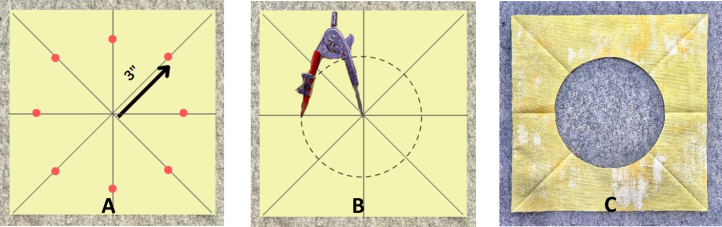
Figure 6 A, B, and C
Place Fabric B (circle) right side up on the work surface.
Center the Fabric A (frame) right side up on top of Fabric B (circle), aligning it with the creases on Fabric B (circle). (Figure 7)
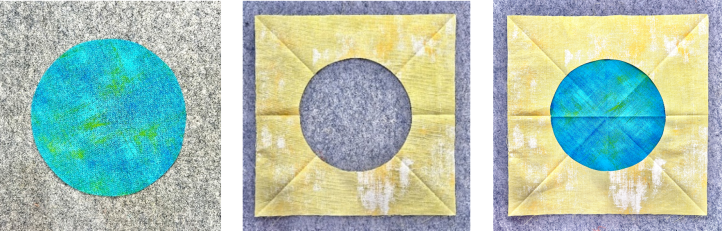
Figure 7
Starting with the top edge of Fabric A (the frame), lift and turn, (“flip”), the edge of the circle cutout area, (the hole in the fabric frame), so that the right sides of Fabric A (yellow) and Fabric B (blue) are together. (Figure 8A and 8B)
Handling the fabric gently, align the cutout edge at the top of Fabric A (the frame) with the top edge of Fabric B (the circle), and pin to hold these edges together. (Figure 8C)
Repeat these steps, (flipping, aligning edges, and pinning), for the bottom edge of Fabrics A and B, the frame and circle. (Figure 8D and 8E)
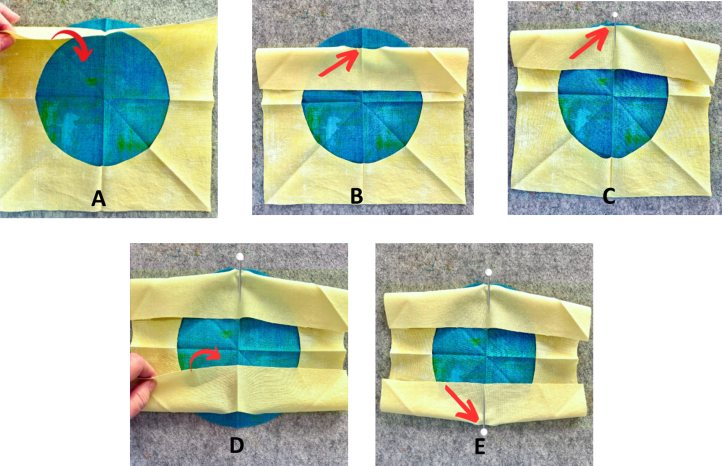
Figure 8 A, B, C, D, and E
Repeat the steps from Figure 8, (flipping, aligning edges, and pinning), for the right and left edges of the frame and circle. (Figure 9A and 9B)
Then repeat the steps of flipping, aligning edges, and pinning for the remaining sections: Top left corner, top right corner, bottom left corner, and bottom right corner. (Figure 9B and 9C)
Once all edges are flipped, aligned, and pinned in place, the fullness of the outer edges of the frame will puddle on top of the pinned unit. The frame should look like a scrunched-up pile laying on top of the circle underneath it. (Figure 9D)
Lastly, check to make sure you have pinned right sides together all the way around the circle and that you don’t have any pieces of fabric twisted through the opening of the frame fabric.
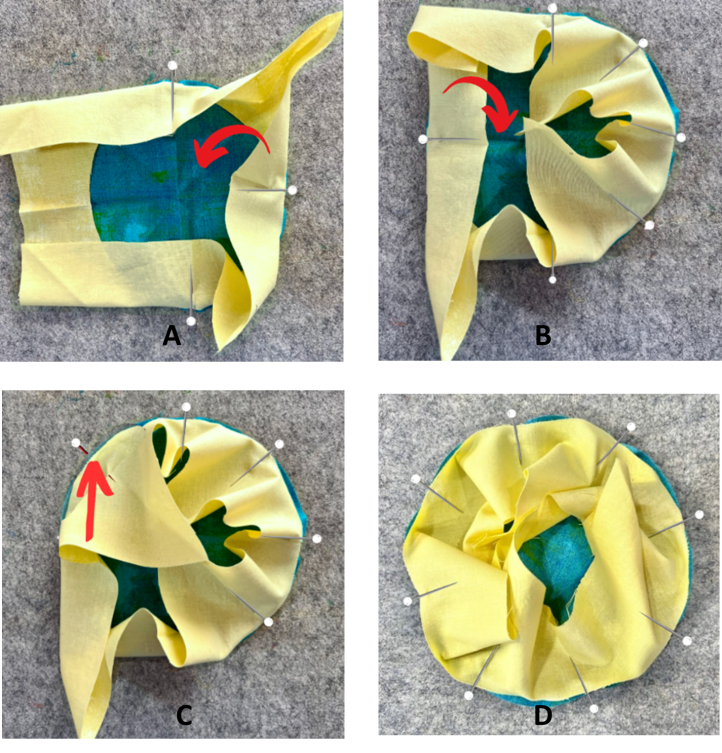
Figure 9 A, B, C, and D
The key to having a smooth inset circle unit and avoiding puckers is to stitch slowly, stopping to remove pins in the stitching path and to adjust fullness in the fabric, as needed, before continuing to stitch.
To prepare the pinned unit for stitching, place the flat part (the circle) on the bed of the sewing machine, leaving the frame fabric facing up. Position the edge of the circle in an almost straight line in front of the presser foot, allowing for a 1/4” seam allowance as you position the fabric under the presser foot, and adjust the top fabric (the frame) so that it is out of the way of the area directly in front of the presser foot. Using a 1/4” seam allowance, stitch slowly along the flat area of fabric directly in front of the presser foot. (Figure 10A)
Stop stitching as you approach any pins and remove them before continuing to stitch. In addition, stop stitching as you approach any fullness in the top fabric. The red X in Figure 10A shows an area of fullness in the fabric that will need to be adjusted, as well as a pin that should be removed, before continuing to stitch. (Figure 10A)
To help prevent fabric puckers, lift the presser foot, and adjust the fullness in the top fabric by gently lifting the fabric and moving it toward the back of the presser foot. (Figure 10B)
Once that fullness is adjusted and moved out of the way, there should be a straight and flat section of fabric in front of the machine needle, allowing you to continue stitching. Sometimes this may mean only stitching for 1” to 2” before reaching that next area of fullness, (or a pin). (Figure 10C)
Once you have stitched all the way around the circle unit, secure the ending stitches, cut the threads, and remove the stitched unit from the sewing machine. (Figure 10D)

Figure 10 A, B, C, and D
Place the stitched unit, right side facing down, on your workstation and gently clip into the seam allowance about every 1/2”, taking care not to clip the threads of the seam. (Figure 11A)
Place the clipped unit on the ironing surface, clipped side facing up, and press with the iron. (Figure 11B)
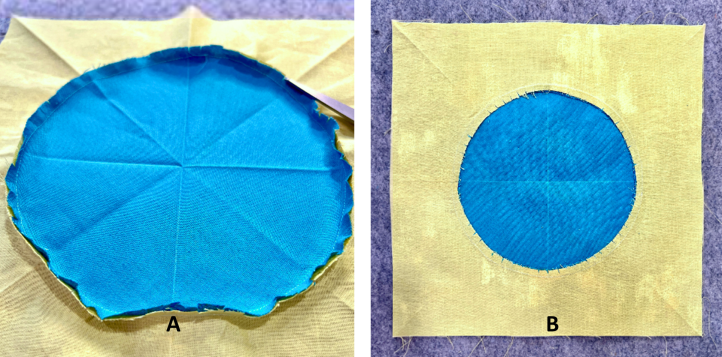
Figure 11 A and B
Flip the unit over to the front and press with the iron. (Figure 12)
Congratulations on completing your inset circle block using the Pinning Method!

Figure 12
The Freezer Paper Method:
Much like the pinning method, the freezer paper method involves cutting a circle of fabric from the center of a fabric square to create a frame for the inset circle, which is cut from a second piece of fabric and then stitched to the frame. However, in the freezer paper method, freezer paper is used to create the frame and for stabilizing both the frame and the circle prior to stitching, and there is a clear line on which to stitch, eliminating the need for an exact 1/4” seam allowance.
To begin, apply starch to Fabric A and Fabric B, then place the fabrics on the heat-safe pressing surface, and press flat with the iron until dry.
In the completed inset circle block, Fabric A, (green), will become the fabric frame, (i.e., the background fabric), and Fabric B, (orange), will become the inset circle. (Figure 1)
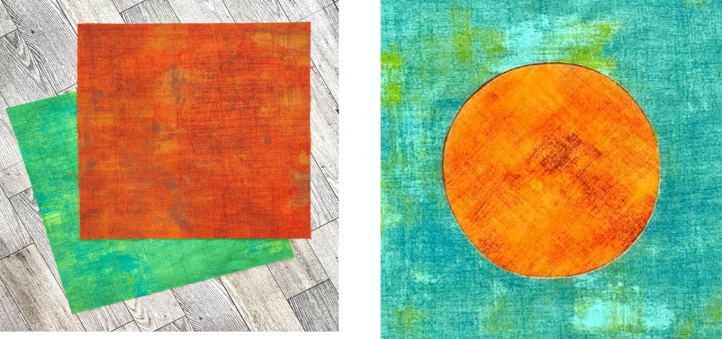
Figure 1
Using a ruler and pencil to measure and mark the paper side of the freezer paper, divide the freezer paper into four equal sections. (Figure 2A)
Measure 3” away from the center of the drawn lines and use the pencil to mark that measurement on each of the lines that run from the center to the edge of the freezer paper. (Figure 2B)
Using the compass, and the marked measurements as a guide for the compass, draw a circle with a 6” diameter. (Figure 2B)
Then, cut out the circle along the drawn line. (Figure 2C)
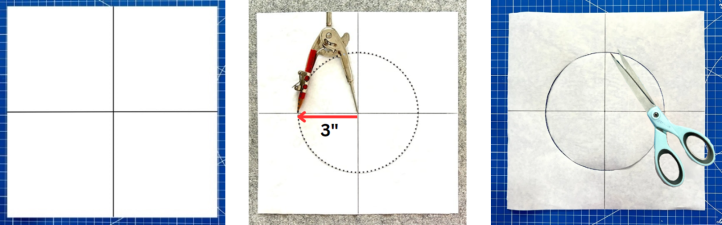
Figure 2 A, B, and C
Working with Fabric A, (the frame fabric), fold it into quarters, by first folding it in half and then in half again. The fabric will look like a square when folded into 4 sections. Use the heat-safe pressing surface and the iron and press on the folds to crease the 4 sections. (Figure 3)
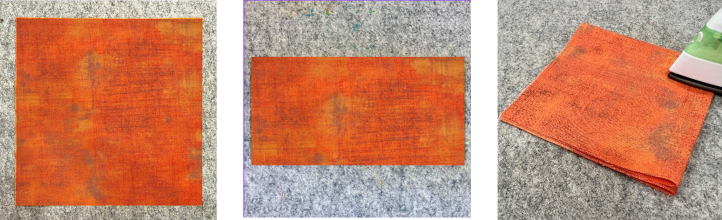
Figure 3
Place the creased fabric right side facing down on the heat-safe pressing surface, and center the freezer paper template, paper side up, on top of the creased fabric, lining up the creases of the fabric with the creases on the freezer paper. Using the iron, press the freezer paper to the fabric. (Figure 4A)
Using the fabric marking pencil, draw a line approximately 1/2” away from the edge of the circle cutout, (shown as a dashed line in Figure 4B).
Using the fabric marking pencil, draw a line approximately 1/8” away from the edge of the circle cutout, (shown as a solid line in Figure 4B).
Cut along the inner most line, cutting away the center of Fabric A. (Figure 4C)
Carefully clip into the seam allowance about every 1/2”, taking care not to clip the remaining drawn line. (Figure 4D)
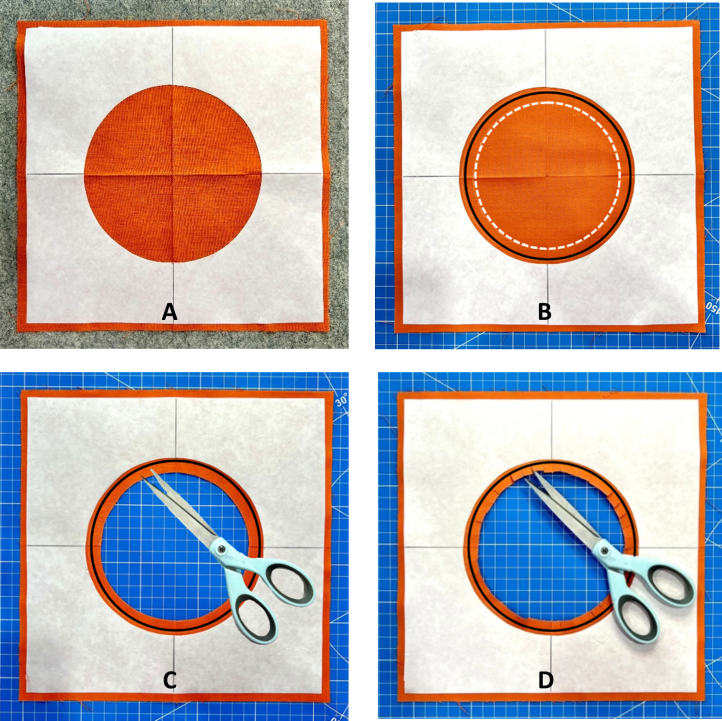
Figure 4 A, B, C, and D
Protect the heat-safe pressing surface from glue and use an applique pressing sheet to protect the iron from glue. Note: An applique pressing sheet was not used in these photos, (because glue and heat were not used when taking the photos), but an applique pressing sheet should be used when working with glue and heat to create the inset circle block.
Apply a light layer of glue on the underside of the clipped tabs and gently fold the clipped fabric up and over the edge of the freezer paper (Figure 5A); and cover the glued area with an applique pressing sheet, and LIGHTLY tack the folded edges in place with the iron (Figure 5B).
You will be removing the freezer paper, so it is important not to “cement” the freezer paper pattern in place with too much glue or too much pressing.
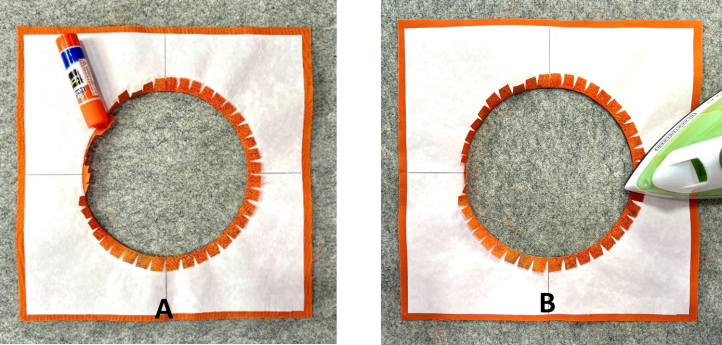
Figure 5 A and B
Use the ruler and the fabric marking pencil to draw two diagonal lines on the back of Fabric A, (the inset circle fabric). (Figure 6A)
Measure 3.5” away from the center of the marked X on the back of Fabric B and use the fabric marking pencil to mark that measurement on each of the lines that runs from the center to the corners. (Figure 6B)
Using the compass, and the marked measurements as a guide for the compass, draw a circle with a 7” diameter on the back of Fabric B. (Figure 6B)
Then, cut out the circle along the drawn line. (Figure 6C)
Handle the circle cutout gently to help lessen the chance of stretching its bias edges.
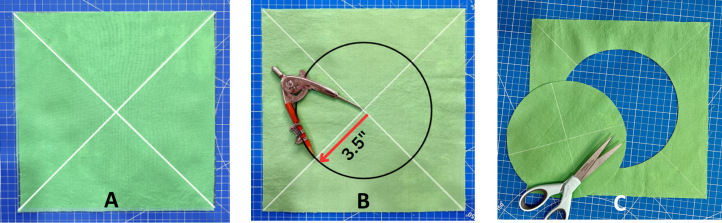
Figure 6 A, B, and C
Protect the heat-safe pressing surface from glue and use an applique pressing sheet to protect the iron from glue. Note: An applique pressing sheet was not used in these photos, (because glue and heat were not used when taking the photos), but an applique pressing sheet should be used when working with glue and heat to create the inset circle block.
With the clipped fabric unit on the heat-safe pressing surface, apply a light layer of glue on top of the clipped fabric tabs. (Figure 7A)
Center Fabric B (the circle), right side facing down, on top of the glued tabs. (Figure 7B)
Cover the glued area with an applique pressing sheet and press lightly with a dry iron to set the glue and secure the pieces. (Figure 7C)
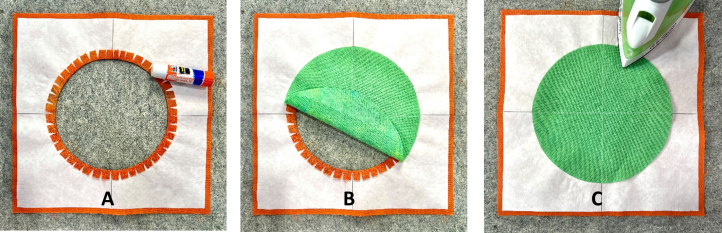
Figure 7 A, B, and C
Gently lift the glued circles away from the freezer paper. (Figure 8A)
If the fabric tabs and circle fabric become separated from each other during this step, stop and repeat the gluing and pressing step again, and allow the glue to set for a few minutes prior to trying to lift the fabrics away from the freezer paper.
Carefully pull the freezer paper away from the fabric, removing all of the freezer paper. (Figure 8B)
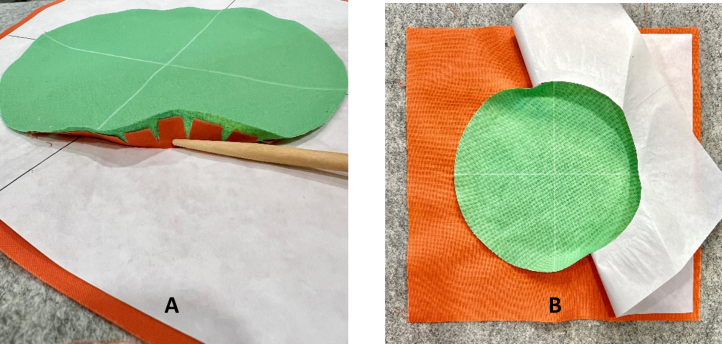
Figure 8 A and B
You will be stitching in the crease of the tabbed fabric and to help make that crease more visible, you may want to use the fabric marking pencil and draw a line in the crease. (Figure 9A)
To prepare the unit for stitching, place the flat part (the circle) on the bed of the sewing machine, leaving the frame fabric facing up. As you place the fabric under the presser foot, position the edge of the circle in an almost straight line in front of the presser foot, with the crease (or your drawn line) in line with the needle, and adjust the top fabric (the frame) so that it is out of the way of the area directly in front of the presser foot. (Figure 9A)
Stitch slowly along the flat area of fabric directly in front of the presser foot. Stitch in the crease or, if you chose to draw a line in the crease, stitch on that line. (Figure 9B)
Stop stitching as you approach any fullness in the top fabric. The X in Figure 9C shows an area of fullness in the fabric that will need to be adjusted before continuing to stitch. (Figure 9C)
To help prevent fabric puckers, lift the presser foot, and adjust the fullness in the top fabric by gently lifting the fabric and moving it toward the back of the presser foot.
Once that fullness is adjusted and moved out of the way, there should be a straight and flat section of fabric in front of the machine needle, allowing you to continue stitching. (Figure 9D)
Sometimes this may mean only stitching for 1” to 2” before reaching that next area of fullness.
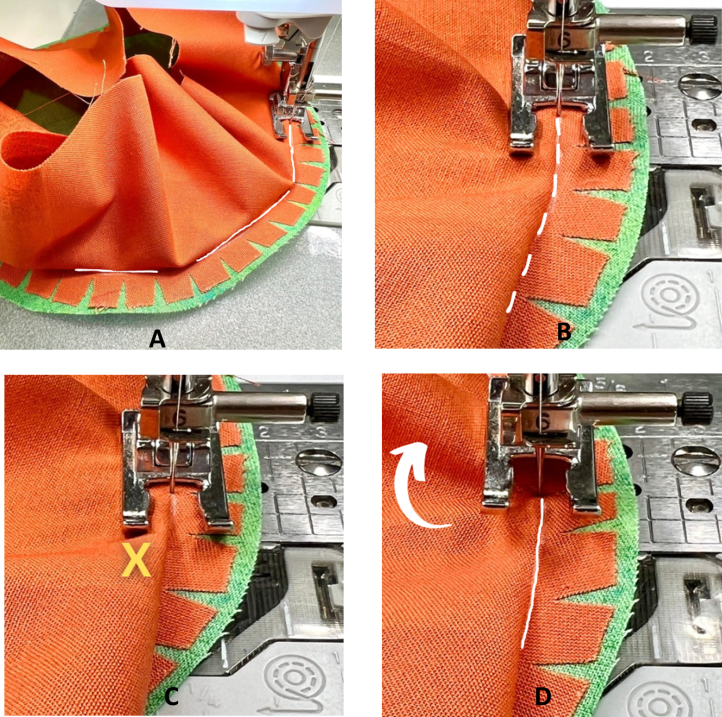
Figure 9 A, B, C, and D
Once you have stitched all the way around the circle unit, secure the ending stitches, cut the threads, and remove the stitched unit from the sewing machine. (Figure 10A)
Carefully trim the seam allowance to approximately 1/4” wide, taking care not to clip the threads of the seam. (Figure 10B)
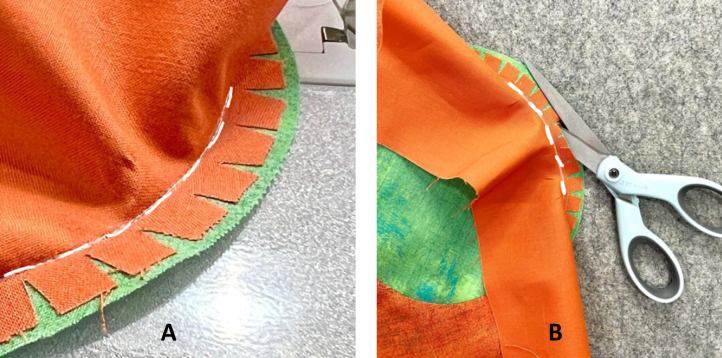
Figure 10 A and B
Place the clipped unit on the heat-safe pressing surface and press with the iron.
Congratulations on completing your inset circle block using the Freezer Paper Method!
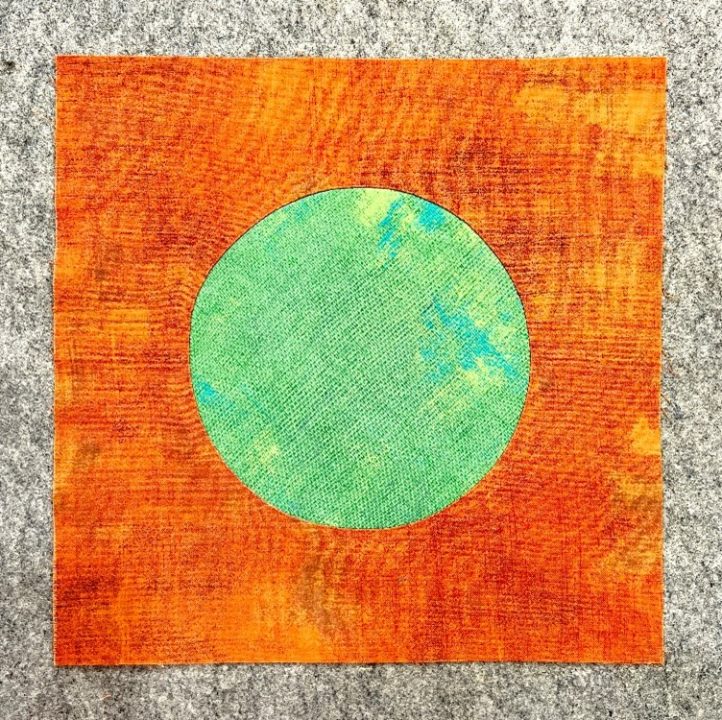
Figure 11
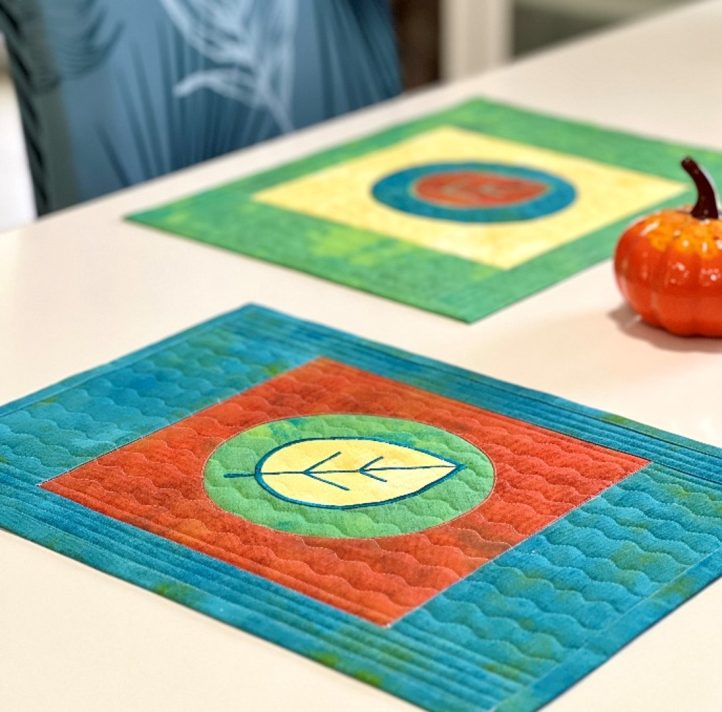
With just a bit of practice, sewing inset circles is surprisingly easy! It’s a fun way to add a unique touch to your projects. Inset circles can be used in all sorts of creative ways—think colorful pillows, stylish tote bags, eye-catching quilts, trendy jacket backs, and even cute placemats. They really add a pop of personality and can turn a simple piece into something special. Enjoy using your inset circle blocks in your next creative project! (Figure 12)
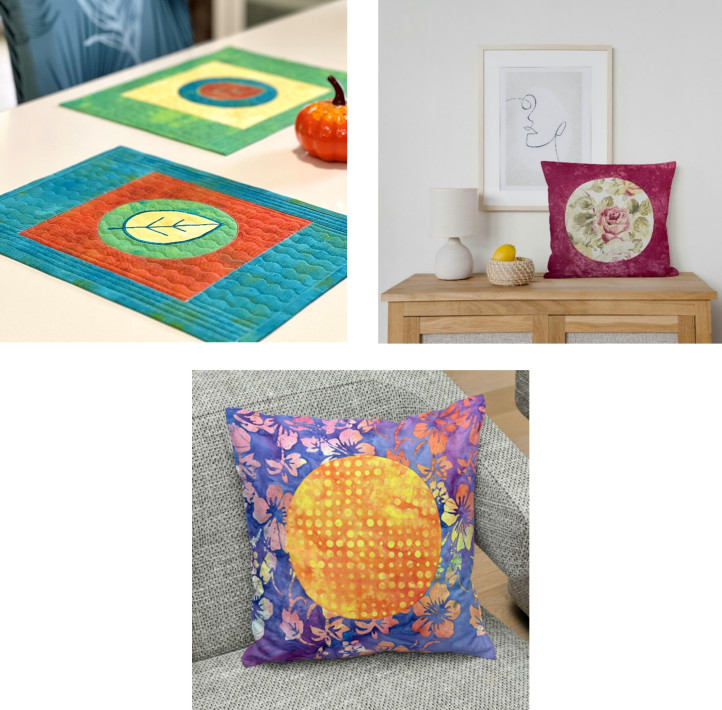
Figure 12
Love learner tips and techniques.
We’re so glad you enjoyed this article, Carol 🙂 Have a great day! – Ashley, We Like Sewing