
What is a FBA?
A FBA (full bust adjustment) allows you to adjust your sewing pattern so it fits over your bust. This adjustment is for the fuller busted woman. This is usually a C cup and above.
A FBA (full bust adjustment) is done on the front pattern piece only to create additional width and length over the bust (at the front only). The circumference or girth of your body is bigger only at the front over the bust. And the front length of your body is longer from shoulder (over the bust) to waist. This can be done on woven and stretch fabrics. Both are approached a little bit differently.
Why Do a Full Bust Adjustment on a T-Shirt If It Stretches Over the Bust Anyway?
T-shirts, although made from a stretch fabric and tending to be non-darted, can vary in styling a lot.
T-shirts can range from a very loose-fitting oversized t-shirt (lots of ease) to semi-fitted or to very fitted and tight (zero or negative ease) on the body.
Ease can be defined as how much bigger or smaller the finished garment is than your body measurements. This affects the fit and look of the garment.
Finished Garment Measurement – Body Measurement = Total Amount of Ease in Pattern
The fit/styling of the t shirt and the amount of stretch in the fabric affects the overall fit of the garment.
A t-shirt that has less ease or zero ease is more likely to need a Full Bust Adjustment (FBA) for a woman who has a larger bust.
So if your t-shirt pattern style is tight or fitted (if you compare the finished garment measurements table to body measurements table on the sewing pattern), the ease can be worked out.
Finished Garment Measurement – Body Measurement = Total Amount of Ease in Pattern
This is something to consider when buying a pattern.
Working Example of a FBA
The mannequin featured in the photos below has a 39” Full Bust measurement. The high bust measurement is 36”.
I have chosen a pattern with a Full Bust of 36” (Size 14 pattern UK in this example).
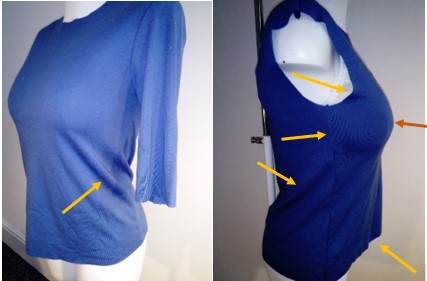
I have made a toile (also known as a mock-up or muslin) to demonstrate this.
The t-shirt is a good fit on neckline, shoulders and waist area, suggesting we do not need to go up a size. It is just the bust area which is too small creating fit issues on the toile. This is because the bust measurement is bigger than the pattern measurements creating the following fit issues:
- Diagonal drag lines under bust.
- The bust is pulling the side seam forward, which pulls the back forward as well.
- Fabric is stretched and pulls tight across bust.
- Front of the garment rides up, lifting the front hem.
- Armholes has been pulled forward by the bust. I have left a sleeve out to demonstrate this on one side of the toile.
How to Work Out If You Need a FBA
An indicator that you need a Full Bust Adjustment (FBA) is if your Full bust measurement is larger than the sewing pattern size you need.
Below explains how to work out your pattern size.
On your sewing pattern envelope or information section, there will be 2 tables of measurements to help you work out your pattern size you need. These are:
- Body measurements table
- Finished garment measurements table
To find the correct size pattern, you will need YOUR body measurements to compare to the pattern body measurements.
Body Measurements Needed For Your FBA
Your body measurements are used to calculate FBA.
Tip: Ensure when measuring you are wearing the bra that you will be wearing with the finished garment. Different styles of bra can affect the proportion, position, size and shape of your bust. This then affects how your t-shirt fits.
MEASUREMENTS NEEDED:
Do not take measurements over clothes. Take them over underwear.
- HIGH BUST: Taken with tape measure wrapping around back, then coming under armholes to your front. Tape measure must not be too tight or slack. Tape measure will dip slightly at back. Ensure shoulders are not hunched up and are relaxed.
- BUST: Taken with tape measure going over fullest part of bust straight across back (wearing a bra).
- SIDE NECK TO BUST POINT: (Also known as bust apex) This is where your bust is at its most prominent or fullest. This is usually marked on your pattern. Compare yours to the pattern. Move if it is different or mark on pattern accordingly.
Tip: Do check your Nape (center back neck) to waist measurement is correct before doing an FBA and adjust accordingly on pattern. This ensures that waist position is correct on pattern before starting an FBA.
HOW TO CHOOSE YOUR PATTERN SIZE:
- Use your high bust (HB) measurement to help you choose your correct size pattern. For example:
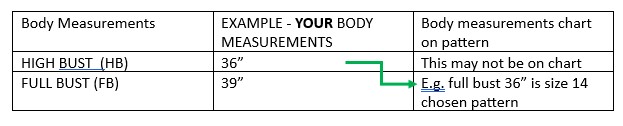
- On the example above, you would choose Size 14 pattern with a full bust of 36″. We know this pattern is too small in the full bust area but the correct base size for creating our FBA.
- Next step is to copy by either tracing off (if using a tissue pattern) or printing off (if using a PDF pattern) of the front t-shirt pattern piece. Note on a symmetrical garment such as a t-shirt, this is likely to be on the half pattern (Place to fold at CF). This copy pattern will be used to create your FBA.
WORKING OUT YOUR FBA:
This is worked out as follows:
Full Bust (FB) – High Bust (HB) = Full Bust Adjustment (FBA)
EXAMPLE:
39″ – 36” = 3” FBA
This is 3” to add to front pattern only. As mentioned earlier, if the pattern is symmetrical, we will work on the half pattern which is total FBA divided to 2. This looks like this 3” divided by 2 = 1 1/2″ FBA on half pattern.
There are several ways to do an FBA on a t-shirt. This method increases fabric at the bust area while maintaining the styling of the t-shirt by introducing a bust dart.
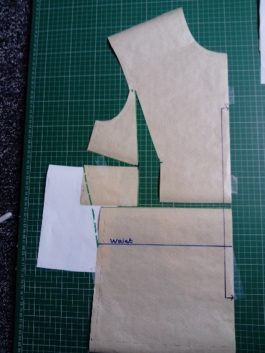
- Trace off your size front pattern as worked out previously. Do include correct bust point position (marked with cross on pattern) and waist position.
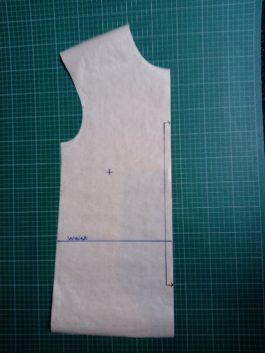
- Draw a line parallel to waist seam approximately 2 to 3 inches above waist seam. This is shown with green line.
- Cut along green line. We will now be working on top part of pattern. Put lower part of pattern aside for the moment.
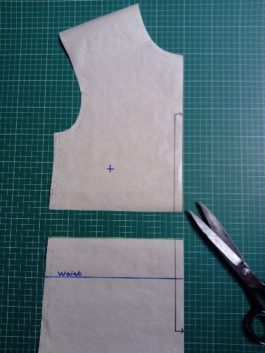
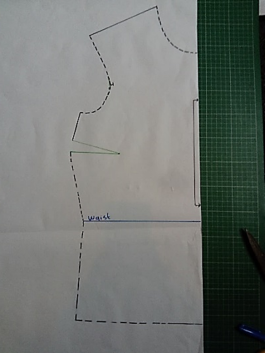
- Pictured is the top part of pattern we will be working on.

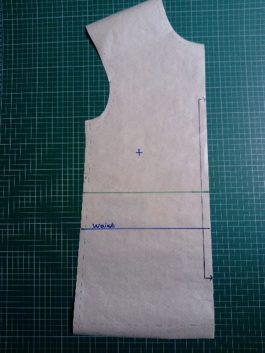
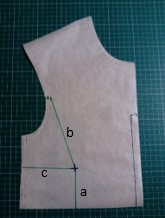
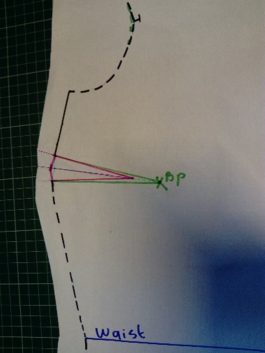
- Mark the 3 following lines from bust point (BP) (blue cross on pattern):
- BP to lower pattern edge. This line must be parallel to center front.
- BP to mid armhole seamline. This is usually where sleeve notch is.
- BP to a point 2 to 3 inches below the armhole. This line is going to be the position for bust dart. I have gone straight across from bust point.
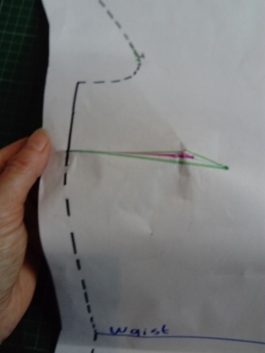
- Cut carefully line a to BP then line B to seam line. Snip seam line from other side of armhole, leaving a pivot point. Be careful not to snip through. You can reinforce with some scotch tape before if you like.
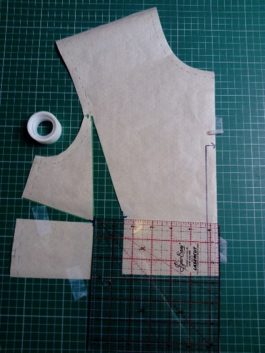
- Cut line C to almost BP, leaving a pivot point. Now carefully open up your FBA amount as worked out previously. In this example, it is 1 1/2 inches. Note line a remains parallel to center front. Line C will automatically open up to create a bust dart. I have taped the pattern to mat to hold in place.
- Place lower section under top portion of pattern piece. Line up center front. Note there will be a gap between top and bottom pattern parts. This is correct, as this is adding length through the front of your garment. Yours may be different to the example and that’s ok.
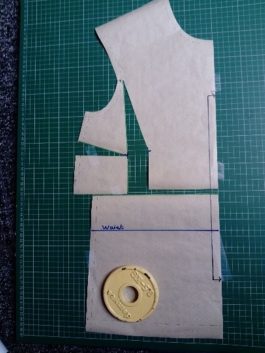
- Smooth in side seam from bust dart to waist line as diagram shows. I have placed a piece of copier paper underneath pattern pieces; use a soft curve shape, taking some off top and adding a little to lower pattern piece.
- Trace off pattern piece. Do check your front armhole shape and smooth curve in if it has become distorted.
- Draw in bust dart. Note the bust dart apex will be approximately 2 inches from bust point. New dart is shown in pink. Check that dart legs are equal length.
- Fold in bust dart to check side seam smooth curve and dart folds are okay.
COMPLETED TOILE (MOCK-UP) AFTER FBA WITH BUST DART:
As with any pattern alteration, it’s definitely worth doing a toile. This gives you chance to check the fit and make any further adjustments without cutting into your best fabric.
When doing a t-shirt toile, do try and use similar quality fabric to achieve the same fit results with your final garment.
