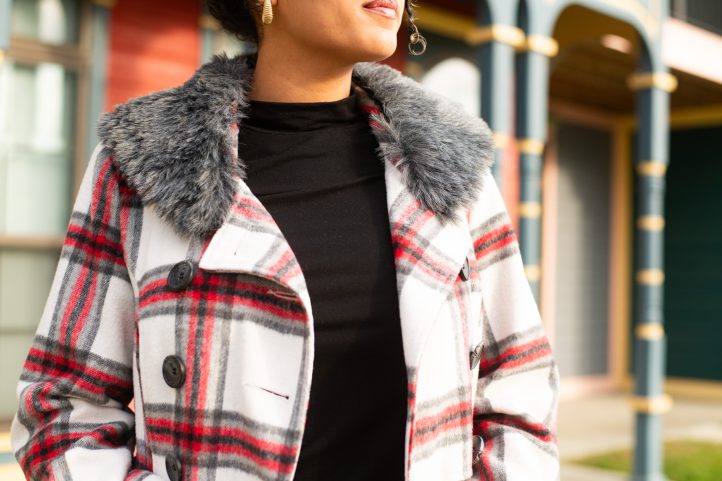
Cozy soft and wonderfully comfortable against your skin, it’s always an eye-catcher and protects against the chilling winter cold, yet… it’s completely fake. I’m talking about that great pretender, imitation fur, also known as faux fur, fake fur, or hobby fur. In fact, it’s not fur at all but a warp knit with a plush pile.
Imitation fur is the vegan-friendly alternative to real fur and instantly makes your outfit a little more luxurious. Top-grade processed imitation fur looks almost indistinguishable from real animal fur. Or, if you prefer not to glamorize animals used for fashion, dyed and printed imitation furs are just as soft and suitable for use in eye-catching fashion creations and creative home décor ideas. For your hobby projects, theatrical costume designs, cosplays or fursuits requiring sculpting or dyeing of the fur, there are whole ranges of imitation furs to choose from, with a lower weight (g/m²) for more comfort when worn and vibrant fashion colors for visual and textural appeal. These modern specialty-knit fabrics are more affordable than real fur, they can be used in many design applications, and offered in a wide range of choices of animal skins, pile lengths, colors, textures and patterns.
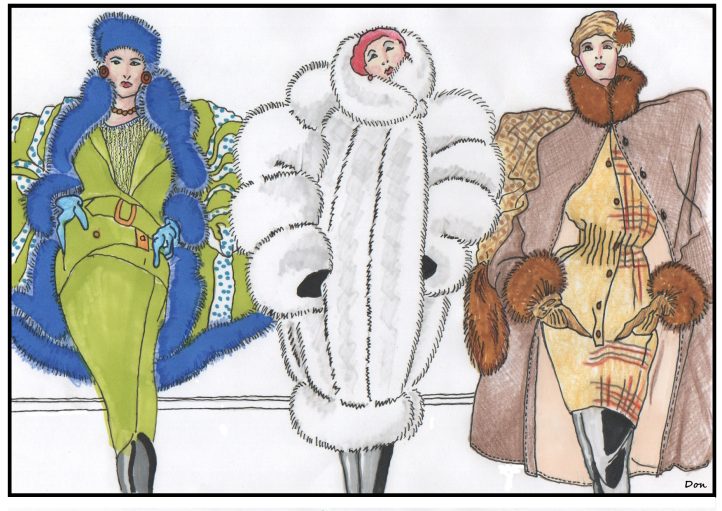
A Fabric That Is Easy to Work With (Yes!)
Despite what one might think, working with imitation fur is not so difficult. This is especially true for many types of imitation fur as they are made on a knitted backing or a felted woven backing. This means it is a stable medium to work with and does not require overcasting after cutting. Also, imitation fur fabrics are very durable and do not easily shed hair, which guarantees a longer life for your creations.
Fur can be sewn by hand, simply with thread and needle, as well as with a standard sewing machine, equipped with standard thread and needle. This does not require any special equipment or technique, sewing imitation fur is accessible to all sewers/crafters as the skill level required in basic!
As a result, with imitation fur, many creative projects can be realized, for example:
- Outerwear, jackets, coats, vests, sweaters, hooded sweatshirts
- Trimmings for leg-warmers, mittens, scarves, snoods, capes, sleeves and hemlines
- Chapkas, berets, toques, pom-poms
- Bags, tote bags, fanny packs, backpacks, pouches, purses, etc.
- Historical costumes, theater and opera costumes
- Disguises, masks, mascots
- Special effects, fantastic creatures and animals
- Dolls, teddy bears, cuddly toys
- Partial or complete fursuits
- Cosplays: Accessories, complete outfits, nekomimis, tails of all kinds
- Area rugs, cushions, throws, blankets
- Upholstery: Sofas, chairs, armchairs, stools, footstools
- Pet beds for dogs and cats, cat trees
Construction Methods for Imitation Fur
When working with plushy pile fabric, you cannot use traditional clothing construction seams, with the fabric right sides together, as you would for dressmaking or tailoring.
Imitation fur one uses either the cut-edge approach or the turned-finish approach.
Imitation furs with knit backings generally use the cut-edge method to join edges creating low-bulk, invisible seams. There is no seam allowances involved and each fabric piece is butted edge-to-edge and sewn by hand, with needle and thread, in the same manner that a furrier would do. Then, with wrong sides up (knit), the seam is spread out and flattened with a seam creaser. Finally, the fur is brushed over the seam on the right side (fur) to hide the seamline.
For imitation furs with felted woven backings, one would use the turned-finish approach. Its backing tends to ravel and is not very strong when cut. With this method, the seam allowances are shaved. The shaved seam is closer to a traditional seam, but in order to place the fur with right sides together, you need to remove the pile from the seam allowances. With a beard trimmer or other type of clipper, shave the allowances in two or more passes, and vacuum frequently during this process.
With a standard sewing machine, equipped with standard thread and a universal needle, imitation fur with woven backings can be sewn in the same manner that typical garments are made. Seams can be opened and flattened with a seam brayer and then graded and hand-stitched down.
Both construction methods do not require any special equipment or technique, but are laborious in nature yet the skill level required in basic.
Creating a Workable Pattern for Imitation Fur
Let the beauty of the fur shine! Create a simple design with limited seams and no excess pleats, gathers, or darts. Eliminate all surface detailing and keep hardware to a minimum.
Decide whether you will use the cut-edge or a turned finish in the construction. Keep the styling lines simple in design as most often the sewing is done by hand. Keep it simple and let the beauty of the imitation fur be the star!
ALTERING A COMMERCIAL SEWING PATTERN:
Consider that imitation fur fabric is often thick and therefore bulky, especially if you are adapting a pattern that was not originally intended to be made with fur. As any kind of fur is directional in appearance, it is advisable to eliminate any horizontal seams if possible. For example, if your garment pattern has a shoulder yoke, simplify its construction by taping or gluing the yoke pattern piece to the body pattern piece to eliminate a seam. Always follow the one-way direction of the pile. If the seams run vertically, they will be invisible on the outside of the garment and look attractive.
Likewise with any darts, try pivoting any horizontal dart into a vertical position or seam to hide it. Eliminating bulk is crucial. A gathered sleeve into a cuff, for example, should be altered by removing excess fabric by way of a row of vertical darts or cut-out pleats to fit the width of the cuff instead of gathering. Eliminate bulky patch pockets by having in-seam pockets at the side seams instead.
Due to the fact that imitation fur is not sewn in the conventional way, you’ll need to remove all seam allowances in key areas of the pattern. Also, cut out the dart value, also called dart returns, for vertical and side darts. Don’t remove the hem allowances. For front facings, eliminate the center-front seam and create a cut-on facing instead. This reduces bulk along the opening edge.
CONSIDER MIXING FURS:
Consider designs that offer the opportunity to mix different furs. For example, a simple wrap coat with a wide shawl collar can combine short-hair fur in the body of the coat, with longer pile fur in the collar.
FINALIZING YOUR PATTERN:
Once you have made all your alterations to your pattern, trace out any cut-on-fold pieces (often a garment back, collar back seams, etc.) onto fresh sheets of folded paper to produce one whole garment piece, as fur will be marked and cut in a single ply. Remember to flip pattern pieces that are cut 2X for a left and a right piece.
Before cutting the imitation fur, I recommend to “proof” the pattern with a muslin test garment. A fur jacket or coat should have more ease than a similar garment in a lighter, less lofty fabric, so don’t over-fit.
Examining Your Goods
As mentioned earlier, imitation fur’s manufacturing method is as a warp knit, one side of the fabric being knitted and the other side having a pile. When using a fur pile, you must treat it as a one-way directional fabric, as you would for napped fabrics. Naturally, the length of the hair will make a difference to the final look. Imitation furs are available in short-haired, medium-haired, and long-haired versions, but they are all textile goods (knits) meaning they come in wide fabric widths and their fabric thicknesses are uniform, unlike real fur. This also means it is economical with very little waste.
Primarily, “nap” is the raised (fuzzy) surface on certain kinds of cloth, such as velvet or corduroy. The term “pile” refers to raised fibers that are there on purpose, rather than as a by-product of producing the cloth, as is the case with imitation fur. Furthermore, nap typically has a direction in which it feels smoothest (downward stroke). In garments, nap direction is often matched across seams because cloth will not only feel but look different depending on the direction of the nap and how light reflects off of it. For this reason, sewing patterns frequently show the nap direction, or warn that more fabric yardage will be needed if the fabric has a nap or pile.
Make certain that the fur will lie in the proper direction on your design. Hold the fur up and look to see where the hair naturally falls. Check the direction of the pile: all imitation fur fabrics have a dominant sense of pile that must be respected in relation to what you want to sew. For example, to sew a garment that hangs from the shoulders, the hair falls from the head to the feet, so when you prepare the right, left, front, back parts of your garment, all the pieces will have to have the hair lying in the same direction. Same for the sleeves, the hair goes downward from the shoulders to the hands.
How To Mark Out Your Pattern
To begin, don’t forget the direction of the pile: Mark a big arrow on the backside of the fur to indicate the direction of the nap/pile. Place all pattern pieces head-to-toe following the direction of the arrow.
Always work on the backside of the fur fabric (backing is face up), it will be easier to trace your pattern and make your cuts. For your markings, you can use a soft-lead pencil for lighter fabrics (the reverse side of the fabric is usually the same color as the face/hair side), or a tailor’s waxed chalk for darker fabrics.
Begin with your largest piece and work in descending order, following the straight grain of the knit fabric (eg. parallel to the selvage). The elasticity of the warp knit should be greatest across its width. Hold your pattern down with pattern weights. While many people use dressmaker’s pins to hold their pattern pieces in place, using pins can pinch and distort your fabric, and significantly affect the final shape and fit. Also, the fur backing is thick, so a heavy book is a better alternative. This substitution has the added benefit of making your pattern pieces easy to position and reposition quickly. You can use just about anything heavy as a pattern weight, such as large metal washers or bean bags.
Trace around each pattern piece and note how many of each piece is needed (eg. cut 2X means trace the pattern piece, flip it over, reposition it, and trace it again, for a total of 2). If you are using more than one faux fur fabric in your design, ensure that the correct pattern pieces are used for each faux fur.
How To Cut Imitation Fur
You might be tempted to cut the imitation fur with scissors or a rotary cutter like you would for any knitted jersey weave. An art-knife (X-acto knife) or even a safety razor blade will do a better job, just follow these few tips to make a perfect cut …
The two biggest fears when cutting fur are:
- making mistakes when cutting, resulting in waste with a relatively expensive fabric.
- cutting through the hair and giving the fur a haircut, which gives a less beautiful finish to the seams.
To get around this, here’s how to do it:
- use only a sharp art-knife with a fresh blade or safety razor blade.
- ideally place yourself on a carpet mat, which will prevent the hair from flying everywhere. (I use a small non-slip door mat on my cutting table and do my cutting on top of it.)
- place the fur, hair down, on the work surface and have the knit backing face up in front of you.
- while following your cutting line, pick up the fabric and make a blade slice cleanly through the knit backing and enter as little as possible into the fur; pull the excess material away from your cut as you go.
- cut on the inside of the line as the chalk adds thickness to the lines.
- proceed slowly, in small successive cuts/slashes, until you finish your cut.
- detach your cut-out from your main fabric, proceed slowly so as not to make hairs fly everywhere.
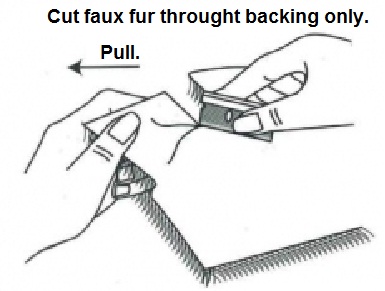
You may see some hairs that fall out after cutting, it’s normal, they got in the way. To remove them, “pull them out” all along your cut. You just have to pull on them by small handfuls, without pulling too hard, and all the hairs that have been cut will come off easily. Those which were not cut will remain perfectly fixed, do not worry. Gently “comb” the fur on the edges of the cut sections towards the center of the fabric piece to remove any stray unwanted hair.
After each cut, put the knife in a safe place, and then vacuum along the edge you just cut to collect any loose hairs. This keeps your work space and your clothing fuzz-free, with minimal cleanup needed once all the garment pieces have been cut.
Fur Preparation
VERSION 1: STAY TAPING:
Just like real fur, imitation fur has “give” and edges may stretch out of shape when handled. In such a case, stay-taping the edges will solve that problem as well as provide a secure edge to sew.
Using narrow stay-tape (1/2-inch or 12 mm wide), baste the tape along the outer edges of the fur pieces. (fig.1)
Use long stitch lengths and a single-strand of waxed thread.
For a desired finished edge on fur pile, sew a wide stay tape (3/4 -inch or 20 mm wide) along the taped edge of the fur. This time the stay-tape is applied on the hair side of the fur and the edge is whip-stitched, encasing both tapes and the raw edge. (fig. 2) To complete, fold over the wider tape over the stitched edge and baste it to the back of the fur with long basting stitches. Do not worry, the hair will hide the long stitches and the finished edge is neat. (fig. 3)
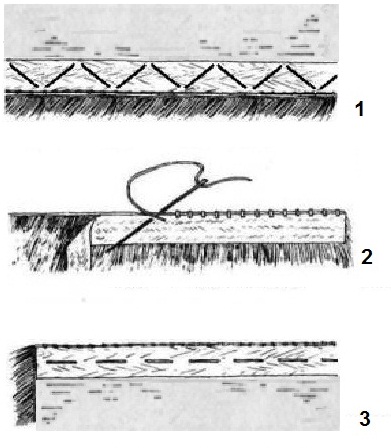
When the fur has been properly taped, the stitches will say in place without trouble and stabilize the edge. Make sure the imitation fur is completely prepared for sewing before you begin the assembly.
To give body to the silhouette and to protect the fabric lining, you may want to interline the fur material. A needle-punched polyester fleece fabric or flannel cotton are ideal for this and is available in a variety of weights and thickness. Hand-baste the interlining to the back of the fabric with long stitches. For a desired finished edge to the fur, tape the edge as described above and fold over the tape to encased the raw edge of the interlining and baste down with long stitches.
VERSION 2: SHAVED SEAMS:
For the turned-finish method, a standard sewing machine is used in the construction and is perfect for imitation furs that have a woven backing. Trace out and cut the pattern pieces needed for the garment in the manner described above, using a sharp blade.
The seam allowances are required to fit under the pressure foot so it helps to ensure the bulk created by the fur pile is eliminated between the layers of fabric. This is done by shaving the seam allowances with an electric razor. Care needs to be taken not to catch the cutting blades in the backing or stray to close to the stitching line. Take your time to prep the seam allowances properly for best results. You won’t need to use stay-tape on this type of fur preparation.
Before you begin shaving, test your clippers on a scrap to make sure you have the right blade length snapped in, or the right guard length installed for the fur length you desire. With the fur direction going away from you, trim the fur in vertical rows pushing the clippers away from your body and keep within the width of the seam allowance (5/8-inch). Hold the clippers stable with the flat bottom of the clippers flat with the fur’s backing. Avoid tilting the blades too extremely during this process. Keep it approximately a 30 degree angle.
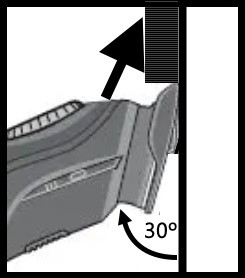
Depending on the size of the piece you are trimming, clean your blade between each step with a nylon brush or similar stiff bristled brush to keep loose fur clear of the cutting mechanism. If you need to oil your blades in the middle of these steps, be sure to wipe any excess oil off with a soft cloth. Be cautious if your blades are heating up as well, it can reduce cutting performance. Cordless hand vacuums are very good tools for handling the fluff.
Keep a vacuum cleaner nearby as you shear the seam allowances to keep your work area clean. And don’t forget about yourself… an apron or work smock comes in handy.
How To Sew Imitation Fur By Hand
You might think that it is very complicated to sew fur, but just follow these few tips to get the best professional results on how to join edges to create low-bulk, invisible seams that will be hidden under the fur.
You will need:
- Ball-point hand needle or tailor’s betweens
- Polyester or nylon thread
- Metal or leather thimble
- Beeswax
- Quilter’s clips
- Wide-toothed comb or pet brush
Here are the 3 very simple steps to follow:
First secret of a successful sewing: Prepare your work well.
Prepare your work by always working on the backing side of the fabric. Stay-tape all cut edges of the knit backing.
With fur sides together and using quilter clips to hold the layers together, place the first clip at the begin of the seam, hair running downward, then push any visible hairs in the seam towards the inside of the seam with the tip of your seam creaser. Do one small section at a time. Place a second clip 2 – 3 inches away from the first one.
Then, push the hairs back and tuck in any more stray hair between the two layers and place a new clip to hold the edges together. Proceed in this way along the entire length of the seam that you are going to sew.
Permit yourself to work slowly and to place as many quilter clips as needed. The more clips you have, the more easier your sewing will be.
Sewing the seam.
Sewing fur by hand is very easy too! To do so, you will make a whip-stitch, which is one of the basic sewing stitches. This type of stitch is ideal to use when sewing fur by hand as it is strong and very easy to perform. Start by drawing your thread through the bee’s wax to lubricate the thread. Wax can smooth fibers, add weight and thickness to thread. This leads to fewer tangles while sewing and reduces friction. A thimble can help push the needle through the material.
The Whip-Stitch
- Taking two pieces of imitation fur, place them fur side together and align the taped edges to one another. Place a quilter’s clip at the start and end points of the seam. Add supporting clips between the 2 first clips.
- Take a needle and waxed thread, enter perpendicular to the edge from the back of the fabric of the first layer (1). Pull all the way through until the knot stops in the fabric. As you sew, try to catch the edge of the stay-tape as well in your stitching.
- Enter the second layer of fabric from the face side keeping close to the edge and including some of the stay-tape (2). Then, pull through both layers and loop over the edge and go through the back of the first piece again and repeat.
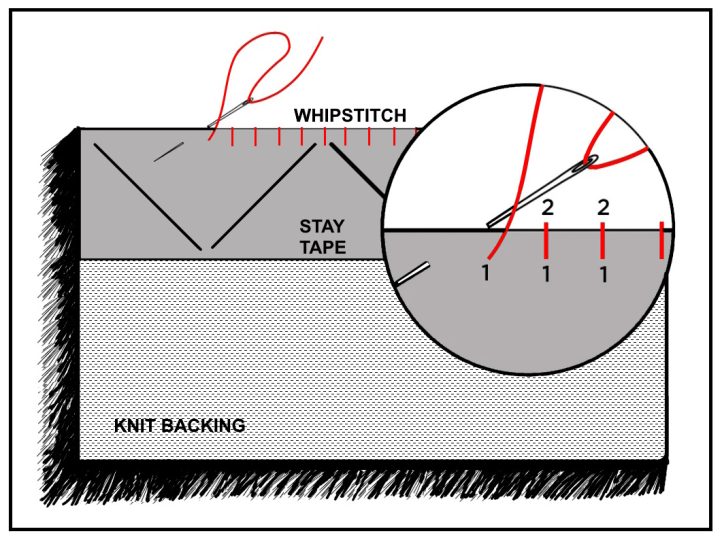
- Repeat as often as needed until the seam is finished. Keep your stitches small and uniform.
Finishing the seam.
With wrong sides up (knit), the seam is spread out and flattened with a seam creaser, leaving an edge that is low-bulk and an invisible seam from the face side of the fur.
Turn your work over, and comb (very delicately) the hairs along the seam. This will allow you to remove hairs that have fallen out. You can also pass a velvet upholstery brush along your seam to remove any stray fluff.
Then, using the point of a straight pin, pluck out the last hairs that would have gotten stuck in the seam. Finally, brush the seam hairs with a pet brush to smooth out the hairs that were bent in the seam, for an absolutely perfect look. The pile will hide the seam therefore invisible to the eye.
How To Sew Imitation Fur By Machine
You might think that it is very complicated to sew fur, but just follow these few tips to get the best results.
Here is the material you will need:
- A sewing machine with jersey needles (size 90 universal needles are also very suitable)
- Standard polyester sewing thread
- A pair of thread snips
- Ball point straight pins for knits (many sewing pins)
- A point/seam creaser
- Metal comb or pet brush
Here are the 4 very simple steps to follow:
First secret of a successful sewing: Secure the seam well.
Prepare your work by always working on the backing side. Imitation fur fabrics do not fray, so there is no need to overcast the edges of your fabric but the seam allowances must be sheared to have a flat surface to match together.
To perfectly sew imitation fur, even when you’re a total beginner, the secret to success is to tuck the fur in along the seam. For that, your best ally will be a small object like the blunt end of a seam creaser, which will be used to push/tuck the hairs back inside the seam. Ideally, this tool should be very thin, about a half-inch wide and a maximum length of 8 inches. You can also use a small metal ruler, a small spoon handle, a crochet hook, handle of your tweezers … whatever is handy.
- Comb the fur along the seam allowance towards the center of the cloth and away from the seam allowances. With right side together, align and match the seam along the edge.
- Place the first straight pin at the beginning of the seam directly on the stitching line and perpendicular to the stitching line, then push the hairs towards the inside of the seam with your seam creaser.
- Place a second pin approximately 2 inches away from the first one, tucking in the hairs back again and place a new pin.
- Proceed in this way along the entire edge that you are going to sew.
- Do not hesitate to work slowly, and to place many pins. The more pins you have, the more secure your sewing will be.
The second secret to successful sewing: Work gently.
Place your work under the presser foot of the sewing machine, choose a longer than normal straight stitch with a length of 3 to 5. Start sewing along the stitching line about 1/2-inch, then push the hairs back inside the seam (again) very evenly, as you remove the pins. Sweep the seam creaser between the seam allowances and push in the stray hairs into the seam. To make a perfect seam, you will have to move forward very slowly, stopping every inch or two. Tuck back the hairs, remove a pin, sew, push back the hairs, remove a pin and so on.
Third secret of a successful sewing: Grading the seam allowances.
Once your seam is finished, cut the threads. Carefully run your hand over all your seams to make sure you have removed all the pins. Finger-press the seam open and grade one of the seam allowance by half its width. Fold the seam allowances all to one side and hand-stitch the edge of the seam allowance to the back of the fabric.
Use a herringbone stitch, traditionally used to secure one fabric to another so that it “floats”. You can make large stitches as the thread will not be visible on the fur side of the cloth.
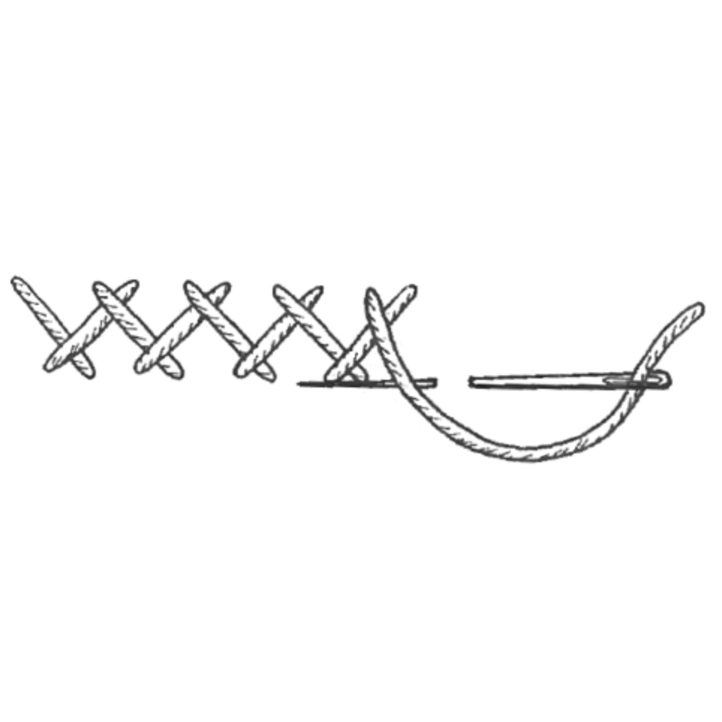
The fourth secret to successful sewing: Take care of the finishing touches.
For a really perfect seam: turn your work over, and comb (very delicately) the hairs along the seam. This will allow you to remove the last cut hairs that have not yet fallen out. You can also pass a velvet upholstery brush along your seam to remove any fluff.
Then, using the point of a straight pin, pluck out the last hairs that would have gotten stuck in the seam. Finally, brush the seam hairs with a pet brush to smooth out the hairs that were bent in the seam, for an absolutely perfect look.
How To Avoid Putting Hairs Everywhere
Generally imitation furs are very strong and do not shed hair. The only hairs that can come off are those located along a cut. So to achieve a perfect job without any hair falling out and without putting hair everywhere in your home, I recommend following these tips:
- When you handle imitation fur fabric make slow gestures, do not shake it, unfold it gently to prevent the cut hairs from flying away.
- Make your cuts on a carpeted area where you cut. This will make it easier to vacuum up the hairs attached to it.
- Keep a velvet brush close at hand to remove any hair that gets on your lining fabric or clothing.
- Always remember to remove any cut hairs that get caught in the seam by hand, pulling them out gently.
- Use a vacuum cleaner with low power and a clean nozzle to easily vacuum the cut hairs.
- Brush away any stray hairs that get caught in the sewing machine mechanism.
Closures For Imitation Fur
One of my favorite closures is a vintage button. It is like the jewelry of the garment. These ornamental fasteners come in some fabulous colors and styles and can really make a garment a fashion statement. Their structure was that they had a shank hidden on the underside of the button and were supported by a backer button on the inside of the fur. Instead of buttonholes, these old-fashioned buttons slipped into an elastic button loop. They were made from natural materials, such as mother-of-pearl (shells), bone, or horn. These notions can look like buttons or they can look like flowers, animals or some abstract object, so they don’t always have to be round. Buttons used for fur pile fabrics are rarely used today because of wear & tear caused by friction.
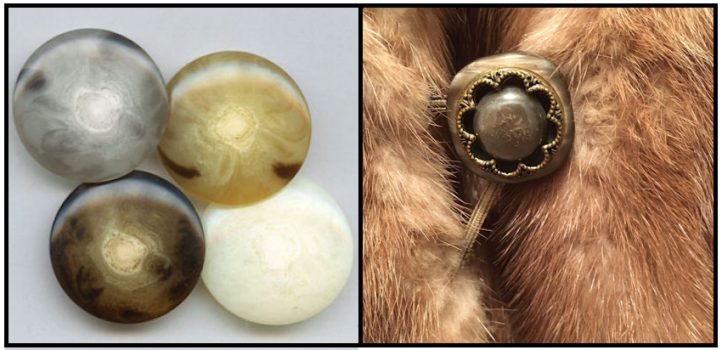
Today, when it comes to working with imitation fur, alternative hardware closures are more utilitarian than decorative, and generally designed to be hidden instead of seen. Most are designed to be “invisible”, to support areas where buttons are commonly placed, and to prevent wear-and-tear on the garment. Modern choices consist of keska™ hinged-fasteners, covered fur hook-and-eye sets, low-profile magnetic snaps, horn toggles, and plastic separating zippers. These notions are durable and heavy-duty, large in size for easy manipulation, and are inconspicuous in the pile of the fabric. Fasteners such as the keska hinged fastener, fur hook and eyes, and magnetic snaps generally are neutral in color, but zippers and toggles can come in fashion colors as well as most often they are visible. Their supportive function makes them a necessary notion in many sewing projects.

Other modern day sewing notions at your local haberdashery are butterfly pin collar tacks, invisible low-profile metal snaps, elastic anorak cord, and button-loop tape by the yard. These notions are often handy for finishing detachable collars and hoods so that they can be removed when the garment needs laundering.
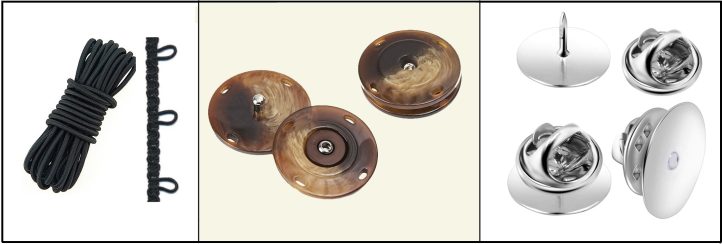
To apply, the metal hardware is supported with a vertical strip of interfacing along the inside of the fur which is basted along the length to be fastened and extending a little above and below the top and bottom fasteners. If a slot is cut through the fur backing to receive the hardware, (to support the fastener mostly) layer an additional square of interfacing on top of the interfacing strip where each fastener would be secured. Not necessarily heavy interfacing, something matched to the weight of the lining material. An alternate and perhaps better approach would be to interfacing the lining with a ‘facing’ of interfacing so the overlaps act as a whole. With the fastener encased in the interfacing it is easier to attach the fastener and sew the interfacing “sandwich” to the back of the fur.
Items like zippers are sewn to a flat braid or grosgrain ribbon then attached to the garment opening so as to not have the fur get caught in its teeth. Any areas where the fur is folded (hemlines, front facings, sleeve bottoms,…), there is a bias-cut strip of flannel or interlining place in the fold to support the edge of the garment. It is not usual to find French hem finishes or false hems using a secondary material such as imitation leather or the lining material instead of folding under the fur.
How To Care For and Preserve Imitation Fur
If you want this alternative to remain environmentally friendly, you must take care of your fur so that it keeps all its splendor for a long time! As an apparel designer, I have a few tips to share with you on this subject. Here’s everything you need to know to take care of your beautiful imitation fur and make sure you keep it in perfect condition for as long as possible!
The Worst Danger for Imitation Fur
Imitation fur is completely unaffected by insects, such as moths, unlike its natural counterpart. It does not suffer from drying out of the leather or loss of hair. What threatens it the most is wear and tear! Friction is the worst enemy of imitation fur.
What is this friction? They happen daily and by repeating them over and over again, they will come to the end of the most luxurious furs, here is an example of the areas of wear and tear for clothing:
- Elbows and arms when you lean against a table
- Sleeves bottoms with wrist rubbing
- Armpits with arm rubbing
- Back and bottom when you remain seated
- Inside of the collar with neck rubbing
- Shoulder with the rubbing of a bag strap
While some of these situations are difficult to avoid, certain habits will allow you to keep a fake fur in perfect condition for many years!
Don’t Fear the Weather
Newcomers to fur often think rain or snow are their garment’s worst enemy, but for most fur types that’s simply not true. If you’re caught in inclement weather, just shake your fur out, place it on a proper hanger, and leave it in a well-ventilated room to dry slowly. Keep it away from direct heat, and never use a hair dryer! Also, never comb or brush your fur when it’s wet.
Avoid Shoulder Bags
Veteran wearers of fur coats prefer purses to shoulder bags for one simple reason. Shoulder bag straps can break fur hairs and create bald patches. Likewise when driving, open your coat so the seat belt doesn’t rub across the chest or shoulder.
Limit Sitting Time
We spend half our lives sitting, but try to limit sitting time while wearing fur. Like shoulder bag straps, sitting on fur can break the hairs. And if you must sit in your full-length fur, remember to hitch it up first to avoid stretching the knit backing under your bottom.
The habit to adopt is to always remove your fur when you have to sit down. You can still enjoy its soft warmth by keeping it on your lap, for example, when possible. This advice alone will prevent 90% of the symptoms of fur wear.
No Perfume or Hairspray
If you like enveloping yourself in a cloud of perfume or hairspray, do it with your fur coat off. These chemicals can dry the fur, remove its lustre, and make it sticky (and thus attractive to dust). And if your fur smells musty, spraying it with cologne won’t fix the problem. It probably needs a good clean!
Don’t Use Your Pockets
While pockets are necessary to hold our belongings, try to limit their use as not to wear bald spots at the openings through over usage.
Heat Is Dangerous Too!
Another enemy to avoid: heat sources! In addition to the fact that it is bad for your health, absolutely avoid smoking while wearing fur (possible burns on the collar), and at all costs never put it in the dryer. Dry air heated to the extreme by tumble dryers will burn the tips of the hairs and give them an absolutely unflattering visual appearance, making them lose all suppleness and softness. Even with a cold setting, the dryer is a real enemy to fur because repeated rubbing on the drum surfaces wears away the tips of the hairs.
Washing? To Be Controlled!
Dry cleaning by professionals is always the best way to clean a fur. Certainly more expensive than cleaning at home, it is the guarantee of a cleaning that respects the synthetic fibers and avoids any damage to the fur.
Hand Washing Faux Fur
If you can’t or don’t want to use a dry cleaner, remember in a few words that synthetic fur should be treated like wool. Washing is ideally done by hand, in slightly warm soapy water. Never use fabric softener with imitation fur, contrary to what one might think, it may leave stains, and its chemical composition causes irreversible damage to the pile. Let the soap or mild detergent stand for 10 minutes. Then rinse with clear, barely lukewarm water, simply by showering the fur abundantly until the water is clear. And since two precautions are better than one, once again, never, ever tumble dry. Air drying will dry your fur efficiently without damaging it.
Storage, Often Forgotten!
Synthetic fur fears too tight storage. Therefore, to avoid crushing the hair provide space if you hang your furs in a closet. And if you have to fold your fur blanket, don’t crush it too much.
Indeed, synthetic hair fears crushing and returns with difficulty in place after such a treatment. In this case, your fur will not be specifically worn out, but its visual aspect and softness will be strongly degraded. Make sure that the hair is laid flat, to avoid it being ruffled, and thus even stored for several months, your fur will be impeccable in the first days of cold weather!
With these few tips, you will keep your furs beautiful and soft for many years. So, adopt an eco-friendly attitude by taking care of these wonders to avoid having to dispose them too quickly.
Ready to put your new knowledge to the test? Don’t miss Don’s pattern for a beautiful faux fur collar, which you can find here!

Great information!!! How can I get a subscription to the magazine?
Hi Sue! To sign up for a Gold Club membership, click on the “Clubs” tab on our homepage and then click on “Gold Club”. Have a great day! – Ashley, We Like Sewing